{props.title}
{props.content}
 The following diagram explains the relationship between organizations, workspaces, and the different resources scoped to and within a workspace:
  See the table below for details on which features are available in which scope (organization or workspace):
| Resource/Setting | Scope |
| --------------------------------------------------------------------------- | ---------------- |
| Trace Projects | Workspace |
| Annotation Queues | Workspace |
| Deployments | Workspace |
| Datasets & Experiments | Workspace |
| Prompts | Workspace |
| Resource Tags | Workspace |
| API Keys | Workspace |
| Settings including Secrets, Feedback config, Models, Rules, and Shared URLs | Workspace |
| User management: Invite User to Workspace | Workspace |
| RBAC: Assigning Workspace Roles | Workspace |
| Data Retention, Usage Limits | Workspace\* |
| Plans and Billing, Credits, Invoices | Organization |
| User management: Invite User to Organization | Organization\*\* |
| Adding Workspaces | Organization |
| Assigning Organization Roles | Organization |
| RBAC: Creating/Editing/Deleting Custom Roles | Organization |
\* Data retention settings and usage limits will be available soon for the organization level as well \*\* Self-hosted installations may enable workspace-level invites of users to the organization via a feature flag. See the [self-hosted user management docs](/langsmith/self-host-user-management) for details.
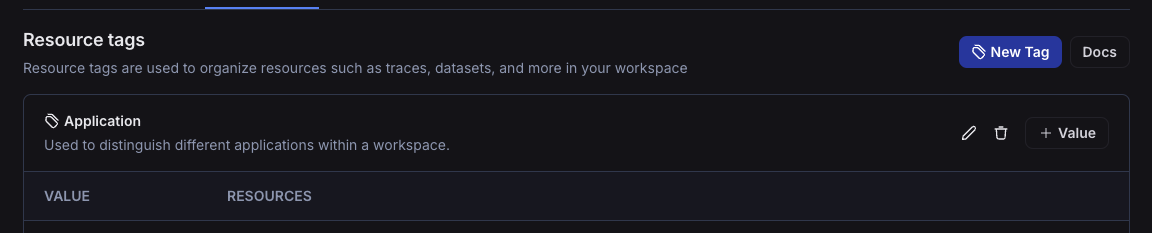
### Resource tags
Resource tags allow you to organize resources within a workspace. Each tag is a key-value pair that can be assigned to a resource. Tags can be used to filter workspace-scoped resources in the UI and API: Projects, Datasets, Annotation Queues, Deployments, and Experiments.
Each new workspace comes with two default tag keys: `Application` and `Environment`; as the names suggest, these tags can be used to categorize resources based on the application and environment they belong to. More tags can be added as needed.
LangSmith resource tags are very similar to tags in cloud services like [AWS](https://docs.aws.amazon.com/tag-editor/latest/userguide/tagging.html).
See the table below for details on which features are available in which scope (organization or workspace):
| Resource/Setting | Scope |
| --------------------------------------------------------------------------- | ---------------- |
| Trace Projects | Workspace |
| Annotation Queues | Workspace |
| Deployments | Workspace |
| Datasets & Experiments | Workspace |
| Prompts | Workspace |
| Resource Tags | Workspace |
| API Keys | Workspace |
| Settings including Secrets, Feedback config, Models, Rules, and Shared URLs | Workspace |
| User management: Invite User to Workspace | Workspace |
| RBAC: Assigning Workspace Roles | Workspace |
| Data Retention, Usage Limits | Workspace\* |
| Plans and Billing, Credits, Invoices | Organization |
| User management: Invite User to Organization | Organization\*\* |
| Adding Workspaces | Organization |
| Assigning Organization Roles | Organization |
| RBAC: Creating/Editing/Deleting Custom Roles | Organization |
\* Data retention settings and usage limits will be available soon for the organization level as well \*\* Self-hosted installations may enable workspace-level invites of users to the organization via a feature flag. See the [self-hosted user management docs](/langsmith/self-host-user-management) for details.
### Resource tags
Resource tags allow you to organize resources within a workspace. Each tag is a key-value pair that can be assigned to a resource. Tags can be used to filter workspace-scoped resources in the UI and API: Projects, Datasets, Annotation Queues, Deployments, and Experiments.
Each new workspace comes with two default tag keys: `Application` and `Environment`; as the names suggest, these tags can be used to categorize resources based on the application and environment they belong to. More tags can be added as needed.
LangSmith resource tags are very similar to tags in cloud services like [AWS](https://docs.aws.amazon.com/tag-editor/latest/userguide/tagging.html).
 ## User Management and RBAC
### Users
A user is a person who has access to LangSmith. Users can be members of one or more organizations and workspaces within those organizations.
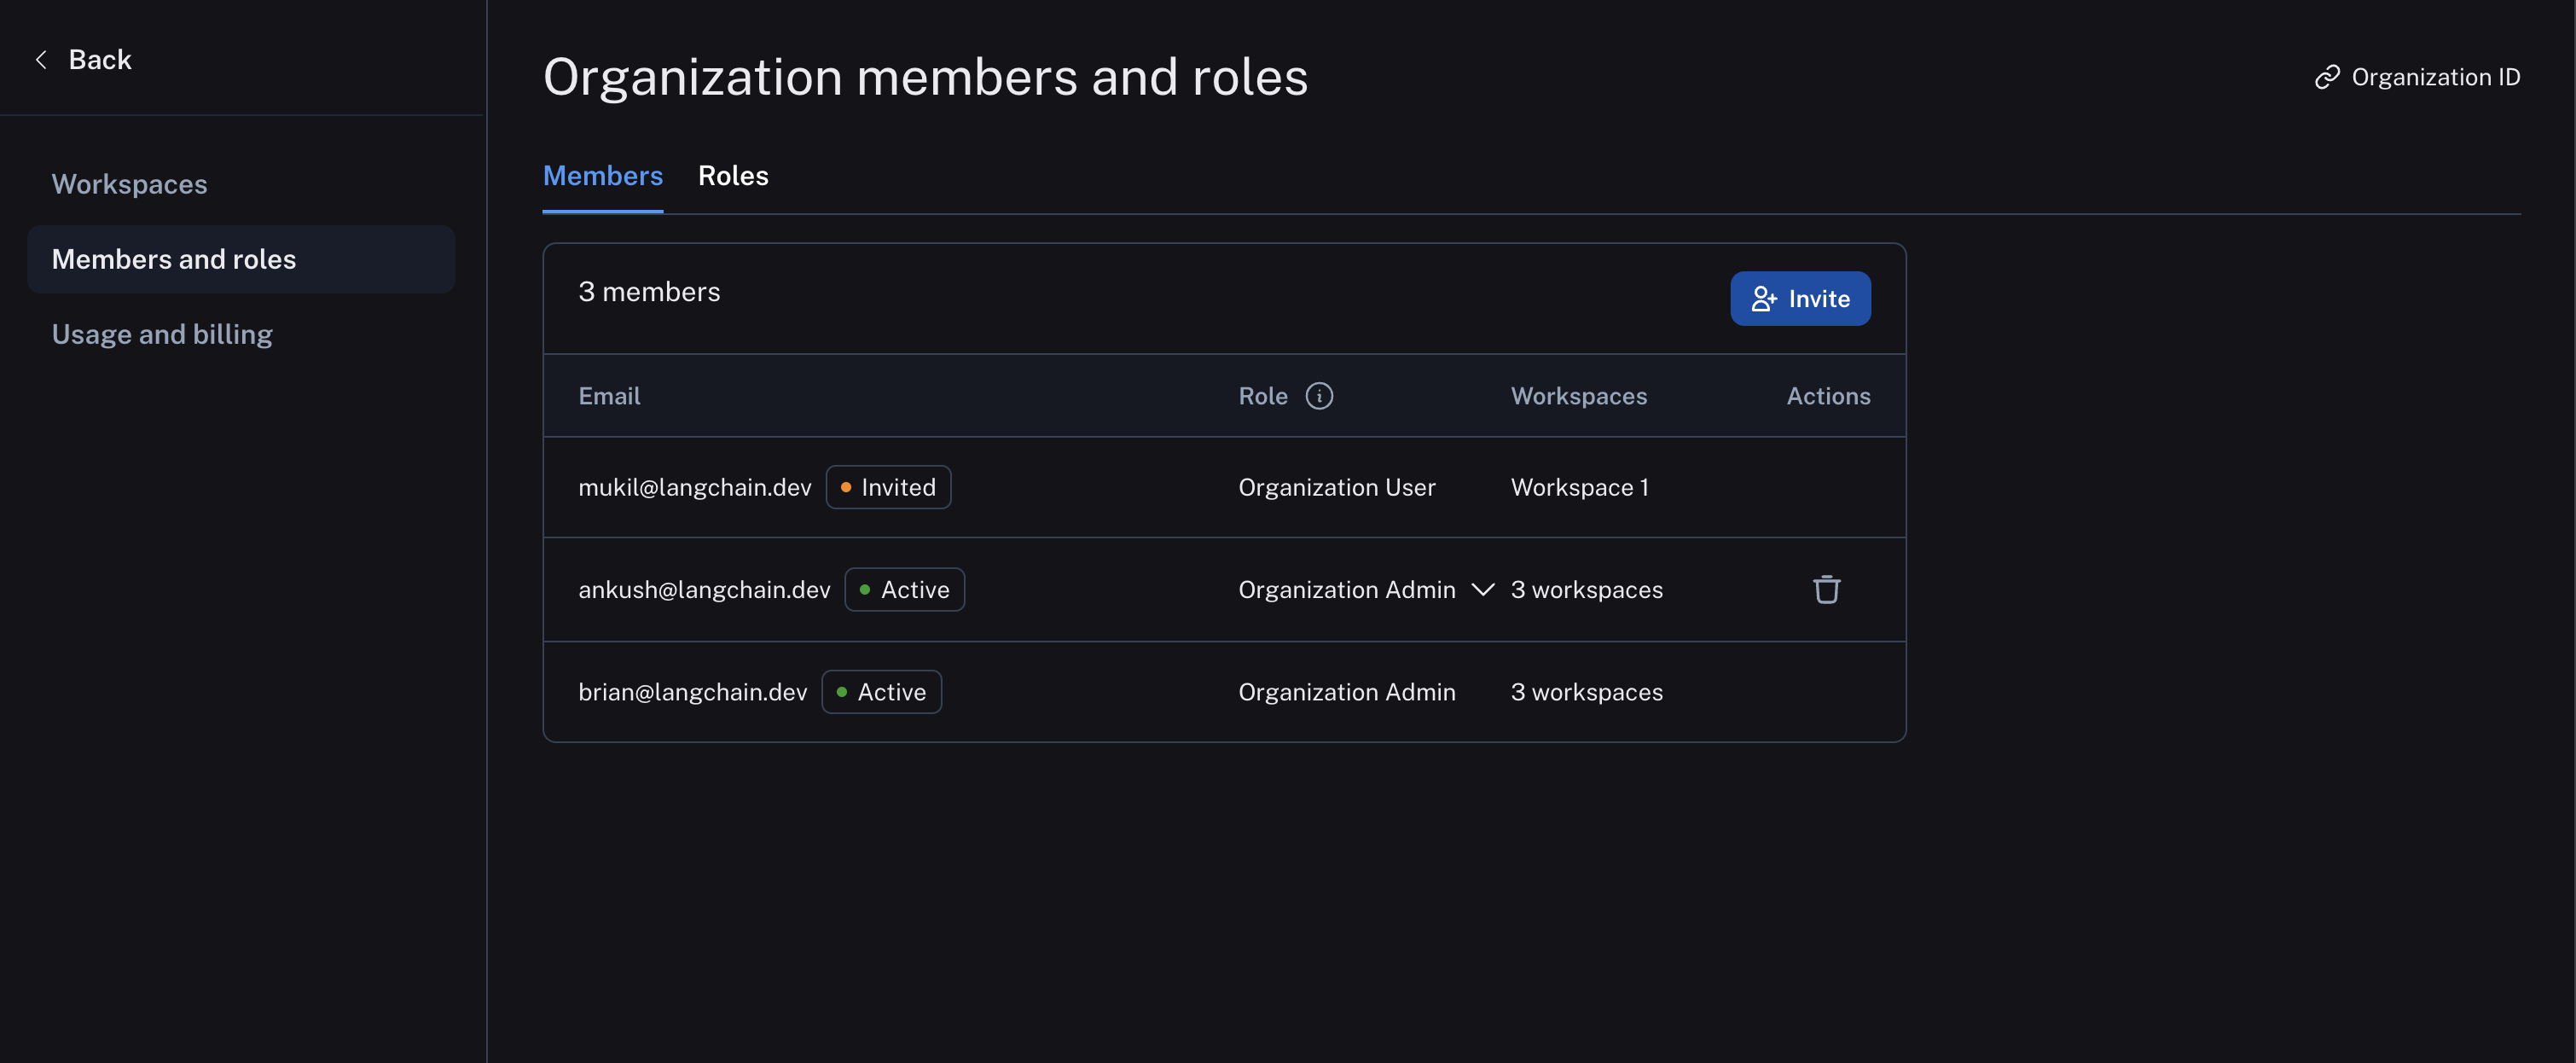
Organization members are managed in organization settings:
## User Management and RBAC
### Users
A user is a person who has access to LangSmith. Users can be members of one or more organizations and workspaces within those organizations.
Organization members are managed in organization settings:
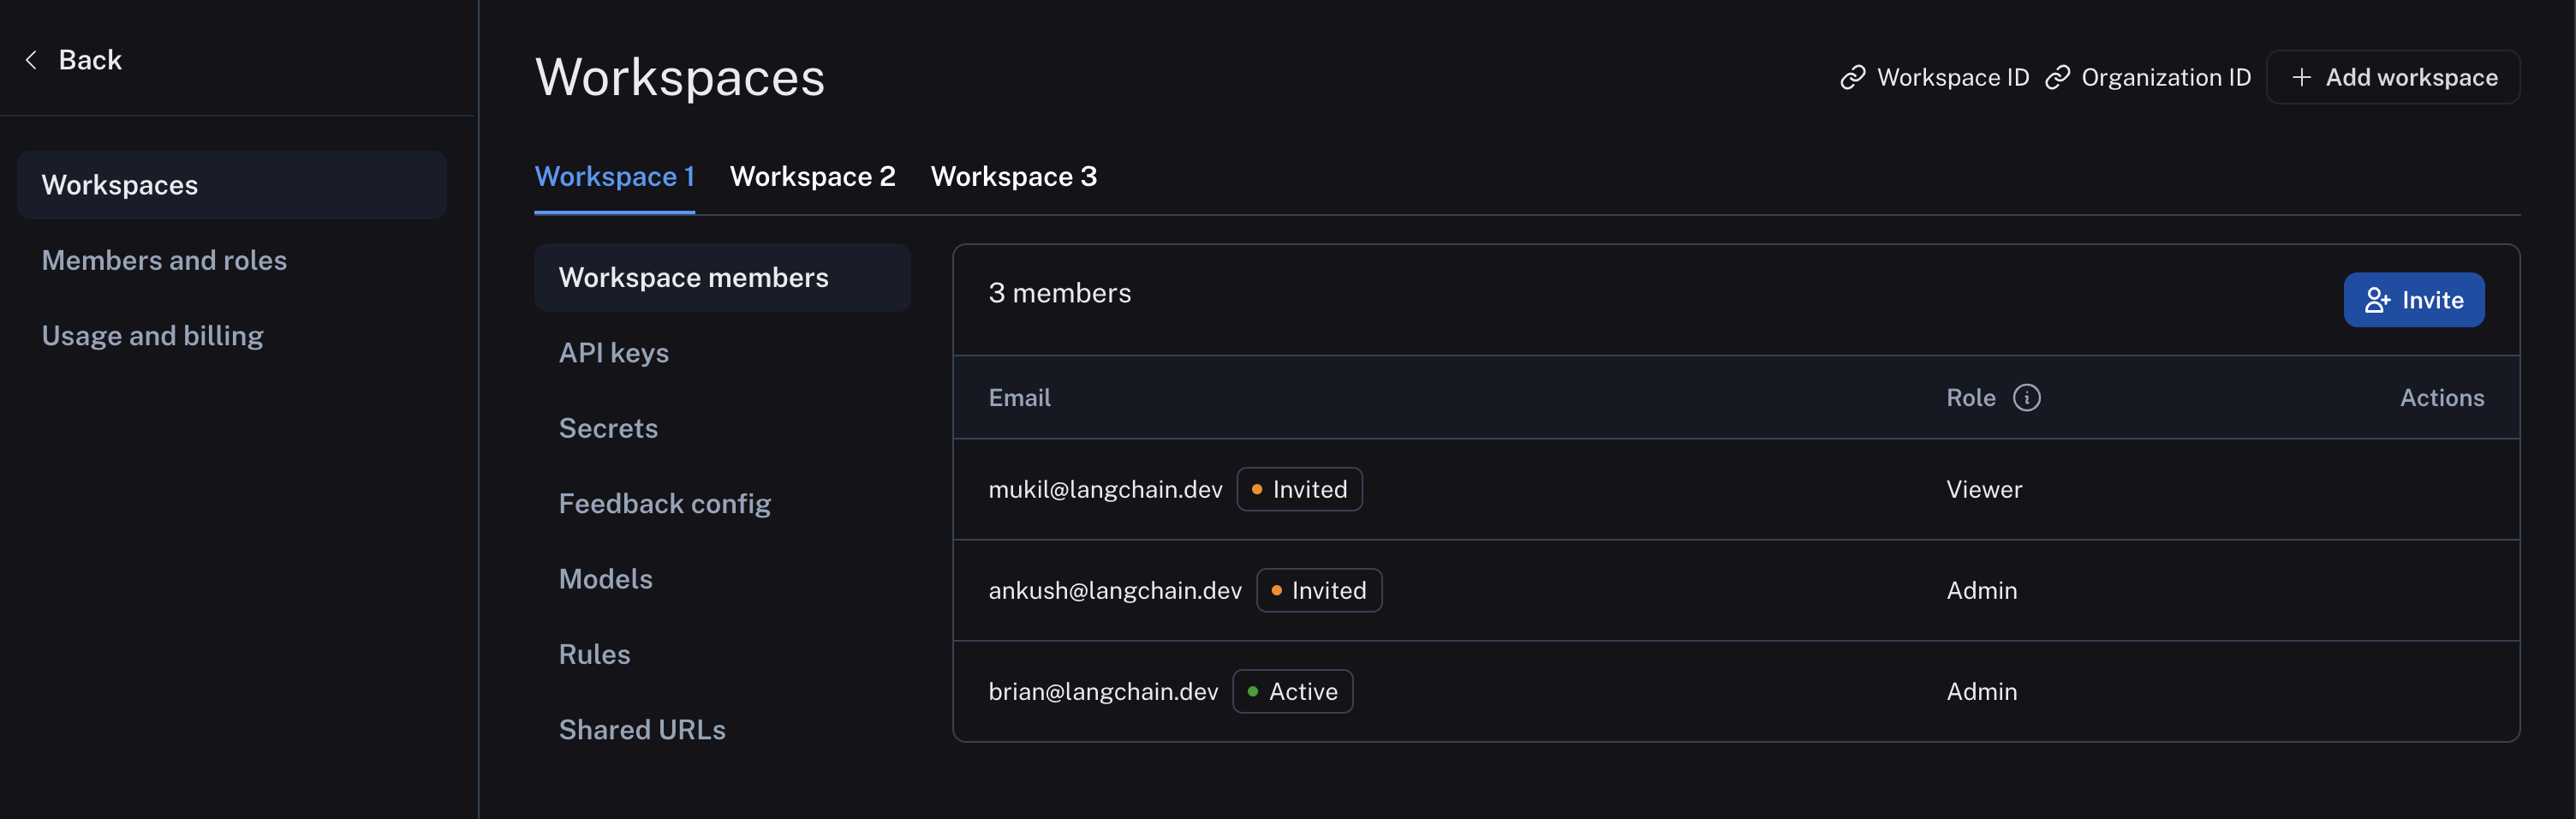
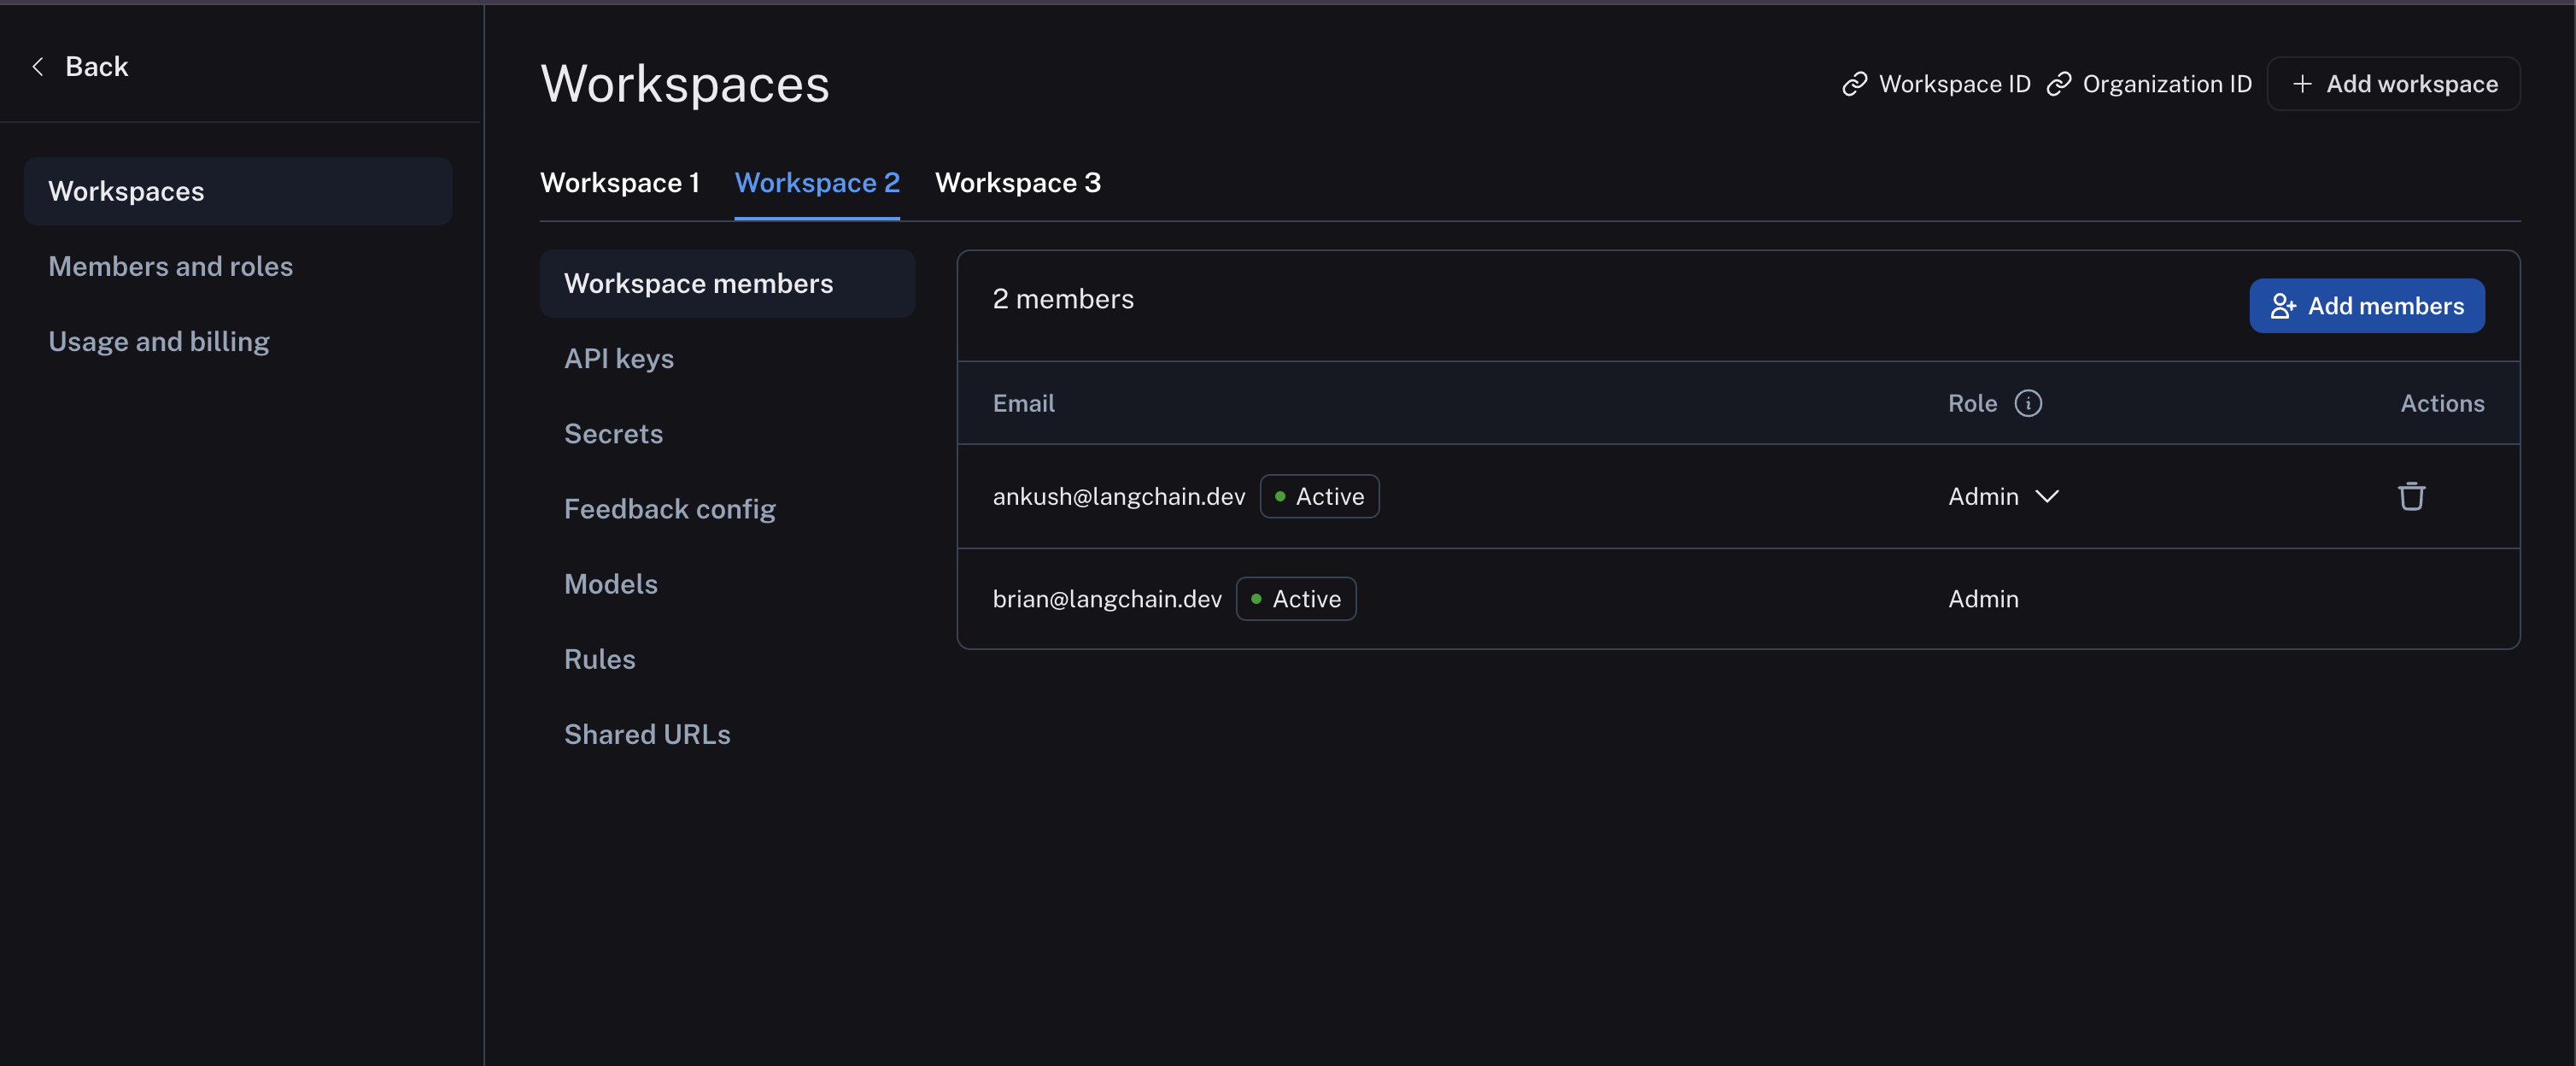
 And workspace members are managed in workspace settings:
 ### API keys
 * For comprehensive documentation on roles and permissions, refer to the [Role-based access control](/langsmith/rbac) guide.
* For more details on assigning and creating roles, refer to the [User Management](/langsmith/user-management) guide.
* For a comprehensive list of required permissions along with the operations and roles that can perform them, refer to the [Organization and workspace reference](/langsmith/organization-workspace-operations).
## Best Practices
### Environment Separation
Use [resource tags](#resource-tags) to organize resources by environment using the default tag key `Environment` and different values for the environment (e.g., `dev`, `staging`, `prod`). We do not recommend using separate workspaces for environment separation because resources cannot be shared across workspaces, which would prevent you from promoting resources (like prompts) between environments.
* For comprehensive documentation on roles and permissions, refer to the [Role-based access control](/langsmith/rbac) guide.
* For more details on assigning and creating roles, refer to the [User Management](/langsmith/user-management) guide.
* For a comprehensive list of required permissions along with the operations and roles that can perform them, refer to the [Organization and workspace reference](/langsmith/organization-workspace-operations).
## Best Practices
### Environment Separation
Use [resource tags](#resource-tags) to organize resources by environment using the default tag key `Environment` and different values for the environment (e.g., `dev`, `staging`, `prod`). We do not recommend using separate workspaces for environment separation because resources cannot be shared across workspaces, which would prevent you from promoting resources (like prompts) between environments.
 After the user completes OAuth authentication and we receive the callback from the provider, they will see the auth success page.
 The agent then resumes execution from the point it left off at, and the token can be used for any API calls. We store and refresh OAuth tokens so that future uses of the service by either the user or agent do not require an OAuth flow.
```python theme={null}
token = auth_result.token
```
#### Outside LangGraph context
Provide the `auth_url` to the user for out-of-band OAuth flows.
```python theme={null}
# Default: user-scoped token (works for any agent under this user)
auth_result = await client.authenticate(
provider="{provider_id}",
scopes=["scopeA"],
user_id="your_user_id"
)
if auth_result.needs_auth:
print(f"Complete OAuth at: {auth_result.auth_url}")
# Wait for completion
completed_auth = await client.wait_for_completion(auth_result.auth_id)
token = completed_auth.token
else:
token = auth_result.token
```
***
The agent then resumes execution from the point it left off at, and the token can be used for any API calls. We store and refresh OAuth tokens so that future uses of the service by either the user or agent do not require an OAuth flow.
```python theme={null}
token = auth_result.token
```
#### Outside LangGraph context
Provide the `auth_url` to the user for out-of-band OAuth flows.
```python theme={null}
# Default: user-scoped token (works for any agent under this user)
auth_result = await client.authenticate(
provider="{provider_id}",
scopes=["scopeA"],
user_id="your_user_id"
)
if auth_result.needs_auth:
print(f"Complete OAuth at: {auth_result.auth_url}")
# Wait for completion
completed_auth = await client.wait_for_completion(auth_result.auth_id)
token = completed_auth.token
else:
token = auth_result.token
```
***

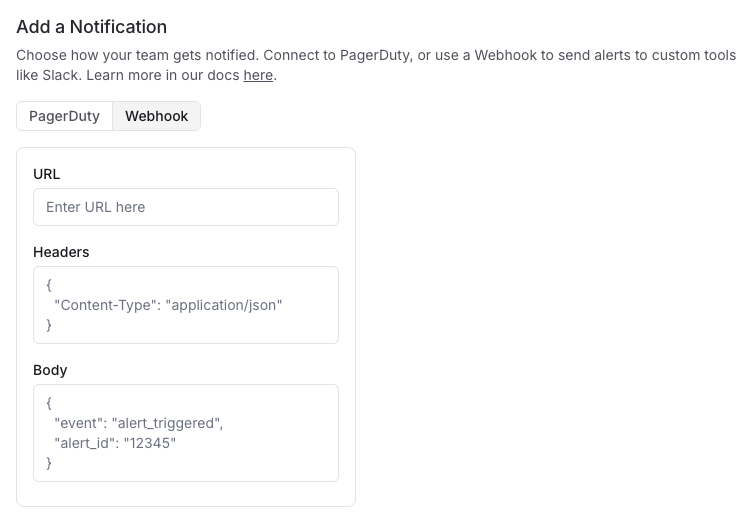 In the notification section of your alert complete the webhook configuration with the following parameters:
**Required Fields**
* **URL**: The complete URL of your receiving endpoint
* Example: `https://api.example.com/incident-webhook`
**Optional Fields**
* **Headers**: JSON Key-value pairs sent with the webhook request
* Common headers include:
* `Authorization`: For authentication tokens
* `Content-Type`: Usually set to `application/json` (default)
* `X-Source`: To identify the source as LangSmith
* If no headers, then simply use `{}`
* **Request Body Template**: Customize the JSON payload sent to your endpoint
* Default: LangSmith sends the payload defined and the following additonal key-value pairs appended to the payload:
* `project_name`: Name of the triggered alert
* `alert_rule_id`: A UUID to identify the LangSmith alert. This can be used as a de-duplication key in the webhook service.
* `alert_rule_name`: The name of the alert rule.
* `alert_rule_type`: The type of alert (as of 04/01/2025 all alerts are of type `threshold`).
* `alert_rule_attribute`: The attribute associated with the alert rule - `error_count`, `feedback_score` or `latency`.
* `triggered_metric_value`: The value of the metric at the time the threshold was triggered.
* `triggered_threshold`: The threshold that triggered the alert.
* `timestamp`: The timestamp that triggered the alert.
### Step 3: Test the Webhook
Click **Send Test Alert** to send the webhook notification to ensure the notification works as intended.
## Troubleshooting
If webhook notifications aren't being delivered:
* Verify the webhook URL is correct and accessible
* Ensure any authentication headers are properly formatted
* Check that your receiving endpoint accepts POST requests
* Examine your endpoint's logs for received but rejected requests
* Verify your custom payload template is valid JSON format
## Security Considerations
* Use HTTPS for your webhook endpoints
* Implement authentication for your webhook endpoint
* Consider adding a shared secret in your headers to verify webhook sources
* Validate incoming webhook requests before processing them
## Sending alerts to Slack using a webhook
Here is an example for configuring LangSmith alerts to send notifications to Slack channels using the [`chat.postMessage`](https://api.slack.com/methods/chat.postMessage) API.
### Prerequisites
* Access to a Slack workspace
* A LangSmith project to set up alerts
* Permissions to create Slack applications
### Step 1: Create a Slack App
1. Visit the [Slack API Applications page](https://api.slack.com/apps)
2. Click **Create New App**
3. Select **From scratch**
4. Provide an **App Name** (e.g., "LangSmith Alerts")
5. Select the workspace where you want to install the app
6. Click **Create App**
### Step 2: Configure Bot Permissions
1. In the left sidebar of your Slack app configuration, click **OAuth & Permissions**
2. Scroll down to **Bot Token Scopes** under **Scopes** and click **Add an OAuth Scope**
3. Add the following scopes:
* `chat:write` (Send messages as the app)
* `chat:write.public` (Send messages to channels the app isn't in)
* `channels:read` (View basic channel information)
### Step 3: Install the App to Your Workspace
1. Scroll up to the top of the **OAuth & Permissions** page
2. Click **Install to Workspace**
3. Review the permissions and click **Allow**
4. Copy the **Bot User OAuth Token** that appears (begins with `xoxb-`)
### Step 4: Configure the Webhook Alert in LangSmith
1. In LangSmith, navigate to your project
2. Select **Alerts → Create Alert**
3. Define your alert metrics and conditions
4. In the notification section, select **Webhook**
5. Configure the webhook with the following settings:
**Webhook URL**
```json theme={null}
https://slack.com/api/chat.postMessage
```
**Headers**
```json theme={null}
{
"Content-Type": "application/json",
"Authorization": "Bearer xoxb-your-token-here"
}
```
> **Note:** Replace `xoxb-your-token-here` with your actual Bot User OAuth Token
**Request Body Template**
```json theme={null}
{
"channel": "{channel_id}",
"text": "{alert_name} triggered for {project_name}",
"blocks": [
{
"type": "section",
"text": {
"type": "mrkdwn",
"text": "🚨{alert_name} has been triggered"
}
},
{
"type": "section",
"text": {
"type": "mrkdwn",
"text": "Please check the following link for more information:"
}
},
{
"type": "section",
"text": {
"type": "mrkdwn",
"text": "<{project-url}|View in LangSmith>"
}
}
]
}
```
**NOTE:** Fill in the `channel_id`, `alert_name`, `project_name` and `project_url` when creating the alert. You can find your `project_url` in the browser's URL bar. Copy the portion up to but not including any query parameters.
6. Click **Save** to activate the webhook configuration
### Step 5: Test the Integration
1. In the LangSmith alert configuration, click **Test Alert**
2. Check your specified Slack channel for the test notification
3. Verify that the message contains the expected alert information
### (Optional) Step 6: Link to the Alert Preview in the Request Body
After creating an alert, you can optionally link to its preview in the webhook's request body.
In the notification section of your alert complete the webhook configuration with the following parameters:
**Required Fields**
* **URL**: The complete URL of your receiving endpoint
* Example: `https://api.example.com/incident-webhook`
**Optional Fields**
* **Headers**: JSON Key-value pairs sent with the webhook request
* Common headers include:
* `Authorization`: For authentication tokens
* `Content-Type`: Usually set to `application/json` (default)
* `X-Source`: To identify the source as LangSmith
* If no headers, then simply use `{}`
* **Request Body Template**: Customize the JSON payload sent to your endpoint
* Default: LangSmith sends the payload defined and the following additonal key-value pairs appended to the payload:
* `project_name`: Name of the triggered alert
* `alert_rule_id`: A UUID to identify the LangSmith alert. This can be used as a de-duplication key in the webhook service.
* `alert_rule_name`: The name of the alert rule.
* `alert_rule_type`: The type of alert (as of 04/01/2025 all alerts are of type `threshold`).
* `alert_rule_attribute`: The attribute associated with the alert rule - `error_count`, `feedback_score` or `latency`.
* `triggered_metric_value`: The value of the metric at the time the threshold was triggered.
* `triggered_threshold`: The threshold that triggered the alert.
* `timestamp`: The timestamp that triggered the alert.
### Step 3: Test the Webhook
Click **Send Test Alert** to send the webhook notification to ensure the notification works as intended.
## Troubleshooting
If webhook notifications aren't being delivered:
* Verify the webhook URL is correct and accessible
* Ensure any authentication headers are properly formatted
* Check that your receiving endpoint accepts POST requests
* Examine your endpoint's logs for received but rejected requests
* Verify your custom payload template is valid JSON format
## Security Considerations
* Use HTTPS for your webhook endpoints
* Implement authentication for your webhook endpoint
* Consider adding a shared secret in your headers to verify webhook sources
* Validate incoming webhook requests before processing them
## Sending alerts to Slack using a webhook
Here is an example for configuring LangSmith alerts to send notifications to Slack channels using the [`chat.postMessage`](https://api.slack.com/methods/chat.postMessage) API.
### Prerequisites
* Access to a Slack workspace
* A LangSmith project to set up alerts
* Permissions to create Slack applications
### Step 1: Create a Slack App
1. Visit the [Slack API Applications page](https://api.slack.com/apps)
2. Click **Create New App**
3. Select **From scratch**
4. Provide an **App Name** (e.g., "LangSmith Alerts")
5. Select the workspace where you want to install the app
6. Click **Create App**
### Step 2: Configure Bot Permissions
1. In the left sidebar of your Slack app configuration, click **OAuth & Permissions**
2. Scroll down to **Bot Token Scopes** under **Scopes** and click **Add an OAuth Scope**
3. Add the following scopes:
* `chat:write` (Send messages as the app)
* `chat:write.public` (Send messages to channels the app isn't in)
* `channels:read` (View basic channel information)
### Step 3: Install the App to Your Workspace
1. Scroll up to the top of the **OAuth & Permissions** page
2. Click **Install to Workspace**
3. Review the permissions and click **Allow**
4. Copy the **Bot User OAuth Token** that appears (begins with `xoxb-`)
### Step 4: Configure the Webhook Alert in LangSmith
1. In LangSmith, navigate to your project
2. Select **Alerts → Create Alert**
3. Define your alert metrics and conditions
4. In the notification section, select **Webhook**
5. Configure the webhook with the following settings:
**Webhook URL**
```json theme={null}
https://slack.com/api/chat.postMessage
```
**Headers**
```json theme={null}
{
"Content-Type": "application/json",
"Authorization": "Bearer xoxb-your-token-here"
}
```
> **Note:** Replace `xoxb-your-token-here` with your actual Bot User OAuth Token
**Request Body Template**
```json theme={null}
{
"channel": "{channel_id}",
"text": "{alert_name} triggered for {project_name}",
"blocks": [
{
"type": "section",
"text": {
"type": "mrkdwn",
"text": "🚨{alert_name} has been triggered"
}
},
{
"type": "section",
"text": {
"type": "mrkdwn",
"text": "Please check the following link for more information:"
}
},
{
"type": "section",
"text": {
"type": "mrkdwn",
"text": "<{project-url}|View in LangSmith>"
}
}
]
}
```
**NOTE:** Fill in the `channel_id`, `alert_name`, `project_name` and `project_url` when creating the alert. You can find your `project_url` in the browser's URL bar. Copy the portion up to but not including any query parameters.
6. Click **Save** to activate the webhook configuration
### Step 5: Test the Integration
1. In the LangSmith alert configuration, click **Test Alert**
2. Check your specified Slack channel for the test notification
3. Verify that the message contains the expected alert information
### (Optional) Step 6: Link to the Alert Preview in the Request Body
After creating an alert, you can optionally link to its preview in the webhook's request body.
 To configure this:
1. Save your alert
2. Find your saved alert in the alerts table and click it
3. Copy the dsiplayed URL
4. Click "Edit Alert"
5. Replace the existing project URL with the copied alert preview URL
## Additional Resources
* [LangSmith Alerts Documentation](/langsmith/alerts)
* [Slack chat.postMessage API Documentation](https://api.slack.com/methods/chat.postMessage)
* [Slack Block Kit Builder](https://app.slack.com/block-kit-builder/)
***
To configure this:
1. Save your alert
2. Find your saved alert in the alerts table and click it
3. Copy the dsiplayed URL
4. Click "Edit Alert"
5. Replace the existing project URL with the copied alert preview URL
## Additional Resources
* [LangSmith Alerts Documentation](/langsmith/alerts)
* [Slack chat.postMessage API Documentation](https://api.slack.com/methods/chat.postMessage)
* [Slack Block Kit Builder](https://app.slack.com/block-kit-builder/)
***
 ### View experiment results
#### Customize columns
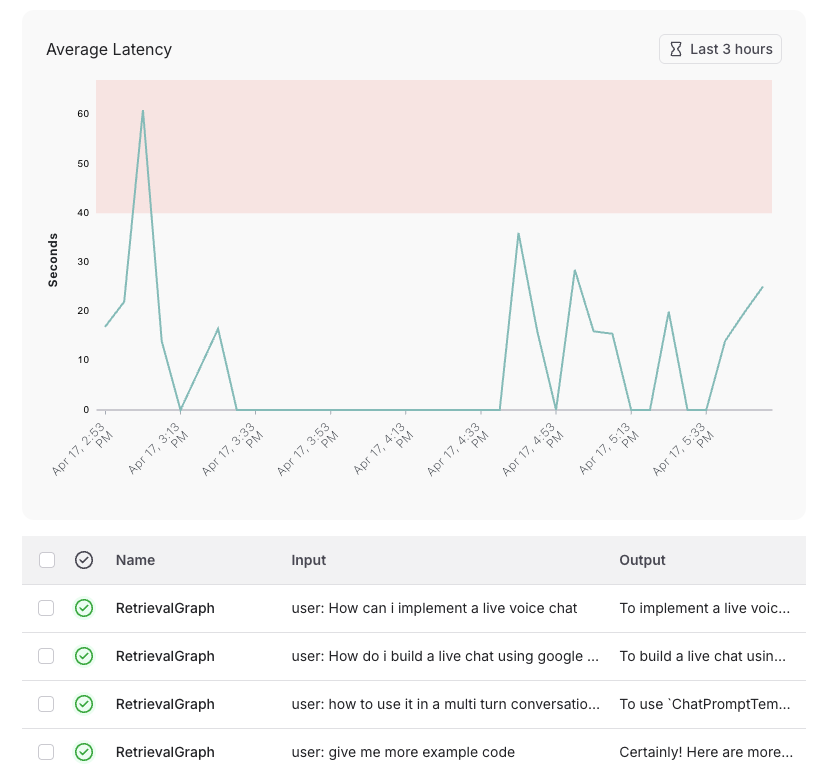
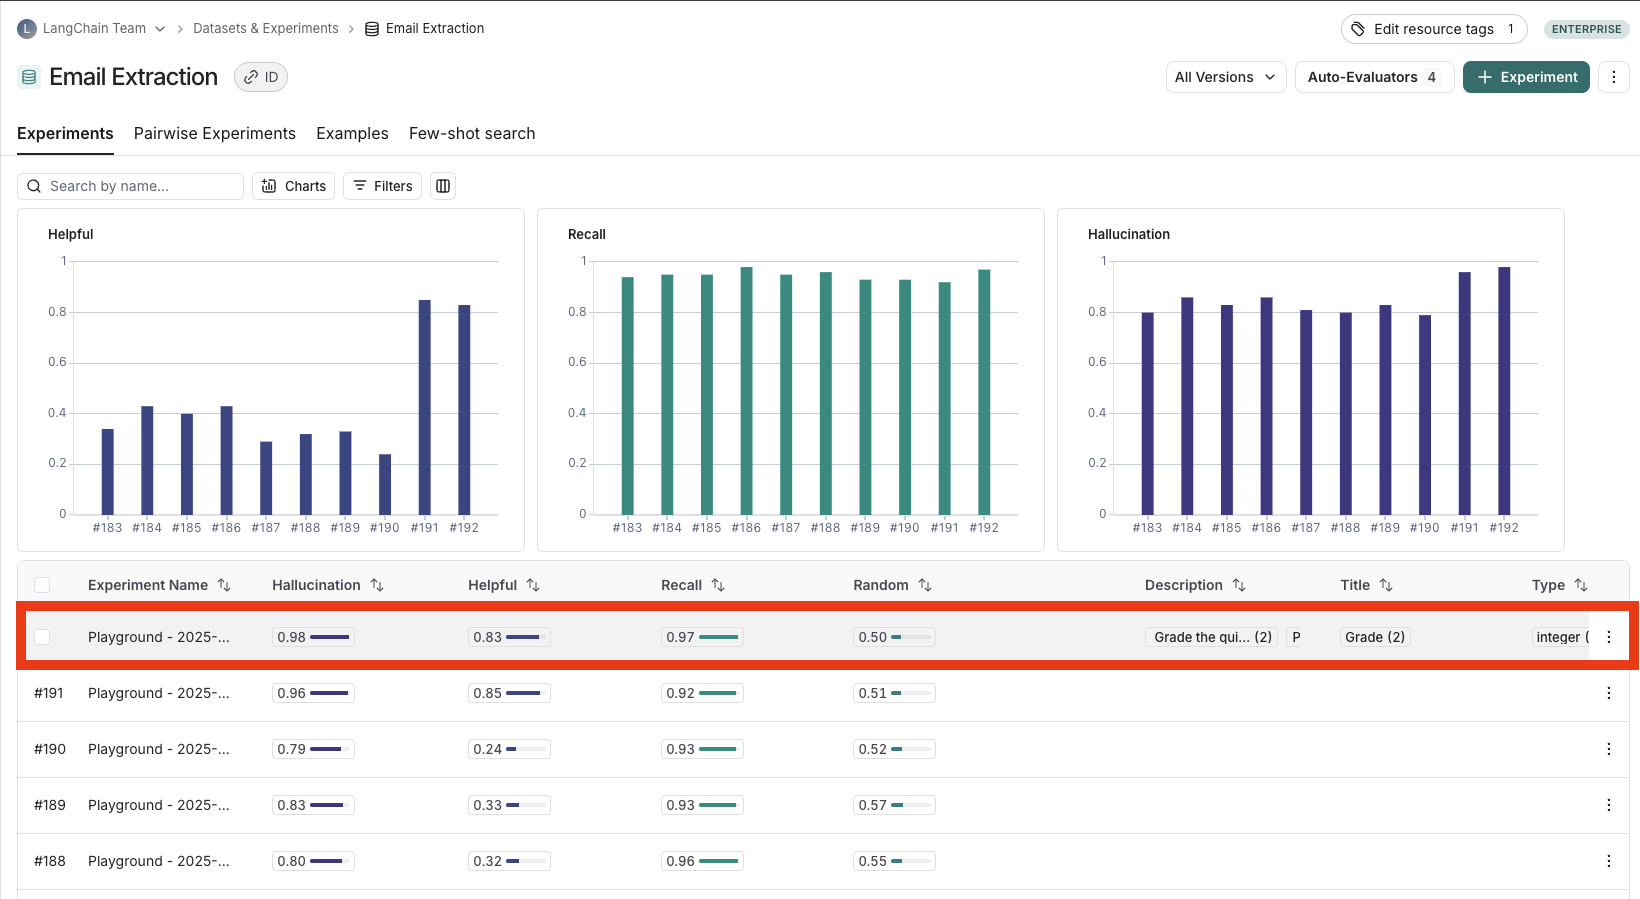
By default, the experiment view shows the input, output, and reference output for each [example](/langsmith/evaluation-concepts#examples) in the dataset, feedback scores from evaluations and experiment metrics like cost, token counts, latency and status.
You can customize the columns using the **Display** button to make it easier to interpret experiment results:
* **Break out fields from inputs, outputs, and reference outputs** into their own columns. This is especially helpful if you have long inputs/outputs/reference outputs and want to surface important fields.
* **Hide and reorder columns** to create focused views for analysis.
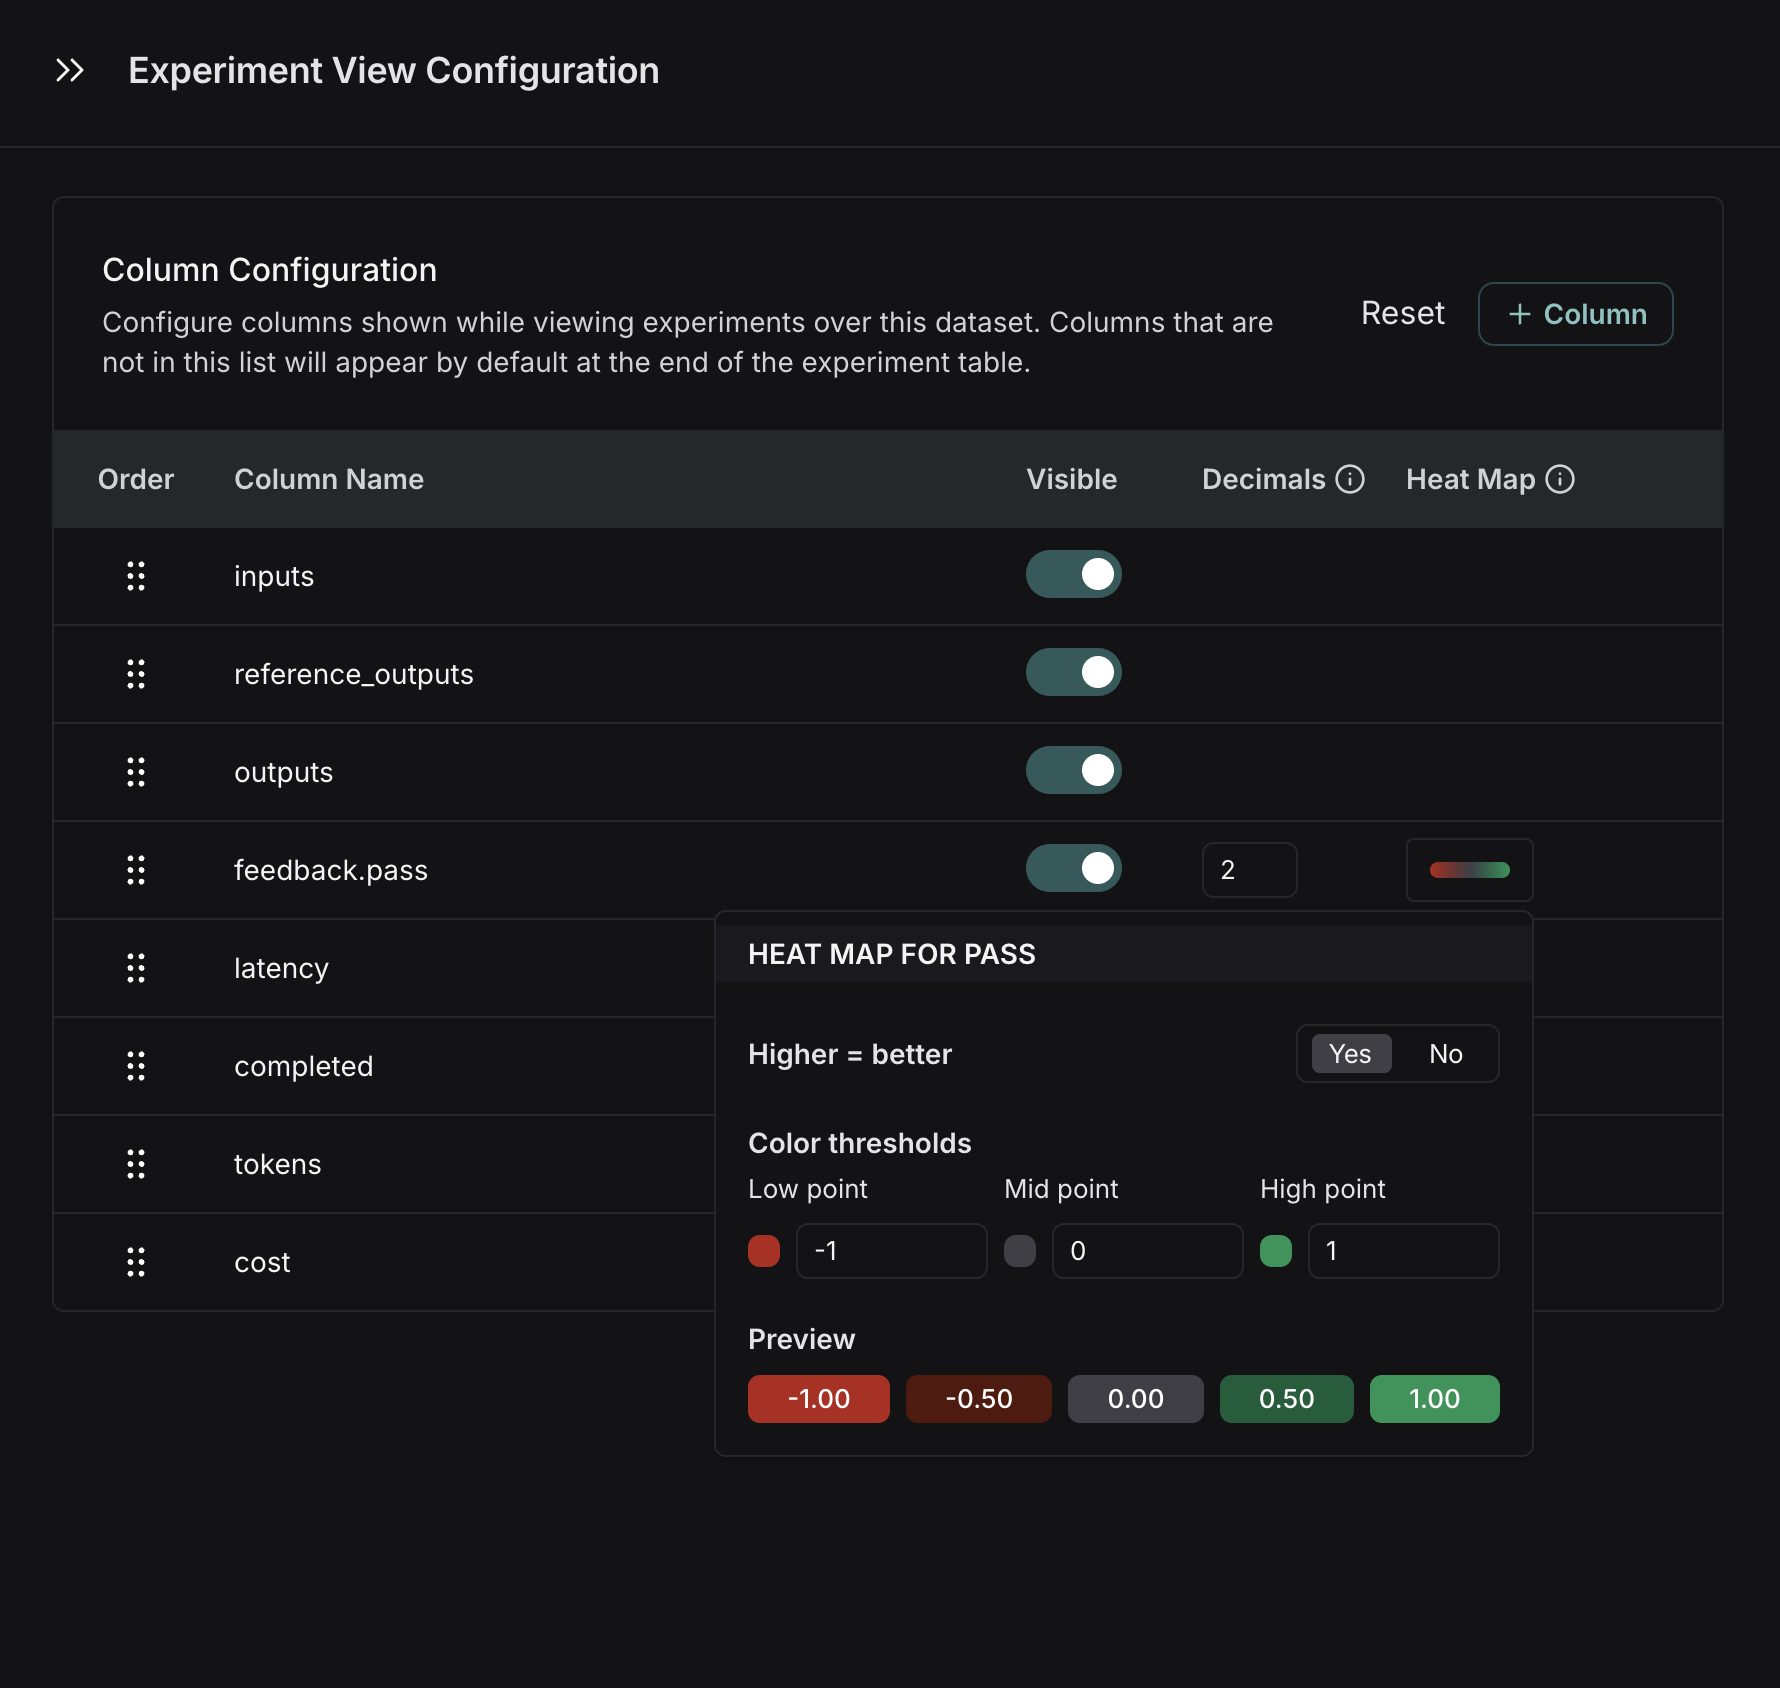
* **Control decimal precision on feedback scores**. By default, LangSmith surfaces numerical feedback scores with a decimal precision of 2, but you can customize this setting to be up to 6 decimals.
* **Set the Heat Map threshold** to high, middle, and low for numeric feedback scores in your experiment, which affects the threshold at which score chips render as red or green:
### View experiment results
#### Customize columns
By default, the experiment view shows the input, output, and reference output for each [example](/langsmith/evaluation-concepts#examples) in the dataset, feedback scores from evaluations and experiment metrics like cost, token counts, latency and status.
You can customize the columns using the **Display** button to make it easier to interpret experiment results:
* **Break out fields from inputs, outputs, and reference outputs** into their own columns. This is especially helpful if you have long inputs/outputs/reference outputs and want to surface important fields.
* **Hide and reorder columns** to create focused views for analysis.
* **Control decimal precision on feedback scores**. By default, LangSmith surfaces numerical feedback scores with a decimal precision of 2, but you can customize this setting to be up to 6 decimals.
* **Set the Heat Map threshold** to high, middle, and low for numeric feedback scores in your experiment, which affects the threshold at which score chips render as red or green:
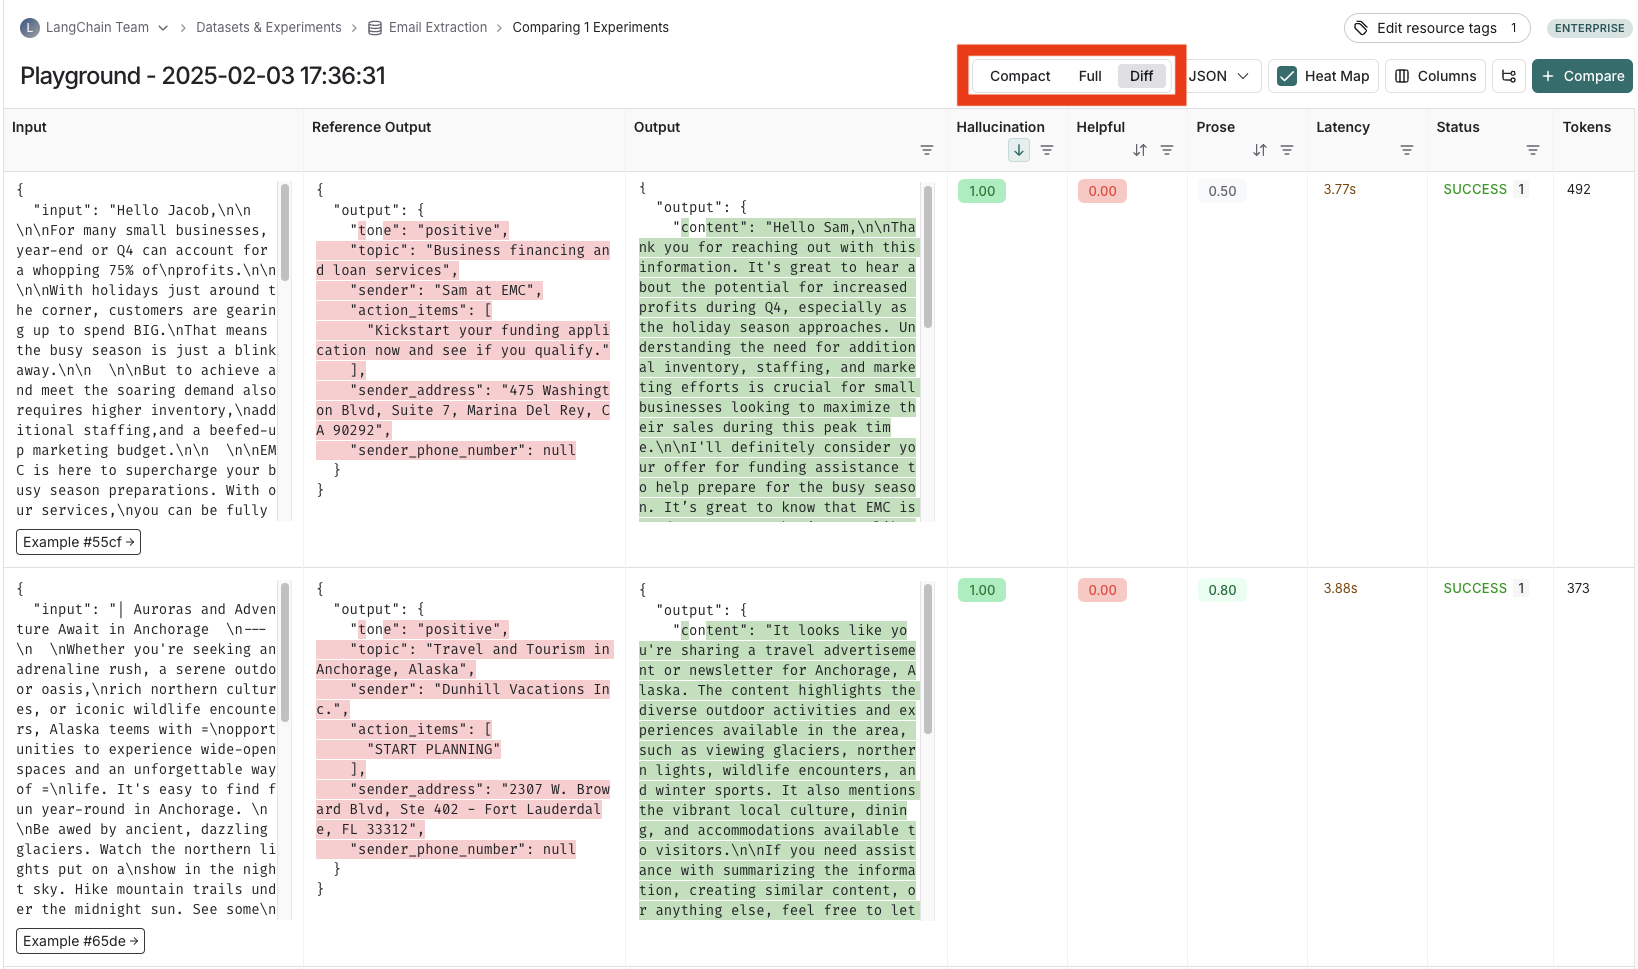
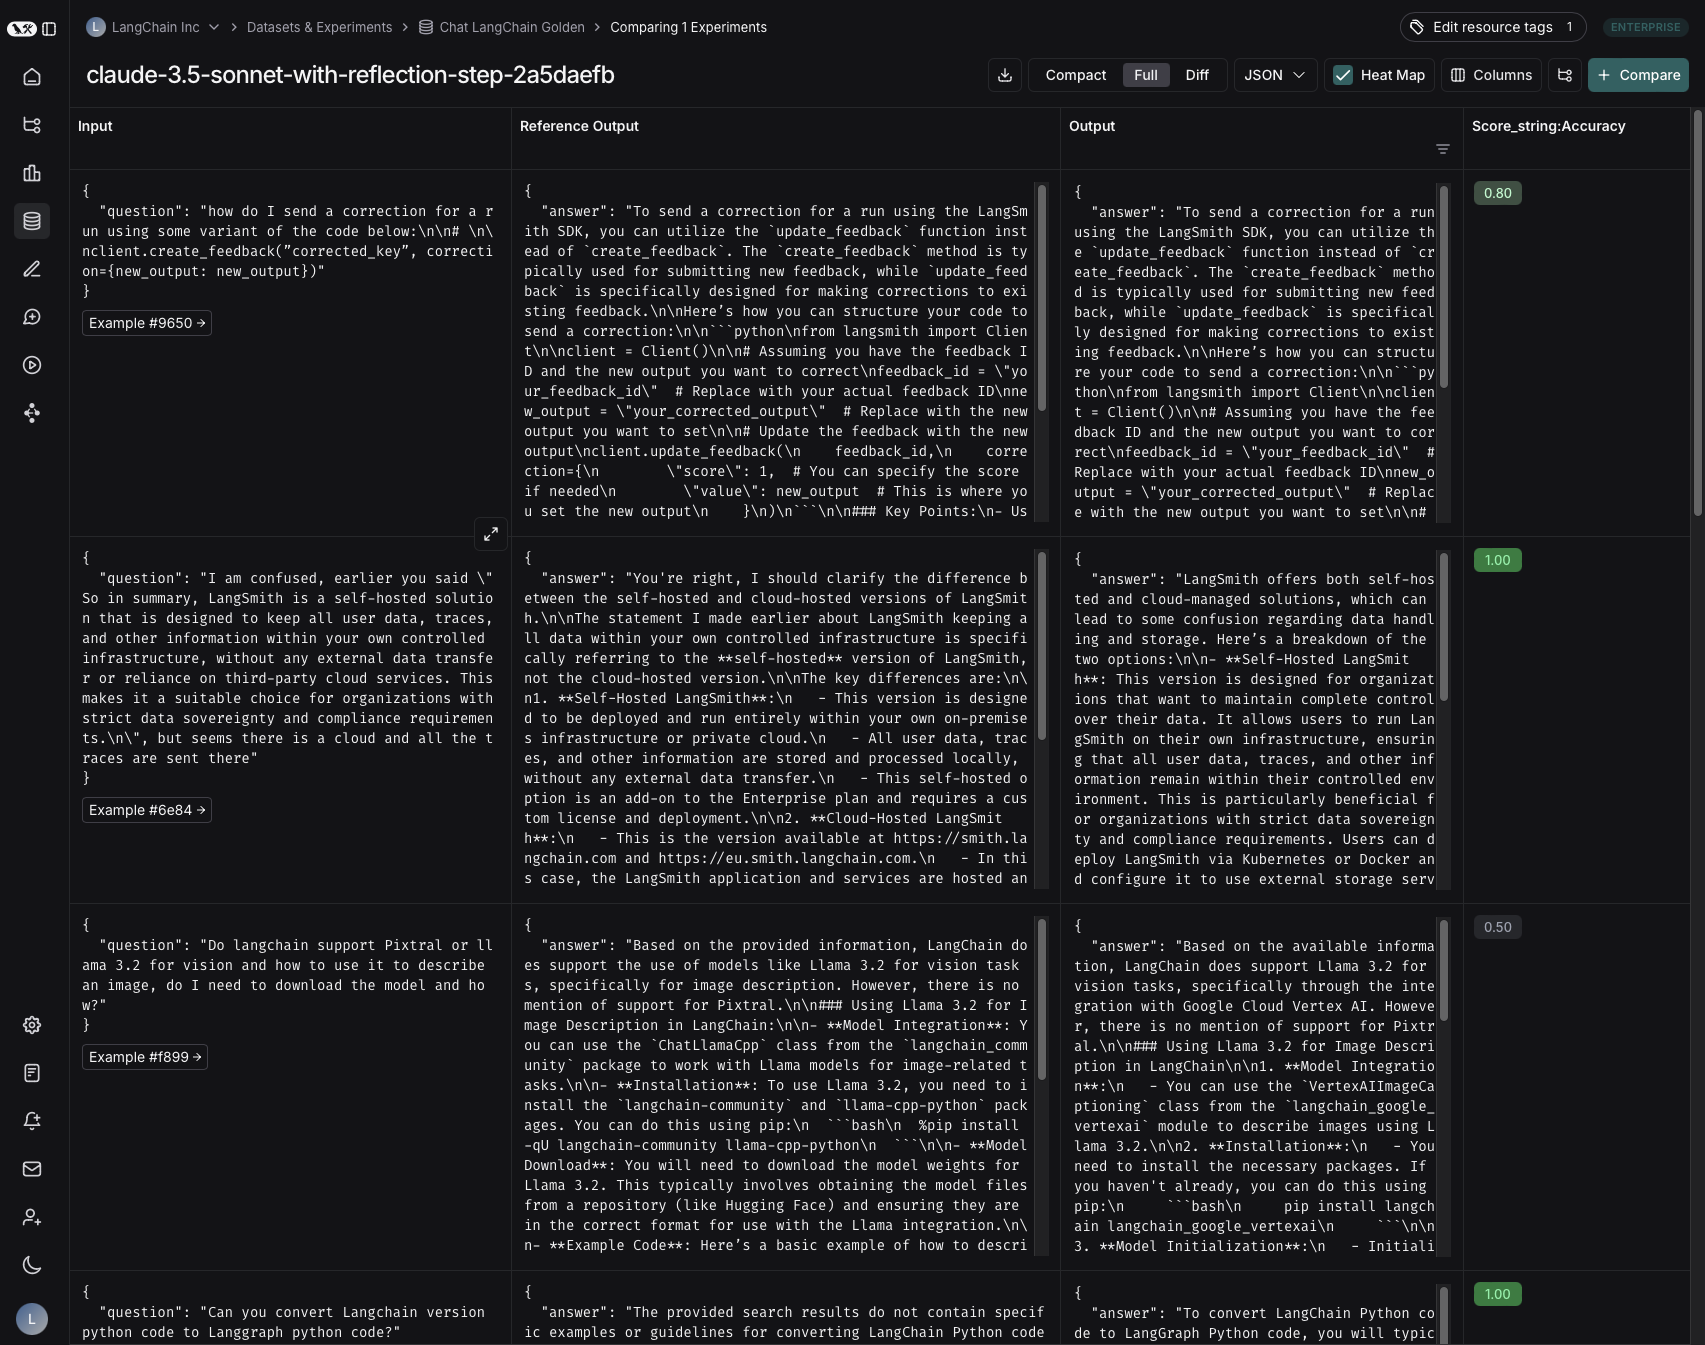
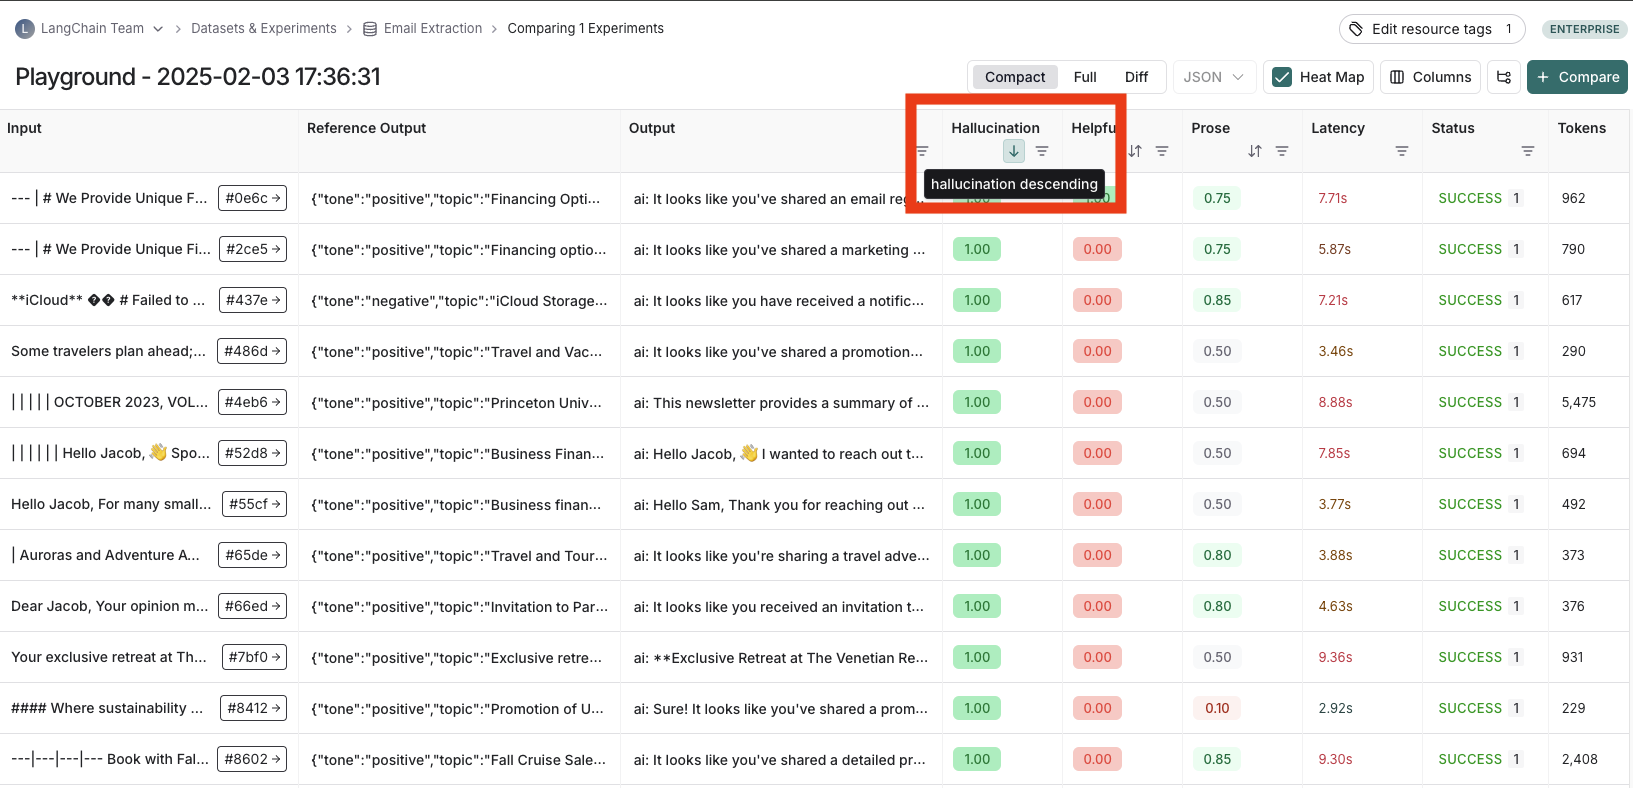 #### Table views
Depending on the view most useful for your analysis, you can change the formatting of the table by toggling between a compact view, a full, view, and a diff view.
* The **Compact** view shows each run as a one-line row, for ease of comparing scores at a glance.
* The **Full** view shows the full output for each run for digging into the details of individual runs.
* The **Diff** view shows the text difference between the reference output and the output for each run.
#### Table views
Depending on the view most useful for your analysis, you can change the formatting of the table by toggling between a compact view, a full, view, and a diff view.
* The **Compact** view shows each run as a one-line row, for ease of comparing scores at a glance.
* The **Full** view shows the full output for each run for digging into the details of individual runs.
* The **Diff** view shows the text difference between the reference output and the output for each run.
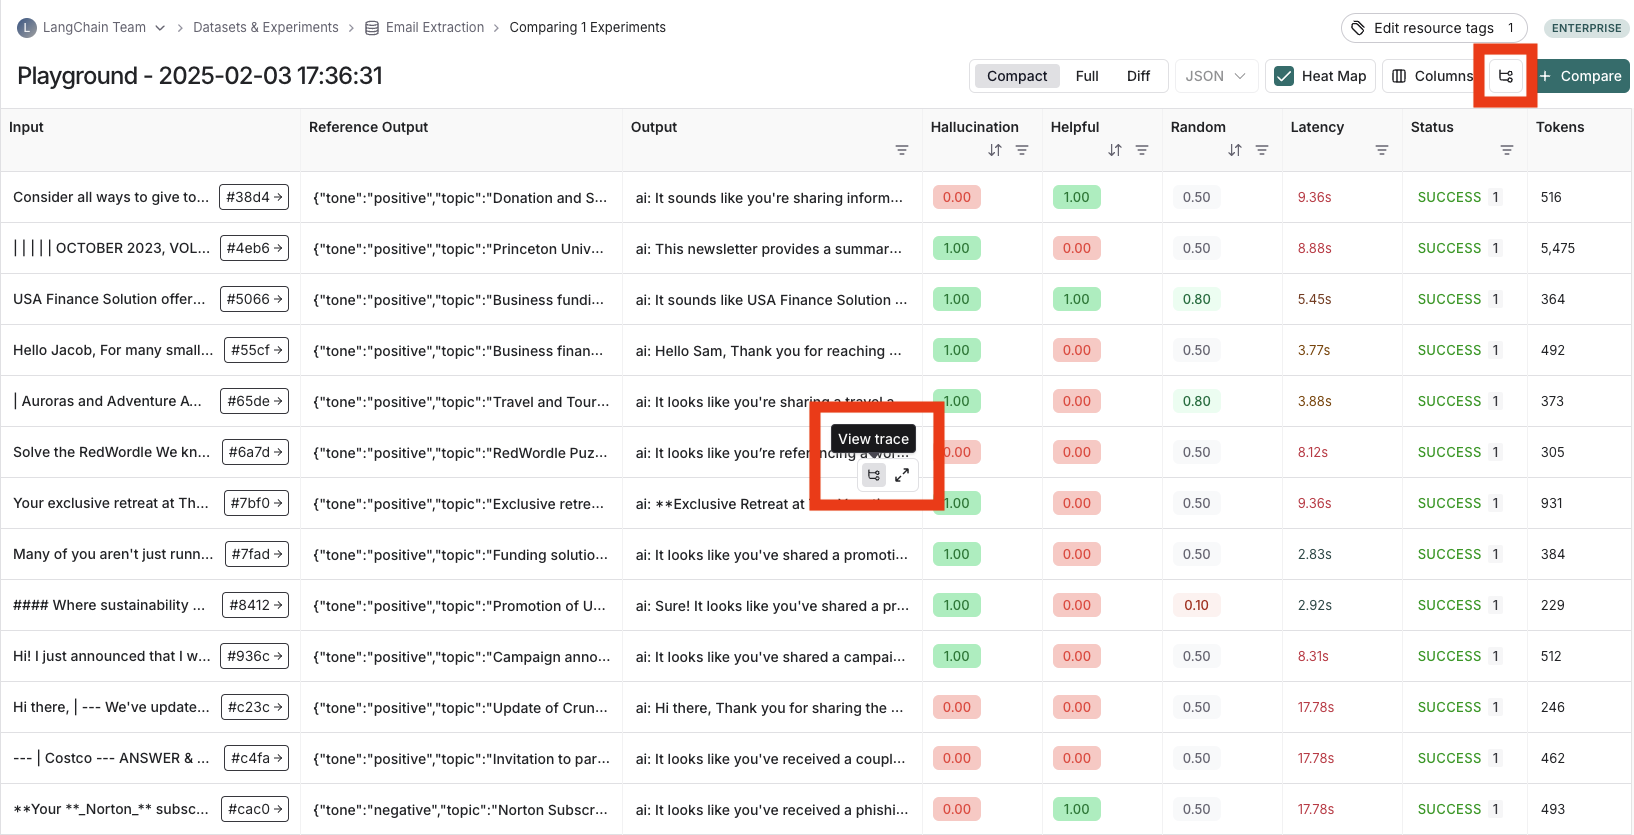
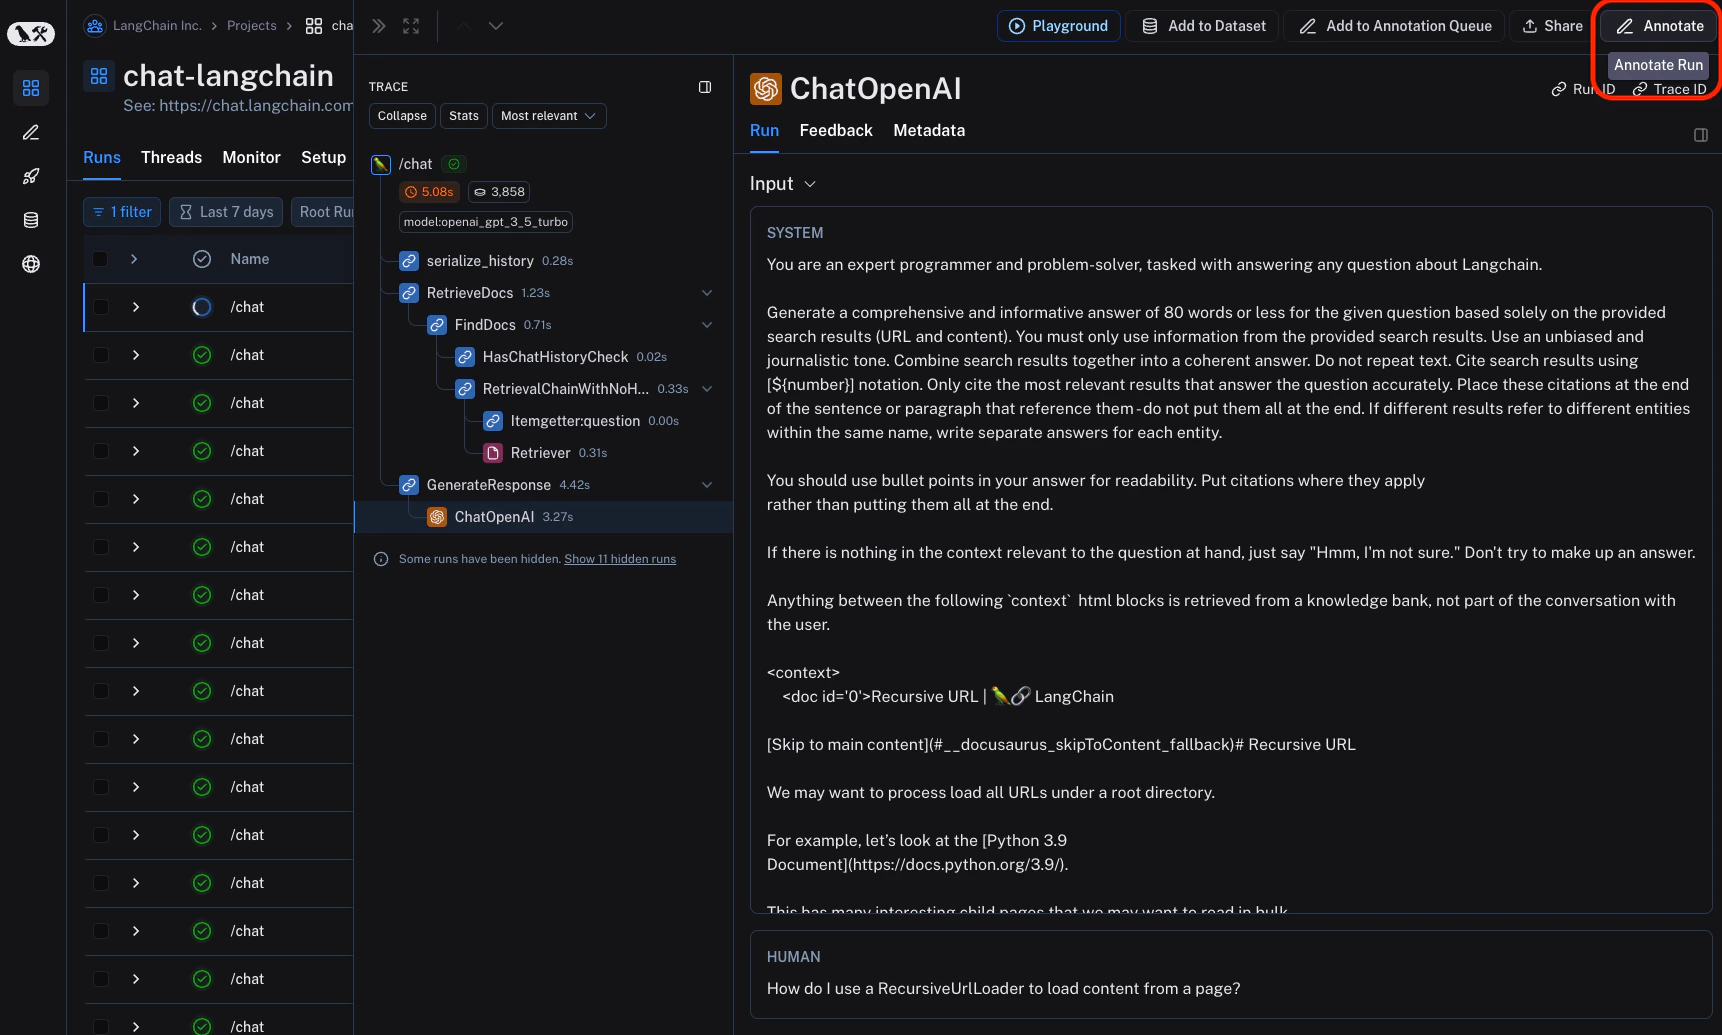
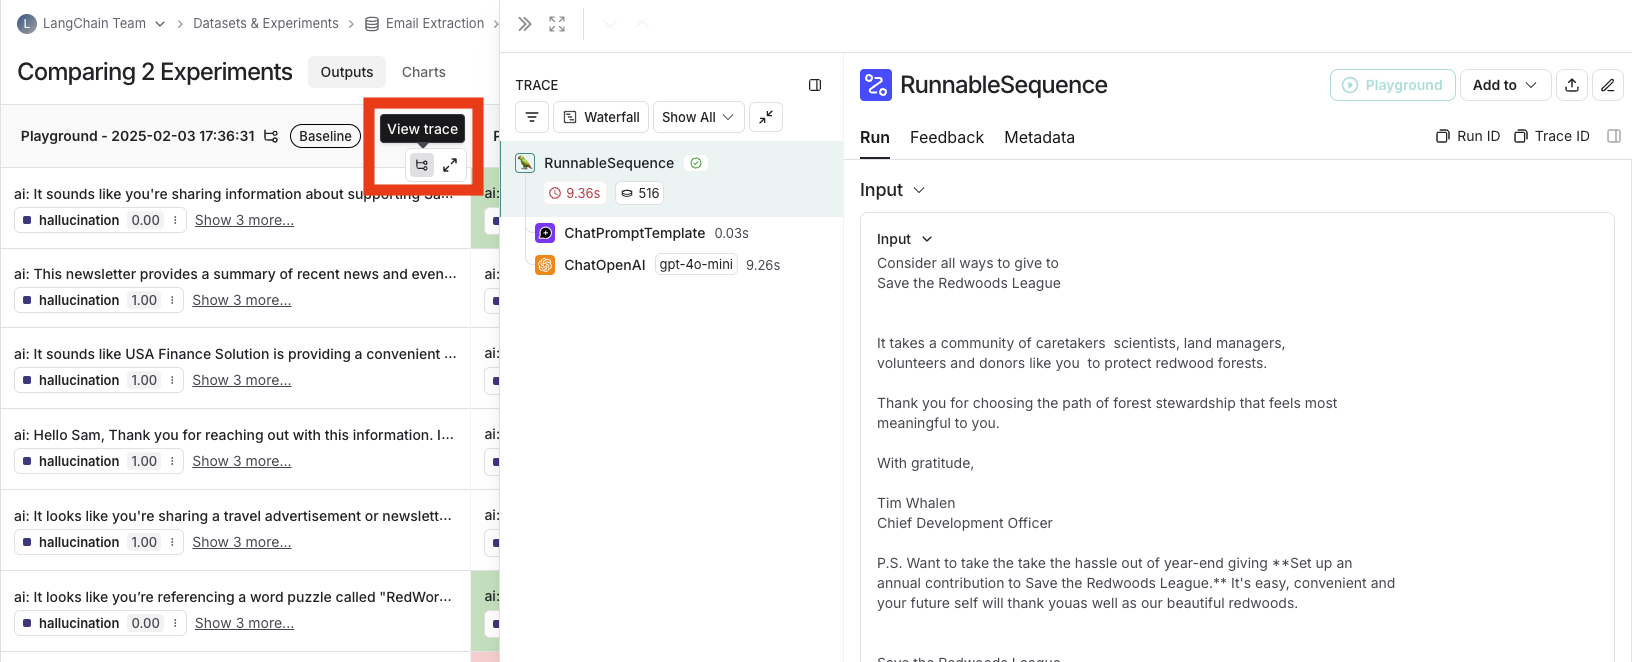
 #### View the traces
Hover over any of the output cells, and click on the trace icon to view the trace for that run. This will open up a trace in the side panel.
To view the entire tracing project, click on the **View Project** button in the top right of the header.
#### View the traces
Hover over any of the output cells, and click on the trace icon to view the trace for that run. This will open up a trace in the side panel.
To view the entire tracing project, click on the **View Project** button in the top right of the header.
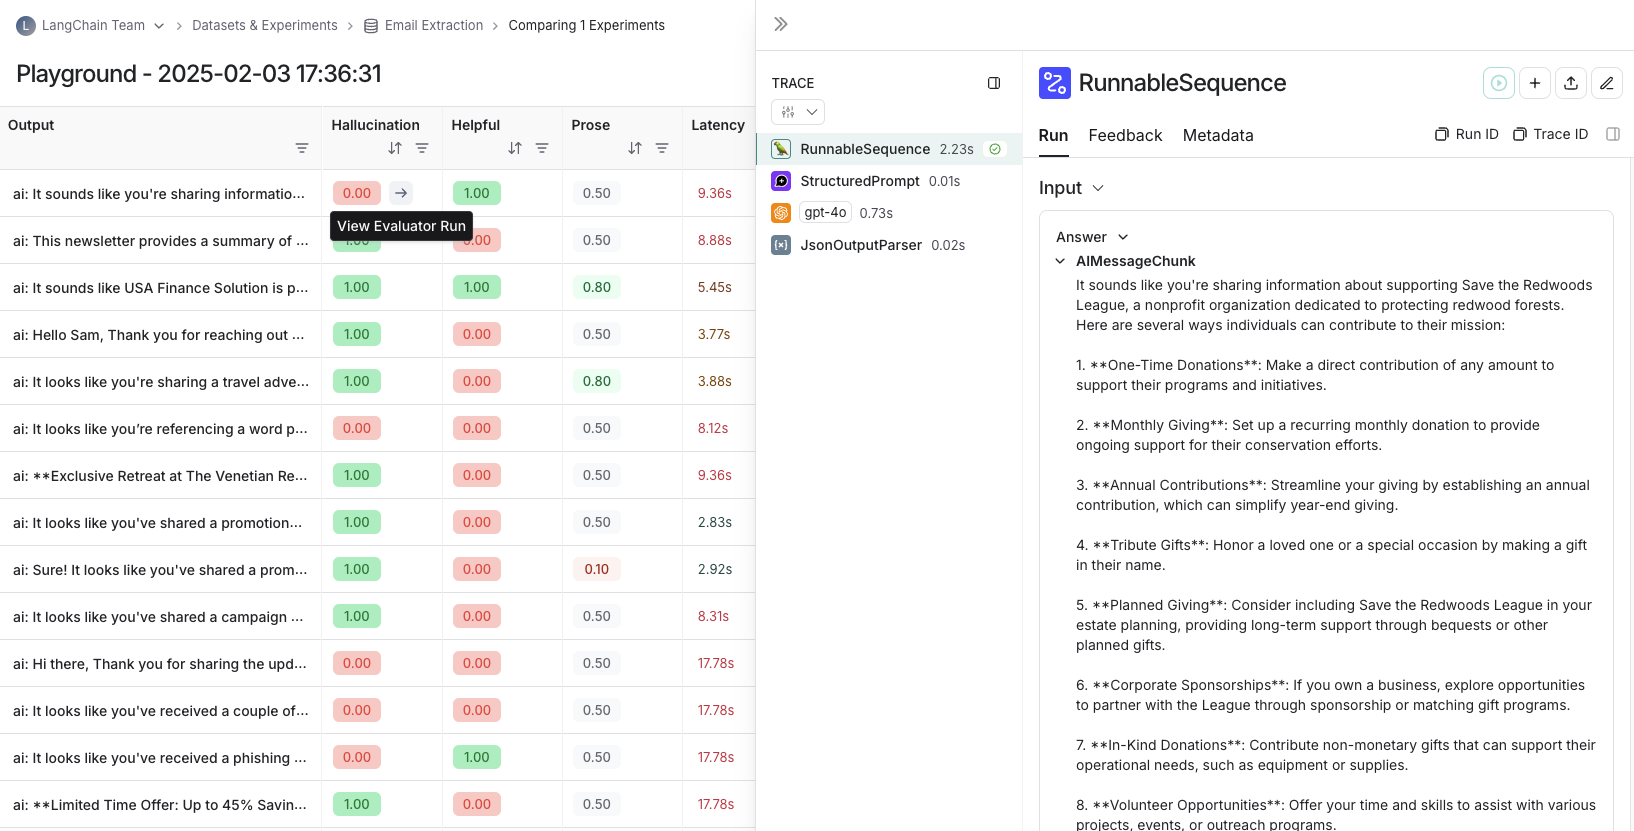
 #### View evaluator runs
For evaluator scores, you can view the source run by hovering over the evaluator score cell and clicking on the arrow icon. This will open up a trace in the side panel. If you're running a [LLM-as-a-judge evaluator](/langsmith/llm-as-judge), you can view the prompt used for the evaluator in this run. If your experiment has [repetitions](/langsmith/evaluation-concepts#repetitions), you can click on the aggregate average score to find links to all of the individual runs.
#### View evaluator runs
For evaluator scores, you can view the source run by hovering over the evaluator score cell and clicking on the arrow icon. This will open up a trace in the side panel. If you're running a [LLM-as-a-judge evaluator](/langsmith/llm-as-judge), you can view the prompt used for the evaluator in this run. If your experiment has [repetitions](/langsmith/evaluation-concepts#repetitions), you can click on the aggregate average score to find links to all of the individual runs.
 ### Group results by metadata
You can add metadata to examples to categorize and organize them. For example, if you're evaluating factual accuracy on a question answering dataset, the metadata might include which subject area each question belongs to. Metadata can be added either [via the UI](/langsmith/manage-datasets-in-application#edit-example-metadata) or [via the SDK](/langsmith/manage-datasets-programmatically#update-single-example).
To analyze results by metadata, use the **Group by** dropdown in the top right corner of the experiment view and select your desired metadata key. This displays average feedback scores, latency, total tokens, and cost for each metadata group.
### Group results by metadata
You can add metadata to examples to categorize and organize them. For example, if you're evaluating factual accuracy on a question answering dataset, the metadata might include which subject area each question belongs to. Metadata can be added either [via the UI](/langsmith/manage-datasets-in-application#edit-example-metadata) or [via the SDK](/langsmith/manage-datasets-programmatically#update-single-example).
To analyze results by metadata, use the **Group by** dropdown in the top right corner of the experiment view and select your desired metadata key. This displays average feedback scores, latency, total tokens, and cost for each metadata group.
 ### Compare to another experiment
In the top right of the experiment view, you can select another experiment to compare to. This will open up a comparison view, where you can see how the two experiments compare. To learn more about the comparison view, see [how to compare experiment results](/langsmith/compare-experiment-results).
## Download experiment results as a CSV
LangSmith lets you download experiment results as a CSV file, which allows you to analyze and share your results.
To download as a CSV, click the download icon at the top of the experiment view. The icon is directly to the left of the [Compact toggle](/langsmith/compare-experiment-results#adjust-the-table-display).
### Compare to another experiment
In the top right of the experiment view, you can select another experiment to compare to. This will open up a comparison view, where you can see how the two experiments compare. To learn more about the comparison view, see [how to compare experiment results](/langsmith/compare-experiment-results).
## Download experiment results as a CSV
LangSmith lets you download experiment results as a CSV file, which allows you to analyze and share your results.
To download as a CSV, click the download icon at the top of the experiment view. The icon is directly to the left of the [Compact toggle](/langsmith/compare-experiment-results#adjust-the-table-display).
 ## Rename an experiment
 * The [Experiments view](#renaming-an-experiment-in-the-experiments-view). When viewing results in the experiments view, you can rename an experiment by using the pencil icon beside the experiment name.
 ***
***
 ## Use the `trace` context manager (Python only)
In Python, you can use the `trace` context manager to log traces to LangSmith. This is useful in situations where:
1. You want to log traces for a specific block of code.
2. You want control over the inputs, outputs, and other attributes of the trace.
3. It is not feasible to use a decorator or wrapper.
4. Any or all of the above.
The context manager integrates seamlessly with the `traceable` decorator and `wrap_openai` wrapper, so you can use them together in the same application.
```python theme={null}
import openai
import langsmith as ls
from langsmith.wrappers import wrap_openai
client = wrap_openai(openai.Client())
@ls.traceable(run_type="tool", name="Retrieve Context")
def my_tool(question: str) -> str:
return "During this morning's meeting, we solved all world conflict."
def chat_pipeline(question: str):
context = my_tool(question)
messages = [
{ "role": "system", "content": "You are a helpful assistant. Please respond to the user's request only based on the given context." },
{ "role": "user", "content": f"Question: {question}\nContext: {context}"}
]
chat_completion = client.chat.completions.create(
model="gpt-4o-mini", messages=messages
)
return chat_completion.choices[0].message.content
app_inputs = {"input": "Can you summarize this morning's meetings?"}
with ls.trace("Chat Pipeline", "chain", project_name="my_test", inputs=app_inputs) as rt:
output = chat_pipeline("Can you summarize this morning's meetings?")
rt.end(outputs={"output": output})
```
## Use the `RunTree` API
Another, more explicit way to log traces to LangSmith is via the `RunTree` API. This API allows you more control over your tracing - you can manually create runs and children runs to assemble your trace. You still need to set your `LANGSMITH_API_KEY`, but `LANGSMITH_TRACING` is not necessary for this method.
This method is not recommended, as it's easier to make mistakes in propagating trace context.
## Use the `trace` context manager (Python only)
In Python, you can use the `trace` context manager to log traces to LangSmith. This is useful in situations where:
1. You want to log traces for a specific block of code.
2. You want control over the inputs, outputs, and other attributes of the trace.
3. It is not feasible to use a decorator or wrapper.
4. Any or all of the above.
The context manager integrates seamlessly with the `traceable` decorator and `wrap_openai` wrapper, so you can use them together in the same application.
```python theme={null}
import openai
import langsmith as ls
from langsmith.wrappers import wrap_openai
client = wrap_openai(openai.Client())
@ls.traceable(run_type="tool", name="Retrieve Context")
def my_tool(question: str) -> str:
return "During this morning's meeting, we solved all world conflict."
def chat_pipeline(question: str):
context = my_tool(question)
messages = [
{ "role": "system", "content": "You are a helpful assistant. Please respond to the user's request only based on the given context." },
{ "role": "user", "content": f"Question: {question}\nContext: {context}"}
]
chat_completion = client.chat.completions.create(
model="gpt-4o-mini", messages=messages
)
return chat_completion.choices[0].message.content
app_inputs = {"input": "Can you summarize this morning's meetings?"}
with ls.trace("Chat Pipeline", "chain", project_name="my_test", inputs=app_inputs) as rt:
output = chat_pipeline("Can you summarize this morning's meetings?")
rt.end(outputs={"output": output})
```
## Use the `RunTree` API
Another, more explicit way to log traces to LangSmith is via the `RunTree` API. This API allows you more control over your tracing - you can manually create runs and children runs to assemble your trace. You still need to set your `LANGSMITH_API_KEY`, but `LANGSMITH_TRACING` is not necessary for this method.
This method is not recommended, as it's easier to make mistakes in propagating trace context.
 This will open up a pane that allows you to choose from feedback tags associated with your workspace and add a score for particular tags. You can also add a standalone comment. Follow [this guide](./set-up-feedback-criteria) to set up feedback tags for your workspace.
You can also set up new feedback criteria from within the pane itself.
This will open up a pane that allows you to choose from feedback tags associated with your workspace and add a score for particular tags. You can also add a standalone comment. Follow [this guide](./set-up-feedback-criteria) to set up feedback tags for your workspace.
You can also set up new feedback criteria from within the pane itself.
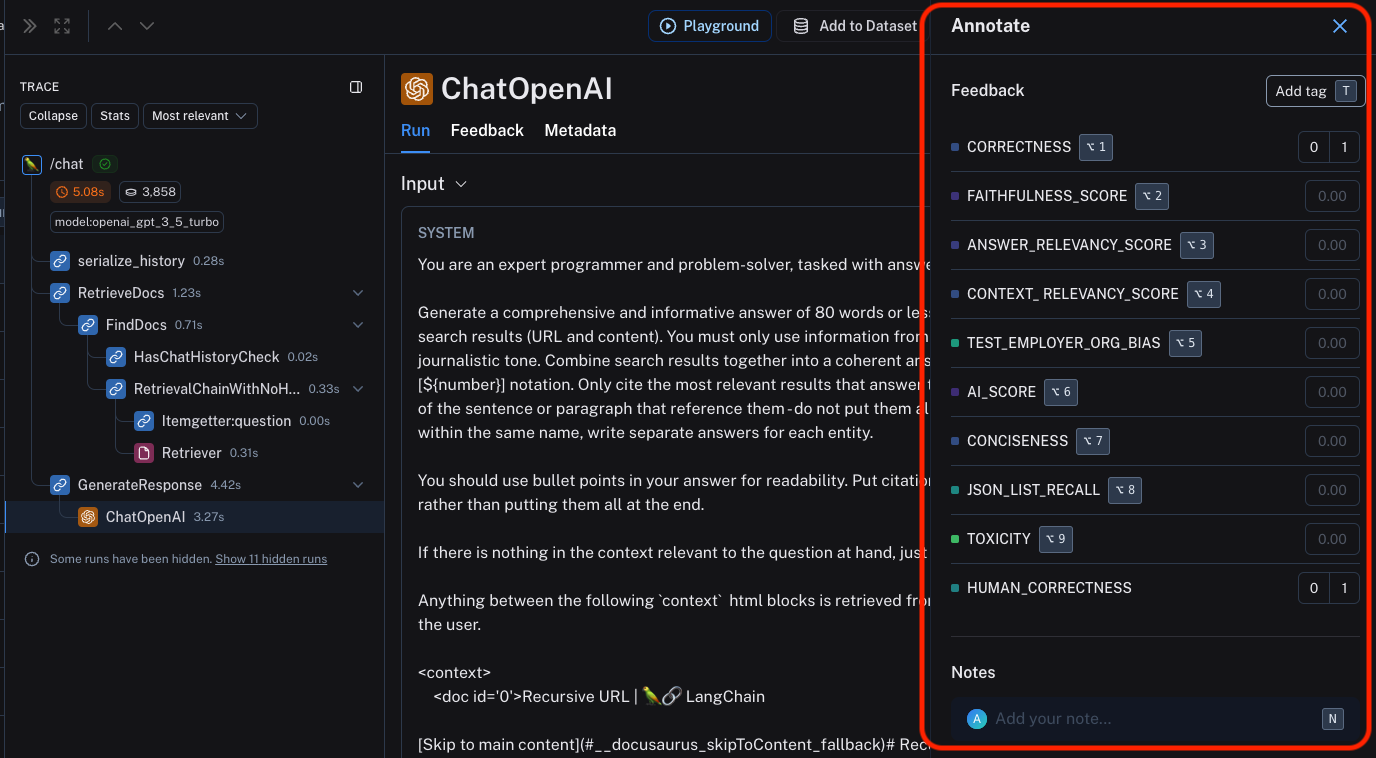 You can use the labeled keyboard shortcuts to streamline the annotation process.
***
You can use the labeled keyboard shortcuts to streamline the annotation process.
***
 ### Basic Details
1. Fill in the form with the **Name** and **Description** of the queue. You can also assign a **default dataset** to queue, which will streamline the process of sending the inputs and outputs of certain runs to datasets in your LangSmith [workspace](/langsmith/administration-overview#workspaces).
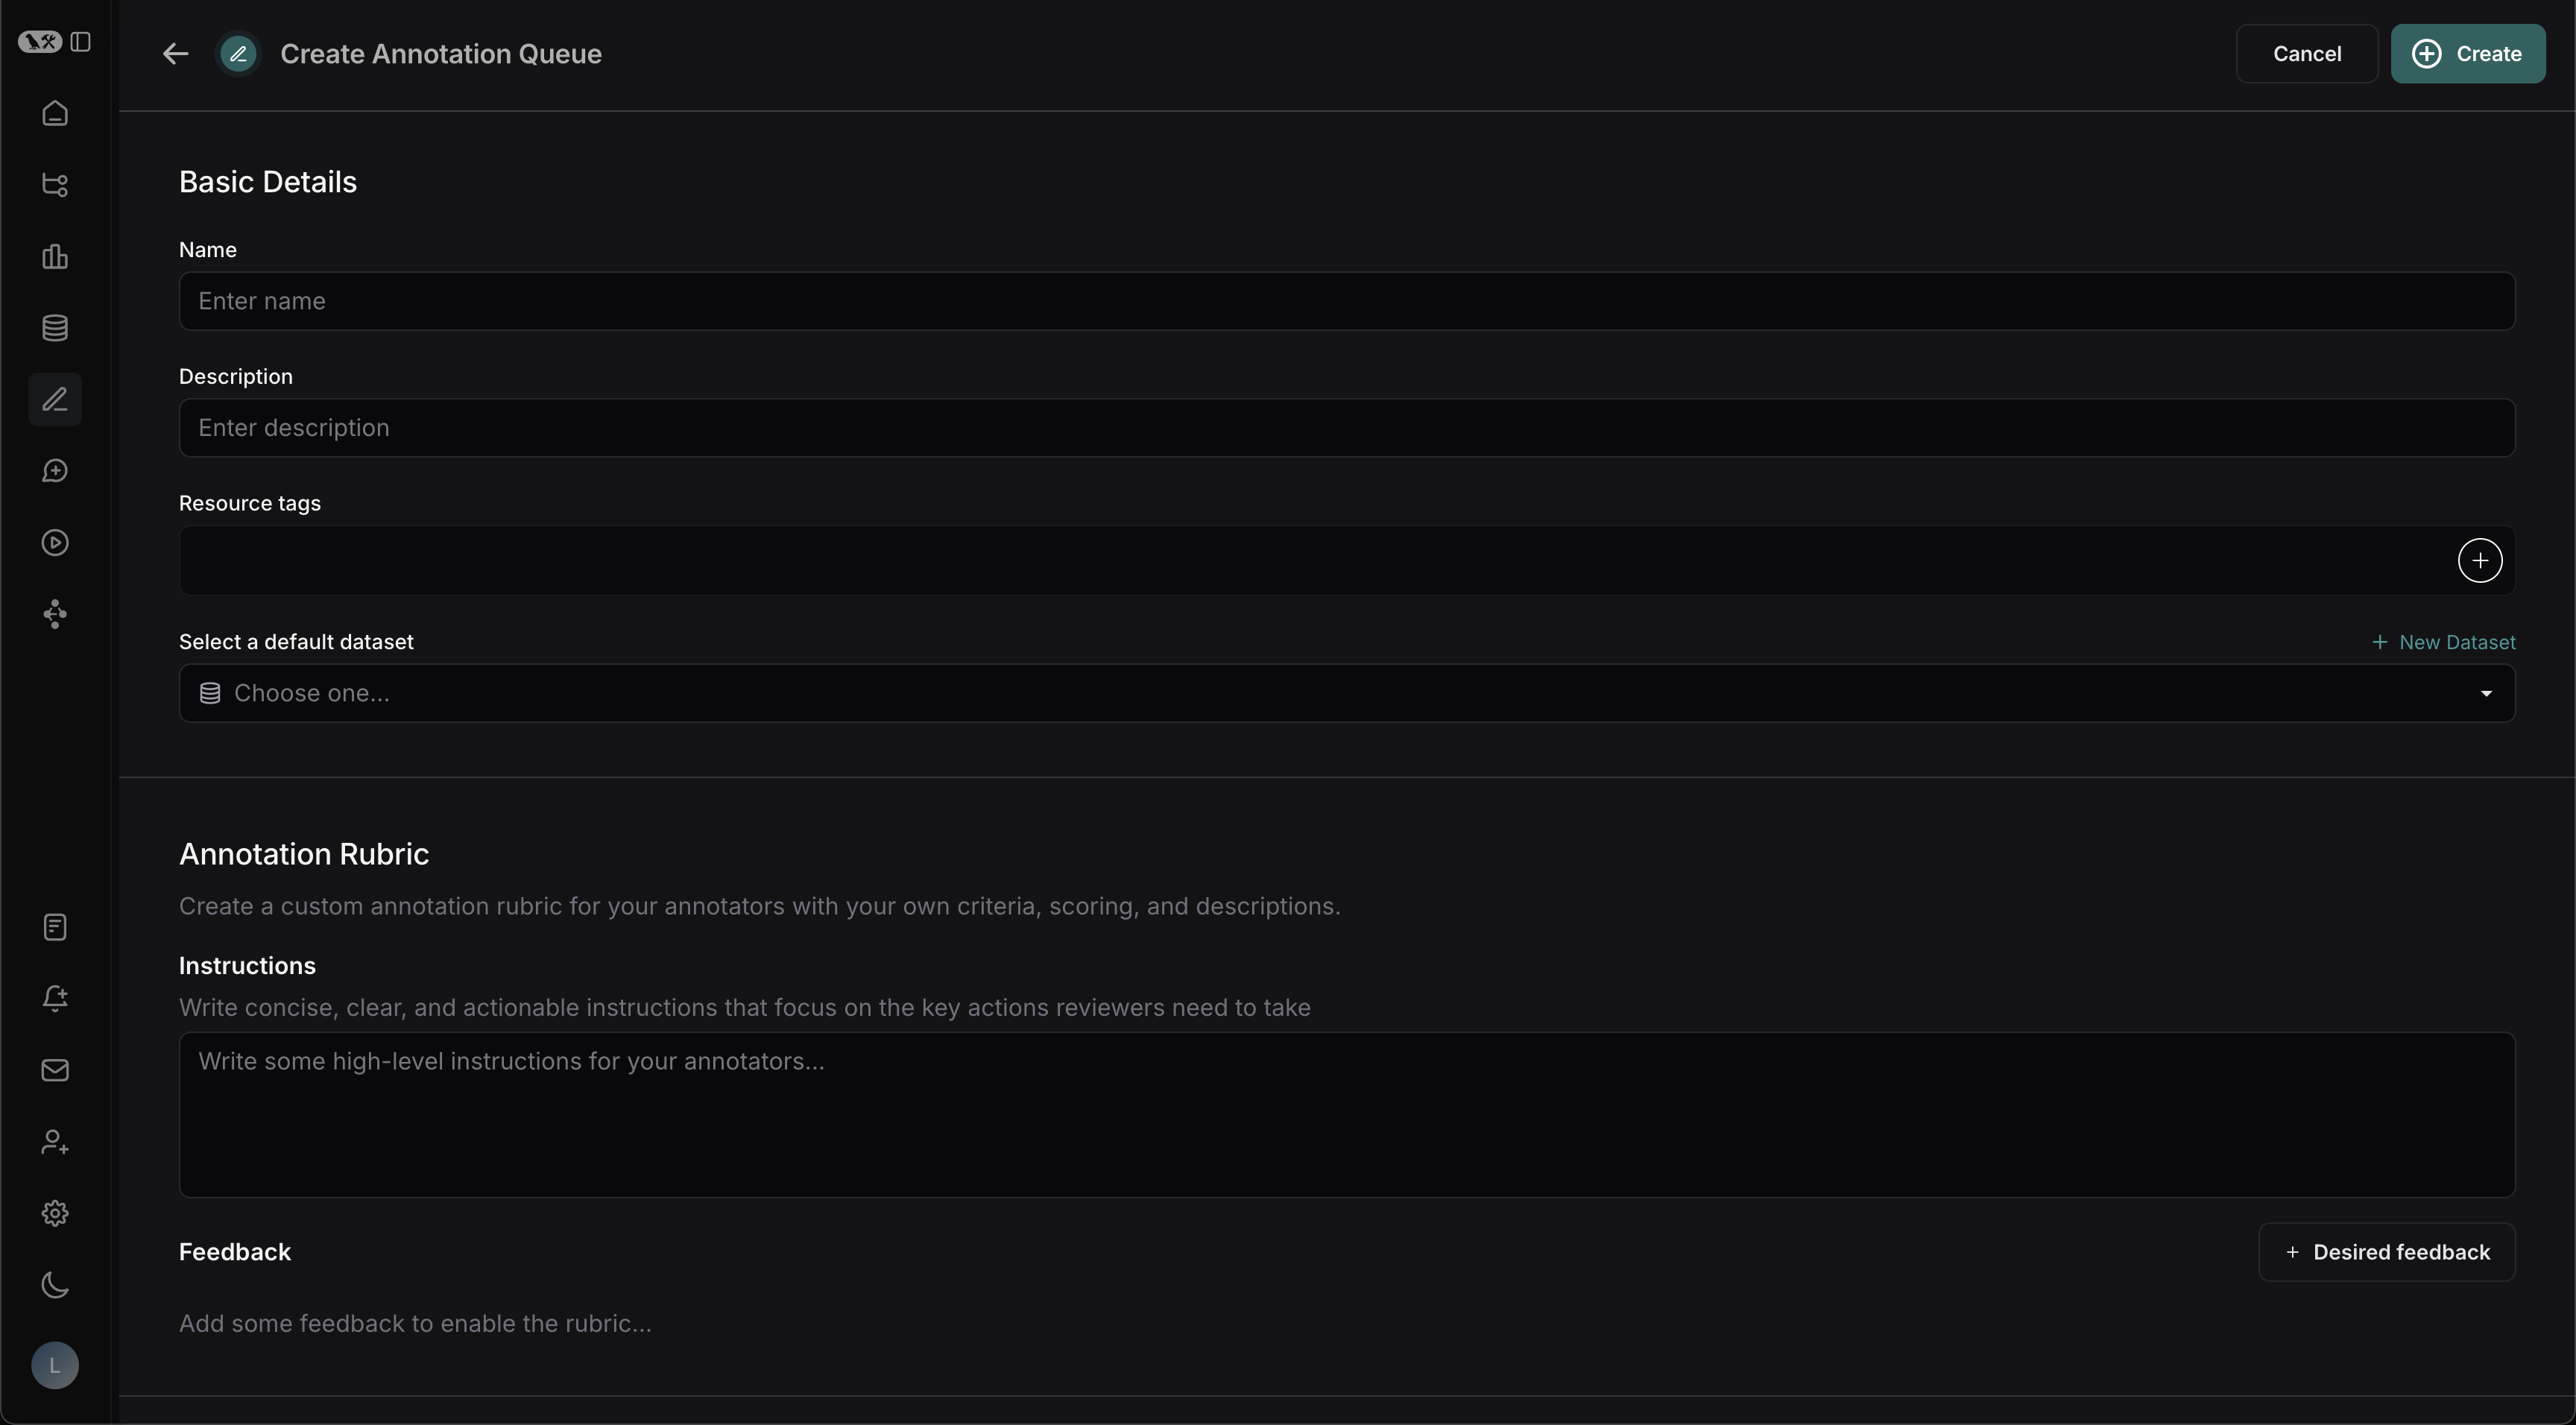
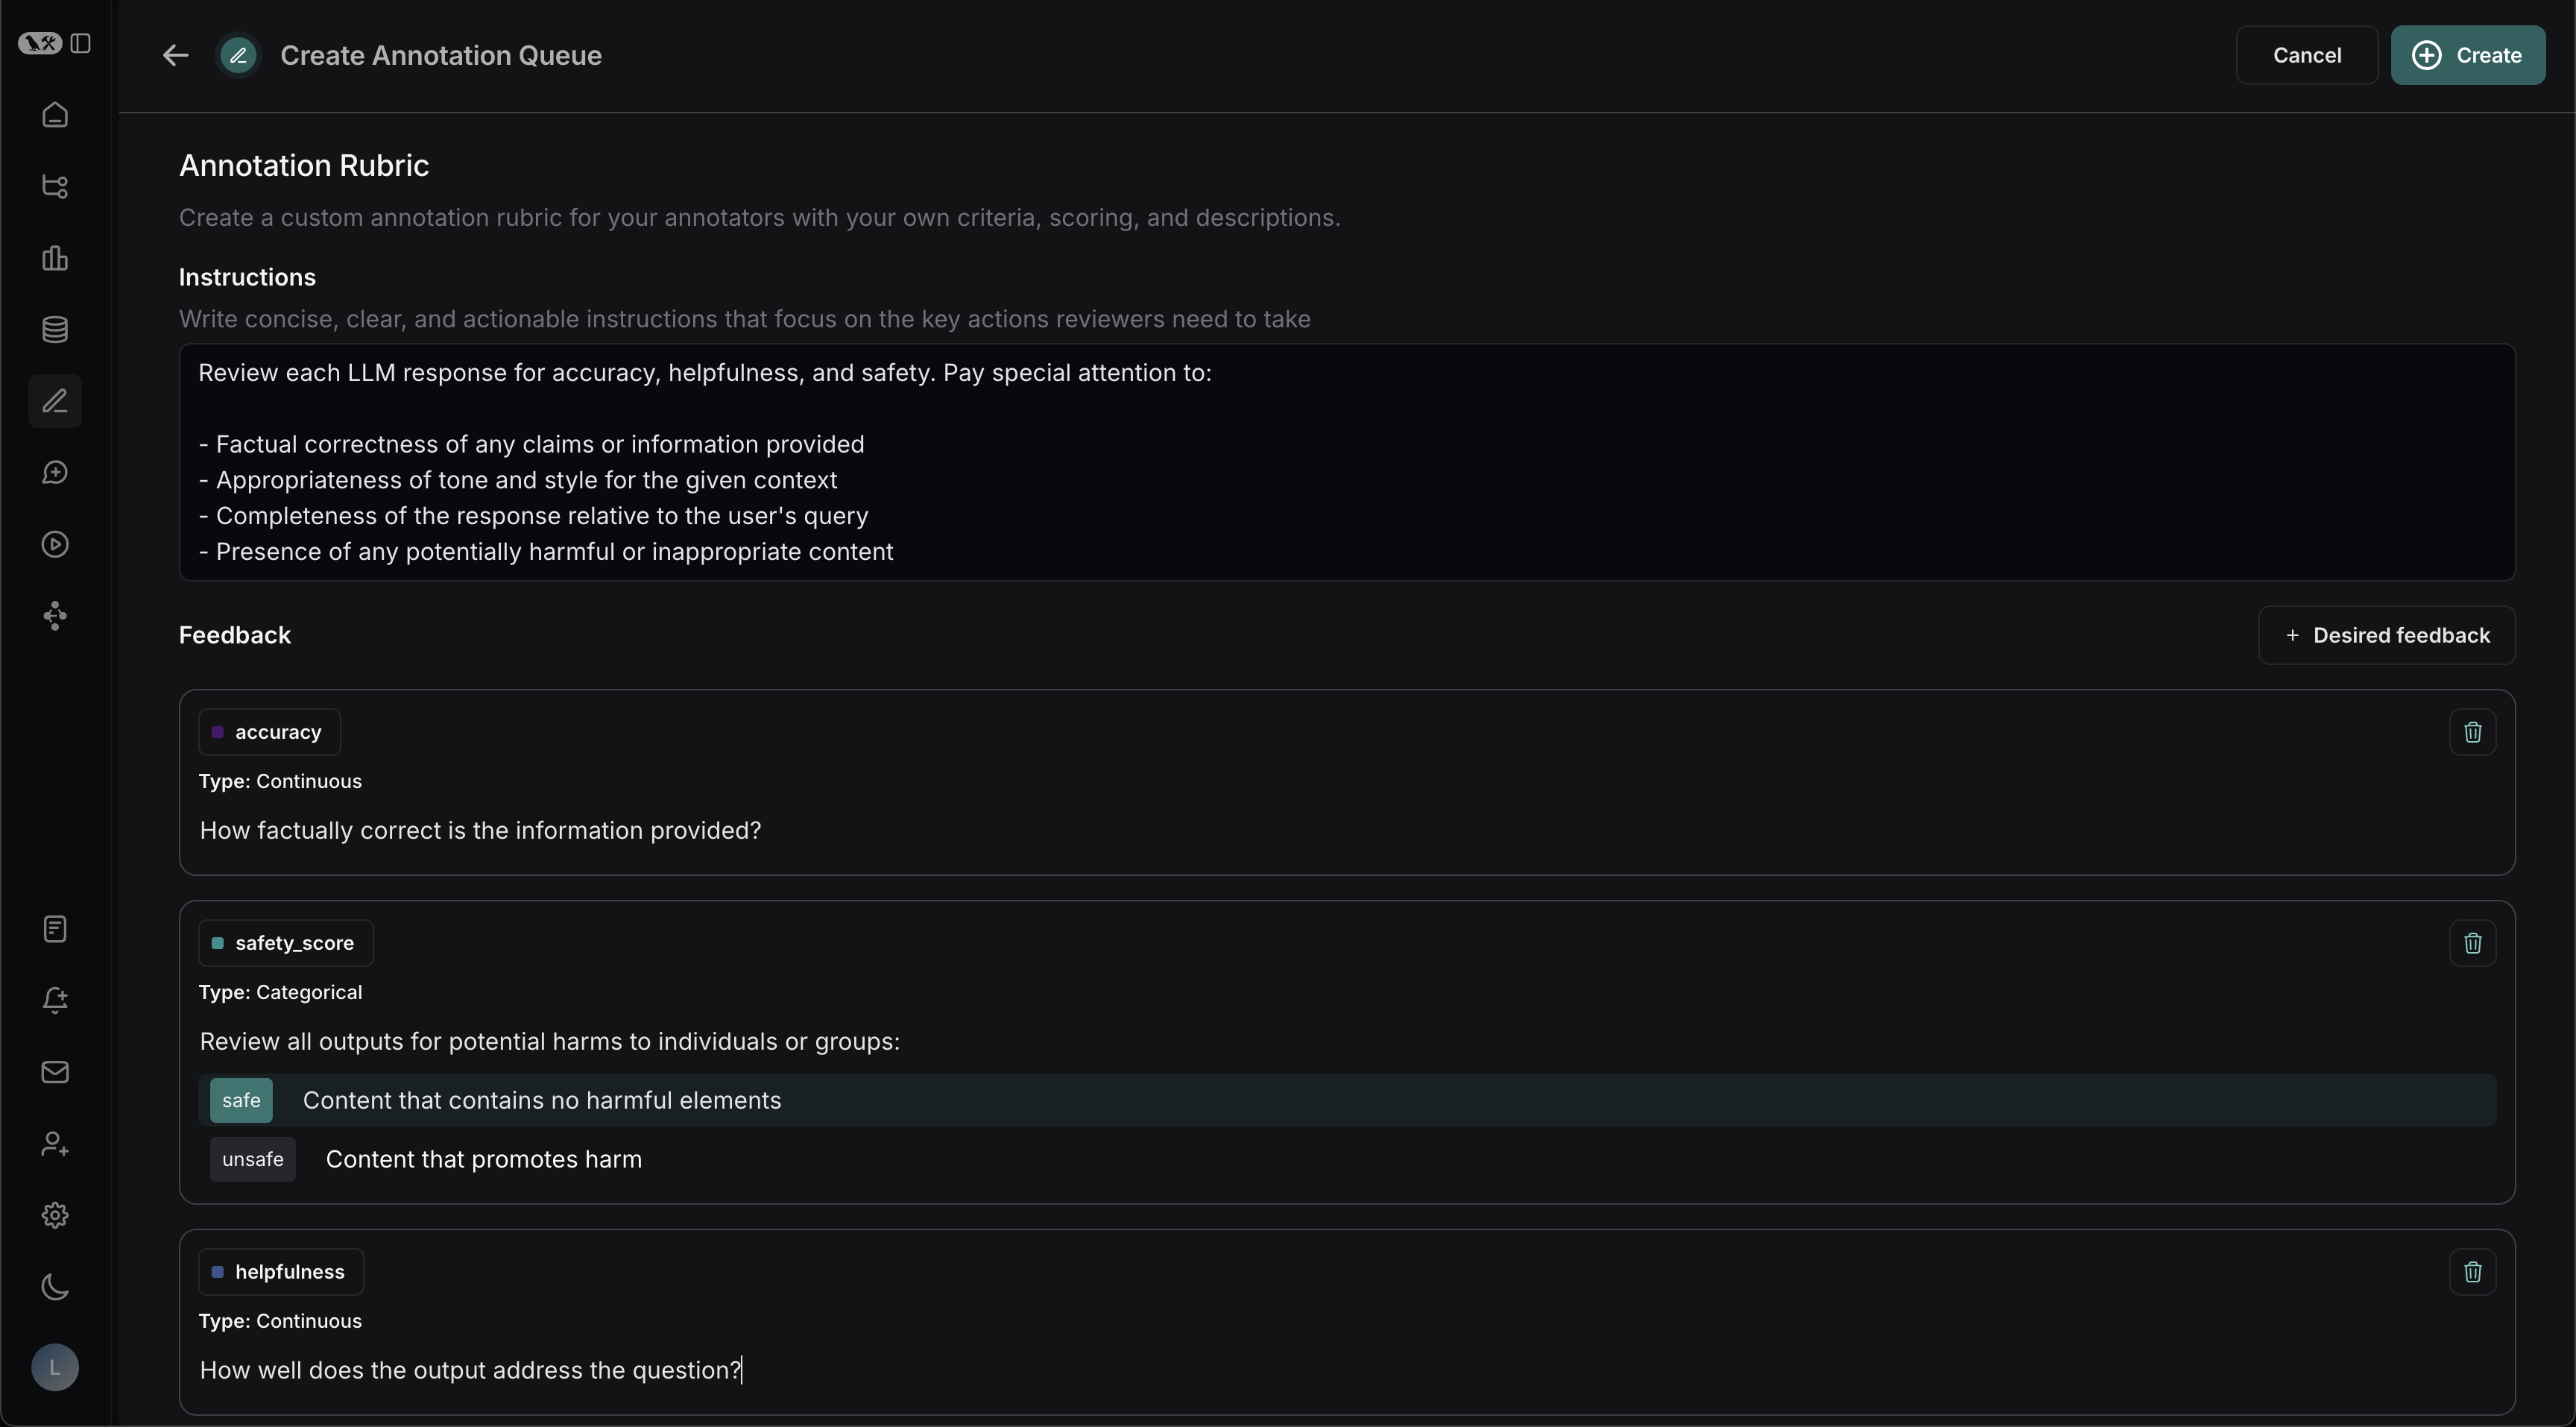
### Annotation Rubric
1. Draft some high-level instructions for your annotators, which will be shown in the sidebar on every run.
2. Click **+ Desired Feedback** to add feedback keys to your annotation queue. Annotators will be presented with these feedback keys on each run.
3. Add a description for each, as well as a short description of each category, if the feedback is categorical.
### Basic Details
1. Fill in the form with the **Name** and **Description** of the queue. You can also assign a **default dataset** to queue, which will streamline the process of sending the inputs and outputs of certain runs to datasets in your LangSmith [workspace](/langsmith/administration-overview#workspaces).
### Annotation Rubric
1. Draft some high-level instructions for your annotators, which will be shown in the sidebar on every run.
2. Click **+ Desired Feedback** to add feedback keys to your annotation queue. Annotators will be presented with these feedback keys on each run.
3. Add a description for each, as well as a short description of each category, if the feedback is categorical.
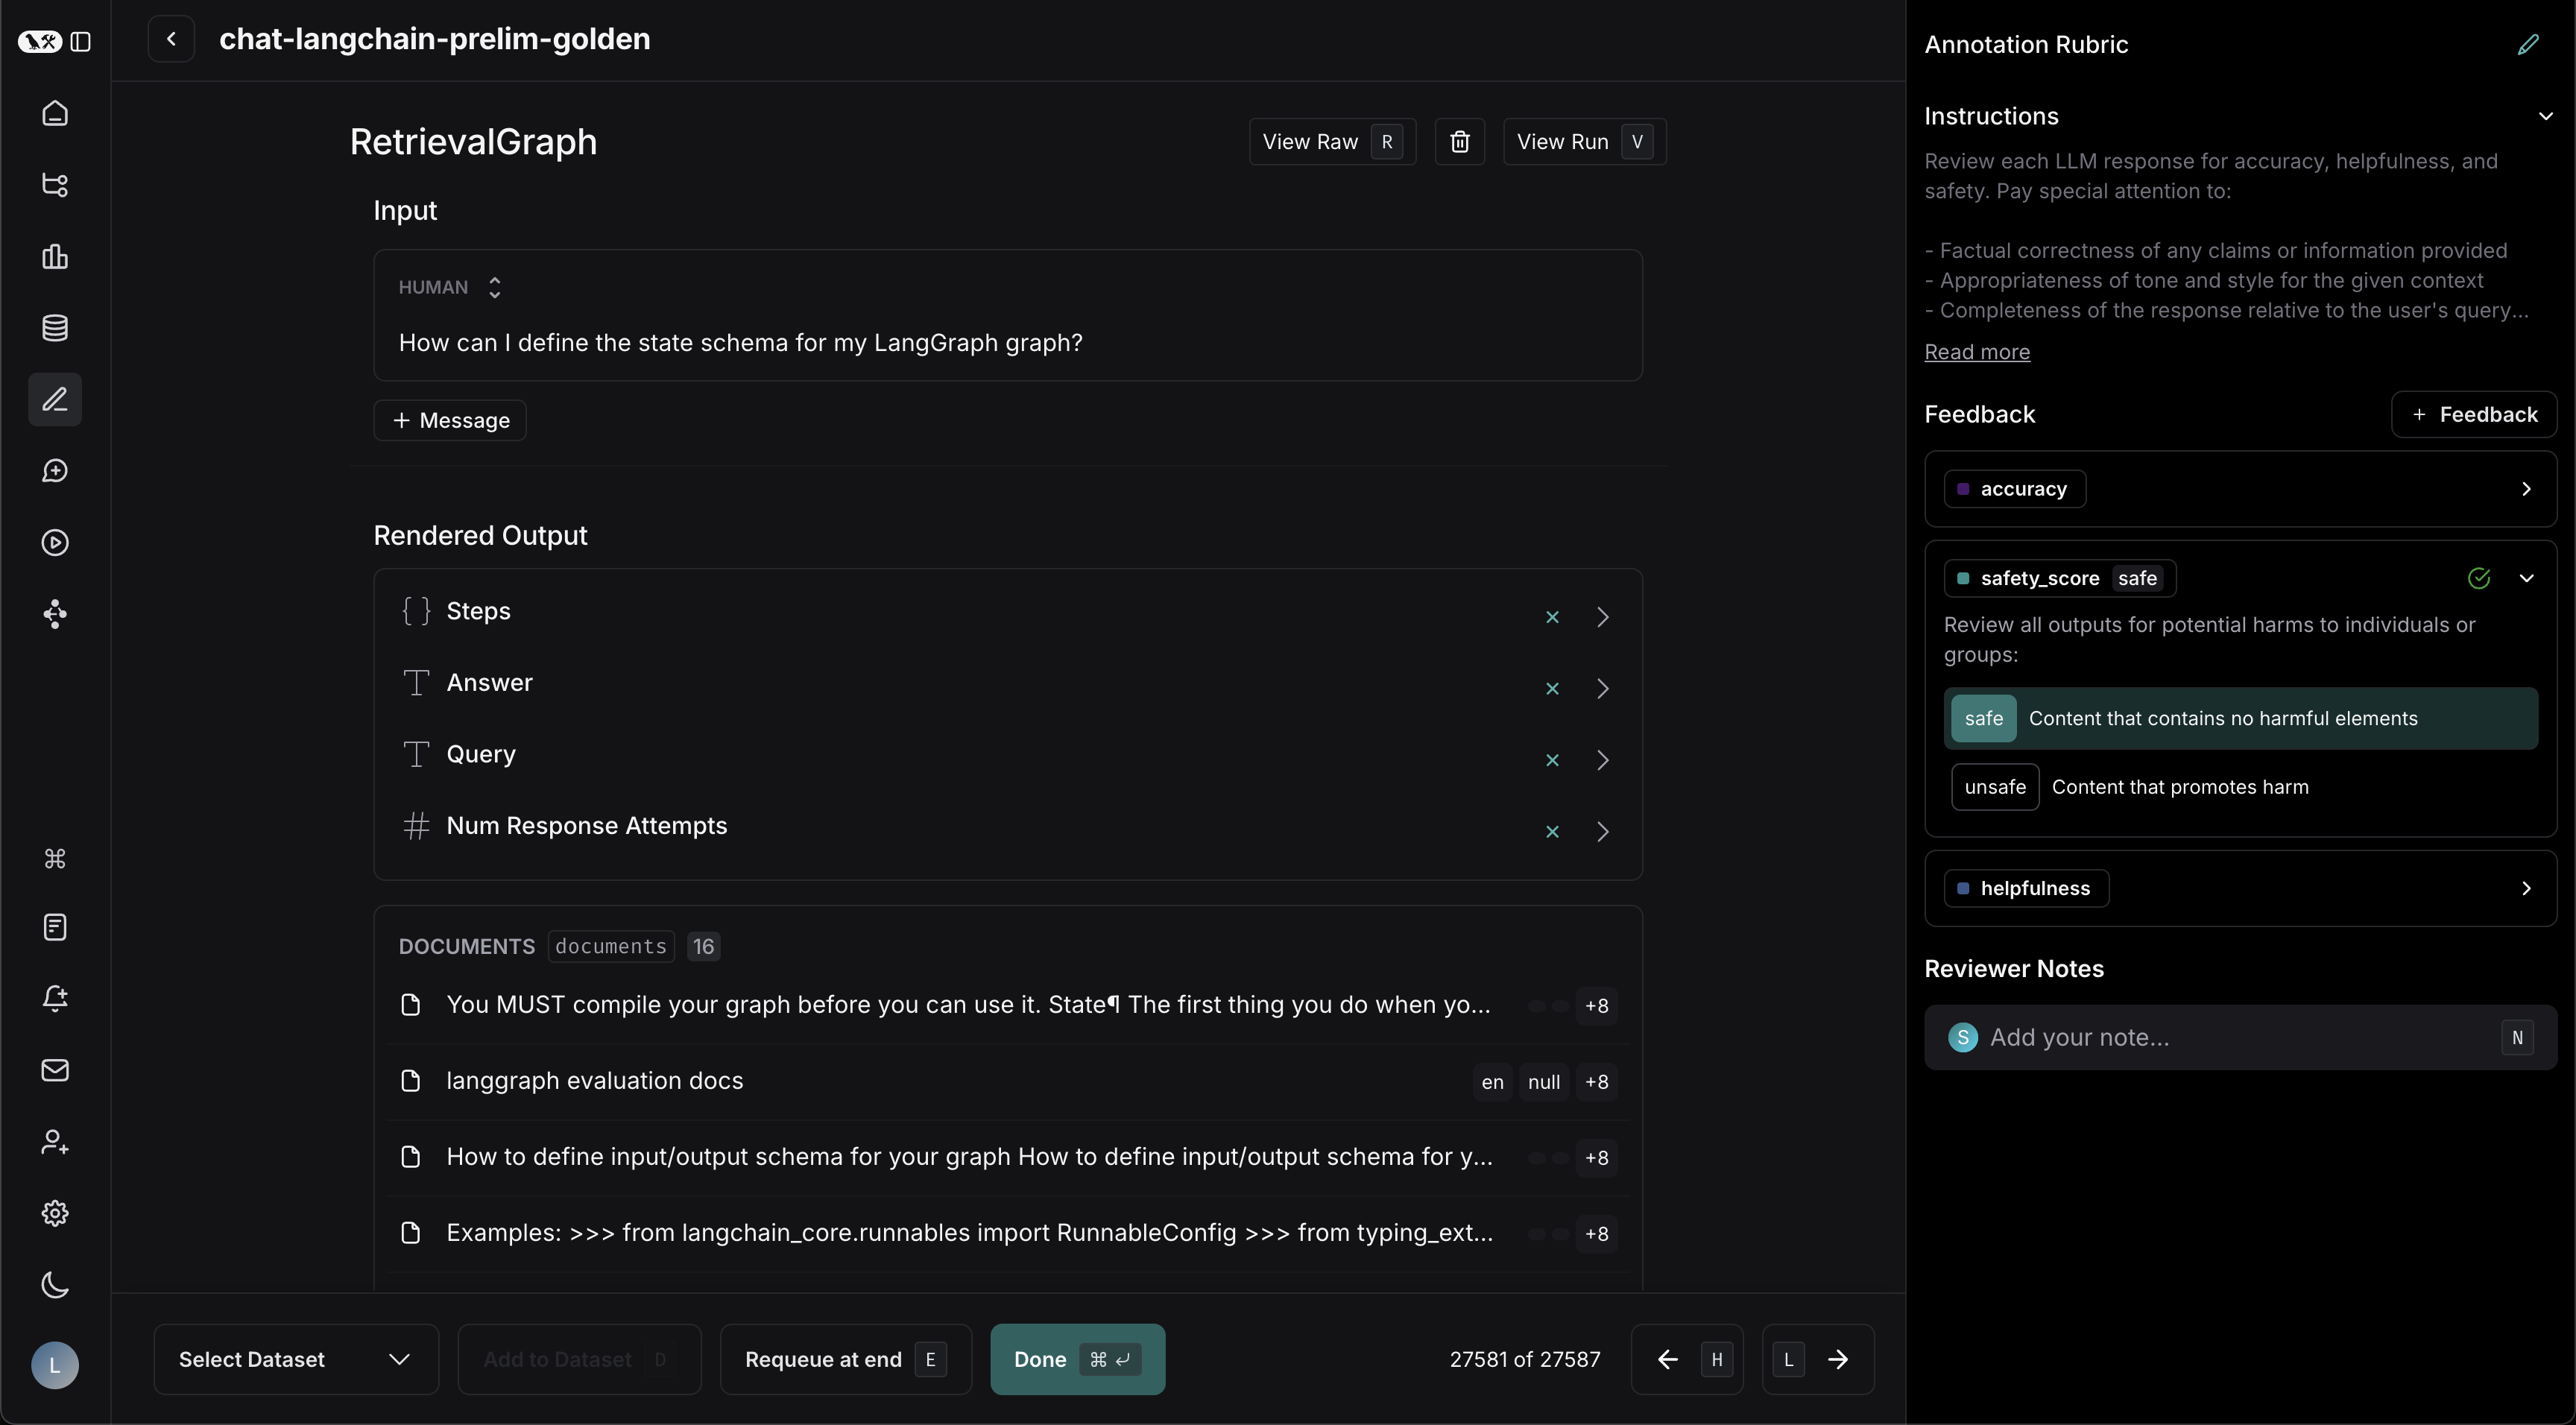
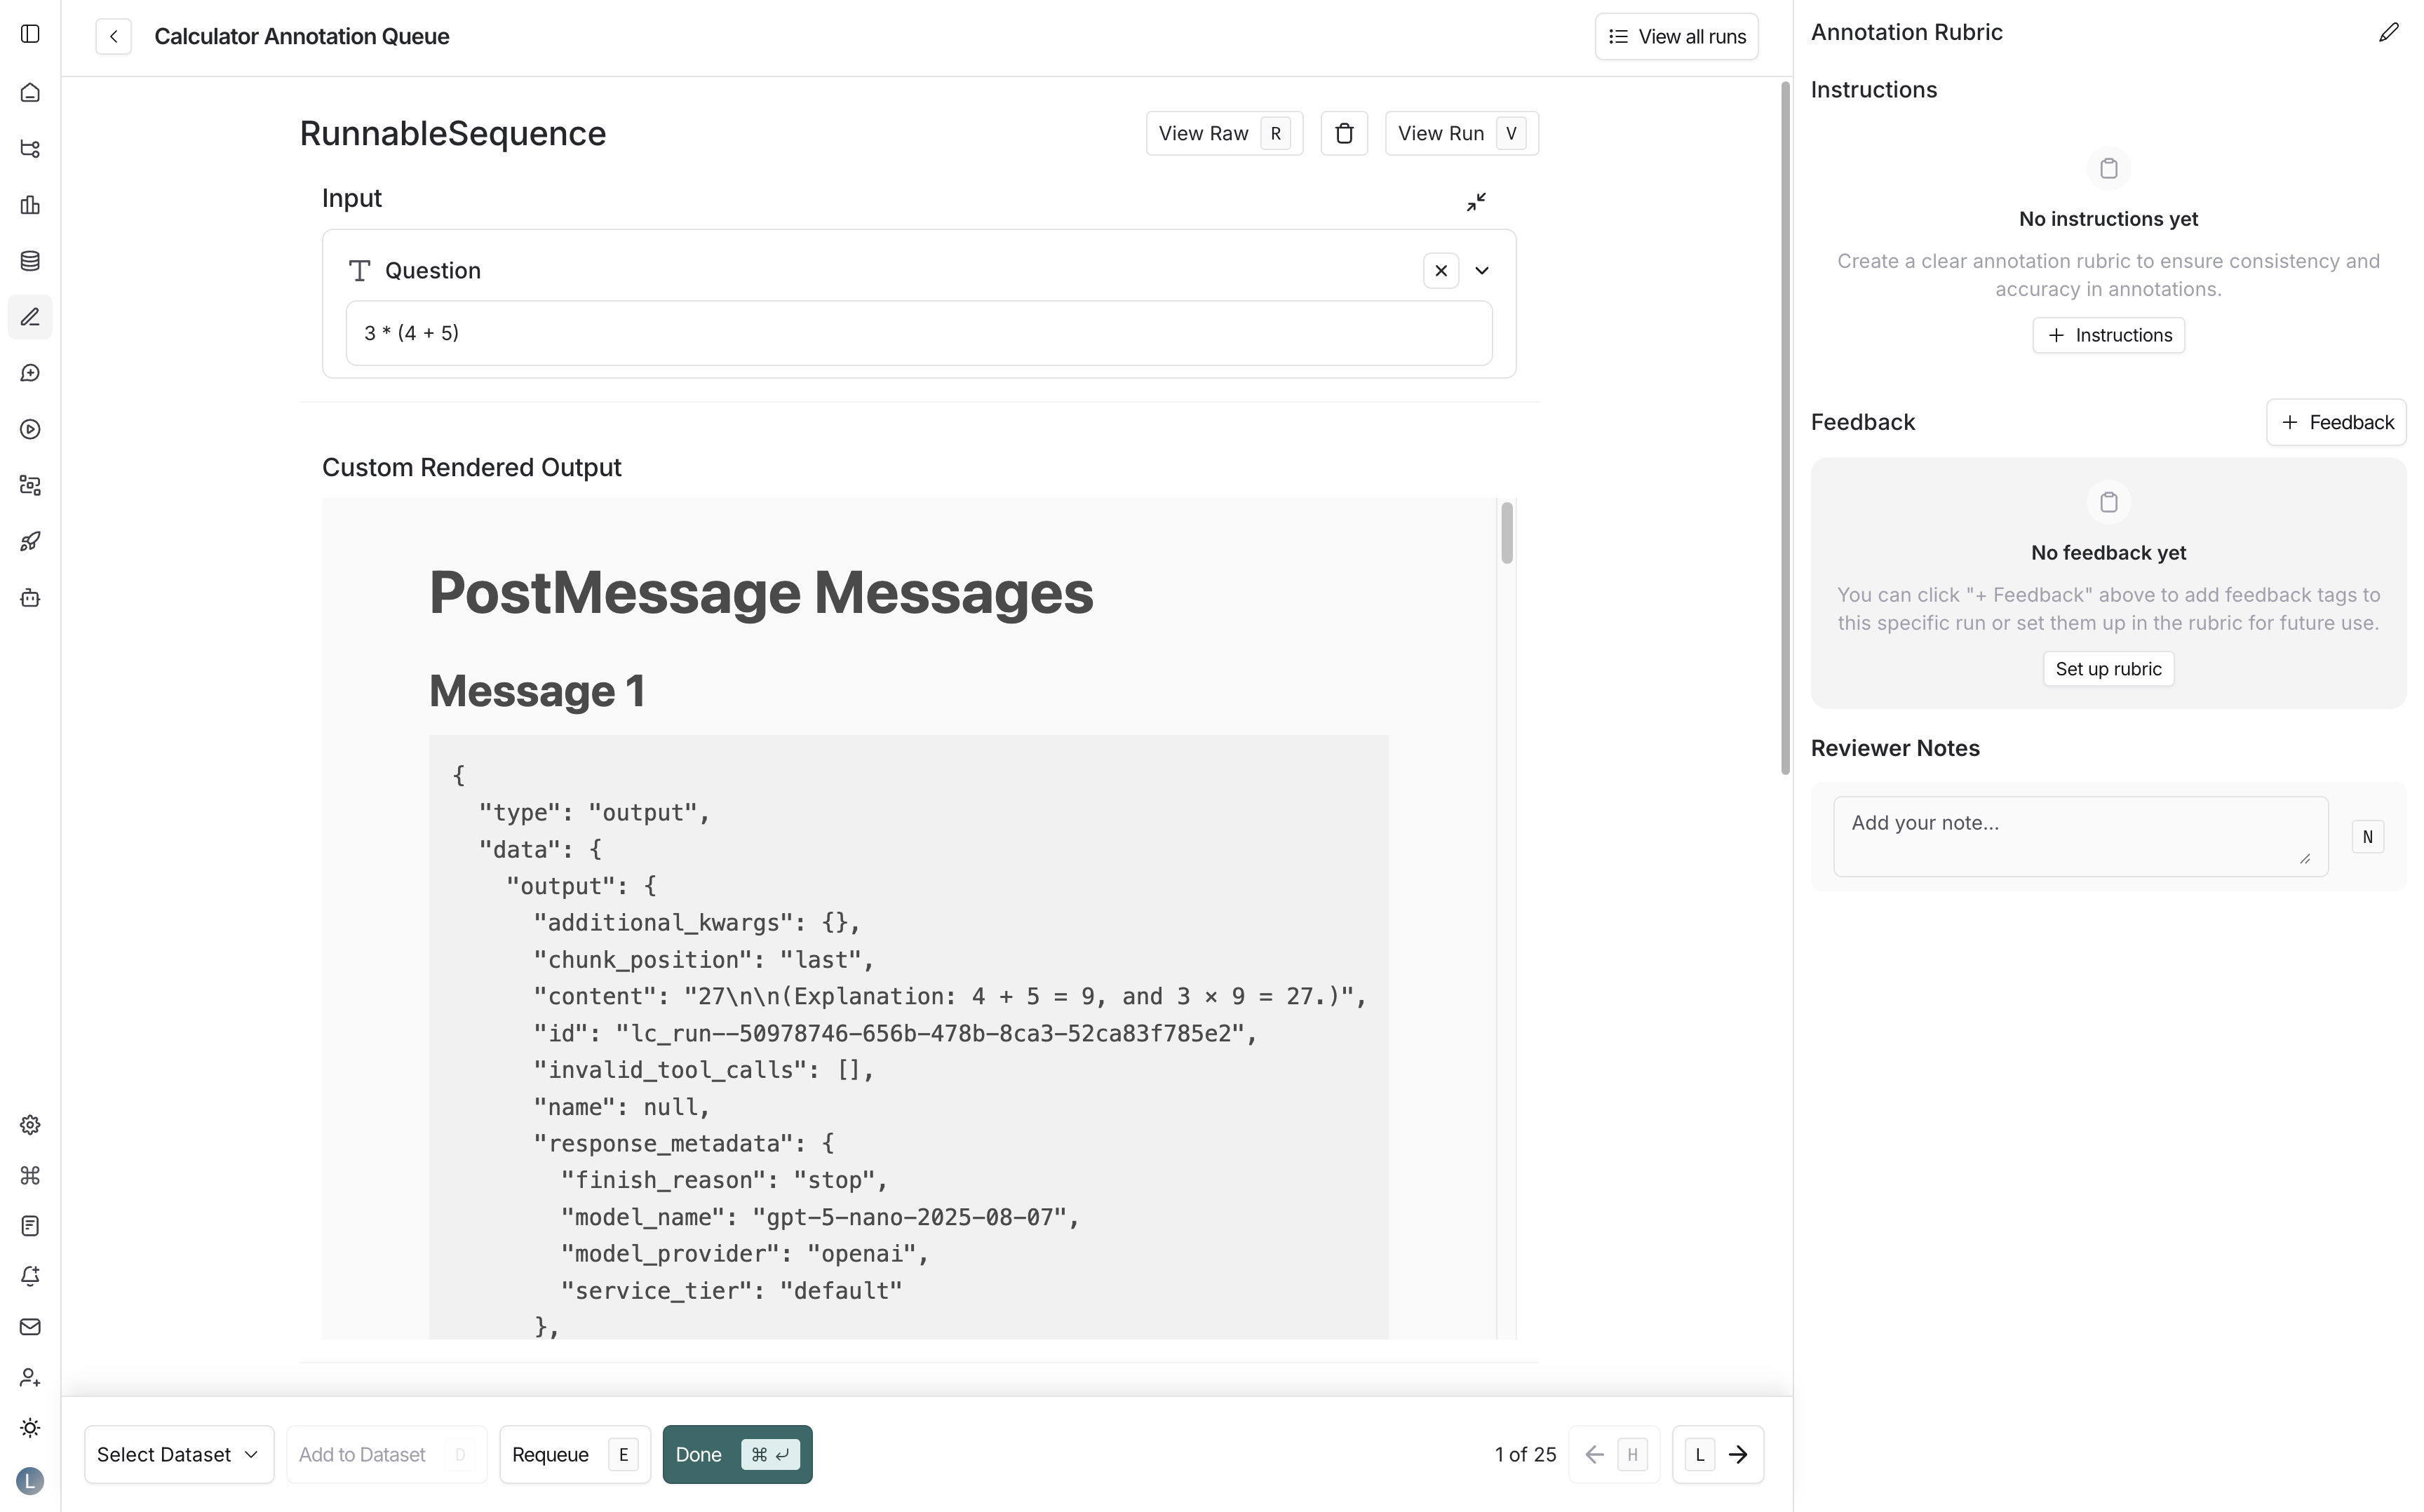
 For example, with the descriptions in the previous screenshot, reviewers will see the **Annotation Rubric** details in the right-hand pane of the UI.
 ### Collaborator Settings
When there are multiple annotators for a run:
* **Number of reviewers per run**: This determines the number of reviewers that must mark a run as **Done** for it to be removed from the queue. If you check **All workspace members review each run**, then a run will remain in the queue until all [workspace](/langsmith/administration-overview#workspaces) members have marked their review as **Done**.
* Reviewers cannot view the feedback left by other reviewers.
* Comments on runs are visible to all reviewers.
* **Enable reservations on runs**: When a reviewer views a run, the run is reserved for that reviewer for the specified **Reservation length**. If there are multiple reviewers per run as specified above, the run can be reserved by multiple reviewers (up to the number of reviewers per run) at the same time.
### Collaborator Settings
When there are multiple annotators for a run:
* **Number of reviewers per run**: This determines the number of reviewers that must mark a run as **Done** for it to be removed from the queue. If you check **All workspace members review each run**, then a run will remain in the queue until all [workspace](/langsmith/administration-overview#workspaces) members have marked their review as **Done**.
* Reviewers cannot view the feedback left by other reviewers.
* Comments on runs are visible to all reviewers.
* **Enable reservations on runs**: When a reviewer views a run, the run is reserved for that reviewer for the specified **Reservation length**. If there are multiple reviewers per run as specified above, the run can be reserved by multiple reviewers (up to the number of reviewers per run) at the same time.
 * Select multiple runs in the runs table then click **Add to Annotation Queue** at the bottom of the page.
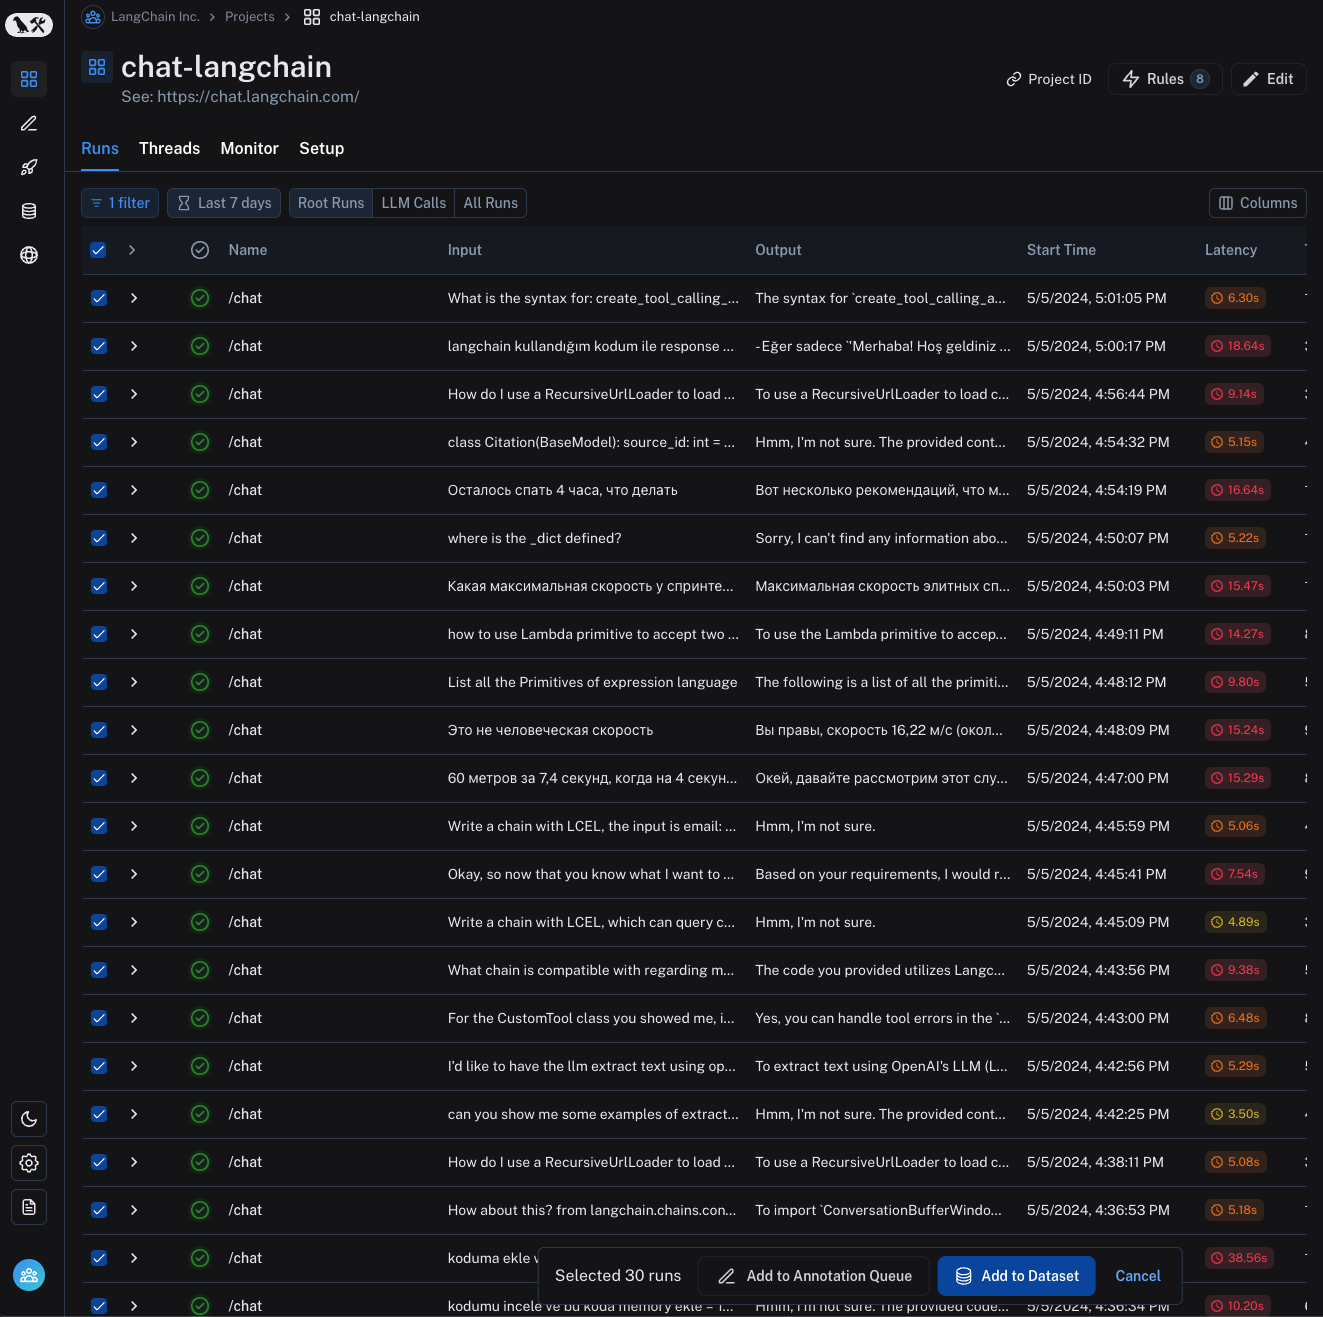 * [Set up an automation rule](/langsmith/rules) that automatically assigns runs that pass a certain filter and sampling condition to an annotation queue.
* Navigate to the **Datasets & Experiments** page and select a dataset. On the dataset's page select one or multiple [experiments](/langsmith/evaluation-concepts#experiment). At the bottom of the page, click **
* [Set up an automation rule](/langsmith/rules) that automatically assigns runs that pass a certain filter and sampling condition to an annotation queue.
* Navigate to the **Datasets & Experiments** page and select a dataset. On the dataset's page select one or multiple [experiments](/langsmith/evaluation-concepts#experiment). At the bottom of the page, click **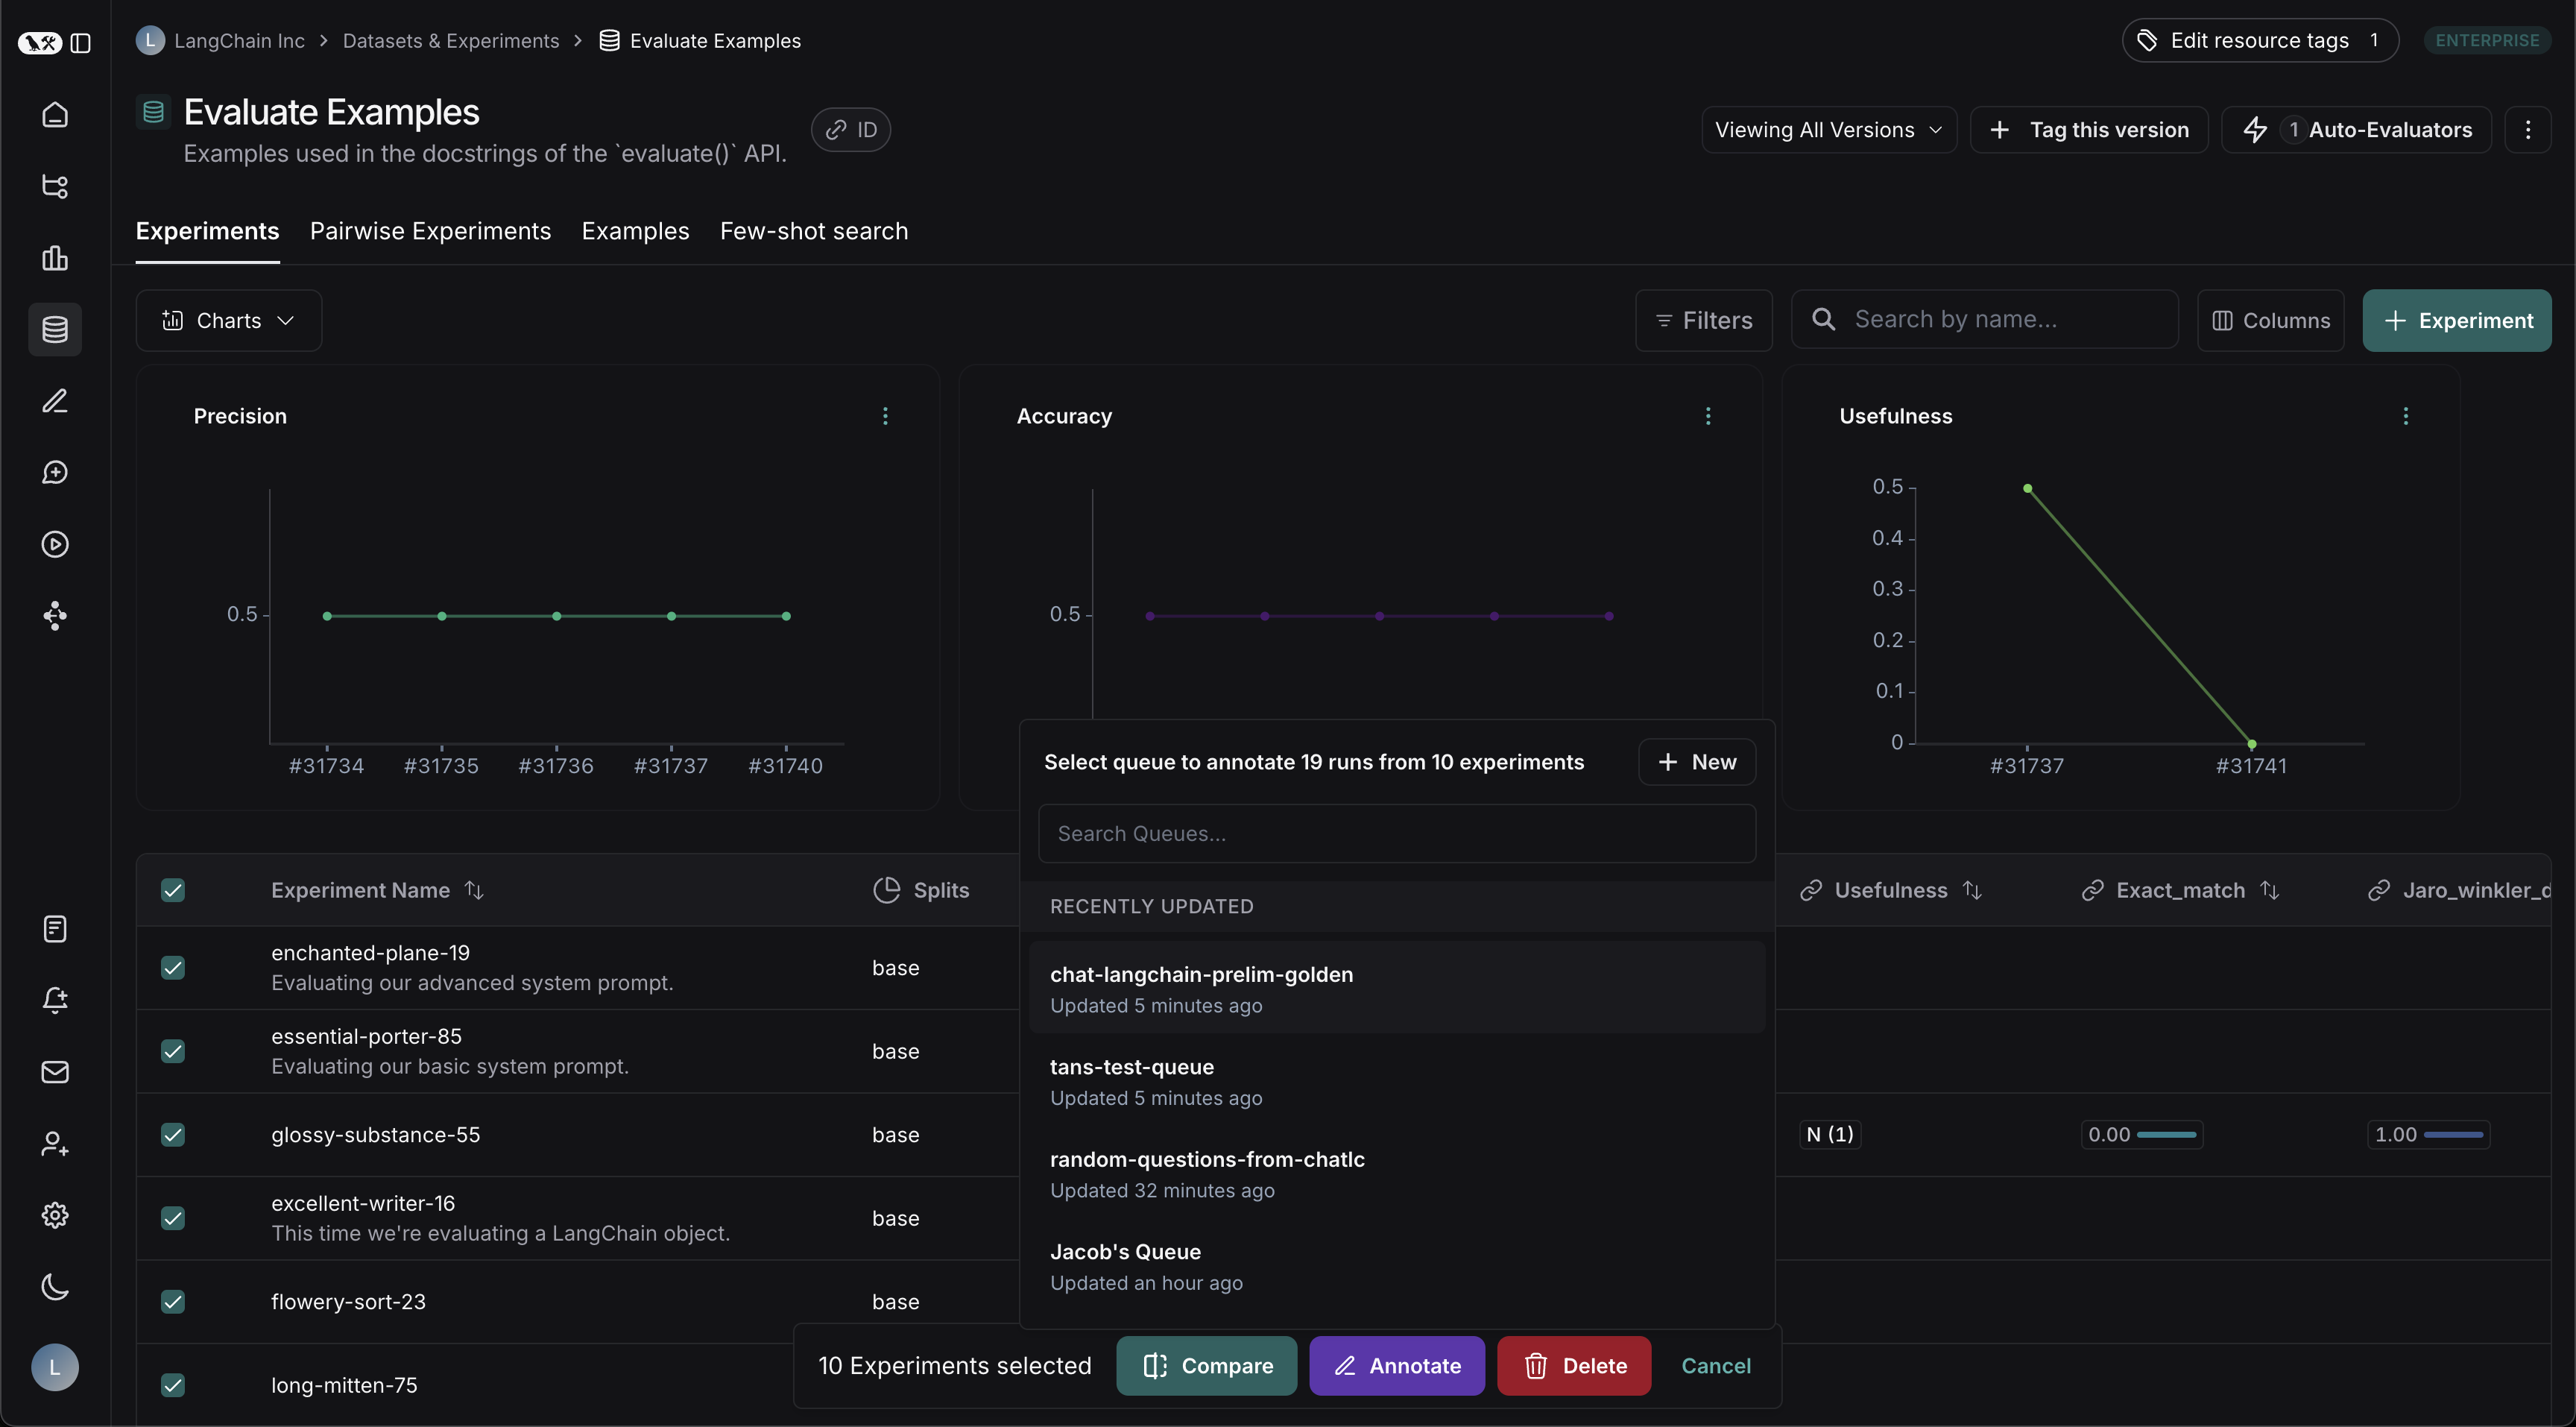
 ## Video guide
***
## Video guide
***
 The LangGraph API provides several endpoints for creating and managing assistants and their versions. See the [API reference](https://langchain-ai.github.io/langgraph/cloud/reference/api/api_ref/#tag/assistants) for more details.
 ## In the runs table
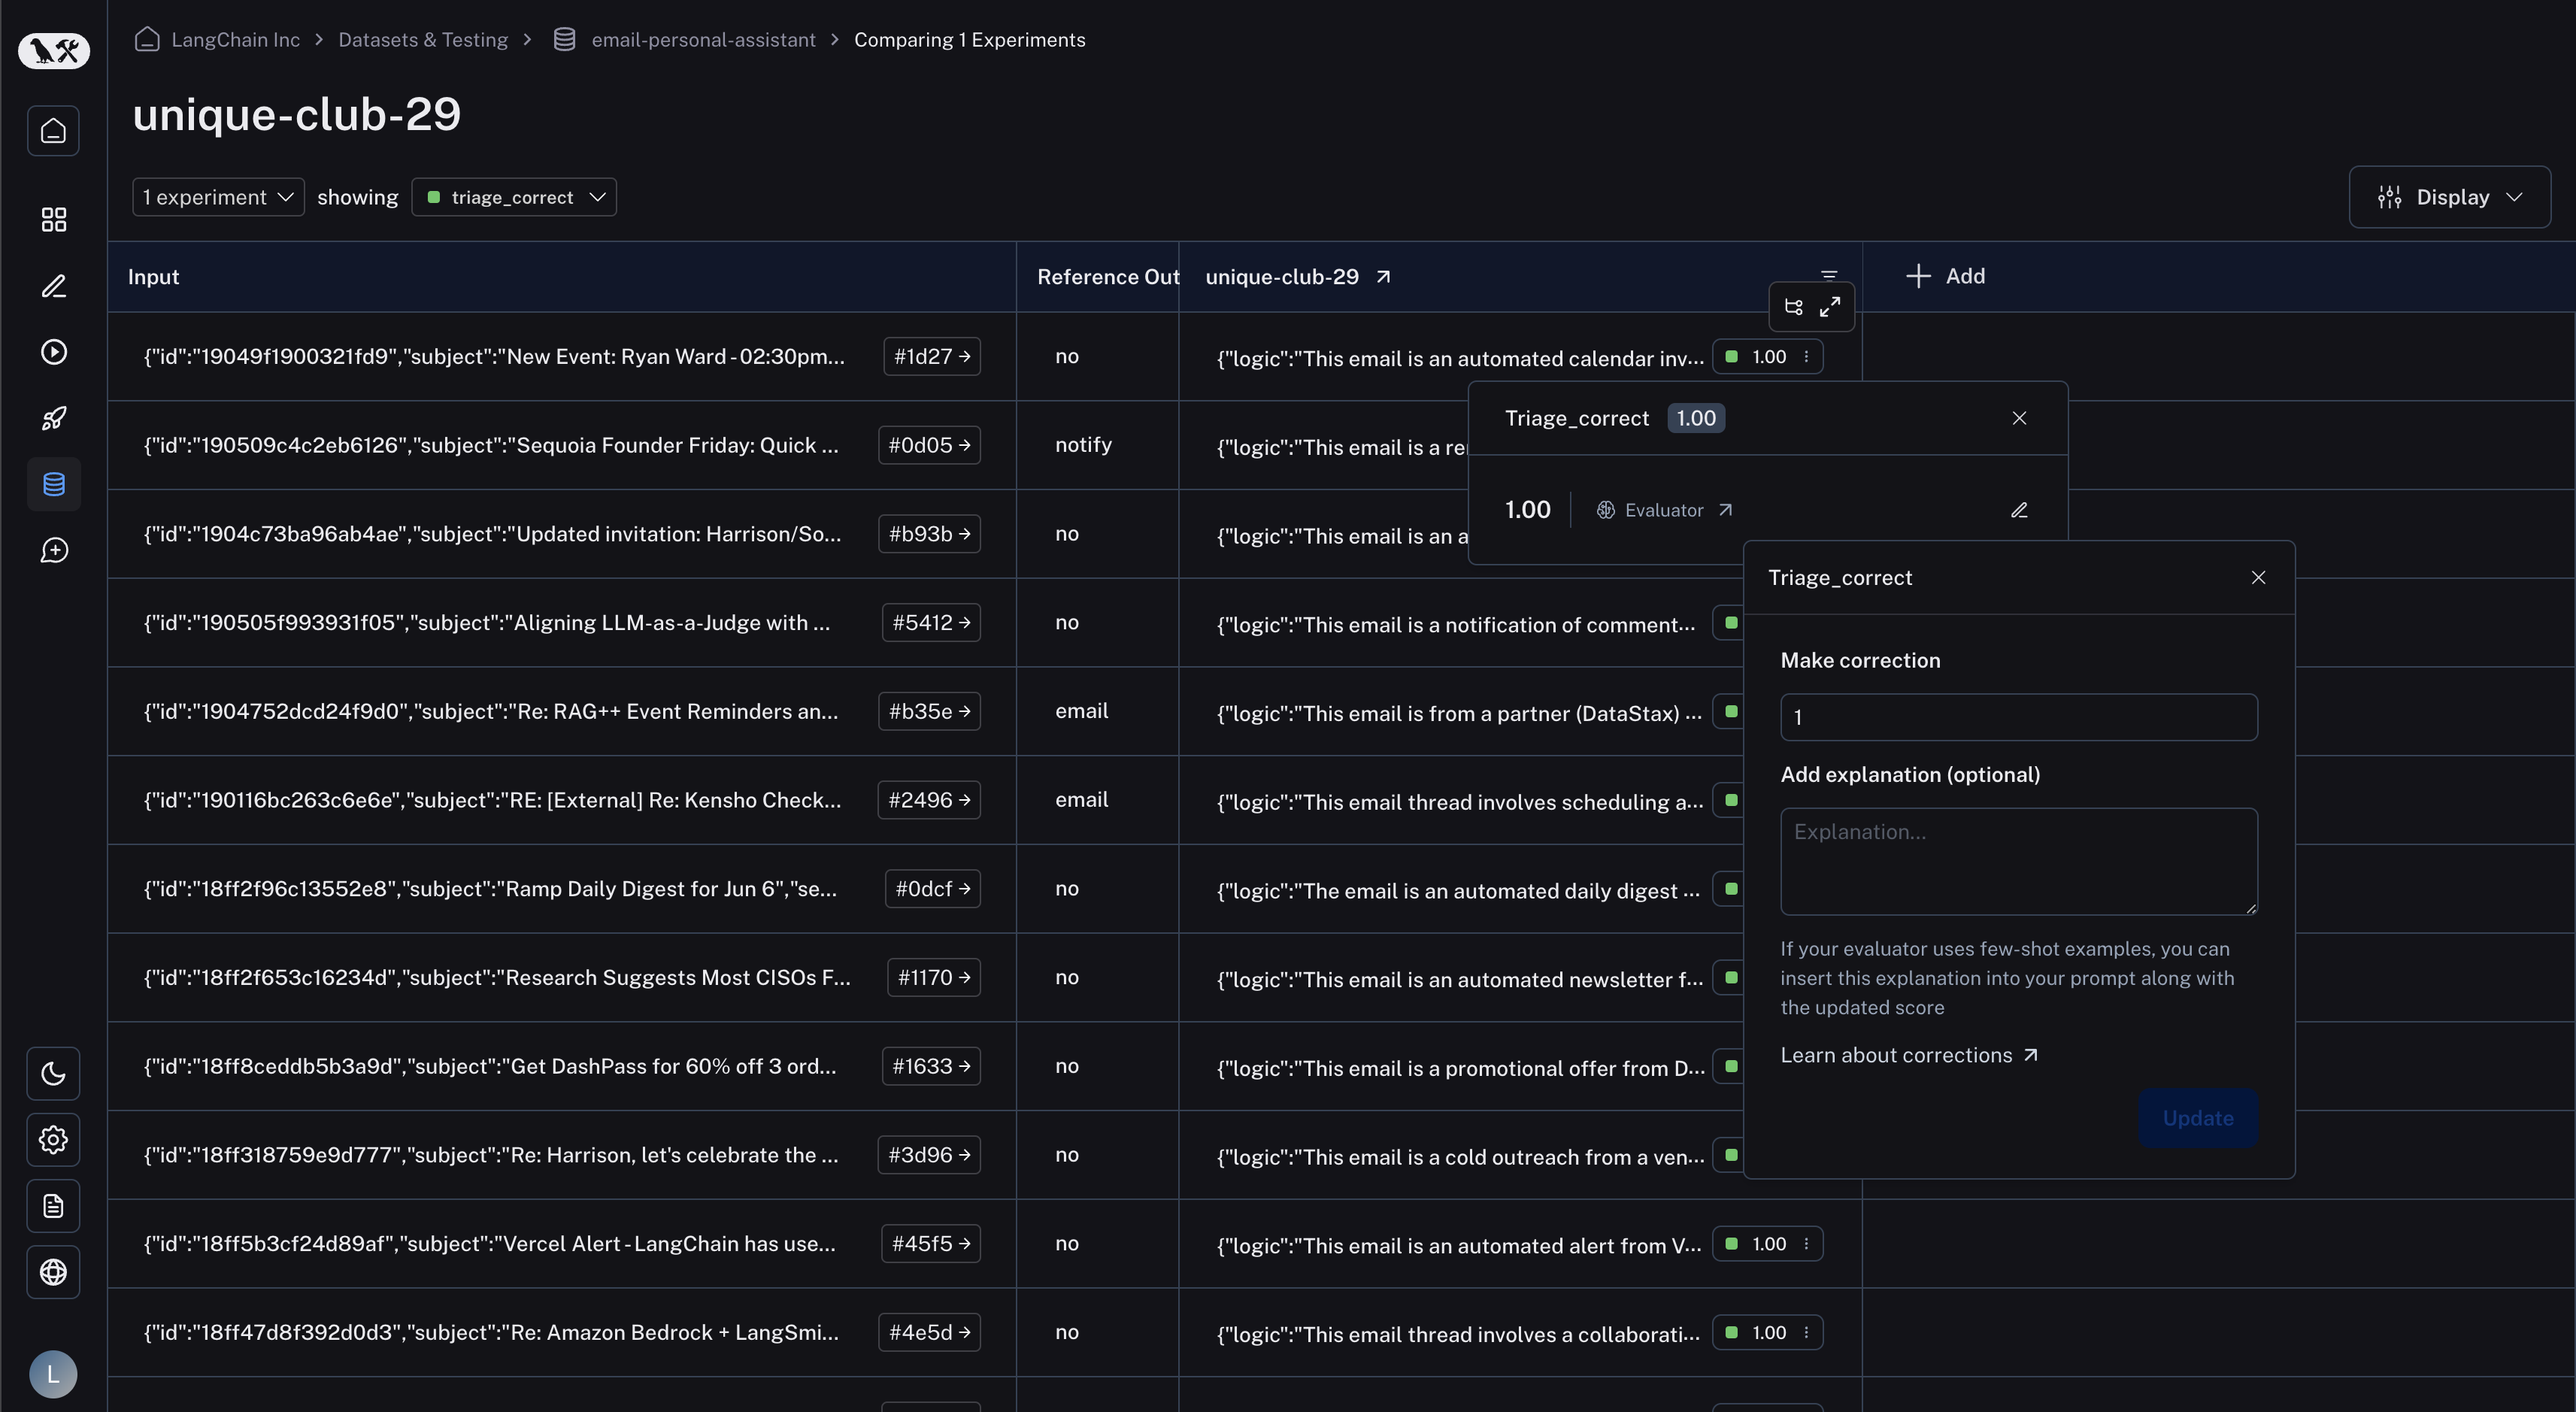
In the runs table, find the "Feedback" column and click on the feedback tag to bring up the feedback details. Again, click the "edit" icon on the right to bring up the corrections view.
## In the runs table
In the runs table, find the "Feedback" column and click on the feedback tag to bring up the feedback details. Again, click the "edit" icon on the right to bring up the corrections view.
 ## In the SDK
Corrections can be made via the SDK's `update_feedback` function, with the `correction` dict. You must specify a `score` key which corresponds to a number for it to be rendered in the UI.
## In the SDK
Corrections can be made via the SDK's `update_feedback` function, with the `correction` dict. You must specify a `score` key which corresponds to a number for it to be rendered in the UI.
 ## 3. Test the graph locally
Before deploying to LangSmith, you can test the graph locally:
```python {highlight={2,13}} theme={null}
# pass the thread ID to persist agent outputs for future interactions
config = {"configurable": {"thread_id": "1"}}
for chunk in graph.stream(
{
"messages": [
{
"role": "user",
"content": "Find numbers between 10 and 30 in fibonacci sequence",
}
]
},
config,
):
print(chunk)
```
**Output:**
```
user_proxy (to assistant):
Find numbers between 10 and 30 in fibonacci sequence
--------------------------------------------------------------------------------
assistant (to user_proxy):
To find numbers between 10 and 30 in the Fibonacci sequence, we can generate the Fibonacci sequence and check which numbers fall within this range. Here's a plan:
1. Generate Fibonacci numbers starting from 0.
2. Continue generating until the numbers exceed 30.
3. Collect and print the numbers that are between 10 and 30.
...
```
Since we're leveraging LangGraph's [persistence](/oss/python/langgraph/persistence) features we can now continue the conversation using the same thread ID -- LangGraph will automatically pass previous history to the AutoGen agent:
```python {highlight={10}} theme={null}
for chunk in graph.stream(
{
"messages": [
{
"role": "user",
"content": "Multiply the last number by 3",
}
]
},
config,
):
print(chunk)
```
**Output:**
```
user_proxy (to assistant):
Multiply the last number by 3
Context:
Find numbers between 10 and 30 in fibonacci sequence
The Fibonacci numbers between 10 and 30 are 13 and 21.
These numbers are part of the Fibonacci sequence, which is generated by adding the two preceding numbers to get the next number, starting from 0 and 1.
The sequence goes: 0, 1, 1, 2, 3, 5, 8, 13, 21, 34, ...
As you can see, 13 and 21 are the only numbers in this sequence that fall between 10 and 30.
TERMINATE
--------------------------------------------------------------------------------
assistant (to user_proxy):
The last number in the Fibonacci sequence between 10 and 30 is 21. Multiplying 21 by 3 gives:
21 * 3 = 63
TERMINATE
--------------------------------------------------------------------------------
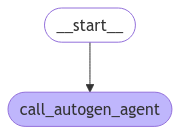
{'call_autogen_agent': {'messages': {'role': 'assistant', 'content': 'The last number in the Fibonacci sequence between 10 and 30 is 21. Multiplying 21 by 3 gives:\n\n21 * 3 = 63\n\nTERMINATE'}}}
```
## 4. Prepare for deployment
To deploy to LangSmith, create a file structure like the following:
```
my-autogen-agent/
├── agent.py # Your main agent code
├── requirements.txt # Python dependencies
└── langgraph.json # LangGraph configuration
```
## 3. Test the graph locally
Before deploying to LangSmith, you can test the graph locally:
```python {highlight={2,13}} theme={null}
# pass the thread ID to persist agent outputs for future interactions
config = {"configurable": {"thread_id": "1"}}
for chunk in graph.stream(
{
"messages": [
{
"role": "user",
"content": "Find numbers between 10 and 30 in fibonacci sequence",
}
]
},
config,
):
print(chunk)
```
**Output:**
```
user_proxy (to assistant):
Find numbers between 10 and 30 in fibonacci sequence
--------------------------------------------------------------------------------
assistant (to user_proxy):
To find numbers between 10 and 30 in the Fibonacci sequence, we can generate the Fibonacci sequence and check which numbers fall within this range. Here's a plan:
1. Generate Fibonacci numbers starting from 0.
2. Continue generating until the numbers exceed 30.
3. Collect and print the numbers that are between 10 and 30.
...
```
Since we're leveraging LangGraph's [persistence](/oss/python/langgraph/persistence) features we can now continue the conversation using the same thread ID -- LangGraph will automatically pass previous history to the AutoGen agent:
```python {highlight={10}} theme={null}
for chunk in graph.stream(
{
"messages": [
{
"role": "user",
"content": "Multiply the last number by 3",
}
]
},
config,
):
print(chunk)
```
**Output:**
```
user_proxy (to assistant):
Multiply the last number by 3
Context:
Find numbers between 10 and 30 in fibonacci sequence
The Fibonacci numbers between 10 and 30 are 13 and 21.
These numbers are part of the Fibonacci sequence, which is generated by adding the two preceding numbers to get the next number, starting from 0 and 1.
The sequence goes: 0, 1, 1, 2, 3, 5, 8, 13, 21, 34, ...
As you can see, 13 and 21 are the only numbers in this sequence that fall between 10 and 30.
TERMINATE
--------------------------------------------------------------------------------
assistant (to user_proxy):
The last number in the Fibonacci sequence between 10 and 30 is 21. Multiplying 21 by 3 gives:
21 * 3 = 63
TERMINATE
--------------------------------------------------------------------------------
{'call_autogen_agent': {'messages': {'role': 'assistant', 'content': 'The last number in the Fibonacci sequence between 10 and 30 is 21. Multiplying 21 by 3 gives:\n\n21 * 3 = 63\n\nTERMINATE'}}}
```
## 4. Prepare for deployment
To deploy to LangSmith, create a file structure like the following:
```
my-autogen-agent/
├── agent.py # Your main agent code
├── requirements.txt # Python dependencies
└── langgraph.json # LangGraph configuration
```
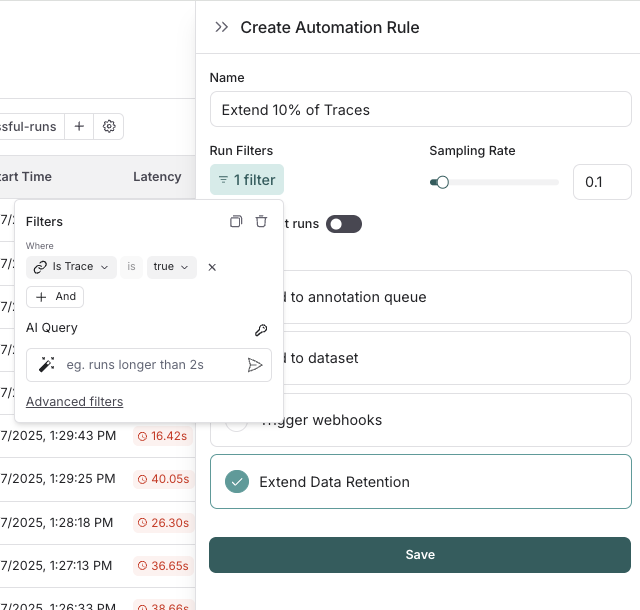
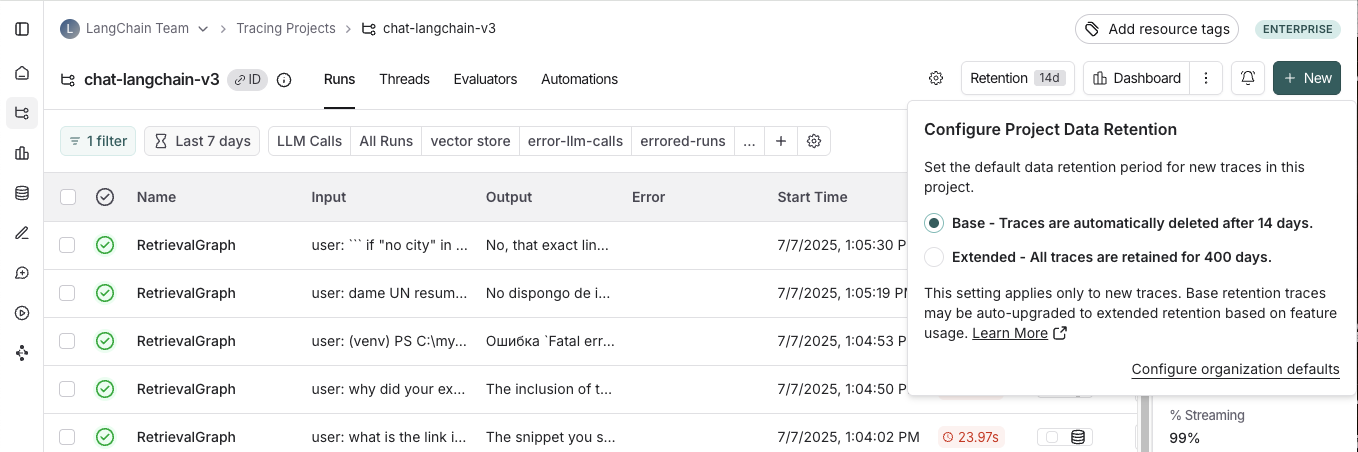 #### Apply extended data retention to a percentage of traces
You may not want all traces to expire after 14 days. You can automatically extend the retention of traces that match some criteria by creating an [automation rule](/langsmith/rules). You might want to apply extended data retention to specific types of traces, such as:
* 10% of all traces: For general analysis or analyzing trends long term.
* Errored traces: To investigate and debug issues thoroughly.
* Traces with specific metadata: For long-term examination of particular features or user flows.
To configure this:
1. Navigate to **Projects** > ***Your project name*** > Select **+ New** > Select **New Automation**.
2. Name your rule and optionally apply filters or a sample rate. For more information on configuring filters, refer to [filtering techniques](/langsmith/filter-traces-in-application#filter-operators).
#### Apply extended data retention to a percentage of traces
You may not want all traces to expire after 14 days. You can automatically extend the retention of traces that match some criteria by creating an [automation rule](/langsmith/rules). You might want to apply extended data retention to specific types of traces, such as:
* 10% of all traces: For general analysis or analyzing trends long term.
* Errored traces: To investigate and debug issues thoroughly.
* Traces with specific metadata: For long-term examination of particular features or user flows.
To configure this:
1. Navigate to **Projects** > ***Your project name*** > Select **+ New** > Select **New Automation**.
2. Name your rule and optionally apply filters or a sample rate. For more information on configuring filters, refer to [filtering techniques](/langsmith/filter-traces-in-application#filter-operators).
 If you want to keep a subset of traces for **longer than 400 days** for data collection purposes, you can create another run rule that sends some runs to a dataset of your choosing. A dataset allows you to store the trace inputs and outputs (e.g., as a key-value dataset), and will persist indefinitely, even after the trace gets deleted.
### Summary
If you have questions about further managing your spend, please reach out to [support@langchain.dev](mailto:support@langchain.dev).
***
If you want to keep a subset of traces for **longer than 400 days** for data collection purposes, you can create another run rule that sends some runs to a dataset of your choosing. A dataset allows you to store the trace inputs and outputs (e.g., as a key-value dataset), and will persist indefinitely, even after the trace gets deleted.
### Summary
If you have questions about further managing your spend, please reach out to [support@langchain.dev](mailto:support@langchain.dev).
***
 * **Testing and evaluation workflow**: In addition to the more traditional testing phases (unit tests, integration tests, end-to-end tests, etc.), the pipeline includes [offline evaluations](/langsmith/evaluation-concepts#offline-evaluation) and [Agent dev server testing](/langsmith/local-server) because you want to test the quality of your agent. These evaluations provide comprehensive assessment of the agent's performance using real-world scenarios and data.

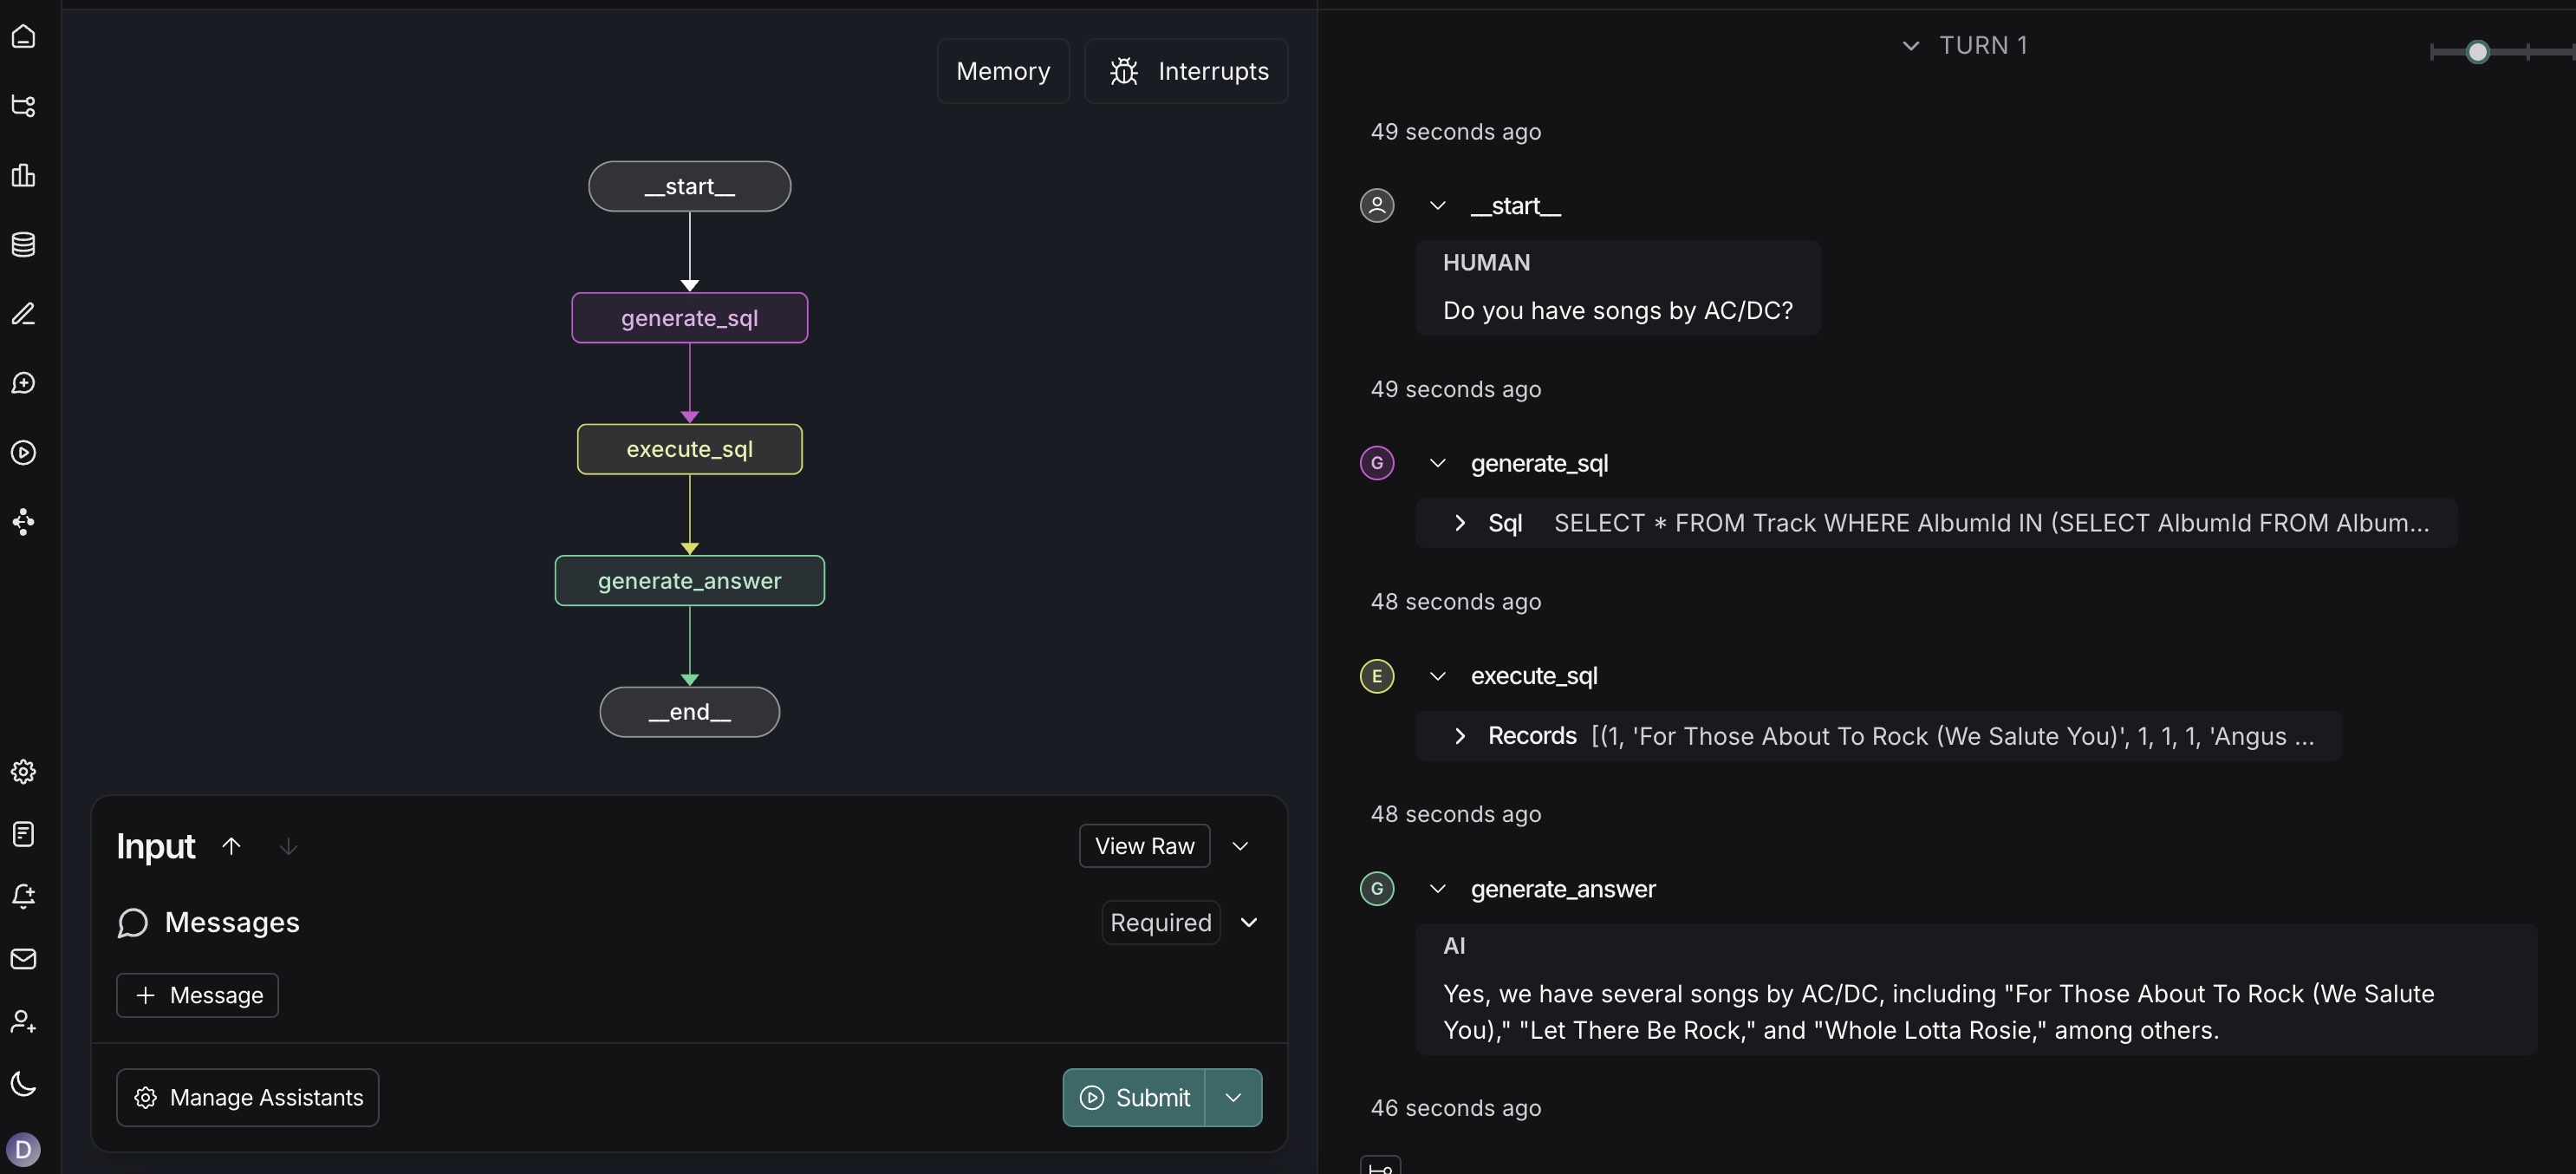 First, test your agent locally using [Studio](/langsmith/studio):
```bash theme={null}
# Start local development server with Studio
langgraph dev
```
This will:
* Spin up a local server with Studio.
* Allow you to visualize and interact with your graph.
* Validate that your agent works correctly before deployment.
First, test your agent locally using [Studio](/langsmith/studio):
```bash theme={null}
# Start local development server with Studio
langgraph dev
```
This will:
* Spin up a local server with Studio.
* Allow you to visualize and interact with your graph.
* Validate that your agent works correctly before deployment.
true : Keep all three tools (skip uninstall).false / omitted : Uninstall all three tools (default behaviour).list\[str] : Names of tools to retain. Each value must be one of "pip", "setuptools", "wheel".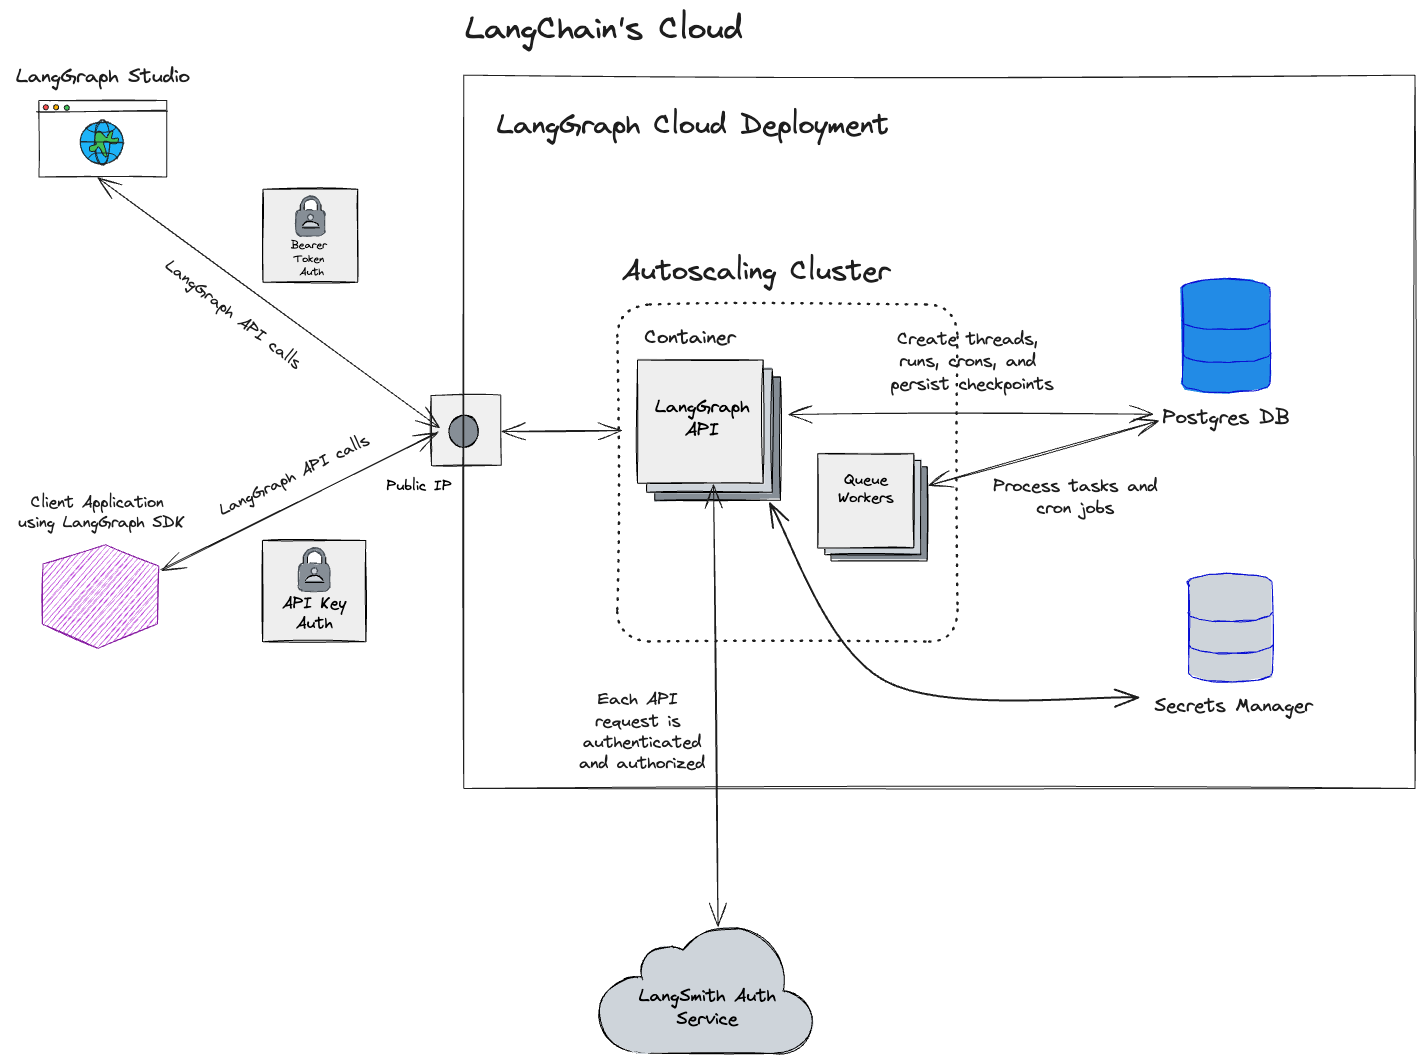 ## Get started
To deploy your first application to Cloud, follow the [Cloud deployment quickstart](/langsmith/deployment-quickstart) or refer to the [comprehensive setup guide](/langsmith/deploy-to-cloud).
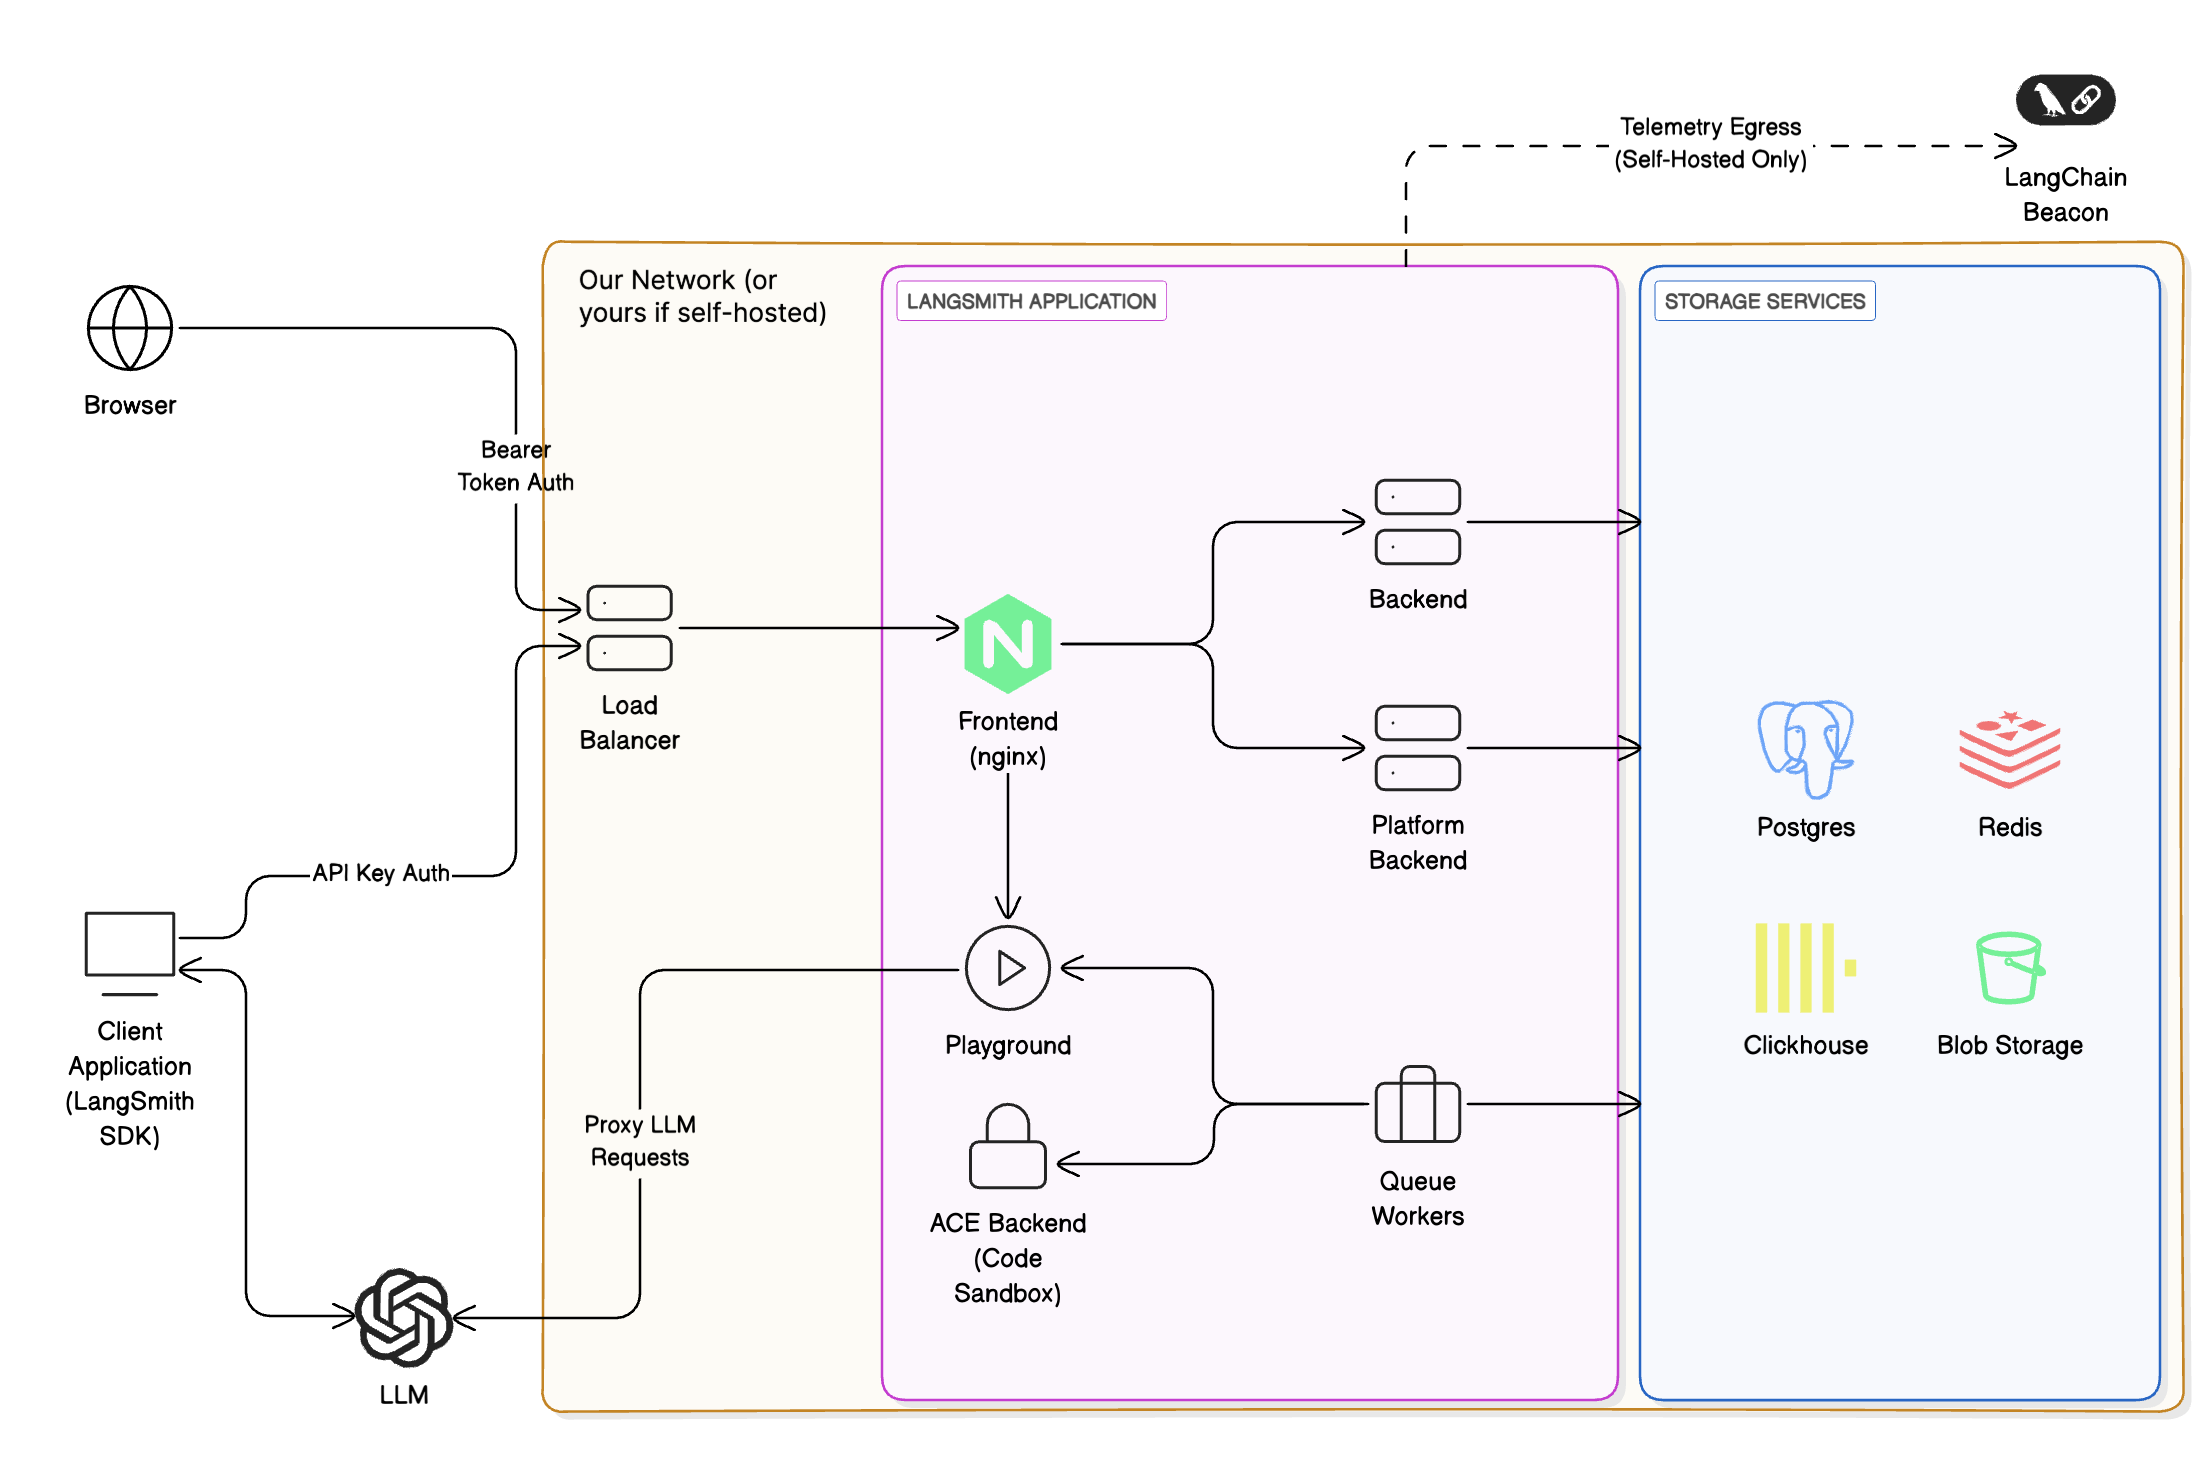
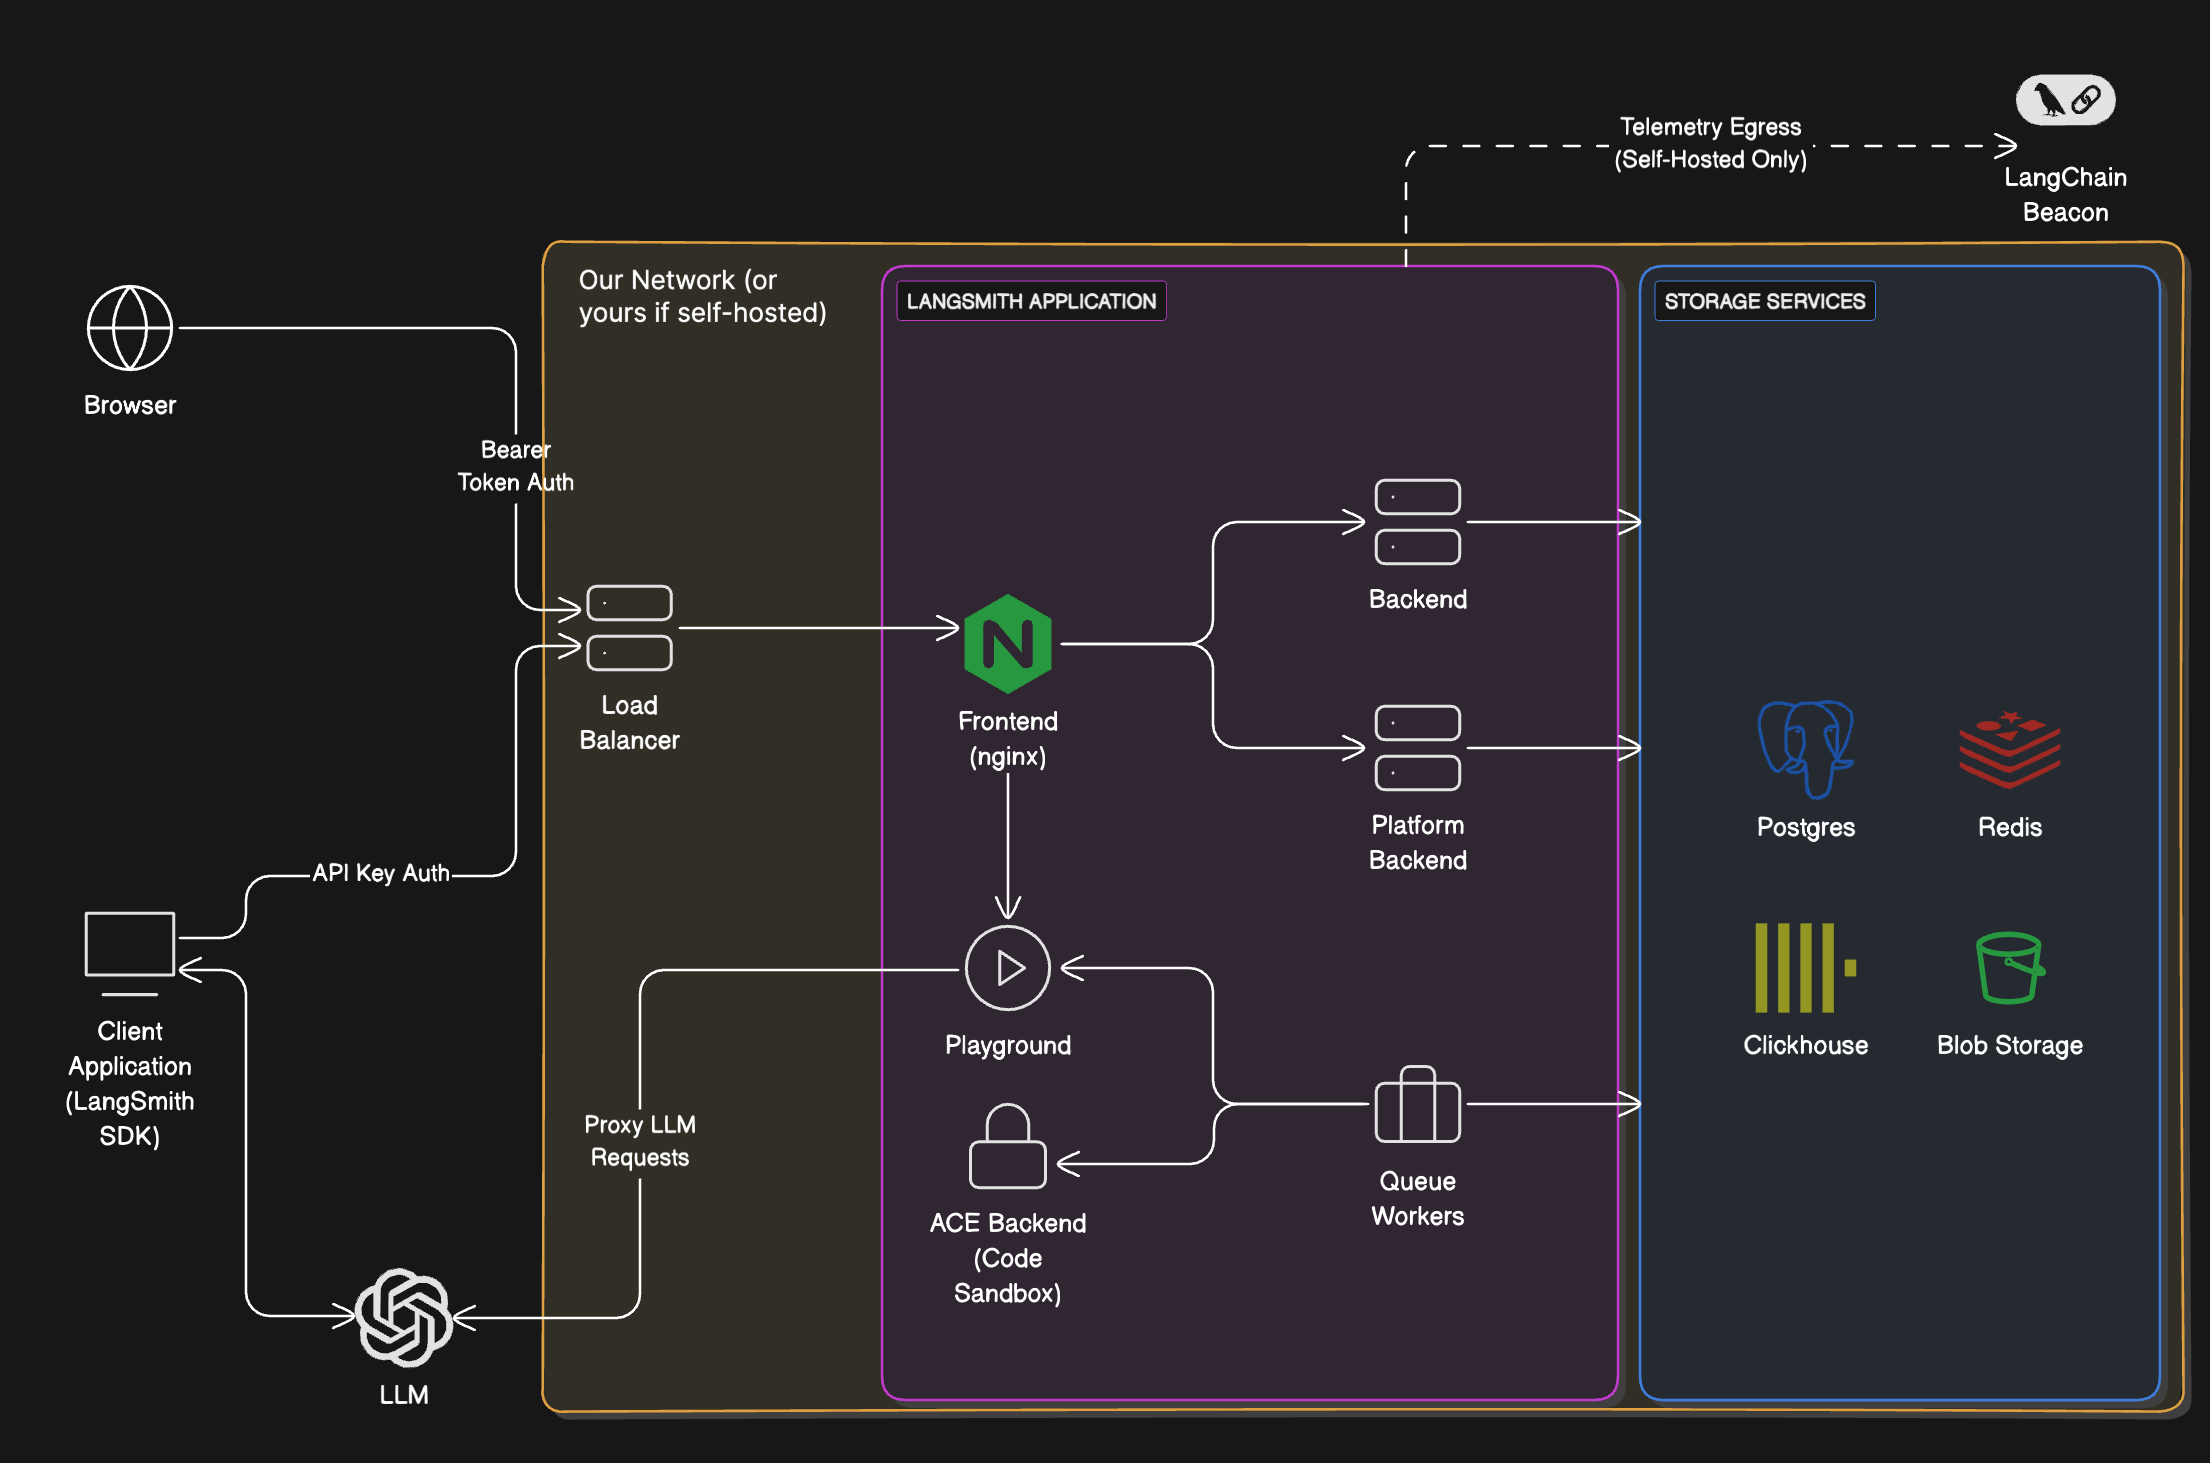
## Cloud architecture and scalability
## Get started
To deploy your first application to Cloud, follow the [Cloud deployment quickstart](/langsmith/deployment-quickstart) or refer to the [comprehensive setup guide](/langsmith/deploy-to-cloud).
## Cloud architecture and scalability
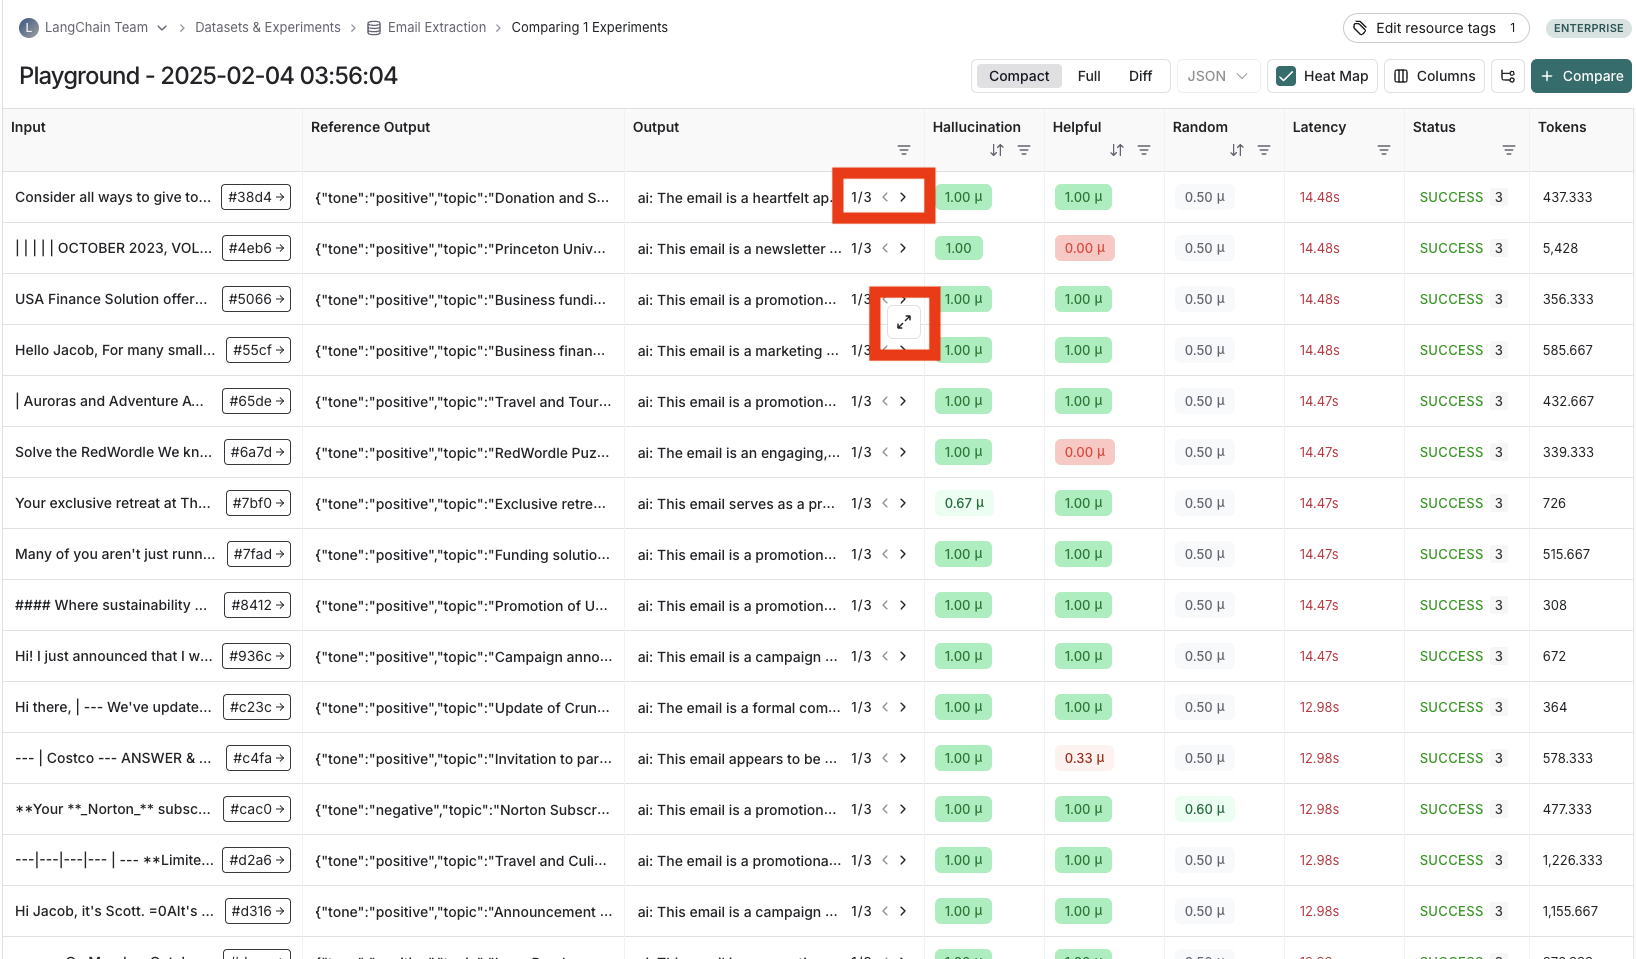
 ## Adjust the table display
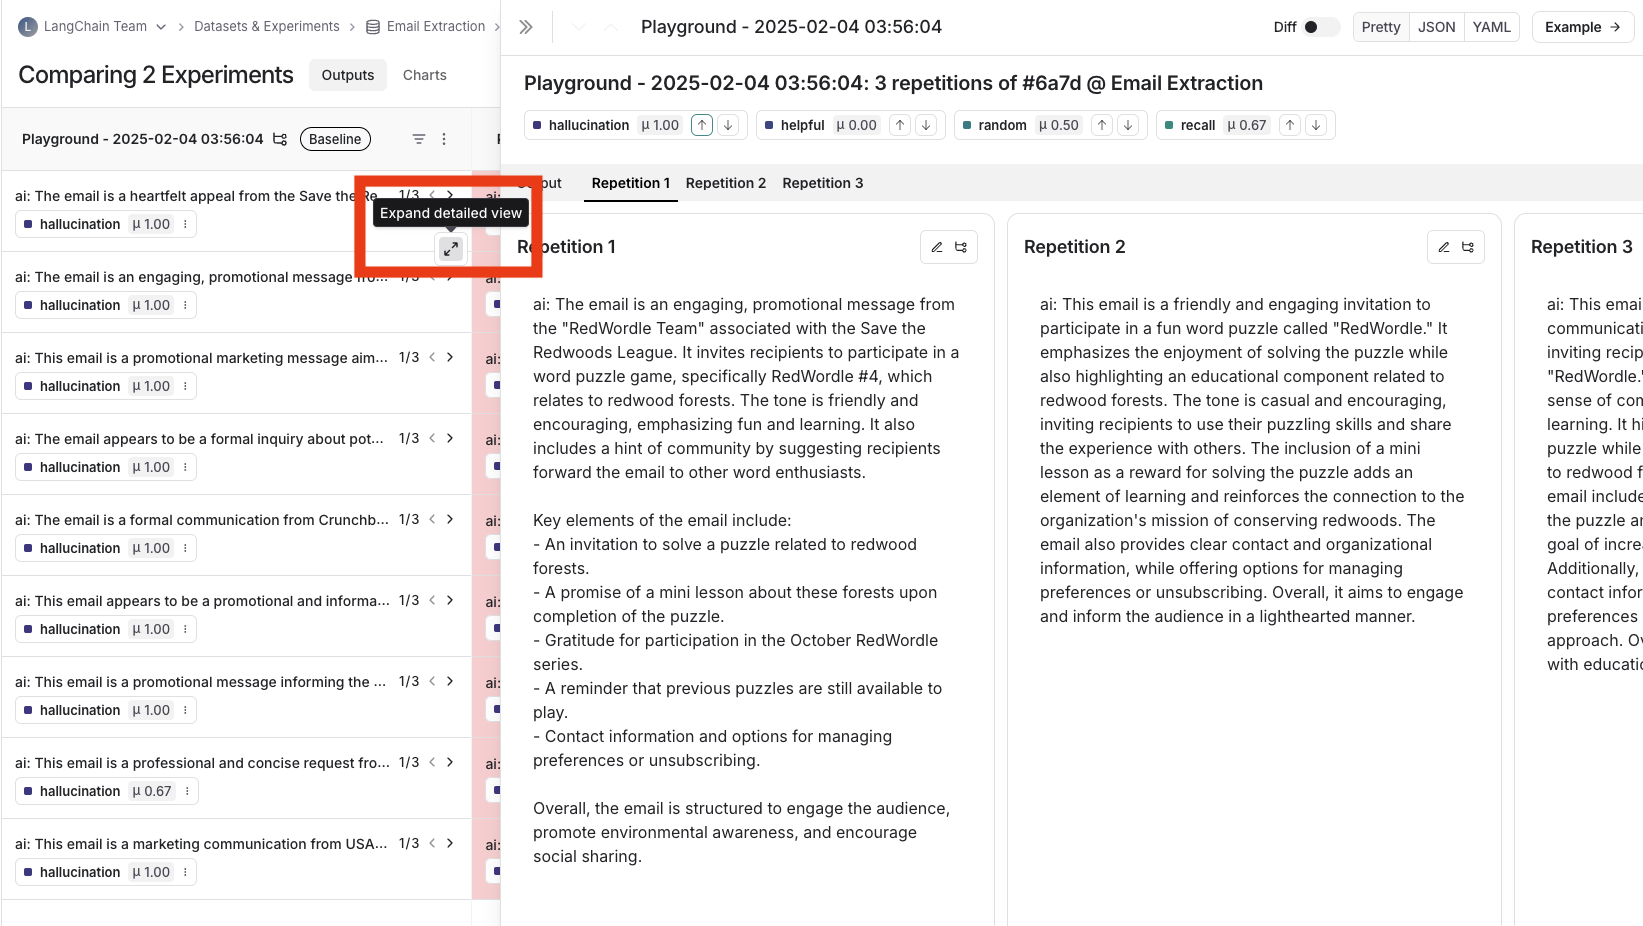
You can toggle between different views by clicking **Full** or **Compact** at the top of the **Comparing Experiments** page.
Toggling **Full** will show the full text of the input, output, and reference output for each run. If the reference output is too long to display in the table, you can click on **Expand detailed view** to view the full content.
You can also select and hide individual feedback keys or individual metrics in the **Display** settings dropdown to isolate the information you need in the comparison view.
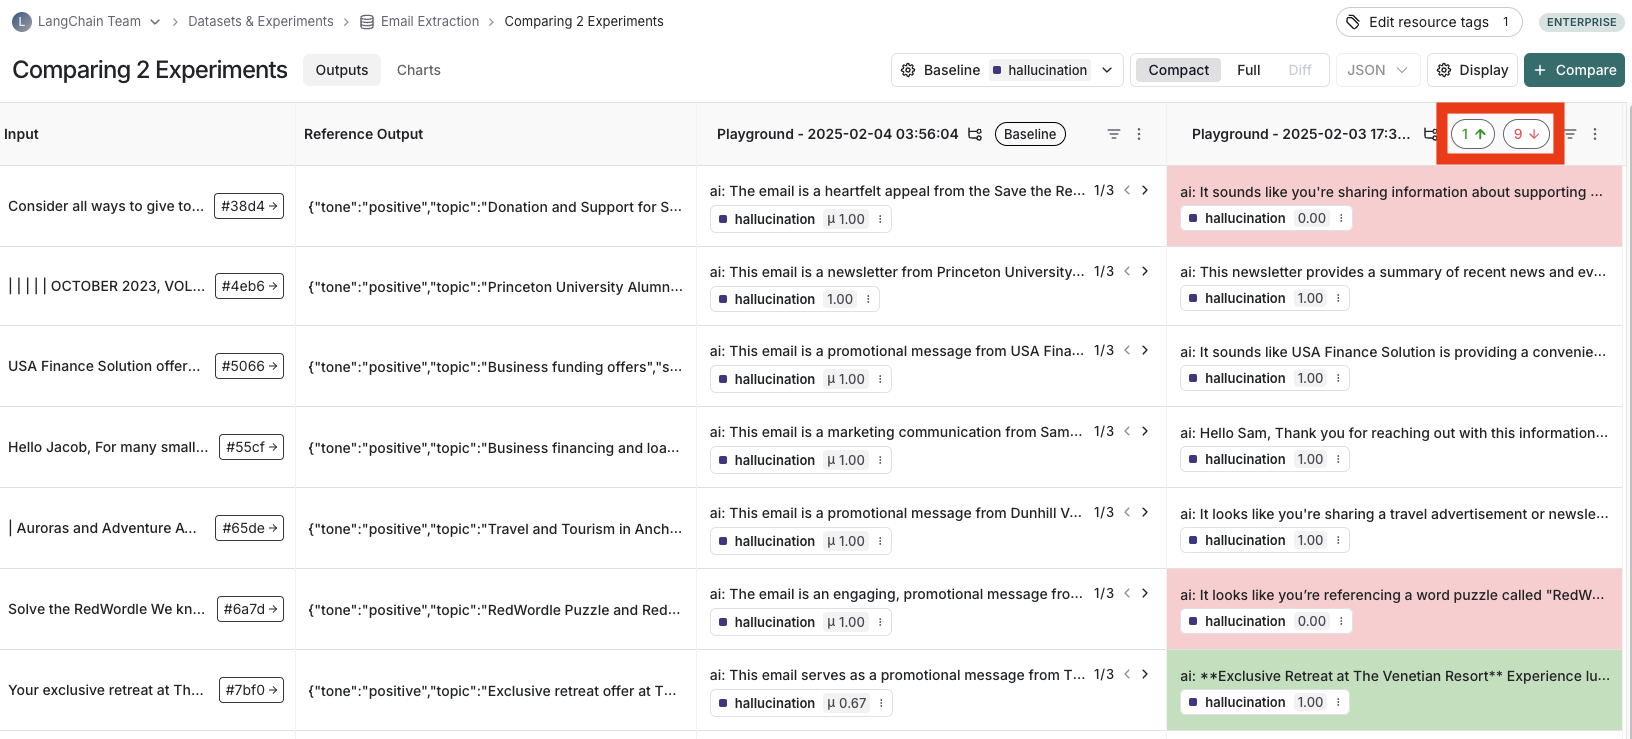
## View regressions and improvements
In the comparison view, runs that *regressed* on your specified feedback key against your baseline experiment will be highlighted in red, while runs that *improved* will be highlighted in green. At the top of each column, you can find how many runs in that experiment did better and how many did worse than your baseline experiment.
Click on the regressions or improvements buttons on the top of each column to filter to the runs that regressed or improved in that specific experiment.
## Adjust the table display
You can toggle between different views by clicking **Full** or **Compact** at the top of the **Comparing Experiments** page.
Toggling **Full** will show the full text of the input, output, and reference output for each run. If the reference output is too long to display in the table, you can click on **Expand detailed view** to view the full content.
You can also select and hide individual feedback keys or individual metrics in the **Display** settings dropdown to isolate the information you need in the comparison view.
## View regressions and improvements
In the comparison view, runs that *regressed* on your specified feedback key against your baseline experiment will be highlighted in red, while runs that *improved* will be highlighted in green. At the top of each column, you can find how many runs in that experiment did better and how many did worse than your baseline experiment.
Click on the regressions or improvements buttons on the top of each column to filter to the runs that regressed or improved in that specific experiment.
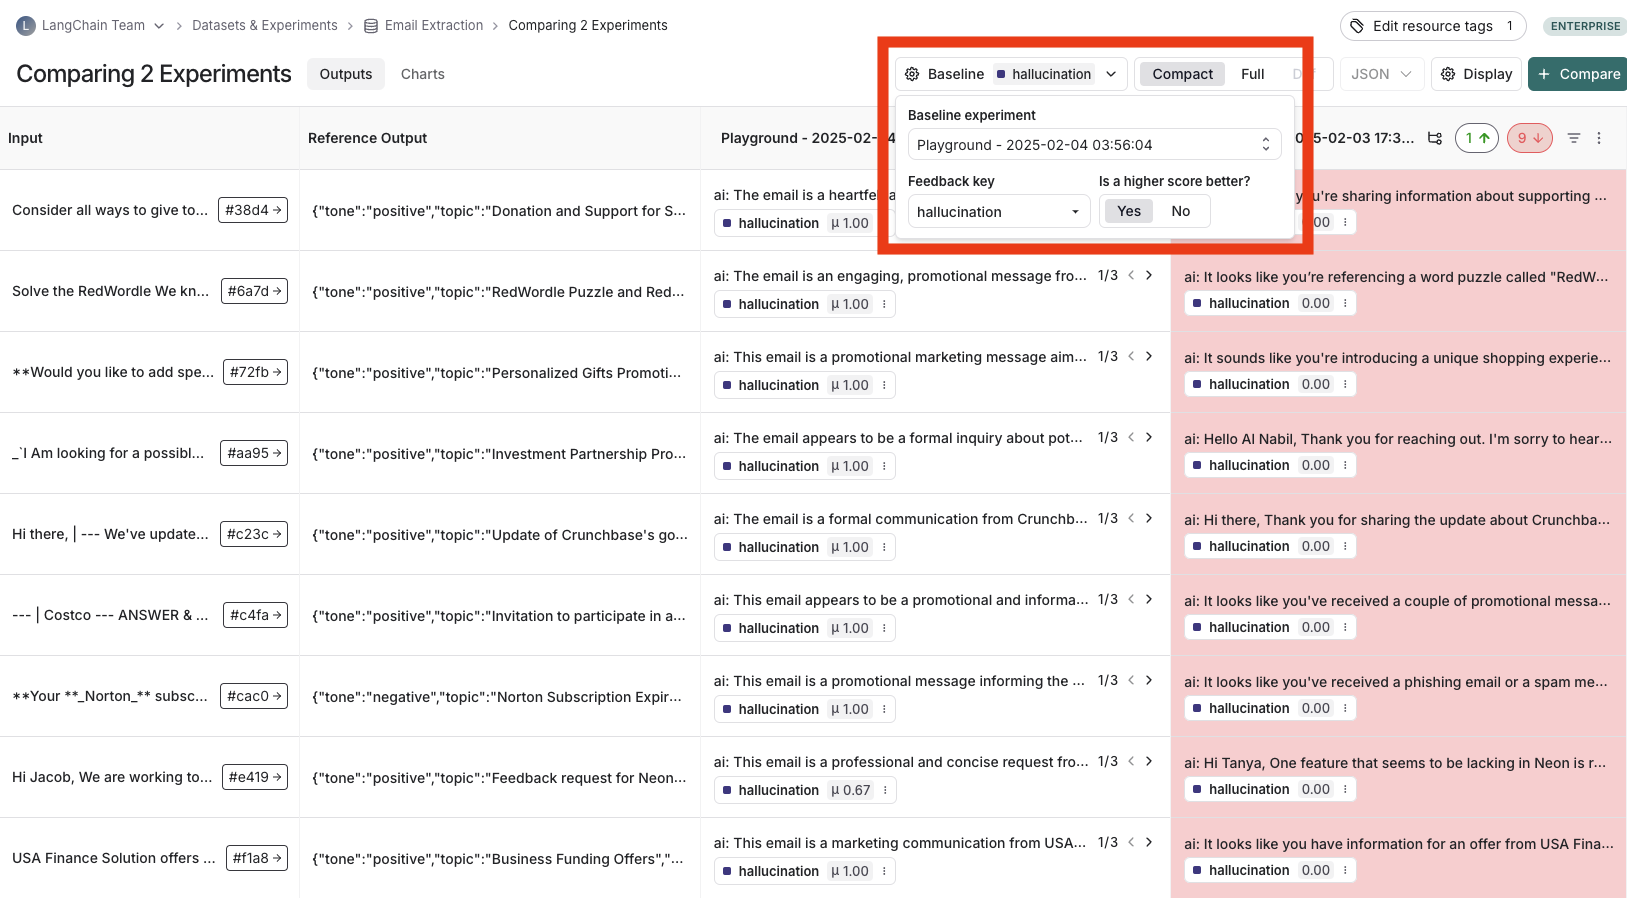
 ## Update baseline experiment and metric
In order to track regressions, you need to:
1. In the **Baseline** dropdown at the top of the comparison view, select a **Baseline experiment** against which to compare. By default, the newest experiment is selected as the baseline.
2. Select a **Feedback key** (evaluation metric) you want to focus compare against. One will be assigned by default, but you can adjust as needed.
3. Configure whether a higher score is better for the selected feedback key. This preference will be stored.
## Update baseline experiment and metric
In order to track regressions, you need to:
1. In the **Baseline** dropdown at the top of the comparison view, select a **Baseline experiment** against which to compare. By default, the newest experiment is selected as the baseline.
2. Select a **Feedback key** (evaluation metric) you want to focus compare against. One will be assigned by default, but you can adjust as needed.
3. Configure whether a higher score is better for the selected feedback key. This preference will be stored.
 ## Open a trace
If the example you're evaluating is from an ingested [run](/langsmith/observability-concepts#runs), you can hover over the output cell and click on the trace icon to open the trace view for that run. This will open up a trace in the side panel.
## Open a trace
If the example you're evaluating is from an ingested [run](/langsmith/observability-concepts#runs), you can hover over the output cell and click on the trace icon to open the trace view for that run. This will open up a trace in the side panel.
 ## Expand detailed view
From any cell, you can click on the expand icon in the hover state to open up a detailed view of all experiment results on that particular example input, along with feedback keys and scores.
## Expand detailed view
From any cell, you can click on the expand icon in the hover state to open up a detailed view of all experiment results on that particular example input, along with feedback keys and scores.
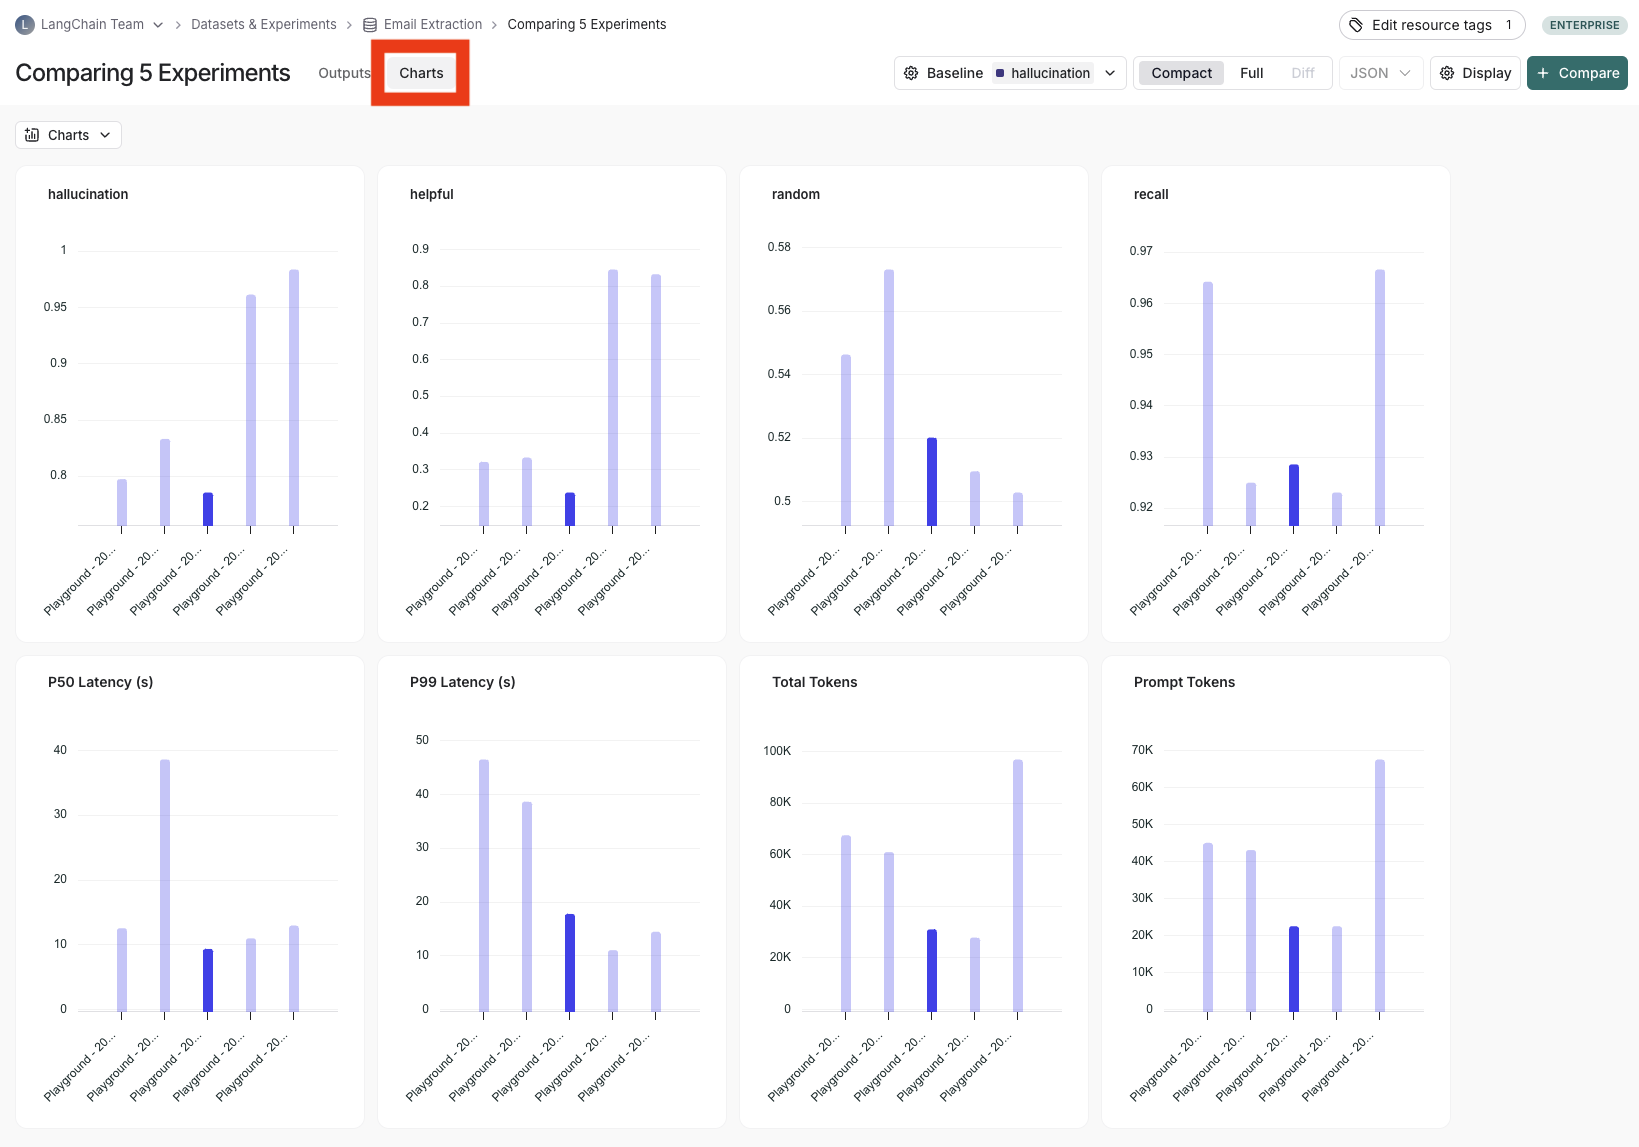
 ## View summary charts
View summary charts by clicking on the **Charts** tab at the top of the page.
## View summary charts
View summary charts by clicking on the **Charts** tab at the top of the page.
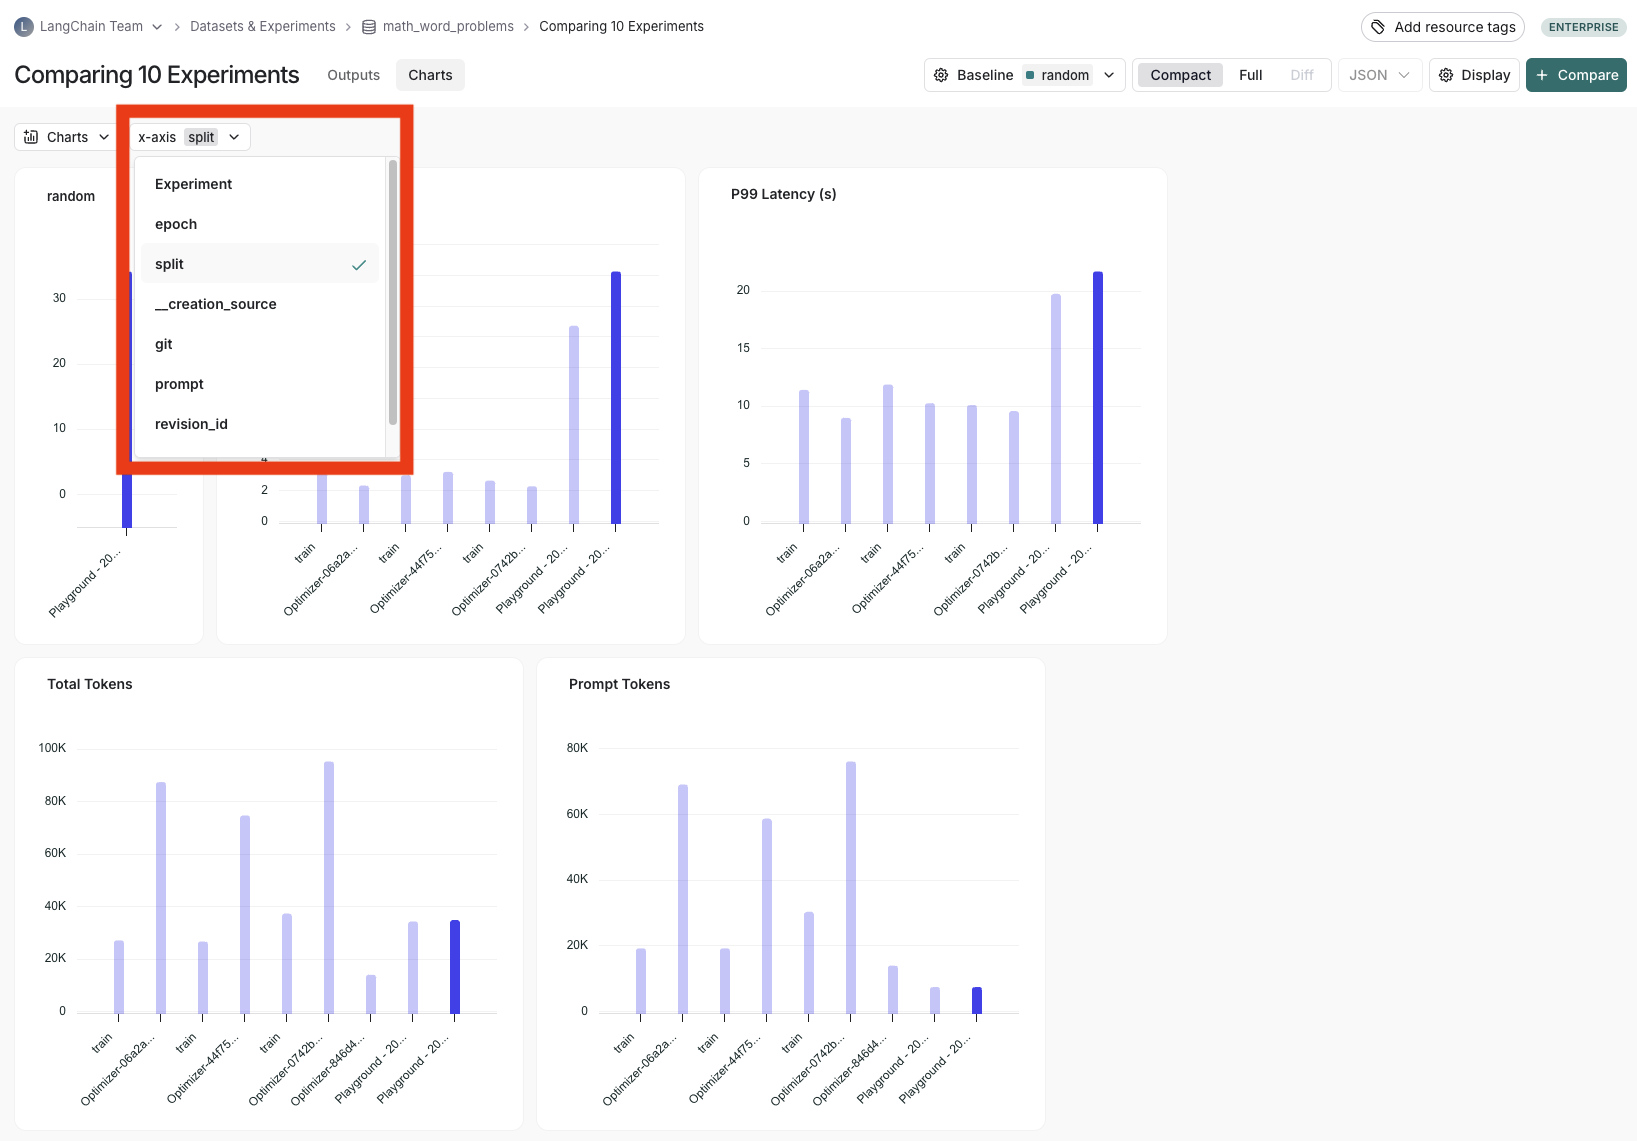
 ## Use experiment metadata as chart labels
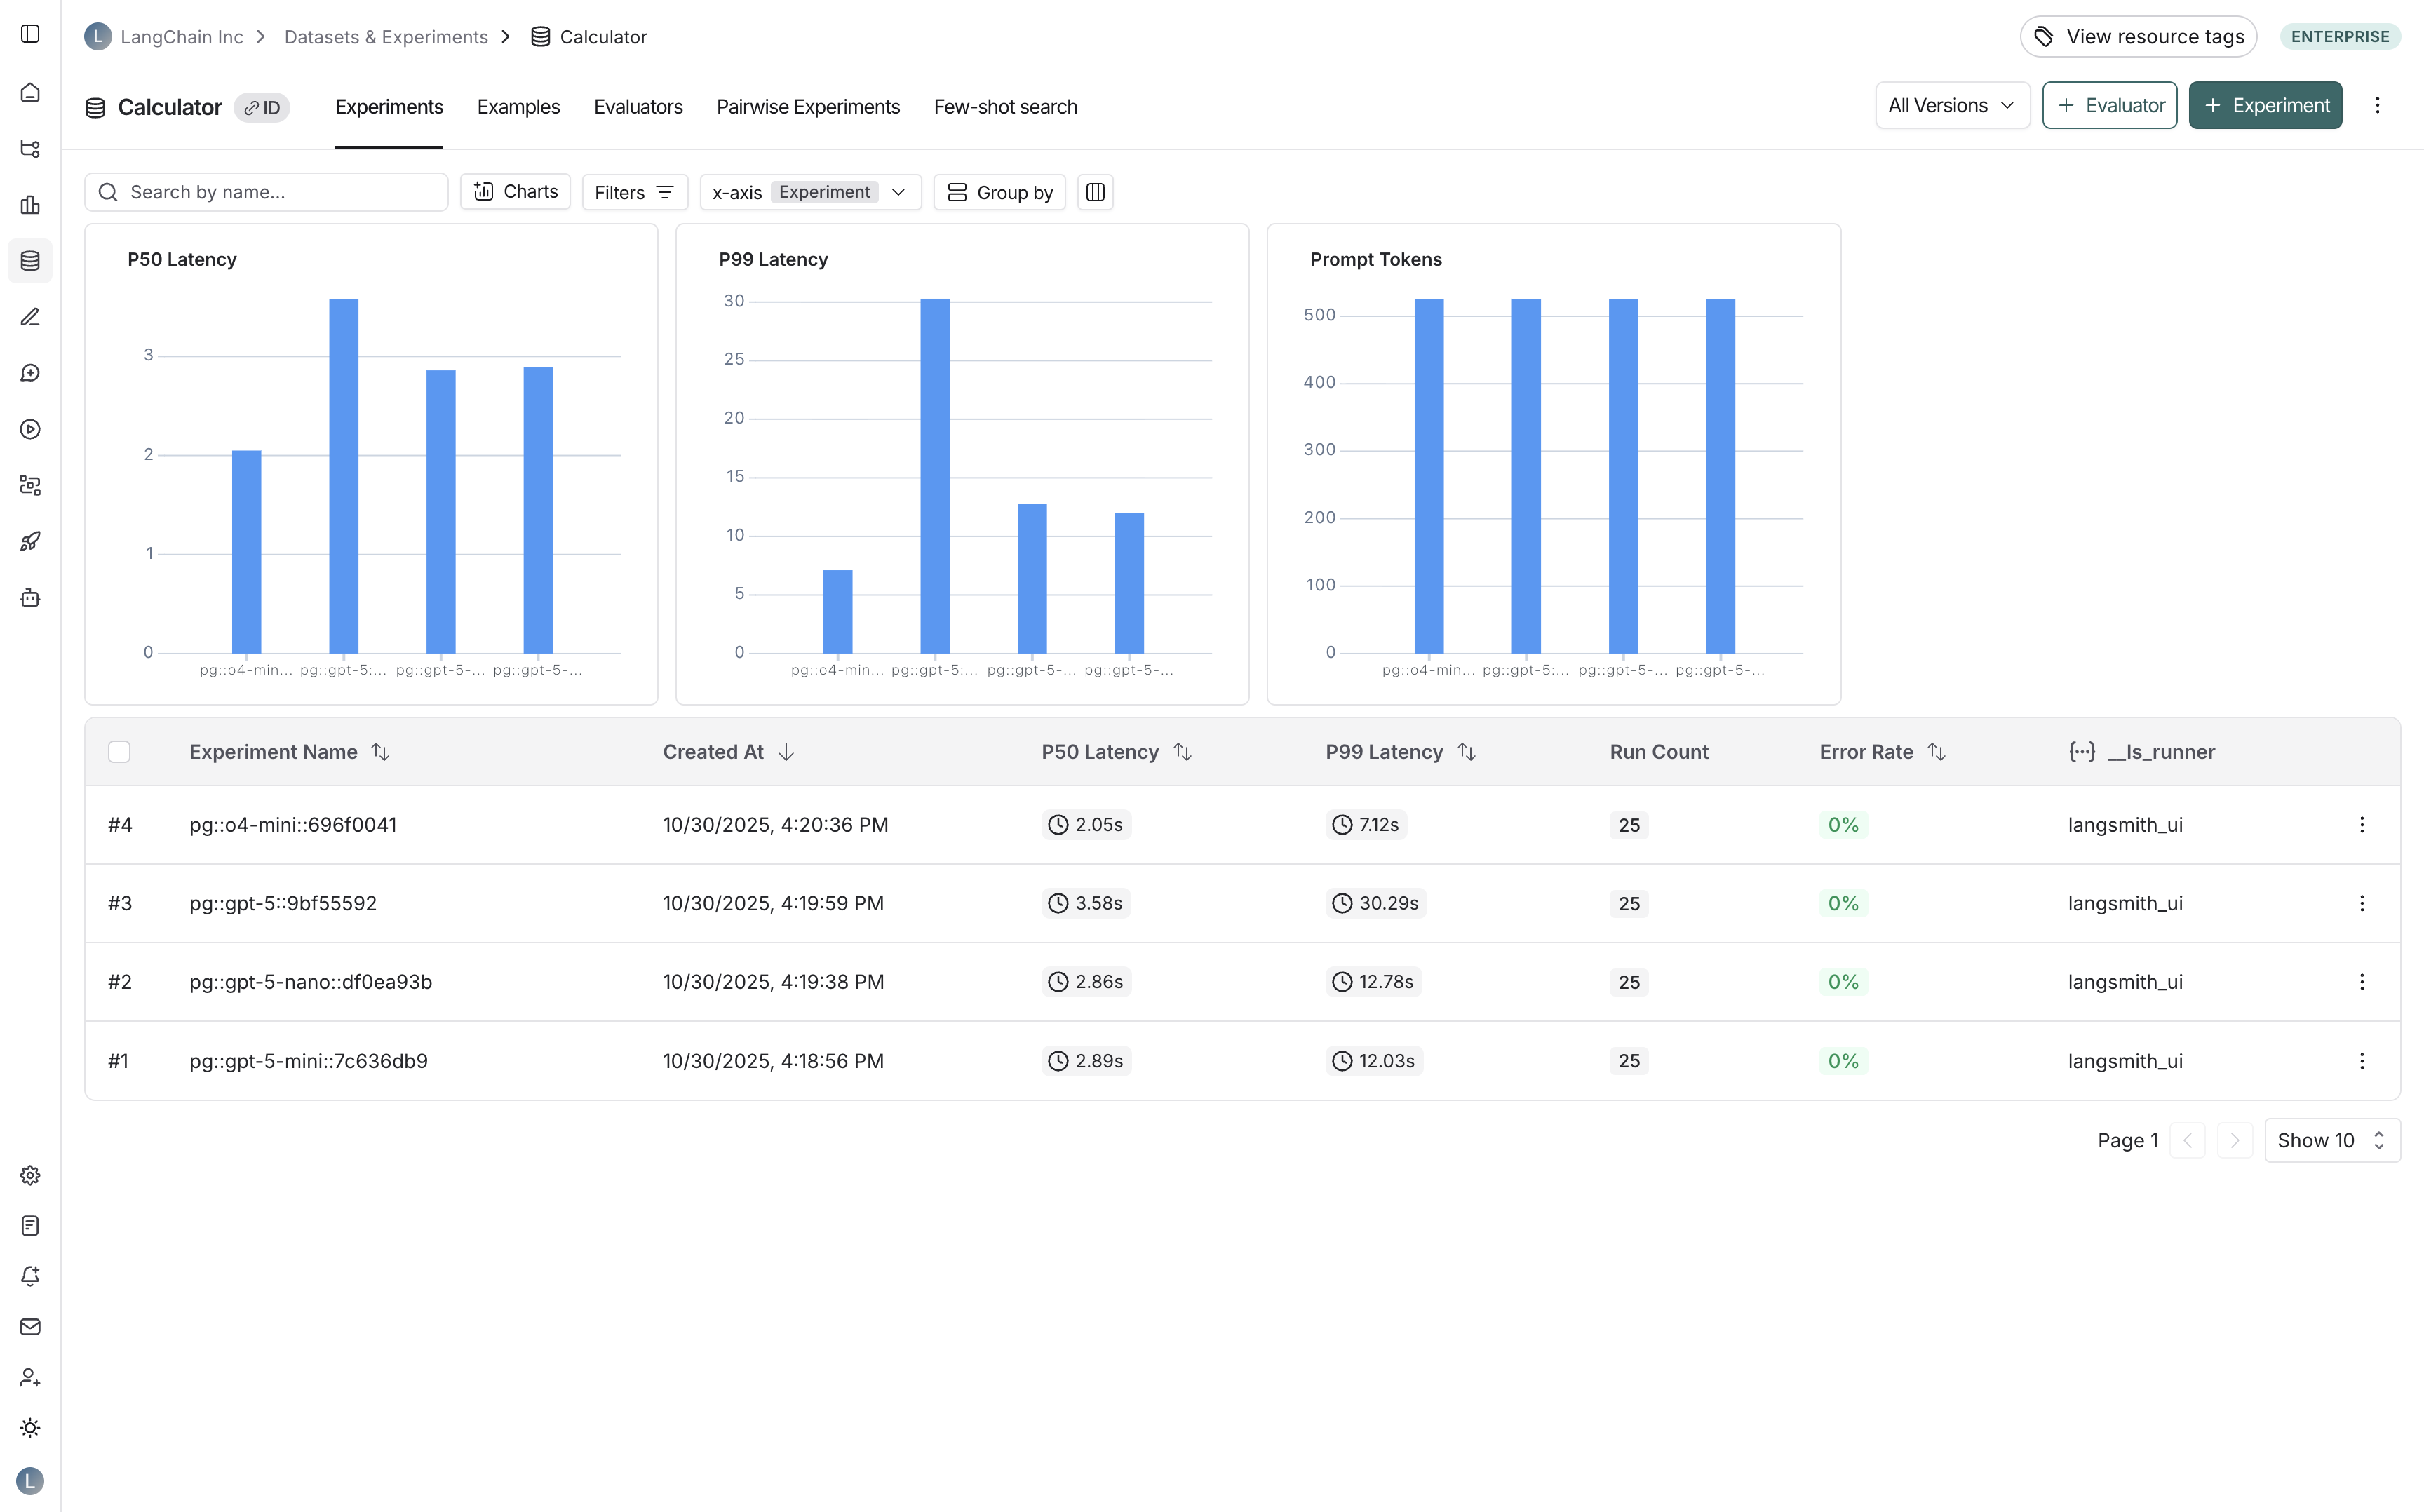
You can configure the x-axis labels for the charts based on [experiment metadata](/langsmith/filter-experiments-ui#background-add-metadata-to-your-experiments).
Select a metadata key in the **x-axis** dropdown to change the chart labels.
## Use experiment metadata as chart labels
You can configure the x-axis labels for the charts based on [experiment metadata](/langsmith/filter-experiments-ui#background-add-metadata-to-your-experiments).
Select a metadata key in the **x-axis** dropdown to change the chart labels.
 ***
***
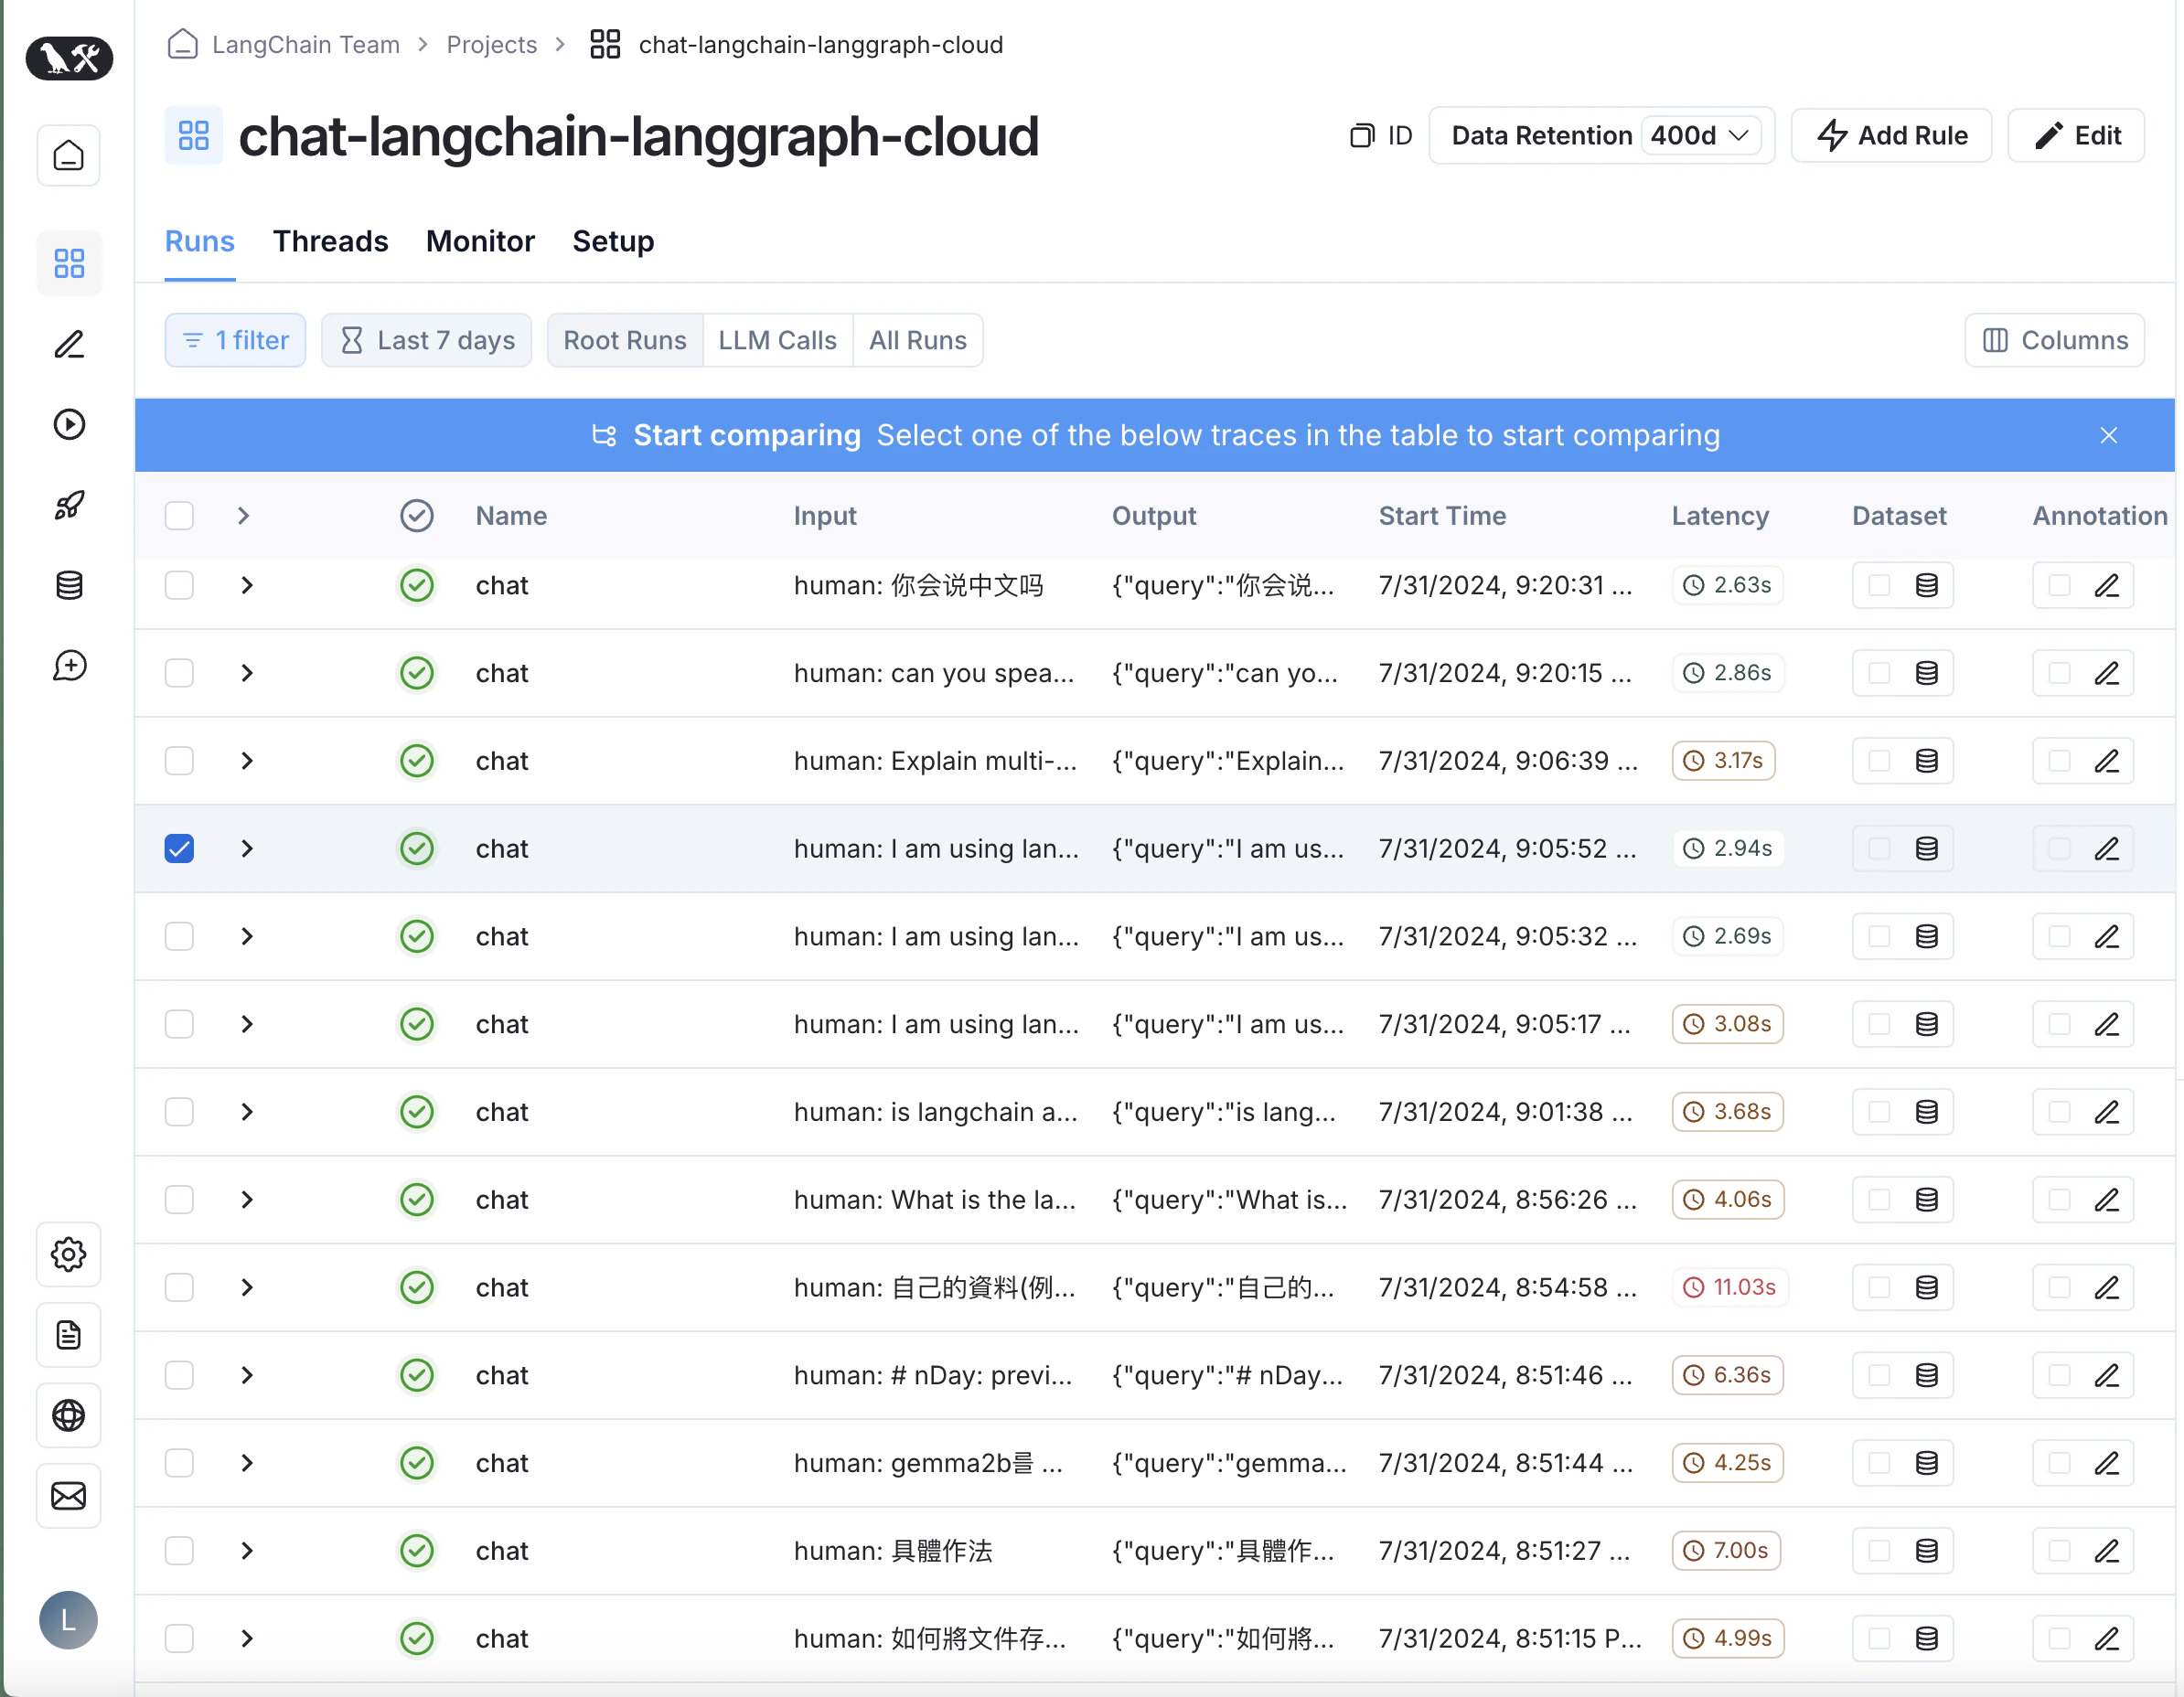
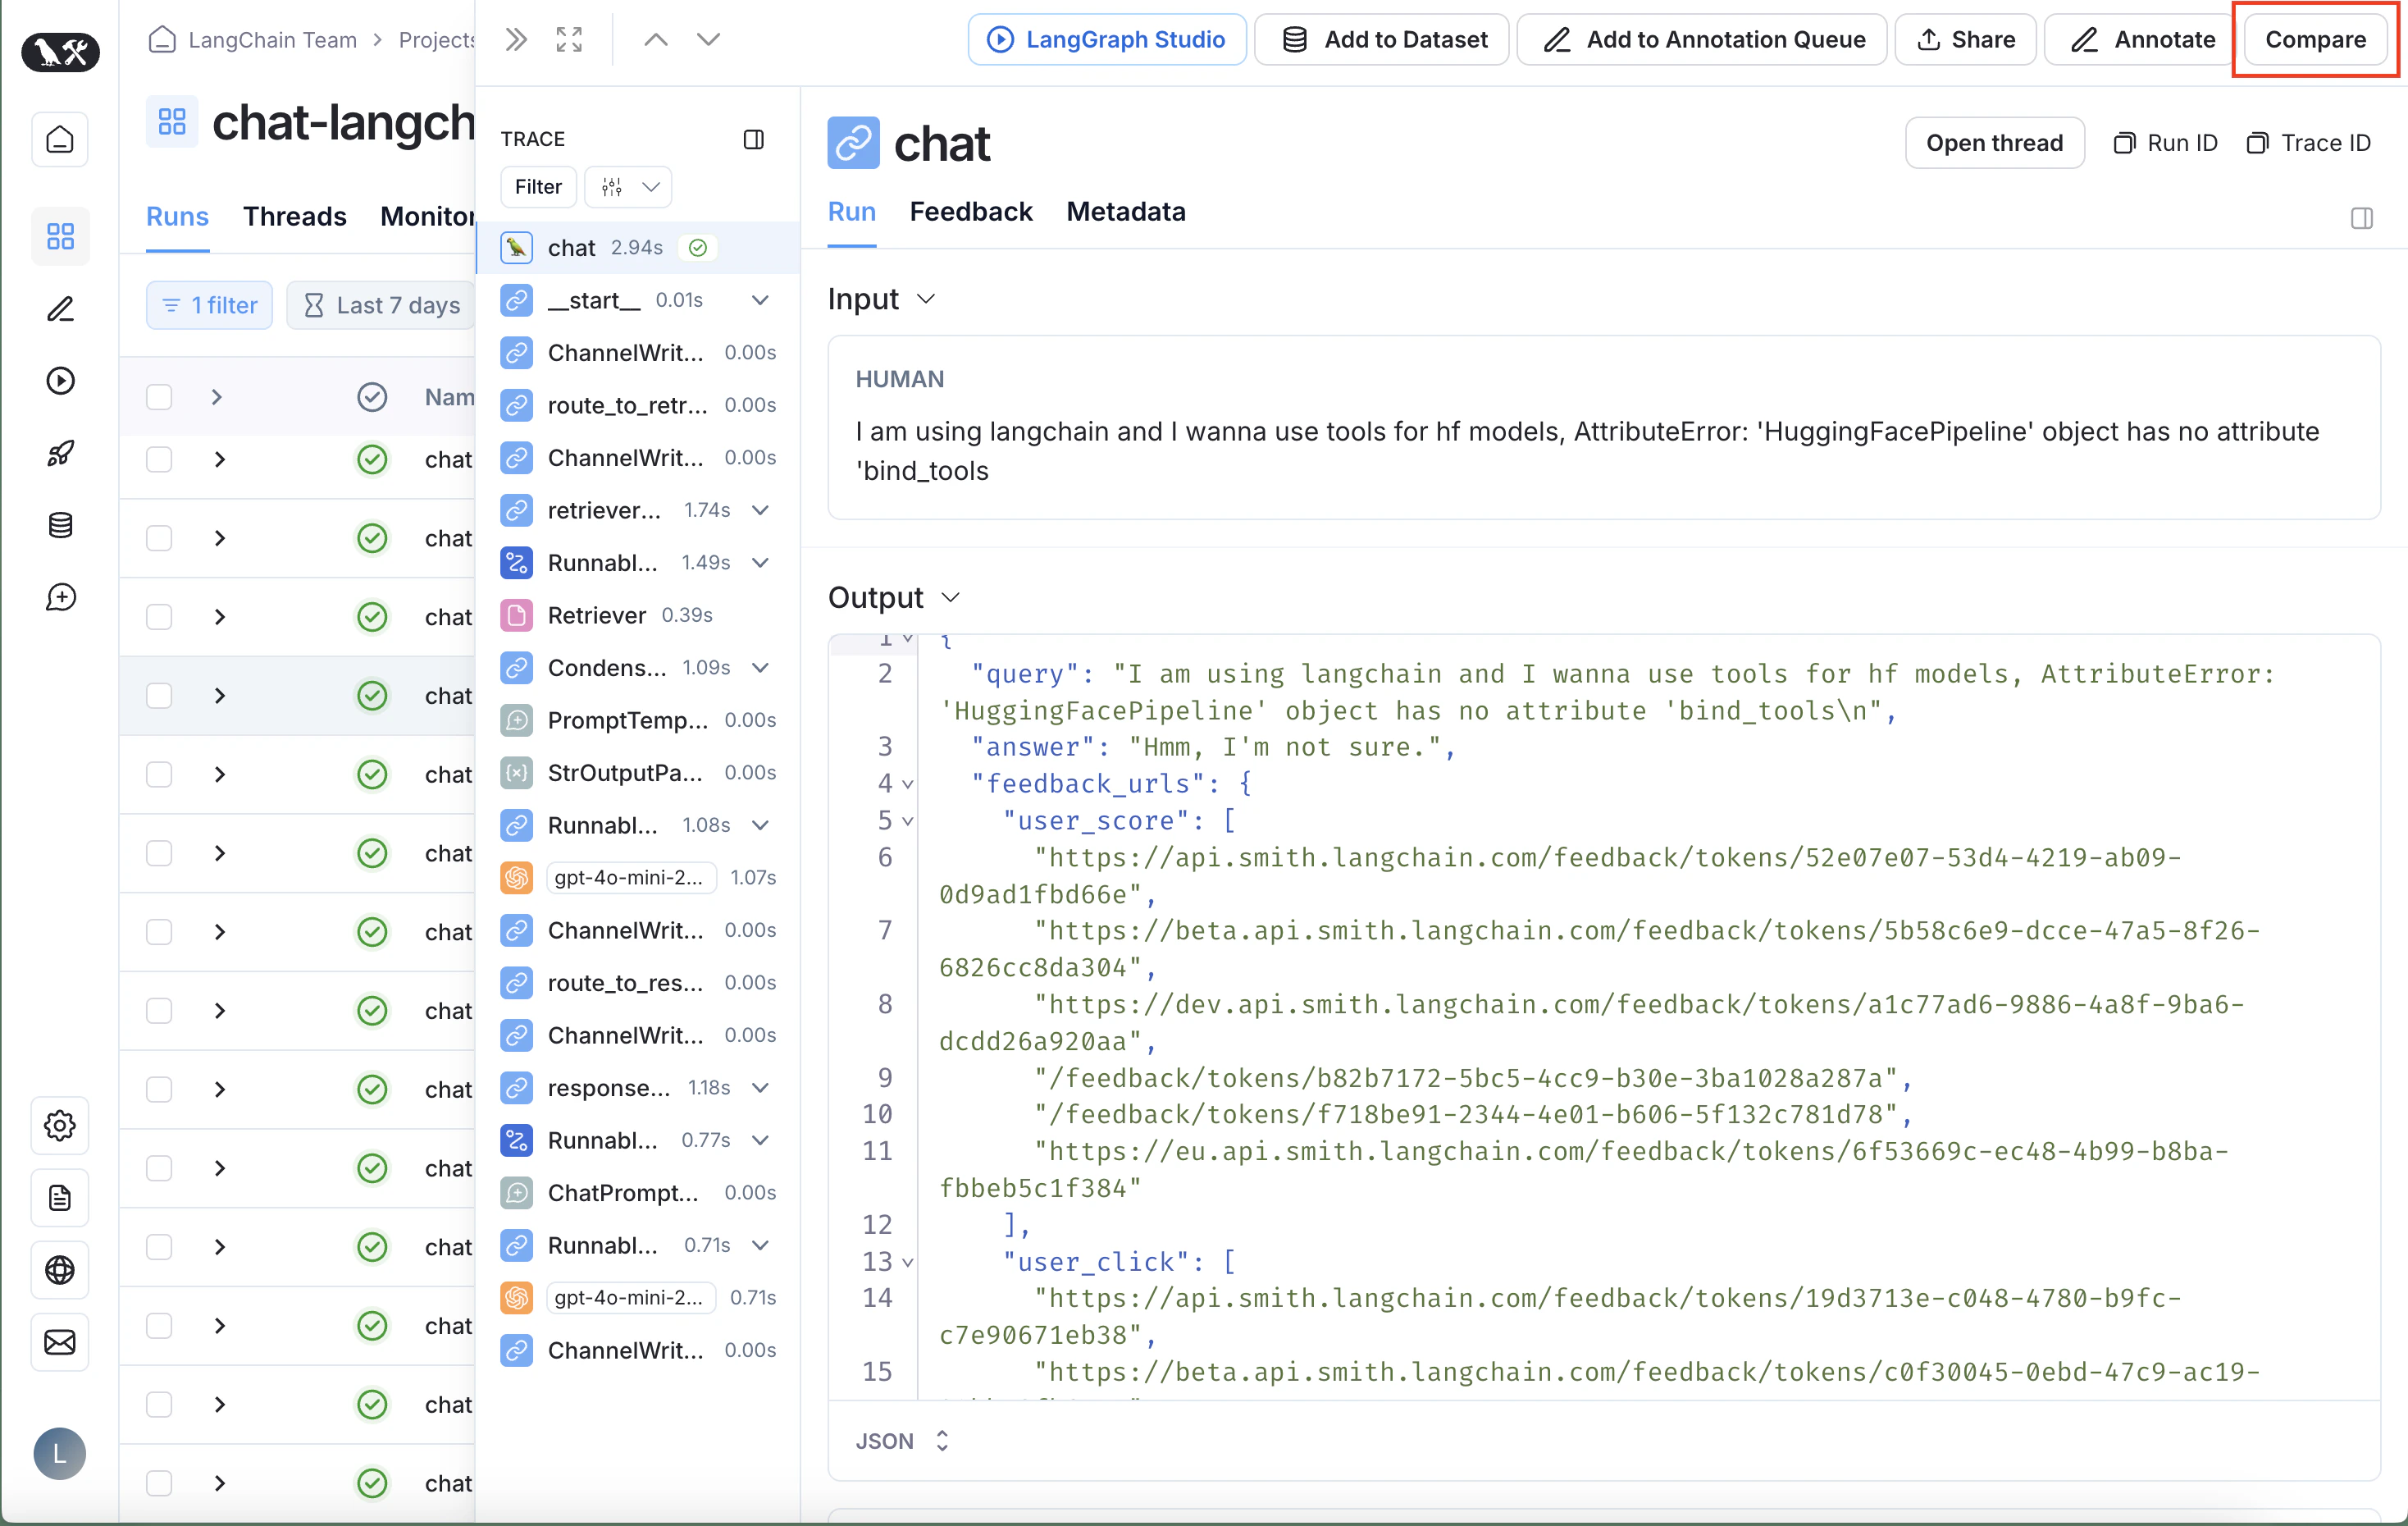 This will show the trace run table. Select the trace you want to compare against the original trace.
 The pane will open with both traces selected in a side by side comparison view.
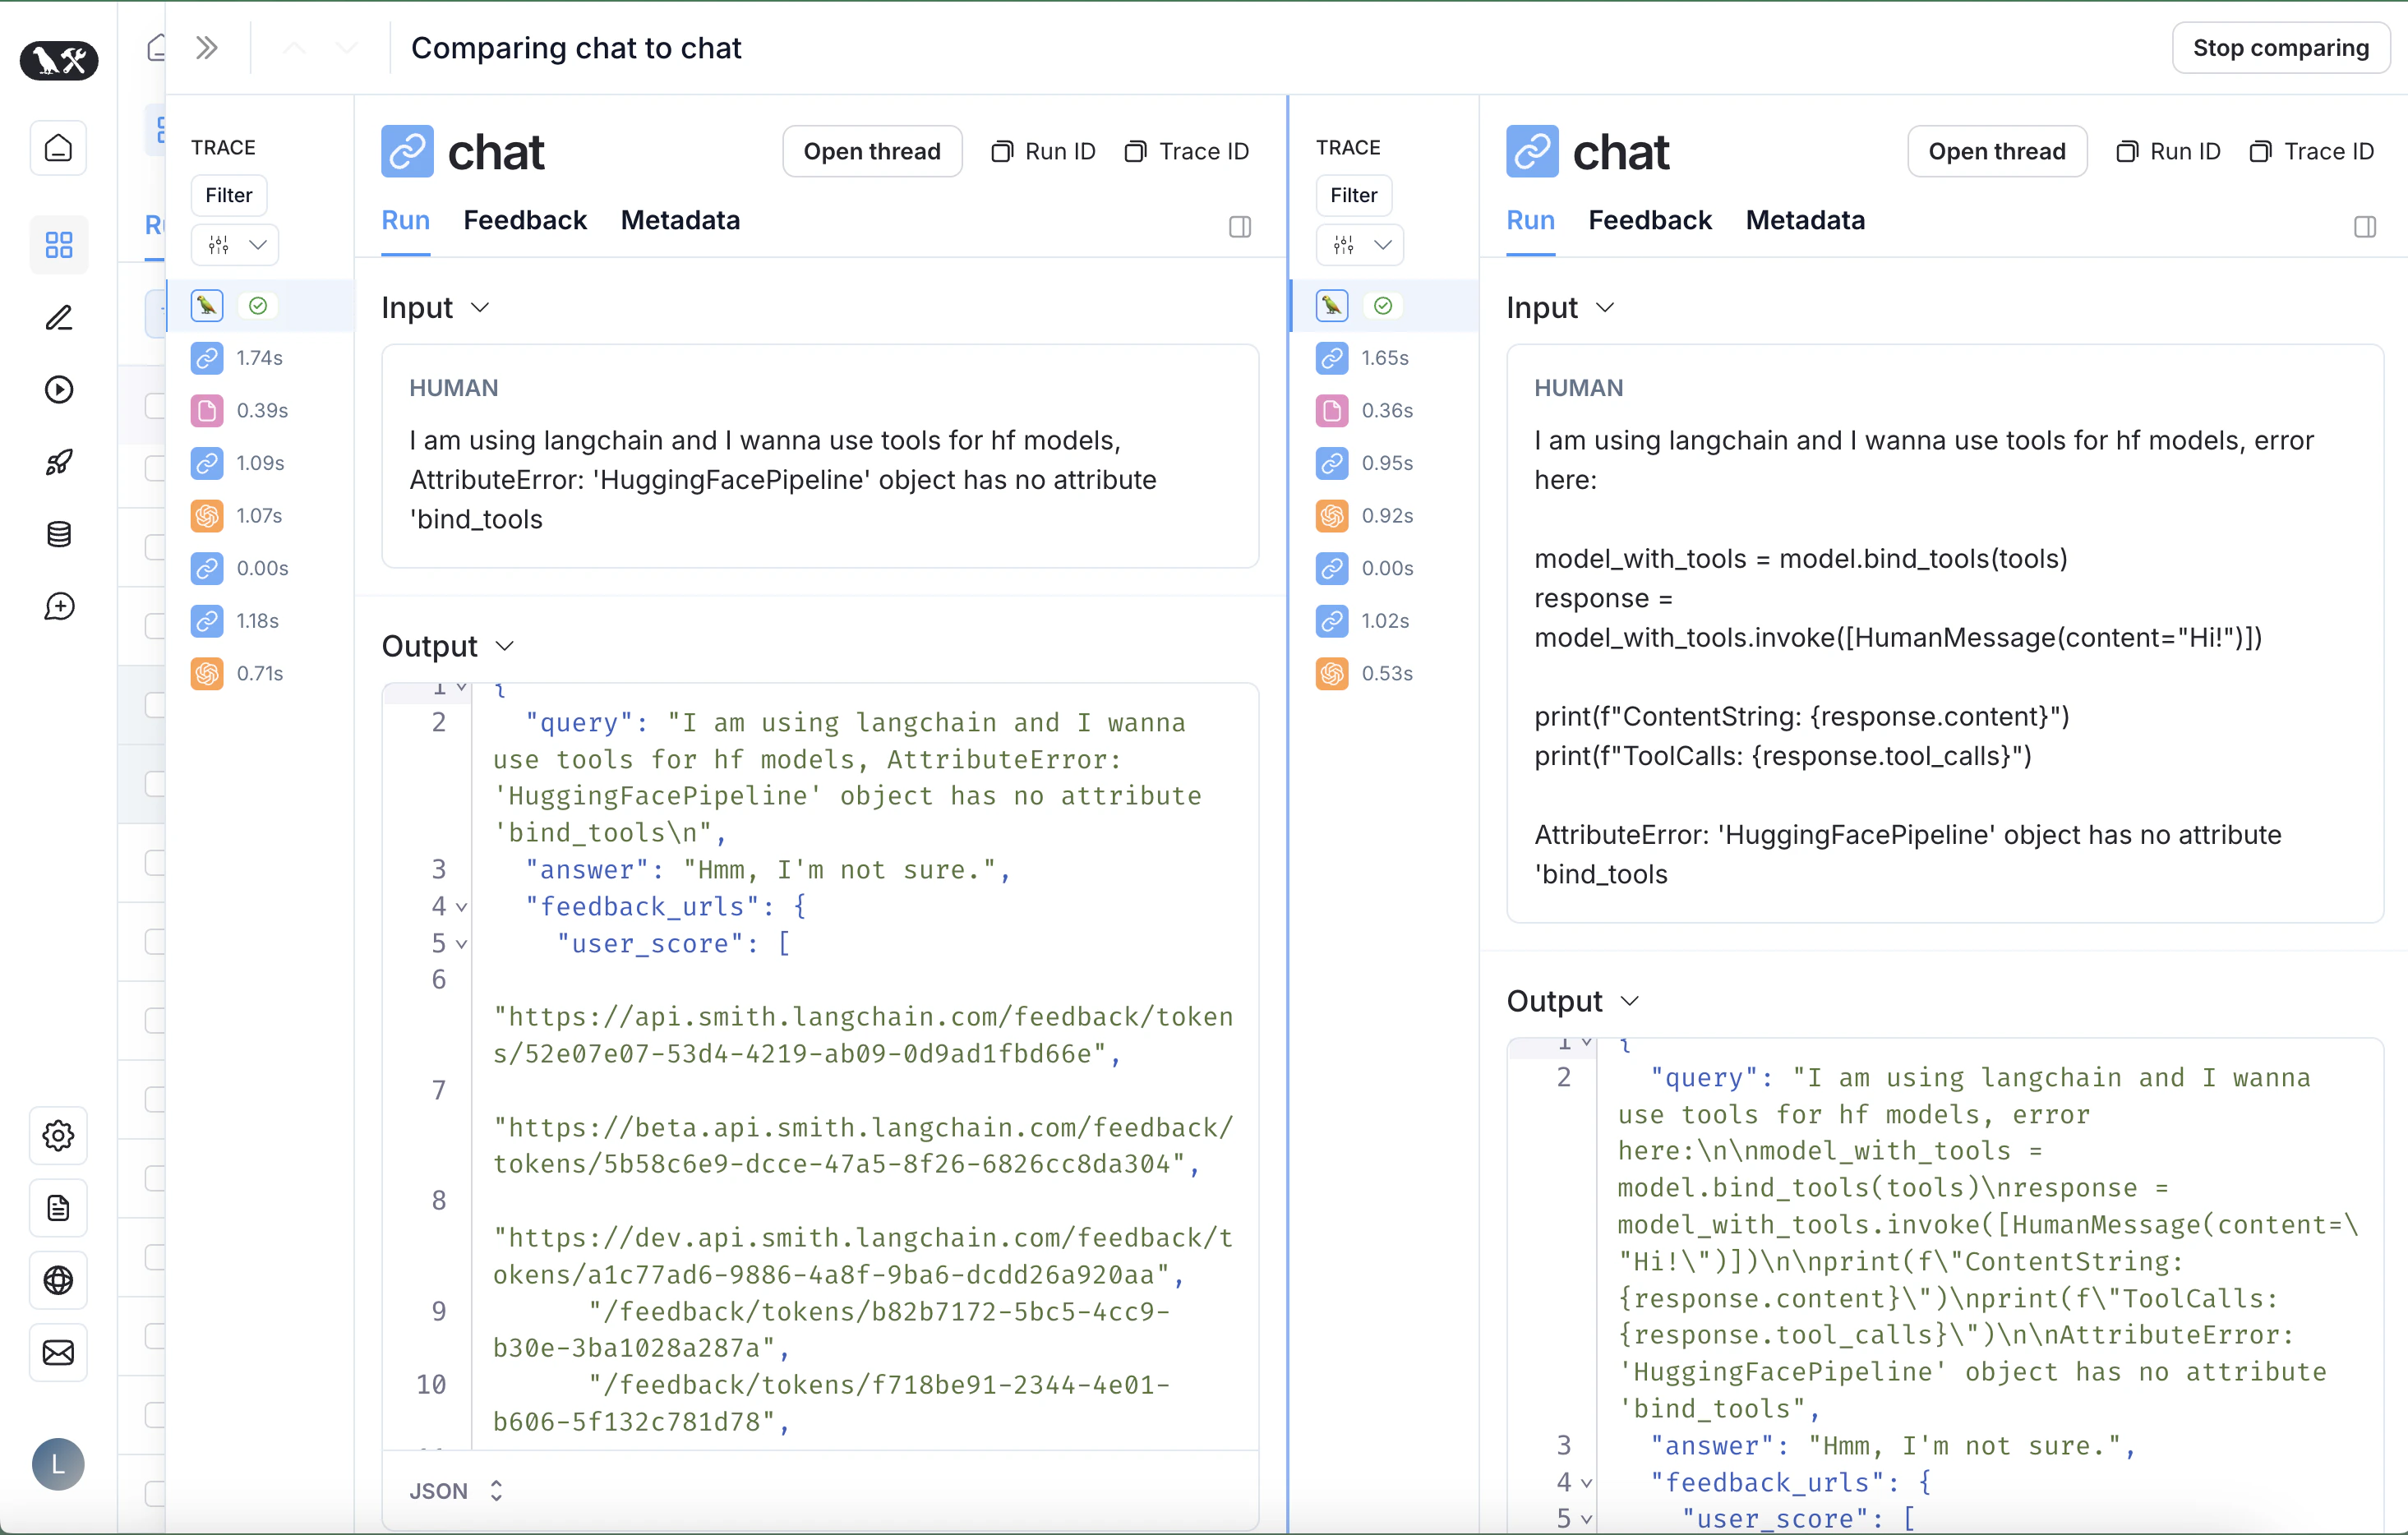 To stop comparing, close the pane or click on **Stop comparing** in the upper right hand side of the pane.
***
To stop comparing, close the pane or click on **Stop comparing** in the upper right hand side of the pane.
***

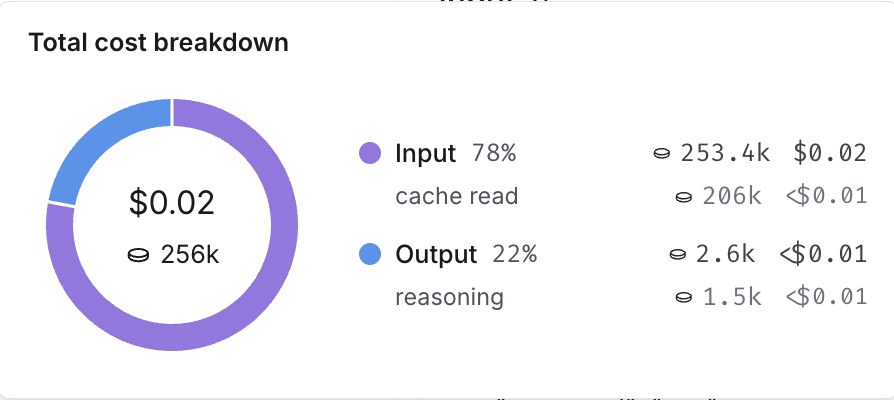
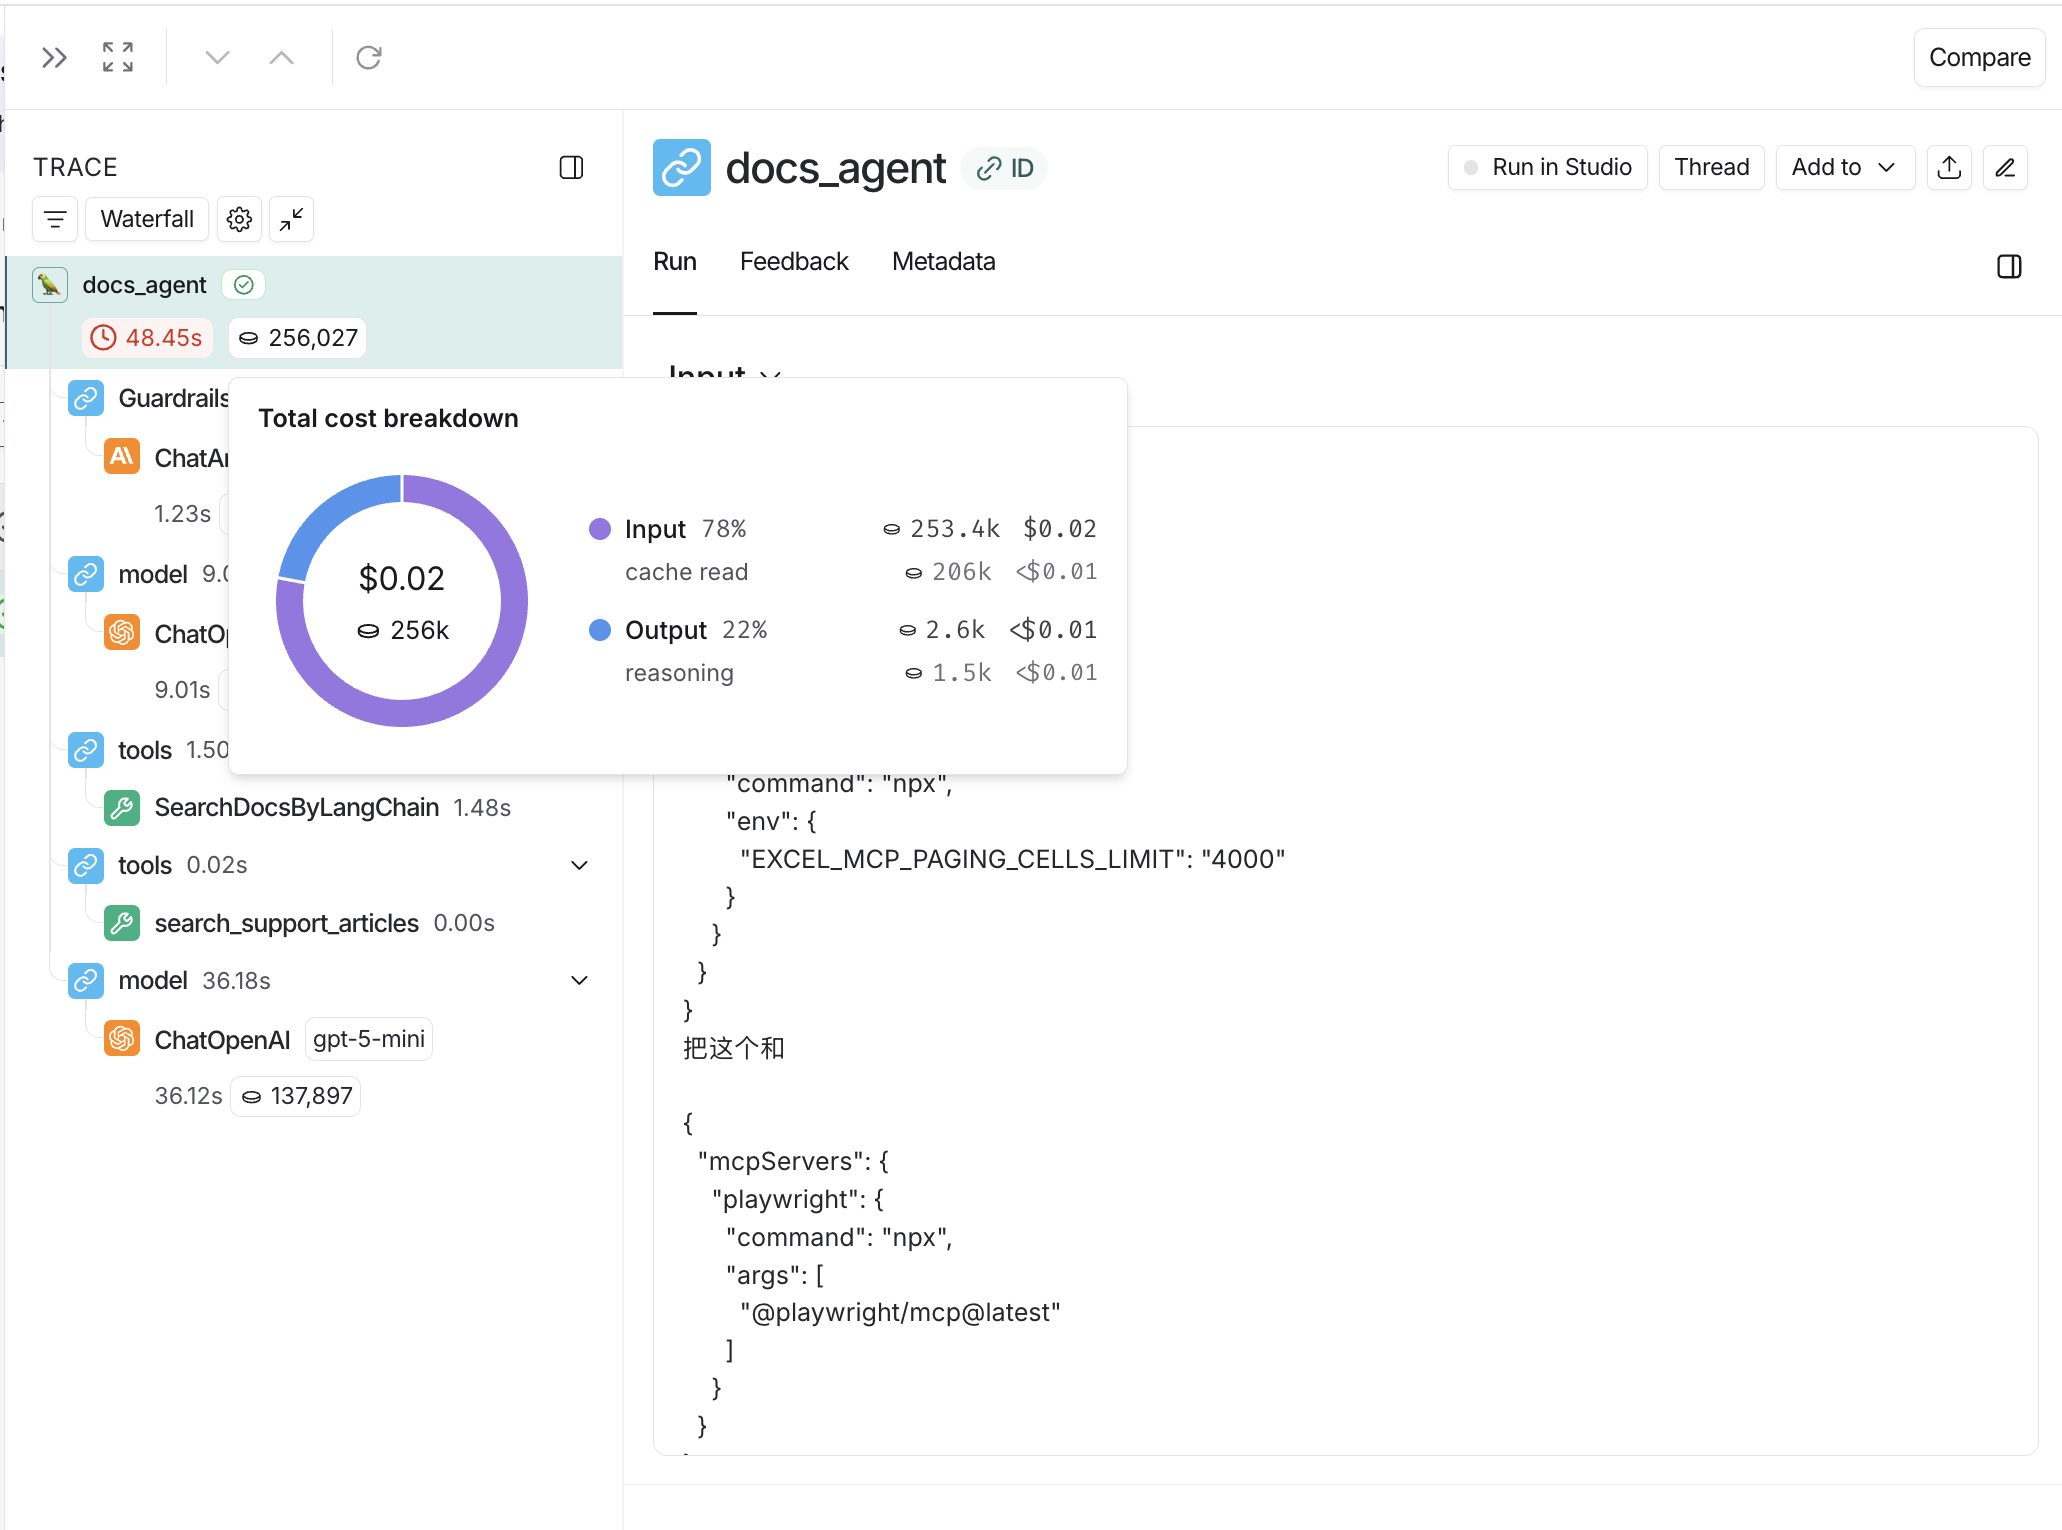
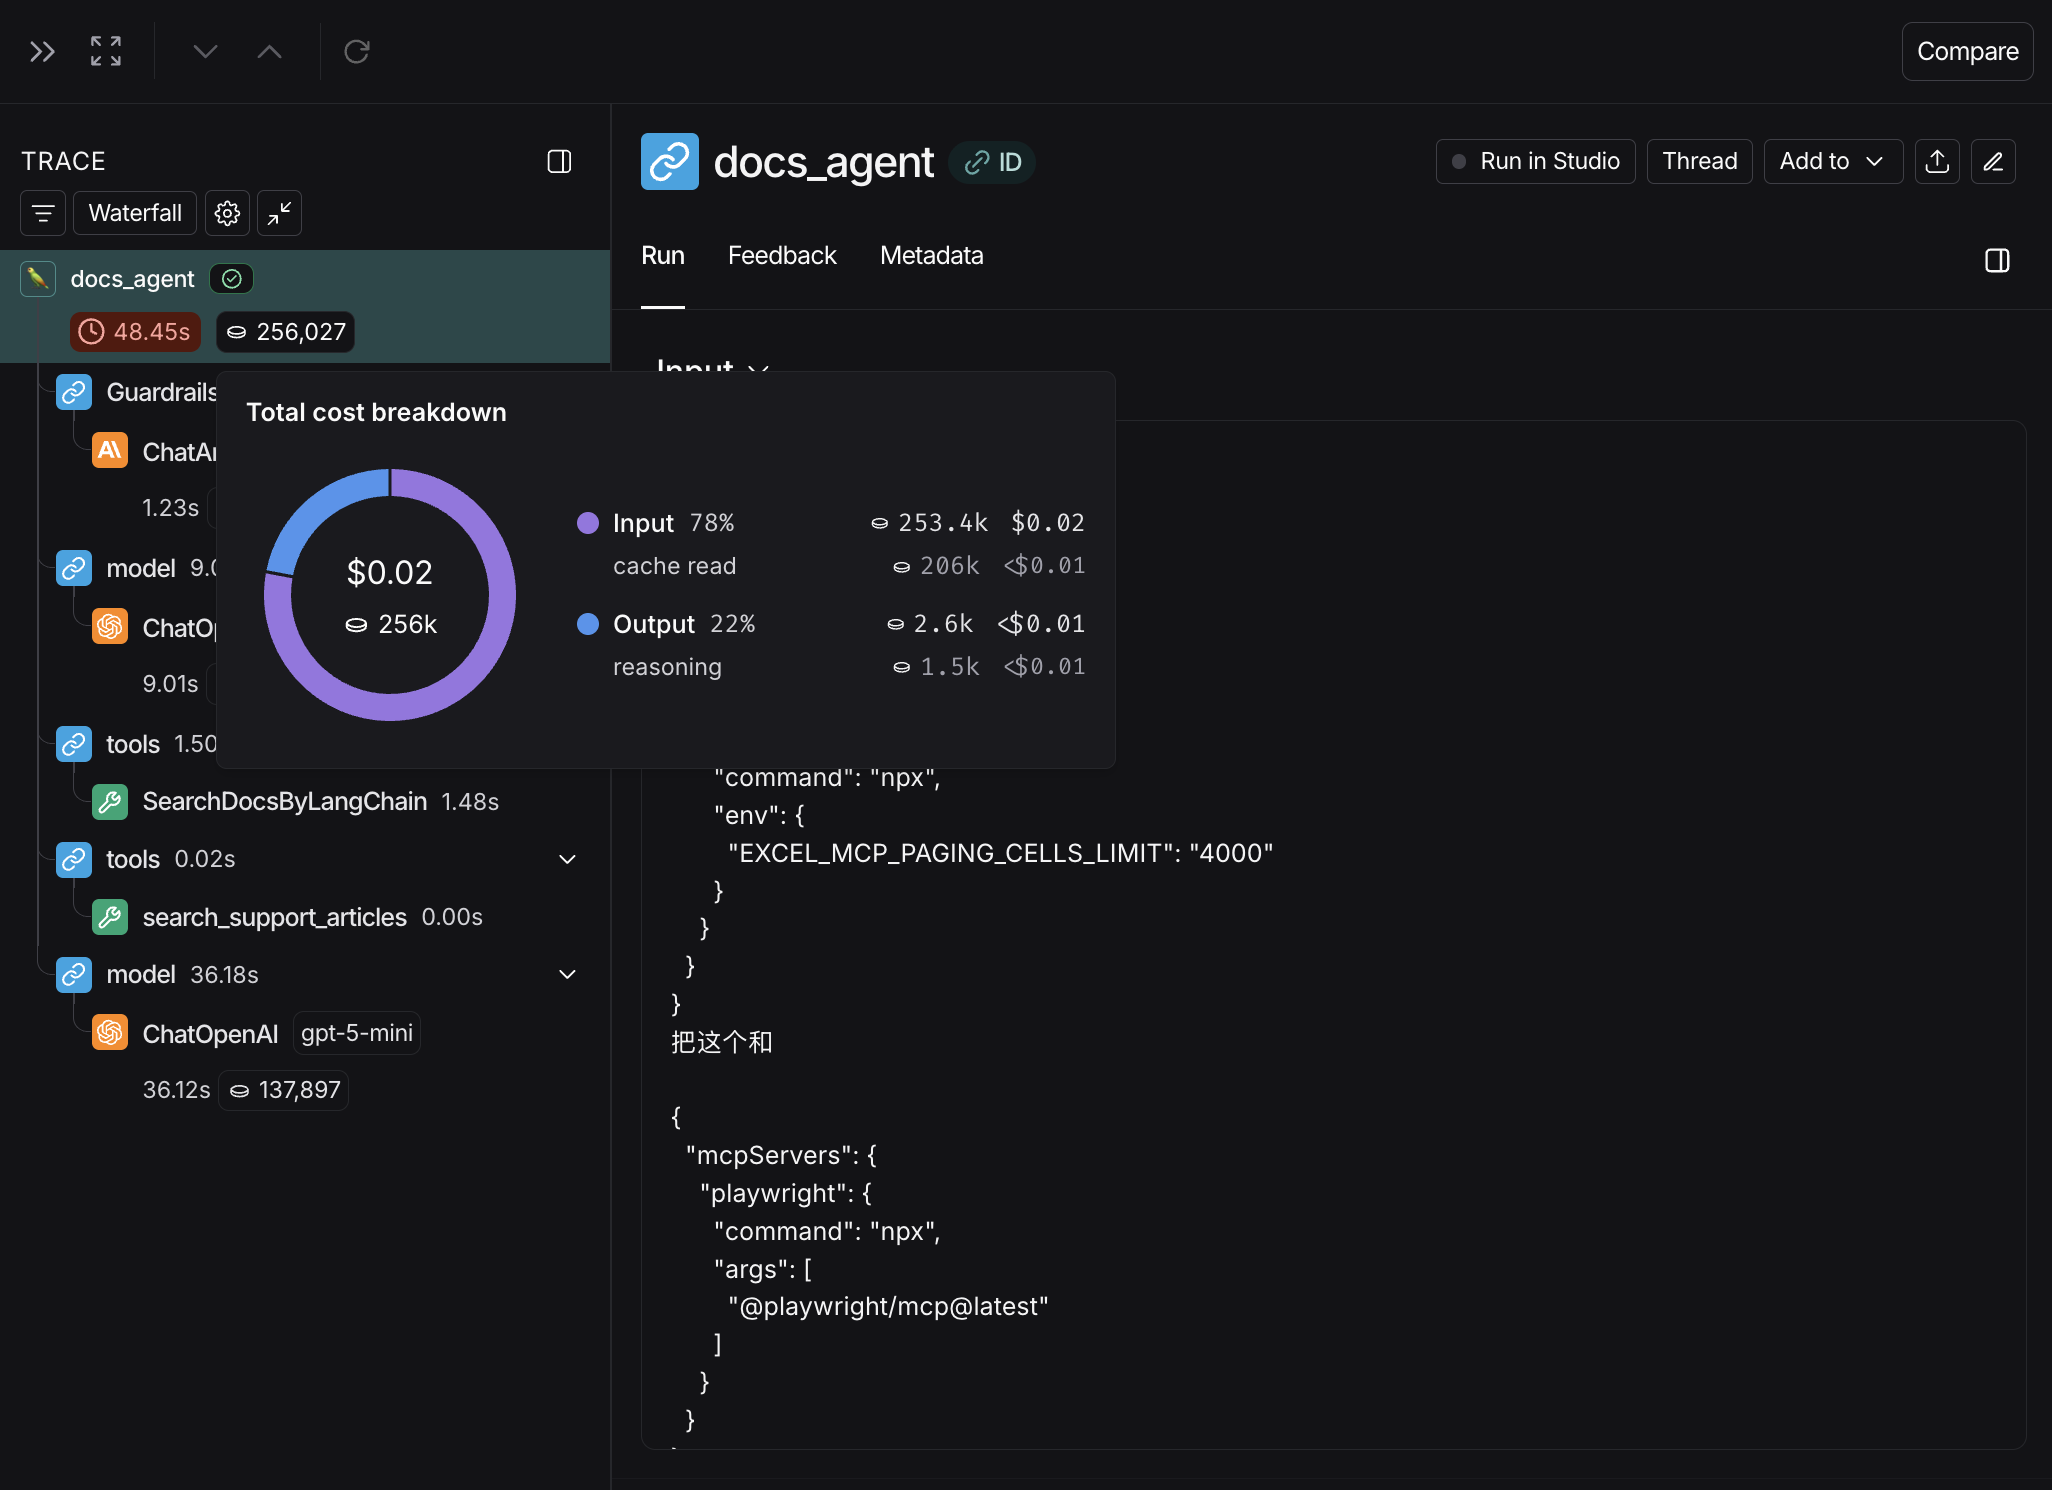
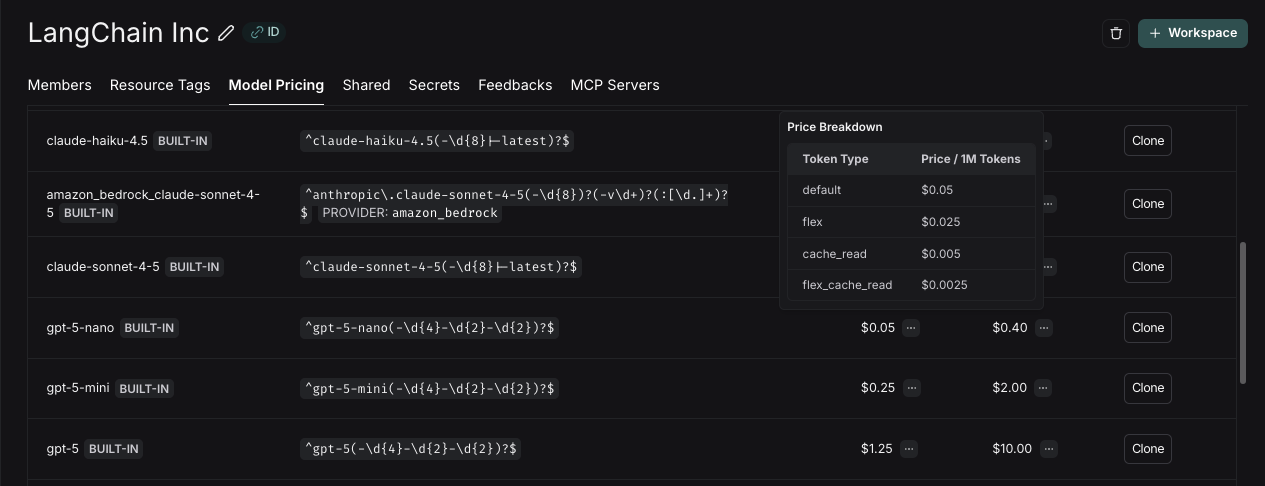
 You can inspect these breakdowns throughout the LangSmith UI, described in the following section.
### Where to view token and cost breakdowns
You can inspect these breakdowns throughout the LangSmith UI, described in the following section.
### Where to view token and cost breakdowns
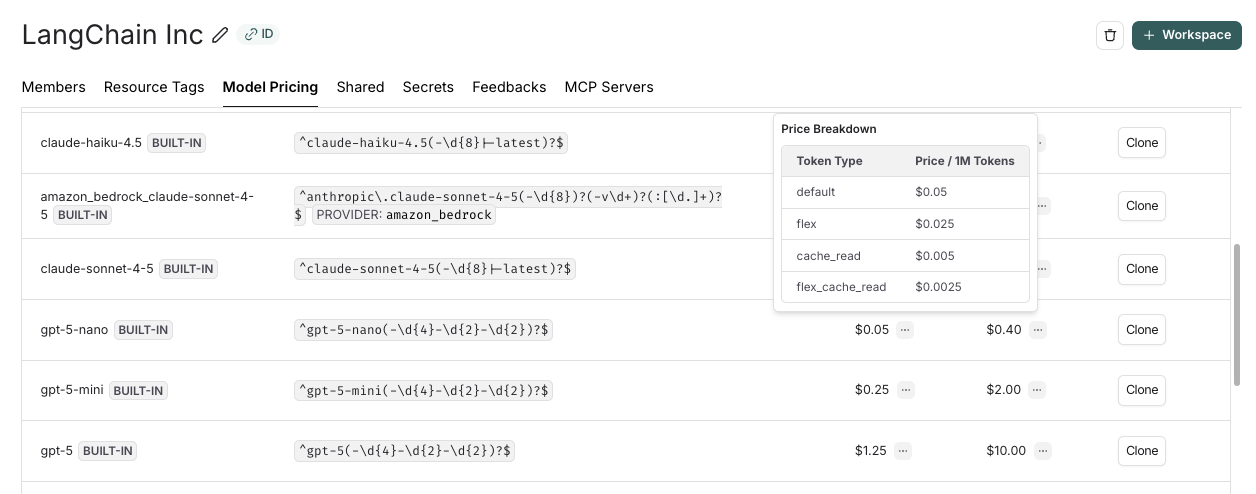
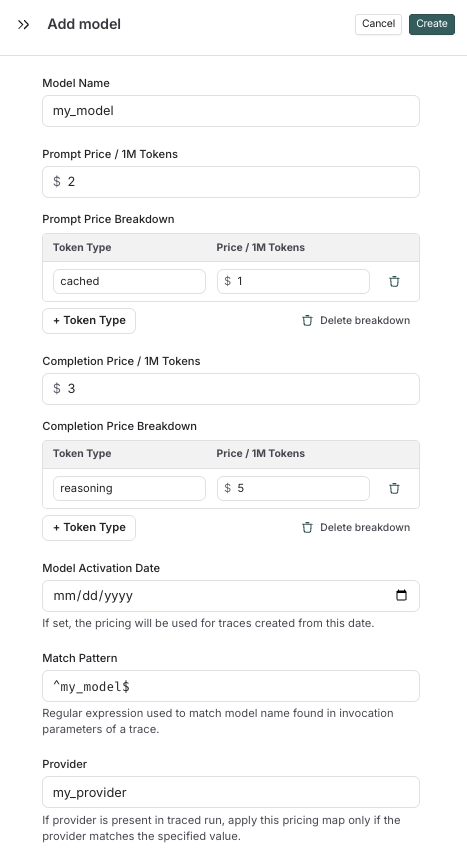
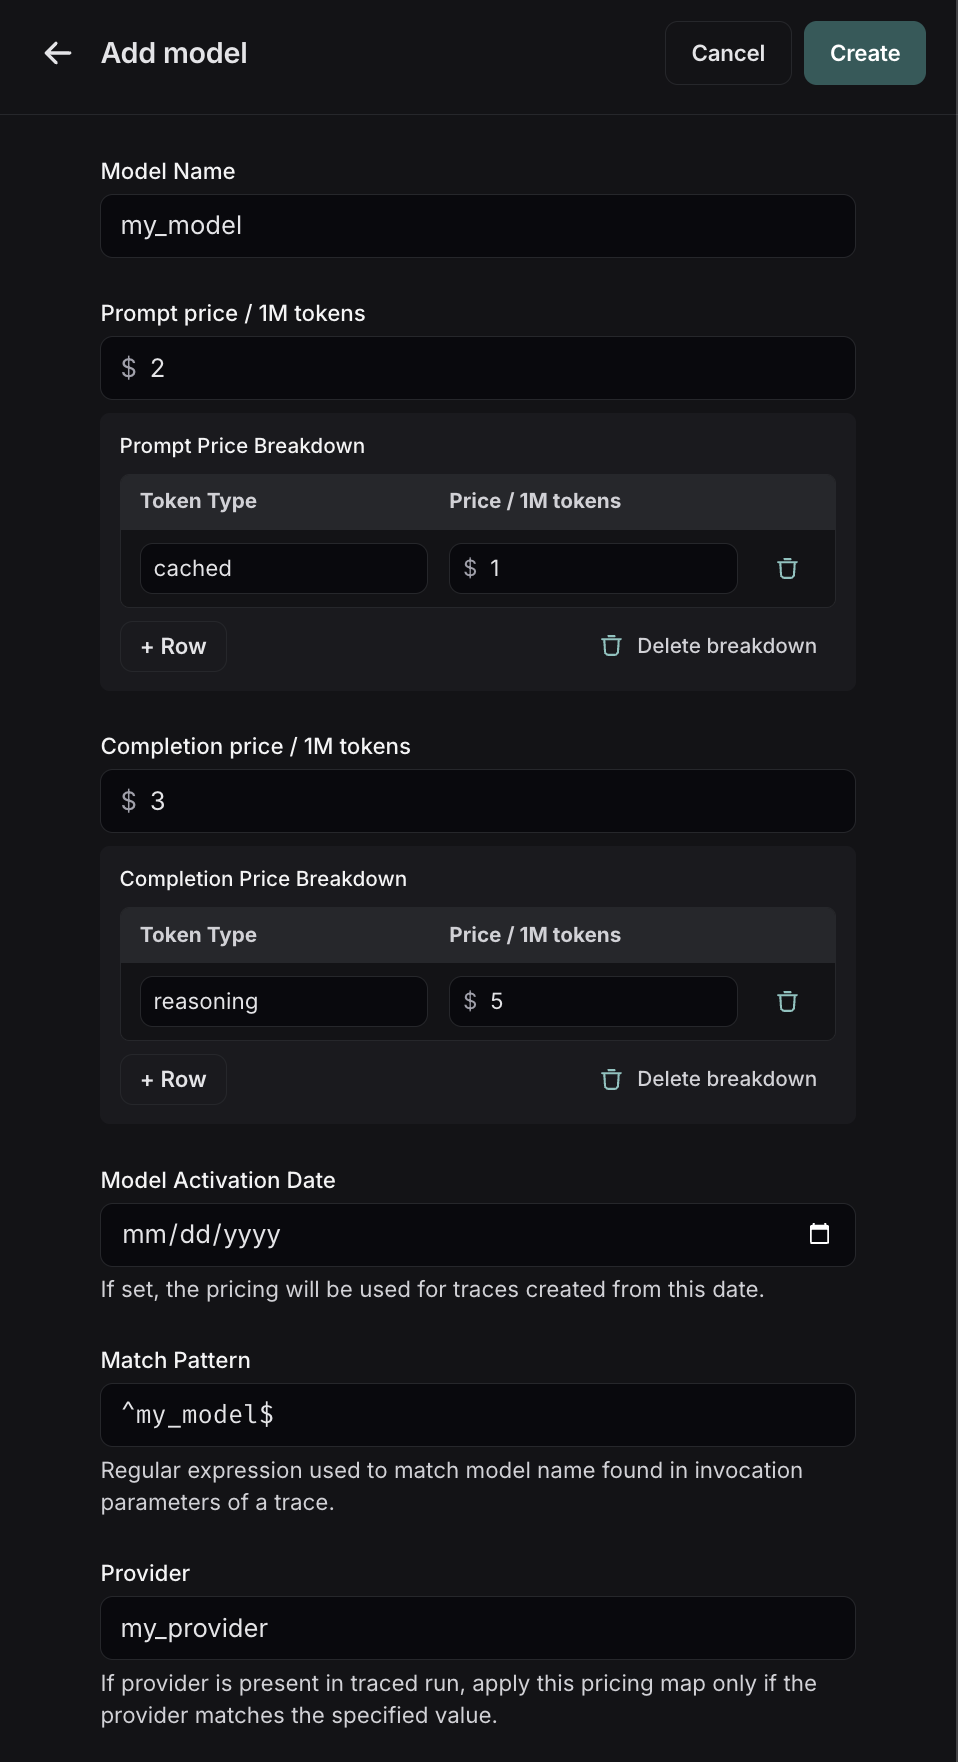 Here, you can specify the following fields:
* **Model Name**: The human-readable name of the model.
* **Input Price**: The cost per 1M input tokens for the model. This number is multiplied by the number of tokens in the prompt to calculate the prompt cost.
* **Input Price Breakdown** (Optional): The breakdown of price for each different type of input token, e.g. `cache_read`, `video`, `audio`
* **Output Price**: The cost per 1M output tokens for the model. This number is multiplied by the number of tokens in the completion to calculate the completion cost.
* **Output Price Breakdown** (Optional): The breakdown of price for each different type of output token, e.g. `reasoning`, `image`, etc.
* **Model Activation Date** (Optional): The date from which the pricing is applicable. Only runs after this date will apply this model price.
* **Match Pattern**: A regex pattern to match the model name. This is used to match the value for `ls_model_name` in the run metadata.
* **Provider** (Optional): The provider of the model. If specified, this is matched against `ls_provider` in the run metadata.
Once you have set up the model pricing map, LangSmith will automatically calculate and aggregate the token-based costs for traces based on the token counts provided in the LLM invocations.
Here, you can specify the following fields:
* **Model Name**: The human-readable name of the model.
* **Input Price**: The cost per 1M input tokens for the model. This number is multiplied by the number of tokens in the prompt to calculate the prompt cost.
* **Input Price Breakdown** (Optional): The breakdown of price for each different type of input token, e.g. `cache_read`, `video`, `audio`
* **Output Price**: The cost per 1M output tokens for the model. This number is multiplied by the number of tokens in the completion to calculate the completion cost.
* **Output Price Breakdown** (Optional): The breakdown of price for each different type of output token, e.g. `reasoning`, `image`, etc.
* **Model Activation Date** (Optional): The date from which the pricing is applicable. Only runs after this date will apply this model price.
* **Match Pattern**: A regex pattern to match the model name. This is used to match the value for `ls_model_name` in the run metadata.
* **Provider** (Optional): The provider of the model. If specified, this is matched against `ls_provider` in the run metadata.
Once you have set up the model pricing map, LangSmith will automatically calculate and aggregate the token-based costs for traces based on the token counts provided in the LLM invocations.
 ### Add a template variable
The power of prompts comes from the ability to use variables in your prompt. You can use variables to add dynamic content to your prompt. Add a template variable in one of two ways:
1. Add `{{variable_name}}` to your prompt (with one curly brace on each side for `f-string` and two for `mustache`).
### Add a template variable
The power of prompts comes from the ability to use variables in your prompt. You can use variables to add dynamic content to your prompt. Add a template variable in one of two ways:
1. Add `{{variable_name}}` to your prompt (with one curly brace on each side for `f-string` and two for `mustache`).  2. Highlight text you want to templatize and click the tooltip button that shows up. Enter a name for your variable, and convert.
  When we add a variable, we see a place to enter sample inputs for our prompt variables. Fill these in with values to test the prompt.
  ### Structured output
Adding an output schema to your prompt will get output in a structured format. Learn more about structured output [here](/langsmith/prompt-engineering-concepts#structured-output).
### Structured output
Adding an output schema to your prompt will get output in a structured format. Learn more about structured output [here](/langsmith/prompt-engineering-concepts#structured-output). 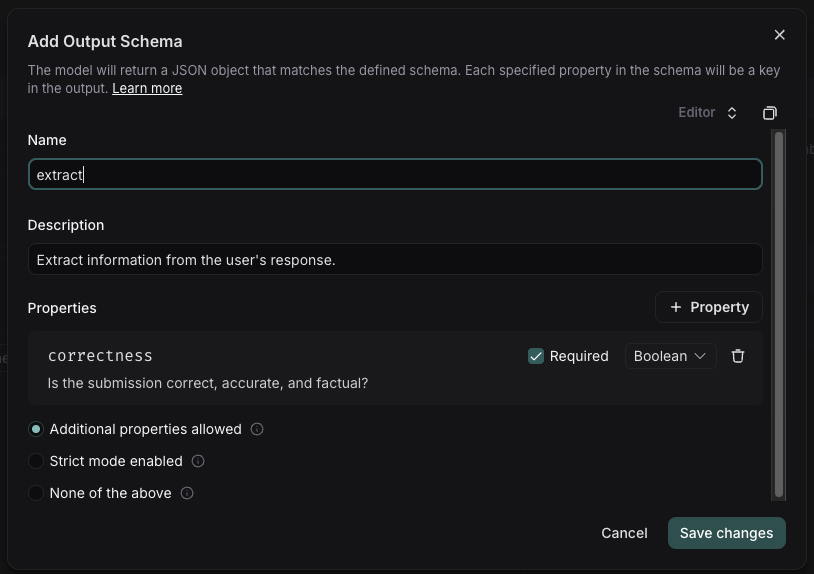 ### Tools
You can also add a tool by clicking the `+ Tool` button at the bottom of the prompt editor. See [here](/langsmith/use-tools) for more information on how to use tools.
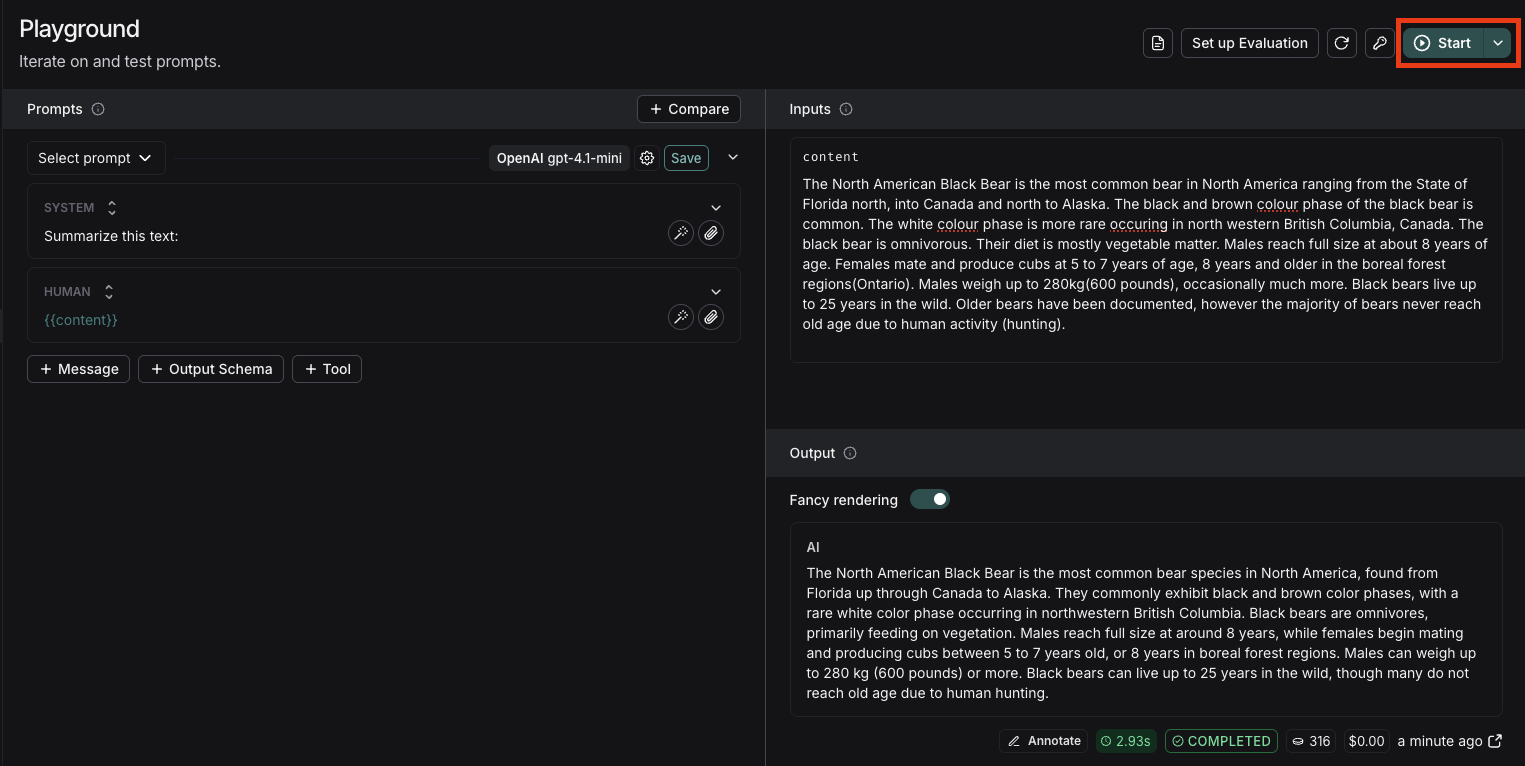
## Run the prompt
Click "Start" to run the prompt.
### Tools
You can also add a tool by clicking the `+ Tool` button at the bottom of the prompt editor. See [here](/langsmith/use-tools) for more information on how to use tools.
## Run the prompt
Click "Start" to run the prompt.
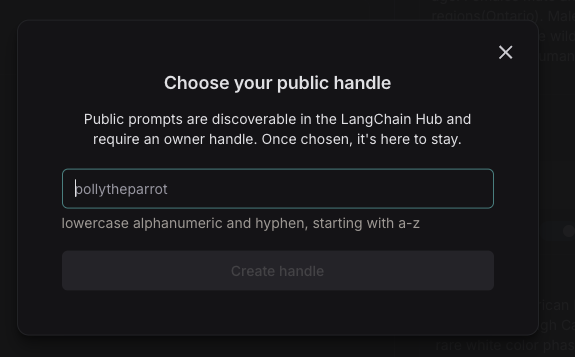
 ## Save your prompt
To save your prompt, click the "Save" button, name your prompt, and decide if you want it to be "private" or "public". Private prompts are only visible to your workspace, while public prompts are discoverable to anyone.
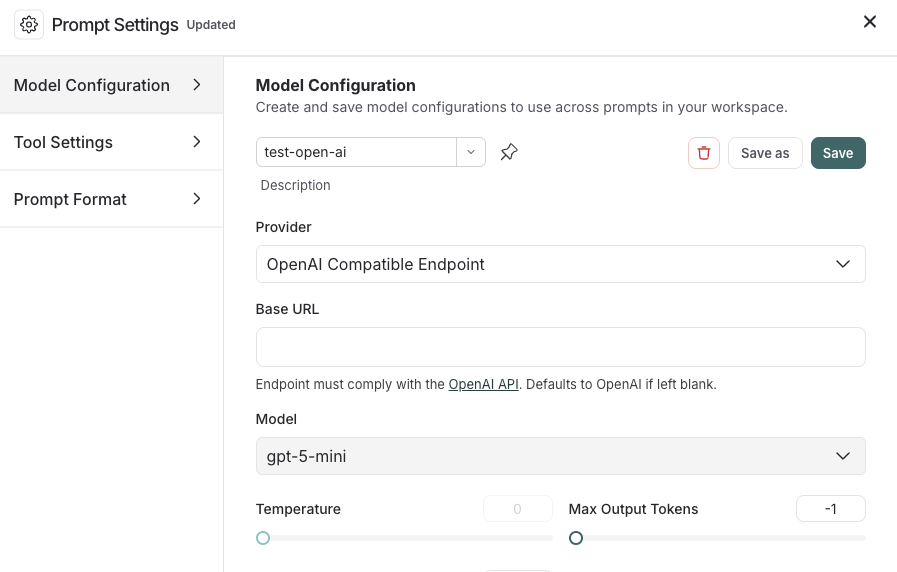
The model and configuration you select in the Playground settings will be saved with the prompt. When you reopen the prompt, the model and configuration will automatically load from the saved version.
## Save your prompt
To save your prompt, click the "Save" button, name your prompt, and decide if you want it to be "private" or "public". Private prompts are only visible to your workspace, while public prompts are discoverable to anyone.
The model and configuration you select in the Playground settings will be saved with the prompt. When you reopen the prompt, the model and configuration will automatically load from the saved version. 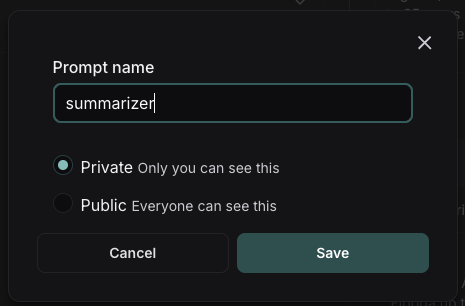
 ## View your prompts
You've just created your first prompt! View a table of your prompts in the prompts tab.
## View your prompts
You've just created your first prompt! View a table of your prompts in the prompts tab.
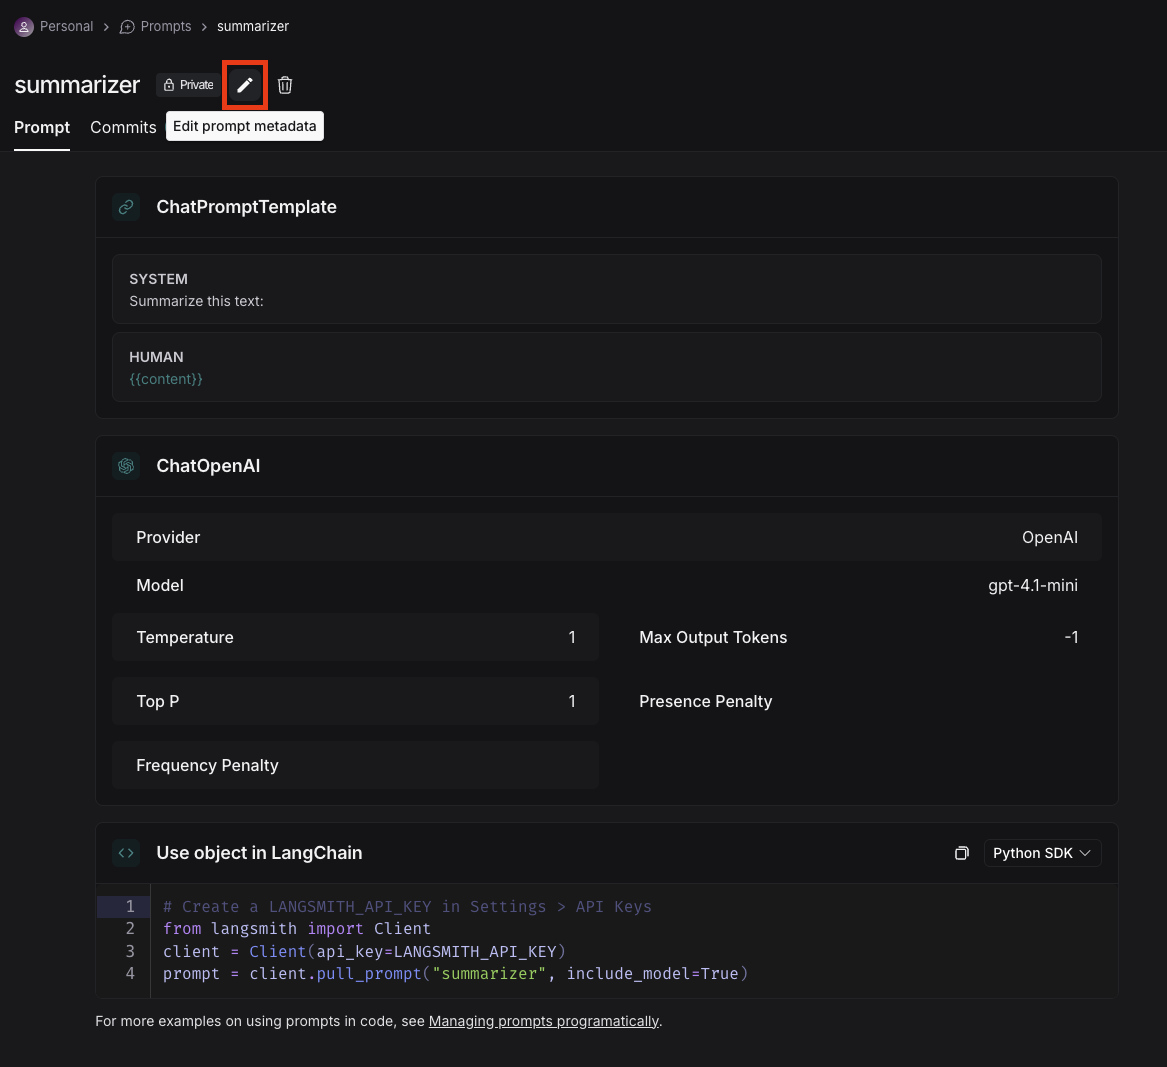
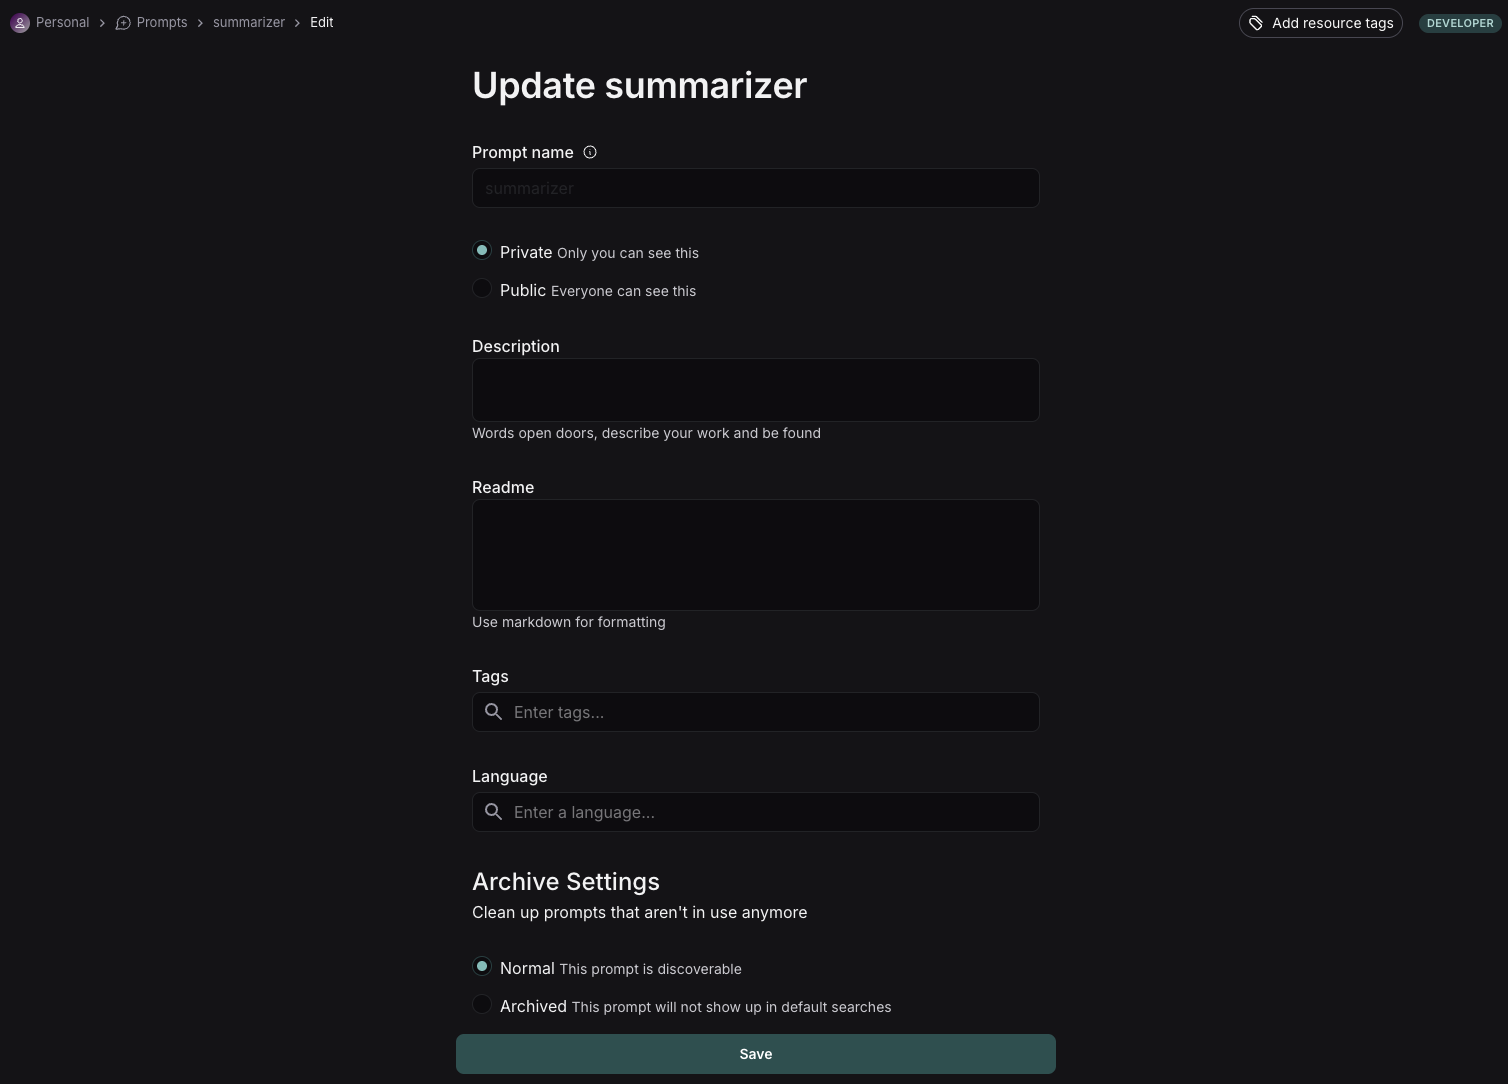
 ## Add metadata
To add metadata to your prompt, click the prompt and then click the "Edit" pencil icon next to the name. This brings you to where you can add additional information about the prompt, including a description, a README, and use cases. For public prompts this information will be visible to anyone who views your prompt in the LangChain Hub.
## Add metadata
To add metadata to your prompt, click the prompt and then click the "Edit" pencil icon next to the name. This brings you to where you can add additional information about the prompt, including a description, a README, and use cases. For public prompts this information will be visible to anyone who views your prompt in the LangChain Hub.
 # Next steps
Now that you've created a prompt, you can use it in your application code. See [how to pull a prompt programmatically](/langsmith/manage-prompts-programmatically#pull-a-prompt).
***
# Next steps
Now that you've created a prompt, you can use it in your application code. See [how to pull a prompt programmatically](/langsmith/manage-prompts-programmatically#pull-a-prompt).
***
 ## API keys
LangSmith supports two types of API keys: Service Keys and Personal Access Tokens. Both types of tokens can be used to authenticate requests to the LangSmith API, but they have different use cases.
For more details on Service Keys and Personal Access Tokens, refer to the [Administration overview page](/langsmith/administration-overview).
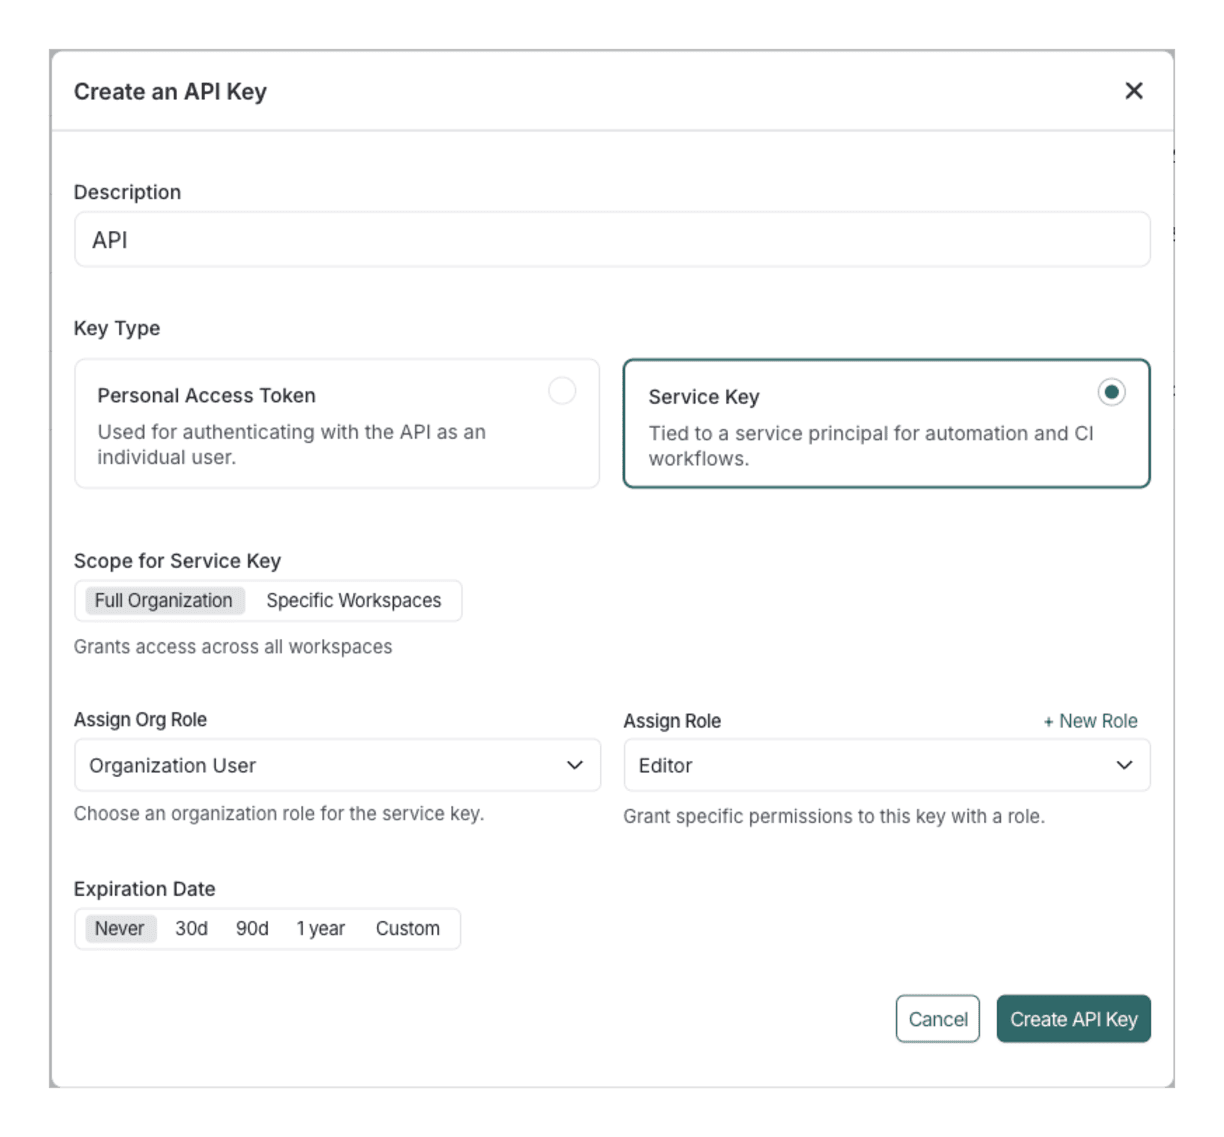
## Create an API key
To log traces and run evaluations with LangSmith, you will need to create an API key to authenticate your requests. API keys can be scoped to a set of [workspaces](/langsmith/administration-overview#workspaces), or the entire [organization](/langsmith/administration-overview#organizations).
To create either type of API key:
1. Navigate to the [Settings page](https://smith.langchain.com/settings) and scroll to the **API Keys** section.
2. For service keys, choose between an organization-scoped and workspace-scoped key. If the key is workspace-scoped, the workspaces must then be specified.
Enterprise users are also able to [assign specific roles](/langsmith/administration-overview#workspace-roles-rbac) to the key, which adjusts its permissions.
3. Set the key's expiration; the key will become unusable after the number of days chosen, or never, if that is selected.
4. Click **Create API Key.**
## API keys
LangSmith supports two types of API keys: Service Keys and Personal Access Tokens. Both types of tokens can be used to authenticate requests to the LangSmith API, but they have different use cases.
For more details on Service Keys and Personal Access Tokens, refer to the [Administration overview page](/langsmith/administration-overview).
## Create an API key
To log traces and run evaluations with LangSmith, you will need to create an API key to authenticate your requests. API keys can be scoped to a set of [workspaces](/langsmith/administration-overview#workspaces), or the entire [organization](/langsmith/administration-overview#organizations).
To create either type of API key:
1. Navigate to the [Settings page](https://smith.langchain.com/settings) and scroll to the **API Keys** section.
2. For service keys, choose between an organization-scoped and workspace-scoped key. If the key is workspace-scoped, the workspaces must then be specified.
Enterprise users are also able to [assign specific roles](/langsmith/administration-overview#workspace-roles-rbac) to the key, which adjusts its permissions.
3. Set the key's expiration; the key will become unusable after the number of days chosen, or never, if that is selected.
4. Click **Create API Key.**
 ## Delete an API key
To delete an API key:
1. Navigate to the [Settings page](https://smith.langchain.com/settings) and scroll to the **API Keys** section.
2. Find the API key you need to delete from the table. Toggle **Personal** or **Service** as needed.
3. Select the trash icon
## Delete an API key
To delete an API key:
1. Navigate to the [Settings page](https://smith.langchain.com/settings) and scroll to the **API Keys** section.
2. Find the API key you need to delete from the table. Toggle **Personal** or **Service** as needed.
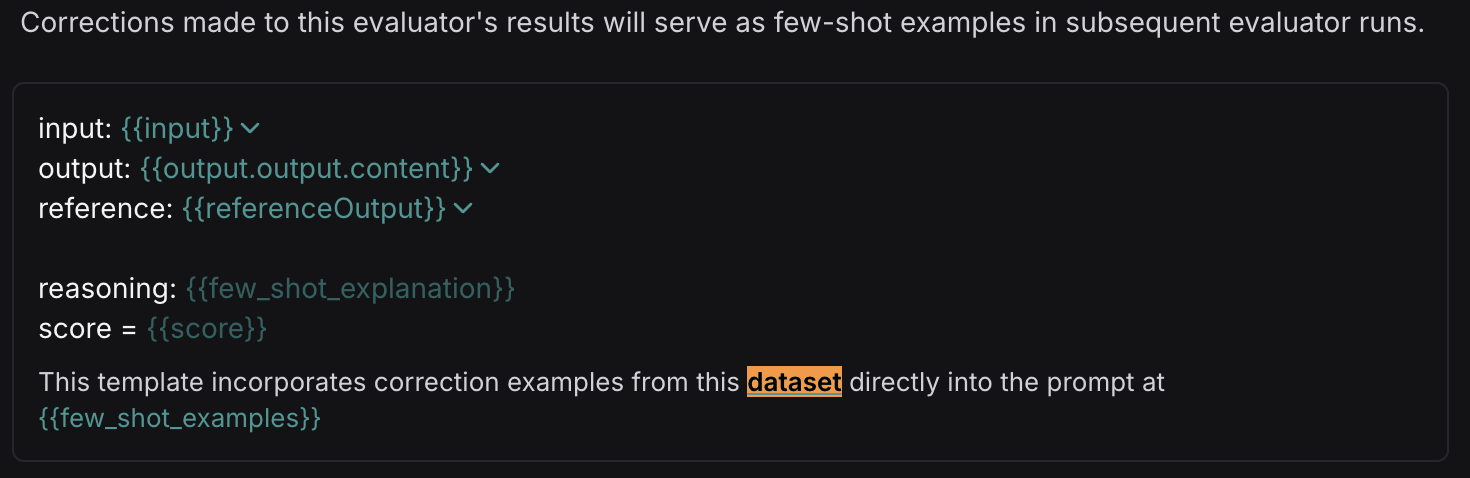
3. Select the trash icon  Note that the corrections may take a minute or two to be populated into your few-shot dataset. Once they are there, future runs of your evaluator will include them in the prompt!
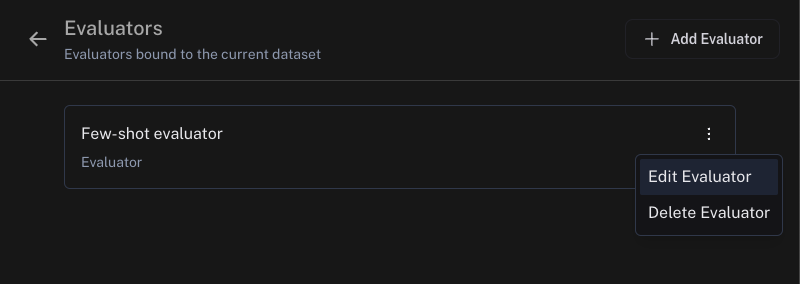
## View your corrections dataset
In order to view your corrections dataset:
* **Online evaluators**: Select your run rule and click **Edit Rule**
* **Offline evaluators**: Select your evaluator and click **Edit Evaluator**
Note that the corrections may take a minute or two to be populated into your few-shot dataset. Once they are there, future runs of your evaluator will include them in the prompt!
## View your corrections dataset
In order to view your corrections dataset:
* **Online evaluators**: Select your run rule and click **Edit Rule**
* **Offline evaluators**: Select your evaluator and click **Edit Evaluator**
 Head to your dataset of corrections linked in the the **Improve evaluator accuracy using few-shot examples** section. You can view and update your few-shot examples in the dataset.
 ***
***
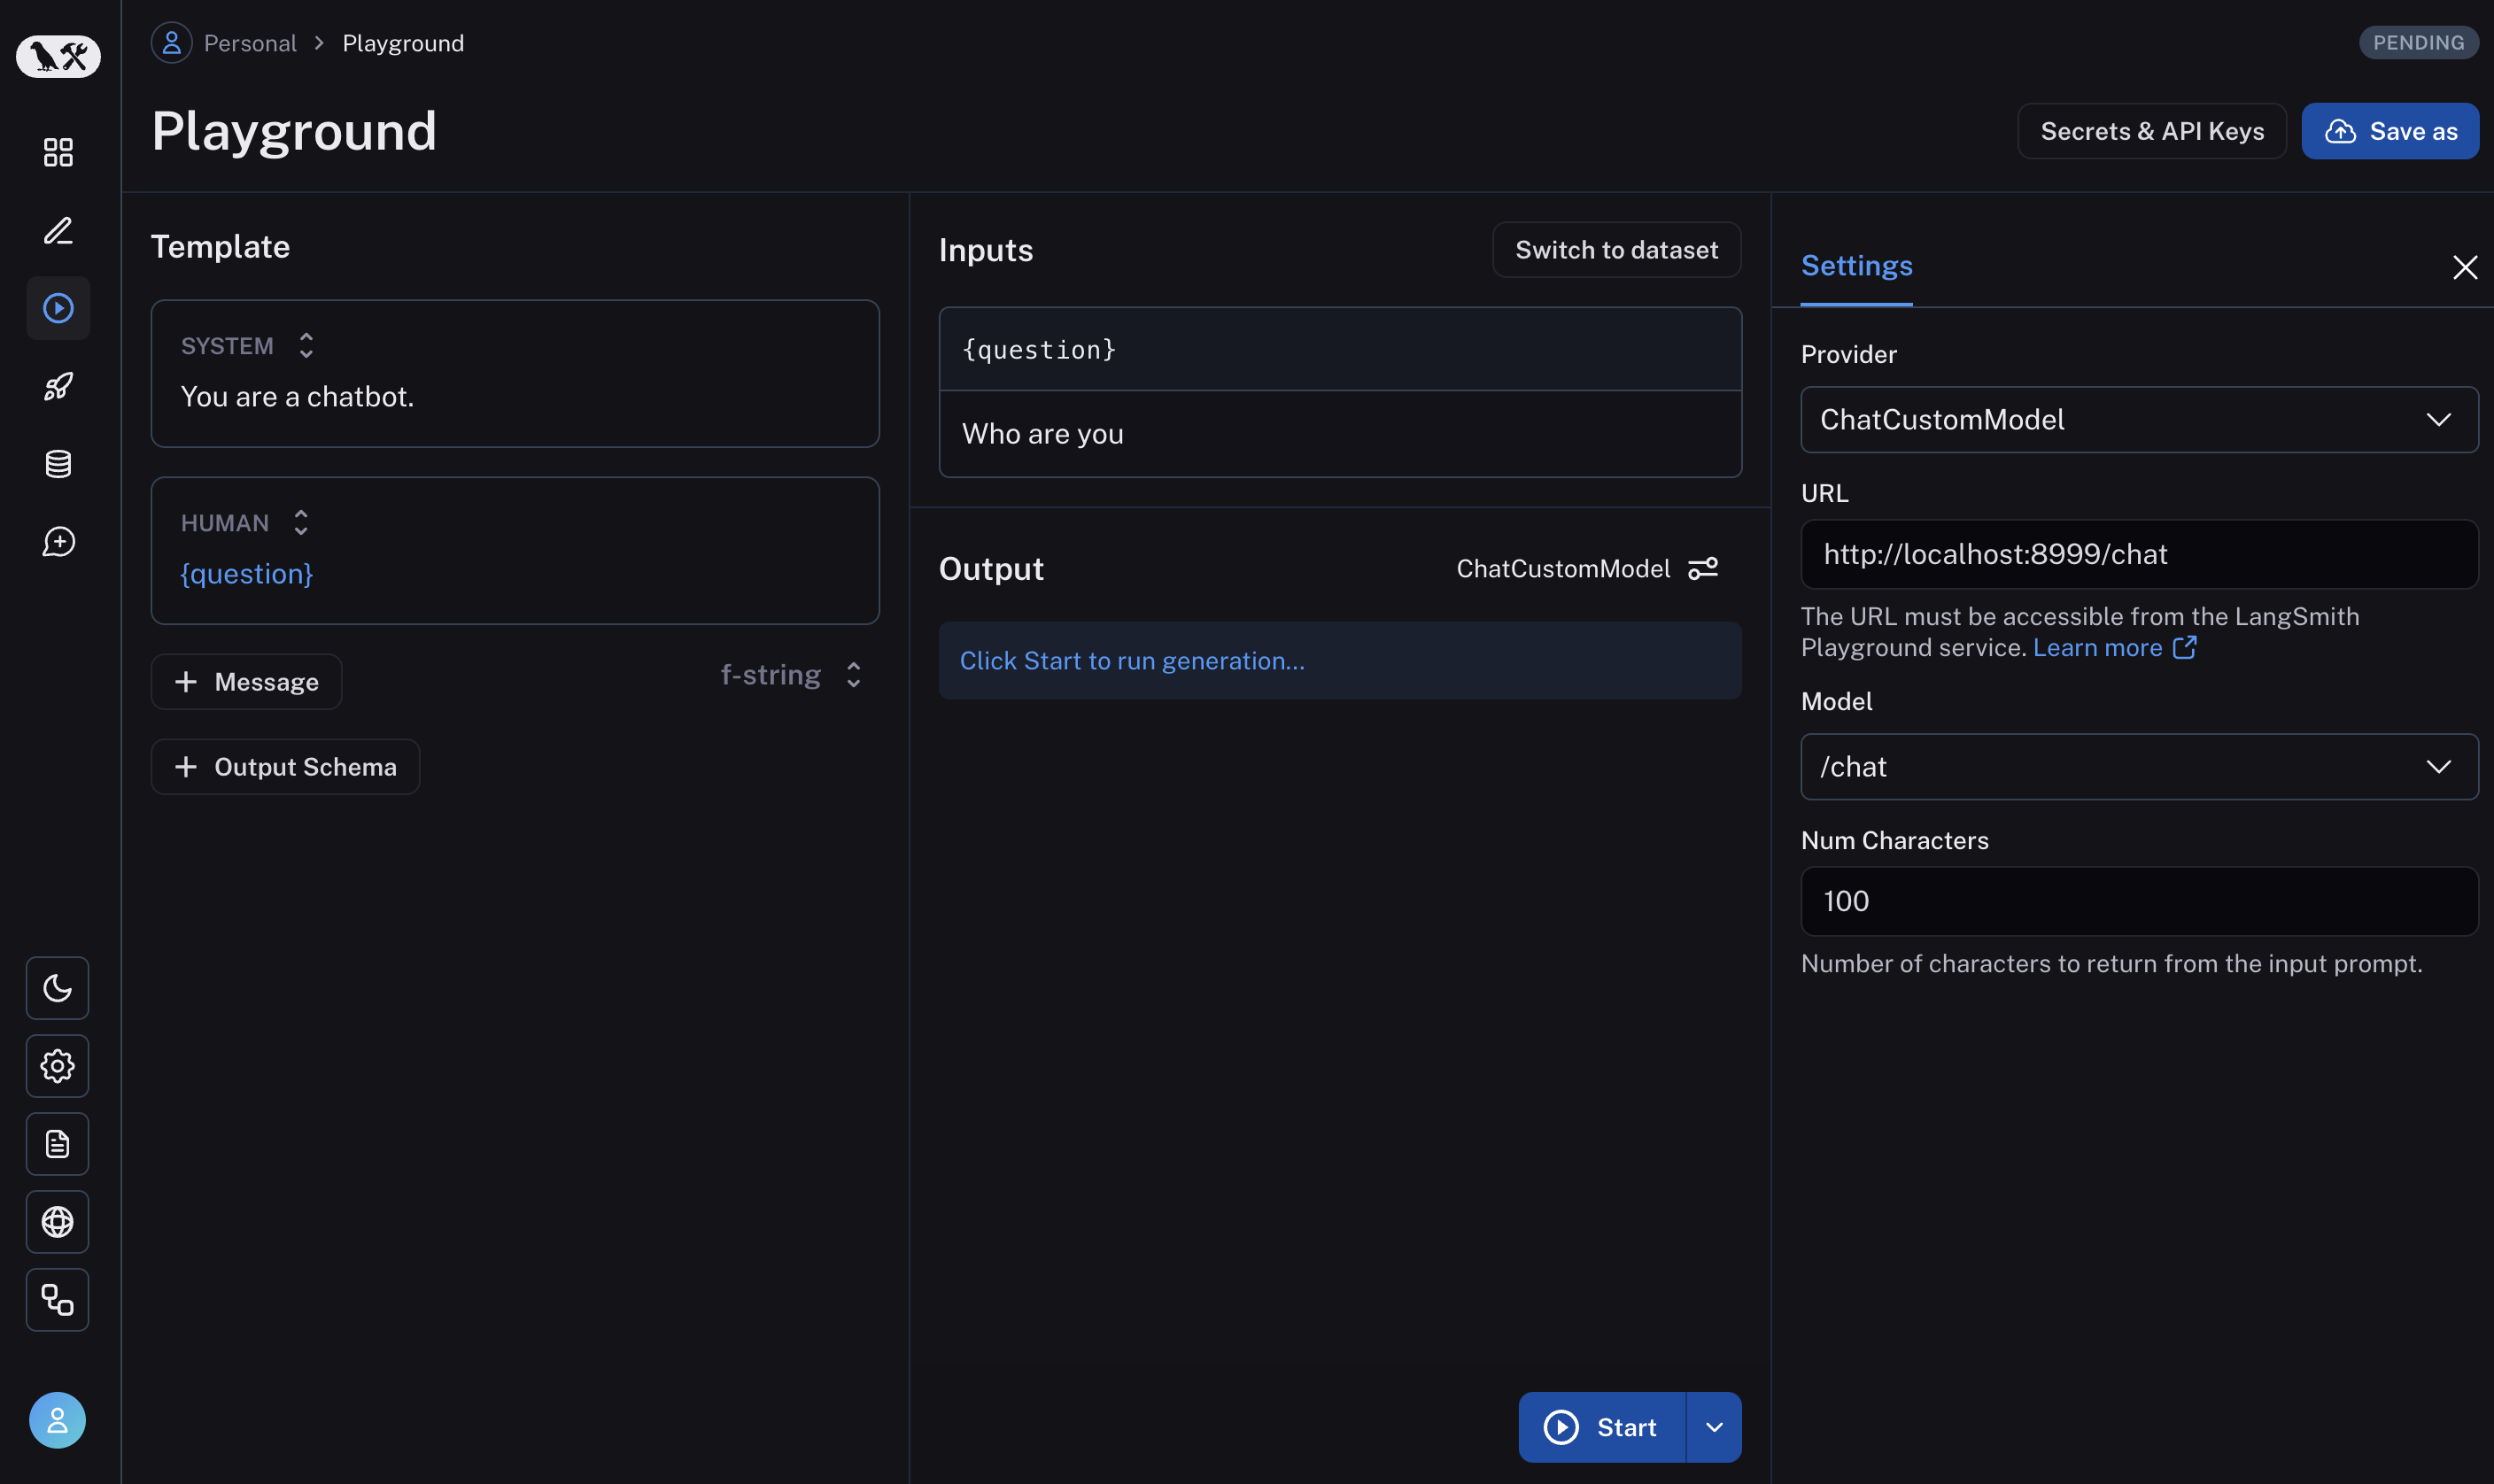 If everything is set up correctly, you should see the model's response in the playground as well as the configurable fields specified in the `with_configurable_fields`.
See how to store your model configuration for later use [here](/langsmith/managing-model-configurations).
***
If everything is set up correctly, you should see the model's response in the playground as well as the configurable fields specified in the `with_configurable_fields`.
See how to store your model configuration for later use [here](/langsmith/managing-model-configurations).
***

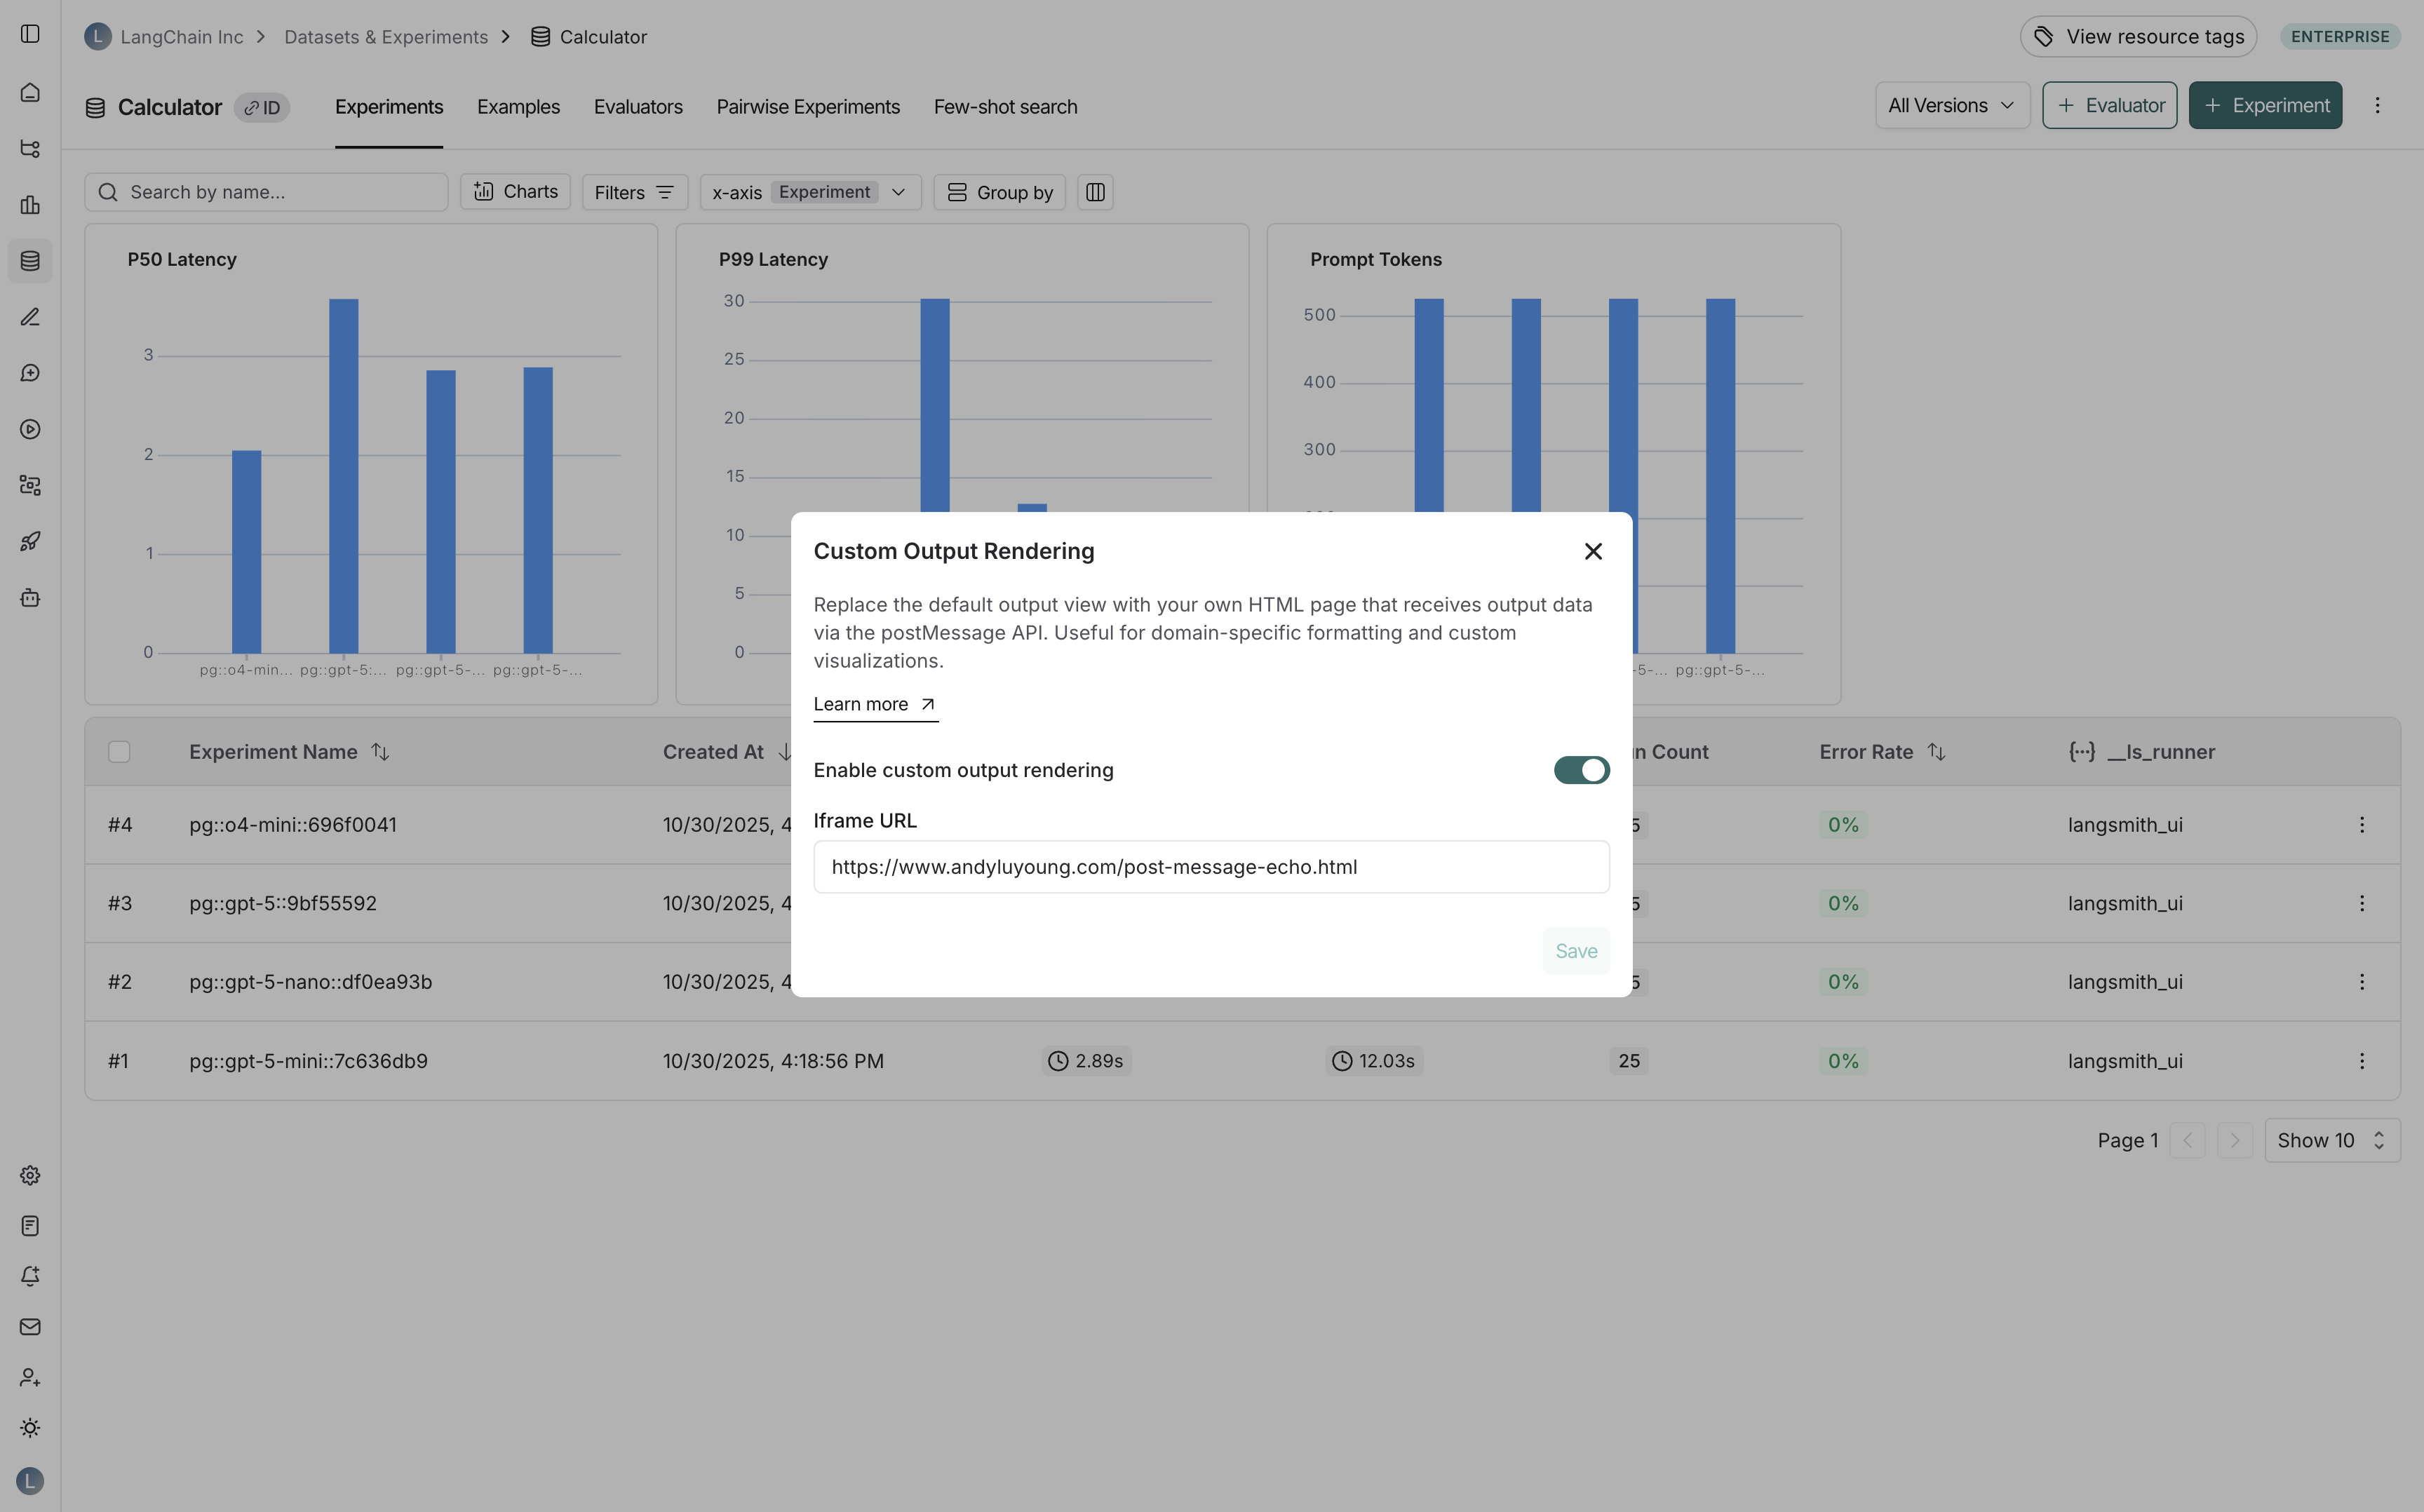
 1. Navigate to your dataset in the **Datasets & Experiments** page.
2. Click **⋮** (three-dot menu) in the top right corner.
3. Select **Custom Output Rendering**.
4. Toggle **Enable custom output rendering**.
5. Enter the webpage URL in the **URL** field.
6. Click **Save**.
1. Navigate to your dataset in the **Datasets & Experiments** page.
2. Click **⋮** (three-dot menu) in the top right corner.
3. Select **Custom Output Rendering**.
4. Toggle **Enable custom output rendering**.
5. Enter the webpage URL in the **URL** field.
6. Click **Save**.
 ### For annotation queues
To configure custom output rendering for an annotation queue:
### For annotation queues
To configure custom output rendering for an annotation queue:
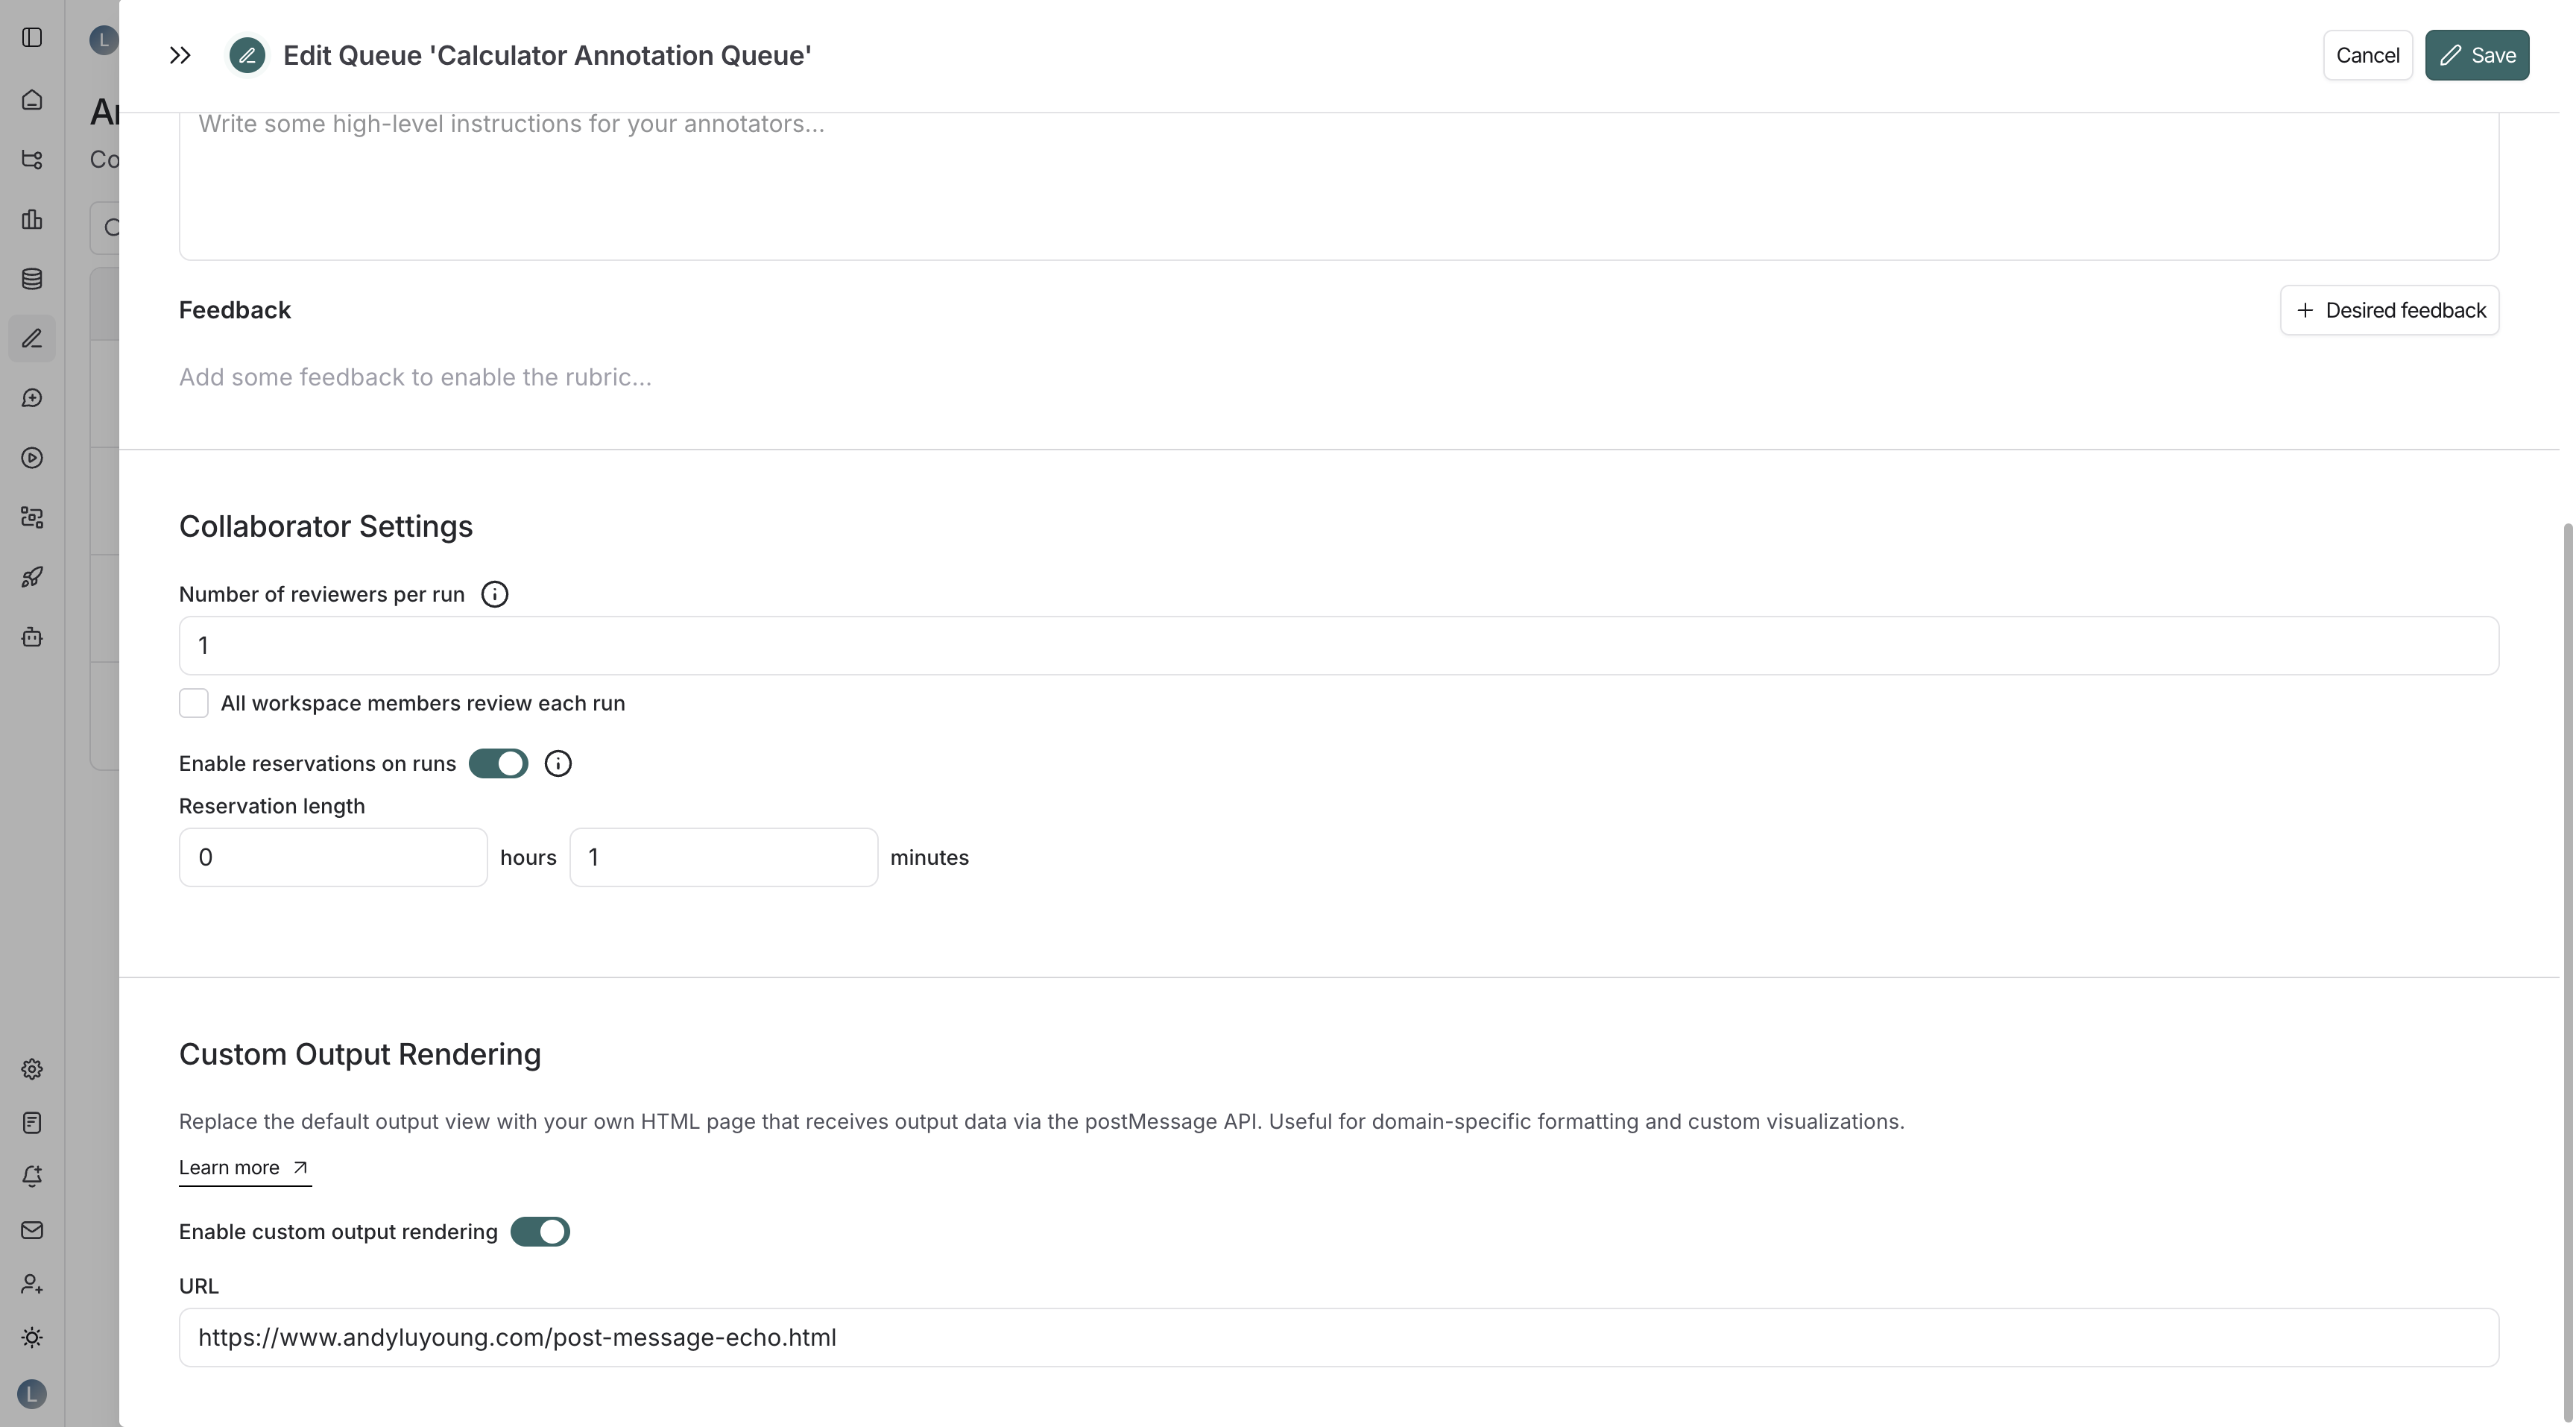 1. Navigate to the **Annotation Queues** page.
2. Click on an existing annotation queue or create a new one.
3. In the annotation queue settings pane, scroll to the **Custom Output Rendering** section.
4. Toggle **Enable custom output rendering**.
5. Enter the webpage URL in the **URL** field.
6. Click **Save** or **Create**.
1. Navigate to the **Annotation Queues** page.
2. Click on an existing annotation queue or create a new one.
3. In the annotation queue settings pane, scroll to the **Custom Output Rendering** section.
4. Toggle **Enable custom output rendering**.
5. Enter the webpage URL in the **URL** field.
6. Click **Save** or **Create**.
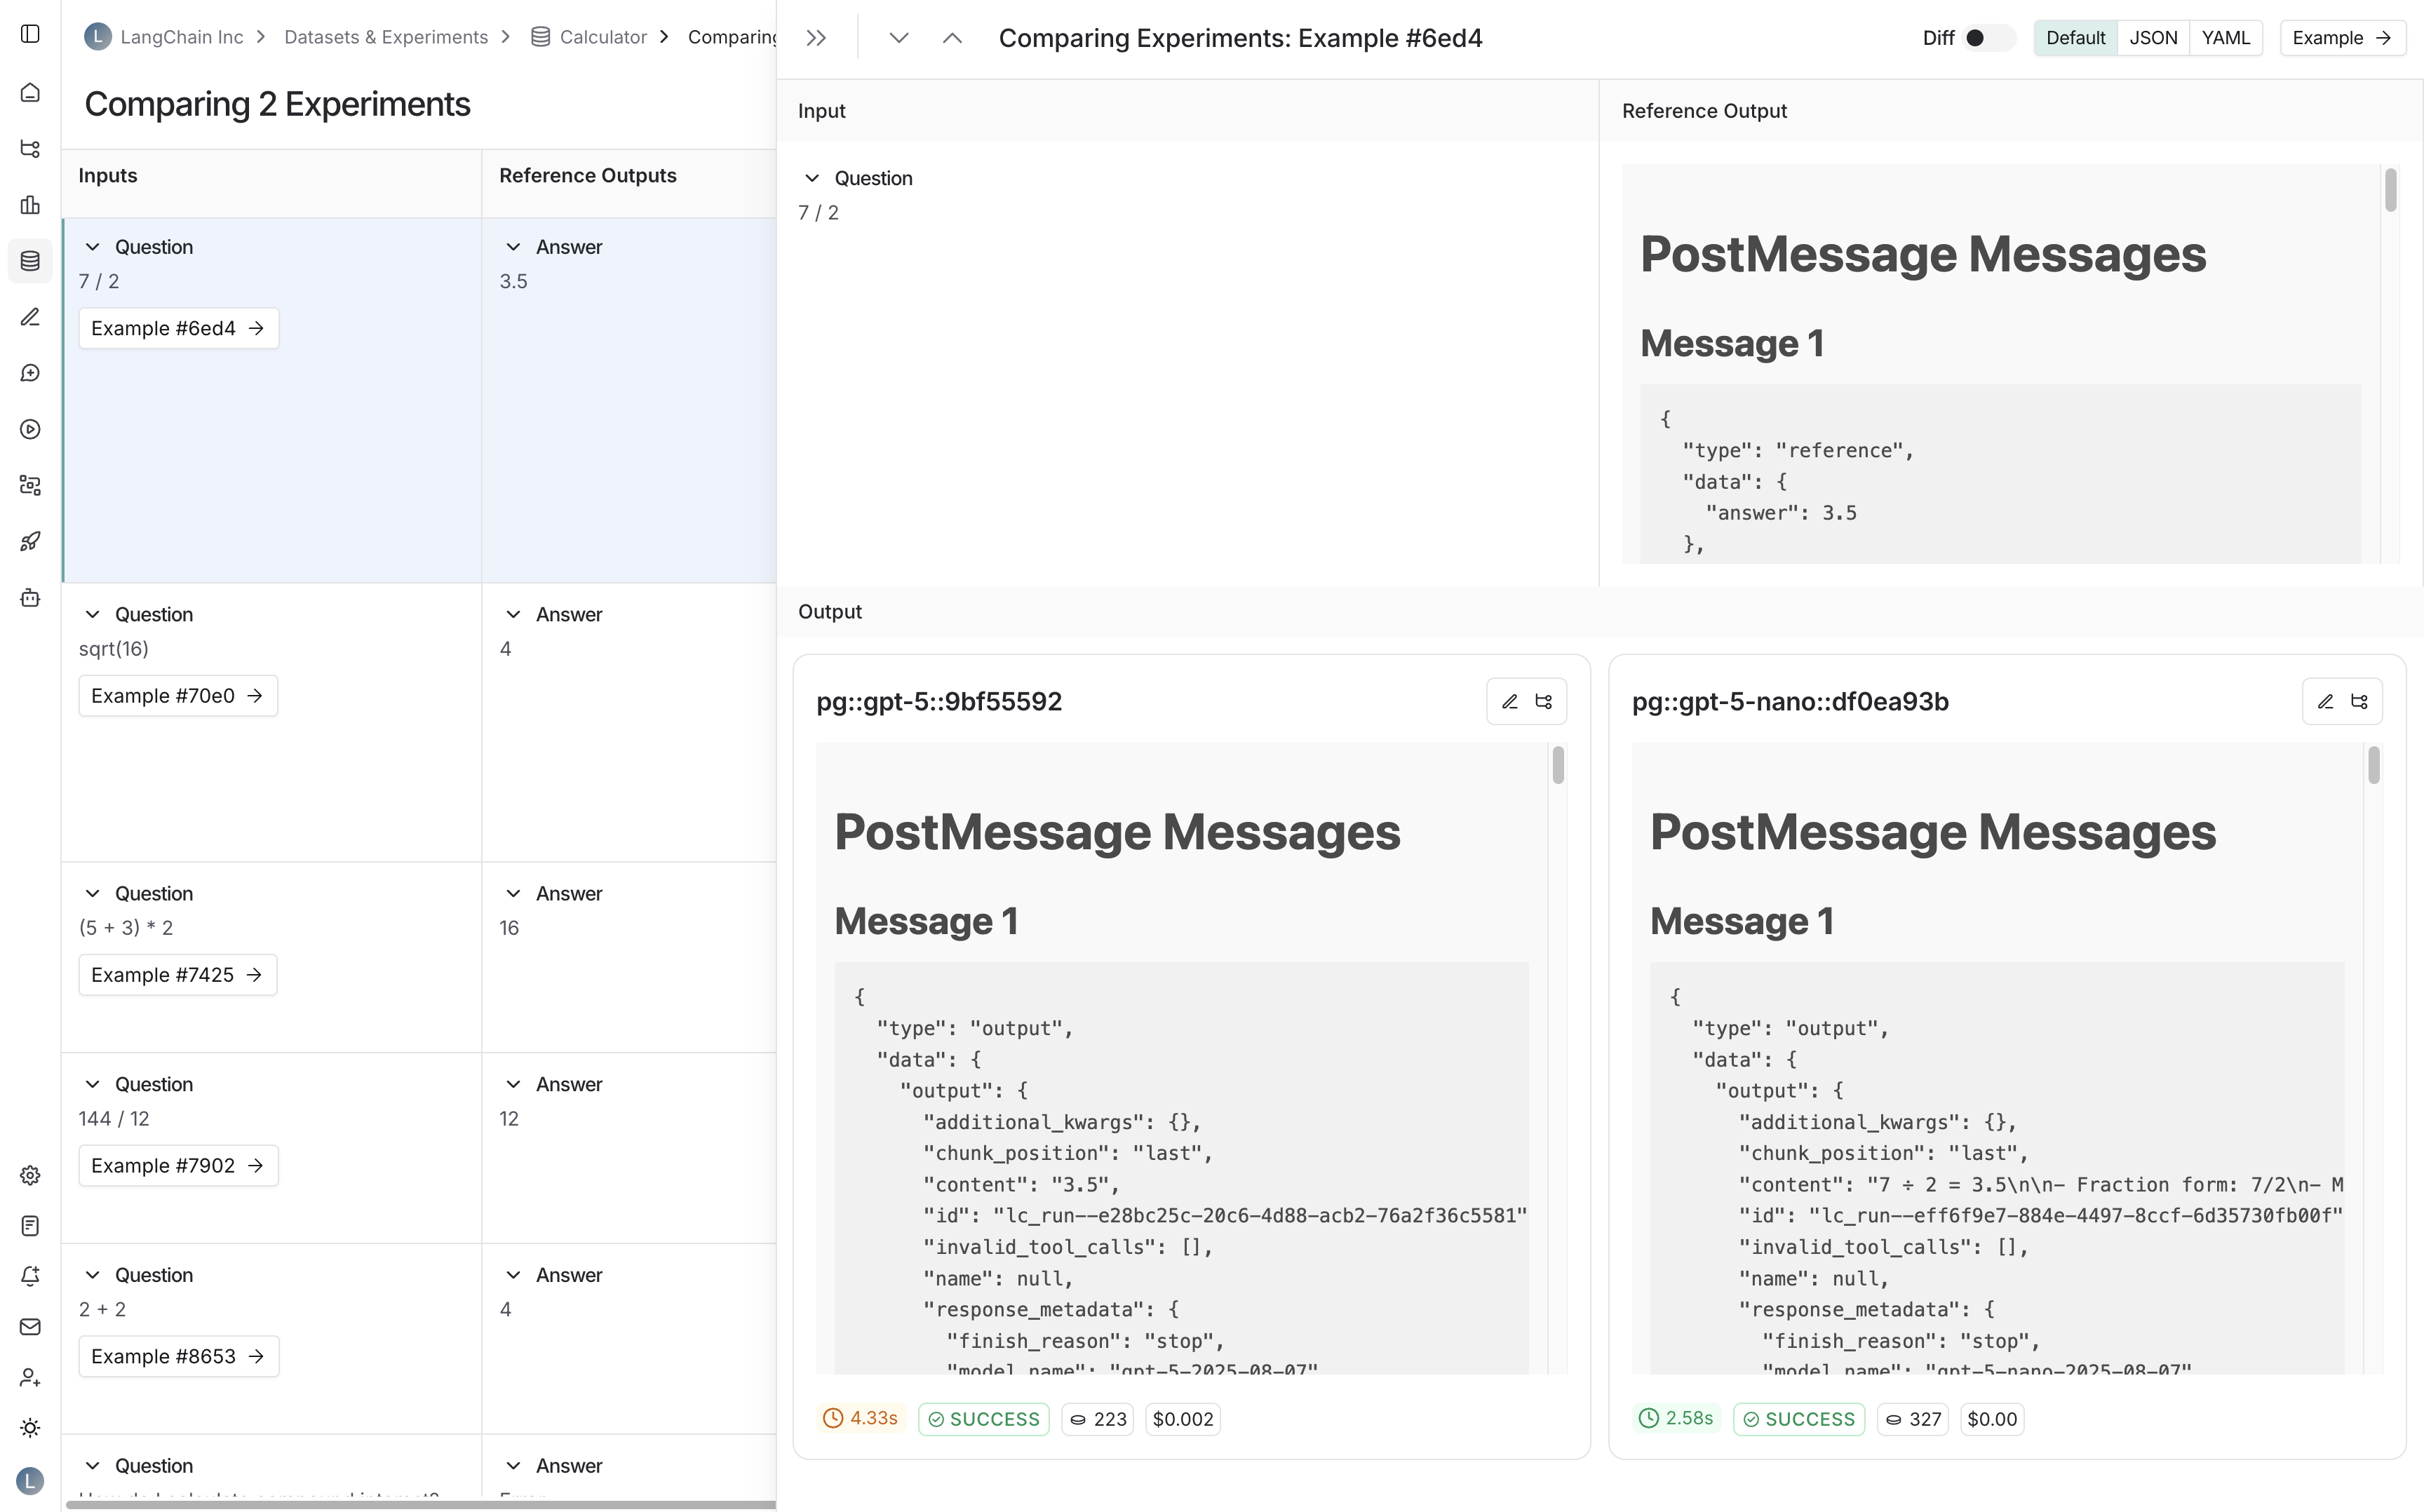 * **Run detail panes**: When viewing runs that are associated with a dataset:
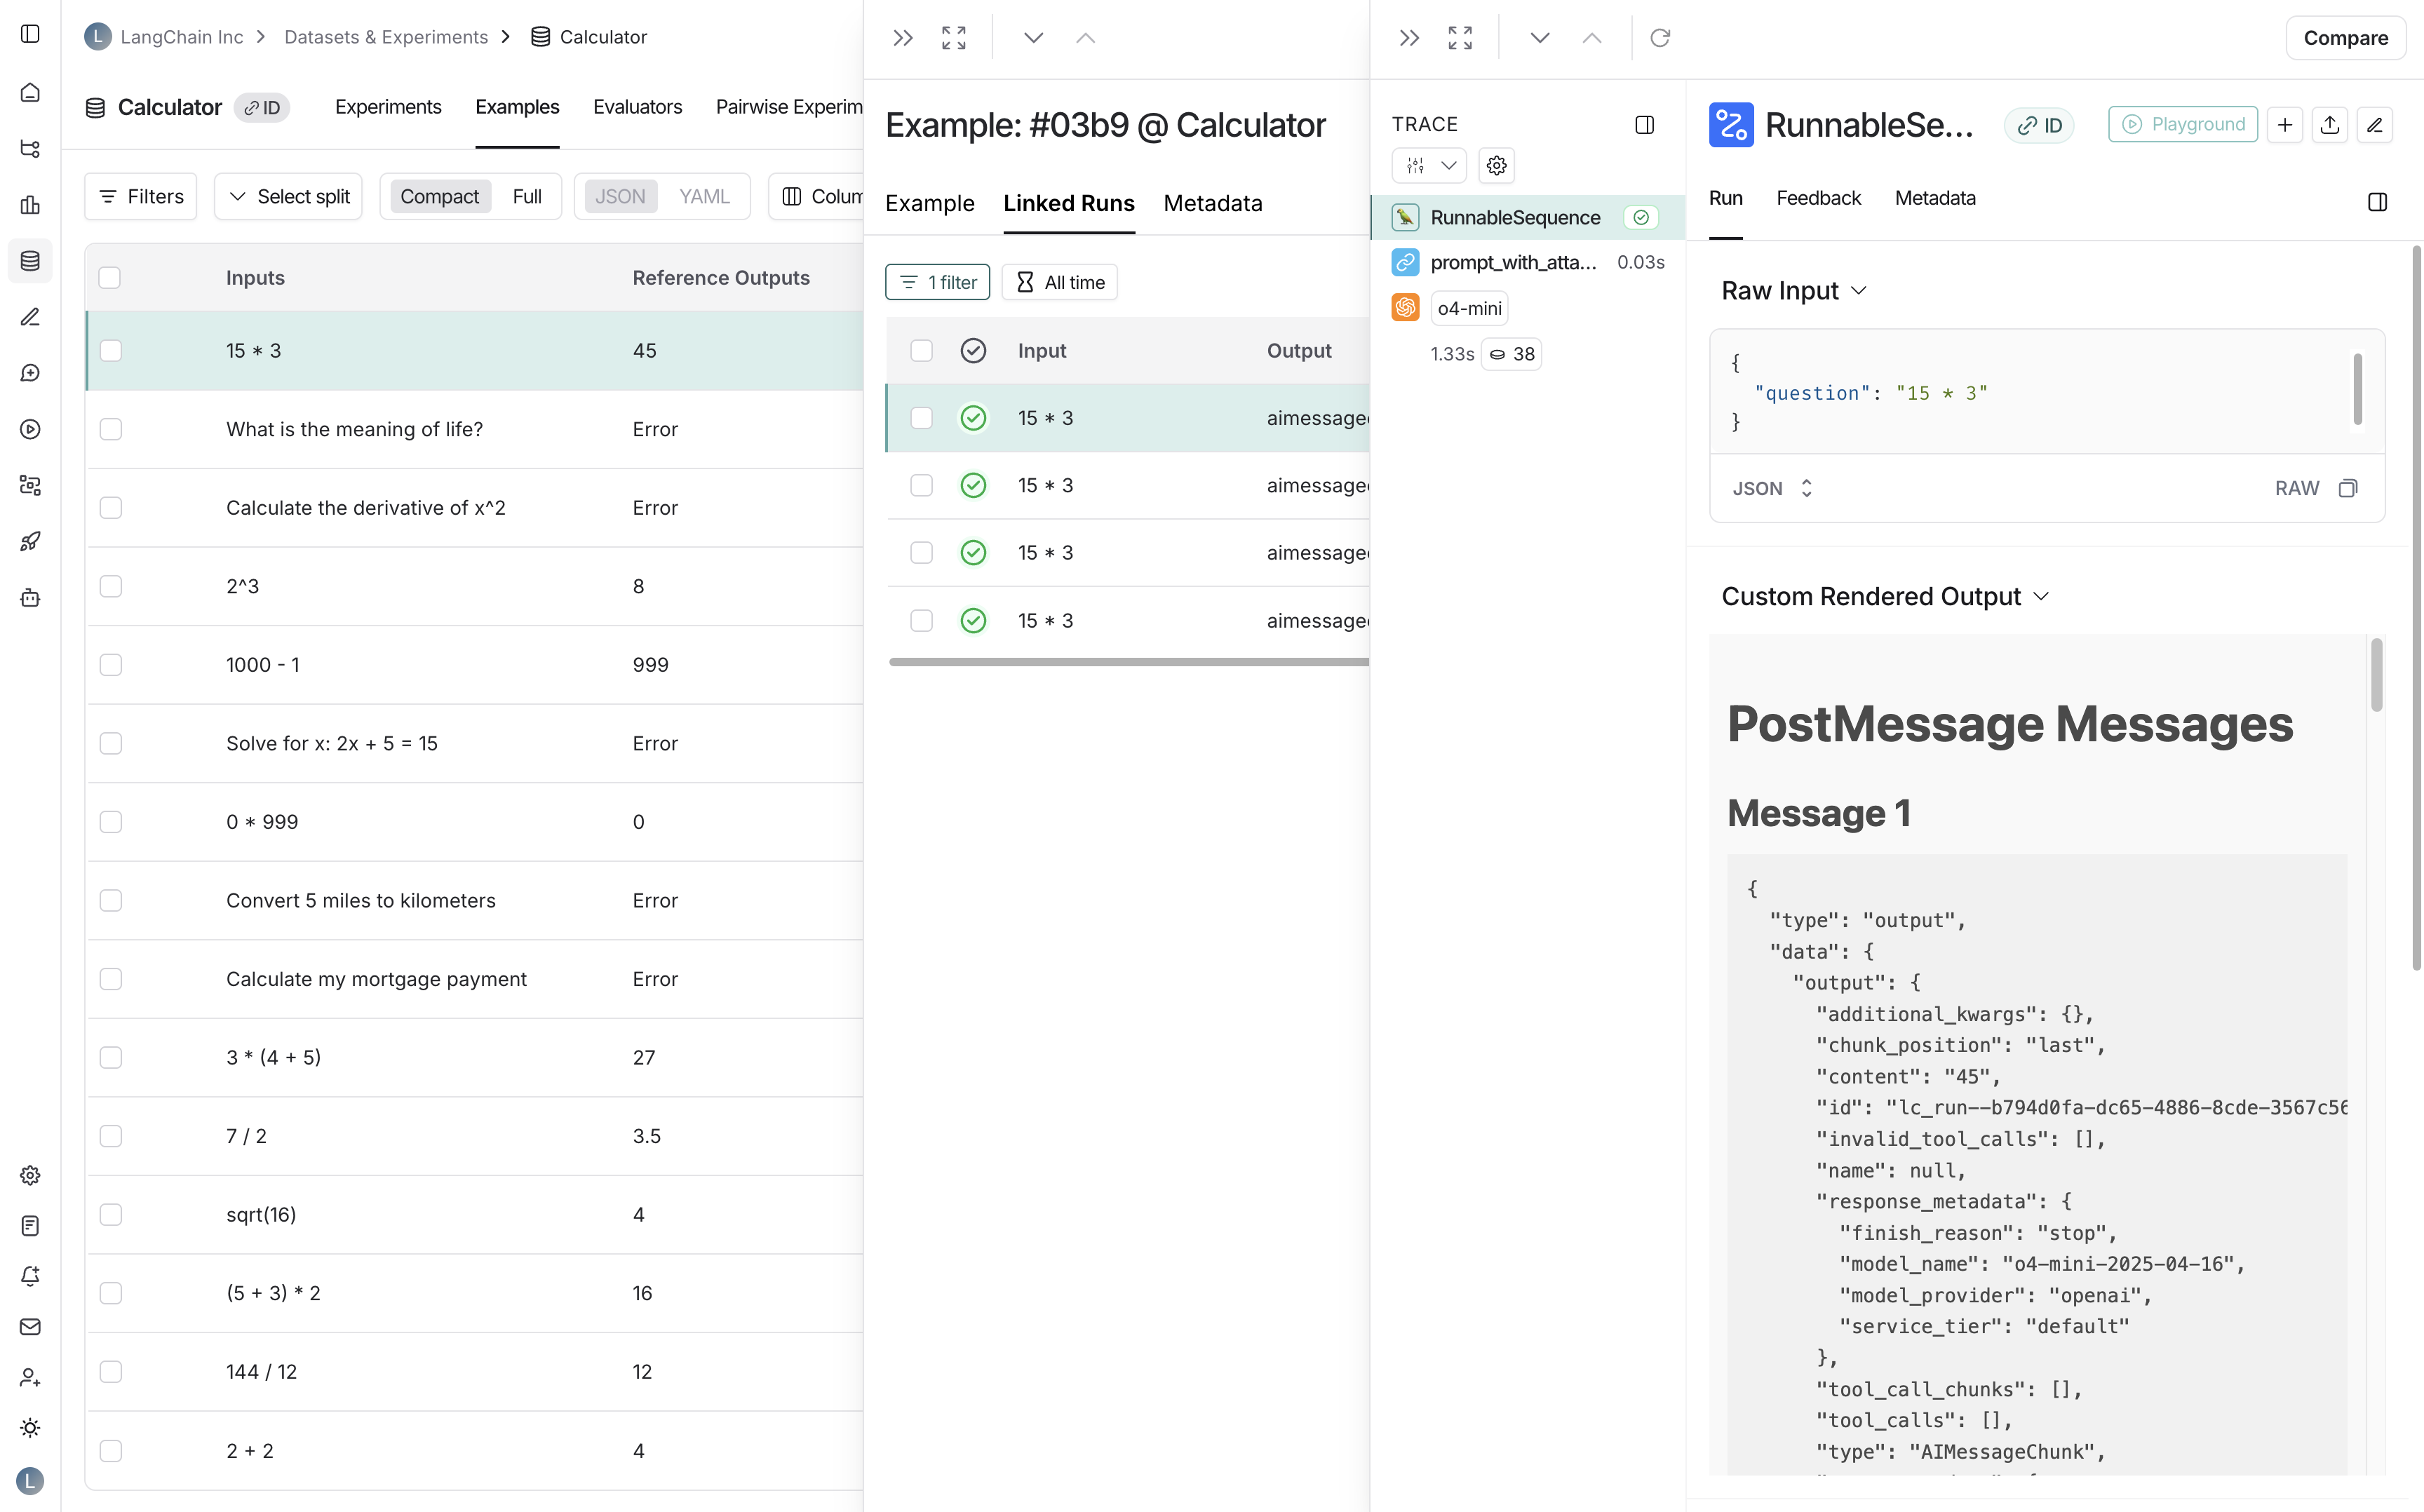 * **Annotation queues**: When reviewing runs in annotation queues:
 ***
***
 ### Group by
Group by [run tag or metadata](/langsmith/add-metadata-tags) can be used to split data over attributes that are important to your application. The global group by setting appears on the top right hand side of the dashboard. Note that the Tool and Run Type charts already have a group by applied, so the global group by won't take effect; the global group by will apply to all other charts.
### Group by
Group by [run tag or metadata](/langsmith/add-metadata-tags) can be used to split data over attributes that are important to your application. The global group by setting appears on the top right hand side of the dashboard. Note that the Tool and Run Type charts already have a group by applied, so the global group by won't take effect; the global group by will apply to all other charts.
 #### Split the data
There are two ways to create multiple series in a chart (i.e. create multiple lines in a chart):
1. **Group by**: Group runs by [run tag or metadata](/langsmith/add-metadata-tags), run name, or run type. Group by automatically splits the data into multiple series based on the field selected. Note that group by is limited to the top 5 elements by frequency.
2. **Data series**: Manually define multiple series with individual filters. This is useful for comparing granular data within a single metric.
#### Split the data
There are two ways to create multiple series in a chart (i.e. create multiple lines in a chart):
1. **Group by**: Group runs by [run tag or metadata](/langsmith/add-metadata-tags), run name, or run type. Group by automatically splits the data into multiple series based on the field selected. Note that group by is limited to the top 5 elements by frequency.
2. **Data series**: Manually define multiple series with individual filters. This is useful for comparing granular data within a single metric.
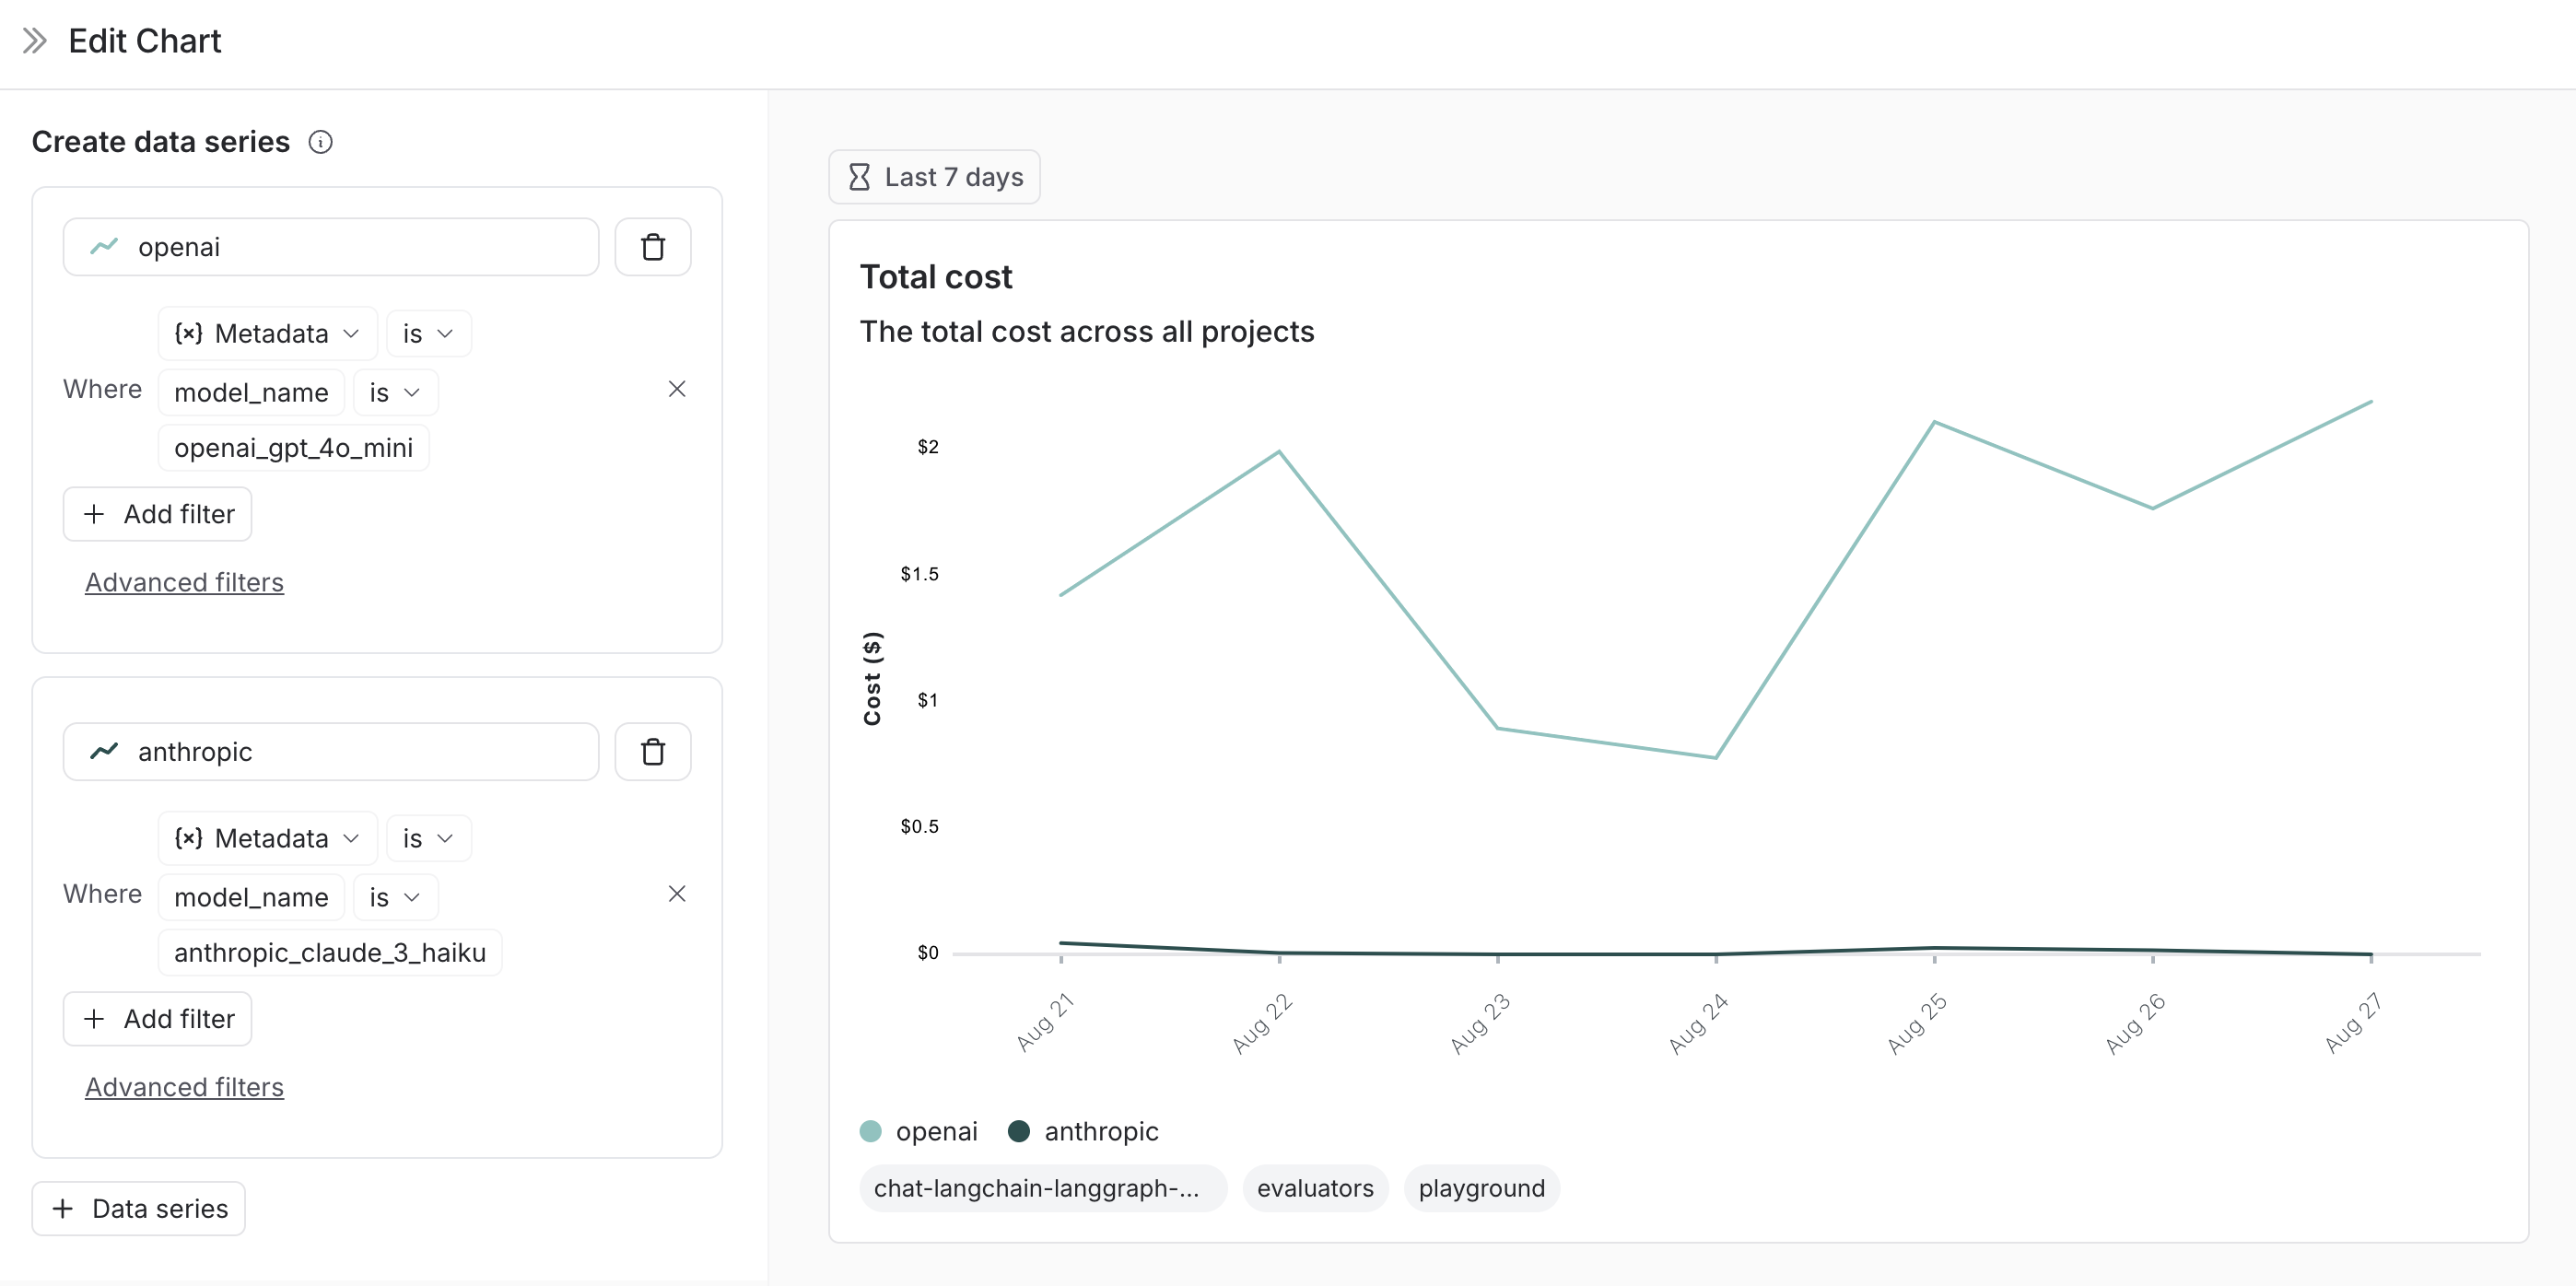 #### Pick a chart type
* Choose between a line chart and a bar chart for visualizing
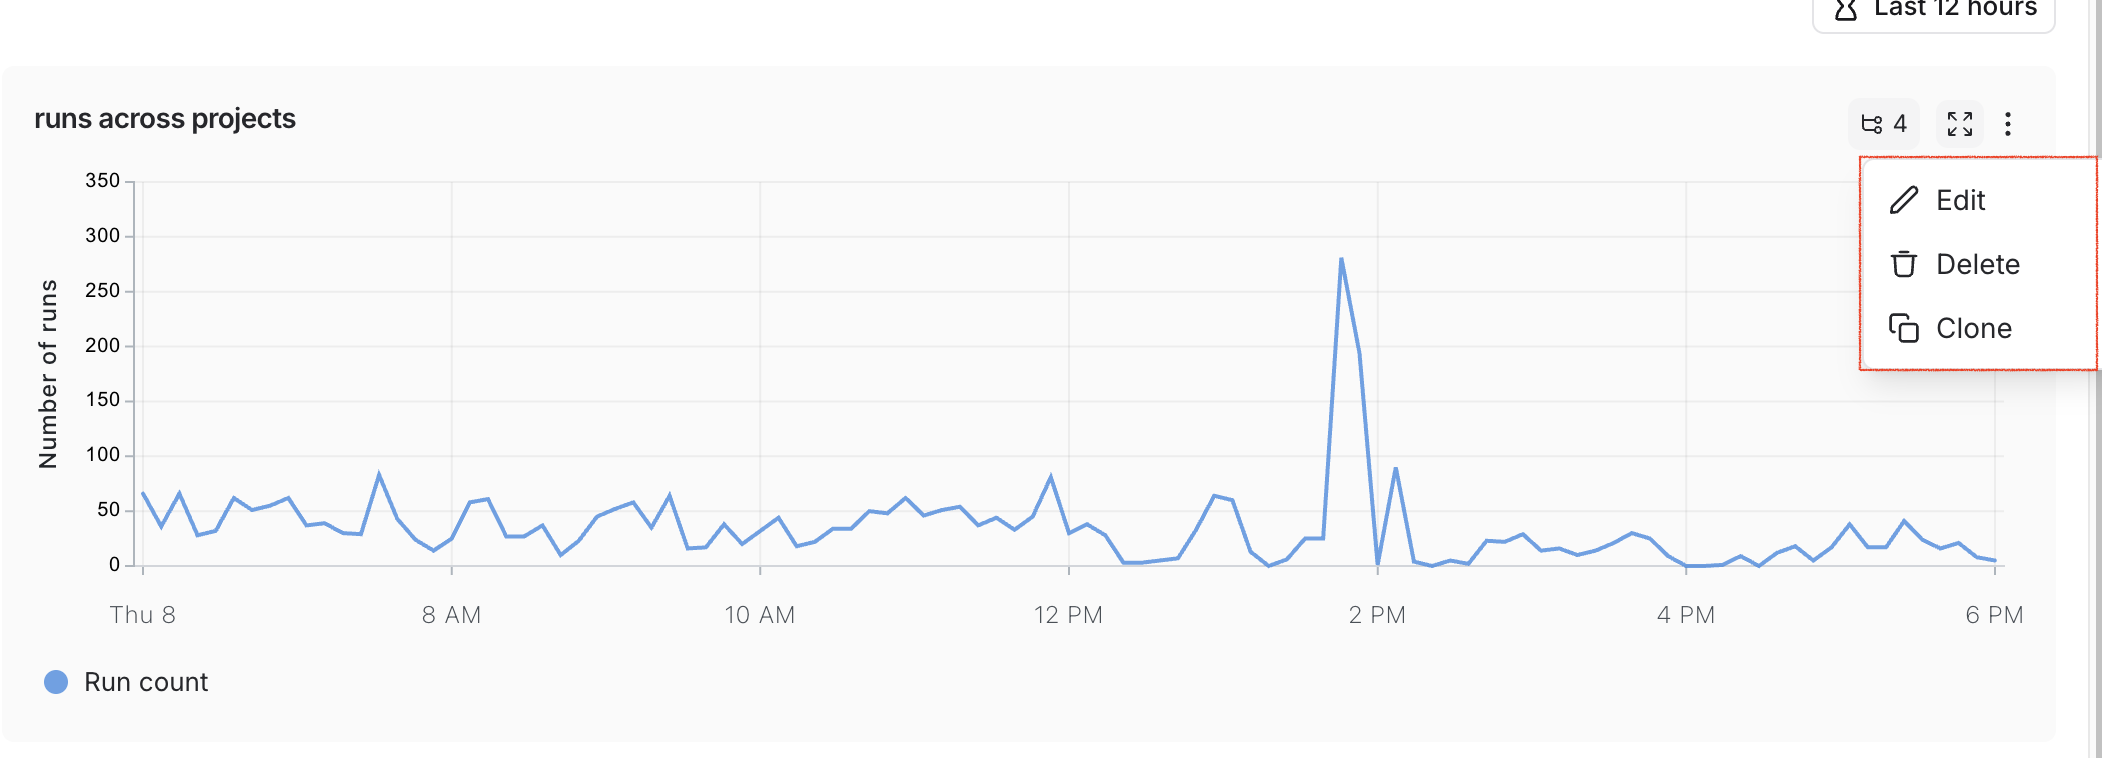
### Save and manage charts
* Click `Save` to save your chart to the dashboard.
* Edit or delete a chart by clicking the triple dot button in the top right of the chart.
* Clone a chart by clicking the triple line button in the top right of the chart and selecting **+ Clone**. This will open a new chart creation pane with the same configurations as the original.
#### Pick a chart type
* Choose between a line chart and a bar chart for visualizing
### Save and manage charts
* Click `Save` to save your chart to the dashboard.
* Edit or delete a chart by clicking the triple dot button in the top right of the chart.
* Clone a chart by clicking the triple line button in the top right of the chart and selecting **+ Clone**. This will open a new chart creation pane with the same configurations as the original.
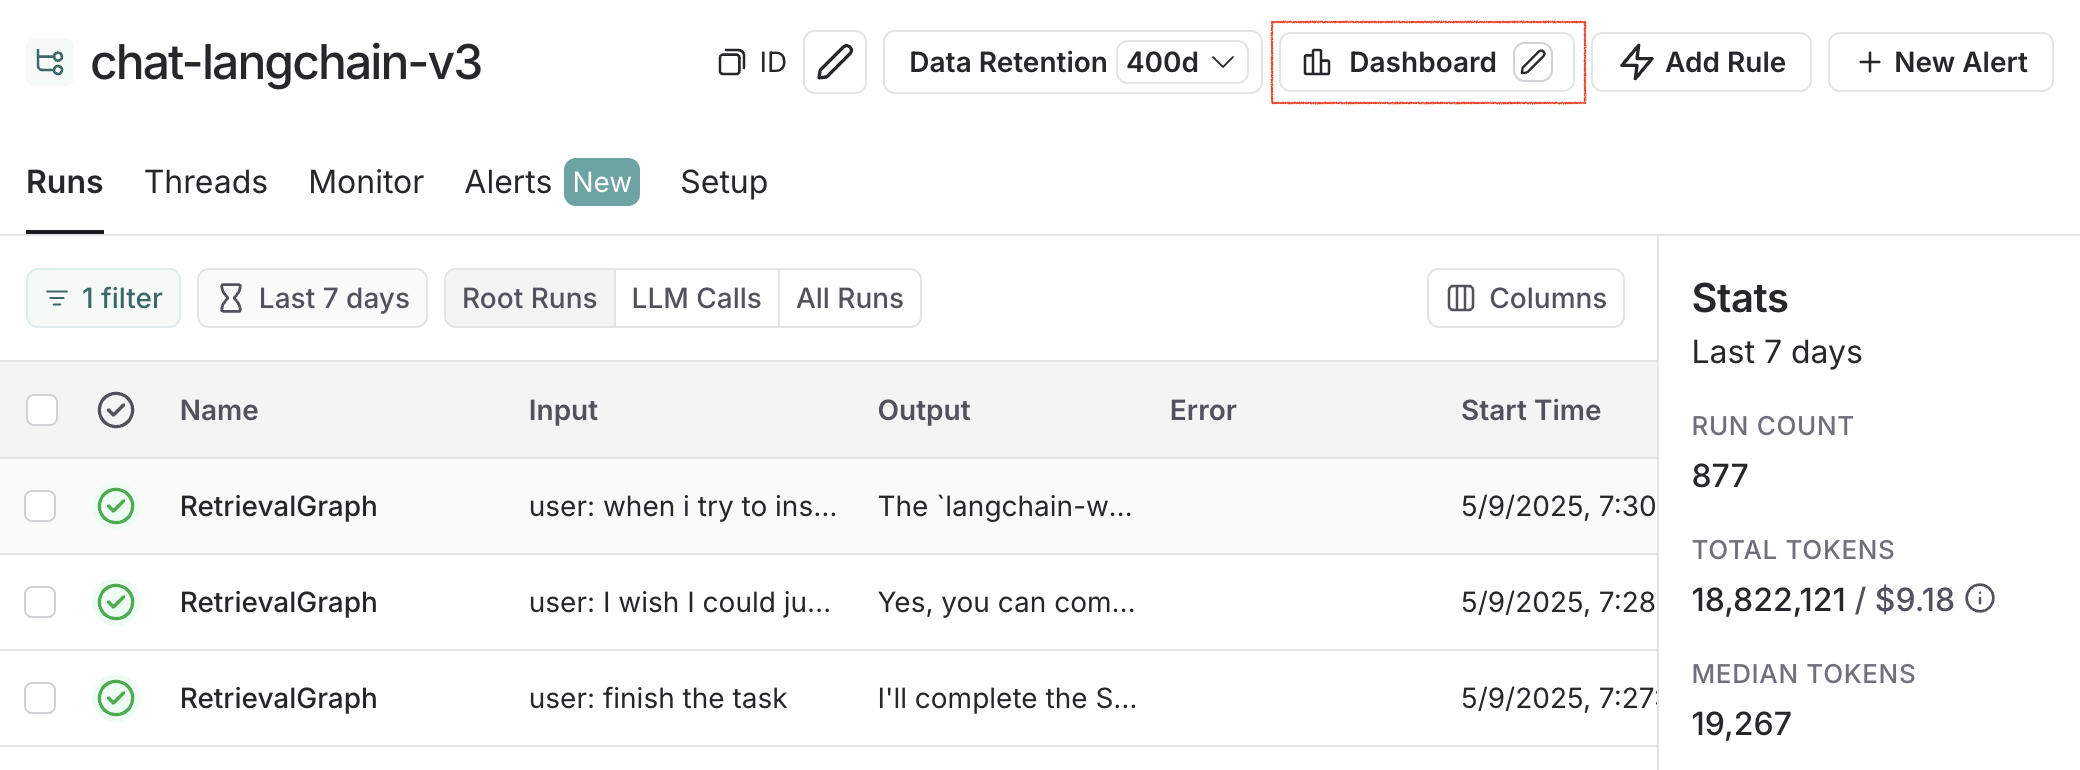
 ## Linking to a dashboard from a tracing project
You can link to any dashboard directly from a tracing project. By default, the prebuilt dashboard for your tracing project is selected. If you have a custom dashboard that you would like to link instead:
1. In your tracing project, click the three dots next to the **Dashboard** button.
2. Choose a dashboard to set as the new default.
## Linking to a dashboard from a tracing project
You can link to any dashboard directly from a tracing project. By default, the prebuilt dashboard for your tracing project is selected. If you have a custom dashboard that you would like to link instead:
1. In your tracing project, click the three dots next to the **Dashboard** button.
2. Choose a dashboard to set as the new default.
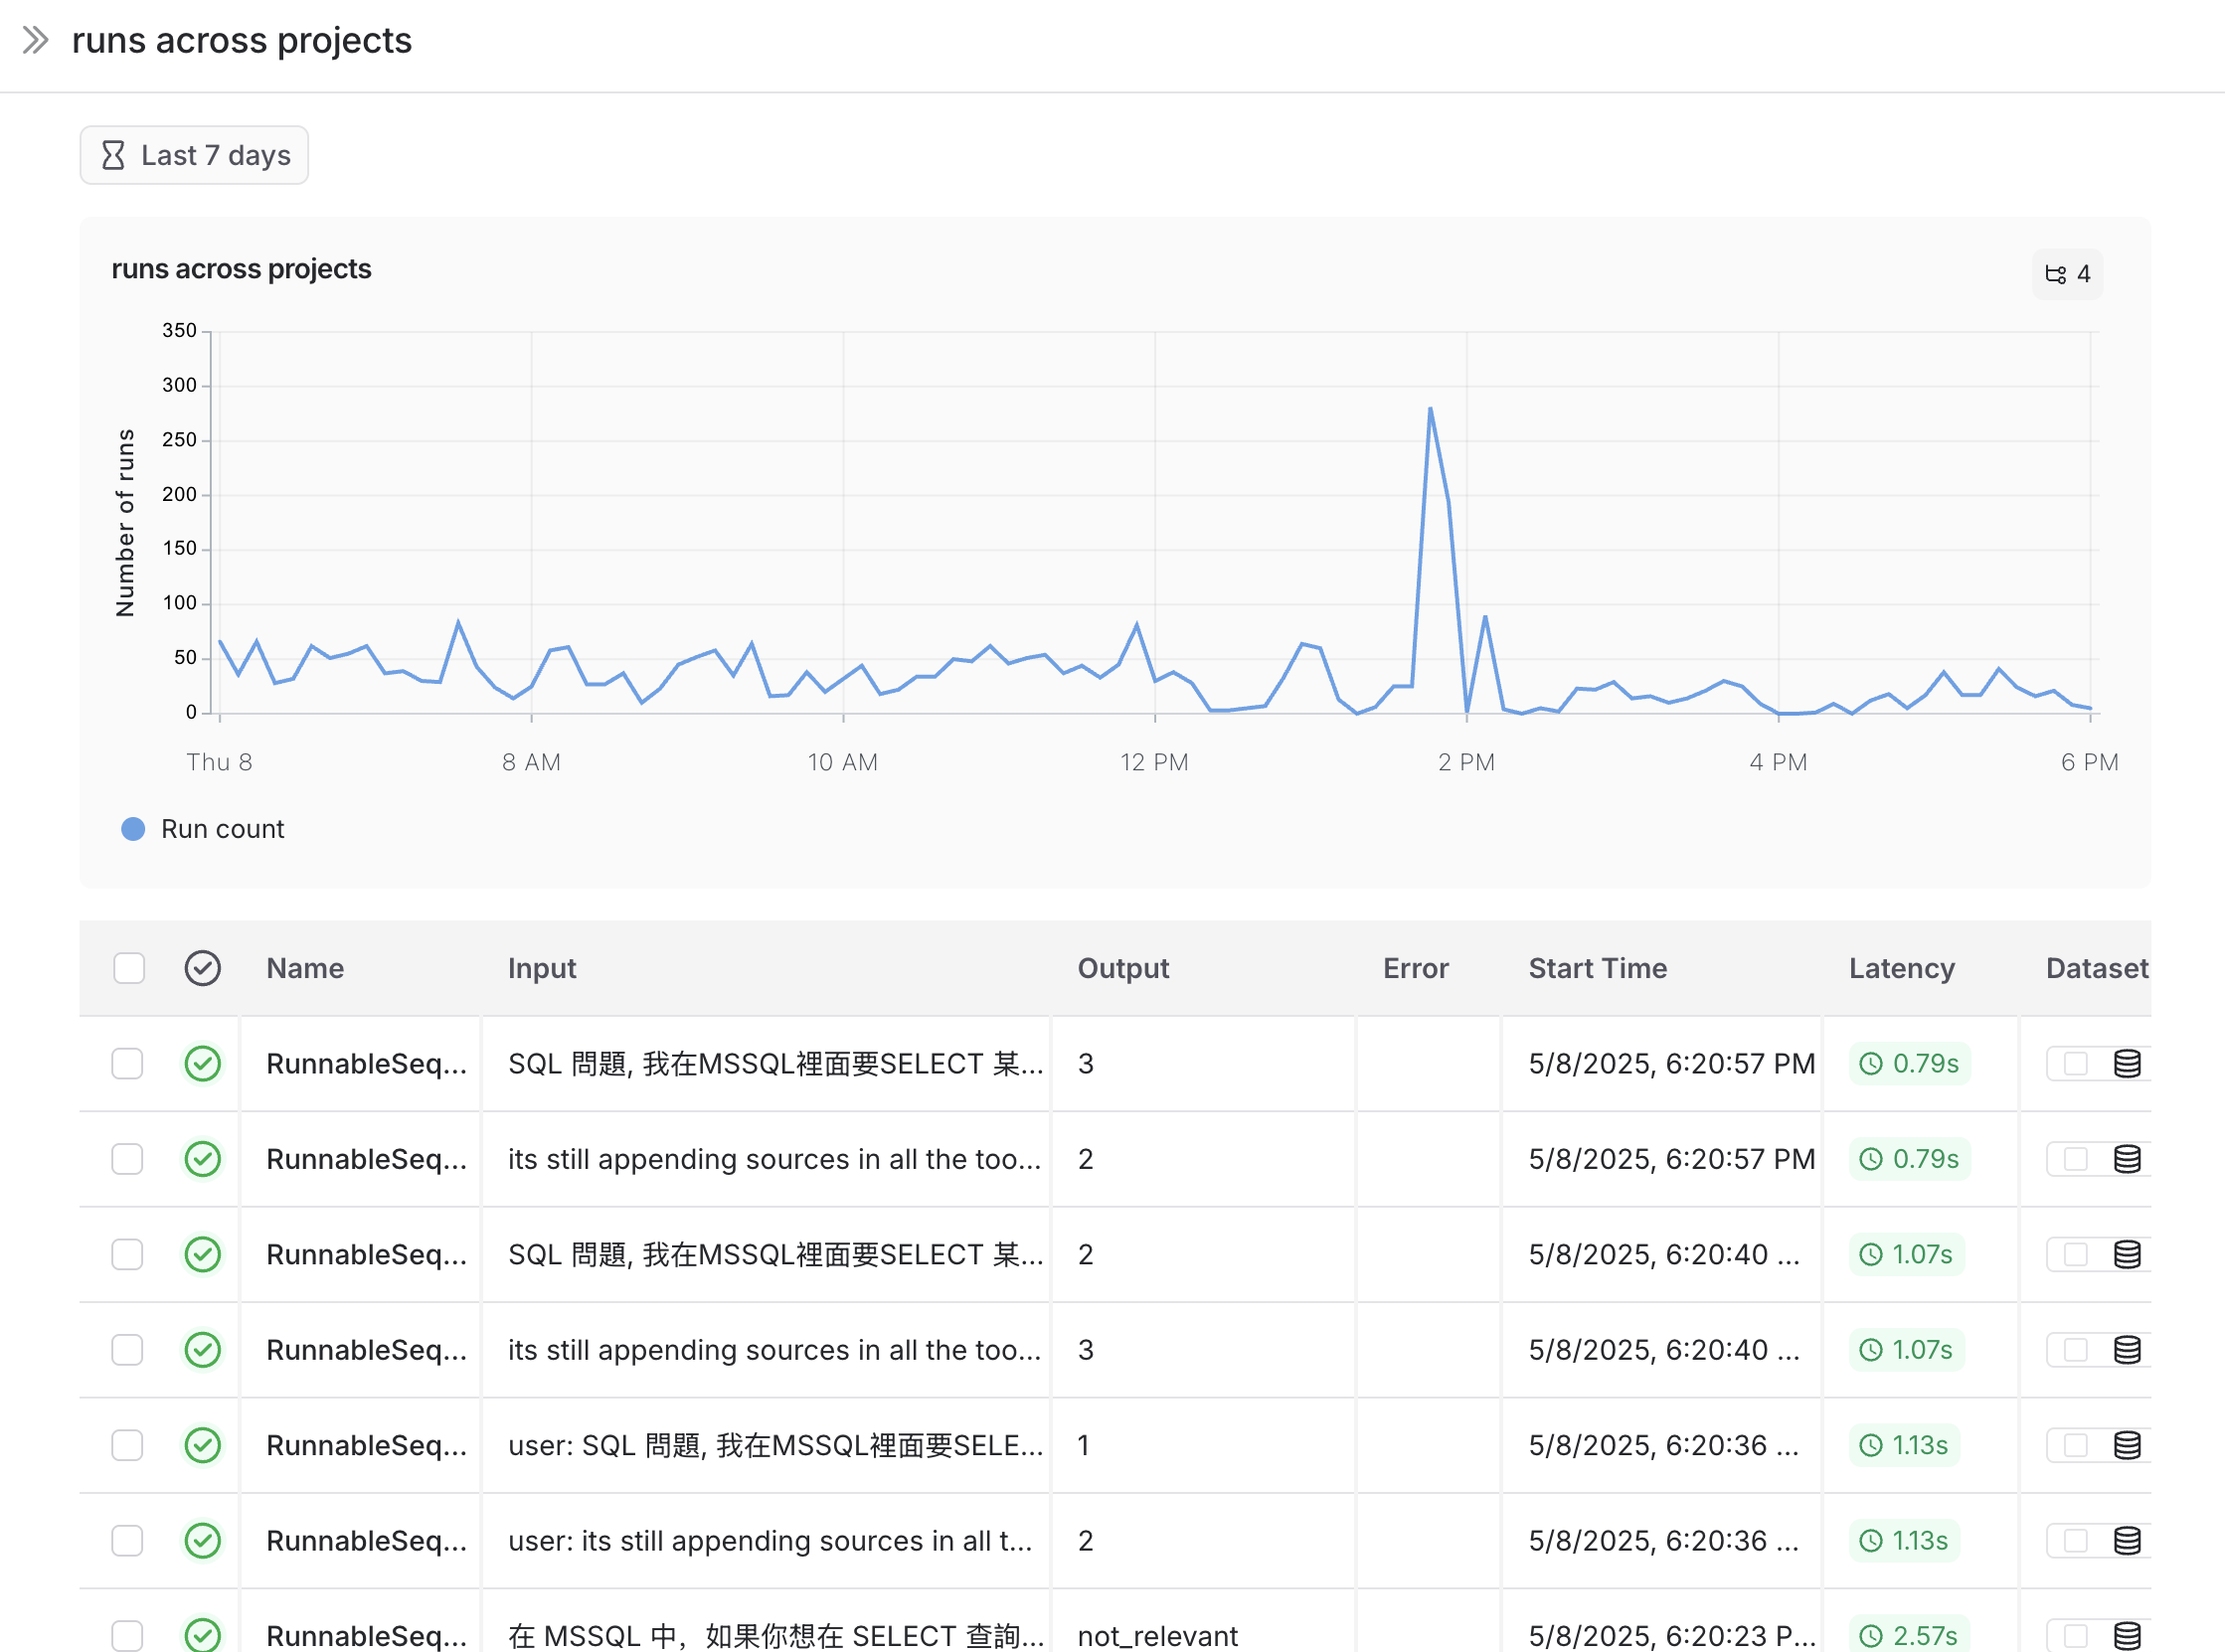
 ## Example: user-journey monitoring
Use monitoring charts for mapping the decisions made by an agent at a particular node.
Consider an email assistant agent. At a particular node it makes a decision about an email to:
* send an email back
* notify the user
* no response needed
We can create a chart to track and visualize the breakdown of these decisions.
**Creating the chart**
1. **Metric Selection**: Select the metric `Run count`.
2. **Chart Filters**: Add a tree filter to include all of the traces with name `triage_input`. This means we only include traces that hit the `triage_input` node. Also add a chart filter for `Is Root` is `true`, so our count is not inflated by the number of nodes in the trace.
## Example: user-journey monitoring
Use monitoring charts for mapping the decisions made by an agent at a particular node.
Consider an email assistant agent. At a particular node it makes a decision about an email to:
* send an email back
* notify the user
* no response needed
We can create a chart to track and visualize the breakdown of these decisions.
**Creating the chart**
1. **Metric Selection**: Select the metric `Run count`.
2. **Chart Filters**: Add a tree filter to include all of the traces with name `triage_input`. This means we only include traces that hit the `triage_input` node. Also add a chart filter for `Is Root` is `true`, so our count is not inflated by the number of nodes in the trace.
 3. **Data Series**: Create a data series for each decision made at the `triage_input` node. The output of the decision is stored in the `triage.response` field of the output object, and the value of the decision is either `no`, `email`, or `notify`. Each of these decisions generates a separate data series in the chart.
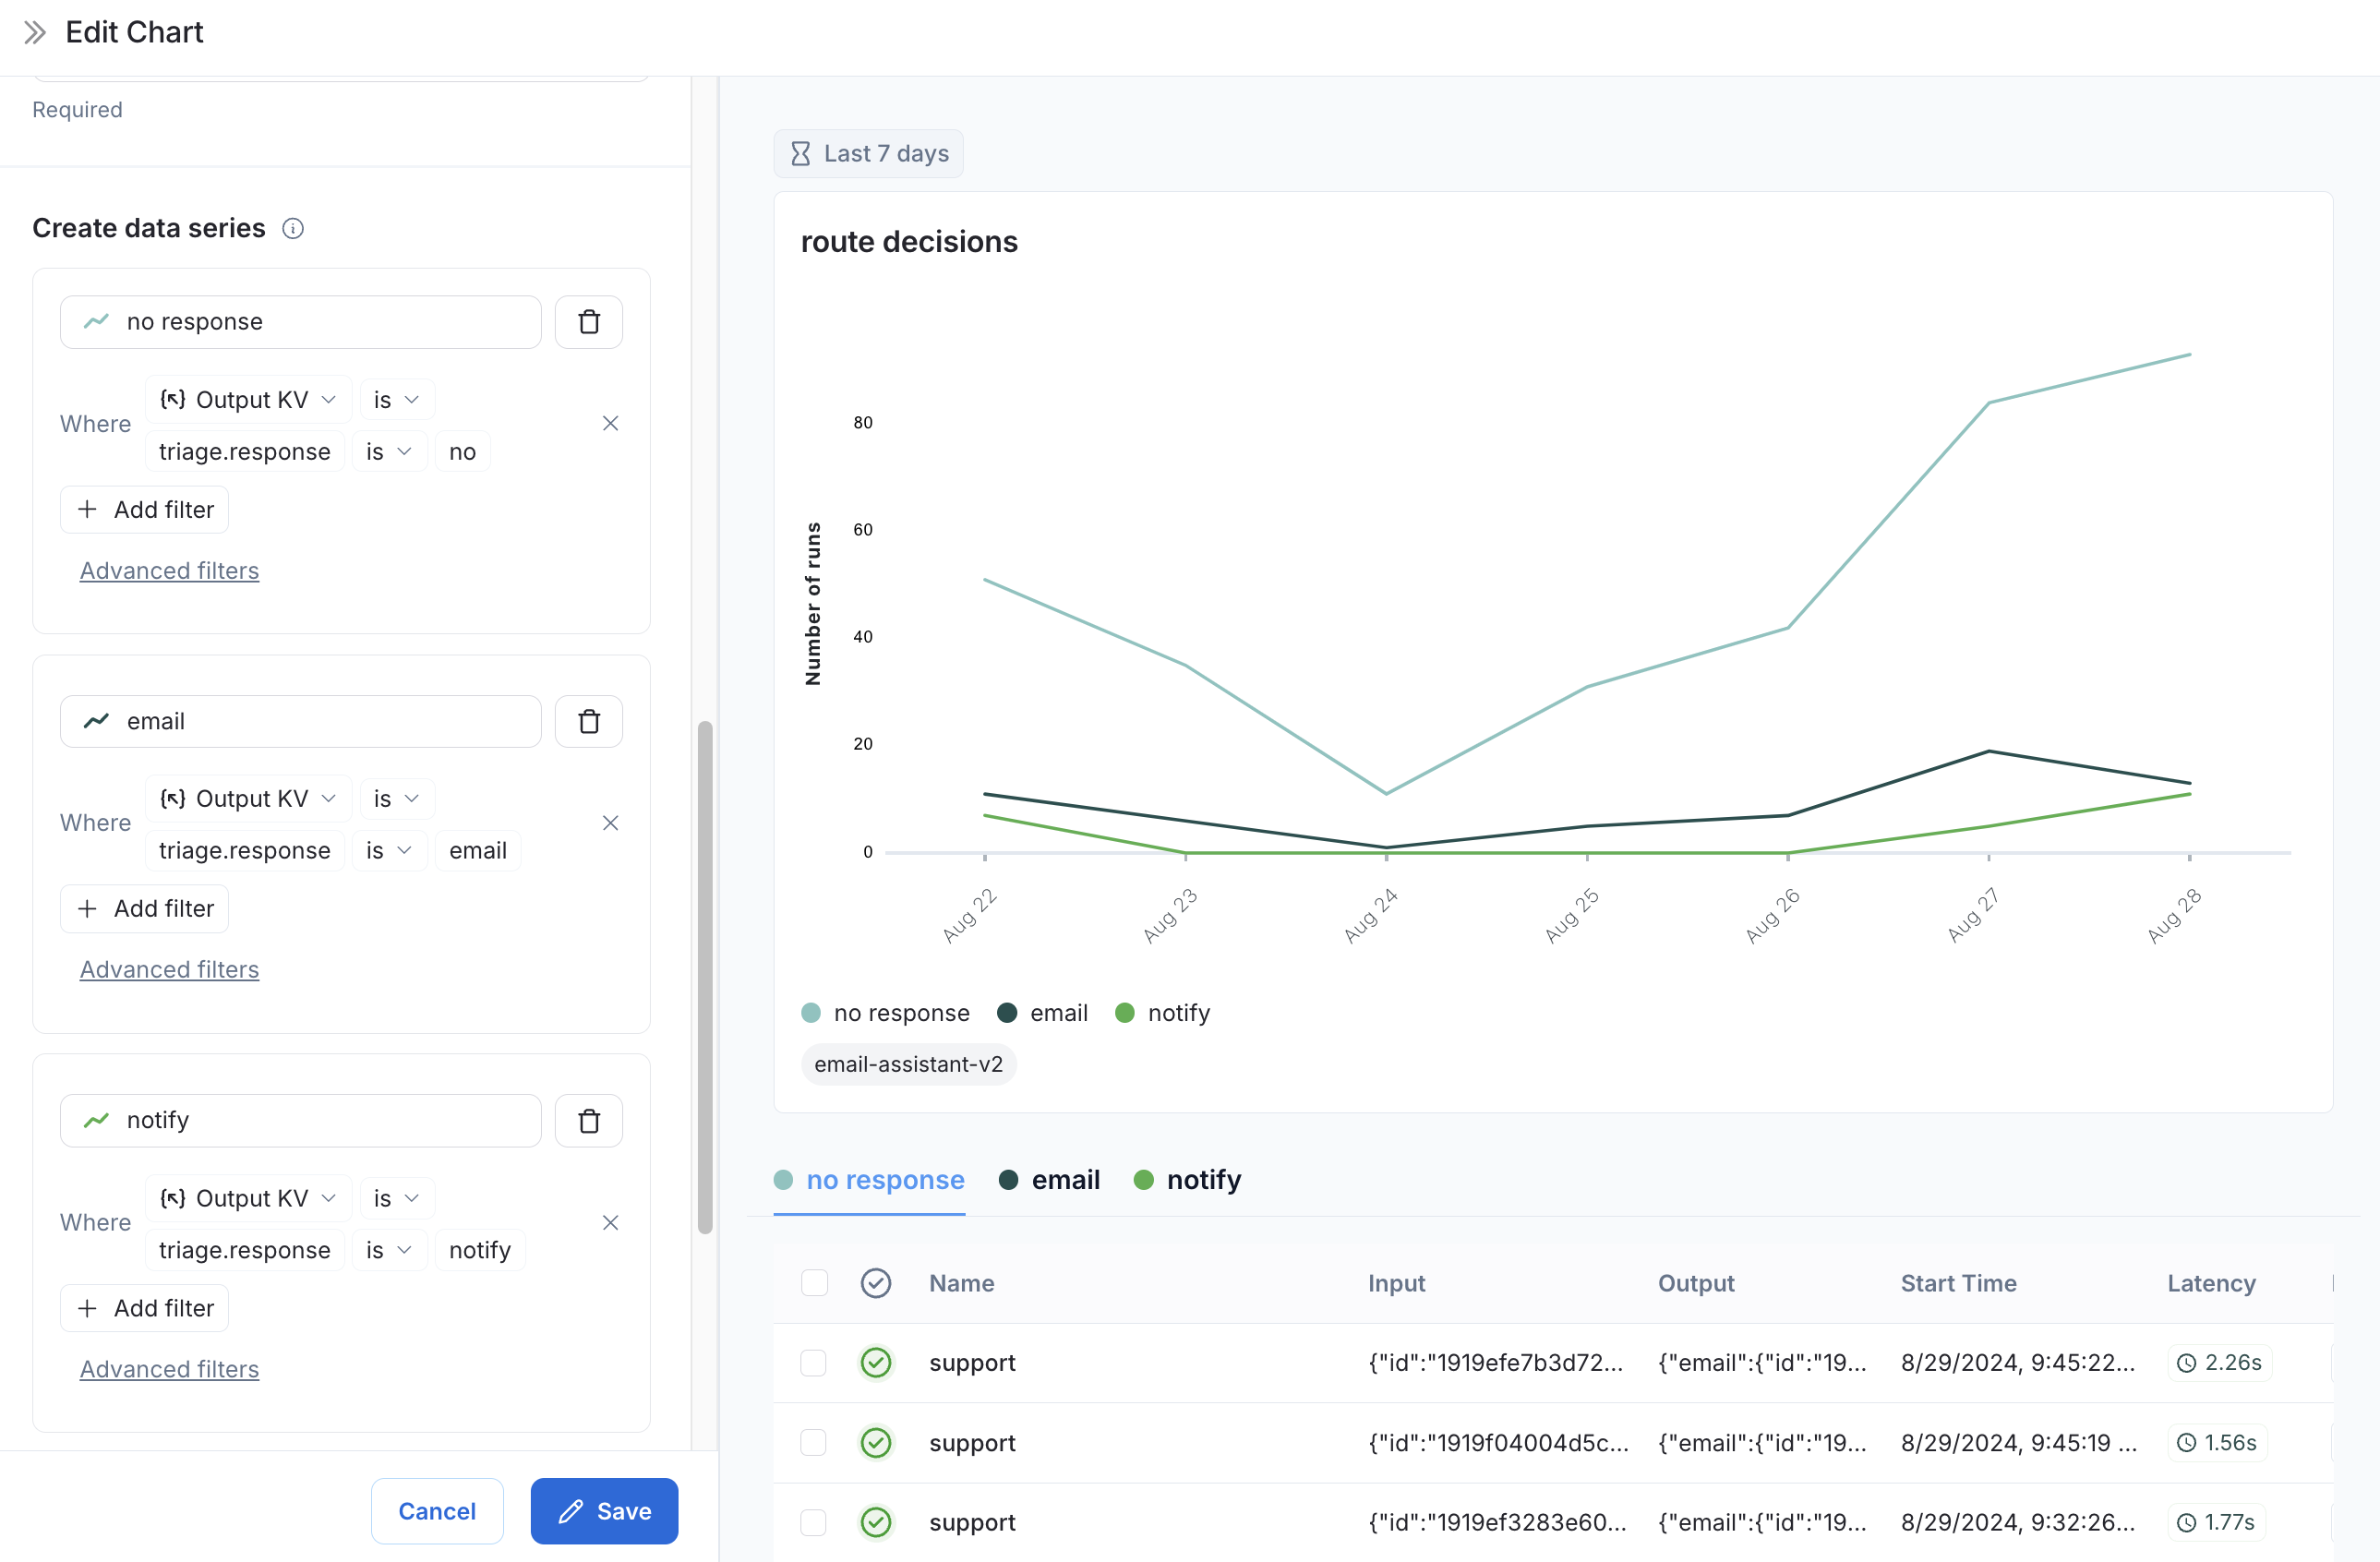 Now we can visualize the decisions made at the `triage_input` node over time.
## Video guide
***
Now we can visualize the decisions made at the `triage_input` node over time.
## Video guide
***
 ### Checking the logs
If, at any point, you want to check if the server is running and see the logs, run
```bash theme={null}
docker-compose logs
```
### Stopping the server
```bash theme={null}
docker-compose down
```
## Using LangSmith
Now that LangSmith is running, you can start using it to trace your code. You can find more information on how to use self-hosted LangSmith in the [self-hosted usage guide](/langsmith/self-hosted).
Your LangSmith instance is now running but may not be fully setup yet.
If you used one of the basic configs, you may have deployed a no-auth configuration. In this state, there is no authentication or concept of user accounts nor API keys and traces can be submitted directly without an API key so long as the hostname is passed to the LangChain tracer/LangSmith SDK.
As a next step, it is strongly recommended you work with your infrastructure administrators to:
* Setup DNS for your LangSmith instance to enable easier access
* Configure SSL to ensure in-transit encryption of traces submitted to LangSmith
* Configure LangSmith for [oauth authentication](/langsmith/self-host-sso) or [basic authentication](/langsmith/self-host-basic-auth) to secure your LangSmith instance
* Secure access to your Docker environment to limit access to only the LangSmith frontend and API
* Connect LangSmith to secured Postgres and Redis instances
***
### Checking the logs
If, at any point, you want to check if the server is running and see the logs, run
```bash theme={null}
docker-compose logs
```
### Stopping the server
```bash theme={null}
docker-compose down
```
## Using LangSmith
Now that LangSmith is running, you can start using it to trace your code. You can find more information on how to use self-hosted LangSmith in the [self-hosted usage guide](/langsmith/self-hosted).
Your LangSmith instance is now running but may not be fully setup yet.
If you used one of the basic configs, you may have deployed a no-auth configuration. In this state, there is no authentication or concept of user accounts nor API keys and traces can be submitted directly without an API key so long as the hostname is passed to the LangChain tracer/LangSmith SDK.
As a next step, it is strongly recommended you work with your infrastructure administrators to:
* Setup DNS for your LangSmith instance to enable easier access
* Configure SSL to ensure in-transit encryption of traces submitted to LangSmith
* Configure LangSmith for [oauth authentication](/langsmith/self-host-sso) or [basic authentication](/langsmith/self-host-basic-auth) to secure your LangSmith instance
* Secure access to your Docker environment to limit access to only the LangSmith frontend and API
* Connect LangSmith to secured Postgres and Redis instances
***
 ## Reject
This option rejects any additional incoming runs while a current run is in progress and prevents concurrent execution or double texting.
For configuring the reject double text option, refer to the [how-to guide](/langsmith/reject-concurrent).
## Enqueue
This option allows the current run to finish before processing any new input. Incoming requests are queued and executed sequentially once prior runs complete.
For configuring the enqueue double text option, refer to the [how-to guide](/langsmith/enqueue-concurrent).
## Interrupt
This option halts the current execution and preserves the progress made up to the interruption point. The new user input is then inserted, and execution continues from that state.
When using this option, your graph must account for potential edge cases. For example, a tool call may have been initiated but not yet completed at the time of interruption. In these cases, handling or removing partial tool calls may be necessary to avoid unresolved operations.
For configuring the interrupt double text option, refer to the [how-to guide](/langsmith/interrupt-concurrent).
## Rollback
This option halts the current execution and reverts all progress—including the initial run input—before processing the new user input. The new input is treated as a fresh run, starting from the initial state.
For configuring the rollback double text option, refer to the [how-to guide](/langsmith/rollback-concurrent).
***
## Reject
This option rejects any additional incoming runs while a current run is in progress and prevents concurrent execution or double texting.
For configuring the reject double text option, refer to the [how-to guide](/langsmith/reject-concurrent).
## Enqueue
This option allows the current run to finish before processing any new input. Incoming requests are queued and executed sequentially once prior runs complete.
For configuring the enqueue double text option, refer to the [how-to guide](/langsmith/enqueue-concurrent).
## Interrupt
This option halts the current execution and preserves the progress made up to the interruption point. The new user input is then inserted, and execution continues from that state.
When using this option, your graph must account for potential edge cases. For example, a tool call may have been initiated but not yet completed at the time of interruption. In these cases, handling or removing partial tool calls may be necessary to avoid unresolved operations.
For configuring the interrupt double text option, refer to the [how-to guide](/langsmith/interrupt-concurrent).
## Rollback
This option halts the current execution and reverts all progress—including the initial run input—before processing the new user input. The new input is treated as a fresh run, starting from the initial state.
For configuring the rollback double text option, refer to the [how-to guide](/langsmith/rollback-concurrent).
***
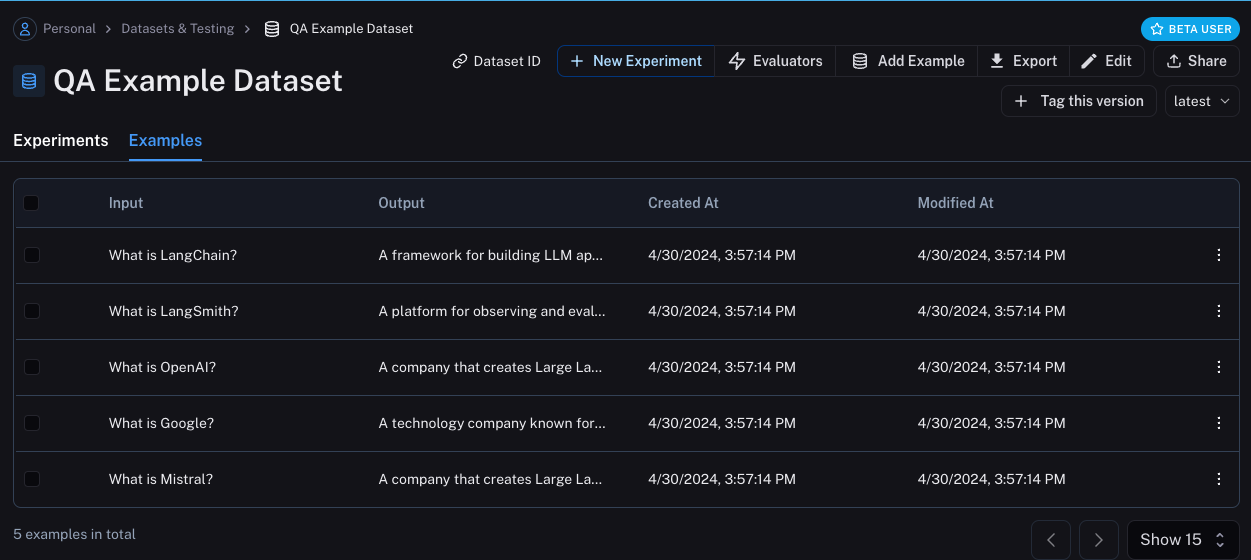 ## Define metrics
After creating our dataset, we can now define some metrics to evaluate our responses on. Since we have an expected answer, we can compare to that as part of our evaluation. However, we do not expect our application to output those **exact** answers, but rather something that is similar. This makes our evaluation a little trickier.
In addition to evaluating correctness, let's also make sure our answers are short and concise. This will be a little easier - we can define a simple Python function to measure the length of the response.
Let's go ahead and define these two metrics.
For the first, we will use an LLM to **judge** whether the output is correct (with respect to the expected output). This **LLM-as-a-judge** is relatively common for cases that are too complex to measure with a simple function. We can define our own prompt and LLM to use for evaluation here:
```python theme={null}
import openai
from langsmith import wrappers
openai_client = wrappers.wrap_openai(openai.OpenAI())
eval_instructions = "You are an expert professor specialized in grading students' answers to questions."
def correctness(inputs: dict, outputs: dict, reference_outputs: dict) -> bool:
user_content = f"""You are grading the following question:
{inputs['question']}
Here is the real answer:
{reference_outputs['answer']}
You are grading the following predicted answer:
{outputs['response']}
Respond with CORRECT or INCORRECT:
Grade:"""
response = openai_client.chat.completions.create(
model="gpt-4o-mini",
temperature=0,
messages=[
{"role": "system", "content": eval_instructions},
{"role": "user", "content": user_content},
],
).choices[0].message.content
return response == "CORRECT"
```
For evaluating the length of the response, this is a lot easier! We can just define a simple function that checks whether the actual output is less than 2x the length of the expected result.
```python theme={null}
def concision(outputs: dict, reference_outputs: dict) -> bool:
return int(len(outputs["response"]) < 2 * len(reference_outputs["answer"]))
```
## Run Evaluations
Great! So now how do we run evaluations? Now that we have a dataset and evaluators, all that we need is our application! We will build a simple application that just has a system message with instructions on how to respond and then passes it to the LLM. We will build this using the OpenAI SDK directly:
```python theme={null}
default_instructions = "Respond to the users question in a short, concise manner (one short sentence)."
def my_app(question: str, model: str = "gpt-4o-mini", instructions: str = default_instructions) -> str:
return openai_client.chat.completions.create(
model=model,
temperature=0,
messages=[
{"role": "system", "content": instructions},
{"role": "user", "content": question},
],
).choices[0].message.content
```
Before running this through LangSmith evaluations, we need to define a simple wrapper that maps the input keys from our dataset to the function we want to call, and then also maps the output of the function to the output key we expect.
```python theme={null}
def ls_target(inputs: str) -> dict:
return {"response": my_app(inputs["question"])}
```
Great! Now we're ready to run an evaluation. Let's do it!
```python theme={null}
experiment_results = client.evaluate(
ls_target, # Your AI system
data=dataset_name, # The data to predict and grade over
evaluators=[concision, correctness], # The evaluators to score the results
experiment_prefix="openai-4o-mini", # A prefix for your experiment names to easily identify them
)
```
This will output a URL. If we click on it, we should see results of our evaluation!
## Define metrics
After creating our dataset, we can now define some metrics to evaluate our responses on. Since we have an expected answer, we can compare to that as part of our evaluation. However, we do not expect our application to output those **exact** answers, but rather something that is similar. This makes our evaluation a little trickier.
In addition to evaluating correctness, let's also make sure our answers are short and concise. This will be a little easier - we can define a simple Python function to measure the length of the response.
Let's go ahead and define these two metrics.
For the first, we will use an LLM to **judge** whether the output is correct (with respect to the expected output). This **LLM-as-a-judge** is relatively common for cases that are too complex to measure with a simple function. We can define our own prompt and LLM to use for evaluation here:
```python theme={null}
import openai
from langsmith import wrappers
openai_client = wrappers.wrap_openai(openai.OpenAI())
eval_instructions = "You are an expert professor specialized in grading students' answers to questions."
def correctness(inputs: dict, outputs: dict, reference_outputs: dict) -> bool:
user_content = f"""You are grading the following question:
{inputs['question']}
Here is the real answer:
{reference_outputs['answer']}
You are grading the following predicted answer:
{outputs['response']}
Respond with CORRECT or INCORRECT:
Grade:"""
response = openai_client.chat.completions.create(
model="gpt-4o-mini",
temperature=0,
messages=[
{"role": "system", "content": eval_instructions},
{"role": "user", "content": user_content},
],
).choices[0].message.content
return response == "CORRECT"
```
For evaluating the length of the response, this is a lot easier! We can just define a simple function that checks whether the actual output is less than 2x the length of the expected result.
```python theme={null}
def concision(outputs: dict, reference_outputs: dict) -> bool:
return int(len(outputs["response"]) < 2 * len(reference_outputs["answer"]))
```
## Run Evaluations
Great! So now how do we run evaluations? Now that we have a dataset and evaluators, all that we need is our application! We will build a simple application that just has a system message with instructions on how to respond and then passes it to the LLM. We will build this using the OpenAI SDK directly:
```python theme={null}
default_instructions = "Respond to the users question in a short, concise manner (one short sentence)."
def my_app(question: str, model: str = "gpt-4o-mini", instructions: str = default_instructions) -> str:
return openai_client.chat.completions.create(
model=model,
temperature=0,
messages=[
{"role": "system", "content": instructions},
{"role": "user", "content": question},
],
).choices[0].message.content
```
Before running this through LangSmith evaluations, we need to define a simple wrapper that maps the input keys from our dataset to the function we want to call, and then also maps the output of the function to the output key we expect.
```python theme={null}
def ls_target(inputs: str) -> dict:
return {"response": my_app(inputs["question"])}
```
Great! Now we're ready to run an evaluation. Let's do it!
```python theme={null}
experiment_results = client.evaluate(
ls_target, # Your AI system
data=dataset_name, # The data to predict and grade over
evaluators=[concision, correctness], # The evaluators to score the results
experiment_prefix="openai-4o-mini", # A prefix for your experiment names to easily identify them
)
```
This will output a URL. If we click on it, we should see results of our evaluation!
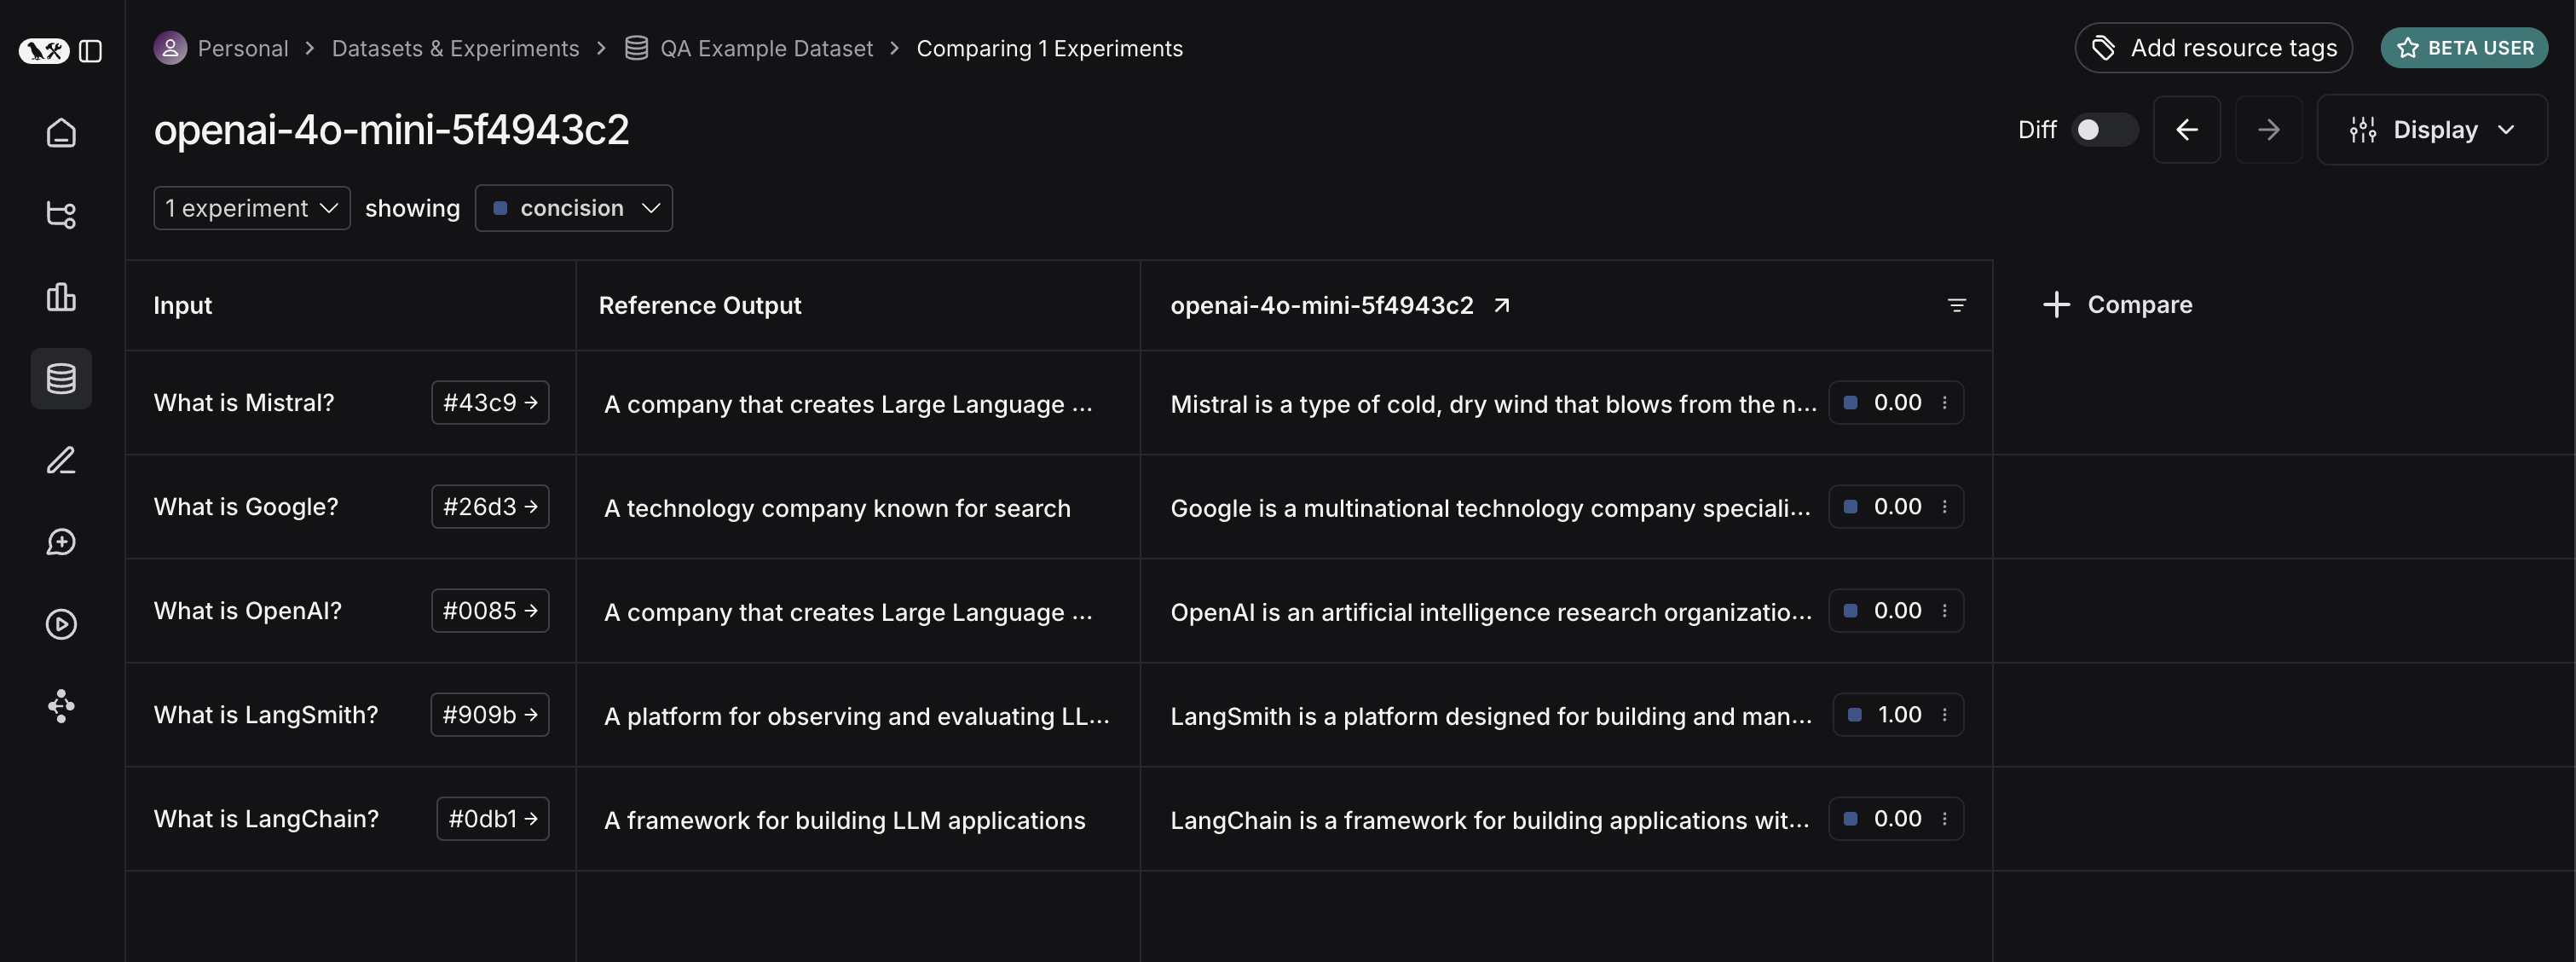 If we go back to the dataset page and select the `Experiments` tab, we can now see a summary of our one run!
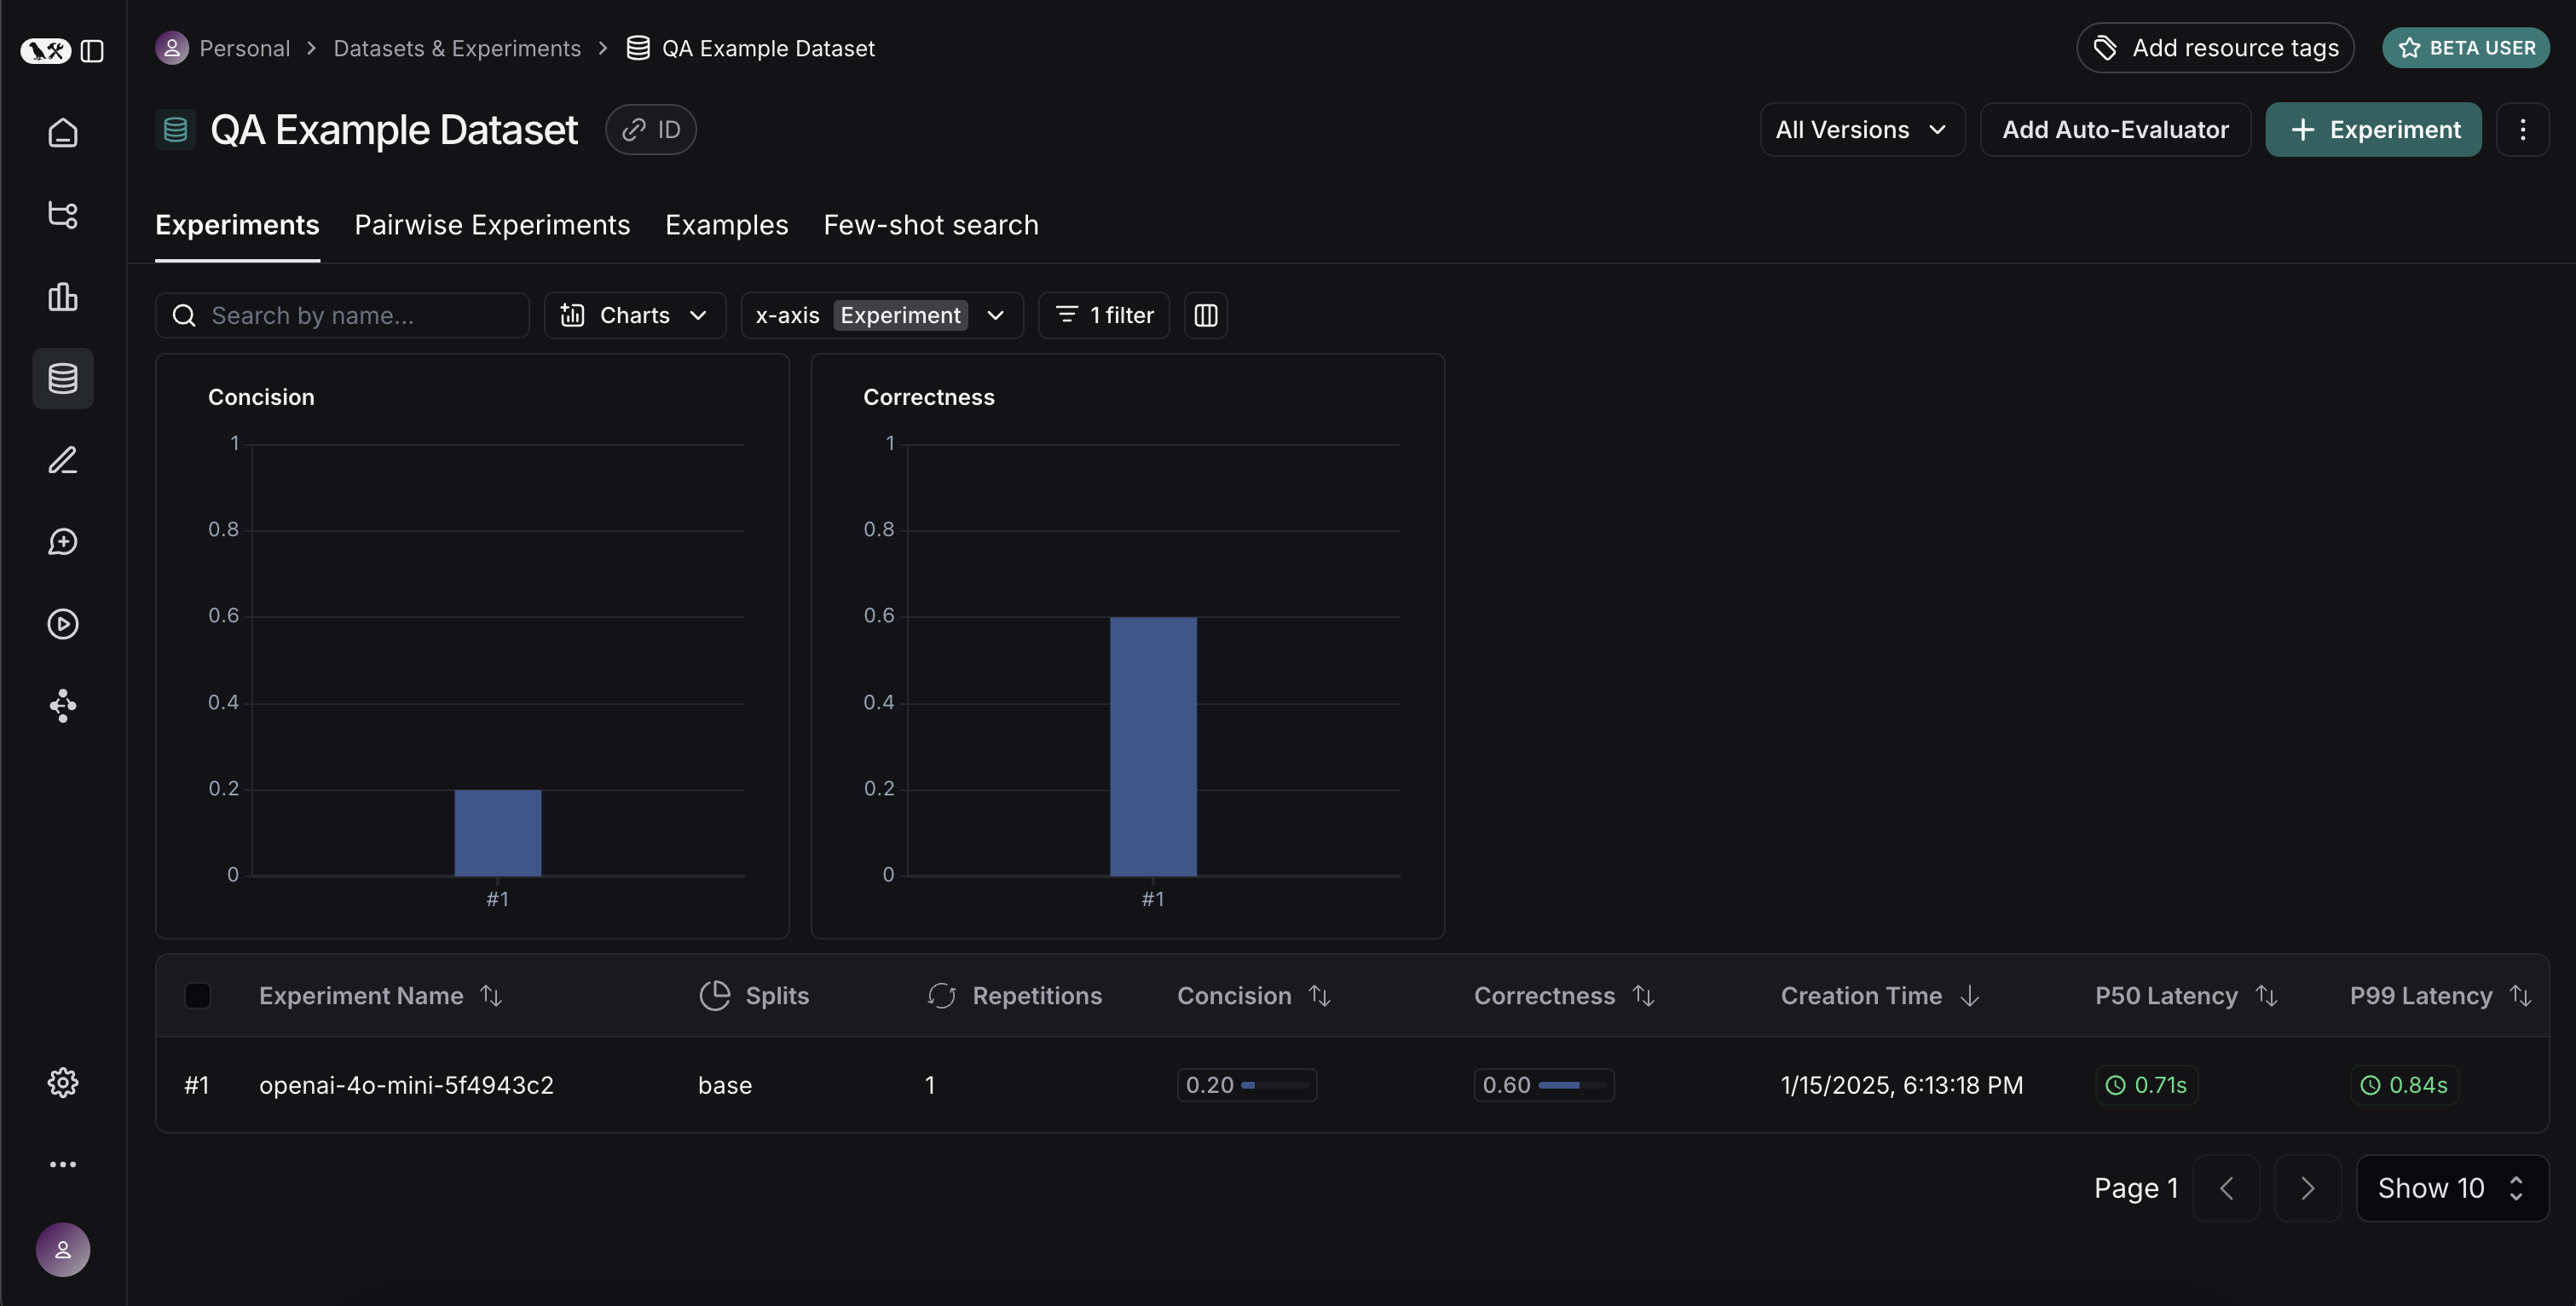 Let's now try it out with a different model! Let's try `gpt-4-turbo`
```python theme={null}
def ls_target_v2(inputs: str) -> dict:
return {"response": my_app(inputs["question"], model="gpt-4-turbo")}
experiment_results = client.evaluate(
ls_target_v2,
data=dataset_name,
evaluators=[concision, correctness],
experiment_prefix="openai-4-turbo",
)
```
And now let's use GPT-4 but also update the prompt to be a bit more strict in requiring the answer to be short.
```python theme={null}
instructions_v3 = "Respond to the users question in a short, concise manner (one short sentence). Do NOT use more than ten words."
def ls_target_v3(inputs: str) -> dict:
response = my_app(
inputs["question"],
model="gpt-4-turbo",
instructions=instructions_v3
)
return {"response": response}
experiment_results = client.evaluate(
ls_target_v3,
data=dataset_name,
evaluators=[concision, correctness],
experiment_prefix="strict-openai-4-turbo",
)
```
If we go back to the `Experiments` tab on the datasets page, we should see that all three runs now show up!
Let's now try it out with a different model! Let's try `gpt-4-turbo`
```python theme={null}
def ls_target_v2(inputs: str) -> dict:
return {"response": my_app(inputs["question"], model="gpt-4-turbo")}
experiment_results = client.evaluate(
ls_target_v2,
data=dataset_name,
evaluators=[concision, correctness],
experiment_prefix="openai-4-turbo",
)
```
And now let's use GPT-4 but also update the prompt to be a bit more strict in requiring the answer to be short.
```python theme={null}
instructions_v3 = "Respond to the users question in a short, concise manner (one short sentence). Do NOT use more than ten words."
def ls_target_v3(inputs: str) -> dict:
response = my_app(
inputs["question"],
model="gpt-4-turbo",
instructions=instructions_v3
)
return {"response": response}
experiment_results = client.evaluate(
ls_target_v3,
data=dataset_name,
evaluators=[concision, correctness],
experiment_prefix="strict-openai-4-turbo",
)
```
If we go back to the `Experiments` tab on the datasets page, we should see that all three runs now show up!
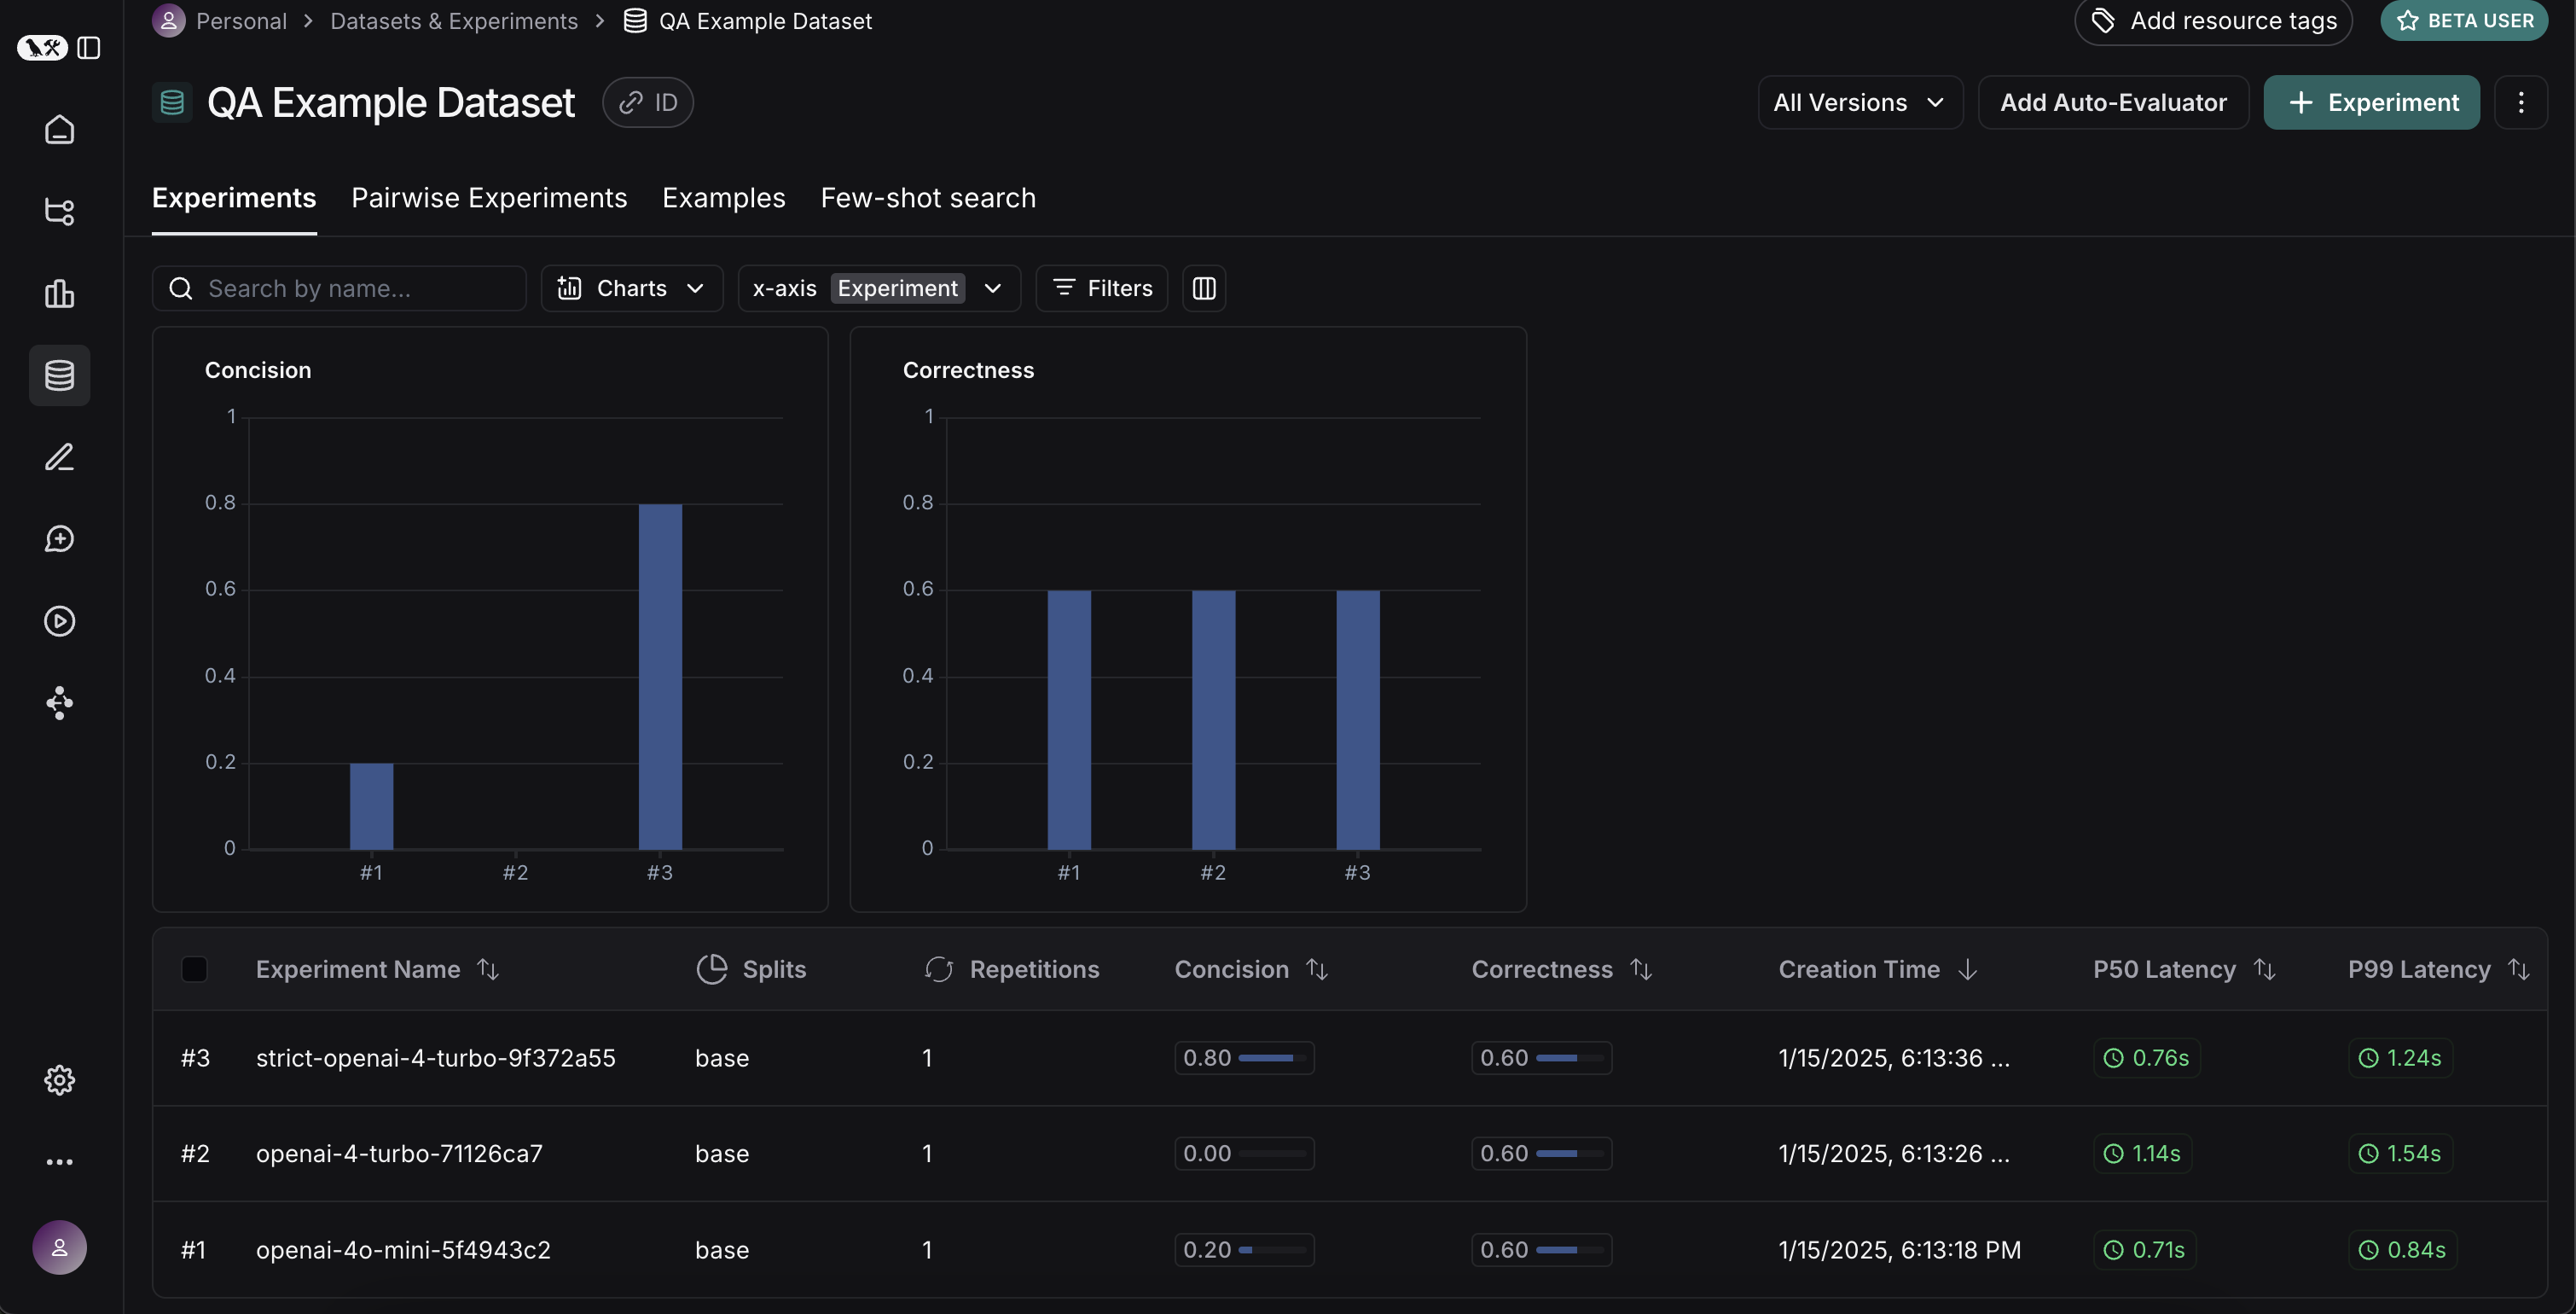 ## Comparing results
Awesome, we've evaluated three different runs. But how can we compare results? The first way we can do this is just by looking at the runs in the `Experiments` tab. If we do that, we can see a high level view of the metrics for each run:
## Comparing results
Awesome, we've evaluated three different runs. But how can we compare results? The first way we can do this is just by looking at the runs in the `Experiments` tab. If we do that, we can see a high level view of the metrics for each run:
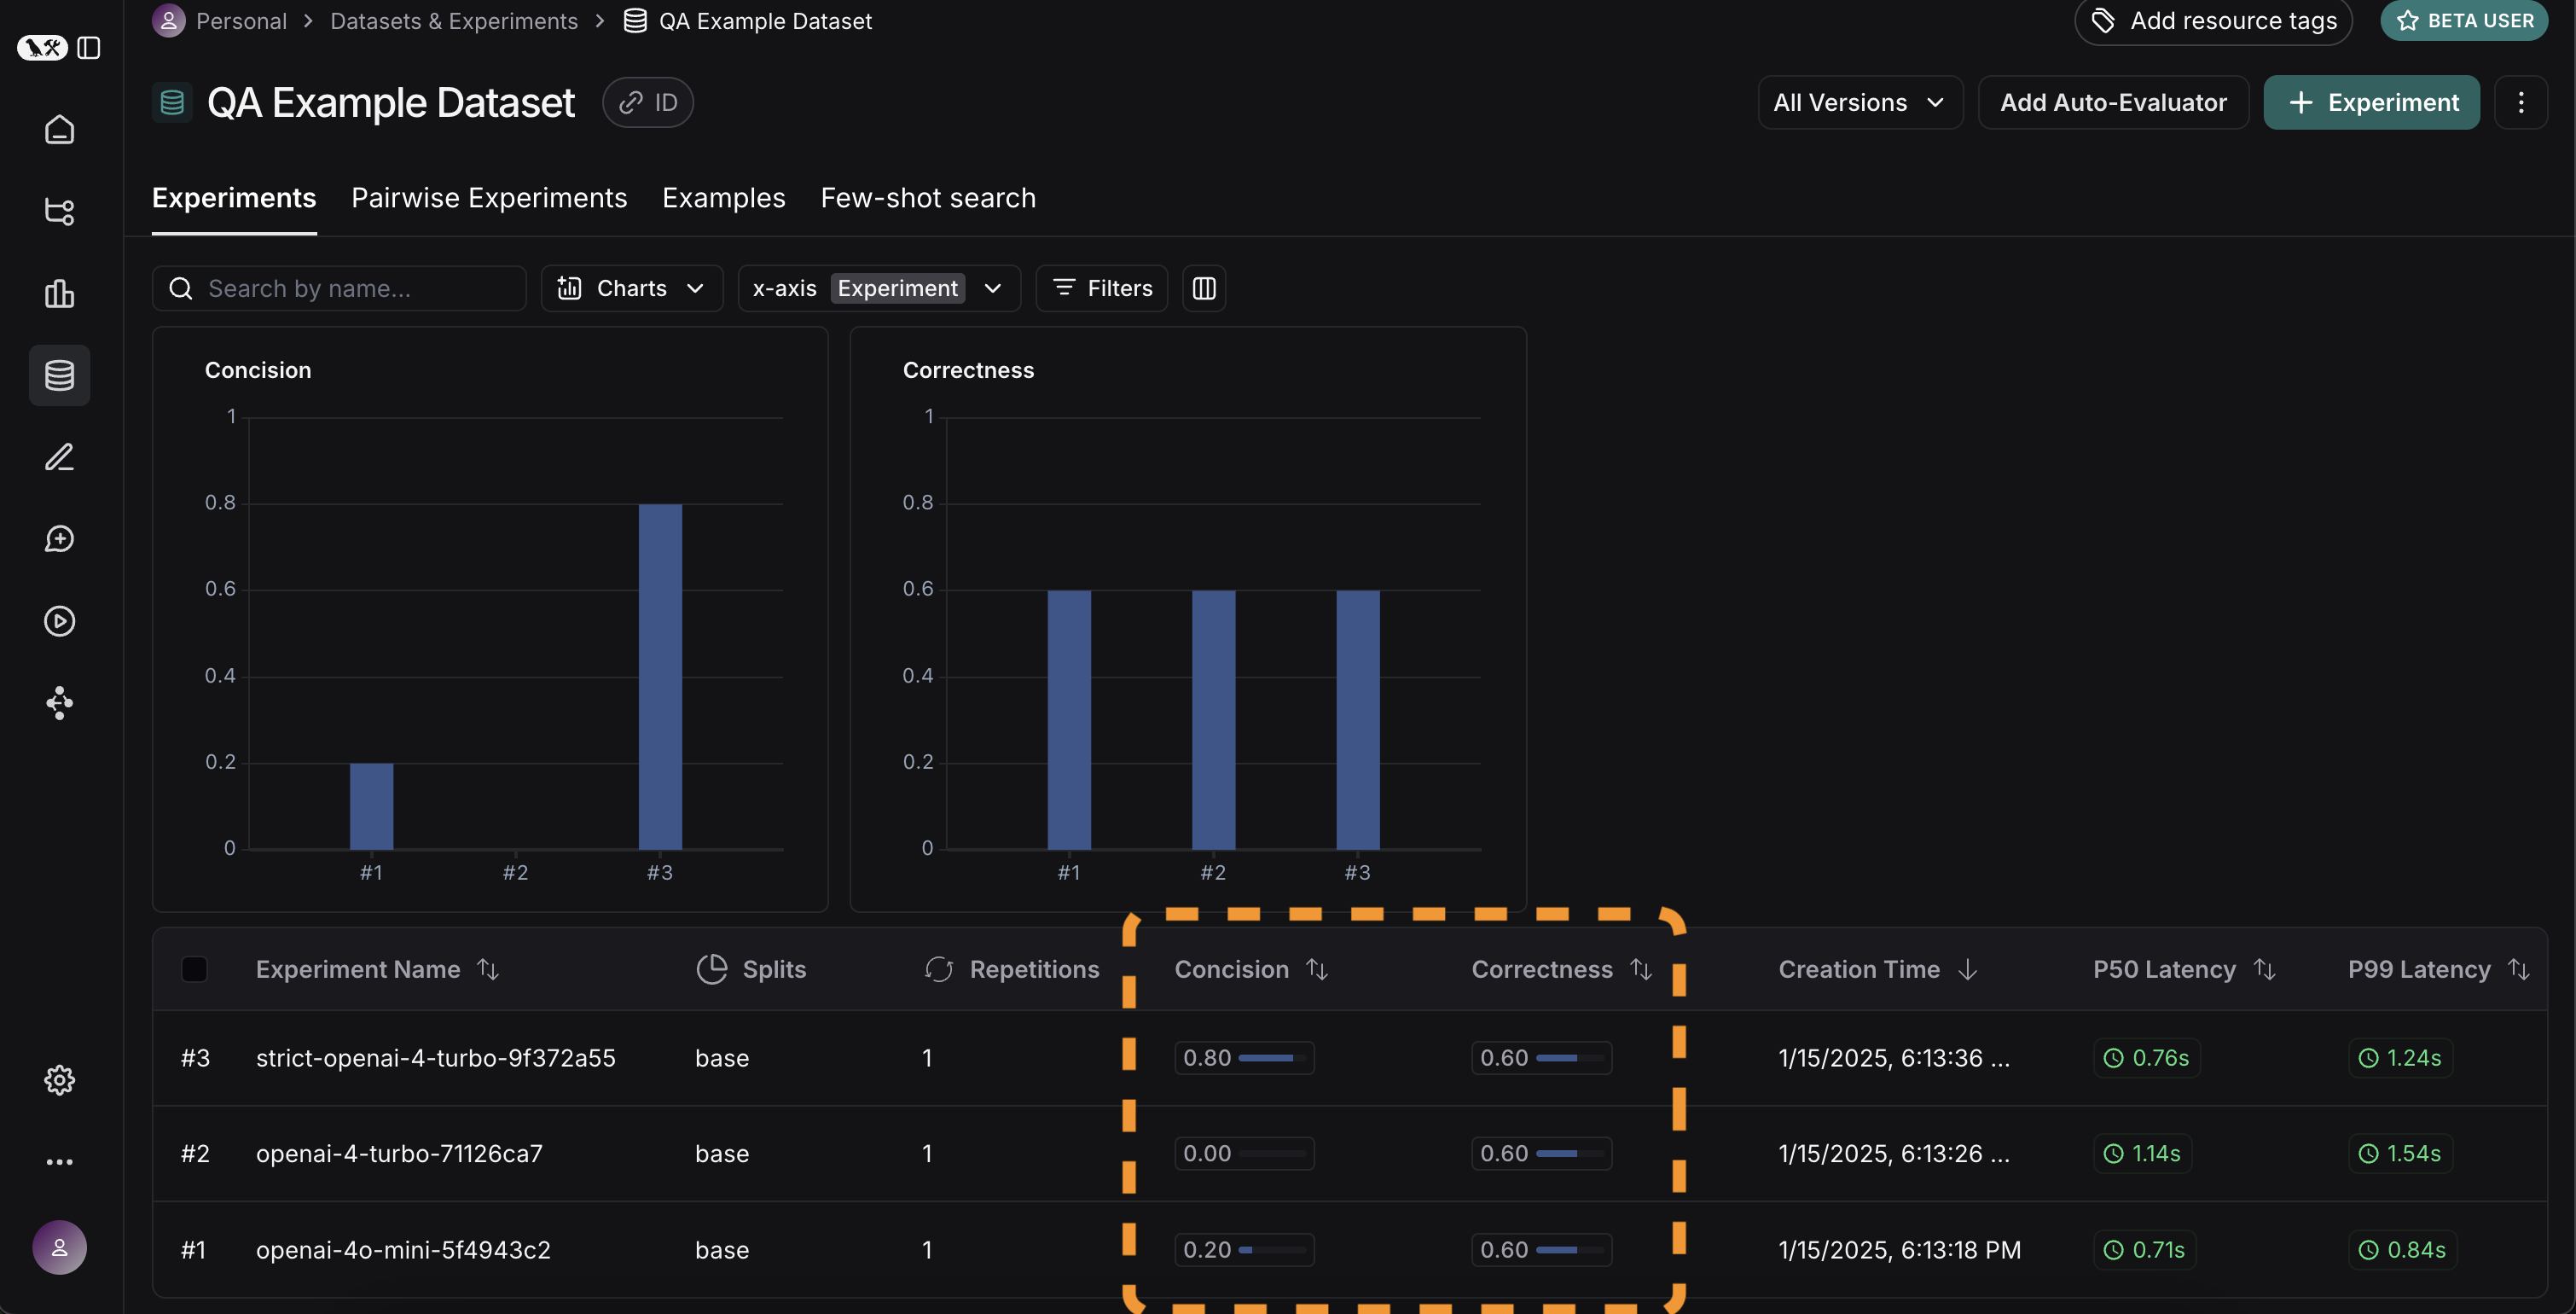 Great! So we can tell that GPT-4 is better than GPT-3.5 at knowing who companies are, and we can see that the strict prompt helped a lot with the length. But what if we want to explore in more detail?
In order to do that, we can select all the runs we want to compare (in this case all three) and open them up in a comparison view. We immediately see all three tests side by side. Some of the cells are color coded - this is showing a regression of *a certain metric* compared to *a certain baseline*. We automatically choose defaults for the baseline and metric, but you can change those yourself. You can also choose which columns and which metrics you see by using the `Display` control. You can also automatically filter to only see the runs that have improvements/regressions by clicking on the icons at the top.
Great! So we can tell that GPT-4 is better than GPT-3.5 at knowing who companies are, and we can see that the strict prompt helped a lot with the length. But what if we want to explore in more detail?
In order to do that, we can select all the runs we want to compare (in this case all three) and open them up in a comparison view. We immediately see all three tests side by side. Some of the cells are color coded - this is showing a regression of *a certain metric* compared to *a certain baseline*. We automatically choose defaults for the baseline and metric, but you can change those yourself. You can also choose which columns and which metrics you see by using the `Display` control. You can also automatically filter to only see the runs that have improvements/regressions by clicking on the icons at the top.
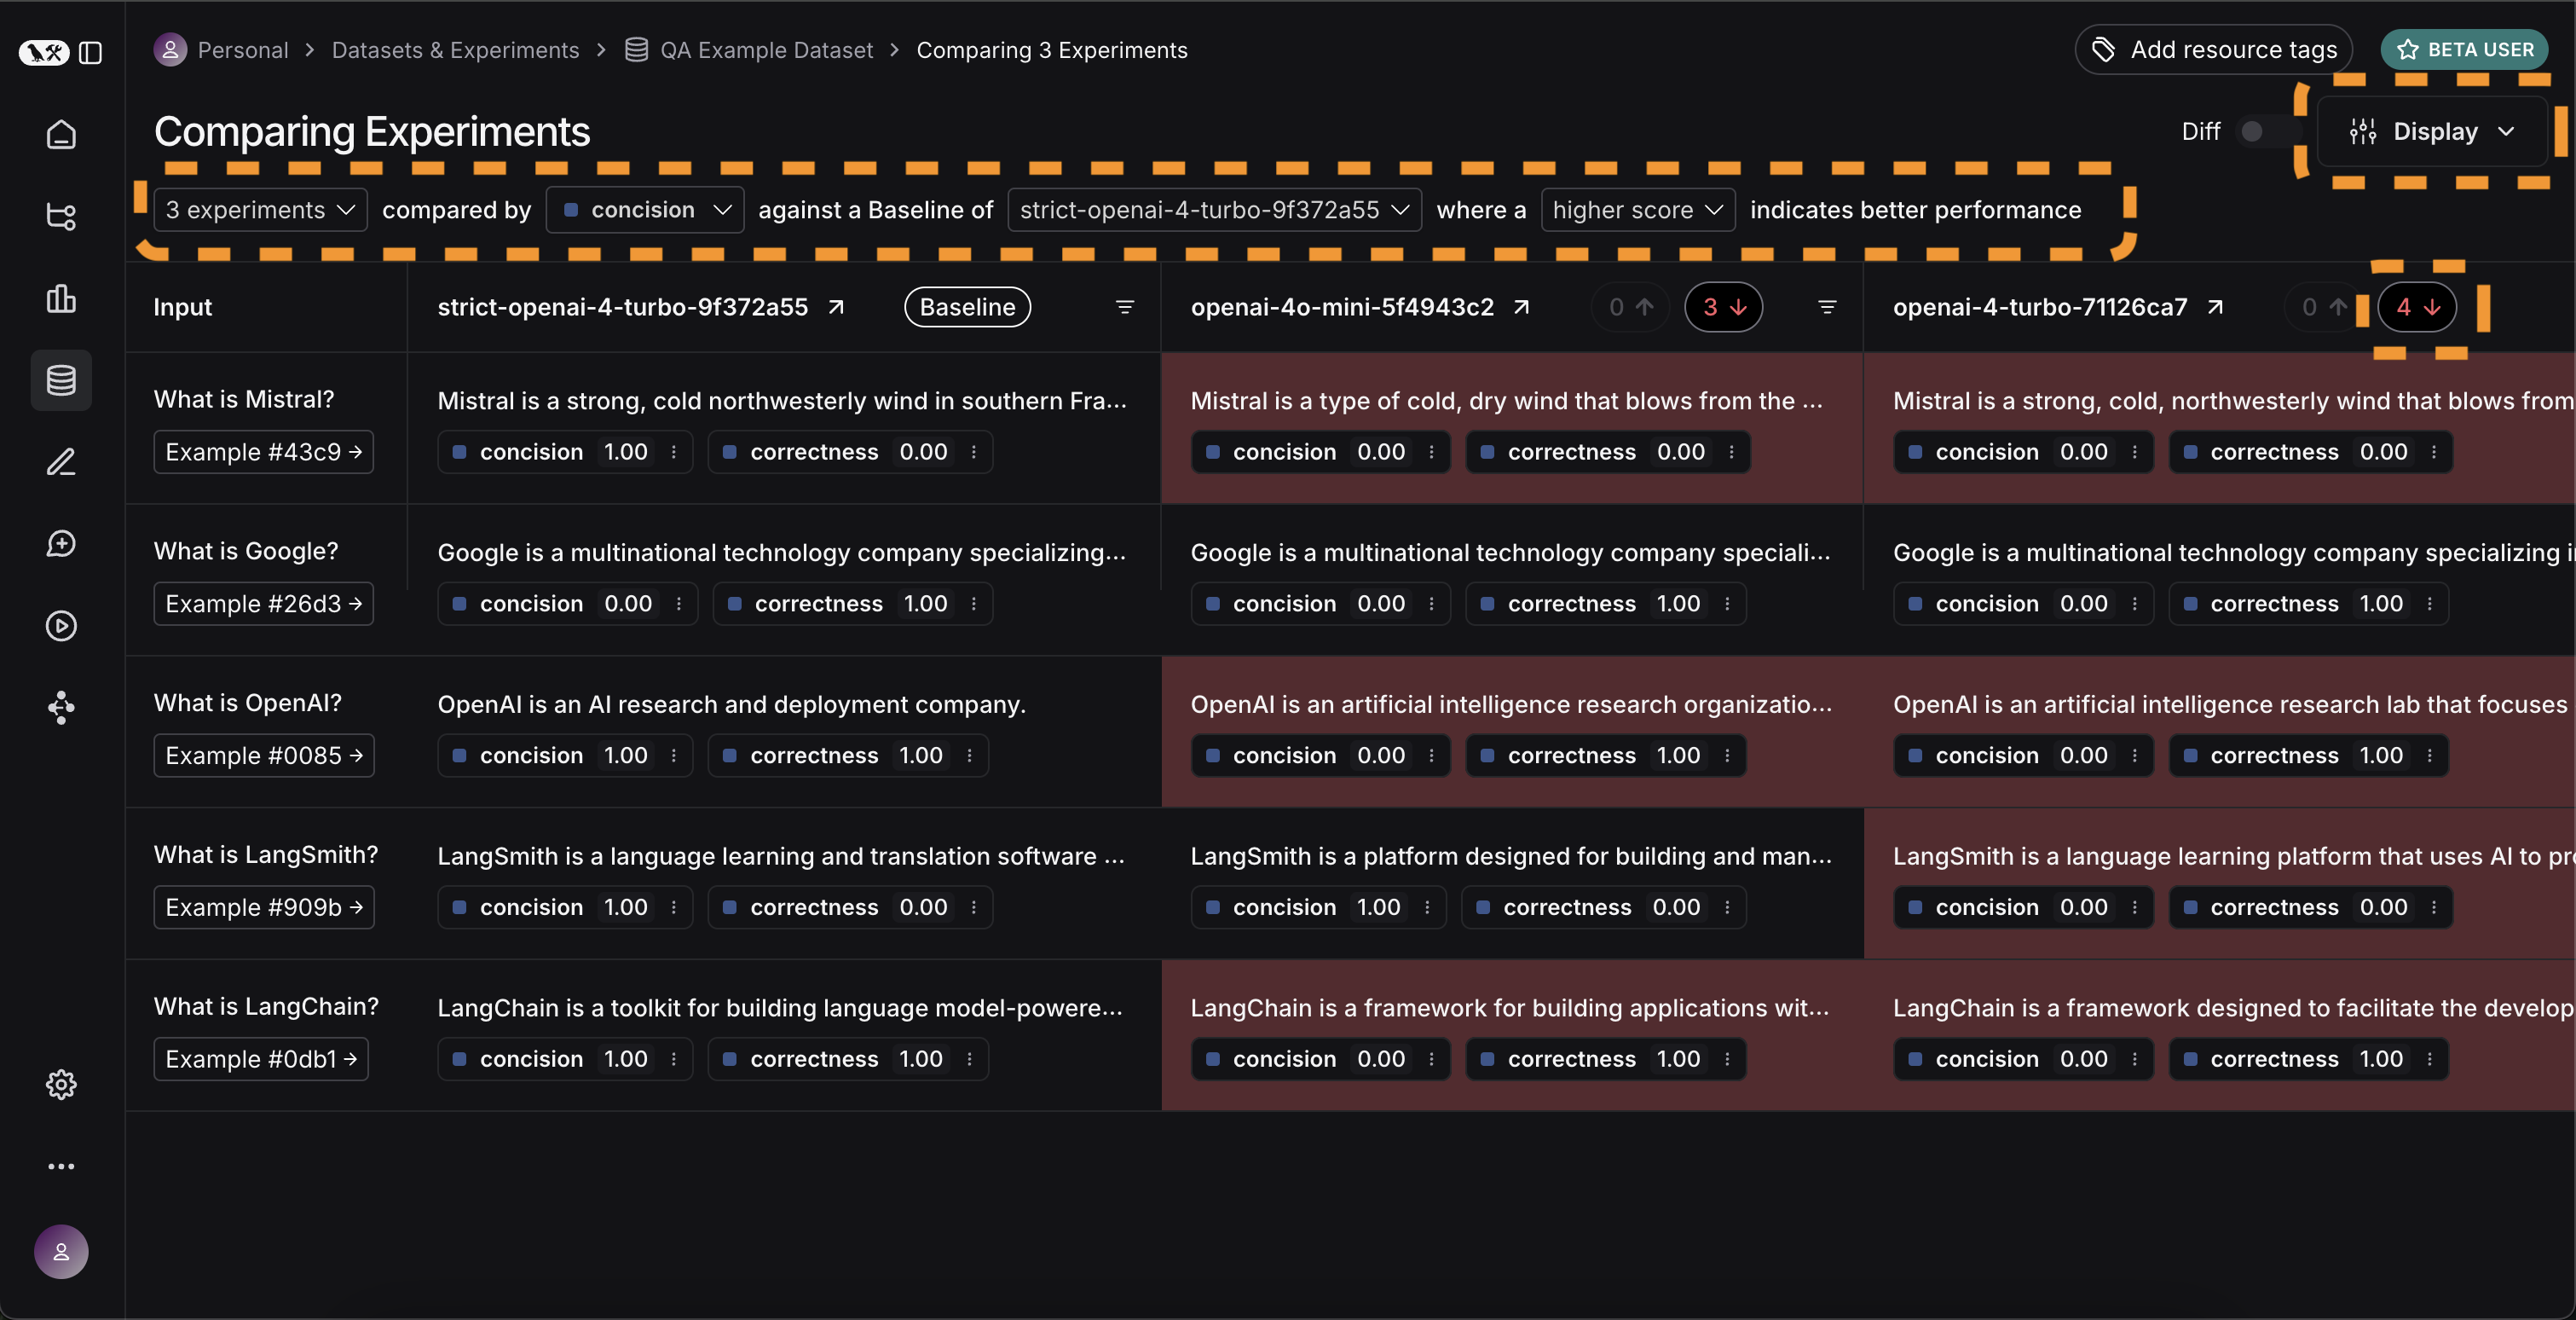 If we want to see more information, we can also select the `Expand` button that appears when hovering over a row to open up a side panel with more detailed information:
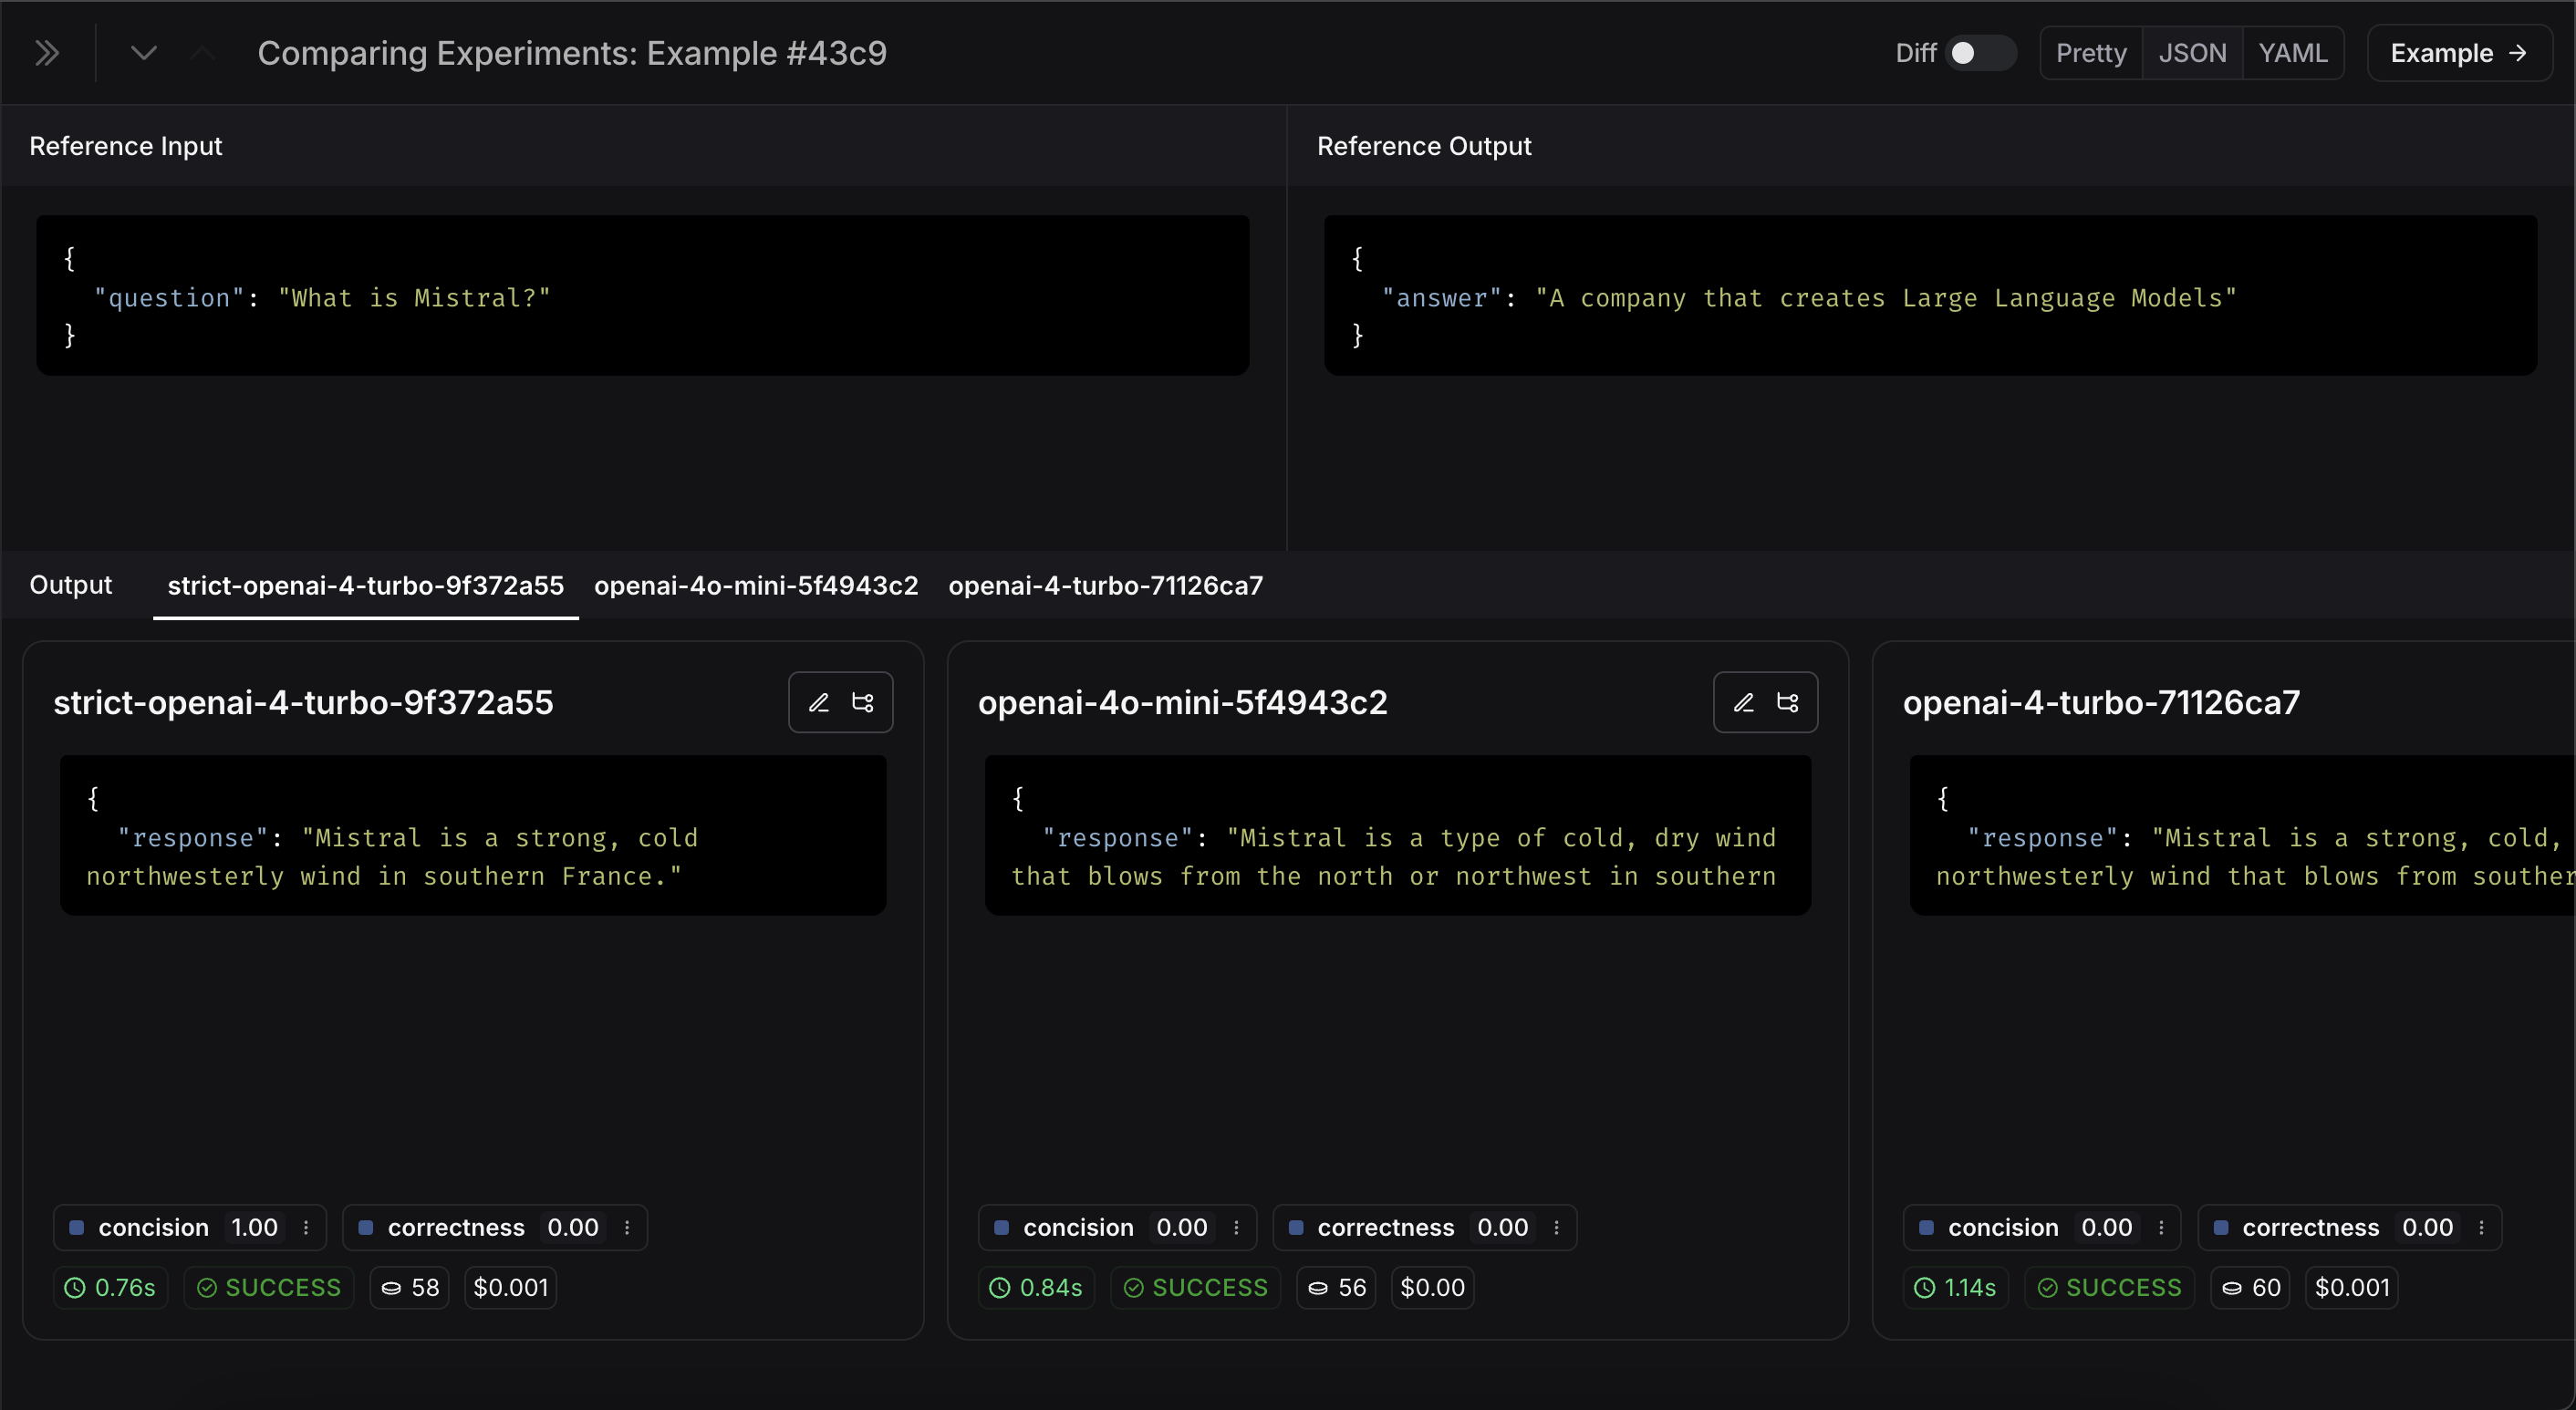 ## Set up automated testing to run in CI/CD
Now that we've run this in a one-off manner, we can set it to run in an automated fashion. We can do this pretty easily by just including it as a pytest file that we run in CI/CD. As part of this, we can either just log the results OR set up some criteria to determine if it passes or not. For example, if I wanted to ensure that we always got at least 80% of generated responses passing the `length` check, we could set that up with a test like:
```python theme={null}
def test_length_score() -> None:
"""Test that the length score is at least 80%."""
experiment_results = evaluate(
ls_target, # Your AI system
data=dataset_name, # The data to predict and grade over
evaluators=[concision, correctness], # The evaluators to score the results
)
# This will be cleaned up in the next release:
feedback = client.list_feedback(
run_ids=[r.id for r in client.list_runs(project_name=experiment_results.experiment_name)],
feedback_key="concision"
)
scores = [f.score for f in feedback]
assert sum(scores) / len(scores) >= 0.8, "Aggregate score should be at least .8"
```
## Track results over time
Now that we've got these experiments running in an automated fashion, we want to track these results over time. We can do this from the overall `Experiments` tab in the datasets page. By default, we show evaluation metrics over time (highlighted in red). We also automatically track git metrics, to easily associate it with the branch of your code (highlighted in yellow).
## Set up automated testing to run in CI/CD
Now that we've run this in a one-off manner, we can set it to run in an automated fashion. We can do this pretty easily by just including it as a pytest file that we run in CI/CD. As part of this, we can either just log the results OR set up some criteria to determine if it passes or not. For example, if I wanted to ensure that we always got at least 80% of generated responses passing the `length` check, we could set that up with a test like:
```python theme={null}
def test_length_score() -> None:
"""Test that the length score is at least 80%."""
experiment_results = evaluate(
ls_target, # Your AI system
data=dataset_name, # The data to predict and grade over
evaluators=[concision, correctness], # The evaluators to score the results
)
# This will be cleaned up in the next release:
feedback = client.list_feedback(
run_ids=[r.id for r in client.list_runs(project_name=experiment_results.experiment_name)],
feedback_key="concision"
)
scores = [f.score for f in feedback]
assert sum(scores) / len(scores) >= 0.8, "Aggregate score should be at least .8"
```
## Track results over time
Now that we've got these experiments running in an automated fashion, we want to track these results over time. We can do this from the overall `Experiments` tab in the datasets page. By default, we show evaluation metrics over time (highlighted in red). We also automatically track git metrics, to easily associate it with the branch of your code (highlighted in yellow).
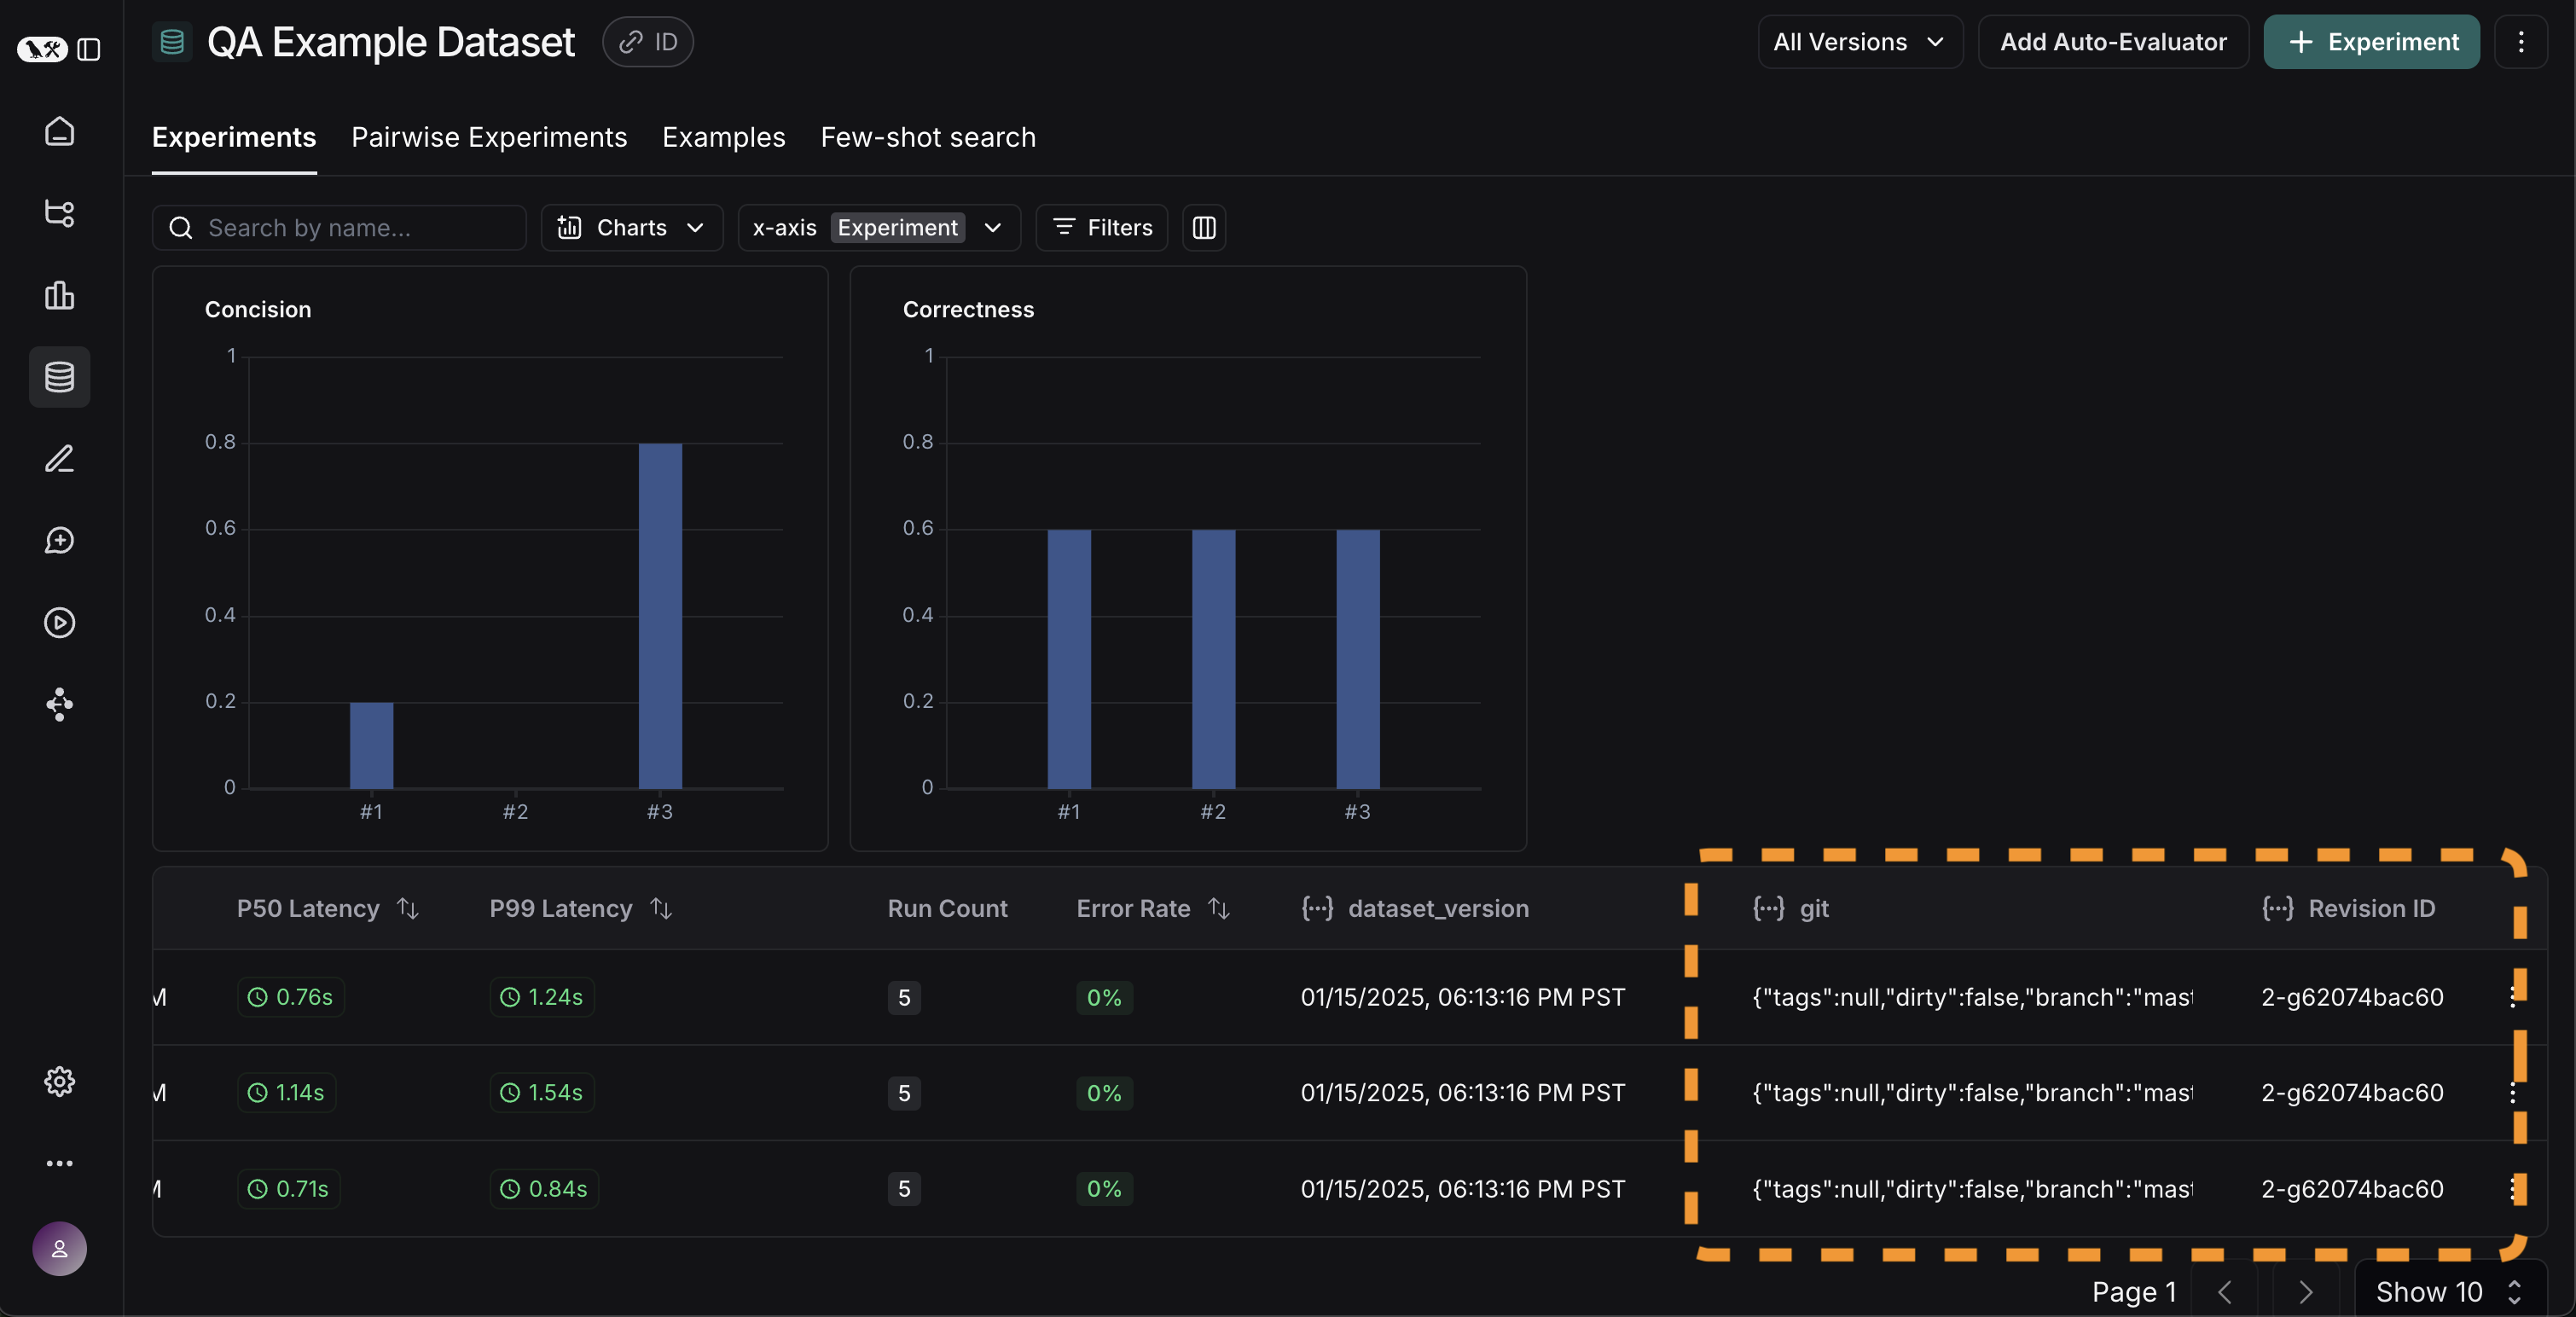 ## Conclusion
That's it for this tutorial!
We've gone over how to create an initial test set, define some evaluation metrics, run experiments, compare them manually, set up CI/CD, and track results over time. Hopefully this can help you iterate with confidence.
This is just the start. As mentioned earlier, evaluation is an ongoing process. For example - the datapoints you will want to evaluate on will likely continue to change over time. There are many types of evaluators you may wish to explore. For information on this, check out the [how-to guides](/langsmith/evaluation).
Additionally, there are other ways to evaluate data besides in this "offline" manner (e.g. you can evaluate production data). For more information on online evaluation, check out [this guide](/langsmith/online-evaluations).
## Reference code
## Conclusion
That's it for this tutorial!
We've gone over how to create an initial test set, define some evaluation metrics, run experiments, compare them manually, set up CI/CD, and track results over time. Hopefully this can help you iterate with confidence.
This is just the start. As mentioned earlier, evaluation is an ongoing process. For example - the datapoints you will want to evaluate on will likely continue to change over time. There are many types of evaluators you may wish to explore. For information on this, check out the [how-to guides](/langsmith/evaluation).
Additionally, there are other ways to evaluate data besides in this "offline" manner (e.g. you can evaluate production data). For more information on online evaluation, check out [this guide](/langsmith/online-evaluations).
## Reference code
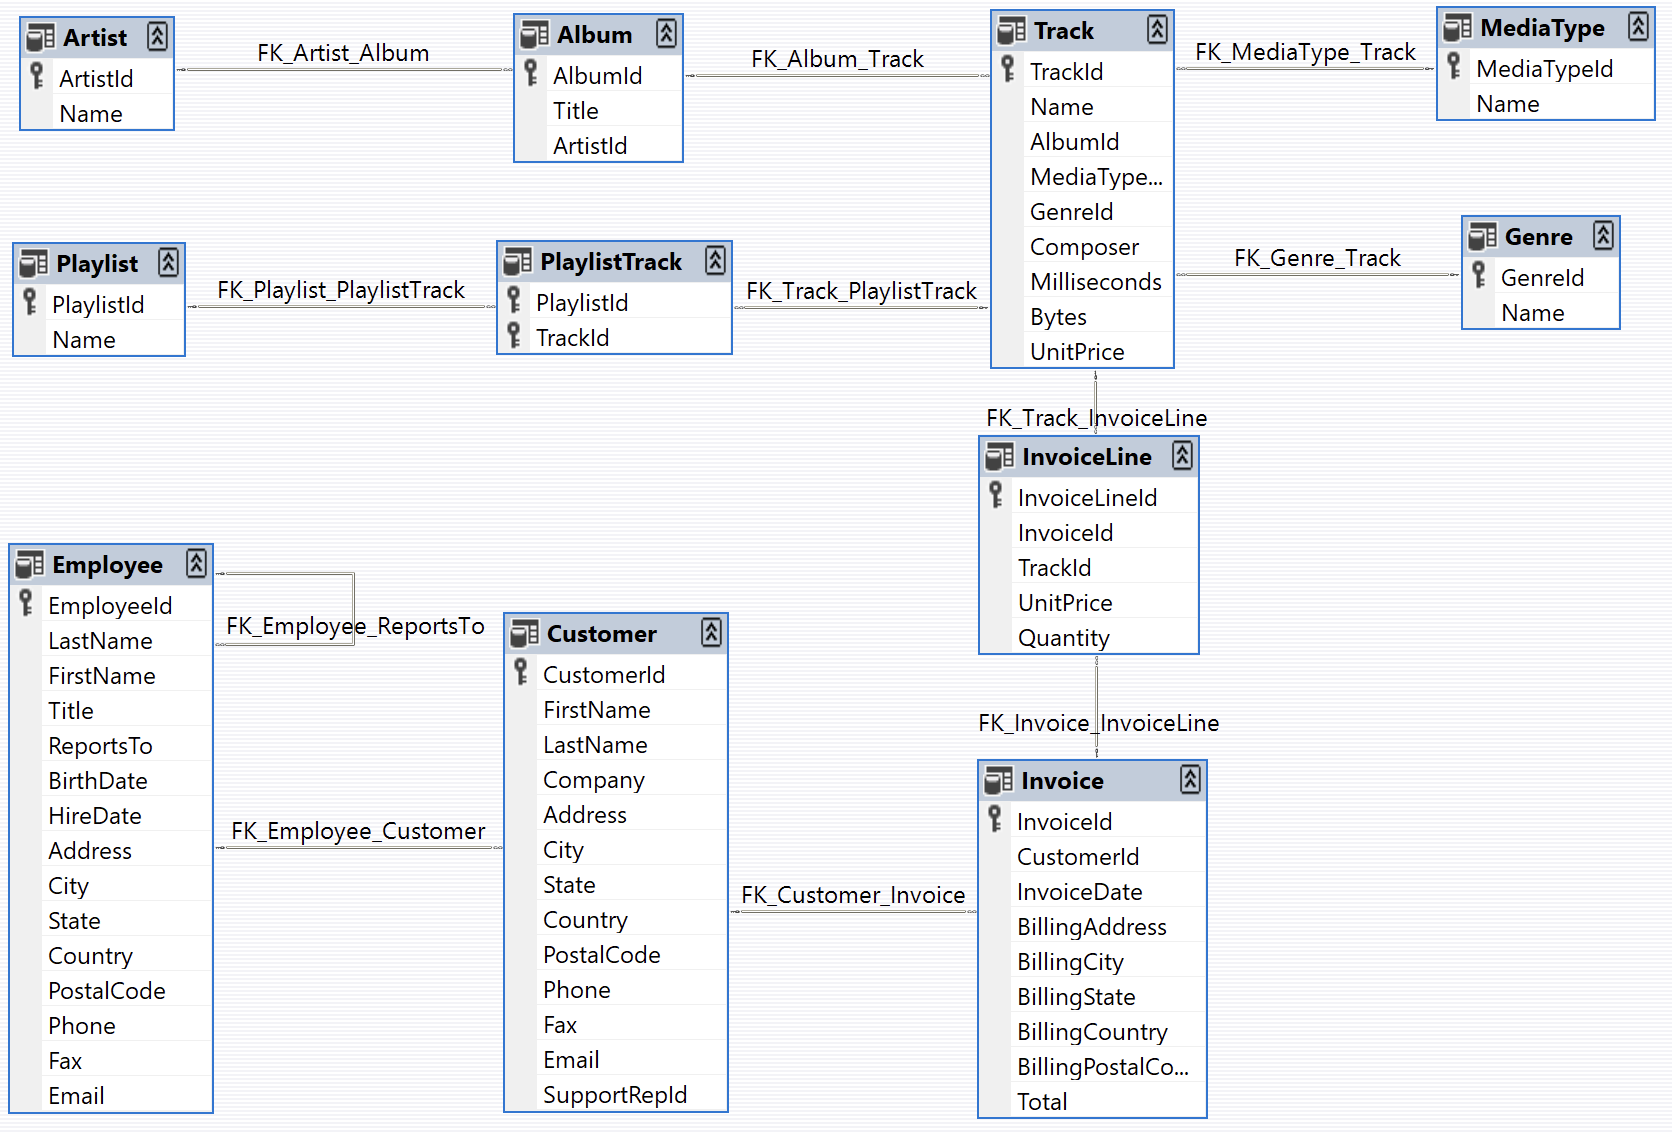 ### Define the customer support agent
We'll create a [LangGraph](https://langchain-ai.github.io/langgraph/) agent with limited access to our database. For demo purposes, our agent will support two basic types of requests:
* Lookup: The customer can look up song titles, artist names, and albums based on other identifying information. For example: "What songs do you have by Jimi Hendrix?"
* Refund: The customer can request a refund on their past purchases. For example: "My name is Claude Shannon and I'd like a refund on a purchase I made last week, could you help me?"
For simplicity in this demo, we'll implement refunds by deleting the corresponding database records. We'll skip implementing user authentication and other production security measures.
The agent's logic will be structured as two separate subgraphs (one for lookups and one for refunds), with a parent graph that routes requests to the appropriate subgraph.
#### Refund agent
Let's build the refund processing agent. This agent needs to:
1. Find the customer's purchase records in the database
2. Delete the relevant Invoice and InvoiceLine records to process the refund
We'll create two SQL helper functions:
1. A function to execute the refund by deleting records
2. A function to look up a customer's purchase history
To make testing easier, we'll add a "mock" mode to these functions. When mock mode is enabled, the functions will simulate database operations without actually modifying any data.
```python theme={null}
import sqlite3
def _refund(invoice_id: int | None, invoice_line_ids: list[int] | None, mock: bool = False) -> float:
...
def _lookup( ...
```
Now let's define our graph. We'll use a simple architecture with three main paths:
1. Extract customer and purchase information from the conversation
2. Route the request to one of three paths:
* Refund path: If we have sufficient purchase details (Invoice ID or Invoice Line IDs) to process a refund
* Lookup path: If we have enough customer information (name and phone) to search their purchase history
* Response path: If we need more information, respond to the user requesting the specific details needed
The graph's state will track:
* The conversation history (messages between user and agent)
* All customer and purchase information extracted from the conversation
* The next message to send to the user (followup text)
````python theme={null}
from typing import Literal
import json
from langchain.chat_models import init_chat_model
from langchain_core.runnables import RunnableConfig
from langgraph.graph import END, StateGraph
from langgraph.graph.message import AnyMessage, add_messages
from langgraph.types import Command, interrupt
from tabulate import tabulate
from typing_extensions import Annotated, TypedDict
# Graph state.
class State(TypedDict):
"""Agent state."""
messages: Annotated[list[AnyMessage], add_messages]
followup: str | None
invoice_id: int | None
invoice_line_ids: list[int] | None
customer_first_name: str | None
customer_last_name: str | None
customer_phone: str | None
track_name: str | None
album_title: str | None
artist_name: str | None
purchase_date_iso_8601: str | None
# Instructions for extracting the user/purchase info from the conversation.
gather_info_instructions = """You are managing an online music store that sells song tracks. \
Customers can buy multiple tracks at a time and these purchases are recorded in a database as \
an Invoice per purchase and an associated set of Invoice Lines for each purchased track.
Your task is to help customers who would like a refund for one or more of the tracks they've \
purchased. In order for you to be able refund them, the customer must specify the Invoice ID \
to get a refund on all the tracks they bought in a single transaction, or one or more Invoice \
Line IDs if they would like refunds on individual tracks.
Often a user will not know the specific Invoice ID(s) or Invoice Line ID(s) for which they \
would like a refund. In this case you can help them look up their invoices by asking them to \
specify:
- Required: Their first name, last name, and phone number.
- Optionally: The track name, artist name, album name, or purchase date.
If the customer has not specified the required information (either Invoice/Invoice Line IDs \
or first name, last name, phone) then please ask them to specify it."""
# Extraction schema, mirrors the graph state.
class PurchaseInformation(TypedDict):
"""All of the known information about the invoice / invoice lines the customer would like refunded. Do not make up values, leave fields as null if you don't know their value."""
invoice_id: int | None
invoice_line_ids: list[int] | None
customer_first_name: str | None
customer_last_name: str | None
customer_phone: str | None
track_name: str | None
album_title: str | None
artist_name: str | None
purchase_date_iso_8601: str | None
followup: Annotated[
str | None,
...,
"If the user hasn't enough identifying information, please tell them what the required information is and ask them to specify it.",
]
# Model for performing extraction.
info_llm = init_chat_model("gpt-4o-mini").with_structured_output(
PurchaseInformation, method="json_schema", include_raw=True
)
# Graph node for extracting user info and routing to lookup/refund/END.
async def gather_info(state: State) -> Command[Literal["lookup", "refund", END]]:
info = await info_llm.ainvoke(
[
{"role": "system", "content": gather_info_instructions},
*state["messages"],
]
)
parsed = info["parsed"]
if any(parsed[k] for k in ("invoice_id", "invoice_line_ids")):
goto = "refund"
elif all(
parsed[k]
for k in ("customer_first_name", "customer_last_name", "customer_phone")
):
goto = "lookup"
else:
goto = END
update = {"messages": [info["raw"]], **parsed}
return Command(update=update, goto=goto)
# Graph node for executing the refund.
# Note that here we inspect the runtime config for an "env" variable.
# If "env" is set to "test", then we don't actually delete any rows from our database.
# This will become important when we're running our evaluations.
def refund(state: State, config: RunnableConfig) -> dict:
# Whether to mock the deletion. True if the configurable var 'env' is set to 'test'.
mock = config.get("configurable", {}).get("env", "prod") == "test"
refunded = _refund(
invoice_id=state["invoice_id"], invoice_line_ids=state["invoice_line_ids"], mock=mock
)
response = f"You have been refunded a total of: ${refunded:.2f}. Is there anything else I can help with?"
return {
"messages": [{"role": "assistant", "content": response}],
"followup": response,
}
# Graph node for looking up the users purchases
def lookup(state: State) -> dict:
args = (
state[k]
for k in (
"customer_first_name",
"customer_last_name",
"customer_phone",
"track_name",
"album_title",
"artist_name",
"purchase_date_iso_8601",
)
)
results = _lookup(*args)
if not results:
response = "We did not find any purchases associated with the information you've provided. Are you sure you've entered all of your information correctly?"
followup = response
else:
response = f"Which of the following purchases would you like to be refunded for?\n\n```json{json.dumps(results, indent=2)}\n```"
followup = f"Which of the following purchases would you like to be refunded for?\n\n{tabulate(results, headers='keys')}"
return {
"messages": [{"role": "assistant", "content": response}],
"followup": followup,
"invoice_line_ids": [res["invoice_line_id"] for res in results],
}
# Building our graph
graph_builder = StateGraph(State)
graph_builder.add_node(gather_info)
graph_builder.add_node(refund)
graph_builder.add_node(lookup)
graph_builder.set_entry_point("gather_info")
graph_builder.add_edge("lookup", END)
graph_builder.add_edge("refund", END)
refund_graph = graph_builder.compile()
````
We can visualize our refund graph:
```
# Assumes you're in an interactive Python environmentfrom IPython.display import Image, display ...
```
### Define the customer support agent
We'll create a [LangGraph](https://langchain-ai.github.io/langgraph/) agent with limited access to our database. For demo purposes, our agent will support two basic types of requests:
* Lookup: The customer can look up song titles, artist names, and albums based on other identifying information. For example: "What songs do you have by Jimi Hendrix?"
* Refund: The customer can request a refund on their past purchases. For example: "My name is Claude Shannon and I'd like a refund on a purchase I made last week, could you help me?"
For simplicity in this demo, we'll implement refunds by deleting the corresponding database records. We'll skip implementing user authentication and other production security measures.
The agent's logic will be structured as two separate subgraphs (one for lookups and one for refunds), with a parent graph that routes requests to the appropriate subgraph.
#### Refund agent
Let's build the refund processing agent. This agent needs to:
1. Find the customer's purchase records in the database
2. Delete the relevant Invoice and InvoiceLine records to process the refund
We'll create two SQL helper functions:
1. A function to execute the refund by deleting records
2. A function to look up a customer's purchase history
To make testing easier, we'll add a "mock" mode to these functions. When mock mode is enabled, the functions will simulate database operations without actually modifying any data.
```python theme={null}
import sqlite3
def _refund(invoice_id: int | None, invoice_line_ids: list[int] | None, mock: bool = False) -> float:
...
def _lookup( ...
```
Now let's define our graph. We'll use a simple architecture with three main paths:
1. Extract customer and purchase information from the conversation
2. Route the request to one of three paths:
* Refund path: If we have sufficient purchase details (Invoice ID or Invoice Line IDs) to process a refund
* Lookup path: If we have enough customer information (name and phone) to search their purchase history
* Response path: If we need more information, respond to the user requesting the specific details needed
The graph's state will track:
* The conversation history (messages between user and agent)
* All customer and purchase information extracted from the conversation
* The next message to send to the user (followup text)
````python theme={null}
from typing import Literal
import json
from langchain.chat_models import init_chat_model
from langchain_core.runnables import RunnableConfig
from langgraph.graph import END, StateGraph
from langgraph.graph.message import AnyMessage, add_messages
from langgraph.types import Command, interrupt
from tabulate import tabulate
from typing_extensions import Annotated, TypedDict
# Graph state.
class State(TypedDict):
"""Agent state."""
messages: Annotated[list[AnyMessage], add_messages]
followup: str | None
invoice_id: int | None
invoice_line_ids: list[int] | None
customer_first_name: str | None
customer_last_name: str | None
customer_phone: str | None
track_name: str | None
album_title: str | None
artist_name: str | None
purchase_date_iso_8601: str | None
# Instructions for extracting the user/purchase info from the conversation.
gather_info_instructions = """You are managing an online music store that sells song tracks. \
Customers can buy multiple tracks at a time and these purchases are recorded in a database as \
an Invoice per purchase and an associated set of Invoice Lines for each purchased track.
Your task is to help customers who would like a refund for one or more of the tracks they've \
purchased. In order for you to be able refund them, the customer must specify the Invoice ID \
to get a refund on all the tracks they bought in a single transaction, or one or more Invoice \
Line IDs if they would like refunds on individual tracks.
Often a user will not know the specific Invoice ID(s) or Invoice Line ID(s) for which they \
would like a refund. In this case you can help them look up their invoices by asking them to \
specify:
- Required: Their first name, last name, and phone number.
- Optionally: The track name, artist name, album name, or purchase date.
If the customer has not specified the required information (either Invoice/Invoice Line IDs \
or first name, last name, phone) then please ask them to specify it."""
# Extraction schema, mirrors the graph state.
class PurchaseInformation(TypedDict):
"""All of the known information about the invoice / invoice lines the customer would like refunded. Do not make up values, leave fields as null if you don't know their value."""
invoice_id: int | None
invoice_line_ids: list[int] | None
customer_first_name: str | None
customer_last_name: str | None
customer_phone: str | None
track_name: str | None
album_title: str | None
artist_name: str | None
purchase_date_iso_8601: str | None
followup: Annotated[
str | None,
...,
"If the user hasn't enough identifying information, please tell them what the required information is and ask them to specify it.",
]
# Model for performing extraction.
info_llm = init_chat_model("gpt-4o-mini").with_structured_output(
PurchaseInformation, method="json_schema", include_raw=True
)
# Graph node for extracting user info and routing to lookup/refund/END.
async def gather_info(state: State) -> Command[Literal["lookup", "refund", END]]:
info = await info_llm.ainvoke(
[
{"role": "system", "content": gather_info_instructions},
*state["messages"],
]
)
parsed = info["parsed"]
if any(parsed[k] for k in ("invoice_id", "invoice_line_ids")):
goto = "refund"
elif all(
parsed[k]
for k in ("customer_first_name", "customer_last_name", "customer_phone")
):
goto = "lookup"
else:
goto = END
update = {"messages": [info["raw"]], **parsed}
return Command(update=update, goto=goto)
# Graph node for executing the refund.
# Note that here we inspect the runtime config for an "env" variable.
# If "env" is set to "test", then we don't actually delete any rows from our database.
# This will become important when we're running our evaluations.
def refund(state: State, config: RunnableConfig) -> dict:
# Whether to mock the deletion. True if the configurable var 'env' is set to 'test'.
mock = config.get("configurable", {}).get("env", "prod") == "test"
refunded = _refund(
invoice_id=state["invoice_id"], invoice_line_ids=state["invoice_line_ids"], mock=mock
)
response = f"You have been refunded a total of: ${refunded:.2f}. Is there anything else I can help with?"
return {
"messages": [{"role": "assistant", "content": response}],
"followup": response,
}
# Graph node for looking up the users purchases
def lookup(state: State) -> dict:
args = (
state[k]
for k in (
"customer_first_name",
"customer_last_name",
"customer_phone",
"track_name",
"album_title",
"artist_name",
"purchase_date_iso_8601",
)
)
results = _lookup(*args)
if not results:
response = "We did not find any purchases associated with the information you've provided. Are you sure you've entered all of your information correctly?"
followup = response
else:
response = f"Which of the following purchases would you like to be refunded for?\n\n```json{json.dumps(results, indent=2)}\n```"
followup = f"Which of the following purchases would you like to be refunded for?\n\n{tabulate(results, headers='keys')}"
return {
"messages": [{"role": "assistant", "content": response}],
"followup": followup,
"invoice_line_ids": [res["invoice_line_id"] for res in results],
}
# Building our graph
graph_builder = StateGraph(State)
graph_builder.add_node(gather_info)
graph_builder.add_node(refund)
graph_builder.add_node(lookup)
graph_builder.set_entry_point("gather_info")
graph_builder.add_edge("lookup", END)
graph_builder.add_edge("refund", END)
refund_graph = graph_builder.compile()
````
We can visualize our refund graph:
```
# Assumes you're in an interactive Python environmentfrom IPython.display import Image, display ...
```
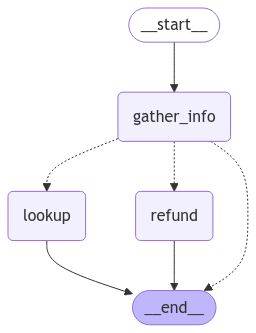 #### Lookup agent
For the lookup (i.e. question-answering) agent, we'll use a simple ReACT architecture and give the agent tools for looking up track names, artist names, and album names based on various filters. For example, you can look up albums by a particular artist, artists who released songs with a specific name, etc.
```python theme={null}
from langchain.embeddings import init_embeddings
from langchain.tools import tool
from langchain_core.vectorstores import InMemoryVectorStore
from langchain.agents import create_agent
# Our SQL queries will only work if we filter on the exact string values that are in the DB.
# To ensure this, we'll create vectorstore indexes for all of the artists, tracks and albums
# ahead of time and use those to disambiguate the user input. E.g. if a user searches for
# songs by "prince" and our DB records the artist as "Prince", ideally when we query our
# artist vectorstore for "prince" we'll get back the value "Prince", which we can then
# use in our SQL queries.
def index_fields() -> tuple[InMemoryVectorStore, InMemoryVectorStore, InMemoryVectorStore]: ...
track_store, artist_store, album_store = index_fields()
# Agent tools
@tool
def lookup_track( ...
@tool
def lookup_album( ...
@tool
def lookup_artist( ...
# Agent model
qa_llm = init_chat_model("claude-sonnet-4-5-20250929")
# The prebuilt ReACT agent only expects State to have a 'messages' key, so the
# state we defined for the refund agent can also be passed to our lookup agent.
qa_graph = create_agent(qa_llm, tools=[lookup_track, lookup_artist, lookup_album])
```
```
display(Image(qa_graph.get_graph(xray=True).draw_mermaid_png()))
```
#### Lookup agent
For the lookup (i.e. question-answering) agent, we'll use a simple ReACT architecture and give the agent tools for looking up track names, artist names, and album names based on various filters. For example, you can look up albums by a particular artist, artists who released songs with a specific name, etc.
```python theme={null}
from langchain.embeddings import init_embeddings
from langchain.tools import tool
from langchain_core.vectorstores import InMemoryVectorStore
from langchain.agents import create_agent
# Our SQL queries will only work if we filter on the exact string values that are in the DB.
# To ensure this, we'll create vectorstore indexes for all of the artists, tracks and albums
# ahead of time and use those to disambiguate the user input. E.g. if a user searches for
# songs by "prince" and our DB records the artist as "Prince", ideally when we query our
# artist vectorstore for "prince" we'll get back the value "Prince", which we can then
# use in our SQL queries.
def index_fields() -> tuple[InMemoryVectorStore, InMemoryVectorStore, InMemoryVectorStore]: ...
track_store, artist_store, album_store = index_fields()
# Agent tools
@tool
def lookup_track( ...
@tool
def lookup_album( ...
@tool
def lookup_artist( ...
# Agent model
qa_llm = init_chat_model("claude-sonnet-4-5-20250929")
# The prebuilt ReACT agent only expects State to have a 'messages' key, so the
# state we defined for the refund agent can also be passed to our lookup agent.
qa_graph = create_agent(qa_llm, tools=[lookup_track, lookup_artist, lookup_album])
```
```
display(Image(qa_graph.get_graph(xray=True).draw_mermaid_png()))
```
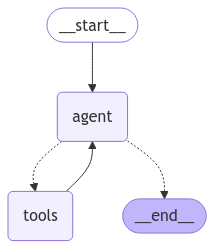 #### Parent agent
Now let's define a parent agent that combines our two task-specific agents. The only job of the parent agent is to route to one of the sub-agents by classifying the user's current intent, and to compile the output into a followup message.
```python theme={null}
# Schema for routing user intent.
# We'll use structured output to enforce that the model returns only
# the desired output.
class UserIntent(TypedDict):
"""The user's current intent in the conversation"""
intent: Literal["refund", "question_answering"]
# Routing model with structured output
router_llm = init_chat_model("gpt-4o-mini").with_structured_output(
UserIntent, method="json_schema", strict=True
)
# Instructions for routing.
route_instructions = """You are managing an online music store that sells song tracks. \
You can help customers in two types of ways: (1) answering general questions about \
tracks sold at your store, (2) helping them get a refund on a purhcase they made at your store.
Based on the following conversation, determine if the user is currently seeking general \
information about song tracks or if they are trying to refund a specific purchase.
Return 'refund' if they are trying to get a refund and 'question_answering' if they are \
asking a general music question. Do NOT return anything else. Do NOT try to respond to \
the user.
"""
# Node for routing.
async def intent_classifier(
state: State,
) -> Command[Literal["refund_agent", "question_answering_agent"]]:
response = router_llm.invoke(
[{"role": "system", "content": route_instructions}, *state["messages"]]
)
return Command(goto=response["intent"] + "_agent")
# Node for making sure the 'followup' key is set before our agent run completes.
def compile_followup(state: State) -> dict:
"""Set the followup to be the last message if it hasn't explicitly been set."""
if not state.get("followup"):
return {"followup": state["messages"][-1].content}
return {}
# Agent definition
graph_builder = StateGraph(State)
graph_builder.add_node(intent_classifier)
# Since all of our subagents have compatible state,
# we can add them as nodes directly.
graph_builder.add_node("refund_agent", refund_graph)
graph_builder.add_node("question_answering_agent", qa_graph)
graph_builder.add_node(compile_followup)
graph_builder.set_entry_point("intent_classifier")
graph_builder.add_edge("refund_agent", "compile_followup")
graph_builder.add_edge("question_answering_agent", "compile_followup")
graph_builder.add_edge("compile_followup", END)
graph = graph_builder.compile()
```
We can visualize our compiled parent graph including all of its subgraphs:
```python theme={null}
display(Image(graph.get_graph().draw_mermaid_png()))
```
#### Parent agent
Now let's define a parent agent that combines our two task-specific agents. The only job of the parent agent is to route to one of the sub-agents by classifying the user's current intent, and to compile the output into a followup message.
```python theme={null}
# Schema for routing user intent.
# We'll use structured output to enforce that the model returns only
# the desired output.
class UserIntent(TypedDict):
"""The user's current intent in the conversation"""
intent: Literal["refund", "question_answering"]
# Routing model with structured output
router_llm = init_chat_model("gpt-4o-mini").with_structured_output(
UserIntent, method="json_schema", strict=True
)
# Instructions for routing.
route_instructions = """You are managing an online music store that sells song tracks. \
You can help customers in two types of ways: (1) answering general questions about \
tracks sold at your store, (2) helping them get a refund on a purhcase they made at your store.
Based on the following conversation, determine if the user is currently seeking general \
information about song tracks or if they are trying to refund a specific purchase.
Return 'refund' if they are trying to get a refund and 'question_answering' if they are \
asking a general music question. Do NOT return anything else. Do NOT try to respond to \
the user.
"""
# Node for routing.
async def intent_classifier(
state: State,
) -> Command[Literal["refund_agent", "question_answering_agent"]]:
response = router_llm.invoke(
[{"role": "system", "content": route_instructions}, *state["messages"]]
)
return Command(goto=response["intent"] + "_agent")
# Node for making sure the 'followup' key is set before our agent run completes.
def compile_followup(state: State) -> dict:
"""Set the followup to be the last message if it hasn't explicitly been set."""
if not state.get("followup"):
return {"followup": state["messages"][-1].content}
return {}
# Agent definition
graph_builder = StateGraph(State)
graph_builder.add_node(intent_classifier)
# Since all of our subagents have compatible state,
# we can add them as nodes directly.
graph_builder.add_node("refund_agent", refund_graph)
graph_builder.add_node("question_answering_agent", qa_graph)
graph_builder.add_node(compile_followup)
graph_builder.set_entry_point("intent_classifier")
graph_builder.add_edge("refund_agent", "compile_followup")
graph_builder.add_edge("question_answering_agent", "compile_followup")
graph_builder.add_edge("compile_followup", END)
graph = graph_builder.compile()
```
We can visualize our compiled parent graph including all of its subgraphs:
```python theme={null}
display(Image(graph.get_graph().draw_mermaid_png()))
```
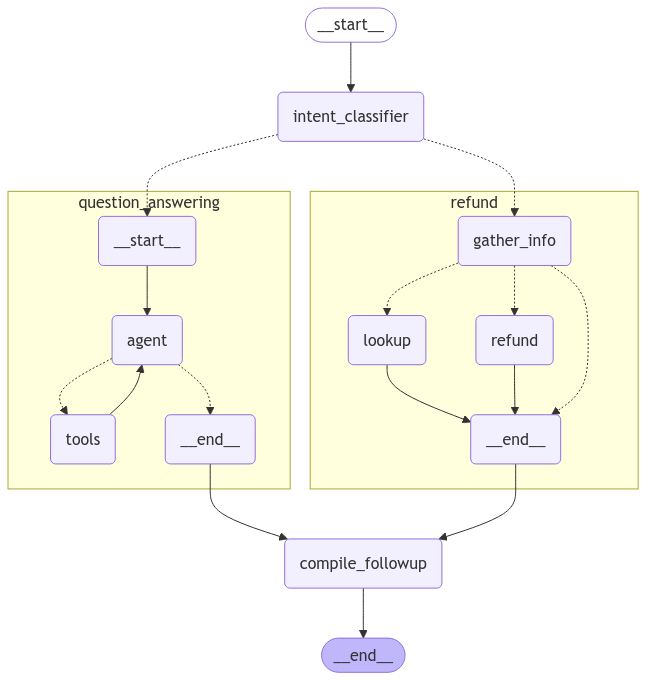 #### Try it out
Let's give our custom support agent a whirl!
```python theme={null}
state = await graph.ainvoke(
{"messages": [{"role": "user", "content": "what james brown songs do you have"}]}
)
print(state["followup"])
```
```
I found 20 James Brown songs in the database, all from the album "Sex Machine". Here they are: ...
```
```python theme={null}
state = await graph.ainvoke({"messages": [
{
"role": "user",
"content": "my name is Aaron Mitchell and my number is +1 (204) 452-6452. I bought some songs by Led Zeppelin that i'd like refunded",
}
]})
print(state["followup"])
```
```
Which of the following purchases would you like to be refunded for? ...
```
## Evaluations
Now that we've got a testable version of our agent, let's run some evaluations. Agent evaluation can focus on at least 3 things:
* [Final response](/langsmith/evaluation-concepts#evaluating-an-agents-final-response): The inputs are a prompt and an optional list of tools. The output is the final agent response.
* [Trajectory](/langsmith/evaluation-concepts#evaluating-an-agents-trajectory): As before, the inputs are a prompt and an optional list of tools. The output is the list of tool calls
* [Single step](/langsmith/evaluation-concepts#evaluating-a-single-step-of-an-agent): As before, the inputs are a prompt and an optional list of tools. The output is the tool call.
Let's run each type of evaluation:
### Final response evaluator
First, let's create a [dataset](/langsmith/evaluation-concepts#datasets) that evaluates end-to-end performance of the agent. For simplicity we'll use the same dataset for final response and trajectory evaluation, so we'll add both ground-truth responses and trajectories for each example question. We'll cover the trajectories in the next section.
```python theme={null}
from langsmith import Client
client = Client()
# Create a dataset
examples = [
{
"inputs": {
"question": "How many songs do you have by James Brown",
},
"outputs": {
"response": "We have 20 songs by James Brown",
"trajectory": ["question_answering_agent", "lookup_track"]
}
},
{
"inputs": {
"question": "My name is Aaron Mitchell and I'd like a refund.",
},
"outputs": {
"response": "I need some more information to help you with the refund. Please specify your phone number, the invoice ID, or the line item IDs for the purchase you'd like refunded.",
"trajectory": ["refund_agent"],
}
},
{
"inputs": {
"question": "My name is Aaron Mitchell and I'd like a refund on my Led Zeppelin purchases. My number is +1 (204) 452-6452",
},
"outputs": {
"response": 'Which of the following purchases would you like to be refunded for?\n\n invoice_line_id track_name artist_name purchase_date quantity_purchased price_per_unit\n----------------- -------------------------------- ------------- ------------------- -------------------- ----------------\n 267 How Many More Times Led Zeppelin 2009-08-06 00:00:00 1 0.99\n 268 What Is And What Should Never Be Led Zeppelin 2009-08-06 00:00:00 1 0.99',
"trajectory": ["refund_agent", "lookup"],
},
},
{
"inputs": {
"question": "Who recorded Wish You Were Here again? What other albums of there's do you have?",
},
"outputs": {
"response": "Wish You Were Here is an album by Pink Floyd",
"trajectory": ["question_answering_agent", "lookup_album"],
},
},
{
"inputs": {
"question": "I want a full refund for invoice 237",
},
"outputs": {
"response": "You have been refunded $0.99.",
"trajectory": ["refund_agent", "refund"],
}
},
]
dataset_name = "Chinook Customer Service Bot: E2E"
if not client.has_dataset(dataset_name=dataset_name):
dataset = client.create_dataset(dataset_name=dataset_name)
client.create_examples(
dataset_id=dataset.id,
examples=examples
)
```
We'll create a custom [LLM-as-judge](/langsmith/evaluation-concepts#llm-as-judge) evaluator that uses another model to compare our agent's output on each example to the reference response, and judge if they're equivalent or not:
```python theme={null}
# LLM-as-judge instructions
grader_instructions = """You are a teacher grading a quiz.
You will be given a QUESTION, the GROUND TRUTH (correct) RESPONSE, and the STUDENT RESPONSE.
Here is the grade criteria to follow:
(1) Grade the student responses based ONLY on their factual accuracy relative to the ground truth answer.
(2) Ensure that the student response does not contain any conflicting statements.
(3) It is OK if the student response contains more information than the ground truth response, as long as it is factually accurate relative to the ground truth response.
Correctness:
True means that the student's response meets all of the criteria.
False means that the student's response does not meet all of the criteria.
Explain your reasoning in a step-by-step manner to ensure your reasoning and conclusion are correct."""
# LLM-as-judge output schema
class Grade(TypedDict):
"""Compare the expected and actual answers and grade the actual answer."""
reasoning: Annotated[str, ..., "Explain your reasoning for whether the actual response is correct or not."]
is_correct: Annotated[bool, ..., "True if the student response is mostly or exactly correct, otherwise False."]
# Judge LLM
grader_llm = init_chat_model("gpt-4o-mini", temperature=0).with_structured_output(Grade, method="json_schema", strict=True)
# Evaluator function
async def final_answer_correct(inputs: dict, outputs: dict, reference_outputs: dict) -> bool:
"""Evaluate if the final response is equivalent to reference response."""
# Note that we assume the outputs has a 'response' dictionary. We'll need to make sure
# that the target function we define includes this key.
user = f"""QUESTION: {inputs['question']}
GROUND TRUTH RESPONSE: {reference_outputs['response']}
STUDENT RESPONSE: {outputs['response']}"""
grade = await grader_llm.ainvoke([{"role": "system", "content": grader_instructions}, {"role": "user", "content": user}])
return grade["is_correct"]
```
Now we can run our evaluation. Our evaluator assumes that our target function returns a 'response' key, so lets define a target function that does so.
Also remember that in our refund graph we made the refund node configurable, so that if we specified `config={"env": "test"}`, we would mock out the refunds without actually updating the DB. We'll use this configurable variable in our target `run_graph` method when invoking our graph:
```python theme={null}
# Target function
async def run_graph(inputs: dict) -> dict:
"""Run graph and track the trajectory it takes along with the final response."""
result = await graph.ainvoke({"messages": [
{ "role": "user", "content": inputs['question']},
]}, config={"env": "test"})
return {"response": result["followup"]}
# Evaluation job and results
experiment_results = await client.aevaluate(
run_graph,
data=dataset_name,
evaluators=[final_answer_correct],
experiment_prefix="sql-agent-gpt4o-e2e",
num_repetitions=1,
max_concurrency=4,
)
experiment_results.to_pandas()
```
You can see what these results look like here: [LangSmith link](https://smith.langchain.com/public/708d08f4-300e-4c75-9677-c6b71b0d28c9/d).
### Trajectory evaluator
As agents become more complex, they have more potential points of failure. Rather than using simple pass/fail evaluations, it's often better to use evaluations that can give partial credit when an agent takes some correct steps, even if it doesn't reach the right final answer.
This is where trajectory evaluations come in. A trajectory evaluation:
1. Compares the actual sequence of steps the agent took against an expected sequence
2. Calculates a score based on how many of the expected steps were completed correctly
For this example, our end-to-end dataset contains an ordered list of steps that we expect the agent to take. Let's create an evaluator that checks the agent's actual trajectory against these expected steps and calculates what percentage were completed:
```python theme={null}
def trajectory_subsequence(outputs: dict, reference_outputs: dict) -> float:
"""Check how many of the desired steps the agent took."""
if len(reference_outputs['trajectory']) > len(outputs['trajectory']):
return False
i = j = 0
while i < len(reference_outputs['trajectory']) and j < len(outputs['trajectory']):
if reference_outputs['trajectory'][i] == outputs['trajectory'][j]:
i += 1
j += 1
return i / len(reference_outputs['trajectory'])
```
Now we can run our evaluation. Our evaluator assumes that our target function returns a 'trajectory' key, so lets define a target function that does so. We'll need to usage [LangGraph's streaming capabilities](https://langchain-ai.github.io/langgra/langsmith/observability-concepts/streaming/) to record the trajectory.
Note that we are reusing the same dataset as for our final response evaluation, so we could have run both evaluators together and defined a target function that returns both "response" and "trajectory". In practice it's often useful to have separate datasets for each type of evaluation, which is why we show them separately here:
```python theme={null}
async def run_graph(inputs: dict) -> dict:
"""Run graph and track the trajectory it takes along with the final response."""
trajectory = []
# Set subgraph=True to stream events from subgraphs of the main graph: https://langchain-ai.github.io/langgraph/how-tos/streaming-subgraphs/
# Set stream_mode="debug" to stream all possible events: https://langchain-ai.github.io/langgra/langsmith/observability-concepts/streaming
async for namespace, chunk in graph.astream({"messages": [
{
"role": "user",
"content": inputs['question'],
}
]}, subgraphs=True, stream_mode="debug"):
# Event type for entering a node
if chunk['type'] == 'task':
# Record the node name
trajectory.append(chunk['payload']['name'])
# Given how we defined our dataset, we also need to track when specific tools are
# called by our question answering ReACT agent. These tool calls can be found
# when the ToolsNode (named "tools") is invoked by looking at the AIMessage.tool_calls
# of the latest input message.
if chunk['payload']['name'] == 'tools' and chunk['type'] == 'task':
for tc in chunk['payload']['input']['messages'][-1].tool_calls:
trajectory.append(tc['name'])
return {"trajectory": trajectory}
experiment_results = await client.aevaluate(
run_graph,
data=dataset_name,
evaluators=[trajectory_subsequence],
experiment_prefix="sql-agent-gpt4o-trajectory",
num_repetitions=1,
max_concurrency=4,
)
experiment_results.to_pandas()
```
You can see what these results look like here: [LangSmith link](https://smith.langchain.com/public/708d08f4-300e-4c75-9677-c6b71b0d28c9/d).
### Single step evaluators
While end-to-end tests give you the most signal about your agents performance, for the sake of debugging and iterating on your agent it can be helpful to pinpoint specific steps that are difficult and evaluate them directly.
In our case, a crucial part of our agent is that it routes the user's intention correctly into either the "refund" path or the "question answering" path. Let's create a dataset and run some evaluations to directly stress test this one component.
```python theme={null}
# Create dataset
examples = [
{
"inputs": {"messages": [{"role": "user", "content": "i bought some tracks recently and i dont like them"}]},
"outputs": {"route": "refund_agent"},
},
{
"inputs": {"messages": [{"role": "user", "content": "I was thinking of purchasing some Rolling Stones tunes, any recommendations?"}]},
"outputs": {"route": "question_answering_agent"},
},
{
"inputs": {"messages": [{"role": "user", "content": "i want a refund on purchase 237"}, {"role": "assistant", "content": "I've refunded you a total of $1.98. How else can I help you today?"}, {"role": "user", "content": "did prince release any albums in 2000?"}]},
"outputs": {"route": "question_answering_agent"},
},
{
"inputs": {"messages": [{"role": "user", "content": "i purchased a cover of Yesterday recently but can't remember who it was by, which versions of it do you have?"}]},
"outputs": {"route": "question_answering_agent"},
},
]
dataset_name = "Chinook Customer Service Bot: Intent Classifier"
if not client.has_dataset(dataset_name=dataset_name):
dataset = client.create_dataset(dataset_name=dataset_name)
client.create_examples(
dataset_id=dataset.id,
examples=examples
)
# Evaluator
def correct(outputs: dict, reference_outputs: dict) -> bool:
"""Check if the agent chose the correct route."""
return outputs["route"] == reference_outputs["route"]
# Target function for running the relevant step
async def run_intent_classifier(inputs: dict) -> dict:
# Note that we can access and run the intent_classifier node of our graph directly.
command = await graph.nodes['intent_classifier'].ainvoke(inputs)
return {"route": command.goto}
# Run evaluation
experiment_results = await client.aevaluate(
run_intent_classifier,
data=dataset_name,
evaluators=[correct],
experiment_prefix="sql-agent-gpt4o-intent-classifier",
max_concurrency=4,
)
```
You can see what these results look like here: [LangSmith link](https://smith.langchain.com/public/f133dae2-8a88-43a0-9bfd-ab45bfa3920b/d).
## Reference code
Here's a consolidated script with all the above code:
#### Try it out
Let's give our custom support agent a whirl!
```python theme={null}
state = await graph.ainvoke(
{"messages": [{"role": "user", "content": "what james brown songs do you have"}]}
)
print(state["followup"])
```
```
I found 20 James Brown songs in the database, all from the album "Sex Machine". Here they are: ...
```
```python theme={null}
state = await graph.ainvoke({"messages": [
{
"role": "user",
"content": "my name is Aaron Mitchell and my number is +1 (204) 452-6452. I bought some songs by Led Zeppelin that i'd like refunded",
}
]})
print(state["followup"])
```
```
Which of the following purchases would you like to be refunded for? ...
```
## Evaluations
Now that we've got a testable version of our agent, let's run some evaluations. Agent evaluation can focus on at least 3 things:
* [Final response](/langsmith/evaluation-concepts#evaluating-an-agents-final-response): The inputs are a prompt and an optional list of tools. The output is the final agent response.
* [Trajectory](/langsmith/evaluation-concepts#evaluating-an-agents-trajectory): As before, the inputs are a prompt and an optional list of tools. The output is the list of tool calls
* [Single step](/langsmith/evaluation-concepts#evaluating-a-single-step-of-an-agent): As before, the inputs are a prompt and an optional list of tools. The output is the tool call.
Let's run each type of evaluation:
### Final response evaluator
First, let's create a [dataset](/langsmith/evaluation-concepts#datasets) that evaluates end-to-end performance of the agent. For simplicity we'll use the same dataset for final response and trajectory evaluation, so we'll add both ground-truth responses and trajectories for each example question. We'll cover the trajectories in the next section.
```python theme={null}
from langsmith import Client
client = Client()
# Create a dataset
examples = [
{
"inputs": {
"question": "How many songs do you have by James Brown",
},
"outputs": {
"response": "We have 20 songs by James Brown",
"trajectory": ["question_answering_agent", "lookup_track"]
}
},
{
"inputs": {
"question": "My name is Aaron Mitchell and I'd like a refund.",
},
"outputs": {
"response": "I need some more information to help you with the refund. Please specify your phone number, the invoice ID, or the line item IDs for the purchase you'd like refunded.",
"trajectory": ["refund_agent"],
}
},
{
"inputs": {
"question": "My name is Aaron Mitchell and I'd like a refund on my Led Zeppelin purchases. My number is +1 (204) 452-6452",
},
"outputs": {
"response": 'Which of the following purchases would you like to be refunded for?\n\n invoice_line_id track_name artist_name purchase_date quantity_purchased price_per_unit\n----------------- -------------------------------- ------------- ------------------- -------------------- ----------------\n 267 How Many More Times Led Zeppelin 2009-08-06 00:00:00 1 0.99\n 268 What Is And What Should Never Be Led Zeppelin 2009-08-06 00:00:00 1 0.99',
"trajectory": ["refund_agent", "lookup"],
},
},
{
"inputs": {
"question": "Who recorded Wish You Were Here again? What other albums of there's do you have?",
},
"outputs": {
"response": "Wish You Were Here is an album by Pink Floyd",
"trajectory": ["question_answering_agent", "lookup_album"],
},
},
{
"inputs": {
"question": "I want a full refund for invoice 237",
},
"outputs": {
"response": "You have been refunded $0.99.",
"trajectory": ["refund_agent", "refund"],
}
},
]
dataset_name = "Chinook Customer Service Bot: E2E"
if not client.has_dataset(dataset_name=dataset_name):
dataset = client.create_dataset(dataset_name=dataset_name)
client.create_examples(
dataset_id=dataset.id,
examples=examples
)
```
We'll create a custom [LLM-as-judge](/langsmith/evaluation-concepts#llm-as-judge) evaluator that uses another model to compare our agent's output on each example to the reference response, and judge if they're equivalent or not:
```python theme={null}
# LLM-as-judge instructions
grader_instructions = """You are a teacher grading a quiz.
You will be given a QUESTION, the GROUND TRUTH (correct) RESPONSE, and the STUDENT RESPONSE.
Here is the grade criteria to follow:
(1) Grade the student responses based ONLY on their factual accuracy relative to the ground truth answer.
(2) Ensure that the student response does not contain any conflicting statements.
(3) It is OK if the student response contains more information than the ground truth response, as long as it is factually accurate relative to the ground truth response.
Correctness:
True means that the student's response meets all of the criteria.
False means that the student's response does not meet all of the criteria.
Explain your reasoning in a step-by-step manner to ensure your reasoning and conclusion are correct."""
# LLM-as-judge output schema
class Grade(TypedDict):
"""Compare the expected and actual answers and grade the actual answer."""
reasoning: Annotated[str, ..., "Explain your reasoning for whether the actual response is correct or not."]
is_correct: Annotated[bool, ..., "True if the student response is mostly or exactly correct, otherwise False."]
# Judge LLM
grader_llm = init_chat_model("gpt-4o-mini", temperature=0).with_structured_output(Grade, method="json_schema", strict=True)
# Evaluator function
async def final_answer_correct(inputs: dict, outputs: dict, reference_outputs: dict) -> bool:
"""Evaluate if the final response is equivalent to reference response."""
# Note that we assume the outputs has a 'response' dictionary. We'll need to make sure
# that the target function we define includes this key.
user = f"""QUESTION: {inputs['question']}
GROUND TRUTH RESPONSE: {reference_outputs['response']}
STUDENT RESPONSE: {outputs['response']}"""
grade = await grader_llm.ainvoke([{"role": "system", "content": grader_instructions}, {"role": "user", "content": user}])
return grade["is_correct"]
```
Now we can run our evaluation. Our evaluator assumes that our target function returns a 'response' key, so lets define a target function that does so.
Also remember that in our refund graph we made the refund node configurable, so that if we specified `config={"env": "test"}`, we would mock out the refunds without actually updating the DB. We'll use this configurable variable in our target `run_graph` method when invoking our graph:
```python theme={null}
# Target function
async def run_graph(inputs: dict) -> dict:
"""Run graph and track the trajectory it takes along with the final response."""
result = await graph.ainvoke({"messages": [
{ "role": "user", "content": inputs['question']},
]}, config={"env": "test"})
return {"response": result["followup"]}
# Evaluation job and results
experiment_results = await client.aevaluate(
run_graph,
data=dataset_name,
evaluators=[final_answer_correct],
experiment_prefix="sql-agent-gpt4o-e2e",
num_repetitions=1,
max_concurrency=4,
)
experiment_results.to_pandas()
```
You can see what these results look like here: [LangSmith link](https://smith.langchain.com/public/708d08f4-300e-4c75-9677-c6b71b0d28c9/d).
### Trajectory evaluator
As agents become more complex, they have more potential points of failure. Rather than using simple pass/fail evaluations, it's often better to use evaluations that can give partial credit when an agent takes some correct steps, even if it doesn't reach the right final answer.
This is where trajectory evaluations come in. A trajectory evaluation:
1. Compares the actual sequence of steps the agent took against an expected sequence
2. Calculates a score based on how many of the expected steps were completed correctly
For this example, our end-to-end dataset contains an ordered list of steps that we expect the agent to take. Let's create an evaluator that checks the agent's actual trajectory against these expected steps and calculates what percentage were completed:
```python theme={null}
def trajectory_subsequence(outputs: dict, reference_outputs: dict) -> float:
"""Check how many of the desired steps the agent took."""
if len(reference_outputs['trajectory']) > len(outputs['trajectory']):
return False
i = j = 0
while i < len(reference_outputs['trajectory']) and j < len(outputs['trajectory']):
if reference_outputs['trajectory'][i] == outputs['trajectory'][j]:
i += 1
j += 1
return i / len(reference_outputs['trajectory'])
```
Now we can run our evaluation. Our evaluator assumes that our target function returns a 'trajectory' key, so lets define a target function that does so. We'll need to usage [LangGraph's streaming capabilities](https://langchain-ai.github.io/langgra/langsmith/observability-concepts/streaming/) to record the trajectory.
Note that we are reusing the same dataset as for our final response evaluation, so we could have run both evaluators together and defined a target function that returns both "response" and "trajectory". In practice it's often useful to have separate datasets for each type of evaluation, which is why we show them separately here:
```python theme={null}
async def run_graph(inputs: dict) -> dict:
"""Run graph and track the trajectory it takes along with the final response."""
trajectory = []
# Set subgraph=True to stream events from subgraphs of the main graph: https://langchain-ai.github.io/langgraph/how-tos/streaming-subgraphs/
# Set stream_mode="debug" to stream all possible events: https://langchain-ai.github.io/langgra/langsmith/observability-concepts/streaming
async for namespace, chunk in graph.astream({"messages": [
{
"role": "user",
"content": inputs['question'],
}
]}, subgraphs=True, stream_mode="debug"):
# Event type for entering a node
if chunk['type'] == 'task':
# Record the node name
trajectory.append(chunk['payload']['name'])
# Given how we defined our dataset, we also need to track when specific tools are
# called by our question answering ReACT agent. These tool calls can be found
# when the ToolsNode (named "tools") is invoked by looking at the AIMessage.tool_calls
# of the latest input message.
if chunk['payload']['name'] == 'tools' and chunk['type'] == 'task':
for tc in chunk['payload']['input']['messages'][-1].tool_calls:
trajectory.append(tc['name'])
return {"trajectory": trajectory}
experiment_results = await client.aevaluate(
run_graph,
data=dataset_name,
evaluators=[trajectory_subsequence],
experiment_prefix="sql-agent-gpt4o-trajectory",
num_repetitions=1,
max_concurrency=4,
)
experiment_results.to_pandas()
```
You can see what these results look like here: [LangSmith link](https://smith.langchain.com/public/708d08f4-300e-4c75-9677-c6b71b0d28c9/d).
### Single step evaluators
While end-to-end tests give you the most signal about your agents performance, for the sake of debugging and iterating on your agent it can be helpful to pinpoint specific steps that are difficult and evaluate them directly.
In our case, a crucial part of our agent is that it routes the user's intention correctly into either the "refund" path or the "question answering" path. Let's create a dataset and run some evaluations to directly stress test this one component.
```python theme={null}
# Create dataset
examples = [
{
"inputs": {"messages": [{"role": "user", "content": "i bought some tracks recently and i dont like them"}]},
"outputs": {"route": "refund_agent"},
},
{
"inputs": {"messages": [{"role": "user", "content": "I was thinking of purchasing some Rolling Stones tunes, any recommendations?"}]},
"outputs": {"route": "question_answering_agent"},
},
{
"inputs": {"messages": [{"role": "user", "content": "i want a refund on purchase 237"}, {"role": "assistant", "content": "I've refunded you a total of $1.98. How else can I help you today?"}, {"role": "user", "content": "did prince release any albums in 2000?"}]},
"outputs": {"route": "question_answering_agent"},
},
{
"inputs": {"messages": [{"role": "user", "content": "i purchased a cover of Yesterday recently but can't remember who it was by, which versions of it do you have?"}]},
"outputs": {"route": "question_answering_agent"},
},
]
dataset_name = "Chinook Customer Service Bot: Intent Classifier"
if not client.has_dataset(dataset_name=dataset_name):
dataset = client.create_dataset(dataset_name=dataset_name)
client.create_examples(
dataset_id=dataset.id,
examples=examples
)
# Evaluator
def correct(outputs: dict, reference_outputs: dict) -> bool:
"""Check if the agent chose the correct route."""
return outputs["route"] == reference_outputs["route"]
# Target function for running the relevant step
async def run_intent_classifier(inputs: dict) -> dict:
# Note that we can access and run the intent_classifier node of our graph directly.
command = await graph.nodes['intent_classifier'].ainvoke(inputs)
return {"route": command.goto}
# Run evaluation
experiment_results = await client.aevaluate(
run_intent_classifier,
data=dataset_name,
evaluators=[correct],
experiment_prefix="sql-agent-gpt4o-intent-classifier",
max_concurrency=4,
)
```
You can see what these results look like here: [LangSmith link](https://smith.langchain.com/public/f133dae2-8a88-43a0-9bfd-ab45bfa3920b/d).
## Reference code
Here's a consolidated script with all the above code:
 ## Reference code[](#reference-code "Direct link to Reference code")
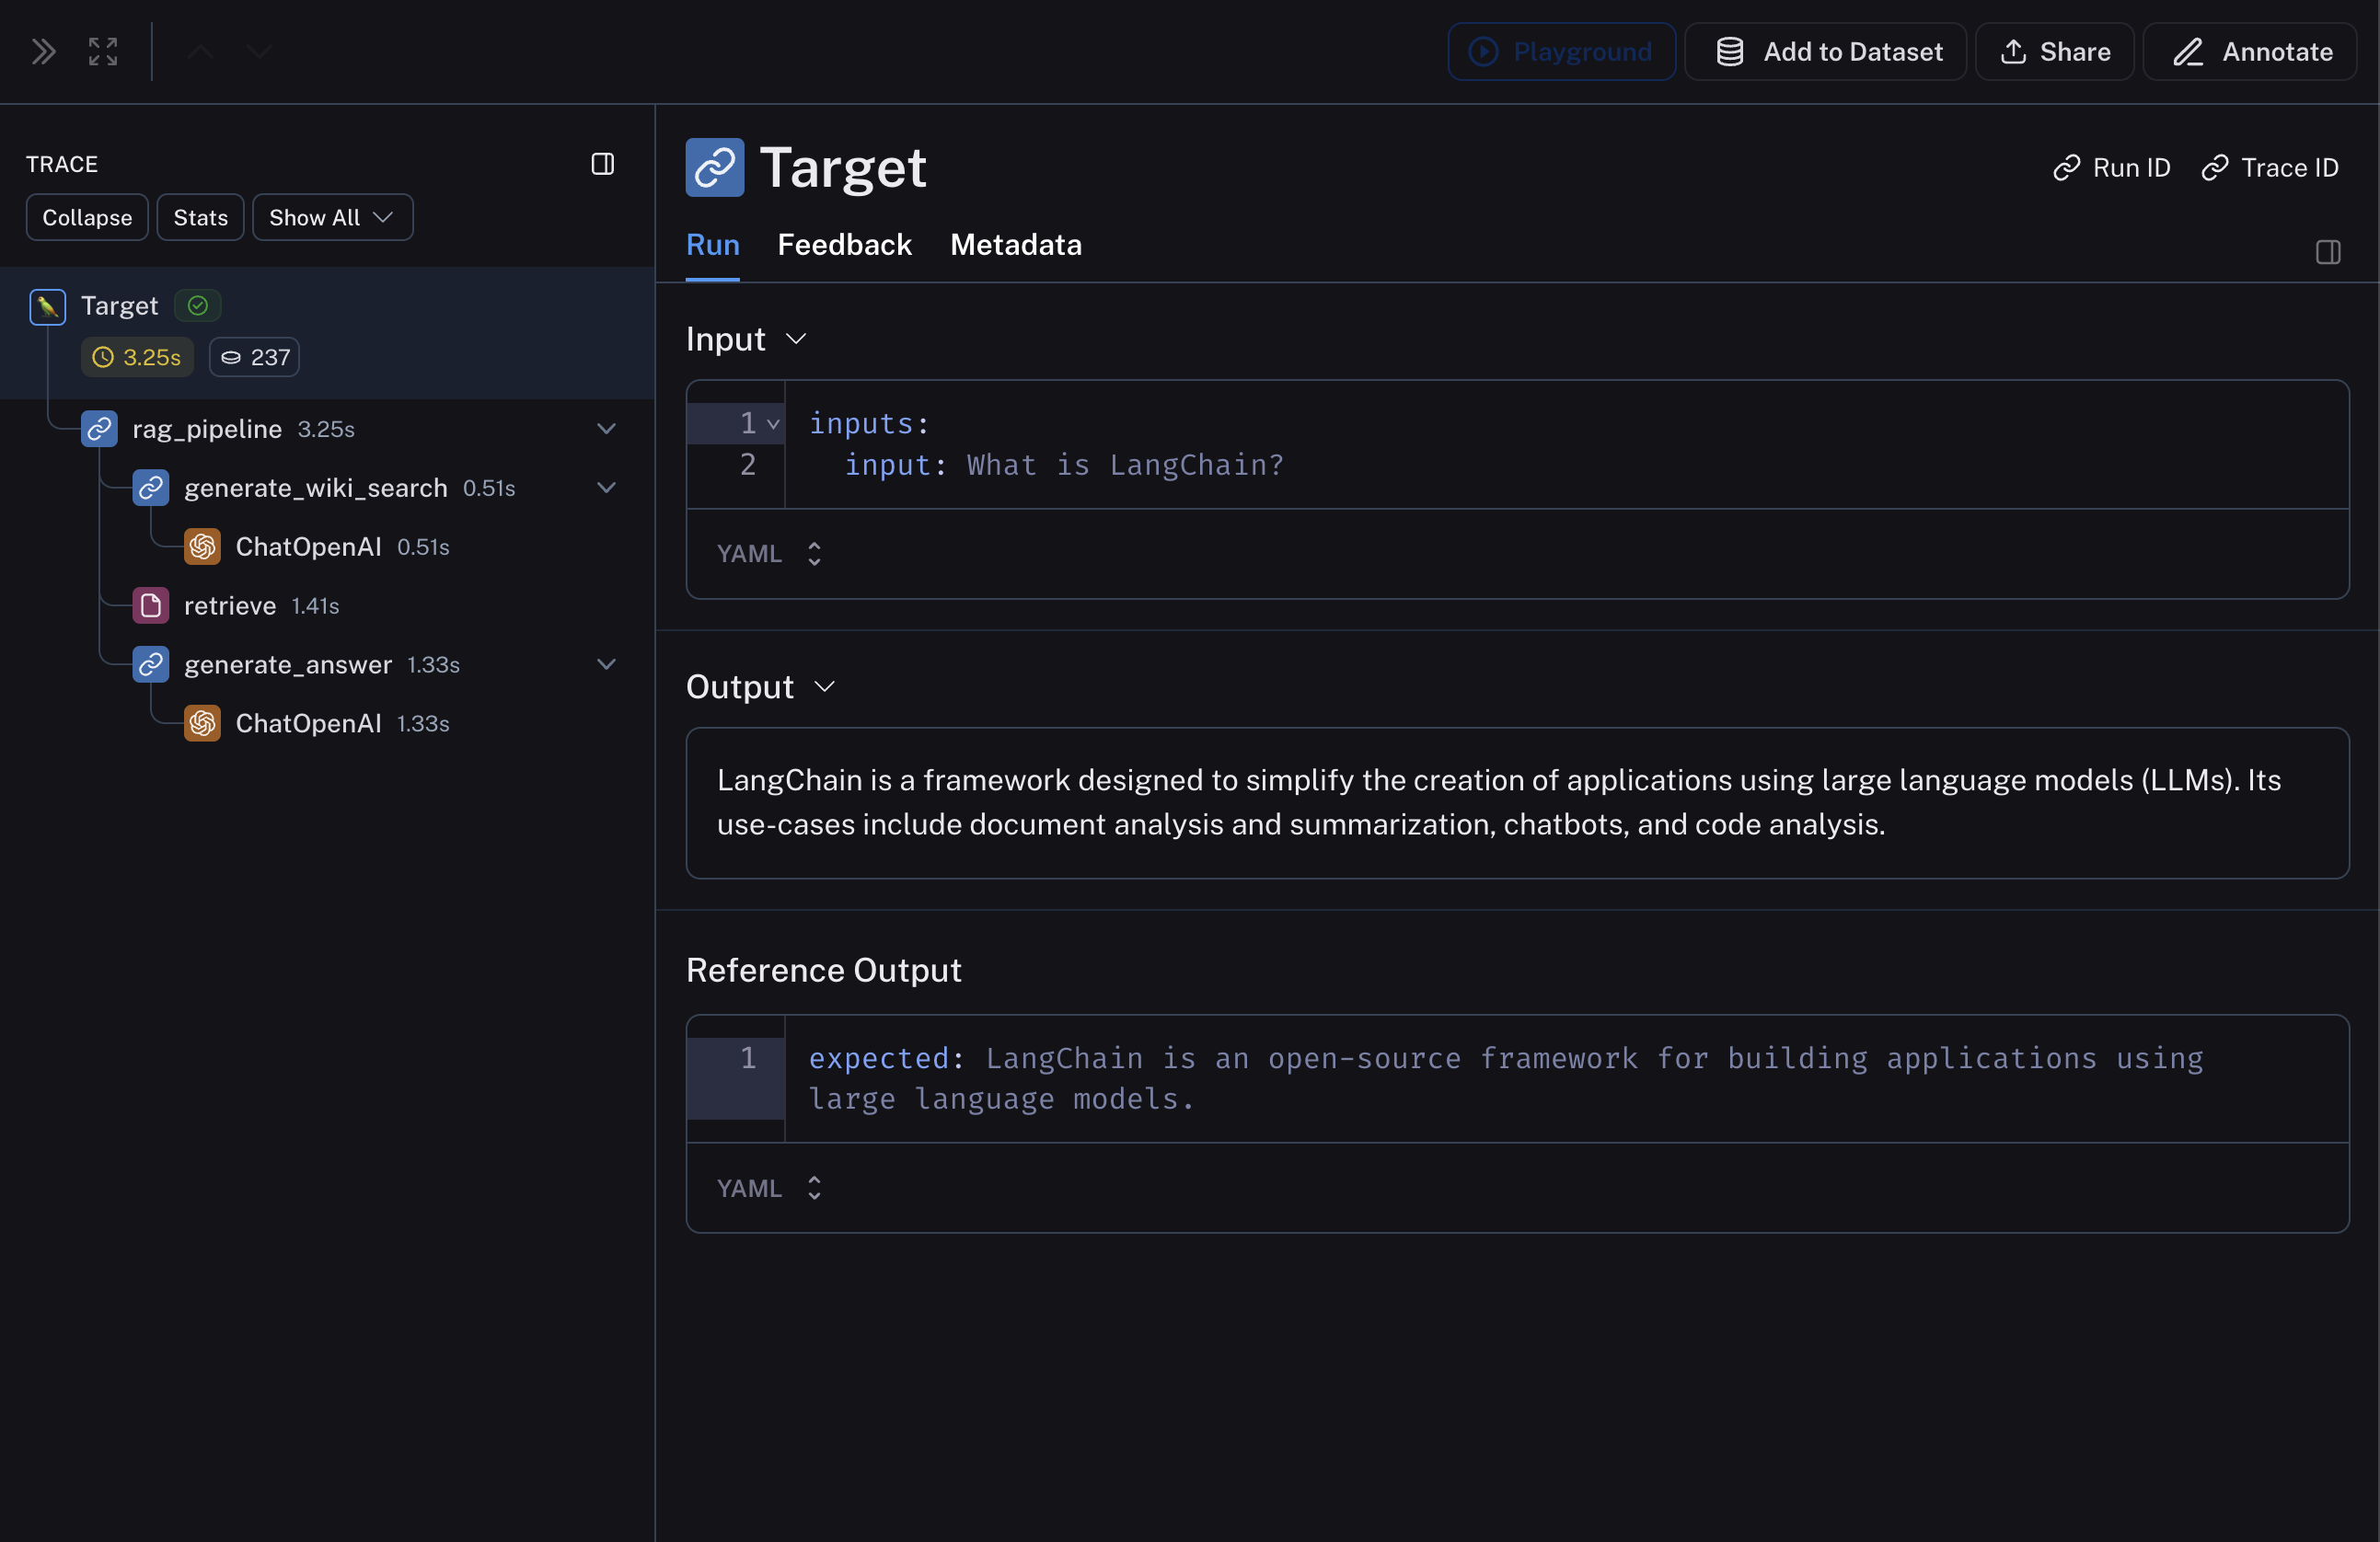 ## 2. Create a dataset and examples to evaluate the pipeline
We are building a very simple dataset with a couple of examples to evaluate the pipeline.
Requires `langsmith>=0.3.13`
## 2. Create a dataset and examples to evaluate the pipeline
We are building a very simple dataset with a couple of examples to evaluate the pipeline.
Requires `langsmith>=0.3.13`
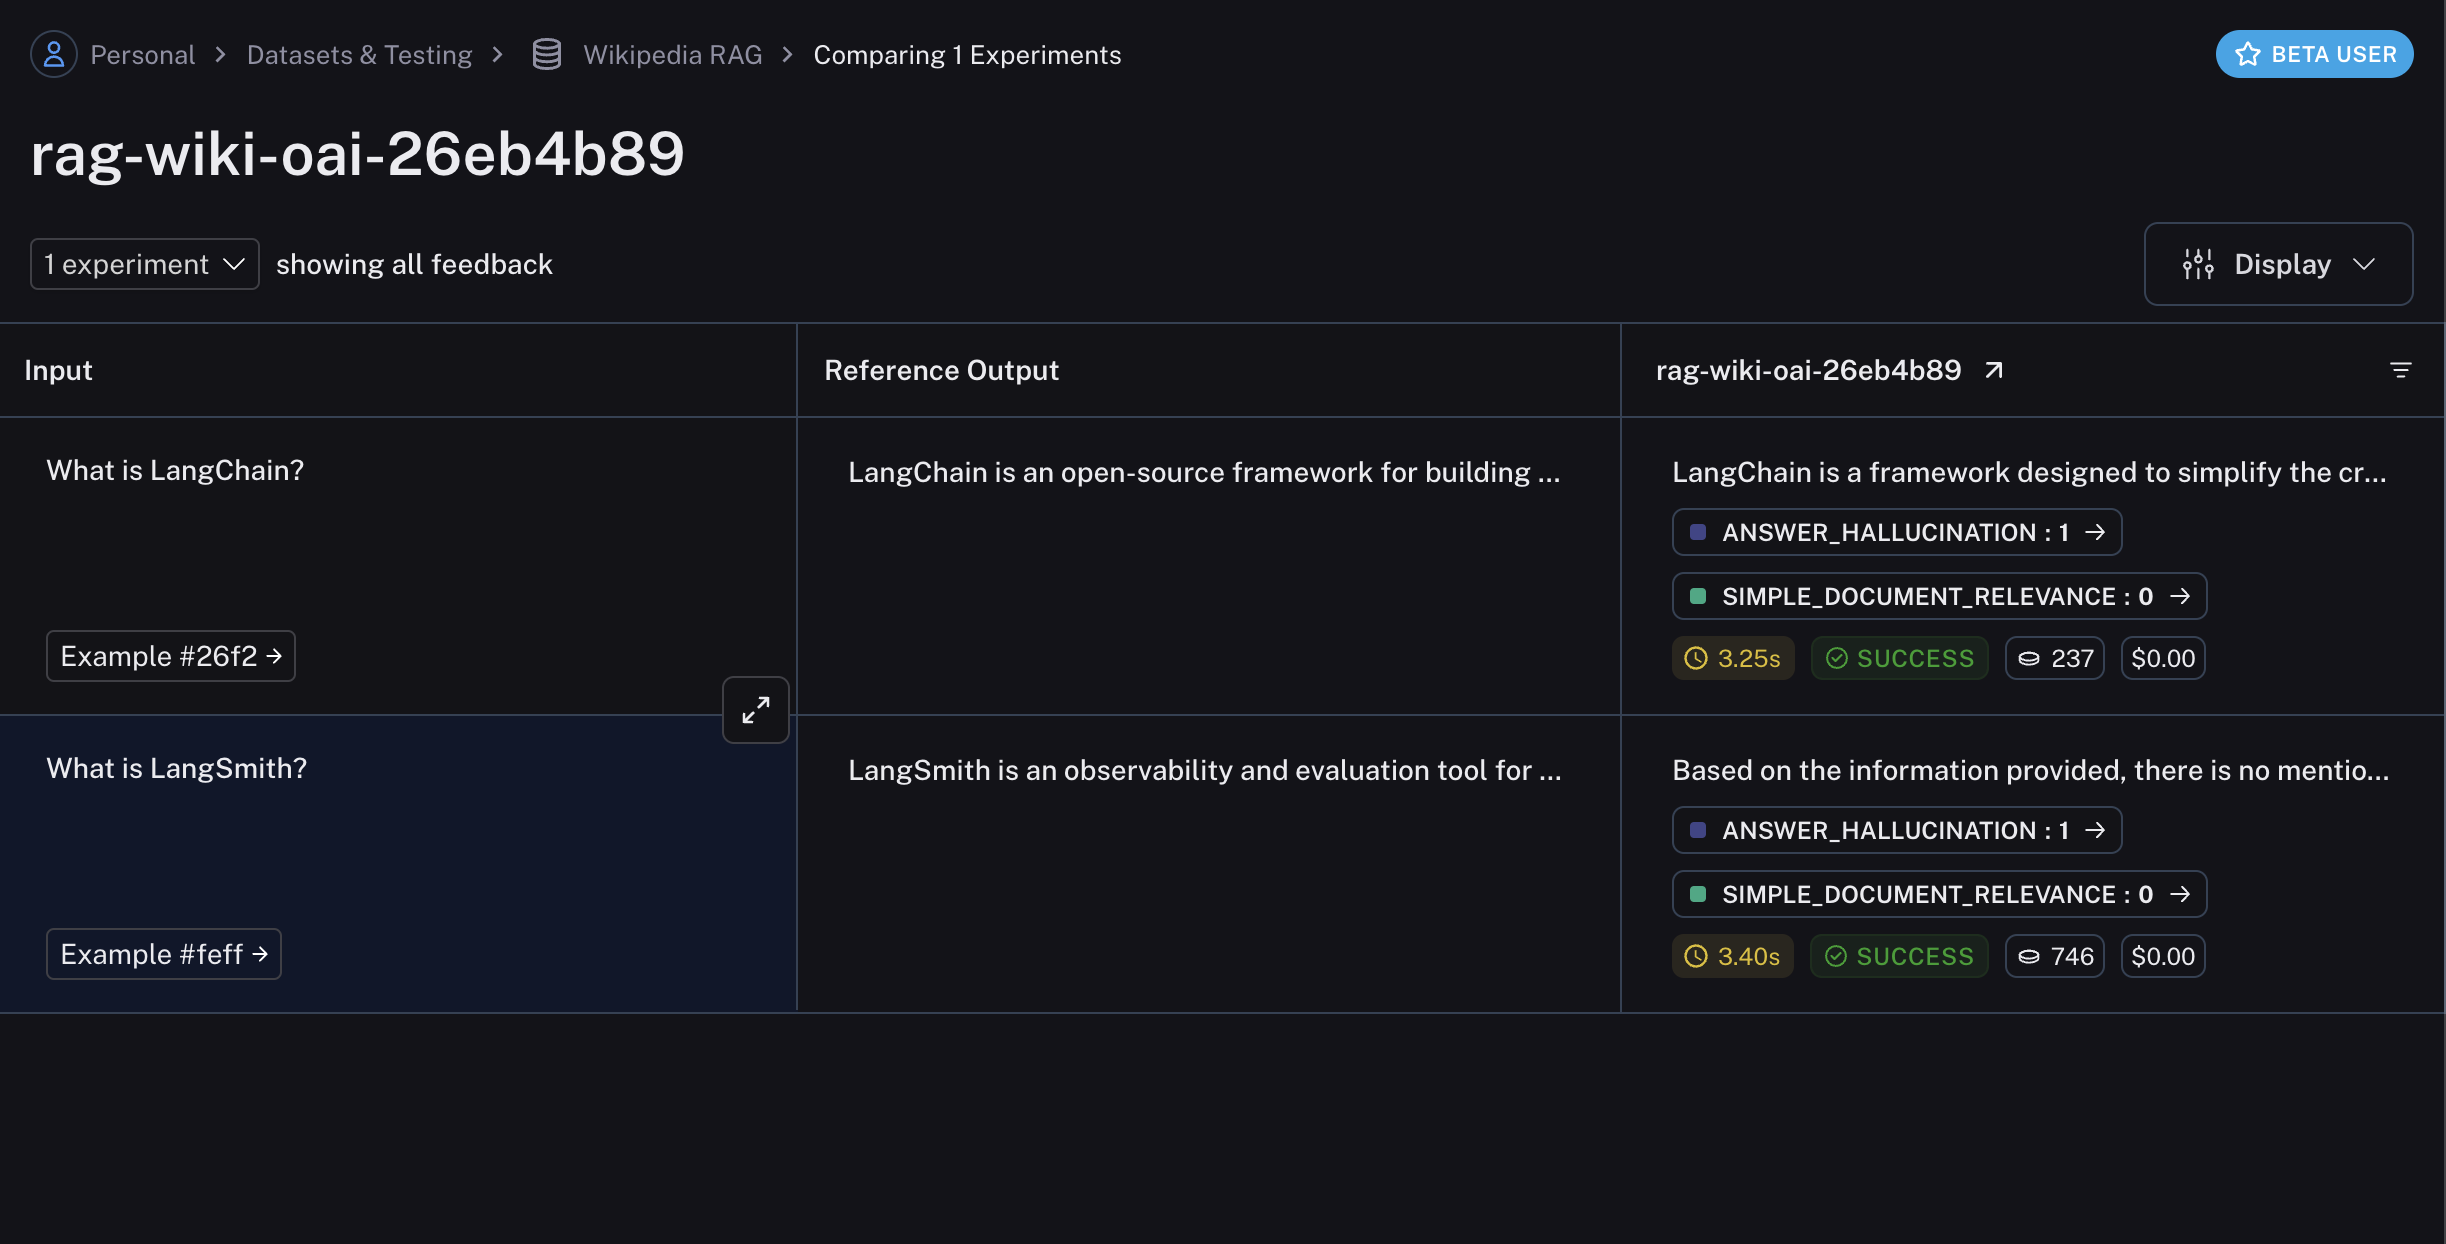 ## Related
* [Evaluate a `langgraph` graph](/langsmith/evaluate-on-intermediate-steps)
***
## Related
* [Evaluate a `langgraph` graph](/langsmith/evaluate-on-intermediate-steps)
***
 Click on a pairwise experiment that you would like to inspect, and you will be brought to the Comparison View:
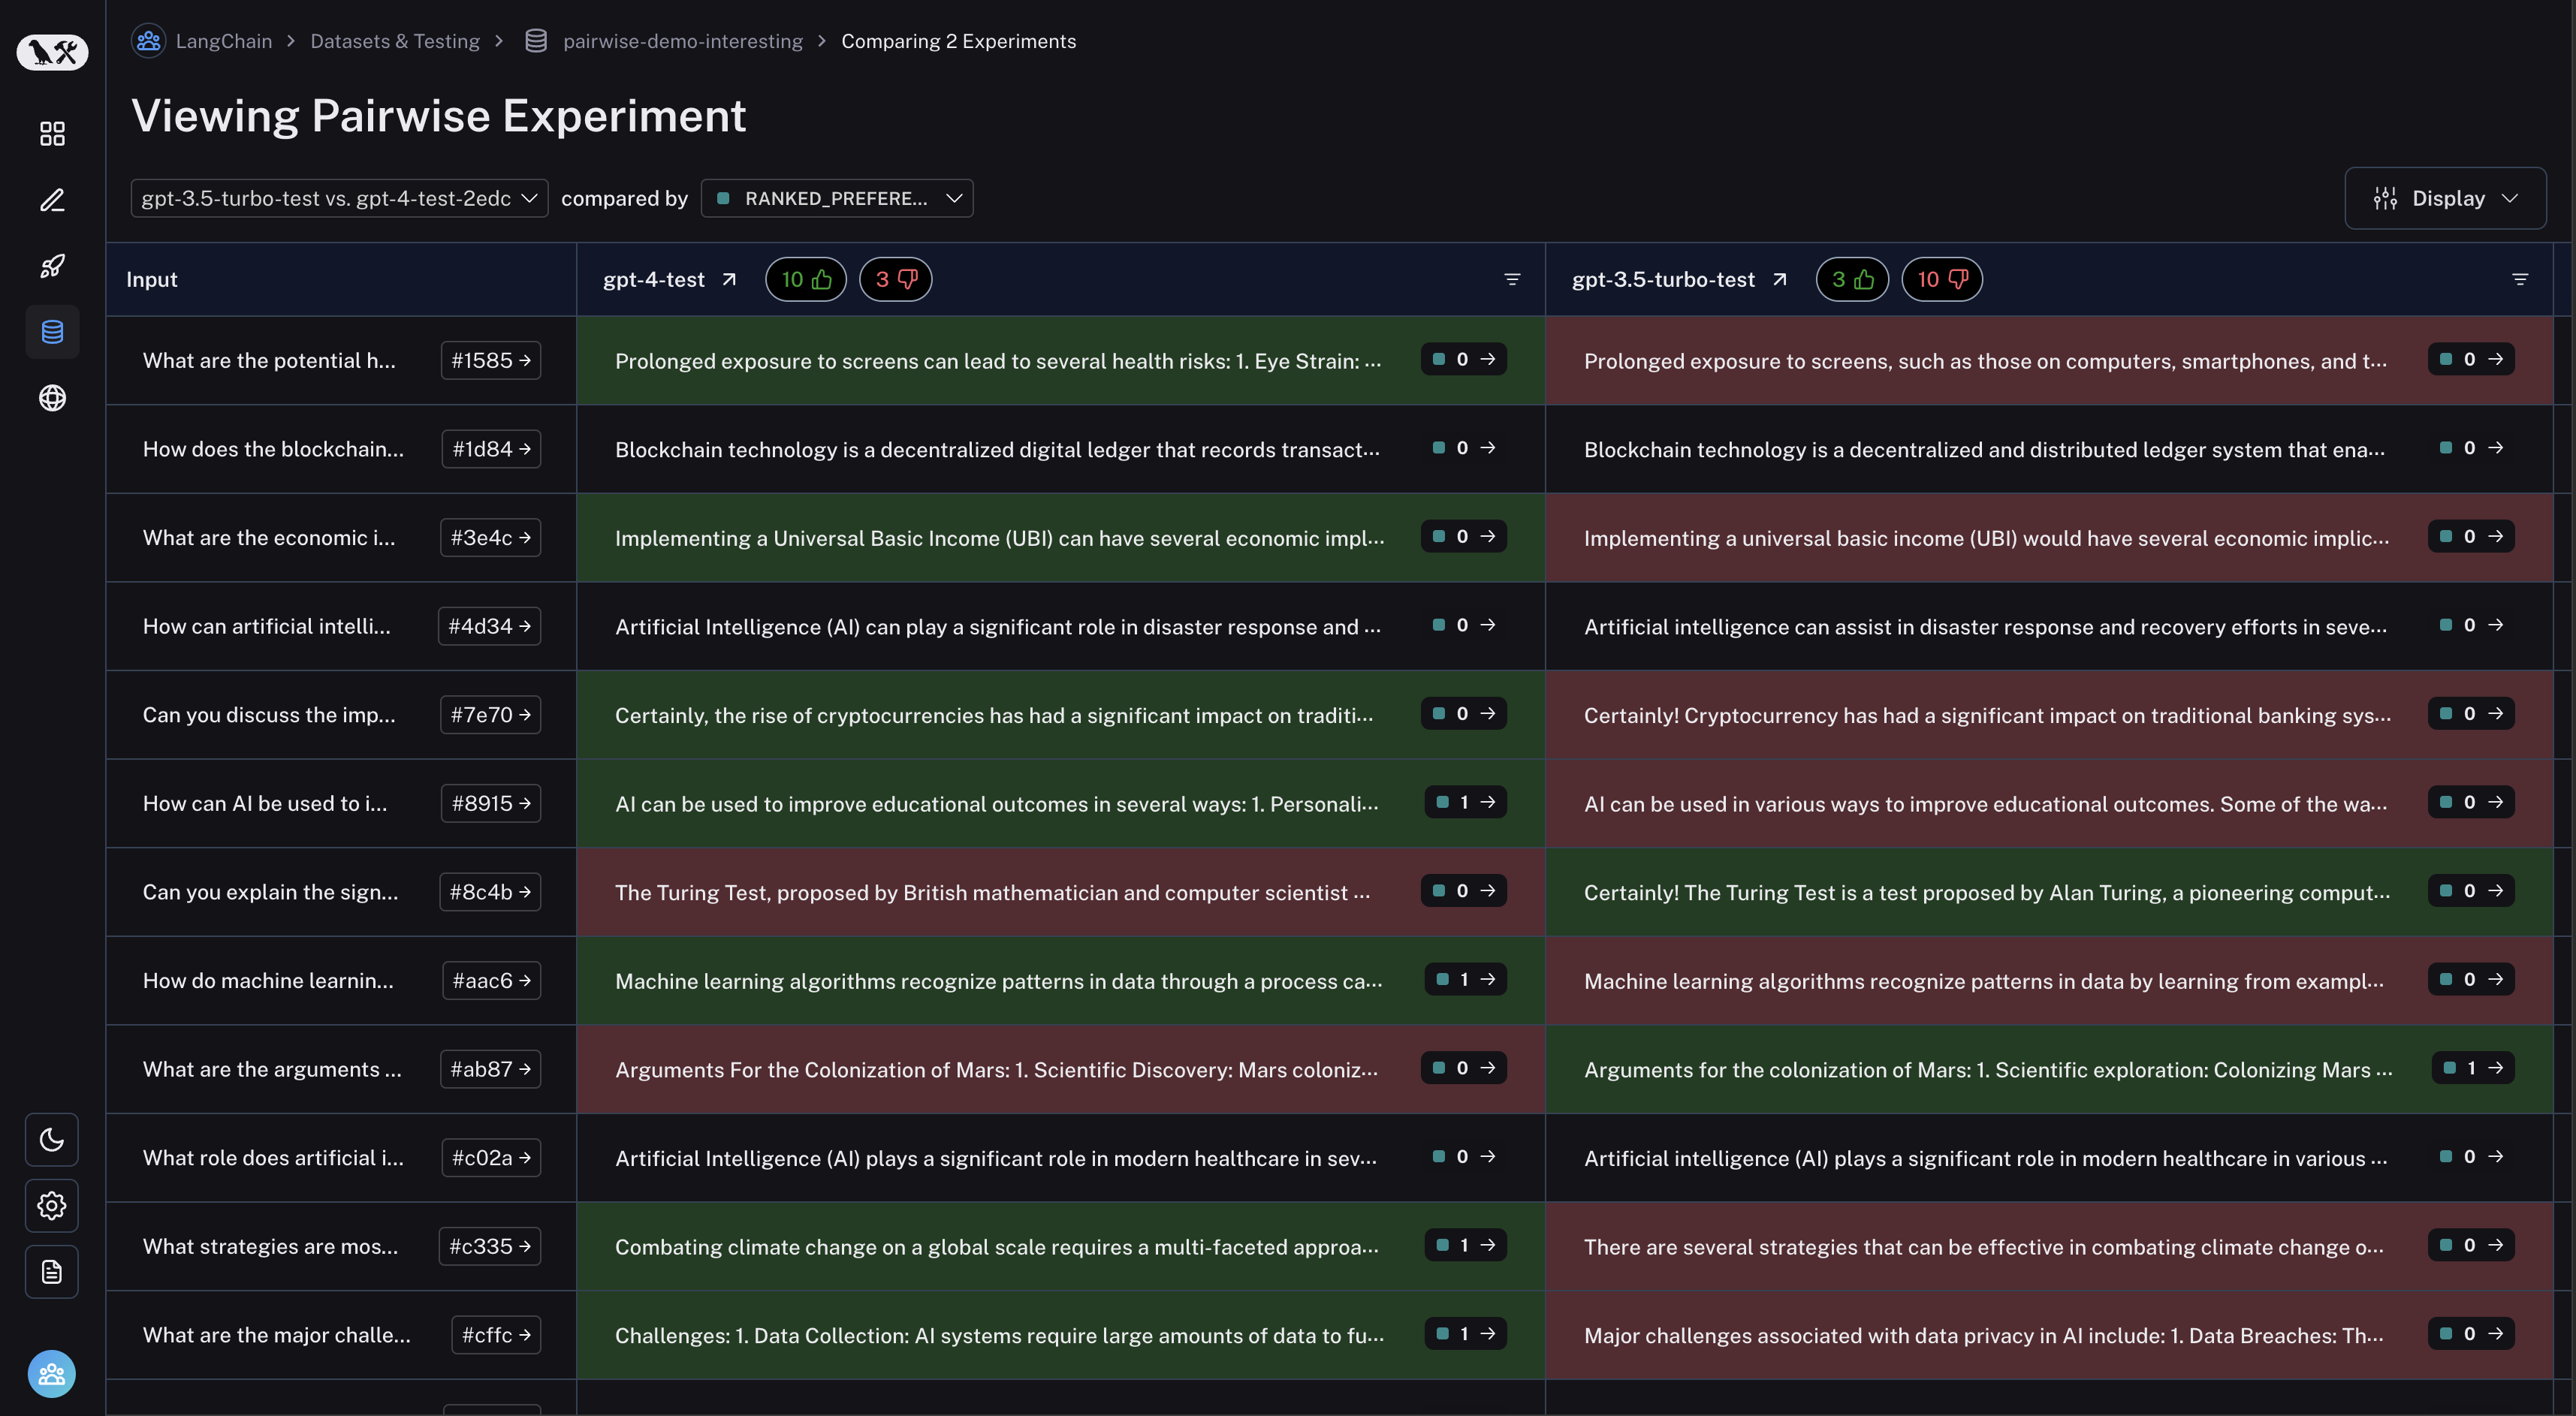 You may filter to runs where the first experiment was better or vice versa by clicking the thumbs up/thumbs down buttons in the table header:
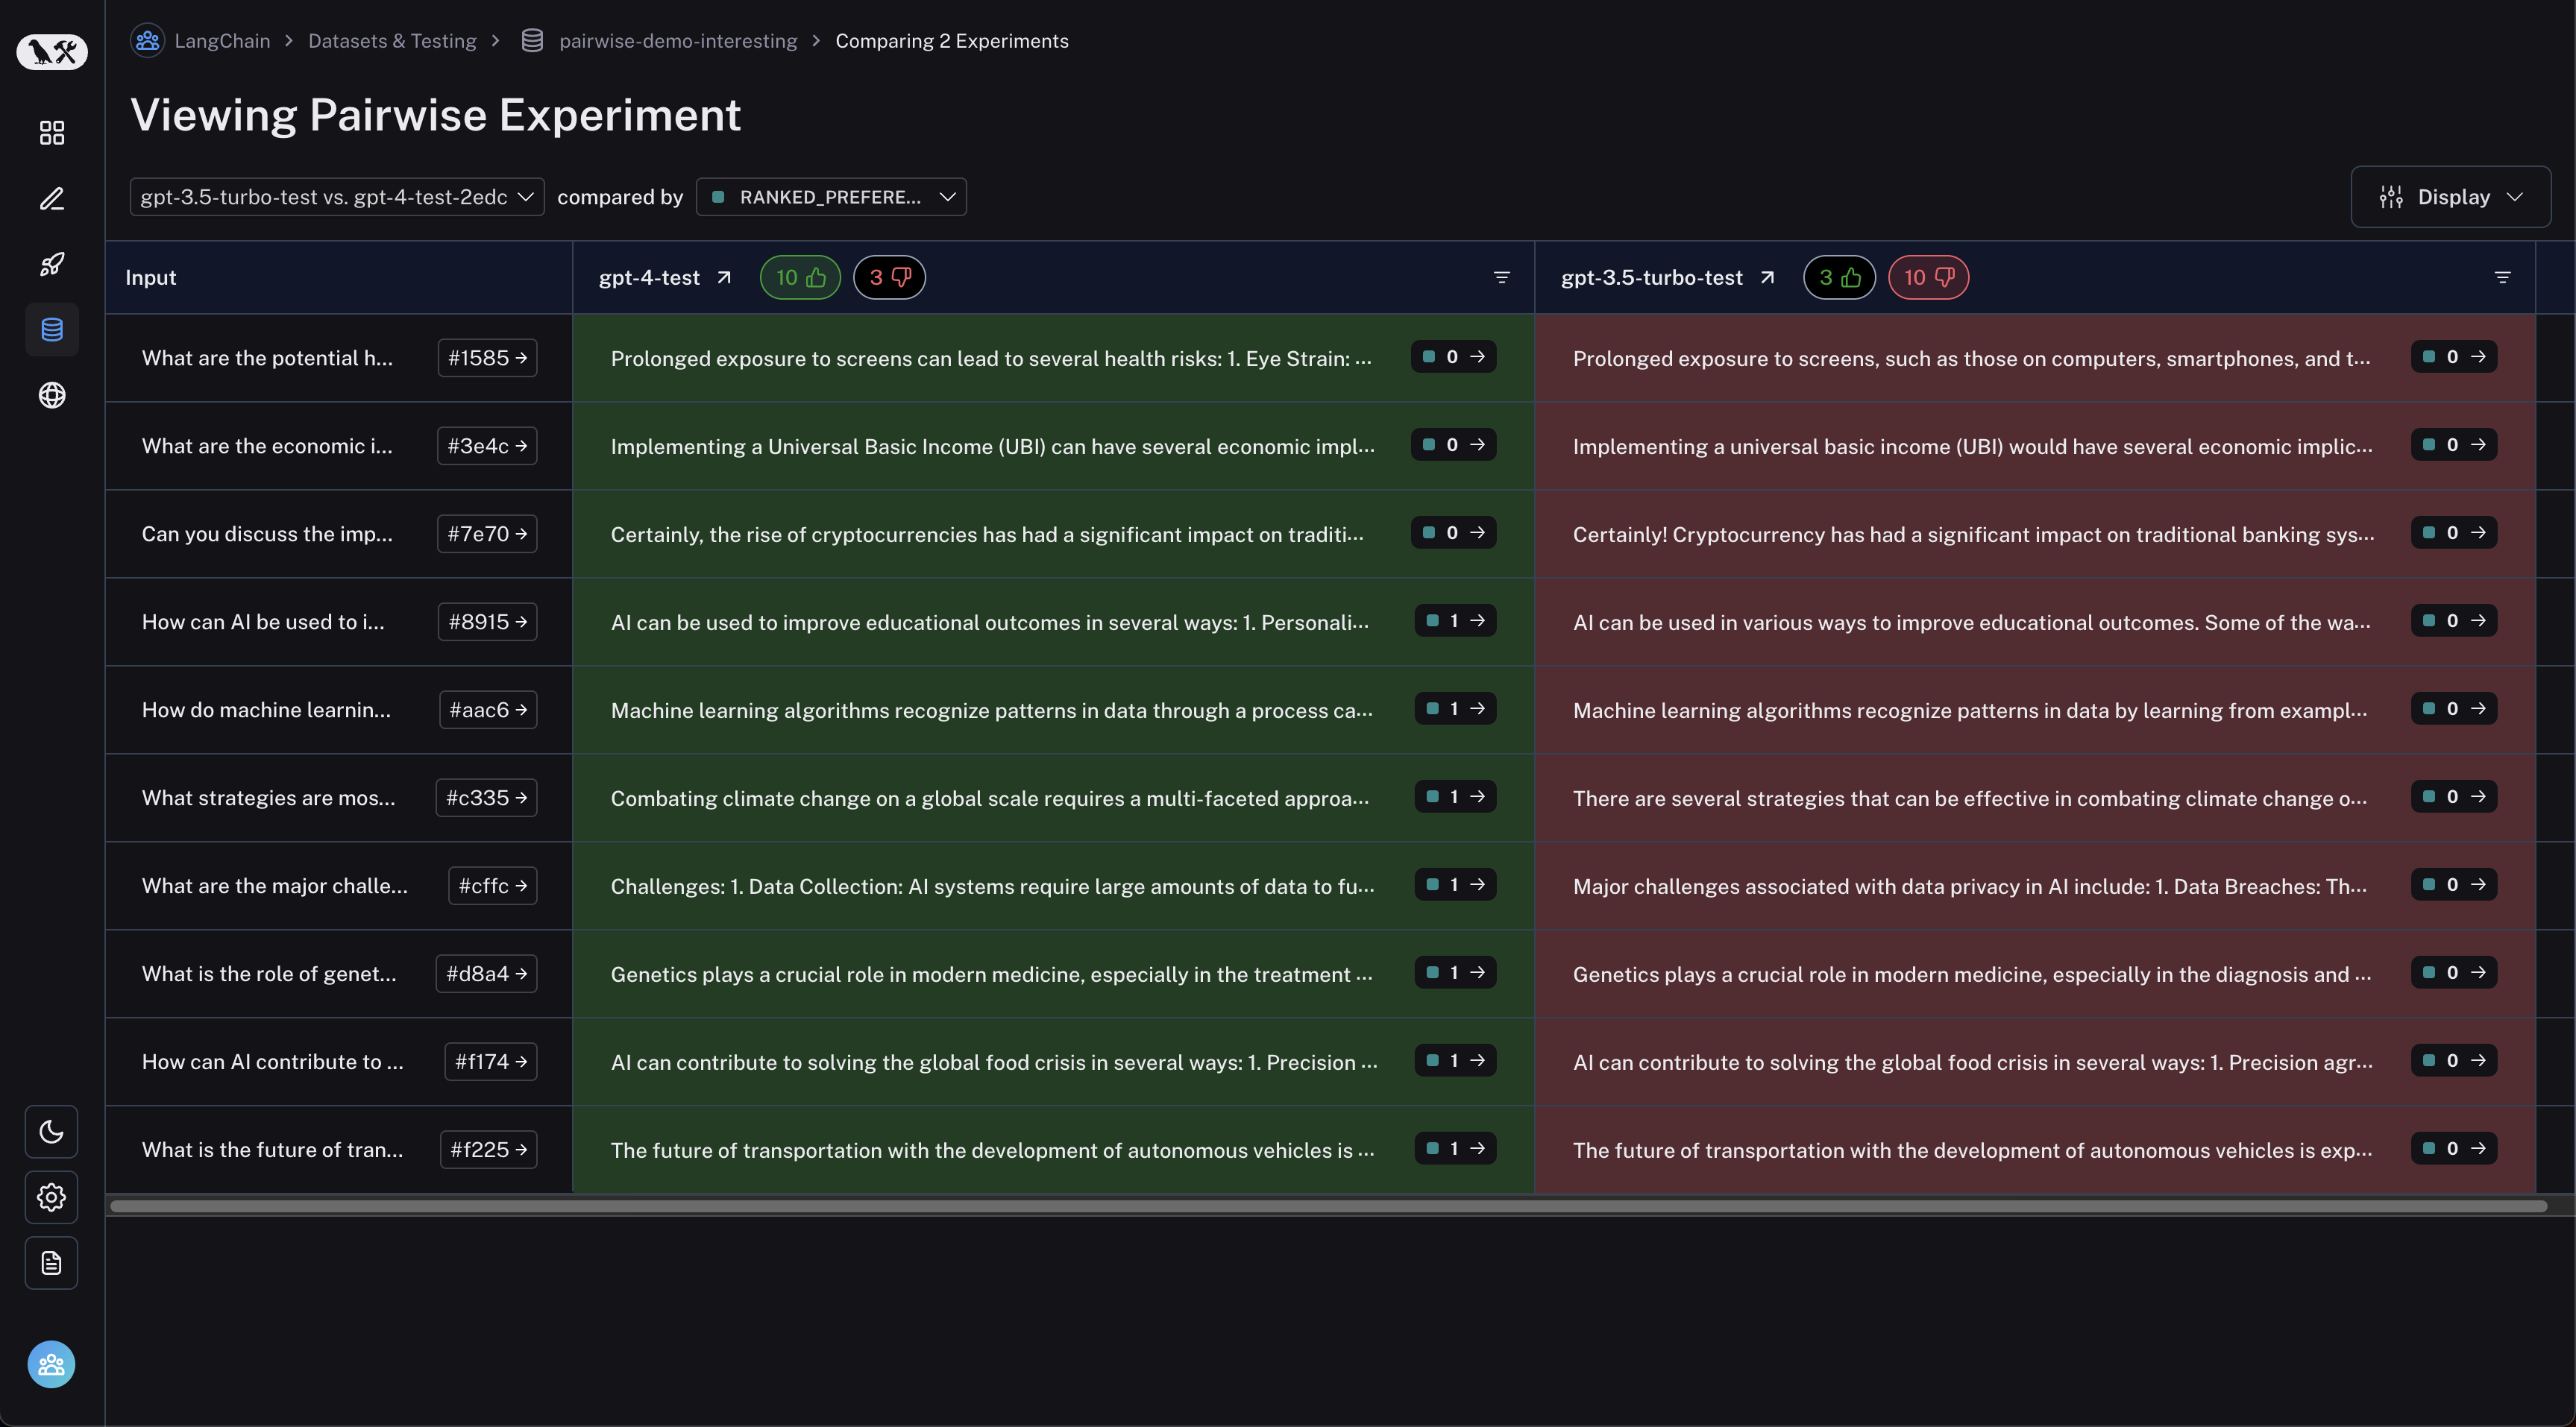 ***
***
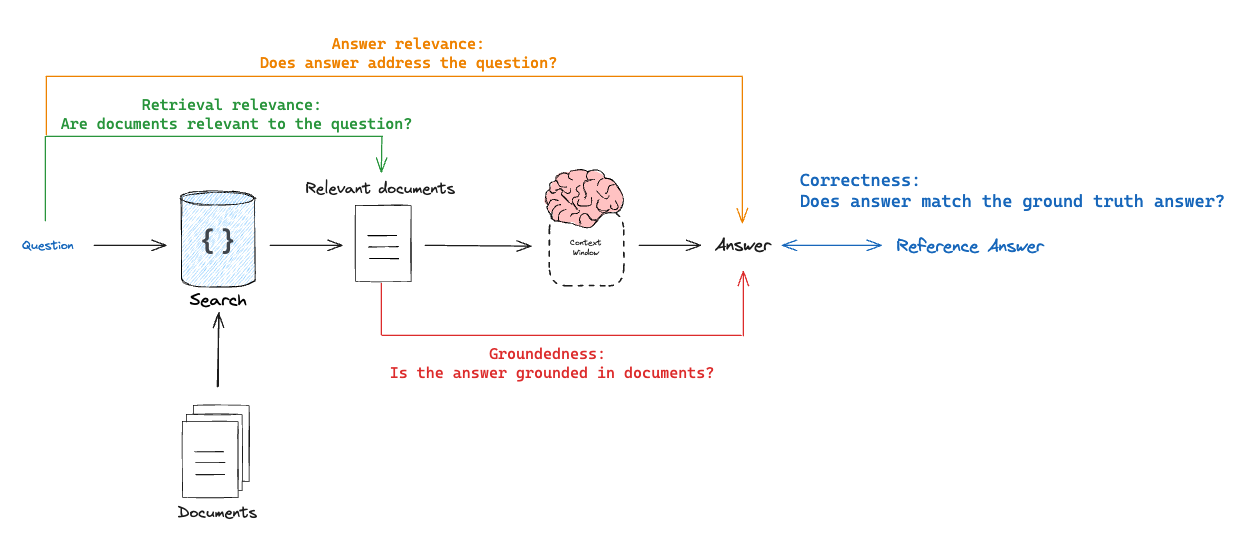 ### Correctness: Response vs reference answer
 #### From scratch
You can create examples with attachments directly from the LangSmith UI. Click the `+ Example` button in the `Examples` tab of the dataset UI. Then upload attachments using the "Upload Files" button:
#### From scratch
You can create examples with attachments directly from the LangSmith UI. Click the `+ Example` button in the `Examples` tab of the dataset UI. Then upload attachments using the "Upload Files" button:
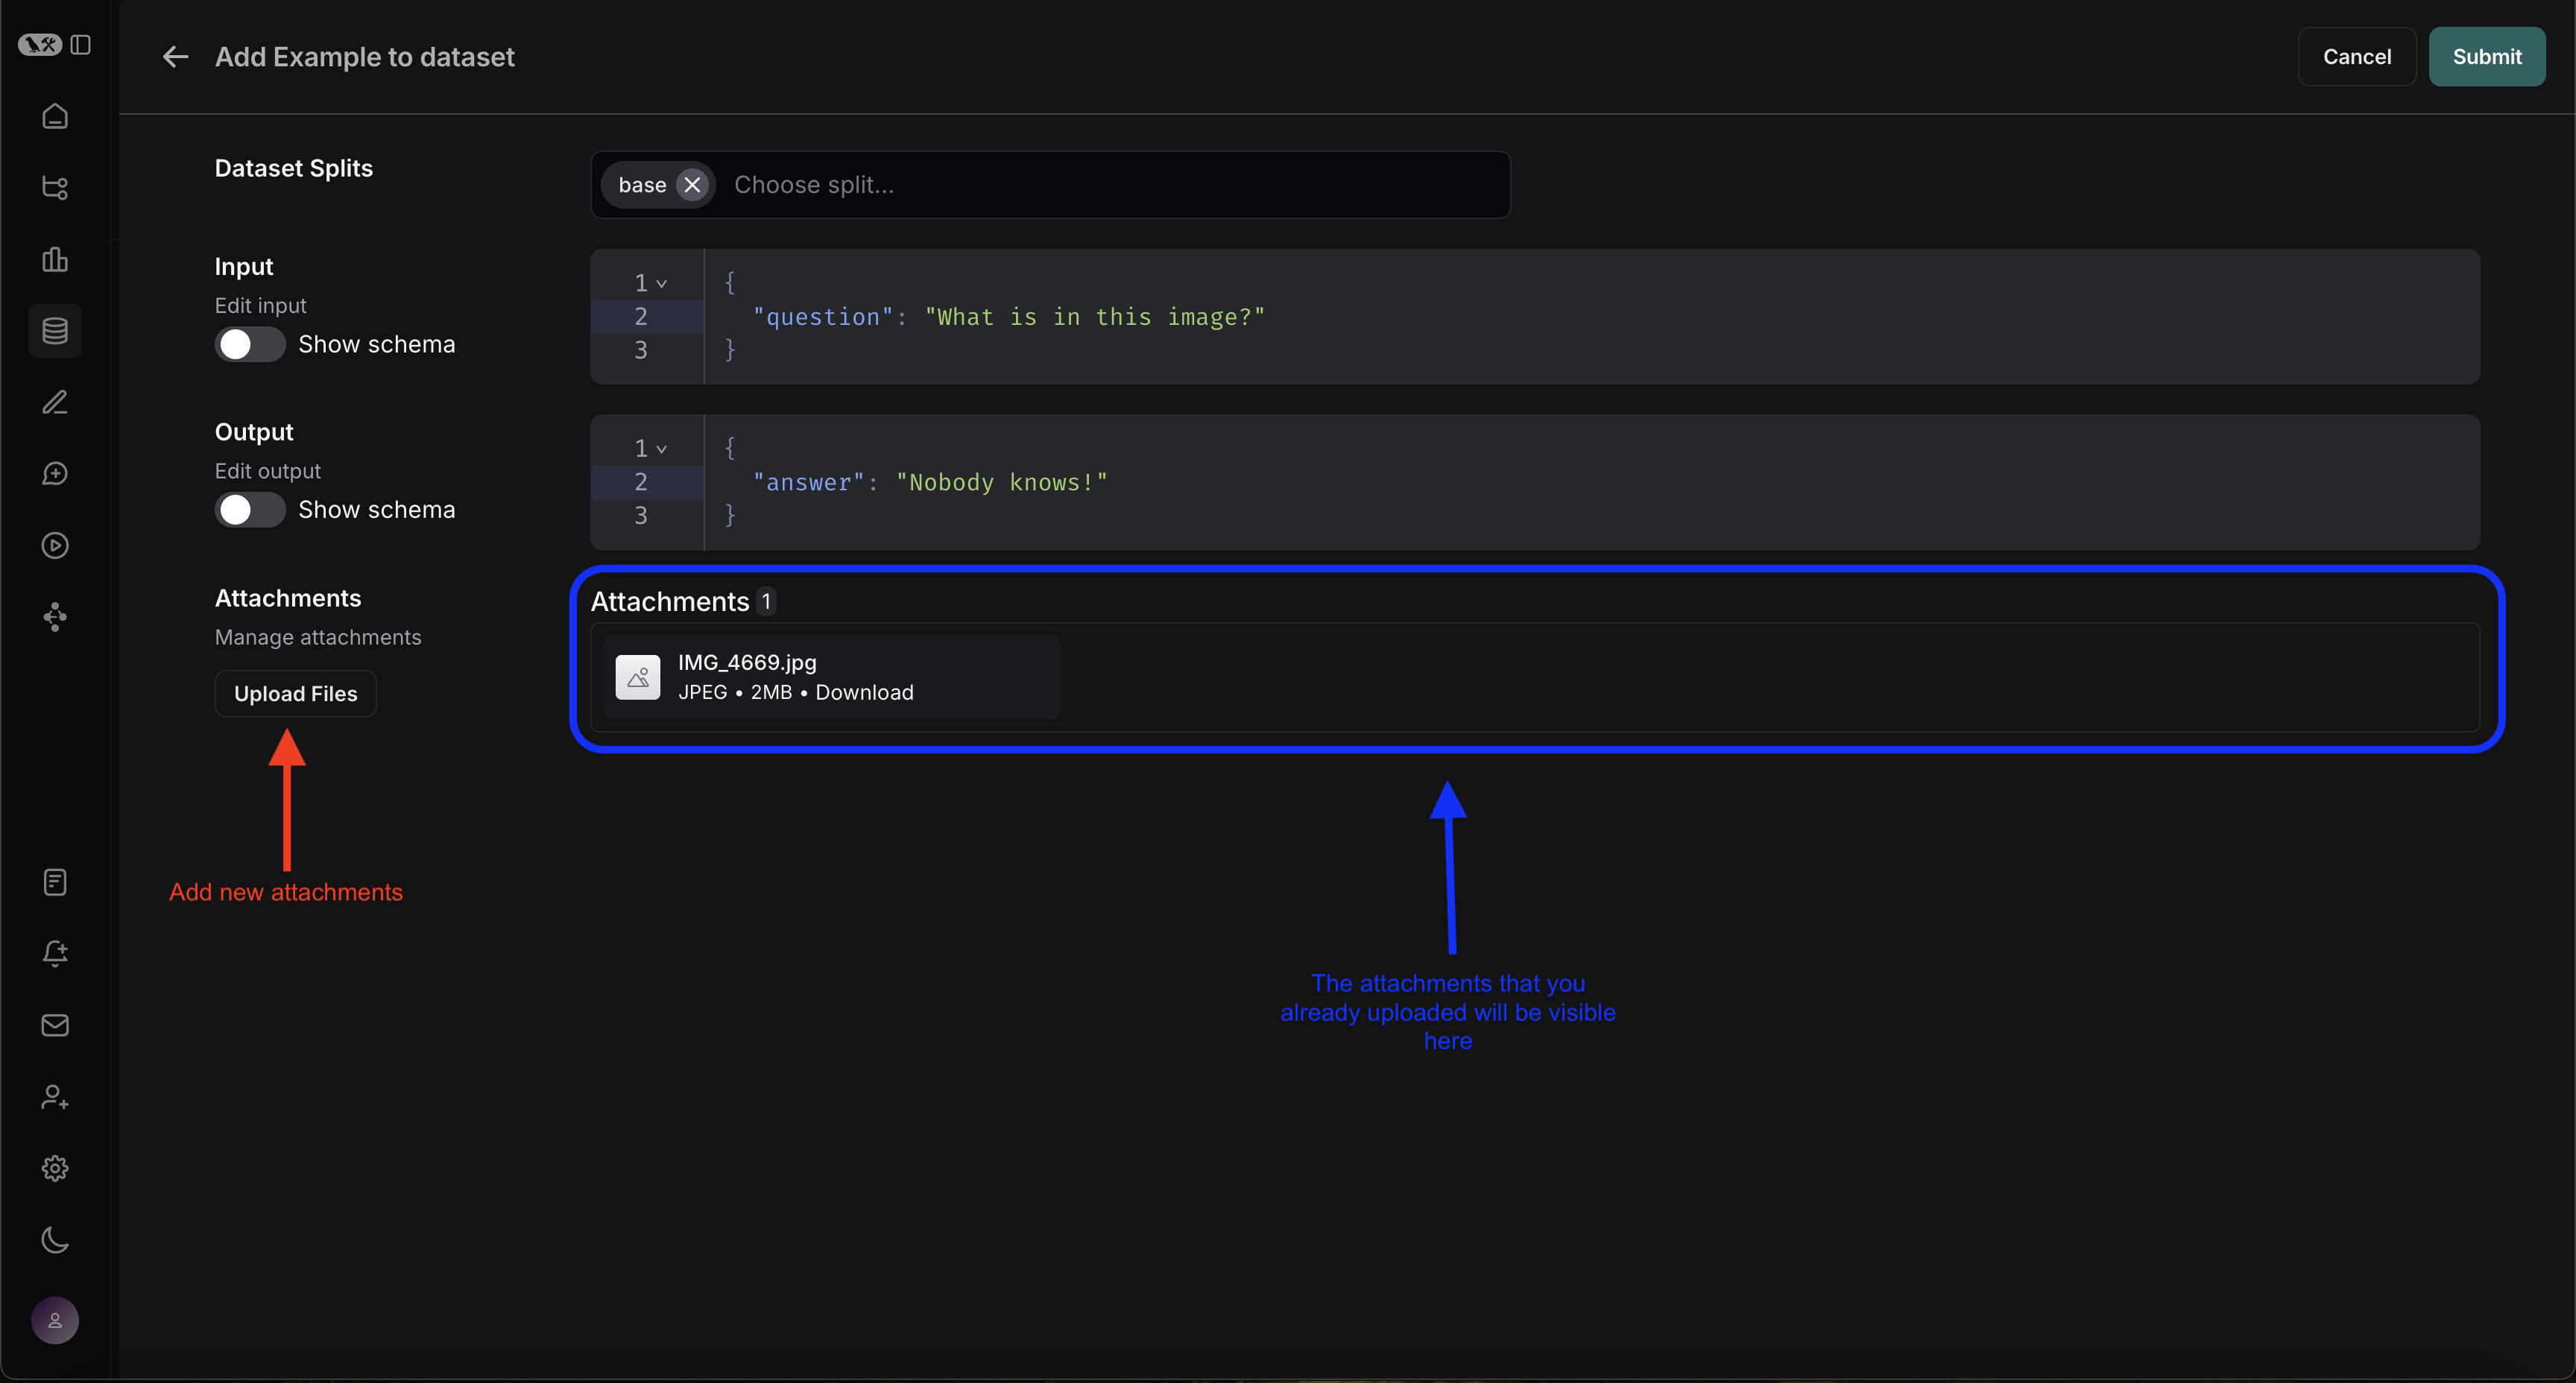 Once uploaded, you can view examples with attachments in the LangSmith UI. Each attachment will be rendered with a preview for easy inspection.
 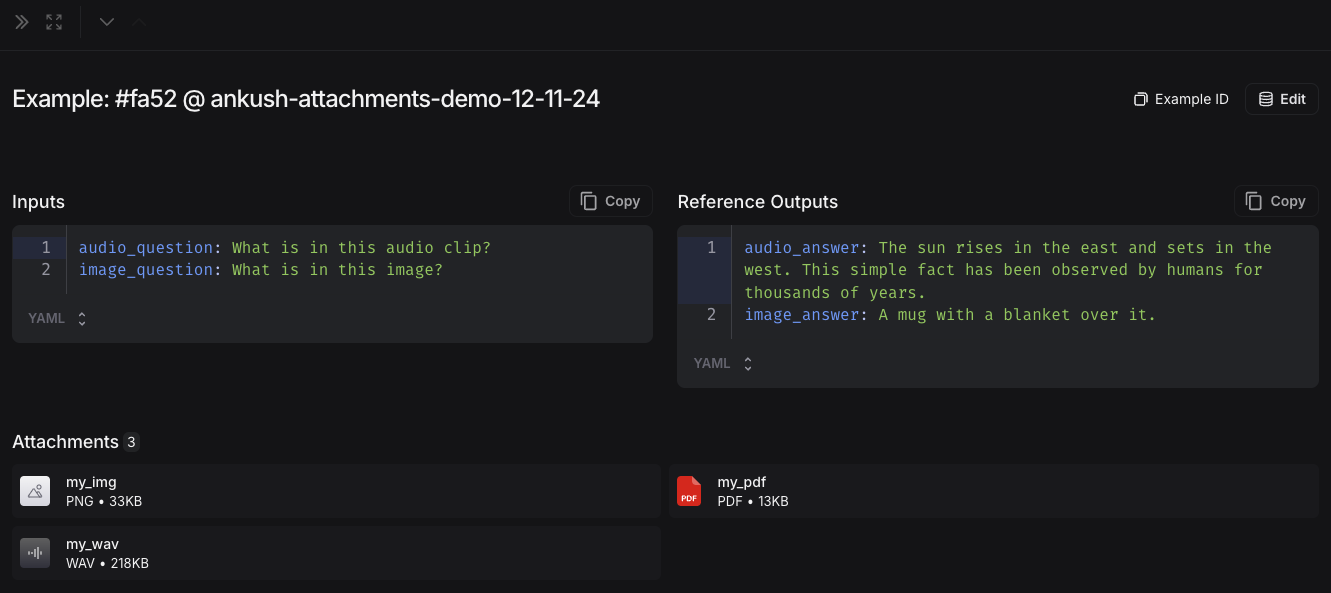 ### 2. Create a multimodal prompt
The LangSmith UI allows you to include attachments in your prompts when evaluating multimodal models:
First, click the file icon in the message where you want to add multimodal content. Next, add a template variable for the attachment(s) you want to include for each example.
* For a single attachment type: Use the suggested variable name. Note: all examples must have an attachment with this name.
* For multiple attachments or if your attachments have varying names from one example to another: Use the `All attachments` variable to include all available attachments for each example.
### 2. Create a multimodal prompt
The LangSmith UI allows you to include attachments in your prompts when evaluating multimodal models:
First, click the file icon in the message where you want to add multimodal content. Next, add a template variable for the attachment(s) you want to include for each example.
* For a single attachment type: Use the suggested variable name. Note: all examples must have an attachment with this name.
* For multiple attachments or if your attachments have varying names from one example to another: Use the `All attachments` variable to include all available attachments for each example.
 ### Define custom evaluators
 ***
***
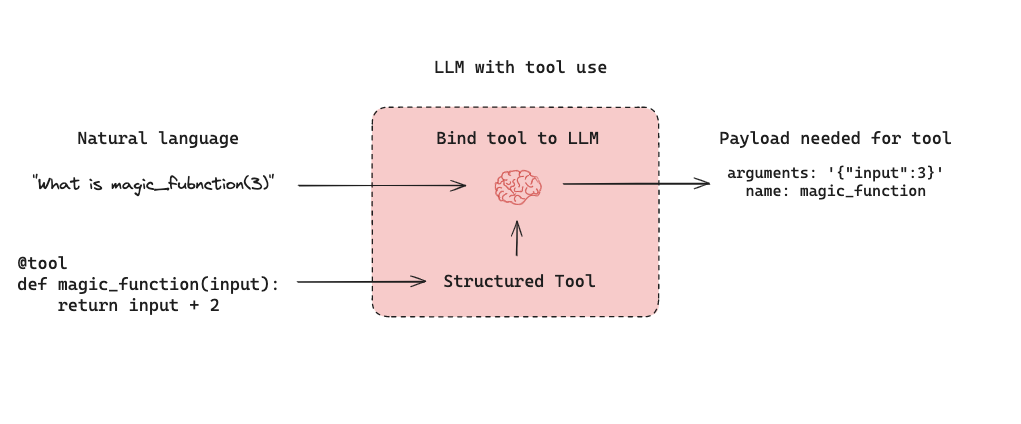 Below is a tool-calling agent in [LangGraph](https://langchain-ai.github.io/langgraph/tutorials/introduction/). The `assistant node` is an LLM that determines whether to invoke a tool based upon the input. The `tool condition` sees if a tool was selected by the `assistant node` and, if so, routes to the `tool node`. The `tool node` executes the tool and returns the output as a tool message to the `assistant node`. This loop continues until as long as the `assistant node` selects a tool. If no tool is selected, then the agent directly returns the LLM response.
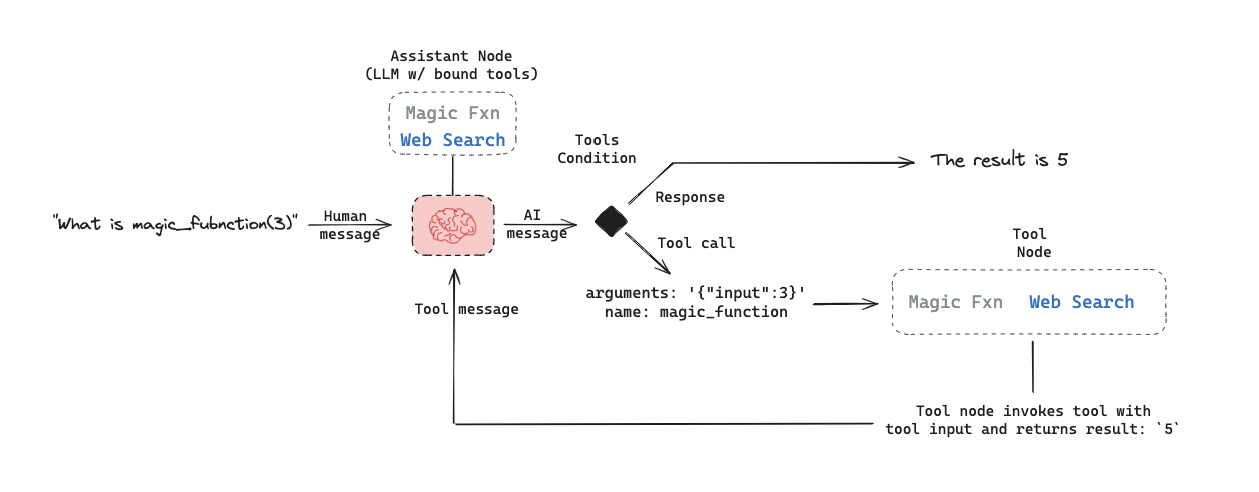 This sets up three general types of agent evaluations that users are often interested in:
* `Final Response`: Evaluate the agent's final response.
* `Single step`: Evaluate any agent step in isolation (e.g., whether it selects the appropriate tool).
* `Trajectory`: Evaluate whether the agent took the expected path (e.g., of tool calls) to arrive at the final answer.
This sets up three general types of agent evaluations that users are often interested in:
* `Final Response`: Evaluate the agent's final response.
* `Single step`: Evaluate any agent step in isolation (e.g., whether it selects the appropriate tool).
* `Trajectory`: Evaluate whether the agent took the expected path (e.g., of tool calls) to arrive at the final answer.
 Below we will cover what these are, the components (inputs, outputs, evaluators) needed for each one, and when you should consider this. Note that you likely will want to do multiple (if not all!) of these types of evaluations - they are not mutually exclusive!
### Evaluating an agent's final response
One way to evaluate an agent is to assess its overall performance on a task. This basically involves treating the agent as a black box and simply evaluating whether or not it gets the job done.
The inputs should be the user input and (optionally) a list of tools. In some cases, tool are hardcoded as part of the agent and they don't need to be passed in. In other cases, the agent is more generic, meaning it does not have a fixed set of tools and tools need to be passed in at run time.
The output should be the agent's final response.
The evaluator varies depending on the task you are asking the agent to do. Many agents perform a relatively complex set of steps and the output a final text response. Similar to RAG, LLM-as-judge evaluators are often effective for evaluation in these cases because they can assess whether the agent got a job done directly from the text response.
However, there are several downsides to this type of evaluation. First, it usually takes a while to run. Second, you are not evaluating anything that happens inside the agent, so it can be hard to debug when failures occur. Third, it can sometimes be hard to define appropriate evaluation metrics.
### Evaluating a single step of an agent
Agents generally perform multiple actions. While it is useful to evaluate them end-to-end, it can also be useful to evaluate these individual actions. This generally involves evaluating a single step of the agent - the LLM call where it decides what to do.
The inputs should be the input to a single step. Depending on what you are testing, this could just be the raw user input (e.g., a prompt and / or a set of tools) or it can also include previously completed steps.
The outputs are just the output of that step, which is usually the LLM response. The LLM response often contains tool calls, indicating what action the agent should take next.
The evaluator for this is usually some binary score for whether the correct tool call was selected, as well as some heuristic for whether the input to the tool was correct. The reference tool can be simply specified as a string.
There are several benefits to this type of evaluation. It allows you to evaluate individual actions, which lets you hone in where your application may be failing. They are also relatively fast to run (because they only involve a single LLM call) and evaluation often uses simple heuristic evaluation of the selected tool relative to the reference tool. One downside is that they don't capture the full agent - only one particular step. Another downside is that dataset creation can be challenging, particular if you want to include past history in the agent input. It is pretty easy to generate a dataset for steps early on in an agent's trajectory (e.g., this may only include the input prompt), but it can be difficult to generate a dataset for steps later on in the trajectory (e.g., including numerous prior agent actions and responses).
### Evaluating an agent's trajectory
Evaluating an agent's trajectory involves evaluating all the steps an agent took.
The inputs are again the inputs to the overall agent (the user input, and optionally a list of tools).
The outputs are a list of tool calls, which can be formulated as an "exact" trajectory (e.g., an expected sequence of tool calls) or simply a set of tool calls that are expected (in any order).
The evaluator here is some function over the steps taken. Assessing the "exact" trajectory can use a single binary score that confirms an exact match for each tool name in the sequence. This is simple, but has some flaws. Sometimes there can be multiple correct paths. This evaluation also does not capture the difference between a trajectory being off by a single step versus being completely wrong.
To address these flaws, evaluation metrics can focused on the number of "incorrect" steps taken, which better accounts for trajectories that are close versus ones that deviate significantly. Evaluation metrics can also focus on whether all of the expected tools are called in any order.
However, none of these approaches evaluate the input to the tools; they only focus on the tools selected. In order to account for this, another evaluation technique is to pass the full agent's trajectory (along with a reference trajectory) as a set of messages (e.g., all LLM responses and tool calls) an LLM-as-judge. This can evaluate the complete behavior of the agent, but it is the most challenging reference to compile (luckily, using a framework like LangGraph can help with this!). Another downside is that evaluation metrics can be somewhat tricky to come up with.
## Retrieval augmented generation (RAG)
Retrieval Augmented Generation (RAG) is a powerful technique that involves retrieving relevant documents based on a user's input and passing them to a language model for processing. RAG enables AI applications to generate more informed and context-aware responses by leveraging external knowledge.
Below we will cover what these are, the components (inputs, outputs, evaluators) needed for each one, and when you should consider this. Note that you likely will want to do multiple (if not all!) of these types of evaluations - they are not mutually exclusive!
### Evaluating an agent's final response
One way to evaluate an agent is to assess its overall performance on a task. This basically involves treating the agent as a black box and simply evaluating whether or not it gets the job done.
The inputs should be the user input and (optionally) a list of tools. In some cases, tool are hardcoded as part of the agent and they don't need to be passed in. In other cases, the agent is more generic, meaning it does not have a fixed set of tools and tools need to be passed in at run time.
The output should be the agent's final response.
The evaluator varies depending on the task you are asking the agent to do. Many agents perform a relatively complex set of steps and the output a final text response. Similar to RAG, LLM-as-judge evaluators are often effective for evaluation in these cases because they can assess whether the agent got a job done directly from the text response.
However, there are several downsides to this type of evaluation. First, it usually takes a while to run. Second, you are not evaluating anything that happens inside the agent, so it can be hard to debug when failures occur. Third, it can sometimes be hard to define appropriate evaluation metrics.
### Evaluating a single step of an agent
Agents generally perform multiple actions. While it is useful to evaluate them end-to-end, it can also be useful to evaluate these individual actions. This generally involves evaluating a single step of the agent - the LLM call where it decides what to do.
The inputs should be the input to a single step. Depending on what you are testing, this could just be the raw user input (e.g., a prompt and / or a set of tools) or it can also include previously completed steps.
The outputs are just the output of that step, which is usually the LLM response. The LLM response often contains tool calls, indicating what action the agent should take next.
The evaluator for this is usually some binary score for whether the correct tool call was selected, as well as some heuristic for whether the input to the tool was correct. The reference tool can be simply specified as a string.
There are several benefits to this type of evaluation. It allows you to evaluate individual actions, which lets you hone in where your application may be failing. They are also relatively fast to run (because they only involve a single LLM call) and evaluation often uses simple heuristic evaluation of the selected tool relative to the reference tool. One downside is that they don't capture the full agent - only one particular step. Another downside is that dataset creation can be challenging, particular if you want to include past history in the agent input. It is pretty easy to generate a dataset for steps early on in an agent's trajectory (e.g., this may only include the input prompt), but it can be difficult to generate a dataset for steps later on in the trajectory (e.g., including numerous prior agent actions and responses).
### Evaluating an agent's trajectory
Evaluating an agent's trajectory involves evaluating all the steps an agent took.
The inputs are again the inputs to the overall agent (the user input, and optionally a list of tools).
The outputs are a list of tool calls, which can be formulated as an "exact" trajectory (e.g., an expected sequence of tool calls) or simply a set of tool calls that are expected (in any order).
The evaluator here is some function over the steps taken. Assessing the "exact" trajectory can use a single binary score that confirms an exact match for each tool name in the sequence. This is simple, but has some flaws. Sometimes there can be multiple correct paths. This evaluation also does not capture the difference between a trajectory being off by a single step versus being completely wrong.
To address these flaws, evaluation metrics can focused on the number of "incorrect" steps taken, which better accounts for trajectories that are close versus ones that deviate significantly. Evaluation metrics can also focus on whether all of the expected tools are called in any order.
However, none of these approaches evaluate the input to the tools; they only focus on the tools selected. In order to account for this, another evaluation technique is to pass the full agent's trajectory (along with a reference trajectory) as a set of messages (e.g., all LLM responses and tool calls) an LLM-as-judge. This can evaluate the complete behavior of the agent, but it is the most challenging reference to compile (luckily, using a framework like LangGraph can help with this!). Another downside is that evaluation metrics can be somewhat tricky to come up with.
## Retrieval augmented generation (RAG)
Retrieval Augmented Generation (RAG) is a powerful technique that involves retrieving relevant documents based on a user's input and passing them to a language model for processing. RAG enables AI applications to generate more informed and context-aware responses by leveraging external knowledge.
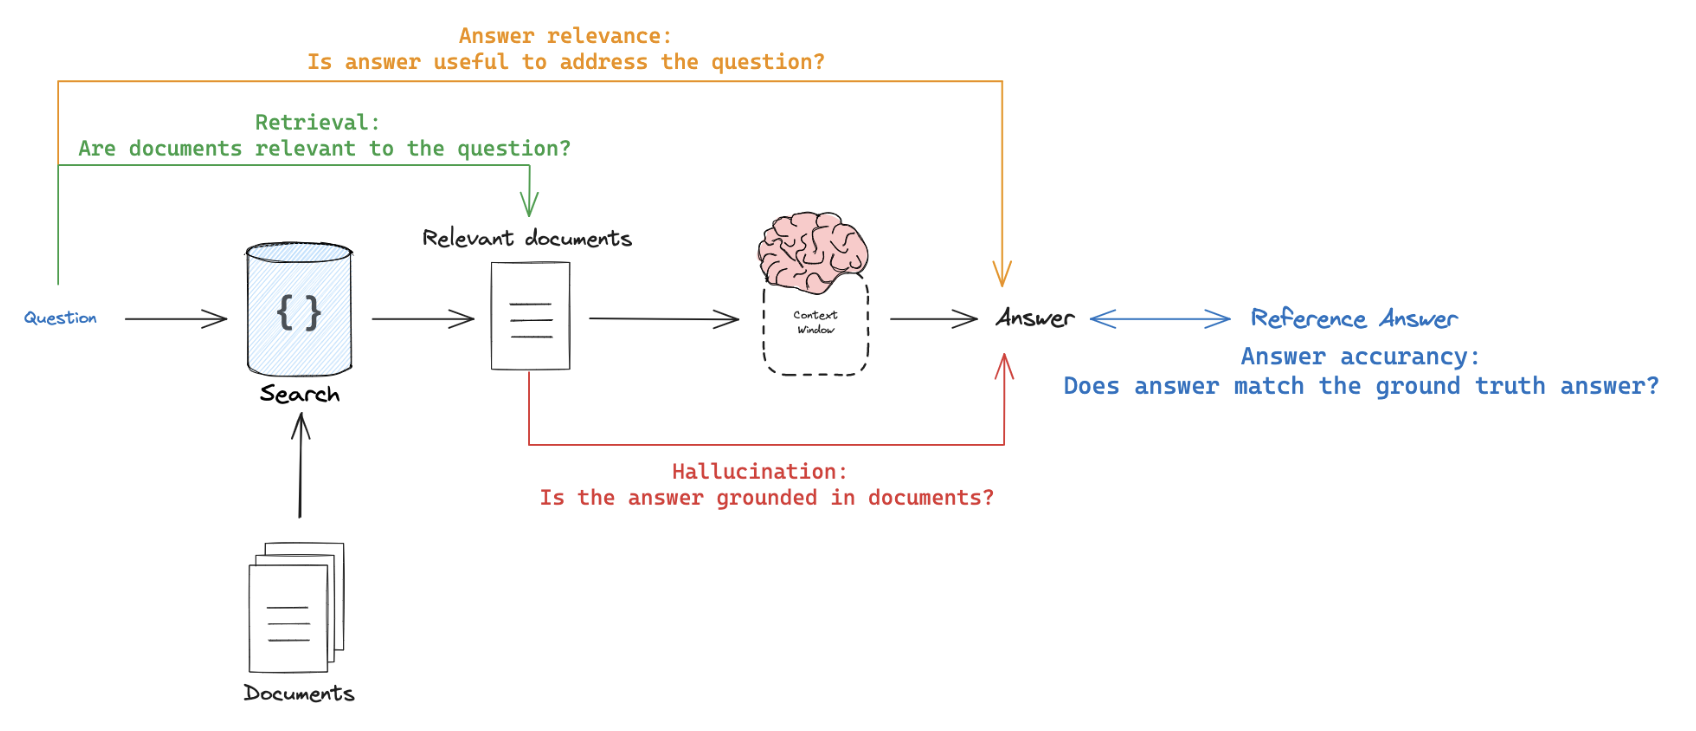 When evaluating RAG applications, you can have evaluators that require reference outputs and those that don't:
1. **Require reference output**: Compare the RAG chain's generated answer or retrievals against a reference answer (or retrievals) to assess its correctness.
2. **Don't require reference output**: Perform self-consistency checks using prompts that don't require a reference answer (represented by orange, green, and red in the above figure).
### Applying RAG Evaluation
When applying RAG evaluation, consider the following approaches:
1. `Offline evaluation`: Use offline evaluation for any prompts that rely on a reference answer. This is most commonly used for RAG answer correctness evaluation, where the reference is a ground truth (correct) answer.
2. `Online evaluation`: Employ online evaluation for any reference-free prompts. This allows you to assess the RAG application's performance in real-time scenarios.
3. `Pairwise evaluation`: Utilize pairwise evaluation to compare answers produced by different RAG chains. This evaluation focuses on user-specified criteria (e.g., answer format or style) rather than correctness, which can be evaluated using self-consistency or a ground truth reference.
### RAG evaluation summary
| Evaluator | Detail | Needs reference output | LLM-as-judge? | Pairwise relevant |
| ------------------- | ------------------------------------------------- | ---------------------- | ------------------------------------------------------------------------------------- | ----------------- |
| Document relevance | Are documents relevant to the question? | No | Yes - [prompt](https://smith.langchain.com/hub/langchain-ai/rag-document-relevance) | No |
| Answer faithfulness | Is the answer grounded in the documents? | No | Yes - [prompt](https://smith.langchain.com/hub/langchain-ai/rag-answer-hallucination) | No |
| Answer helpfulness | Does the answer help address the question? | No | Yes - [prompt](https://smith.langchain.com/hub/langchain-ai/rag-answer-helpfulness) | No |
| Answer correctness | Is the answer consistent with a reference answer? | Yes | Yes - [prompt](https://smith.langchain.com/hub/langchain-ai/rag-answer-vs-reference) | No |
| Pairwise comparison | How do multiple answer versions compare? | No | Yes - [prompt](https://smith.langchain.com/hub/langchain-ai/pairwise-evaluation-rag) | Yes |
## Summarization
Summarization is one specific type of free-form writing. The evaluation aim is typically to examine the writing (summary) relative to a set of criteria.
`Developer curated examples` of texts to summarize are commonly used for evaluation (see a dataset example [here](https://smith.langchain.com/public/659b07af-1cab-4e18-b21a-91a69a4c3990/d)). However, `user logs` from a production (summarization) app can be used for online evaluation with any of the `Reference-free` evaluation prompts below.
`LLM-as-judge` is typically used for evaluation of summarization (as well as other types of writing) using `Reference-free` prompts that follow provided criteria to grade a summary. It is less common to provide a particular `Reference` summary, because summarization is a creative task and there are many possible correct answers.
`Online` or `Offline` evaluation are feasible because of the `Reference-free` prompt used. `Pairwise` evaluation is also a powerful way to perform comparisons between different summarization chains (e.g., different summarization prompts or LLMs):
| Use Case | Detail | Needs reference output | LLM-as-judge? | Pairwise relevant |
| ---------------- | -------------------------------------------------------------------------- | ---------------------- | -------------------------------------------------------------------------------------------- | ----------------- |
| Factual accuracy | Is the summary accurate relative to the source documents? | No | Yes - [prompt](https://smith.langchain.com/hub/langchain-ai/summary-accurancy-evaluator) | Yes |
| Faithfulness | Is the summary grounded in the source documents (e.g., no hallucinations)? | No | Yes - [prompt](https://smith.langchain.com/hub/langchain-ai/summary-hallucination-evaluator) | Yes |
| Helpfulness | Is summary helpful relative to user need? | No | Yes - [prompt](https://smith.langchain.com/hub/langchain-ai/summary-helpfulness-evaluator) | Yes |
## Classification and tagging
Classification and tagging apply a label to a given input (e.g., for toxicity detection, sentiment analysis, etc). Classification/tagging evaluation typically employs the following components, which we will review in detail below:
A central consideration for classification/tagging evaluation is whether you have a dataset with `reference` labels or not. If not, users frequently want to define an evaluator that uses criteria to apply label (e.g., toxicity, etc) to an input (e.g., text, user-question, etc). However, if ground truth class labels are provided, then the evaluation objective is focused on scoring a classification/tagging chain relative to the ground truth class label (e.g., using metrics such as precision, recall, etc).
If ground truth reference labels are provided, then it's common to simply define a [custom heuristic evaluator](/langsmith/code-evaluator) to compare ground truth labels to the chain output. However, it is increasingly common given the emergence of LLMs simply use `LLM-as-judge` to perform the classification/tagging of an input based upon specified criteria (without a ground truth reference).
`Online` or `Offline` evaluation is feasible when using `LLM-as-judge` with the `Reference-free` prompt used. In particular, this is well suited to `Online` evaluation when a user wants to tag / classify application input (e.g., for toxicity, etc).
| Use Case | Detail | Needs reference output | LLM-as-judge? | Pairwise relevant |
| --------- | ------------------- | ---------------------- | ------------- | ----------------- |
| Accuracy | Standard definition | Yes | No | No |
| Precision | Standard definition | Yes | No | No |
| Recall | Standard definition | Yes | No | No |
***
When evaluating RAG applications, you can have evaluators that require reference outputs and those that don't:
1. **Require reference output**: Compare the RAG chain's generated answer or retrievals against a reference answer (or retrievals) to assess its correctness.
2. **Don't require reference output**: Perform self-consistency checks using prompts that don't require a reference answer (represented by orange, green, and red in the above figure).
### Applying RAG Evaluation
When applying RAG evaluation, consider the following approaches:
1. `Offline evaluation`: Use offline evaluation for any prompts that rely on a reference answer. This is most commonly used for RAG answer correctness evaluation, where the reference is a ground truth (correct) answer.
2. `Online evaluation`: Employ online evaluation for any reference-free prompts. This allows you to assess the RAG application's performance in real-time scenarios.
3. `Pairwise evaluation`: Utilize pairwise evaluation to compare answers produced by different RAG chains. This evaluation focuses on user-specified criteria (e.g., answer format or style) rather than correctness, which can be evaluated using self-consistency or a ground truth reference.
### RAG evaluation summary
| Evaluator | Detail | Needs reference output | LLM-as-judge? | Pairwise relevant |
| ------------------- | ------------------------------------------------- | ---------------------- | ------------------------------------------------------------------------------------- | ----------------- |
| Document relevance | Are documents relevant to the question? | No | Yes - [prompt](https://smith.langchain.com/hub/langchain-ai/rag-document-relevance) | No |
| Answer faithfulness | Is the answer grounded in the documents? | No | Yes - [prompt](https://smith.langchain.com/hub/langchain-ai/rag-answer-hallucination) | No |
| Answer helpfulness | Does the answer help address the question? | No | Yes - [prompt](https://smith.langchain.com/hub/langchain-ai/rag-answer-helpfulness) | No |
| Answer correctness | Is the answer consistent with a reference answer? | Yes | Yes - [prompt](https://smith.langchain.com/hub/langchain-ai/rag-answer-vs-reference) | No |
| Pairwise comparison | How do multiple answer versions compare? | No | Yes - [prompt](https://smith.langchain.com/hub/langchain-ai/pairwise-evaluation-rag) | Yes |
## Summarization
Summarization is one specific type of free-form writing. The evaluation aim is typically to examine the writing (summary) relative to a set of criteria.
`Developer curated examples` of texts to summarize are commonly used for evaluation (see a dataset example [here](https://smith.langchain.com/public/659b07af-1cab-4e18-b21a-91a69a4c3990/d)). However, `user logs` from a production (summarization) app can be used for online evaluation with any of the `Reference-free` evaluation prompts below.
`LLM-as-judge` is typically used for evaluation of summarization (as well as other types of writing) using `Reference-free` prompts that follow provided criteria to grade a summary. It is less common to provide a particular `Reference` summary, because summarization is a creative task and there are many possible correct answers.
`Online` or `Offline` evaluation are feasible because of the `Reference-free` prompt used. `Pairwise` evaluation is also a powerful way to perform comparisons between different summarization chains (e.g., different summarization prompts or LLMs):
| Use Case | Detail | Needs reference output | LLM-as-judge? | Pairwise relevant |
| ---------------- | -------------------------------------------------------------------------- | ---------------------- | -------------------------------------------------------------------------------------------- | ----------------- |
| Factual accuracy | Is the summary accurate relative to the source documents? | No | Yes - [prompt](https://smith.langchain.com/hub/langchain-ai/summary-accurancy-evaluator) | Yes |
| Faithfulness | Is the summary grounded in the source documents (e.g., no hallucinations)? | No | Yes - [prompt](https://smith.langchain.com/hub/langchain-ai/summary-hallucination-evaluator) | Yes |
| Helpfulness | Is summary helpful relative to user need? | No | Yes - [prompt](https://smith.langchain.com/hub/langchain-ai/summary-helpfulness-evaluator) | Yes |
## Classification and tagging
Classification and tagging apply a label to a given input (e.g., for toxicity detection, sentiment analysis, etc). Classification/tagging evaluation typically employs the following components, which we will review in detail below:
A central consideration for classification/tagging evaluation is whether you have a dataset with `reference` labels or not. If not, users frequently want to define an evaluator that uses criteria to apply label (e.g., toxicity, etc) to an input (e.g., text, user-question, etc). However, if ground truth class labels are provided, then the evaluation objective is focused on scoring a classification/tagging chain relative to the ground truth class label (e.g., using metrics such as precision, recall, etc).
If ground truth reference labels are provided, then it's common to simply define a [custom heuristic evaluator](/langsmith/code-evaluator) to compare ground truth labels to the chain output. However, it is increasingly common given the emergence of LLMs simply use `LLM-as-judge` to perform the classification/tagging of an input based upon specified criteria (without a ground truth reference).
`Online` or `Offline` evaluation is feasible when using `LLM-as-judge` with the `Reference-free` prompt used. In particular, this is well suited to `Online` evaluation when a user wants to tag / classify application input (e.g., for toxicity, etc).
| Use Case | Detail | Needs reference output | LLM-as-judge? | Pairwise relevant |
| --------- | ------------------- | ---------------------- | ------------- | ----------------- |
| Accuracy | Standard definition | Yes | No | No |
| Precision | Standard definition | Yes | No | No |
| Recall | Standard definition | Yes | No | No |
***
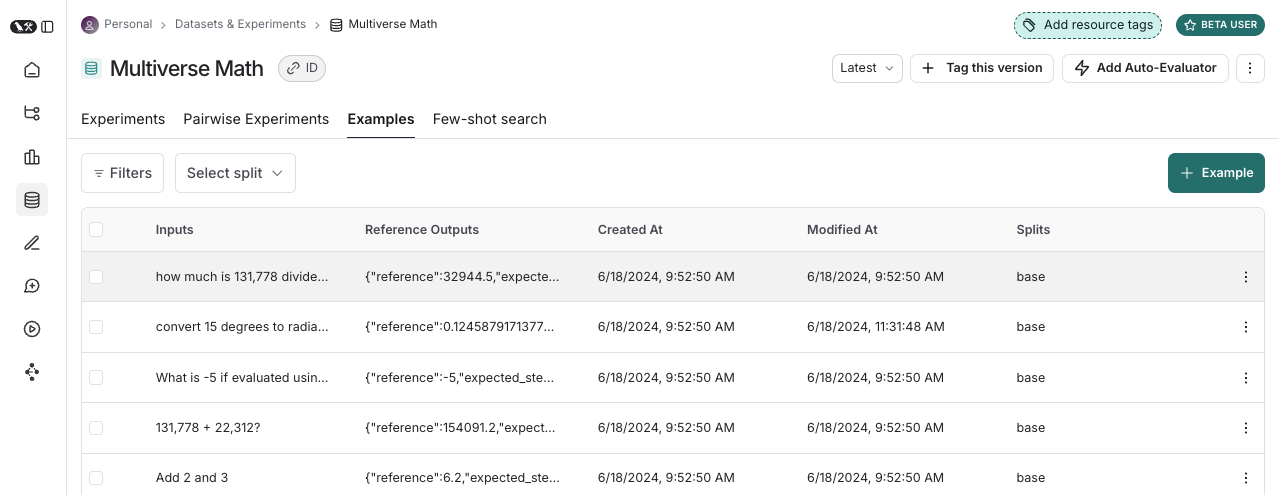 ### Examples
Each example consists of:
* **Inputs**: a dictionary of input variables to pass to your application.
* **Reference outputs** (optional): a dictionary of reference outputs. These do not get passed to your application, they are only used in evaluators.
* **Metadata** (optional): a dictionary of additional information that can be used to create filtered views of a dataset.
### Examples
Each example consists of:
* **Inputs**: a dictionary of input variables to pass to your application.
* **Reference outputs** (optional): a dictionary of reference outputs. These do not get passed to your application, they are only used in evaluators.
* **Metadata** (optional): a dictionary of additional information that can be used to create filtered views of a dataset.
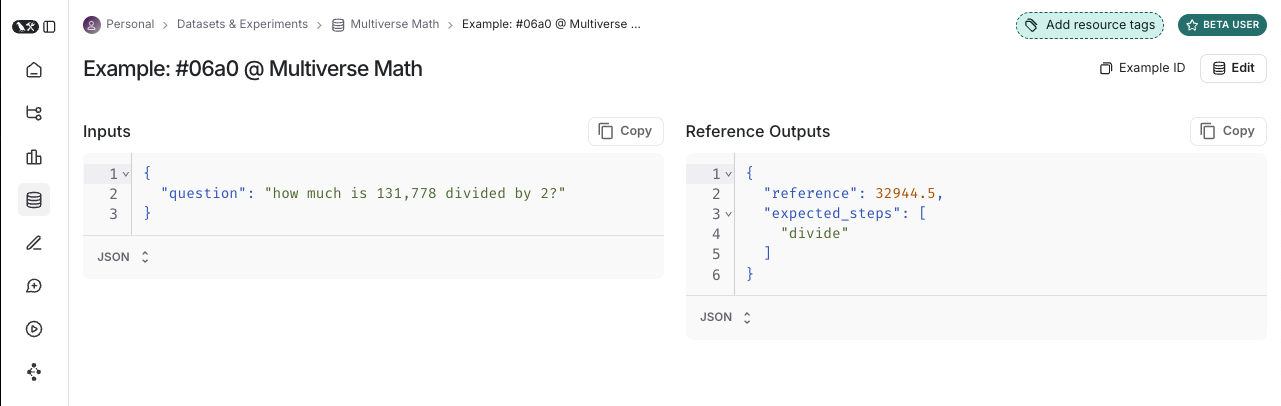 ### Dataset curation
There are various ways to build datasets for evaluation, including:
#### Manually curated examples
This is how we typically recommend people get started creating datasets. From building your application, you probably have some idea of what types of inputs you expect your application to be able to handle, and what "good" responses may be. You probably want to cover a few different common edge cases or situations you can imagine. Even 10-20 high-quality, manually-curated examples can go a long way.
#### Historical traces
Once you have an application in production, you start getting valuable information: how are users actually using it? These real-world runs make for great examples because they're, well, the most realistic!
If you're getting a lot of traffic, how can you determine which runs are valuable to add to a dataset? There are a few techniques you can use:
* **User feedback**: If possible - try to collect end user feedback. You can then see which datapoints got negative feedback. That is super valuable! These are spots where your application did not perform well. You should add these to your dataset to test against in the future.
* **Heuristics**: You can also use other heuristics to identify "interesting" datapoints. For example, runs that took a long time to complete could be interesting to look at and add to a dataset.
* **LLM feedback**: You can use another LLM to detect noteworthy runs. For example, you could use an LLM to label chatbot conversations where the user had to rephrase their question or correct the model in some way, indicating the chatbot did not initially respond correctly.
#### Synthetic data
Once you have a few examples, you can try to artificially generate some more. It's generally advised to have a few good hand-crafted examples before this, as this synthetic data will often resemble them in some way. This can be a useful way to get a lot of datapoints, quickly.
### Splits
When setting up your evaluation, you may want to partition your dataset into different splits. For example, you might use a smaller split for many rapid and cheap iterations and a larger split for your final evaluation. In addition, splits can be important for the interpretability of your experiments. For example, if you have a RAG application, you may want your dataset splits to focus on different types of questions (e.g., factual, opinion, etc) and to evaluate your application on each split separately.
Learn how to [create and manage dataset splits](/langsmith/manage-datasets-in-application#create-and-manage-dataset-splits).
### Versions
Datasets are [versioned](/langsmith/manage-datasets#version-a-dataset) such that every time you add, update, or delete examples in your dataset, a new version of the dataset is created. This makes it easy to inspect and revert changes to your dataset in case you make a mistake. You can also [tag versions](/langsmith/manage-datasets#tag-a-version) of your dataset to give them a more human-readable name. This can be useful for marking important milestones in your dataset's history.
You can run evaluations on specific versions of a dataset. This can be useful when running evaluations in CI, to make sure that a dataset update doesn't accidentally break your CI pipelines.
## Evaluators
Evaluators are functions that score how well your application performs on a particular example.
#### Evaluator inputs
Evaluators receive these inputs:
* [Example](/langsmith/evaluation-concepts#examples): The example(s) from your [Dataset](/langsmith/evaluation-concepts#datasets). Contains inputs, (reference) outputs, and metadata.
* [Run](/langsmith/observability-concepts#runs): The actual outputs and intermediate steps (child runs) from passing the example inputs to the application.
#### Evaluator outputs
An evaluator returns one or more metrics. These should be returned as a dictionary or list of dictionaries of the form:
* `key`: The name of the metric.
* `score` | `value`: The value of the metric. Use `score` if it's a numerical metric and `value` if it's categorical.
* `comment` (optional): The reasoning or additional string information justifying the score.
#### Defining evaluators
There are a number of ways to define and run evaluators:
* **Custom code**: Define [custom evaluators](/langsmith/code-evaluator) as Python or TypeScript functions and run them client-side using the SDKs or server-side via the UI.
* **Built-in evaluators**: LangSmith has a number of built-in evaluators that you can configure and run via the UI.
You can run evaluators using the LangSmith SDK ([Python](https://docs.smith.langchain.com/reference/python/reference) and [TypeScript](https://docs.smith.langchain.com/reference/js)), via the [Prompt Playground](/langsmith/observability-concepts#prompt-playground), or by configuring [Rules](/langsmith/rules) to automatically run them on particular tracing projects or datasets.
#### Evaluation techniques
There are a few high-level approaches to LLM evaluation:
### Human
Human evaluation is [often a great starting point for evaluation](https://hamel.dev/blog/posts/evals/#looking-at-your-traces). LangSmith makes it easy to review your LLM application outputs as well as the traces (all intermediate steps).
LangSmith's [annotation queues](/langsmith/evaluation-concepts#annotation-queues) make it easy to get human feedback on your application's outputs.
### Heuristic
Heuristic evaluators are deterministic, rule-based functions. These are good for simple checks like making sure that a chatbot's response isn't empty, that a snippet of generated code can be compiled, or that a classification is exactly correct.
### LLM-as-judge
LLM-as-judge evaluators use LLMs to score the application's output. To use them, you typically encode the grading rules / criteria in the LLM prompt. They can be reference-free (e.g., check if system output contains offensive content or adheres to specific criteria). Or, they can compare task output to a reference output (e.g., check if the output is factually accurate relative to the reference).
With LLM-as-judge evaluators, it is important to carefully review the resulting scores and tune the grader prompt if needed. Often it is helpful to write these as few-shot evaluators, where you provide examples of inputs, outputs, and expected grades as part of the grader prompt.
Learn about [how to define an LLM-as-a-judge evaluator](/langsmith/llm-as-judge).
### Pairwise
Pairwise evaluators allow you to compare the outputs of two versions of an application. This can use either a heuristic ("which response is longer"), an LLM (with a specific pairwise prompt), or human (asking them to manually annotate examples).
**When should you use pairwise evaluation?**
Pairwise evaluation is helpful when it is difficult to directly score an LLM output, but easier to compare two outputs. This can be the case for tasks like summarization - it may be hard to give a summary an absolute score, but easy to choose which of two summaries is more informative.
Learn [how run pairwise evaluations](/langsmith/evaluate-pairwise).
## Experiment
Each time we evaluate an application on a dataset, we are conducting an experiment. An experiment contains the results of running a specific version of your application on the dataset. To understand how to use the LangSmith experiment view, see [how to analyze experiment results](/langsmith/analyze-an-experiment).
### Dataset curation
There are various ways to build datasets for evaluation, including:
#### Manually curated examples
This is how we typically recommend people get started creating datasets. From building your application, you probably have some idea of what types of inputs you expect your application to be able to handle, and what "good" responses may be. You probably want to cover a few different common edge cases or situations you can imagine. Even 10-20 high-quality, manually-curated examples can go a long way.
#### Historical traces
Once you have an application in production, you start getting valuable information: how are users actually using it? These real-world runs make for great examples because they're, well, the most realistic!
If you're getting a lot of traffic, how can you determine which runs are valuable to add to a dataset? There are a few techniques you can use:
* **User feedback**: If possible - try to collect end user feedback. You can then see which datapoints got negative feedback. That is super valuable! These are spots where your application did not perform well. You should add these to your dataset to test against in the future.
* **Heuristics**: You can also use other heuristics to identify "interesting" datapoints. For example, runs that took a long time to complete could be interesting to look at and add to a dataset.
* **LLM feedback**: You can use another LLM to detect noteworthy runs. For example, you could use an LLM to label chatbot conversations where the user had to rephrase their question or correct the model in some way, indicating the chatbot did not initially respond correctly.
#### Synthetic data
Once you have a few examples, you can try to artificially generate some more. It's generally advised to have a few good hand-crafted examples before this, as this synthetic data will often resemble them in some way. This can be a useful way to get a lot of datapoints, quickly.
### Splits
When setting up your evaluation, you may want to partition your dataset into different splits. For example, you might use a smaller split for many rapid and cheap iterations and a larger split for your final evaluation. In addition, splits can be important for the interpretability of your experiments. For example, if you have a RAG application, you may want your dataset splits to focus on different types of questions (e.g., factual, opinion, etc) and to evaluate your application on each split separately.
Learn how to [create and manage dataset splits](/langsmith/manage-datasets-in-application#create-and-manage-dataset-splits).
### Versions
Datasets are [versioned](/langsmith/manage-datasets#version-a-dataset) such that every time you add, update, or delete examples in your dataset, a new version of the dataset is created. This makes it easy to inspect and revert changes to your dataset in case you make a mistake. You can also [tag versions](/langsmith/manage-datasets#tag-a-version) of your dataset to give them a more human-readable name. This can be useful for marking important milestones in your dataset's history.
You can run evaluations on specific versions of a dataset. This can be useful when running evaluations in CI, to make sure that a dataset update doesn't accidentally break your CI pipelines.
## Evaluators
Evaluators are functions that score how well your application performs on a particular example.
#### Evaluator inputs
Evaluators receive these inputs:
* [Example](/langsmith/evaluation-concepts#examples): The example(s) from your [Dataset](/langsmith/evaluation-concepts#datasets). Contains inputs, (reference) outputs, and metadata.
* [Run](/langsmith/observability-concepts#runs): The actual outputs and intermediate steps (child runs) from passing the example inputs to the application.
#### Evaluator outputs
An evaluator returns one or more metrics. These should be returned as a dictionary or list of dictionaries of the form:
* `key`: The name of the metric.
* `score` | `value`: The value of the metric. Use `score` if it's a numerical metric and `value` if it's categorical.
* `comment` (optional): The reasoning or additional string information justifying the score.
#### Defining evaluators
There are a number of ways to define and run evaluators:
* **Custom code**: Define [custom evaluators](/langsmith/code-evaluator) as Python or TypeScript functions and run them client-side using the SDKs or server-side via the UI.
* **Built-in evaluators**: LangSmith has a number of built-in evaluators that you can configure and run via the UI.
You can run evaluators using the LangSmith SDK ([Python](https://docs.smith.langchain.com/reference/python/reference) and [TypeScript](https://docs.smith.langchain.com/reference/js)), via the [Prompt Playground](/langsmith/observability-concepts#prompt-playground), or by configuring [Rules](/langsmith/rules) to automatically run them on particular tracing projects or datasets.
#### Evaluation techniques
There are a few high-level approaches to LLM evaluation:
### Human
Human evaluation is [often a great starting point for evaluation](https://hamel.dev/blog/posts/evals/#looking-at-your-traces). LangSmith makes it easy to review your LLM application outputs as well as the traces (all intermediate steps).
LangSmith's [annotation queues](/langsmith/evaluation-concepts#annotation-queues) make it easy to get human feedback on your application's outputs.
### Heuristic
Heuristic evaluators are deterministic, rule-based functions. These are good for simple checks like making sure that a chatbot's response isn't empty, that a snippet of generated code can be compiled, or that a classification is exactly correct.
### LLM-as-judge
LLM-as-judge evaluators use LLMs to score the application's output. To use them, you typically encode the grading rules / criteria in the LLM prompt. They can be reference-free (e.g., check if system output contains offensive content or adheres to specific criteria). Or, they can compare task output to a reference output (e.g., check if the output is factually accurate relative to the reference).
With LLM-as-judge evaluators, it is important to carefully review the resulting scores and tune the grader prompt if needed. Often it is helpful to write these as few-shot evaluators, where you provide examples of inputs, outputs, and expected grades as part of the grader prompt.
Learn about [how to define an LLM-as-a-judge evaluator](/langsmith/llm-as-judge).
### Pairwise
Pairwise evaluators allow you to compare the outputs of two versions of an application. This can use either a heuristic ("which response is longer"), an LLM (with a specific pairwise prompt), or human (asking them to manually annotate examples).
**When should you use pairwise evaluation?**
Pairwise evaluation is helpful when it is difficult to directly score an LLM output, but easier to compare two outputs. This can be the case for tasks like summarization - it may be hard to give a summary an absolute score, but easy to choose which of two summaries is more informative.
Learn [how run pairwise evaluations](/langsmith/evaluate-pairwise).
## Experiment
Each time we evaluate an application on a dataset, we are conducting an experiment. An experiment contains the results of running a specific version of your application on the dataset. To understand how to use the LangSmith experiment view, see [how to analyze experiment results](/langsmith/analyze-an-experiment).
 Typically, we will run multiple experiments on a given dataset, testing different configurations of our application (e.g., different prompts or LLMs). In LangSmith, you can easily view all the experiments associated with your dataset. Additionally, you can [compare multiple experiments in a comparison view](/langsmith/compare-experiment-results).
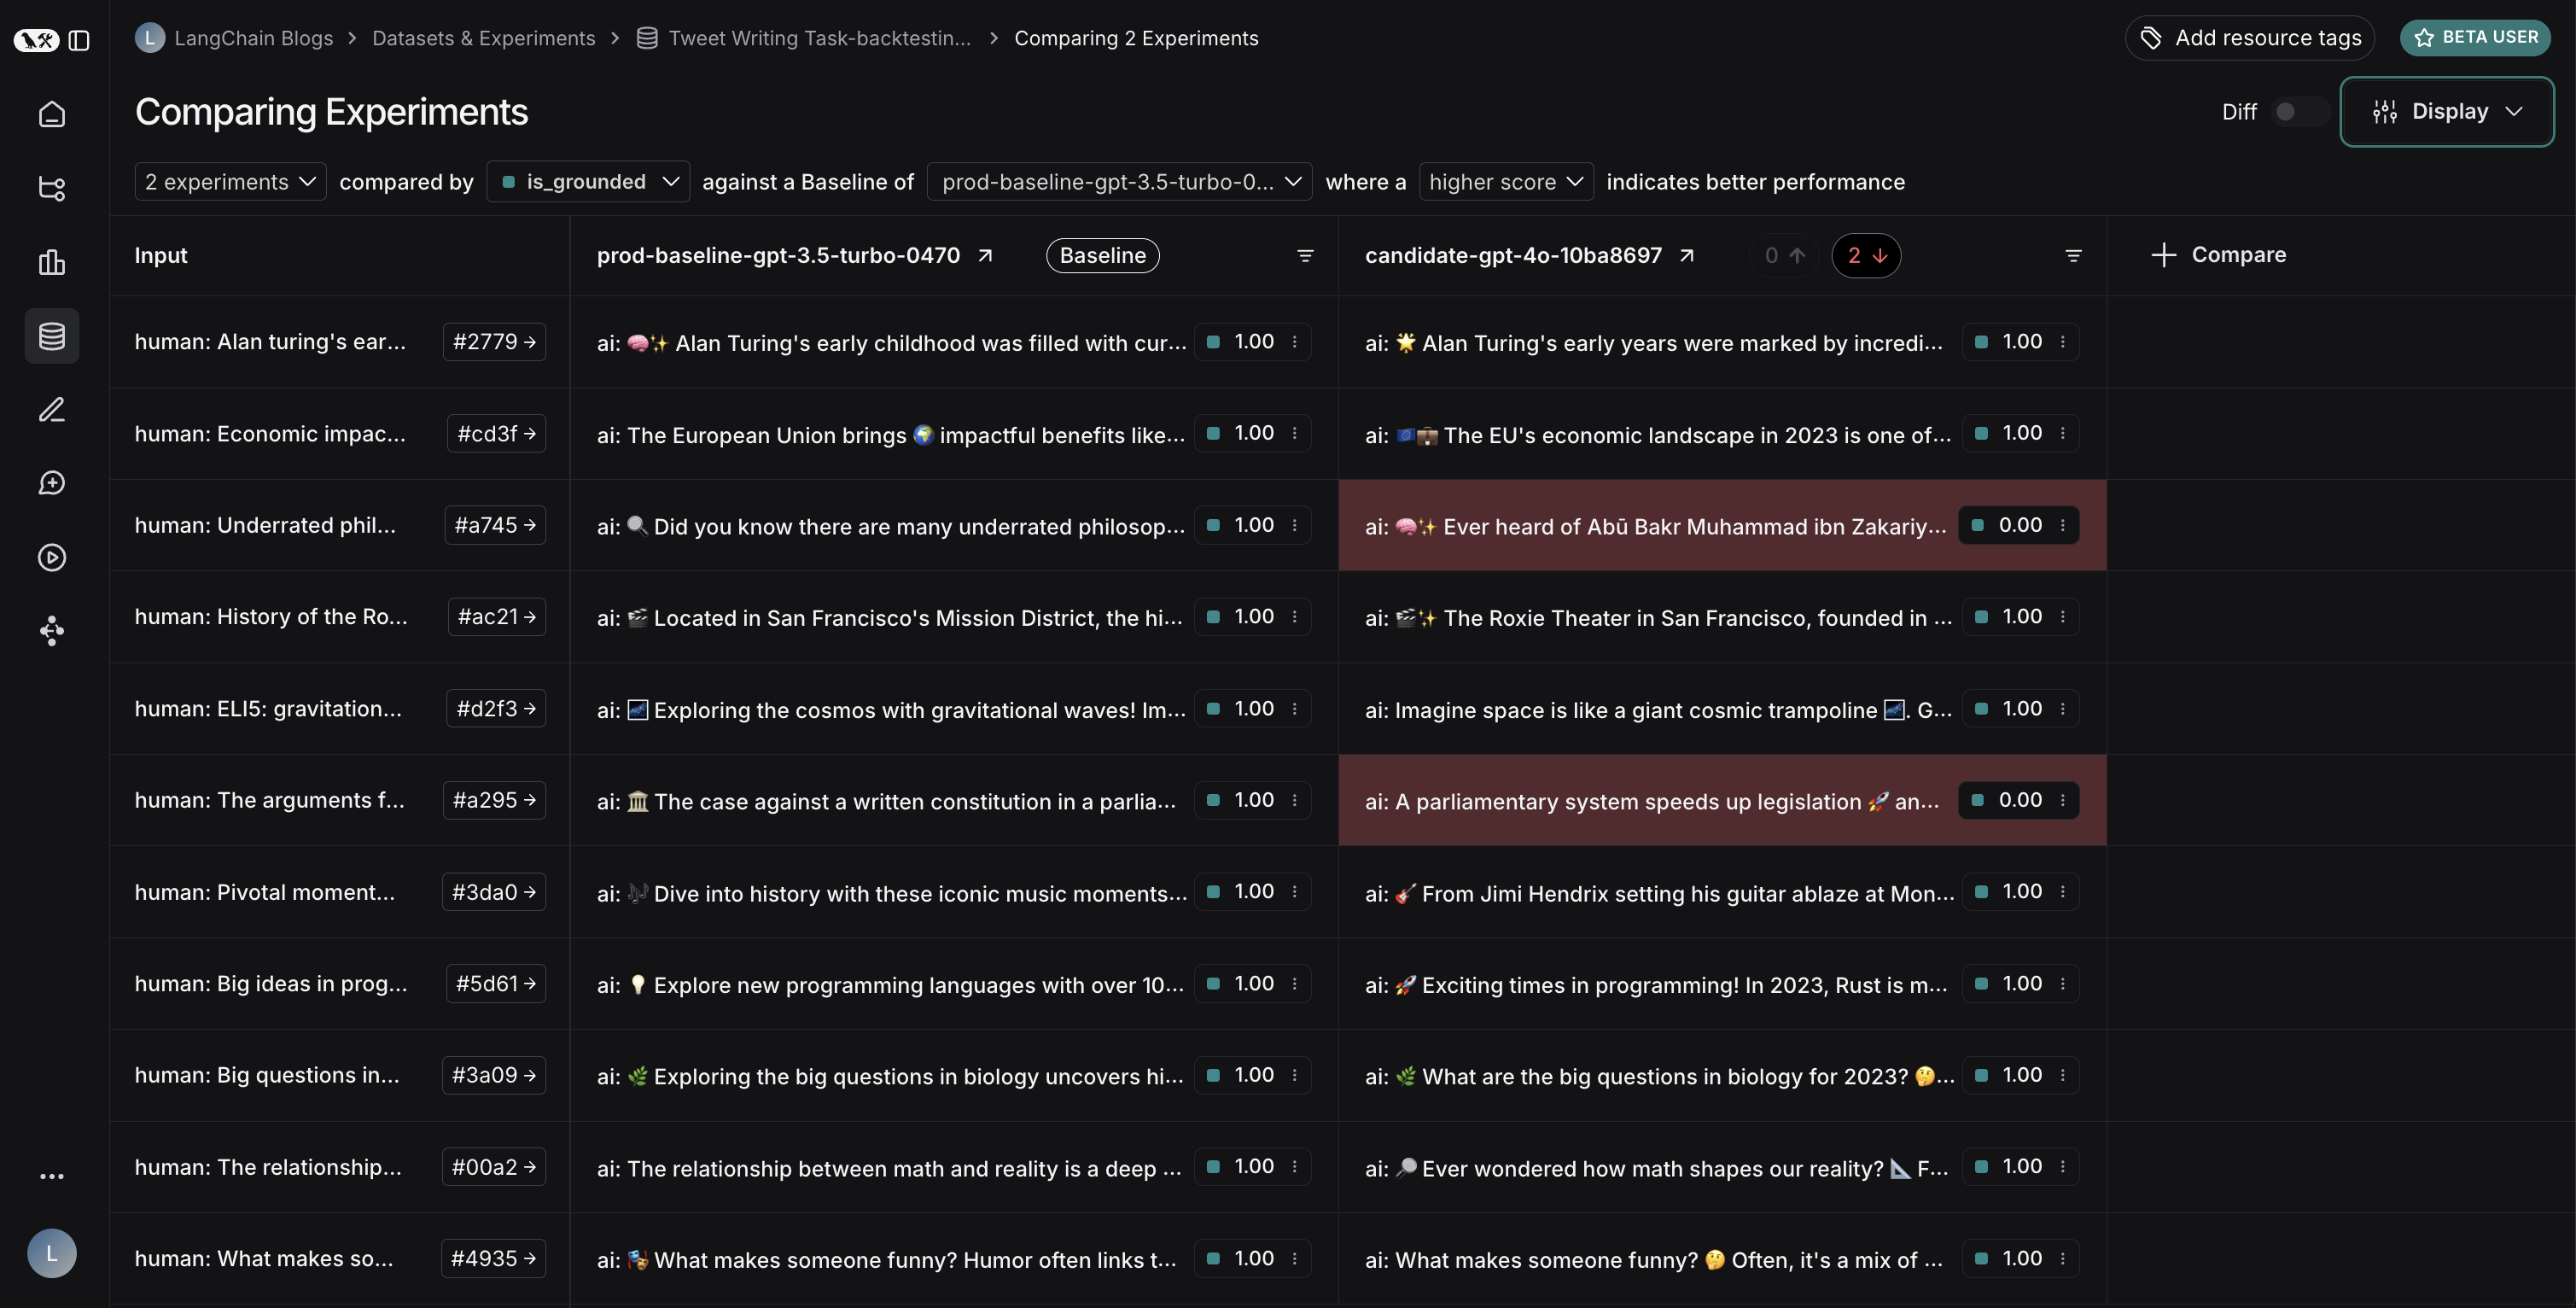 ## Experiment configuration
LangSmith supports a number of experiment configurations which make it easier to run your evals in the manner you want.
### Repetitions
Running an experiment multiple times can be helpful since LLM outputs are not deterministic and can differ from one repetition to the next. By running multiple repetitions, you can get a more accurate estimate of the performance of your system.
Repetitions can be configured by passing the `num_repetitions` argument to `evaluate` / `aevaluate` ([Python](https://docs.smith.langchain.com/reference/python/evaluation/langsmith.evaluation._runner.evaluate), [TypeScript](https://docs.smith.langchain.com/reference/js/interfaces/evaluation.EvaluateOptions#numrepetitions)). Repeating the experiment involves both re-running the target function to generate outputs and re-running the evaluators.
To learn more about running repetitions on experiments, read the [how-to-guide](/langsmith/repetition).
### Concurrency
By passing the `max_concurrency` argument to `evaluate` / `aevaluate`, you can specify the concurrency of your experiment. The `max_concurrency` argument has slightly different semantics depending on whether you are using `evaluate` or `aevaluate`.
#### `evaluate`
The `max_concurrency` argument to `evaluate` specifies the maximum number of concurrent threads to use when running the experiment. This is both for when running your target function as well as your evaluators.
#### `aevaluate`
The `max_concurrency` argument to `aevaluate` is fairly similar to `evaluate`, but instead uses a semaphore to limit the number of concurrent tasks that can run at once. `aevaluate` works by creating a task for each example in the dataset. Each task consists of running the target function as well as all of the evaluators on that specific example. The `max_concurrency` argument specifies the maximum number of concurrent tasks, or put another way - examples, to run at once.
### Caching
Lastly, you can also cache the API calls made in your experiment by setting the `LANGSMITH_TEST_CACHE` to a valid folder on your device with write access. This will cause the API calls made in your experiment to be cached to disk, meaning future experiments that make the same API calls will be greatly sped up.
## Annotation queues
Human feedback is often the most valuable feedback you can gather on your application. With [annotation queues](/langsmith/annotation-queues) you can flag runs of your application for annotation. Human annotators then have a streamlined view to review and provide feedback on the runs in a queue. Often (some subset of) these annotated runs are then transferred to a [dataset](/langsmith/evaluation-concepts#datasets) for future evaluations. While you can always [annotate runs inline](/langsmith/annotate-traces-inline), annotation queues provide another option to group runs together, specify annotation criteria, and configure permissions.
Learn more about [annotation queues and human feedback](/langsmith/annotation-queues).
## Offline evaluation
Evaluating an application on a dataset is what we call "offline" evaluation. It is offline because we're evaluating on a pre-compiled set of data. An online evaluation, on the other hand, is one in which we evaluate a deployed application's outputs on real traffic, in near realtime. Offline evaluations are used for testing a version(s) of your application pre-deployment.
You can run offline evaluations client-side using the LangSmith SDK ([Python](https://docs.smith.langchain.com/reference/python/reference) and [TypeScript](https://docs.smith.langchain.com/reference/js)). You can run them server-side via the [Prompt Playground](/langsmith/observability-concepts#prompt-playground) or by configuring [automations](/langsmith/rules) to run certain evaluators on every new experiment against a specific dataset.
## Experiment configuration
LangSmith supports a number of experiment configurations which make it easier to run your evals in the manner you want.
### Repetitions
Running an experiment multiple times can be helpful since LLM outputs are not deterministic and can differ from one repetition to the next. By running multiple repetitions, you can get a more accurate estimate of the performance of your system.
Repetitions can be configured by passing the `num_repetitions` argument to `evaluate` / `aevaluate` ([Python](https://docs.smith.langchain.com/reference/python/evaluation/langsmith.evaluation._runner.evaluate), [TypeScript](https://docs.smith.langchain.com/reference/js/interfaces/evaluation.EvaluateOptions#numrepetitions)). Repeating the experiment involves both re-running the target function to generate outputs and re-running the evaluators.
To learn more about running repetitions on experiments, read the [how-to-guide](/langsmith/repetition).
### Concurrency
By passing the `max_concurrency` argument to `evaluate` / `aevaluate`, you can specify the concurrency of your experiment. The `max_concurrency` argument has slightly different semantics depending on whether you are using `evaluate` or `aevaluate`.
#### `evaluate`
The `max_concurrency` argument to `evaluate` specifies the maximum number of concurrent threads to use when running the experiment. This is both for when running your target function as well as your evaluators.
#### `aevaluate`
The `max_concurrency` argument to `aevaluate` is fairly similar to `evaluate`, but instead uses a semaphore to limit the number of concurrent tasks that can run at once. `aevaluate` works by creating a task for each example in the dataset. Each task consists of running the target function as well as all of the evaluators on that specific example. The `max_concurrency` argument specifies the maximum number of concurrent tasks, or put another way - examples, to run at once.
### Caching
Lastly, you can also cache the API calls made in your experiment by setting the `LANGSMITH_TEST_CACHE` to a valid folder on your device with write access. This will cause the API calls made in your experiment to be cached to disk, meaning future experiments that make the same API calls will be greatly sped up.
## Annotation queues
Human feedback is often the most valuable feedback you can gather on your application. With [annotation queues](/langsmith/annotation-queues) you can flag runs of your application for annotation. Human annotators then have a streamlined view to review and provide feedback on the runs in a queue. Often (some subset of) these annotated runs are then transferred to a [dataset](/langsmith/evaluation-concepts#datasets) for future evaluations. While you can always [annotate runs inline](/langsmith/annotate-traces-inline), annotation queues provide another option to group runs together, specify annotation criteria, and configure permissions.
Learn more about [annotation queues and human feedback](/langsmith/annotation-queues).
## Offline evaluation
Evaluating an application on a dataset is what we call "offline" evaluation. It is offline because we're evaluating on a pre-compiled set of data. An online evaluation, on the other hand, is one in which we evaluate a deployed application's outputs on real traffic, in near realtime. Offline evaluations are used for testing a version(s) of your application pre-deployment.
You can run offline evaluations client-side using the LangSmith SDK ([Python](https://docs.smith.langchain.com/reference/python/reference) and [TypeScript](https://docs.smith.langchain.com/reference/js)). You can run them server-side via the [Prompt Playground](/langsmith/observability-concepts#prompt-playground) or by configuring [automations](/langsmith/rules) to run certain evaluators on every new experiment against a specific dataset.
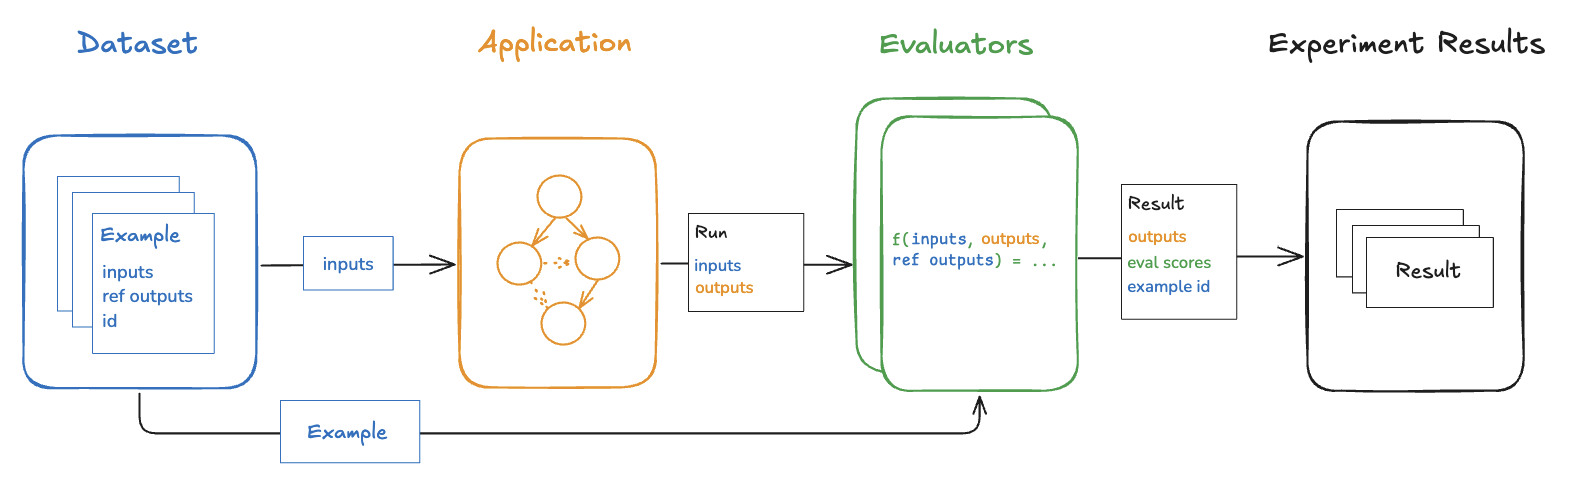 ### Benchmarking
Perhaps the most common type of offline evaluation is one in which we curate a dataset of representative inputs, define the key performance metrics, and benchmark multiple versions of our application to find the best one. Benchmarking can be laborious because for many use cases you have to curate a dataset with gold-standard reference outputs and design good metrics for comparing experimental outputs to them. For a RAG Q\&A bot this might look like a dataset of questions and reference answers, and an LLM-as-judge evaluator that determines if the actual answer is semantically equivalent to the reference answer. For a ReACT agent this might look like a dataset of user requests and a reference set of all the tool calls the model is supposed to make, and a heuristic evaluator that checks if all of the reference tool calls were made.
### Unit tests
Unit tests are used in software development to verify the correctness of individual system components. [Unit tests in the context of LLMs are often rule-based assertions](https://hamel.dev/blog/posts/evals/#level-1-unit-tests) on LLM inputs or outputs (e.g., checking that LLM-generated code can be compiled, JSON can be loaded, etc.) that validate basic functionality.
Unit tests are often written with the expectation that they should always pass. These types of tests are nice to run as part of CI. Note that when doing so it is useful to set up a cache to minimize LLM calls (because those can quickly rack up!).
### Regression tests
Regression tests are used to measure performance across versions of your application over time. They are used to, at the very least, ensure that a new app version does not regress on examples that your current version correctly handles, and ideally to measure how much better your new version is relative to the current. Often these are triggered when you are making app updates (e.g. updating models or architectures) that are expected to influence the user experience.
LangSmith's comparison view has native support for regression testing, allowing you to quickly see examples that have changed relative to the baseline. Regressions are highlighted red, improvements green.
### Backtesting
Backtesting is an approach that combines dataset creation (discussed above) with evaluation. If you have a collection of production logs, you can turn them into a dataset. Then, you can re-run those production examples with newer application versions. This allows you to assess performance on past and realistic user inputs.
This is commonly used to evaluate new model versions. Anthropic dropped a new model? No problem! Grab the 1000 most recent runs through your application and pass them through the new model. Then compare those results to what actually happened in production.
### Pairwise evaluation
For some tasks [it is easier](https://www.oreilly.com/radar/what-we-learned-from-a-year-of-building-with-llms-part-i/) for a human or LLM grader to determine if "version A is better than B" than to assign an absolute score to either A or B. Pairwise evaluations are just this — a scoring of the outputs of two versions against each other as opposed to against some reference output or absolute criteria. Pairwise evaluations are often useful when using LLM-as-judge evaluators on more general tasks. For example, if you have a summarizer application, it may be easier for an LLM-as-judge to determine "Which of these two summaries is more clear and concise?" than to give an absolute score like "Give this summary a score of 1-10 in terms of clarity and concision."
Learn [how run pairwise evaluations](/langsmith/evaluate-pairwise).
## Online evaluation
Evaluating a deployed application's outputs in (roughly) realtime is what we call "online" evaluation. In this case there is no dataset involved and no possibility of reference outputs — we're running evaluators on real inputs and real outputs as they're produced. This is useful for monitoring your application and flagging unintended behavior. Online evaluation can also work hand-in-hand with offline evaluation: for example, an online evaluator can be used to classify input questions into a set of categories that can later be used to curate a dataset for offline evaluation.
Online evaluators are generally intended to be run server-side. LangSmith has built-in [LLM-as-judge evaluators](/langsmith/llm-as-judge) that you can configure, or you can define custom code evaluators that are also run within LangSmith.
### Benchmarking
Perhaps the most common type of offline evaluation is one in which we curate a dataset of representative inputs, define the key performance metrics, and benchmark multiple versions of our application to find the best one. Benchmarking can be laborious because for many use cases you have to curate a dataset with gold-standard reference outputs and design good metrics for comparing experimental outputs to them. For a RAG Q\&A bot this might look like a dataset of questions and reference answers, and an LLM-as-judge evaluator that determines if the actual answer is semantically equivalent to the reference answer. For a ReACT agent this might look like a dataset of user requests and a reference set of all the tool calls the model is supposed to make, and a heuristic evaluator that checks if all of the reference tool calls were made.
### Unit tests
Unit tests are used in software development to verify the correctness of individual system components. [Unit tests in the context of LLMs are often rule-based assertions](https://hamel.dev/blog/posts/evals/#level-1-unit-tests) on LLM inputs or outputs (e.g., checking that LLM-generated code can be compiled, JSON can be loaded, etc.) that validate basic functionality.
Unit tests are often written with the expectation that they should always pass. These types of tests are nice to run as part of CI. Note that when doing so it is useful to set up a cache to minimize LLM calls (because those can quickly rack up!).
### Regression tests
Regression tests are used to measure performance across versions of your application over time. They are used to, at the very least, ensure that a new app version does not regress on examples that your current version correctly handles, and ideally to measure how much better your new version is relative to the current. Often these are triggered when you are making app updates (e.g. updating models or architectures) that are expected to influence the user experience.
LangSmith's comparison view has native support for regression testing, allowing you to quickly see examples that have changed relative to the baseline. Regressions are highlighted red, improvements green.
### Backtesting
Backtesting is an approach that combines dataset creation (discussed above) with evaluation. If you have a collection of production logs, you can turn them into a dataset. Then, you can re-run those production examples with newer application versions. This allows you to assess performance on past and realistic user inputs.
This is commonly used to evaluate new model versions. Anthropic dropped a new model? No problem! Grab the 1000 most recent runs through your application and pass them through the new model. Then compare those results to what actually happened in production.
### Pairwise evaluation
For some tasks [it is easier](https://www.oreilly.com/radar/what-we-learned-from-a-year-of-building-with-llms-part-i/) for a human or LLM grader to determine if "version A is better than B" than to assign an absolute score to either A or B. Pairwise evaluations are just this — a scoring of the outputs of two versions against each other as opposed to against some reference output or absolute criteria. Pairwise evaluations are often useful when using LLM-as-judge evaluators on more general tasks. For example, if you have a summarizer application, it may be easier for an LLM-as-judge to determine "Which of these two summaries is more clear and concise?" than to give an absolute score like "Give this summary a score of 1-10 in terms of clarity and concision."
Learn [how run pairwise evaluations](/langsmith/evaluate-pairwise).
## Online evaluation
Evaluating a deployed application's outputs in (roughly) realtime is what we call "online" evaluation. In this case there is no dataset involved and no possibility of reference outputs — we're running evaluators on real inputs and real outputs as they're produced. This is useful for monitoring your application and flagging unintended behavior. Online evaluation can also work hand-in-hand with offline evaluation: for example, an online evaluator can be used to classify input questions into a set of categories that can later be used to curate a dataset for offline evaluation.
Online evaluators are generally intended to be run server-side. LangSmith has built-in [LLM-as-judge evaluators](/langsmith/llm-as-judge) that you can configure, or you can define custom code evaluators that are also run within LangSmith.
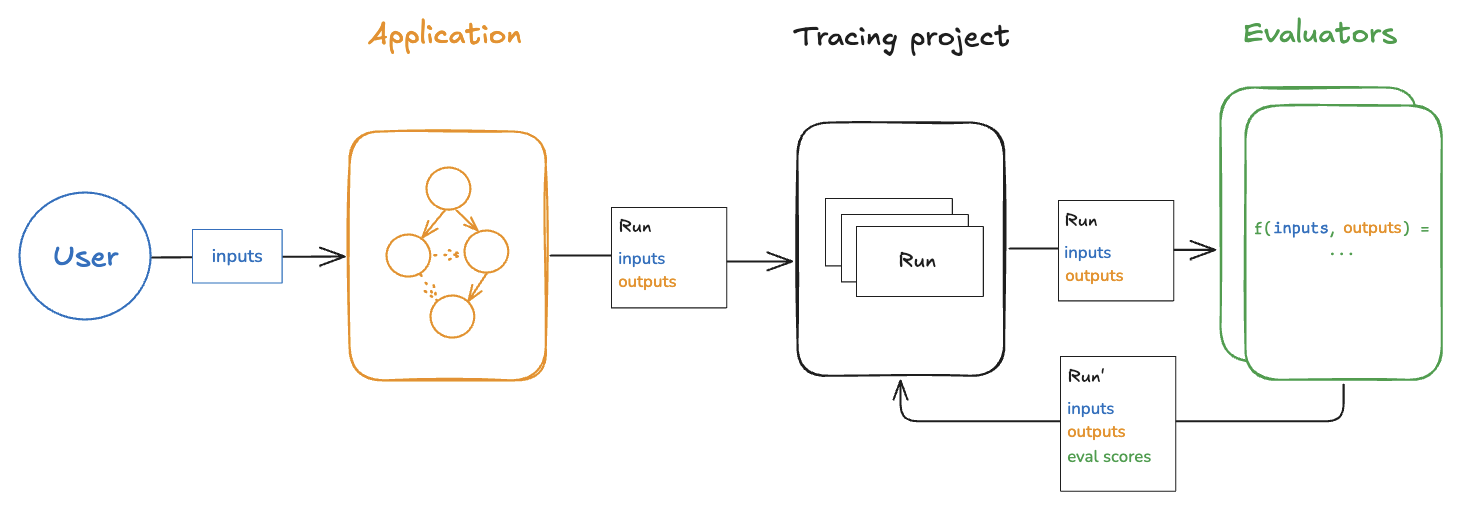 ## Testing
### Evaluations vs testing
Testing and evaluation are very similar and overlapping concepts that often get confused.
**An evaluation measures performance according to a metric(s).** Evaluation metrics can be fuzzy or subjective, and are more useful in relative terms than absolute ones. That is, they're often used to compare two systems against each other rather than to assert something about an individual system.
**Testing asserts correctness.** A system can only be deployed if it passes all tests.
Evaluation metrics can be *turned into* tests. For example, you can write regression tests to assert that any new version of a system must outperform some baseline version of the system on the relevant evaluation metrics.
It can also be more resource efficient to run tests and evaluations together if your system is expensive to run and you have overlapping datasets for your tests and evaluations.
You can also choose to write evaluations using standard software testing tools like `pytest` or `vitest/jest` out of convenience.
### Using `pytest` and `Vitest/Jest`
The LangSmith SDKs come with integrations for [pytest](/langsmith/pytest) and [`Vitest/Jest`](/langsmith/vitest-jest). These make it easy to:
* Track test results in LangSmith
* Write evaluations as tests
Tracking test results in LangSmith makes it easy to share results, compare systems, and debug failing tests.
Writing evaluations as tests can be useful when each example you want to evaluate on requires custom logic for running the application and/or evaluators. The standard evaluation flows assume that you can run your application and evaluators in the same way on every example in a dataset. But for more complex systems or comprehensive evals, you may want to evaluate specific subsets of your system with specific types of inputs and metrics. These types of heterogenous evals are much easier to write as a suite of distinct test cases that all get tracked together rather than using the standard evaluate flow.
Using testing tools is also helpful when you want to *both* evaluate your system's outputs *and* assert some basic things about them.
***
## Testing
### Evaluations vs testing
Testing and evaluation are very similar and overlapping concepts that often get confused.
**An evaluation measures performance according to a metric(s).** Evaluation metrics can be fuzzy or subjective, and are more useful in relative terms than absolute ones. That is, they're often used to compare two systems against each other rather than to assert something about an individual system.
**Testing asserts correctness.** A system can only be deployed if it passes all tests.
Evaluation metrics can be *turned into* tests. For example, you can write regression tests to assert that any new version of a system must outperform some baseline version of the system on the relevant evaluation metrics.
It can also be more resource efficient to run tests and evaluations together if your system is expensive to run and you have overlapping datasets for your tests and evaluations.
You can also choose to write evaluations using standard software testing tools like `pytest` or `vitest/jest` out of convenience.
### Using `pytest` and `Vitest/Jest`
The LangSmith SDKs come with integrations for [pytest](/langsmith/pytest) and [`Vitest/Jest`](/langsmith/vitest-jest). These make it easy to:
* Track test results in LangSmith
* Write evaluations as tests
Tracking test results in LangSmith makes it easy to share results, compare systems, and debug failing tests.
Writing evaluations as tests can be useful when each example you want to evaluate on requires custom logic for running the application and/or evaluators. The standard evaluation flows assume that you can run your application and evaluators in the same way on every example in a dataset. But for more complex systems or comprehensive evals, you may want to evaluate specific subsets of your system with specific types of inputs and metrics. These types of heterogenous evals are much easier to write as a suite of distinct test cases that all get tracked together rather than using the standard evaluate flow.
Using testing tools is also helpful when you want to *both* evaluate your system's outputs *and* assert some basic things about them.
***
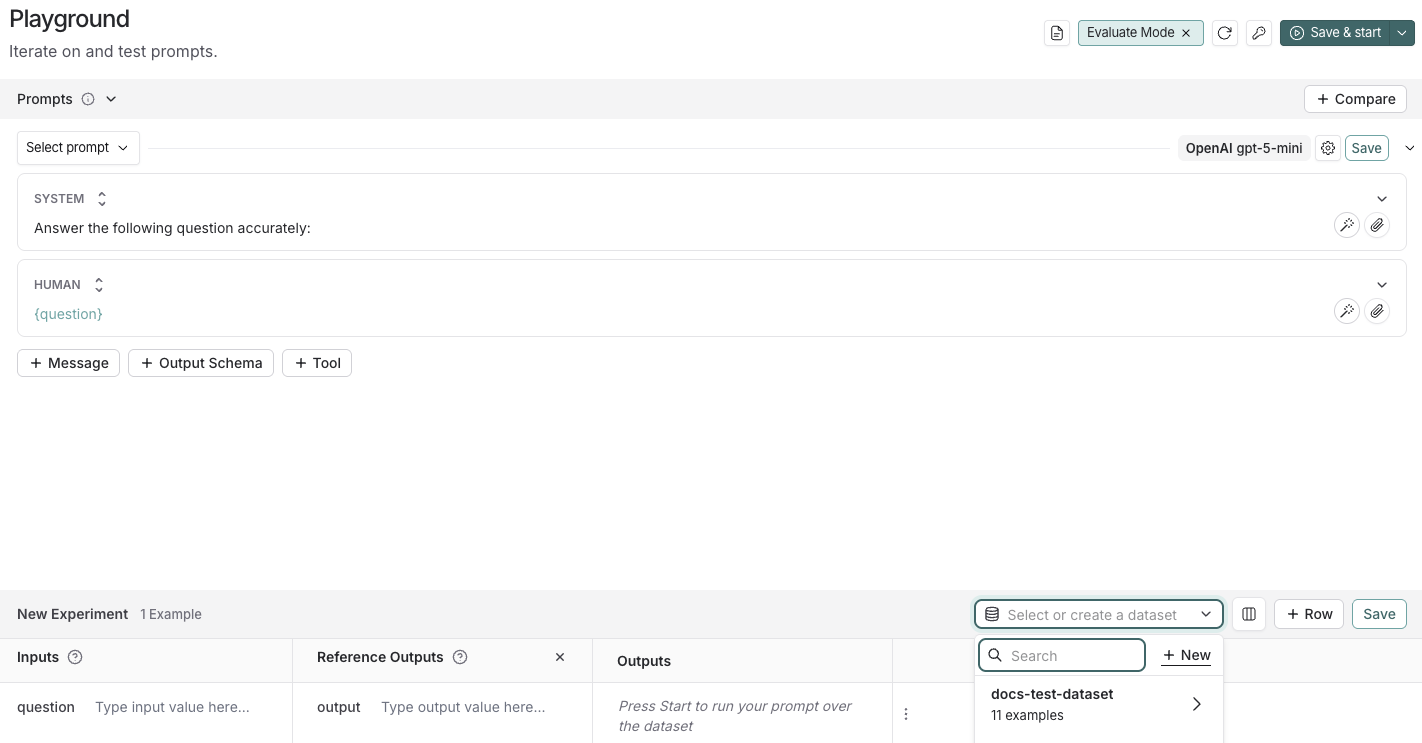

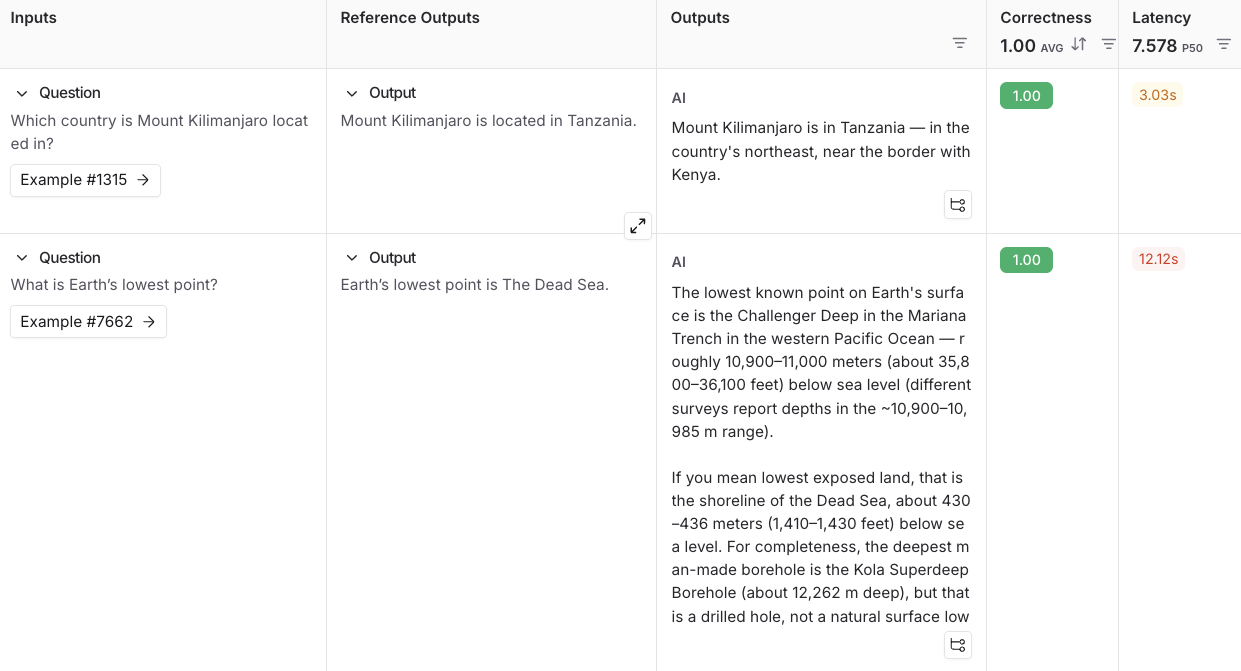
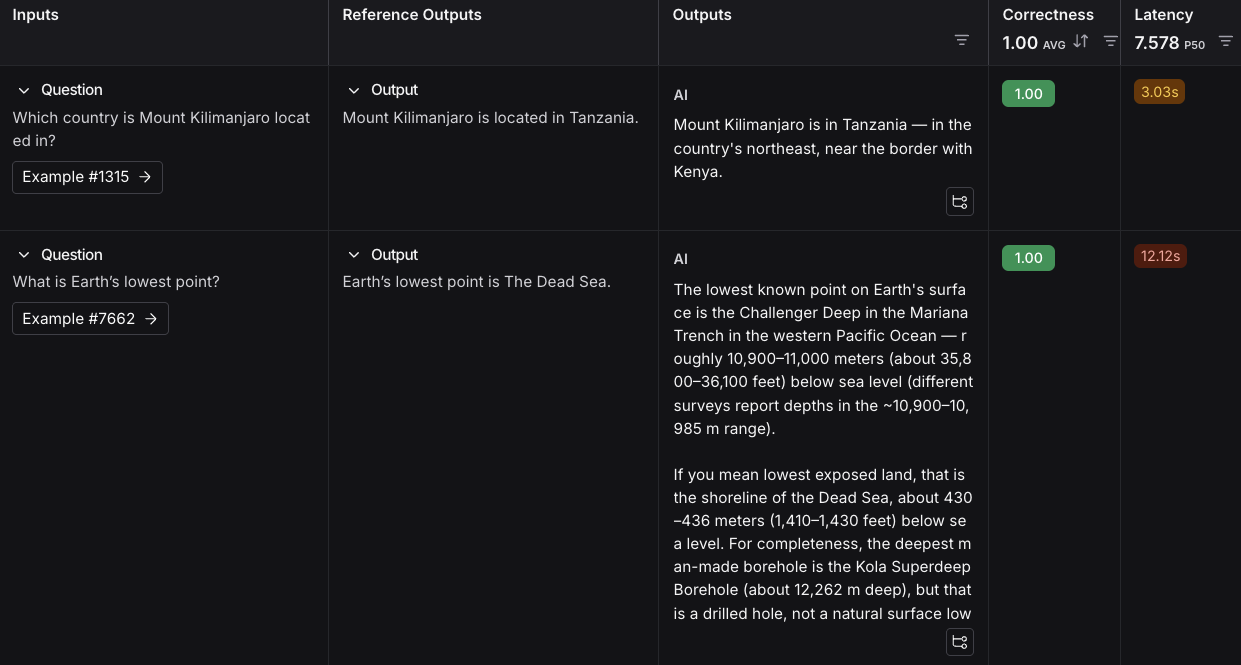
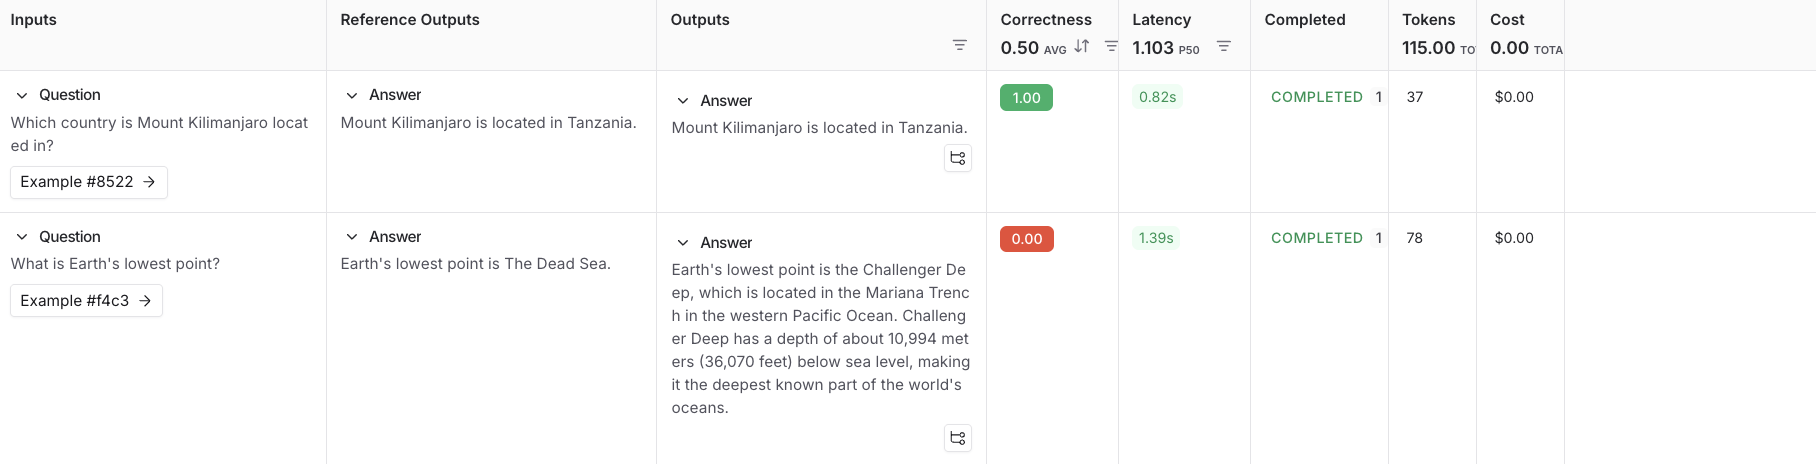
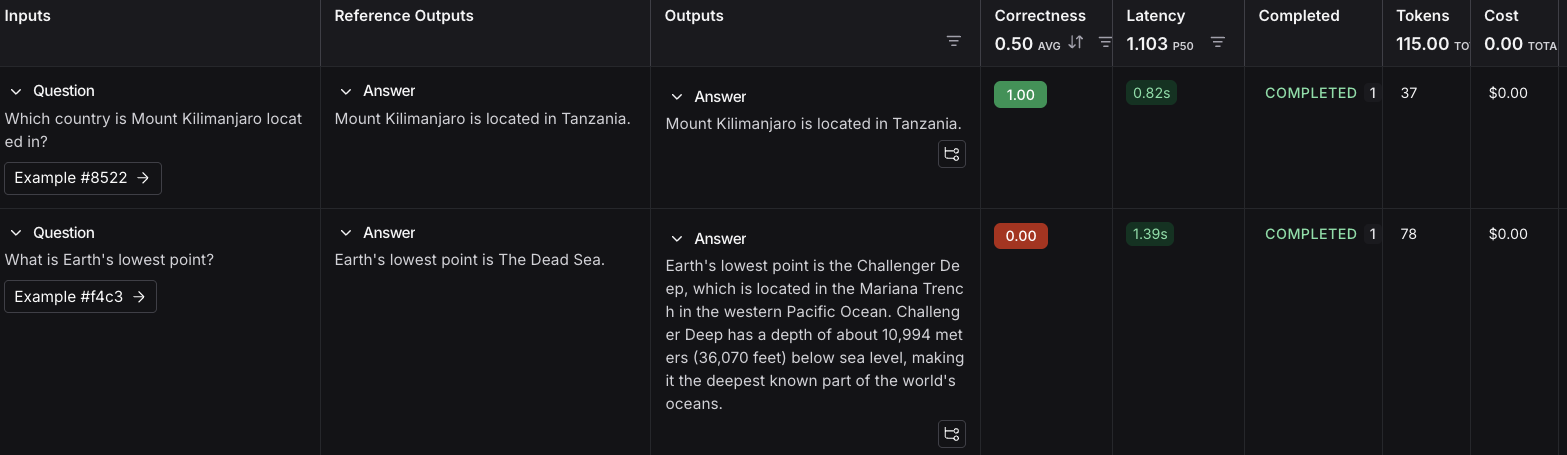
 If we, say, have a preference for openai models, we can easily filter down and see scores within just openai models first:
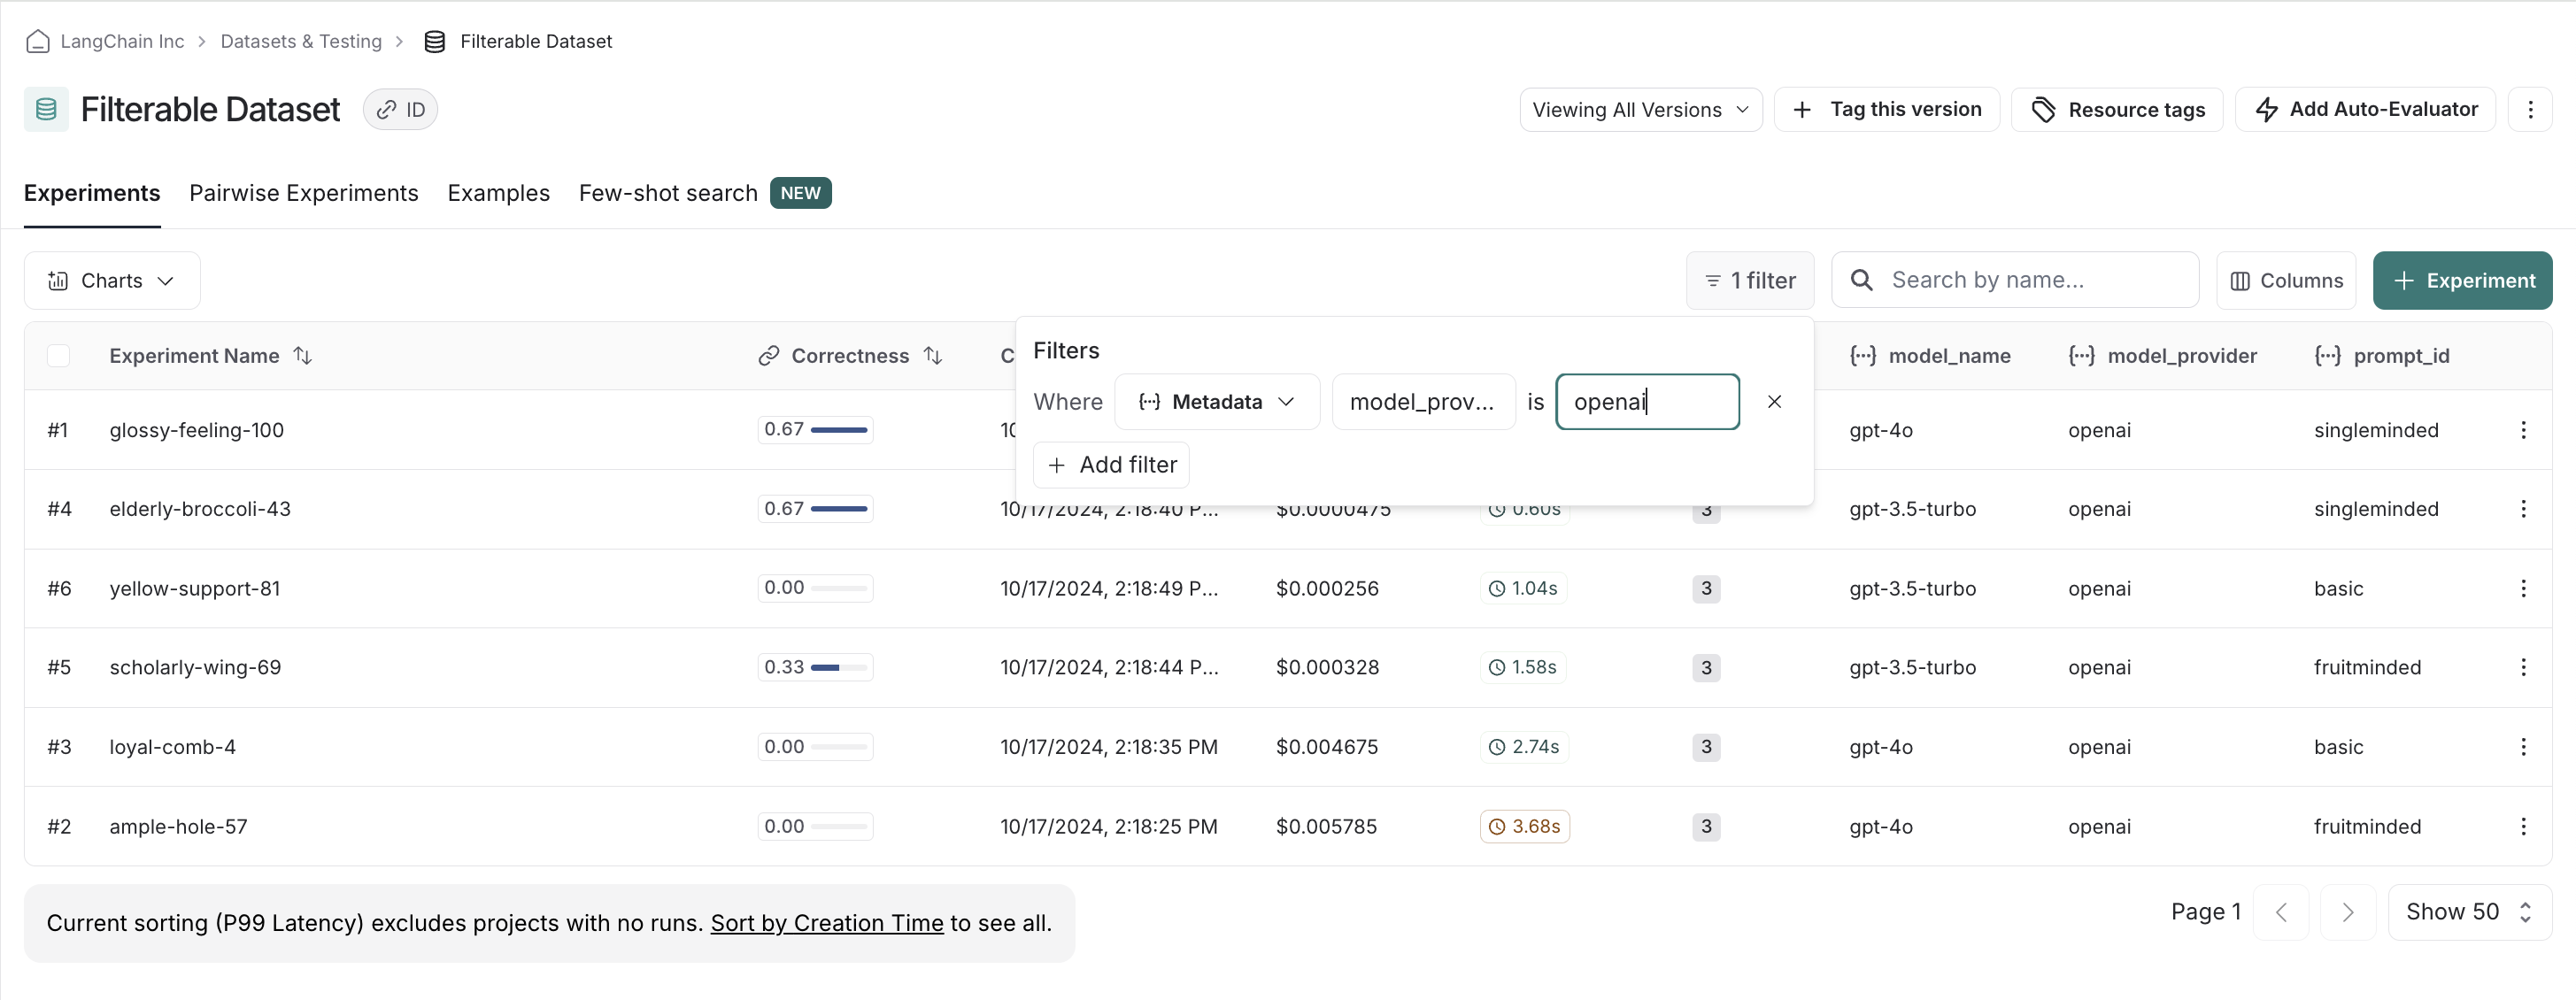 We can stack filters, allowing us to filter out low scores on correctness to make sure we only compare relevant experiments:
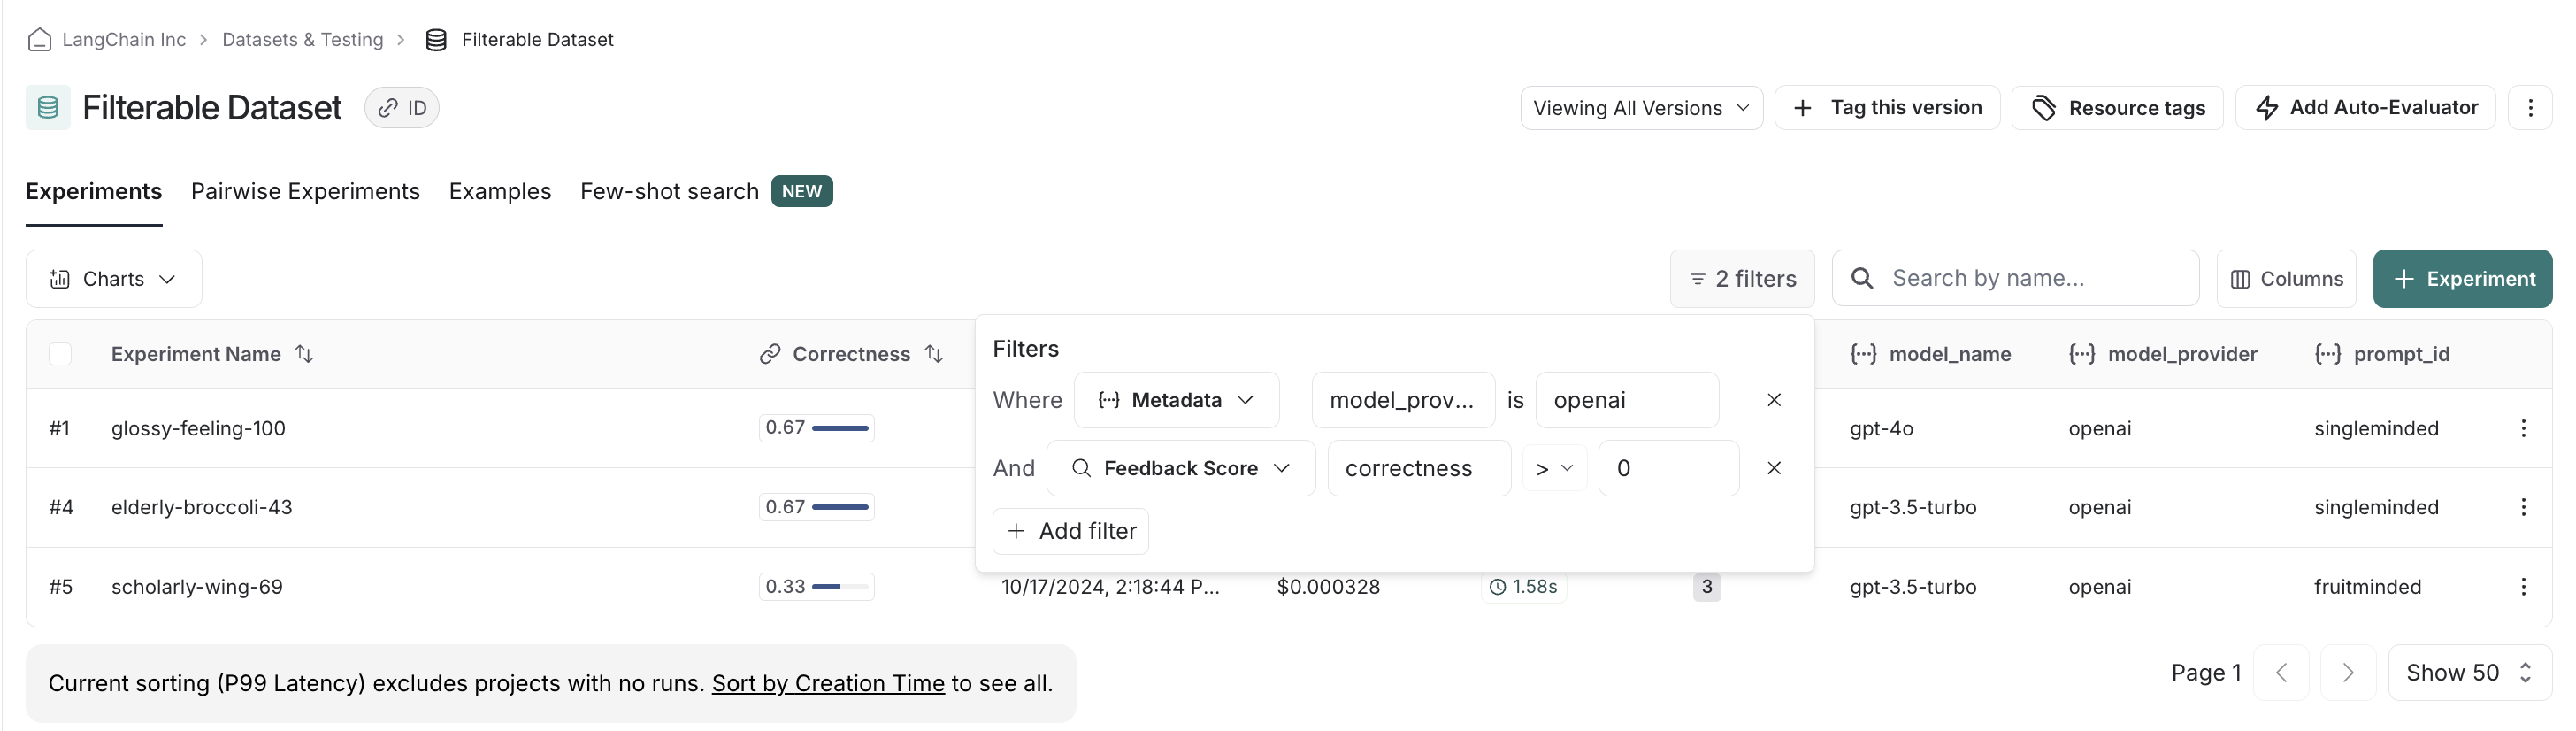 Finally, we can clear and reset filters. For example, if we see there is clear there's a winner with the `singleminded` prompt, we can change filtering settings to see if any other model providers' models work as well with it:
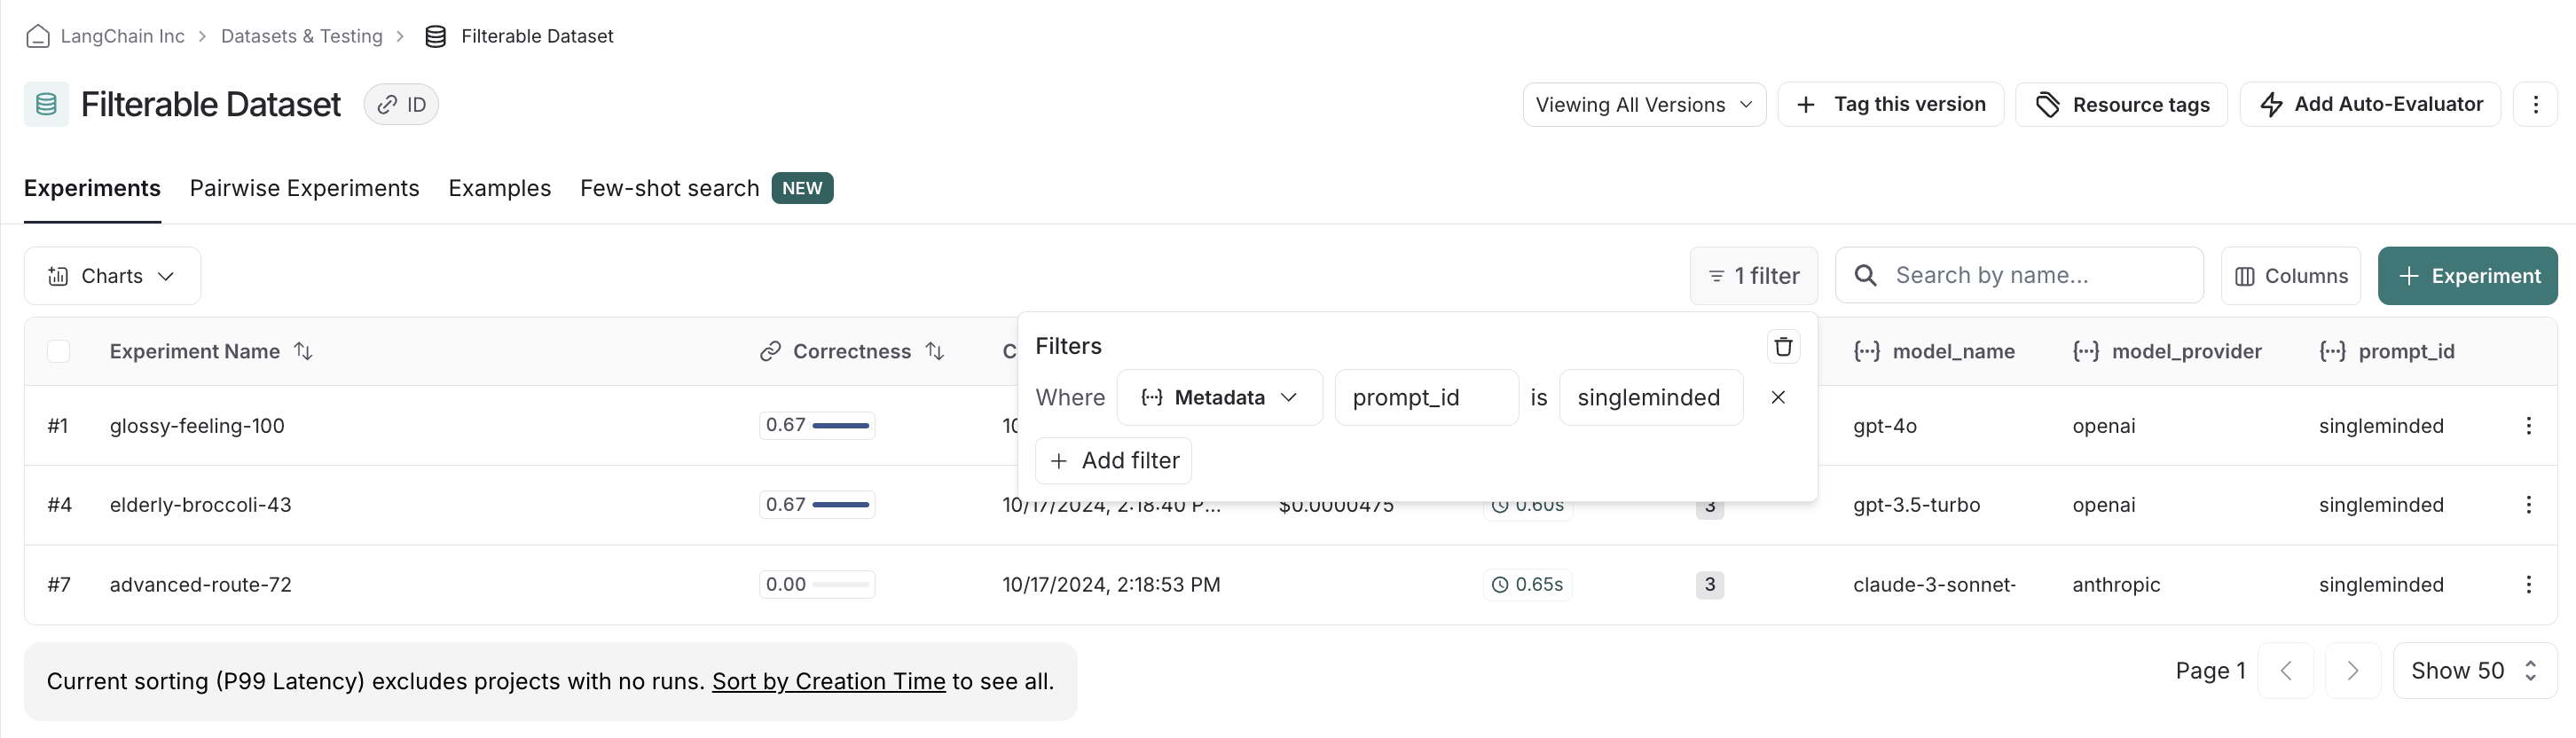 ***
***
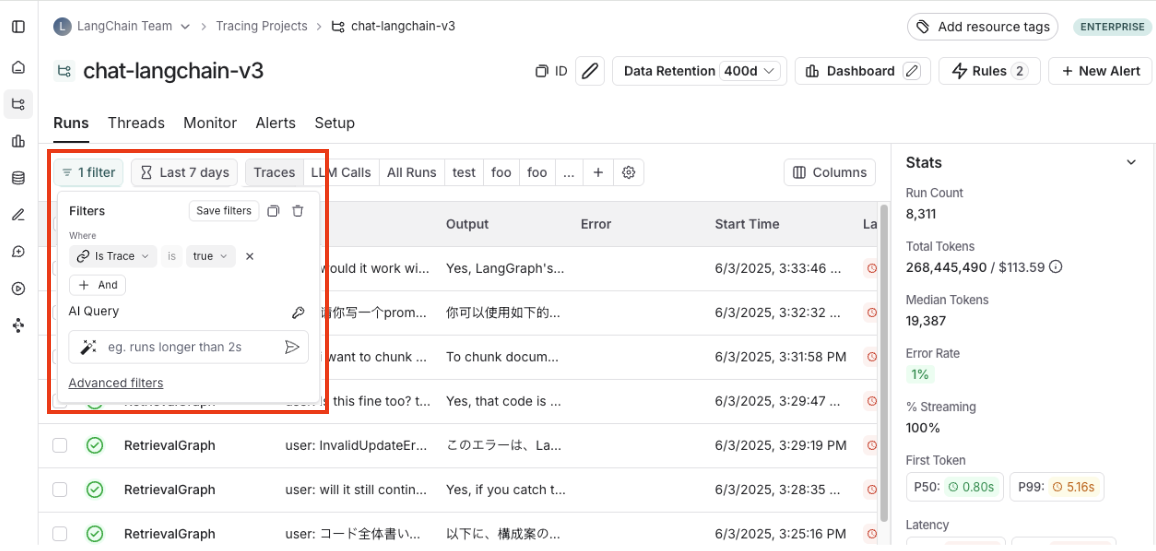 2. **Filter Shortcuts**: Positioned on the right sidebar of the tracing projects page. The filter shortcuts bar provides quick access to filters based on the most frequently occurring attributes in your project's runs.
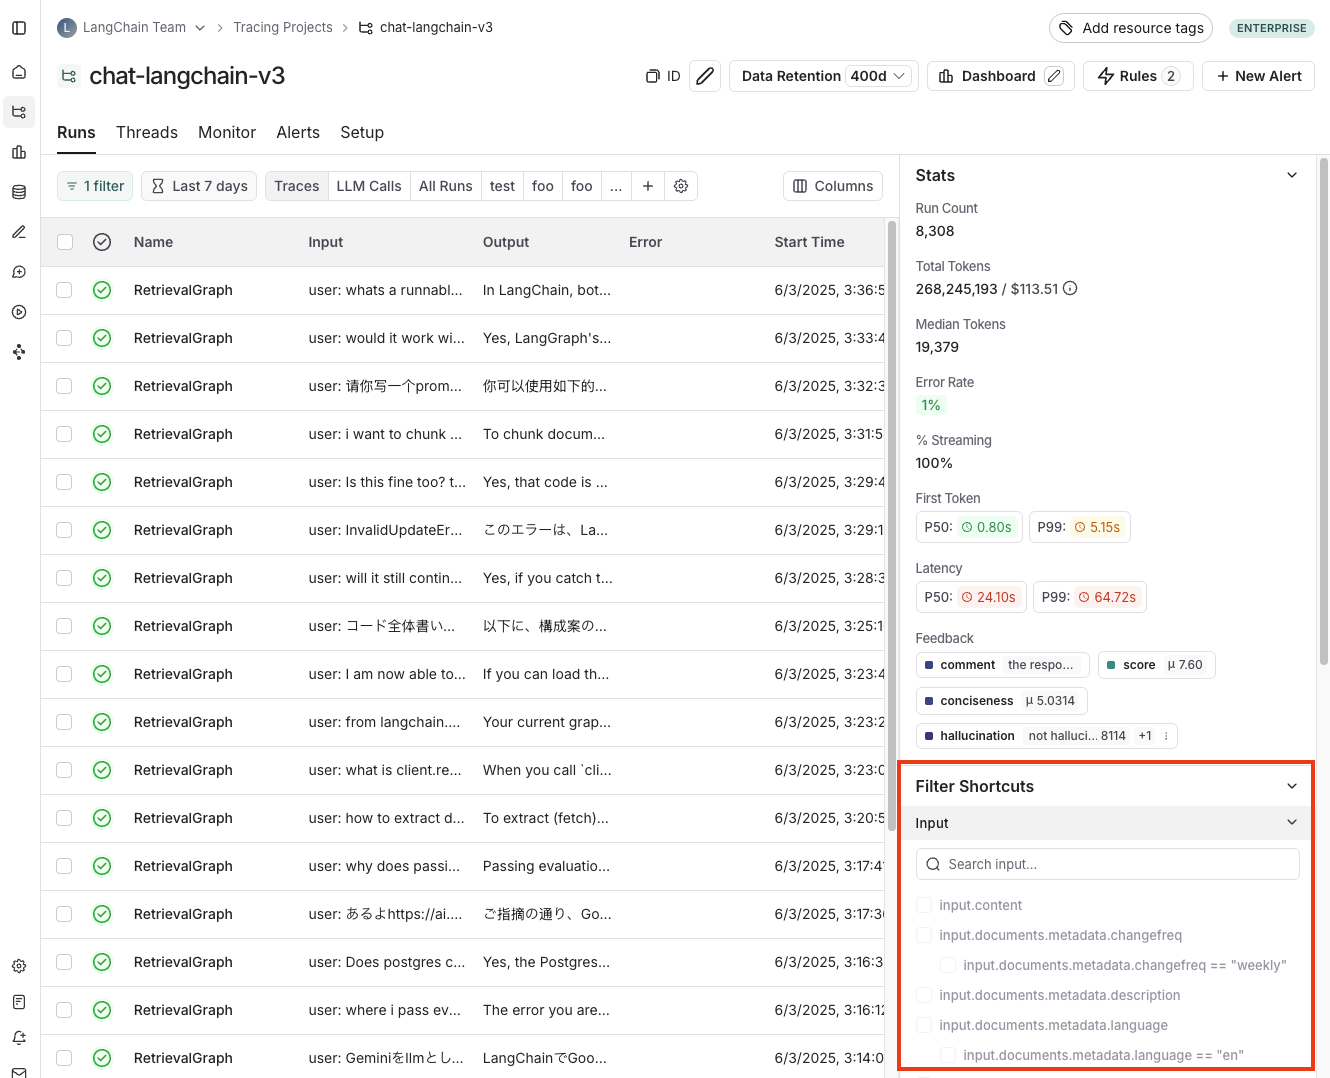
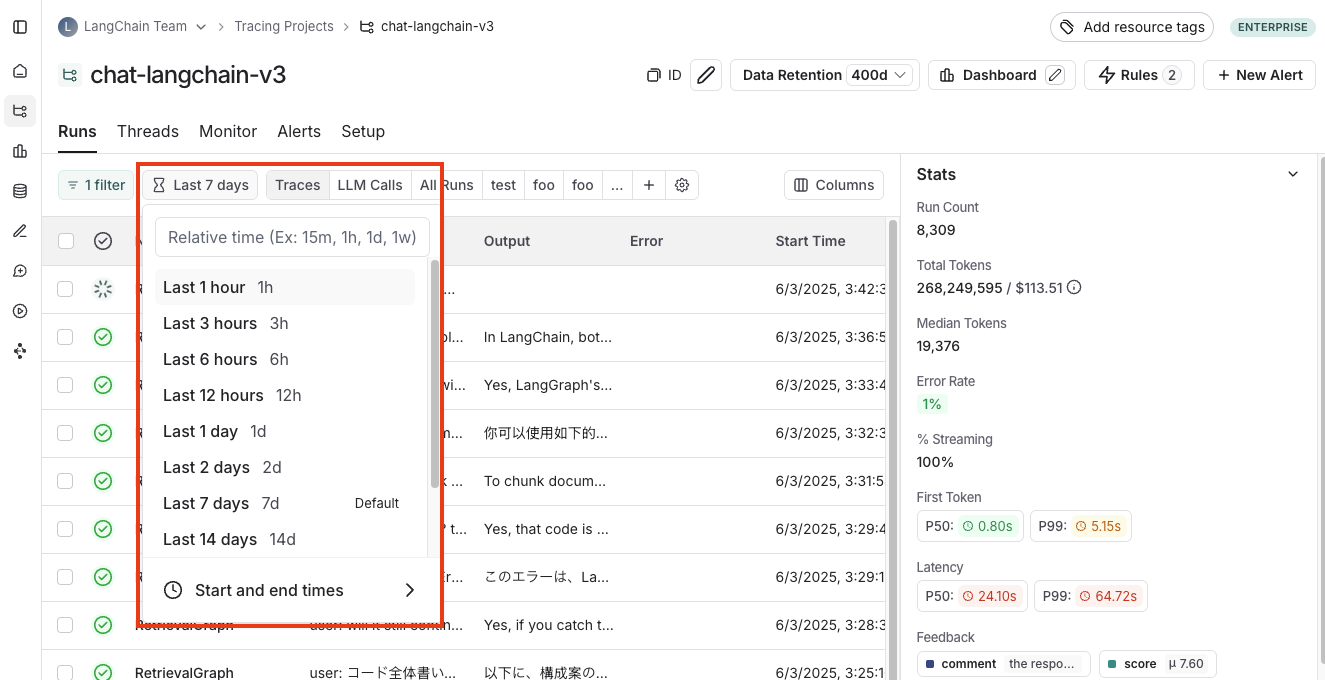 ### Filter operators
The available filter operators depend on the data type of the attribute you are filtering on. Here's an overview of common operators:
* **is**: Exact match on the filter value
* **is not**: Negative match on the filter value
* **contains**: Partial match on the filter value
* **does not contain**: Negative partial match on the filter value
* **is one of**: Match on any of the values in the list
* `>` / `<`: Available for numeric fields
## Specific Filtering Techniques
### Filter for intermediate runs (spans)
In order to filter for intermediate runs (spans), you first need to remove the default `IsTrace` is `true` filter. For example, you would do this if you wanted to filter by `run name` for sub runs or filter by `run type`.
Run metadata and tags are also powerful to filter on. These rely on good tagging across all parts of your pipeline. To learn more, you can check out [this guide](./add-metadata-tags).
### Filter based on inputs and outputs
You can filter runs based on the content in the inputs and outputs of the run.
To filter either inputs or outputs, you can use the `Full-Text Search` filter which will match keywords in either field. For more targeted search, you can use the `Input` or `Output` filters which will only match content based on the respective field.
### Filter operators
The available filter operators depend on the data type of the attribute you are filtering on. Here's an overview of common operators:
* **is**: Exact match on the filter value
* **is not**: Negative match on the filter value
* **contains**: Partial match on the filter value
* **does not contain**: Negative partial match on the filter value
* **is one of**: Match on any of the values in the list
* `>` / `<`: Available for numeric fields
## Specific Filtering Techniques
### Filter for intermediate runs (spans)
In order to filter for intermediate runs (spans), you first need to remove the default `IsTrace` is `true` filter. For example, you would do this if you wanted to filter by `run name` for sub runs or filter by `run type`.
Run metadata and tags are also powerful to filter on. These rely on good tagging across all parts of your pipeline. To learn more, you can check out [this guide](./add-metadata-tags).
### Filter based on inputs and outputs
You can filter runs based on the content in the inputs and outputs of the run.
To filter either inputs or outputs, you can use the `Full-Text Search` filter which will match keywords in either field. For more targeted search, you can use the `Input` or `Output` filters which will only match content based on the respective field.
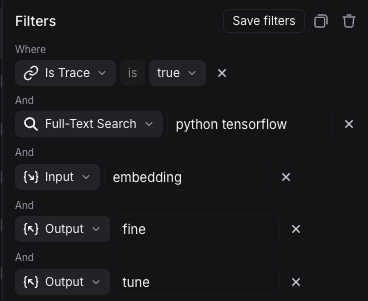 Based on the filters above, the system will search for `python` and `tensorflow` in either inputs or outputs, and `embedding` in the inputs along with `fine` and `tune` in the outputs.
### Filter based on input / output key-value pairs
In addition to full-text search, you can filter runs based on specific key-value pairs in the inputs and outputs. This allows for more precise filtering, especially when dealing with structured data.
Based on the filters above, the system will search for `python` and `tensorflow` in either inputs or outputs, and `embedding` in the inputs along with `fine` and `tune` in the outputs.
### Filter based on input / output key-value pairs
In addition to full-text search, you can filter runs based on specific key-value pairs in the inputs and outputs. This allows for more precise filtering, especially when dealing with structured data.
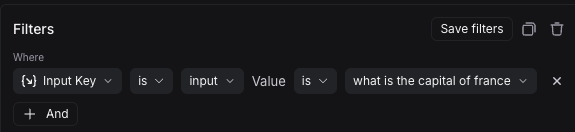 You can also match nested keys by using dot notation to select the nested key name. For example, to match nested keys in the output:
```json theme={null}
{
"documents": [
{
"page_content": "The capital of France is Paris",
"metadata": {},
"type": "Document"
}
]
}
```
Select `Output Key`, enter `documents.page_content` as the key and enter `The capital of France is Paris` as the value. This will match the nested key `documents.page_content` with the specified value.
You can also match nested keys by using dot notation to select the nested key name. For example, to match nested keys in the output:
```json theme={null}
{
"documents": [
{
"page_content": "The capital of France is Paris",
"metadata": {},
"type": "Document"
}
]
}
```
Select `Output Key`, enter `documents.page_content` as the key and enter `The capital of France is Paris` as the value. This will match the nested key `documents.page_content` with the specified value.
 You can add multiple key-value filters to create more complex queries. You can also use the `Filter Shortcuts` on the right side to quickly filter based on common key-value pairs as shown below:
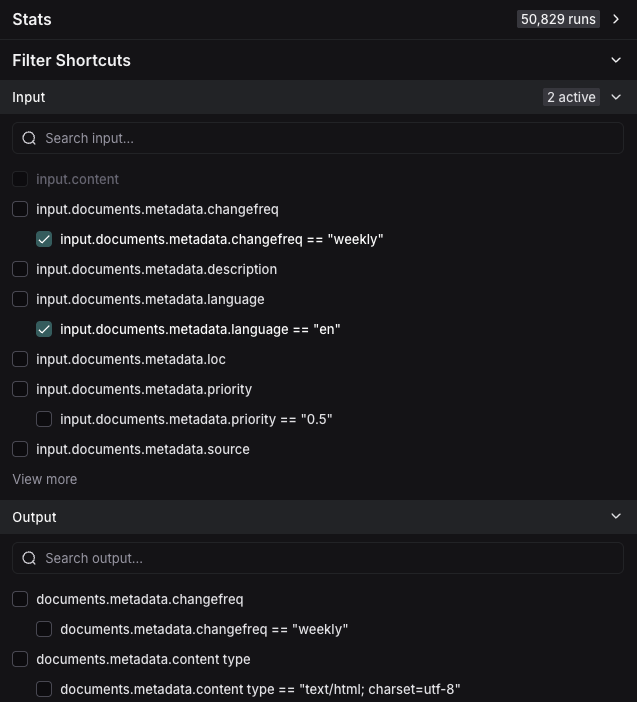 ### Example: Filtering for tool calls
It's common to want to search for traces that contain specific tool calls. Tool calls are typically indicated in the output of an LLM run. To filter for tool calls, you would use the `Output Key` filter.
While this example will show you how to filter for tool calls, the same logic can be applied to filter for any key-value pair in the output.
In this case, let's assume this is the output you want to filter for:
```json theme={null}
{
"generations": [
[
{
"text": "",
"type": "ChatGeneration",
"message": {
"lc": 1,
"type": "constructor",
"id": [],
"kwargs": {
"type": "ai",
"id": "run-ca7f7531-f4de-4790-9c3e-960be7f8b109",
"tool_calls": [
{
"name": "Plan",
"args": {
"steps": [
"Research LangGraph's node configuration capabilities",
"Investigate how to add a Python code execution node",
"Find an example or create a sample implementation of a code execution node"
]
},
"id": "toolu_01XexPzAVknT3gRmUB5PK5BP",
"type": "tool_call"
}
]
}
}
}
]
],
"llm_output": null,
"run": null,
"type": "LLMResult"
}
```
With the example above, the KV search will map each nested JSON path as a key-value pair that you can use to search and filter.
LangSmith will break it into the following set of searchable key-value pairs:
| Key | Value |
| -------------------------------------------------- | ---------------------------------------------------------------------------- |
| `generations.type` | `ChatGeneration` |
| `generations.message.type` | `constructor` |
| `generations.message.kwargs.type` | `ai` |
| `generations.message.kwargs.id` | `run-ca7f7531-f4de-4790-9c3e-960be7f8b109` |
| `generations.message.kwargs.tool_calls.name` | `Plan` |
| `generations.message.kwargs.tool_calls.args.steps` | `Research LangGraph's node configuration capabilities` |
| `generations.message.kwargs.tool_calls.args.steps` | `Investigate how to add a Python code execution node` |
| `generations.message.kwargs.tool_calls.args.steps` | `Find an example or create a sample implementation of a code execution node` |
| `generations.message.kwargs.tool_calls.id` | `toolu_01XexPzAVknT3gRmUB5PK5BP` |
| `generations.message.kwargs.tool_calls.type` | `tool_call` |
| `type` | `LLMResult` |
To search for a specific tool call, you can use the following Output Key search while removing the root runs filter:
`generations.message.kwargs.tool_calls.name` = `Plan`
This will match root and non-root runs where the `tool_calls` name is `Plan`.
### Example: Filtering for tool calls
It's common to want to search for traces that contain specific tool calls. Tool calls are typically indicated in the output of an LLM run. To filter for tool calls, you would use the `Output Key` filter.
While this example will show you how to filter for tool calls, the same logic can be applied to filter for any key-value pair in the output.
In this case, let's assume this is the output you want to filter for:
```json theme={null}
{
"generations": [
[
{
"text": "",
"type": "ChatGeneration",
"message": {
"lc": 1,
"type": "constructor",
"id": [],
"kwargs": {
"type": "ai",
"id": "run-ca7f7531-f4de-4790-9c3e-960be7f8b109",
"tool_calls": [
{
"name": "Plan",
"args": {
"steps": [
"Research LangGraph's node configuration capabilities",
"Investigate how to add a Python code execution node",
"Find an example or create a sample implementation of a code execution node"
]
},
"id": "toolu_01XexPzAVknT3gRmUB5PK5BP",
"type": "tool_call"
}
]
}
}
}
]
],
"llm_output": null,
"run": null,
"type": "LLMResult"
}
```
With the example above, the KV search will map each nested JSON path as a key-value pair that you can use to search and filter.
LangSmith will break it into the following set of searchable key-value pairs:
| Key | Value |
| -------------------------------------------------- | ---------------------------------------------------------------------------- |
| `generations.type` | `ChatGeneration` |
| `generations.message.type` | `constructor` |
| `generations.message.kwargs.type` | `ai` |
| `generations.message.kwargs.id` | `run-ca7f7531-f4de-4790-9c3e-960be7f8b109` |
| `generations.message.kwargs.tool_calls.name` | `Plan` |
| `generations.message.kwargs.tool_calls.args.steps` | `Research LangGraph's node configuration capabilities` |
| `generations.message.kwargs.tool_calls.args.steps` | `Investigate how to add a Python code execution node` |
| `generations.message.kwargs.tool_calls.args.steps` | `Find an example or create a sample implementation of a code execution node` |
| `generations.message.kwargs.tool_calls.id` | `toolu_01XexPzAVknT3gRmUB5PK5BP` |
| `generations.message.kwargs.tool_calls.type` | `tool_call` |
| `type` | `LLMResult` |
To search for a specific tool call, you can use the following Output Key search while removing the root runs filter:
`generations.message.kwargs.tool_calls.name` = `Plan`
This will match root and non-root runs where the `tool_calls` name is `Plan`.
 ### Negative filtering on key-value pairs
Different types of negative filtering can be applied to `Metadata`, `Input Key`, and `Output Key` fields to exclude specific runs from your results.
For example, to find all runs where the metadata key `phone` is not equal to `1234567890`, set the `Metadata` `Key` operator to `is` and `Key` field to `phone`, then set the `Value` operator to `is not` and the `Value` field to `1234567890`. This will match all runs that have a metadata key `phone` with any value except `1234567890`.
### Negative filtering on key-value pairs
Different types of negative filtering can be applied to `Metadata`, `Input Key`, and `Output Key` fields to exclude specific runs from your results.
For example, to find all runs where the metadata key `phone` is not equal to `1234567890`, set the `Metadata` `Key` operator to `is` and `Key` field to `phone`, then set the `Value` operator to `is not` and the `Value` field to `1234567890`. This will match all runs that have a metadata key `phone` with any value except `1234567890`.
 To find runs that don't have a specific metadata key, set the `Key` operator to `is not`. For example, setting the `Key` operator to `is not` with `phone` as the key will match all runs that don't have a `phone` field in their metadata.
 You can also filter for runs that neither have a specific key nor a specific value. To find runs where the metadata has neither the key `phone` nor any field with the value `1234567890`, set the `Key` operator to `is not` with key `phone`, and the `Value` operator to `is not` with value `1234567890`.
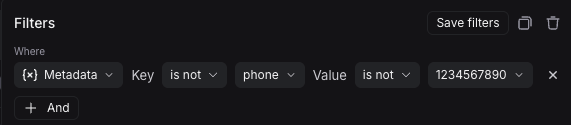 Finally, you can also filter for runs that do not have a specific key but have a specific value. To find runs where there is no `phone` key but there is a value of `1234567890` for some other key, set the `Key` operator to `is not` with key `phone`, and the `Value` operator to `is` with value `1234567890`.
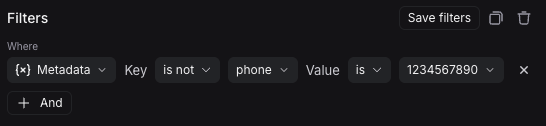 Note that you can use the `does not contain` operator instead of `is not` to perform a substring match.
## Save a filter
Saving filters allows you to store and reuse frequently used filter configurations. Saved filters are specific to a tracing project.
#### Save a filter
In the filter box, click the **Save filter** button after you have constructed your filter. This will bring up a dialog to specify the name and a description of the filter.
Note that you can use the `does not contain` operator instead of `is not` to perform a substring match.
## Save a filter
Saving filters allows you to store and reuse frequently used filter configurations. Saved filters are specific to a tracing project.
#### Save a filter
In the filter box, click the **Save filter** button after you have constructed your filter. This will bring up a dialog to specify the name and a description of the filter.
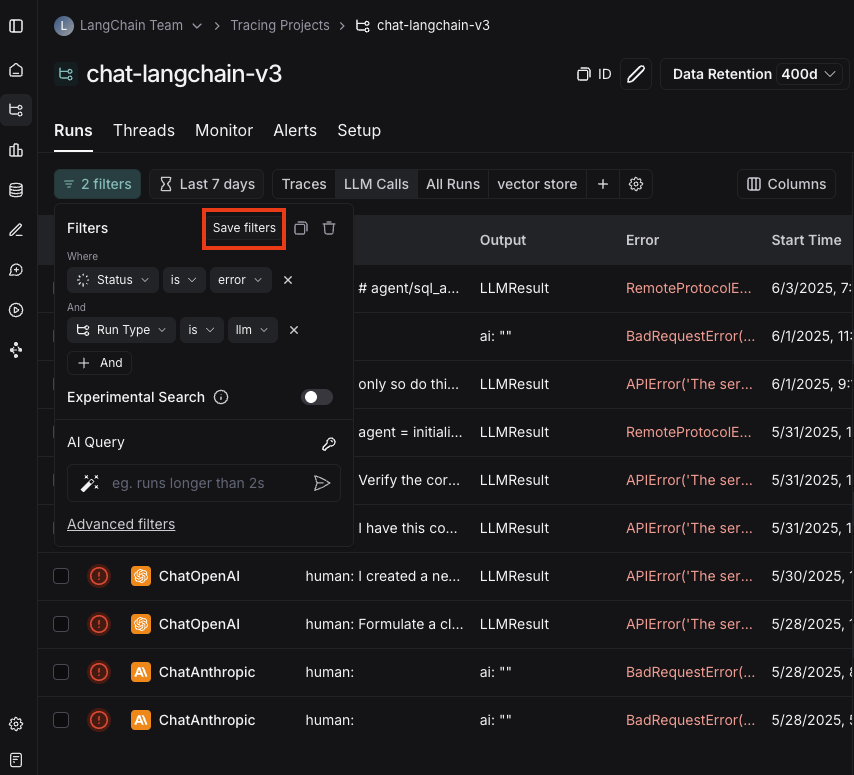 #### Use a saved filter
After saving a filter, it is available in the filter bar as a quick filter for you to use. If you have more than three saved filters, only two will be displayed directly, with the rest accessible via a "more" menu. You can use the settings icon in the saved filter bar to optionally hide default saved filters.
#### Use a saved filter
After saving a filter, it is available in the filter bar as a quick filter for you to use. If you have more than three saved filters, only two will be displayed directly, with the rest accessible via a "more" menu. You can use the settings icon in the saved filter bar to optionally hide default saved filters.
 #### Update a saved filter
With the filter selected, make any changes to filter parameters. Then click **Update filter** > **Update** to update the filter.
In the same menu, you can also create a new saved filter by clicking **Update filter** > **Create new**.
#### Delete a saved filter
Click the settings icon in the saved filter bar, and delete a filter using the trash icon.
## Copy a filter
You can copy a constructed filter to share it with colleagues, reuse it later, or query runs programmatically in the [API](https://api.smith.langchain.com/redoc#tag/run/operation/query_runs_api_v1_runs_query_post) or [SDK](https://docs.smith.langchain.com/reference/python/client/langsmith.client.Client#langsmith.client.Client.list_runs).
In order to copy the filter, you can first create it in the UI. From there, you can click the copy button in the upper right hand corner. If you have constructed tree or trace filters, you can also copy those.
This will give you a string representing the filter in the LangSmith query language. For example: `and(eq(is_root, true), and(eq(feedback_key, "user_score"), eq(feedback_score, 1)))`. For more information on the query language syntax, please refer to [this reference](/langsmith/trace-query-syntax#filter-query-language).
#### Update a saved filter
With the filter selected, make any changes to filter parameters. Then click **Update filter** > **Update** to update the filter.
In the same menu, you can also create a new saved filter by clicking **Update filter** > **Create new**.
#### Delete a saved filter
Click the settings icon in the saved filter bar, and delete a filter using the trash icon.
## Copy a filter
You can copy a constructed filter to share it with colleagues, reuse it later, or query runs programmatically in the [API](https://api.smith.langchain.com/redoc#tag/run/operation/query_runs_api_v1_runs_query_post) or [SDK](https://docs.smith.langchain.com/reference/python/client/langsmith.client.Client#langsmith.client.Client.list_runs).
In order to copy the filter, you can first create it in the UI. From there, you can click the copy button in the upper right hand corner. If you have constructed tree or trace filters, you can also copy those.
This will give you a string representing the filter in the LangSmith query language. For example: `and(eq(is_root, true), and(eq(feedback_key, "user_score"), eq(feedback_score, 1)))`. For more information on the query language syntax, please refer to [this reference](/langsmith/trace-query-syntax#filter-query-language).
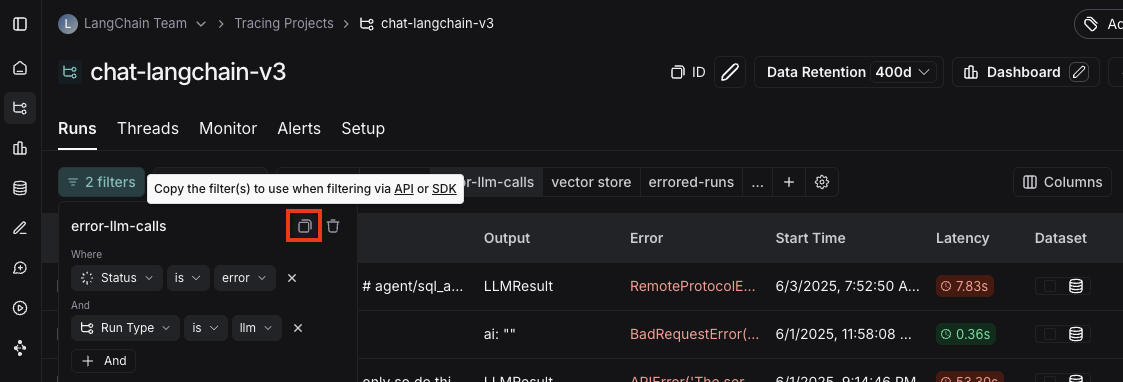 ## Filtering runs within the trace view
You can also apply filters directly within the trace view, which is useful for sifting through traces with a large number of runs. The same filters available in the main runs table view can be applied here.
By default, only the runs that match the filters will be shown. To see the matched runs within the broader context of the trace tree, switch the view option from "Filtered Only" to "Show All" or "Most relevant".
## Filtering runs within the trace view
You can also apply filters directly within the trace view, which is useful for sifting through traces with a large number of runs. The same filters available in the main runs table view can be applied here.
By default, only the runs that match the filters will be shown. To see the matched runs within the broader context of the trace tree, switch the view option from "Filtered Only" to "Show All" or "Most relevant".
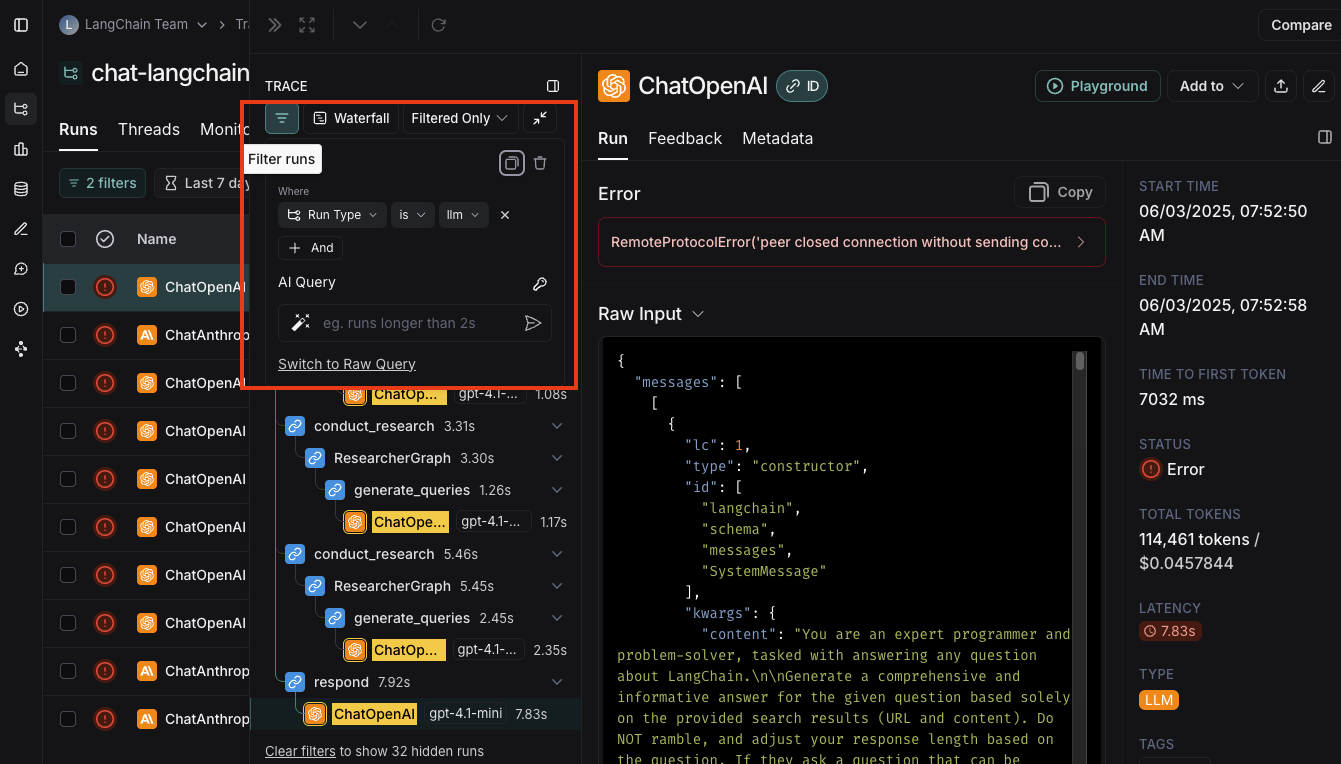 ## Manually specify a raw query in LangSmith query language
If you have [copied a previously constructed filter](/langsmith/filter-traces-in-application#copy-the-filter), you may want to manually apply this raw query in a future session.
In order to do this, you can click on **Advanced filters** on the bottom of the filters popover. From there you can paste a raw query into the text box.
Note that this will add that query to the existing queries, not overwrite it.
## Manually specify a raw query in LangSmith query language
If you have [copied a previously constructed filter](/langsmith/filter-traces-in-application#copy-the-filter), you may want to manually apply this raw query in a future session.
In order to do this, you can click on **Advanced filters** on the bottom of the filters popover. From there you can paste a raw query into the text box.
Note that this will add that query to the existing queries, not overwrite it.
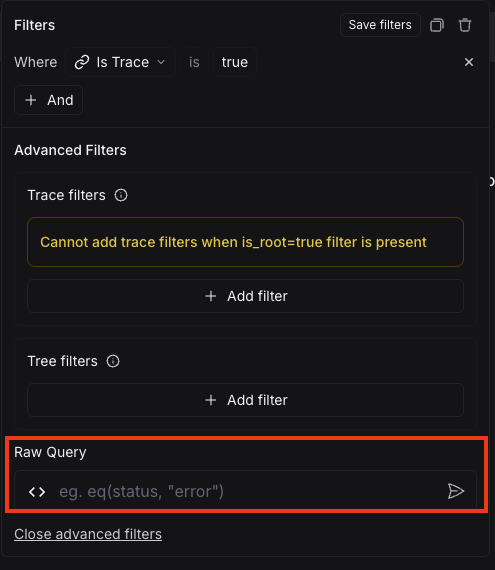 ## Use an AI Query to auto-generate a query (Experimental)
Sometimes figuring out the exact query to specify can be difficult! In order to make it easier, we've added an `AI Query` functionality. With this, you can type in the filter you want to construct in natural language and it will convert it into a valid query.
For example: "All runs longer than 10 seconds"
## Use an AI Query to auto-generate a query (Experimental)
Sometimes figuring out the exact query to specify can be difficult! In order to make it easier, we've added an `AI Query` functionality. With this, you can type in the filter you want to construct in natural language and it will convert it into a valid query.
For example: "All runs longer than 10 seconds"
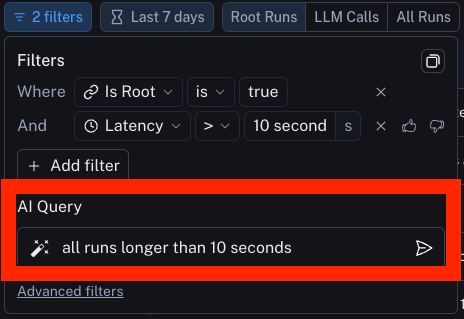 ## Advanced filters
### Filter for intermediate runs (spans) on properties of the root
A common concept is to filter for intermediate runs which are part of a trace whose root run has some attribute. An example is filtering for intermediate runs of a particular type whose root run has positive (or negative) feedback associated with it.
In order to do this, first set up a filter for intermediate runs (per the above section). After that, you can then add another filter rule. You can then click the `Advanced Filters` link all the way at the bottom of the filter. This will open up a new modal where you can add `Trace filters`. These filters will apply to the traces of all the parent runs of the individual runs you've already filtered for.
## Advanced filters
### Filter for intermediate runs (spans) on properties of the root
A common concept is to filter for intermediate runs which are part of a trace whose root run has some attribute. An example is filtering for intermediate runs of a particular type whose root run has positive (or negative) feedback associated with it.
In order to do this, first set up a filter for intermediate runs (per the above section). After that, you can then add another filter rule. You can then click the `Advanced Filters` link all the way at the bottom of the filter. This will open up a new modal where you can add `Trace filters`. These filters will apply to the traces of all the parent runs of the individual runs you've already filtered for.
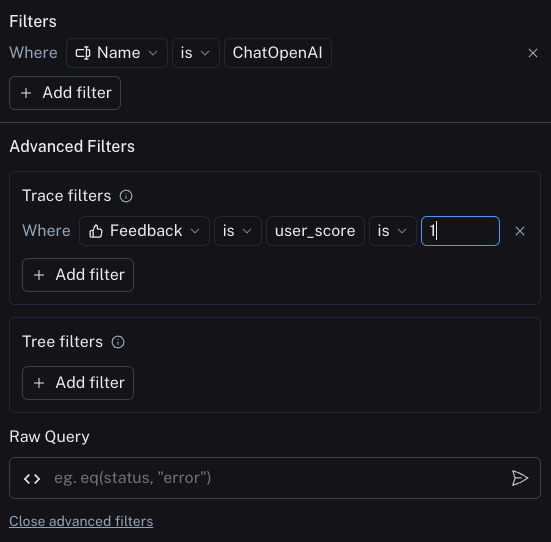 ### Filter for runs (spans) whose child runs have some attribute
This is the opposite of the above. You may want to search for runs who have specific types of sub runs. An example of this could be searching for all traces that had a sub run with name `Foo`. This is useful when `Foo` is not always called, but you want to analyze the cases where it is.
In order to do this, you can click on the `Advanced Filters` link all the way at the bottom of the filter. This will open up a new modal where you can add `Tree filters`. This will make the rule you specify apply to all child runs of the individual runs you've already filtered for.
### Filter for runs (spans) whose child runs have some attribute
This is the opposite of the above. You may want to search for runs who have specific types of sub runs. An example of this could be searching for all traces that had a sub run with name `Foo`. This is useful when `Foo` is not always called, but you want to analyze the cases where it is.
In order to do this, you can click on the `Advanced Filters` link all the way at the bottom of the filter. This will open up a new modal where you can add `Tree filters`. This will make the rule you specify apply to all child runs of the individual runs you've already filtered for.
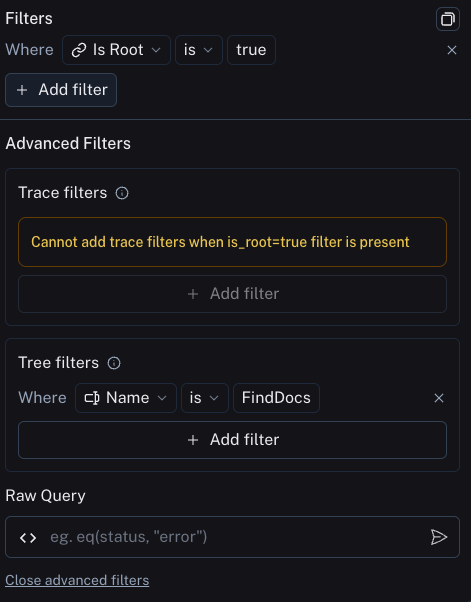 ### Example: Filtering on all runs whose tree contains the tool call filter
Extending the [tool call filtering example](/langsmith/filter-traces-in-application#example-filtering-for-tool-calls) from above, if you would like to filter for all runs *whose tree contains* the tool filter call, you can use the tree filter in the [advanced filters](/langsmith/filter-traces-in-application#advanced-filters) setting:
### Example: Filtering on all runs whose tree contains the tool call filter
Extending the [tool call filtering example](/langsmith/filter-traces-in-application#example-filtering-for-tool-calls) from above, if you would like to filter for all runs *whose tree contains* the tool filter call, you can use the tree filter in the [advanced filters](/langsmith/filter-traces-in-application#advanced-filters) setting:
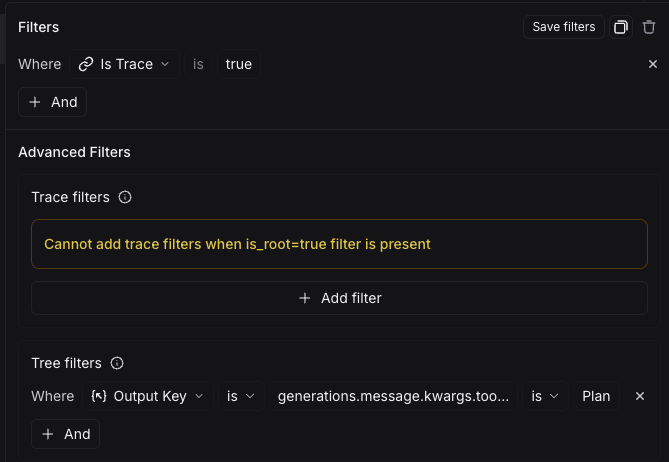 ***
***
 LangSmith supports colocating your React components with your graph code. This allows you to focus on building specific UI components for your graph while easily plugging into existing chat interfaces such as [Agent Chat](https://agentchat.vercel.app) and loading the code only when actually needed.
## Tutorial
### 1. Define and configure UI components
First, create your first UI component. For each component you need to provide an unique identifier that will be used to reference the component in your graph code.
```tsx title="src/agent/ui.tsx" theme={null}
const WeatherComponent = (props: { city: string }) => {
return
LangSmith supports colocating your React components with your graph code. This allows you to focus on building specific UI components for your graph while easily plugging into existing chat interfaces such as [Agent Chat](https://agentchat.vercel.app) and loading the code only when actually needed.
## Tutorial
### 1. Define and configure UI components
First, create your first UI component. For each component you need to provide an unique identifier that will be used to reference the component in your graph code.
```tsx title="src/agent/ui.tsx" theme={null}
const WeatherComponent = (props: { city: string }) => {
return {props.content}

 ***
***
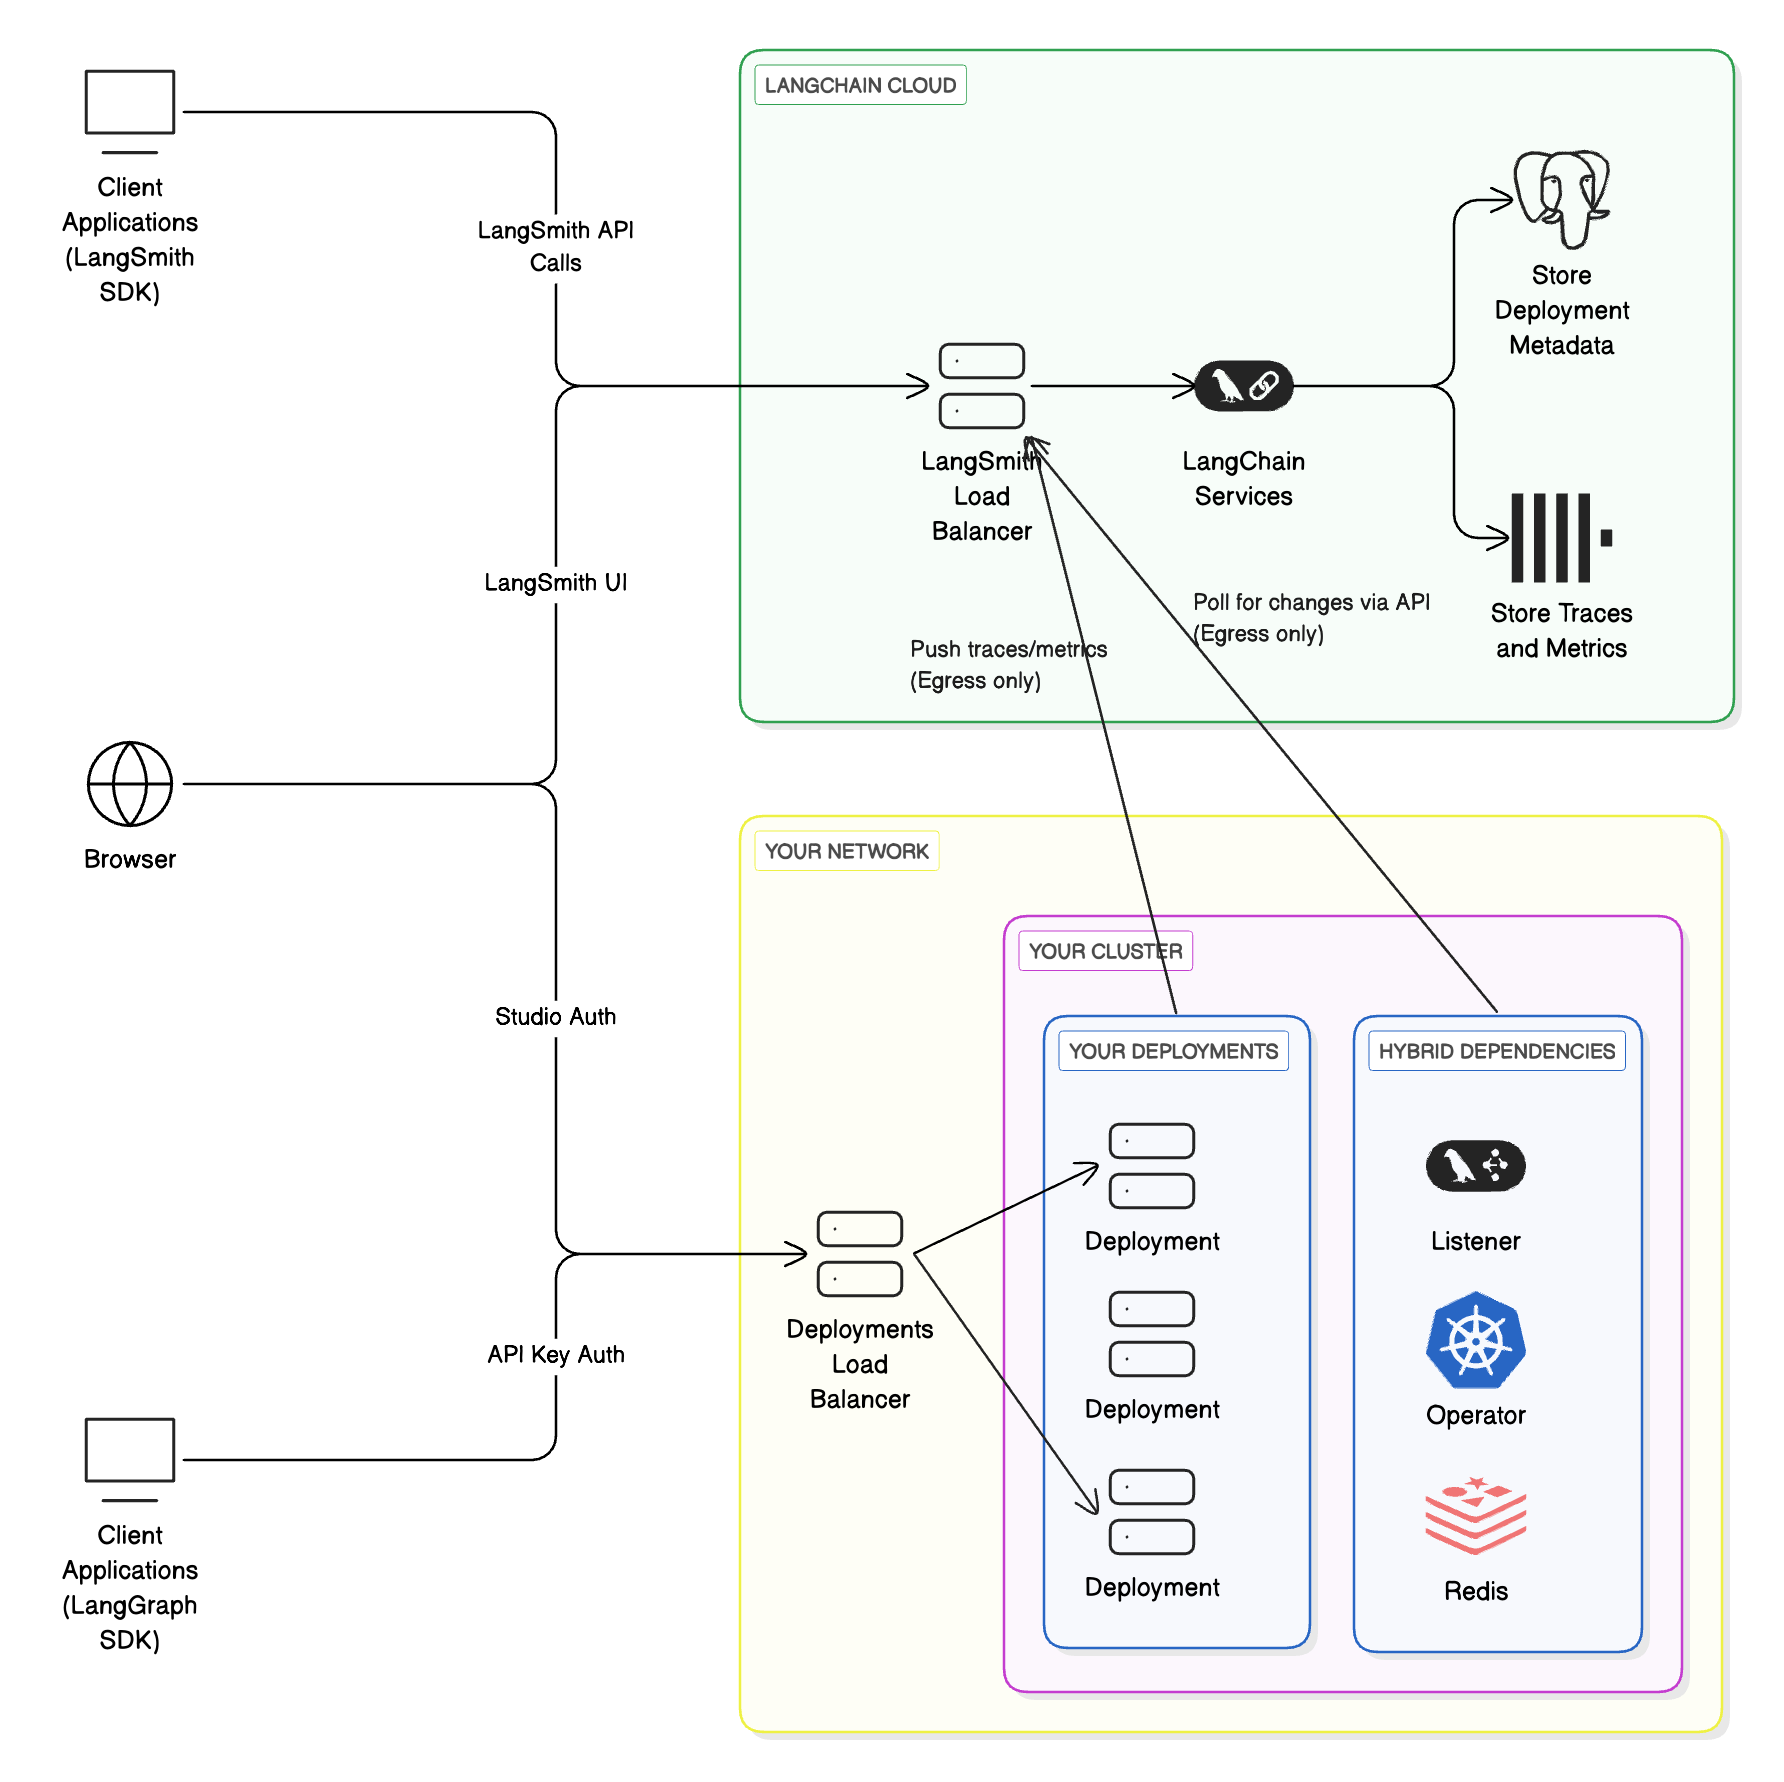
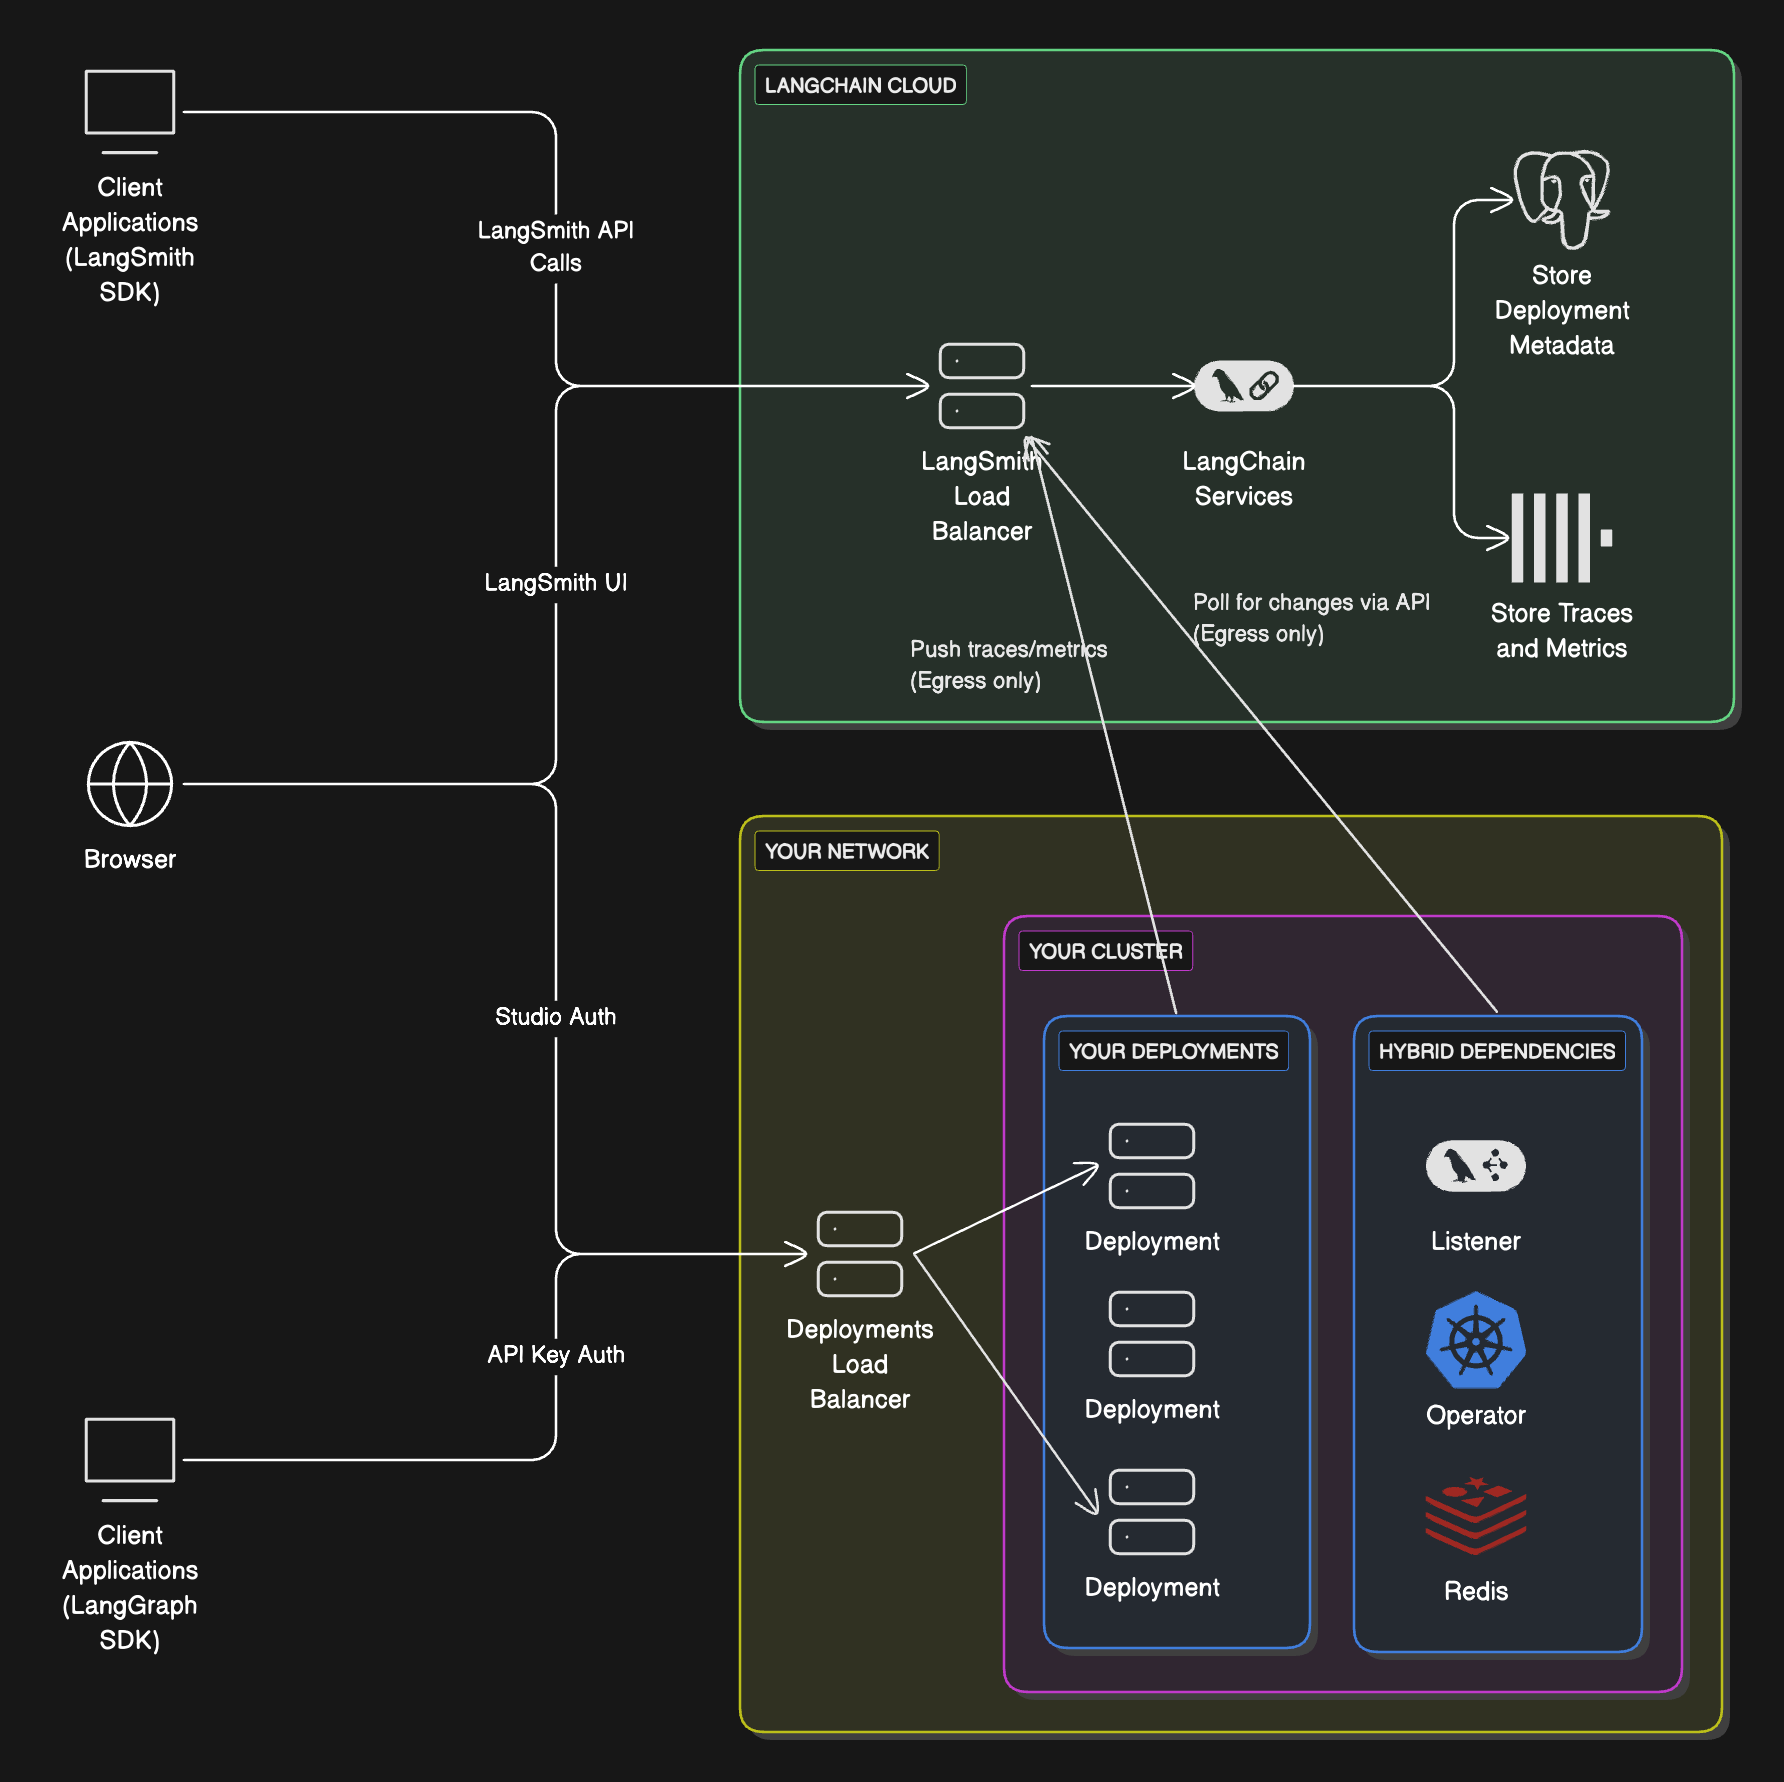 ### Compute Platforms
* **Kubernetes**: Hybrid supports running the data plane on any Kubernetes cluster.
### Compute Platforms
* **Kubernetes**: Hybrid supports running the data plane on any Kubernetes cluster.
 To add any new experiments/runs to an existing annotation queue, head to the **Evaluators** tab, select the evaluator you are aligning and click **Add to Queue.**
 In the evaluator playground you can create or edit your evaluator prompt and click **Start Alignment** to run it over the set of labeled examples that you created in Step 2. After running your evaluator, you'll see how its generated scores compare to your human labels. The alignment score is the percentage of examples where the evaluator's judgment matches that of the human expert.
## 4. Repeat to improve evaluator alignment
Iterate by updating your prompt and testing again to improve evaluator alignment.
In the evaluator playground you can create or edit your evaluator prompt and click **Start Alignment** to run it over the set of labeled examples that you created in Step 2. After running your evaluator, you'll see how its generated scores compare to your human labels. The alignment score is the percentage of examples where the evaluator's judgment matches that of the human expert.
## 4. Repeat to improve evaluator alignment
Iterate by updating your prompt and testing again to improve evaluator alignment.
 This will show the reasoning behind the LLM's score in the evaluator playground.
**3. Add more labeled examples and validate performance**
To avoid overfitting to the labeled examples, it's important to add more labeled examples and test performance, especially if you started off with a small number of examples.
## Video guide
***
This will show the reasoning behind the LLM's score in the evaluator playground.
**3. Add more labeled examples and validate performance**
To avoid overfitting to the labeled examples, it's important to add more labeled examples and test performance, especially if you started off with a small number of examples.
## Video guide
***
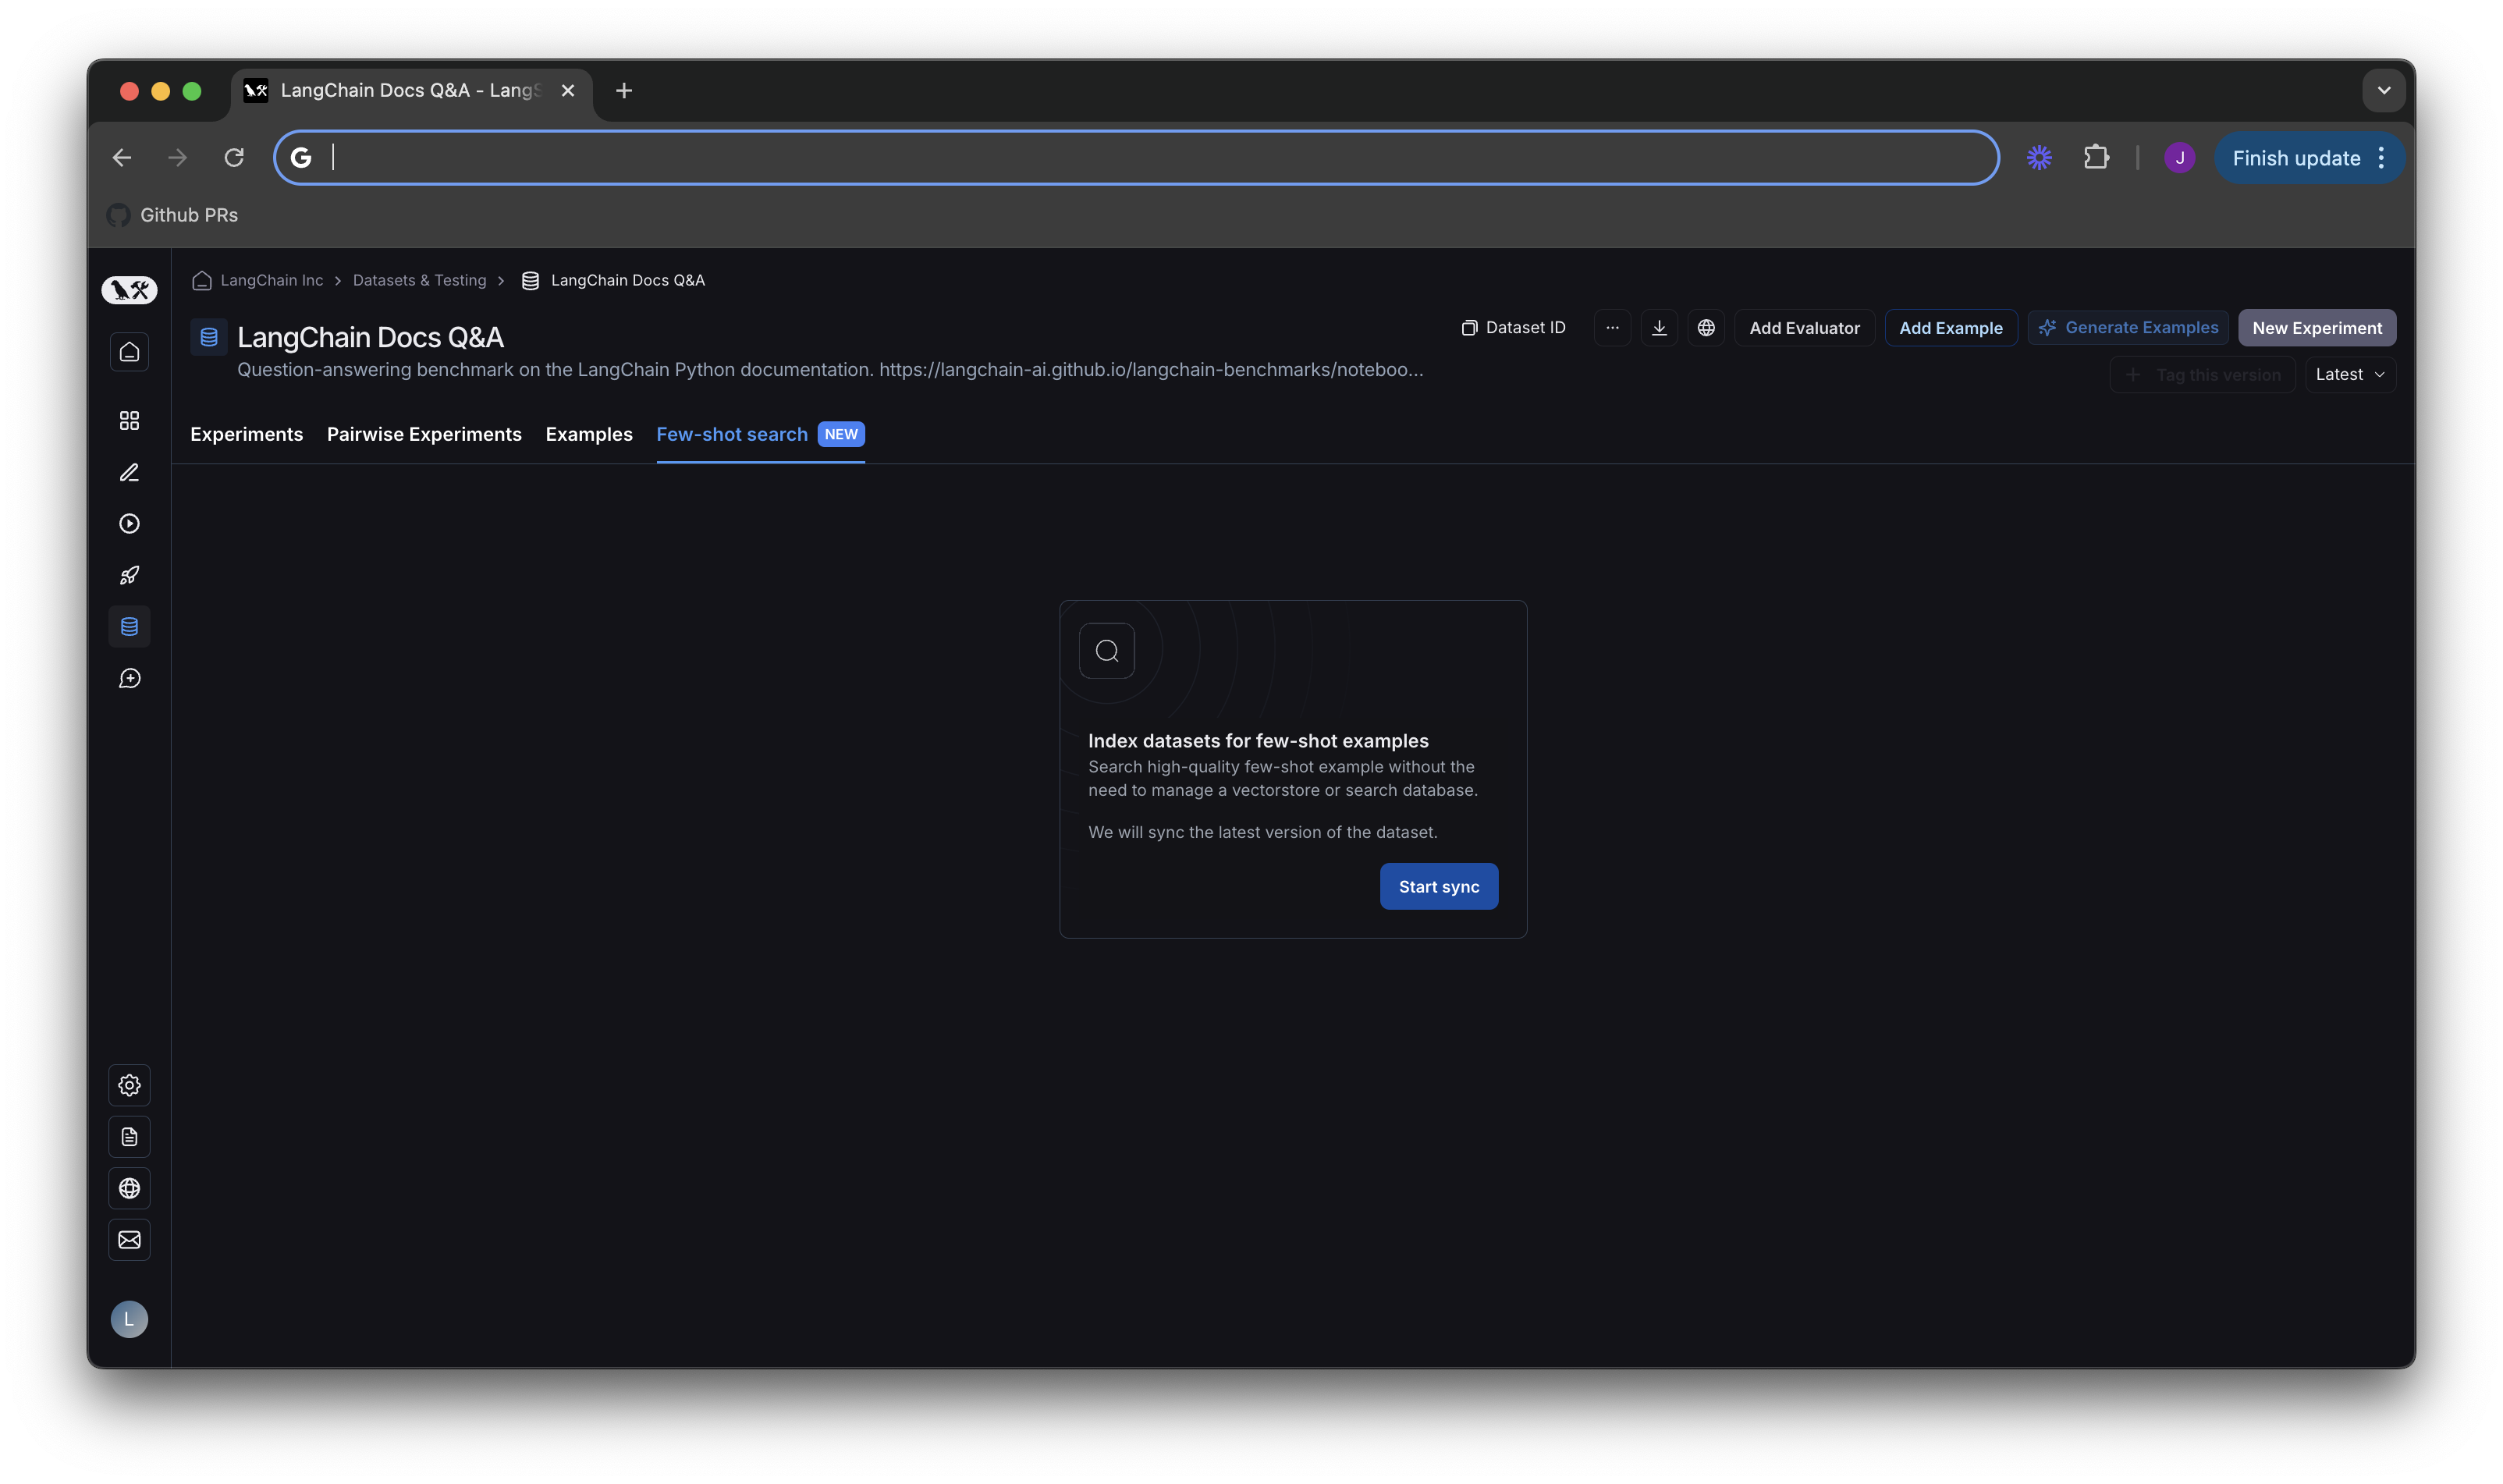 By default, we sync to the latest version of your dataset. That means when new examples are added to your dataset, they will automatically be added to your index. This process runs every few minutes, so there should be a very short delay for indexing new examples. You can see whether your index is up to date under `Few-shot index` on the lefthand side of the screen in the next section.
## Test search quality in the few shot playground
Now that you have turned on indexing for your dataset, you will see the new few shot playground.
By default, we sync to the latest version of your dataset. That means when new examples are added to your dataset, they will automatically be added to your index. This process runs every few minutes, so there should be a very short delay for indexing new examples. You can see whether your index is up to date under `Few-shot index` on the lefthand side of the screen in the next section.
## Test search quality in the few shot playground
Now that you have turned on indexing for your dataset, you will see the new few shot playground.
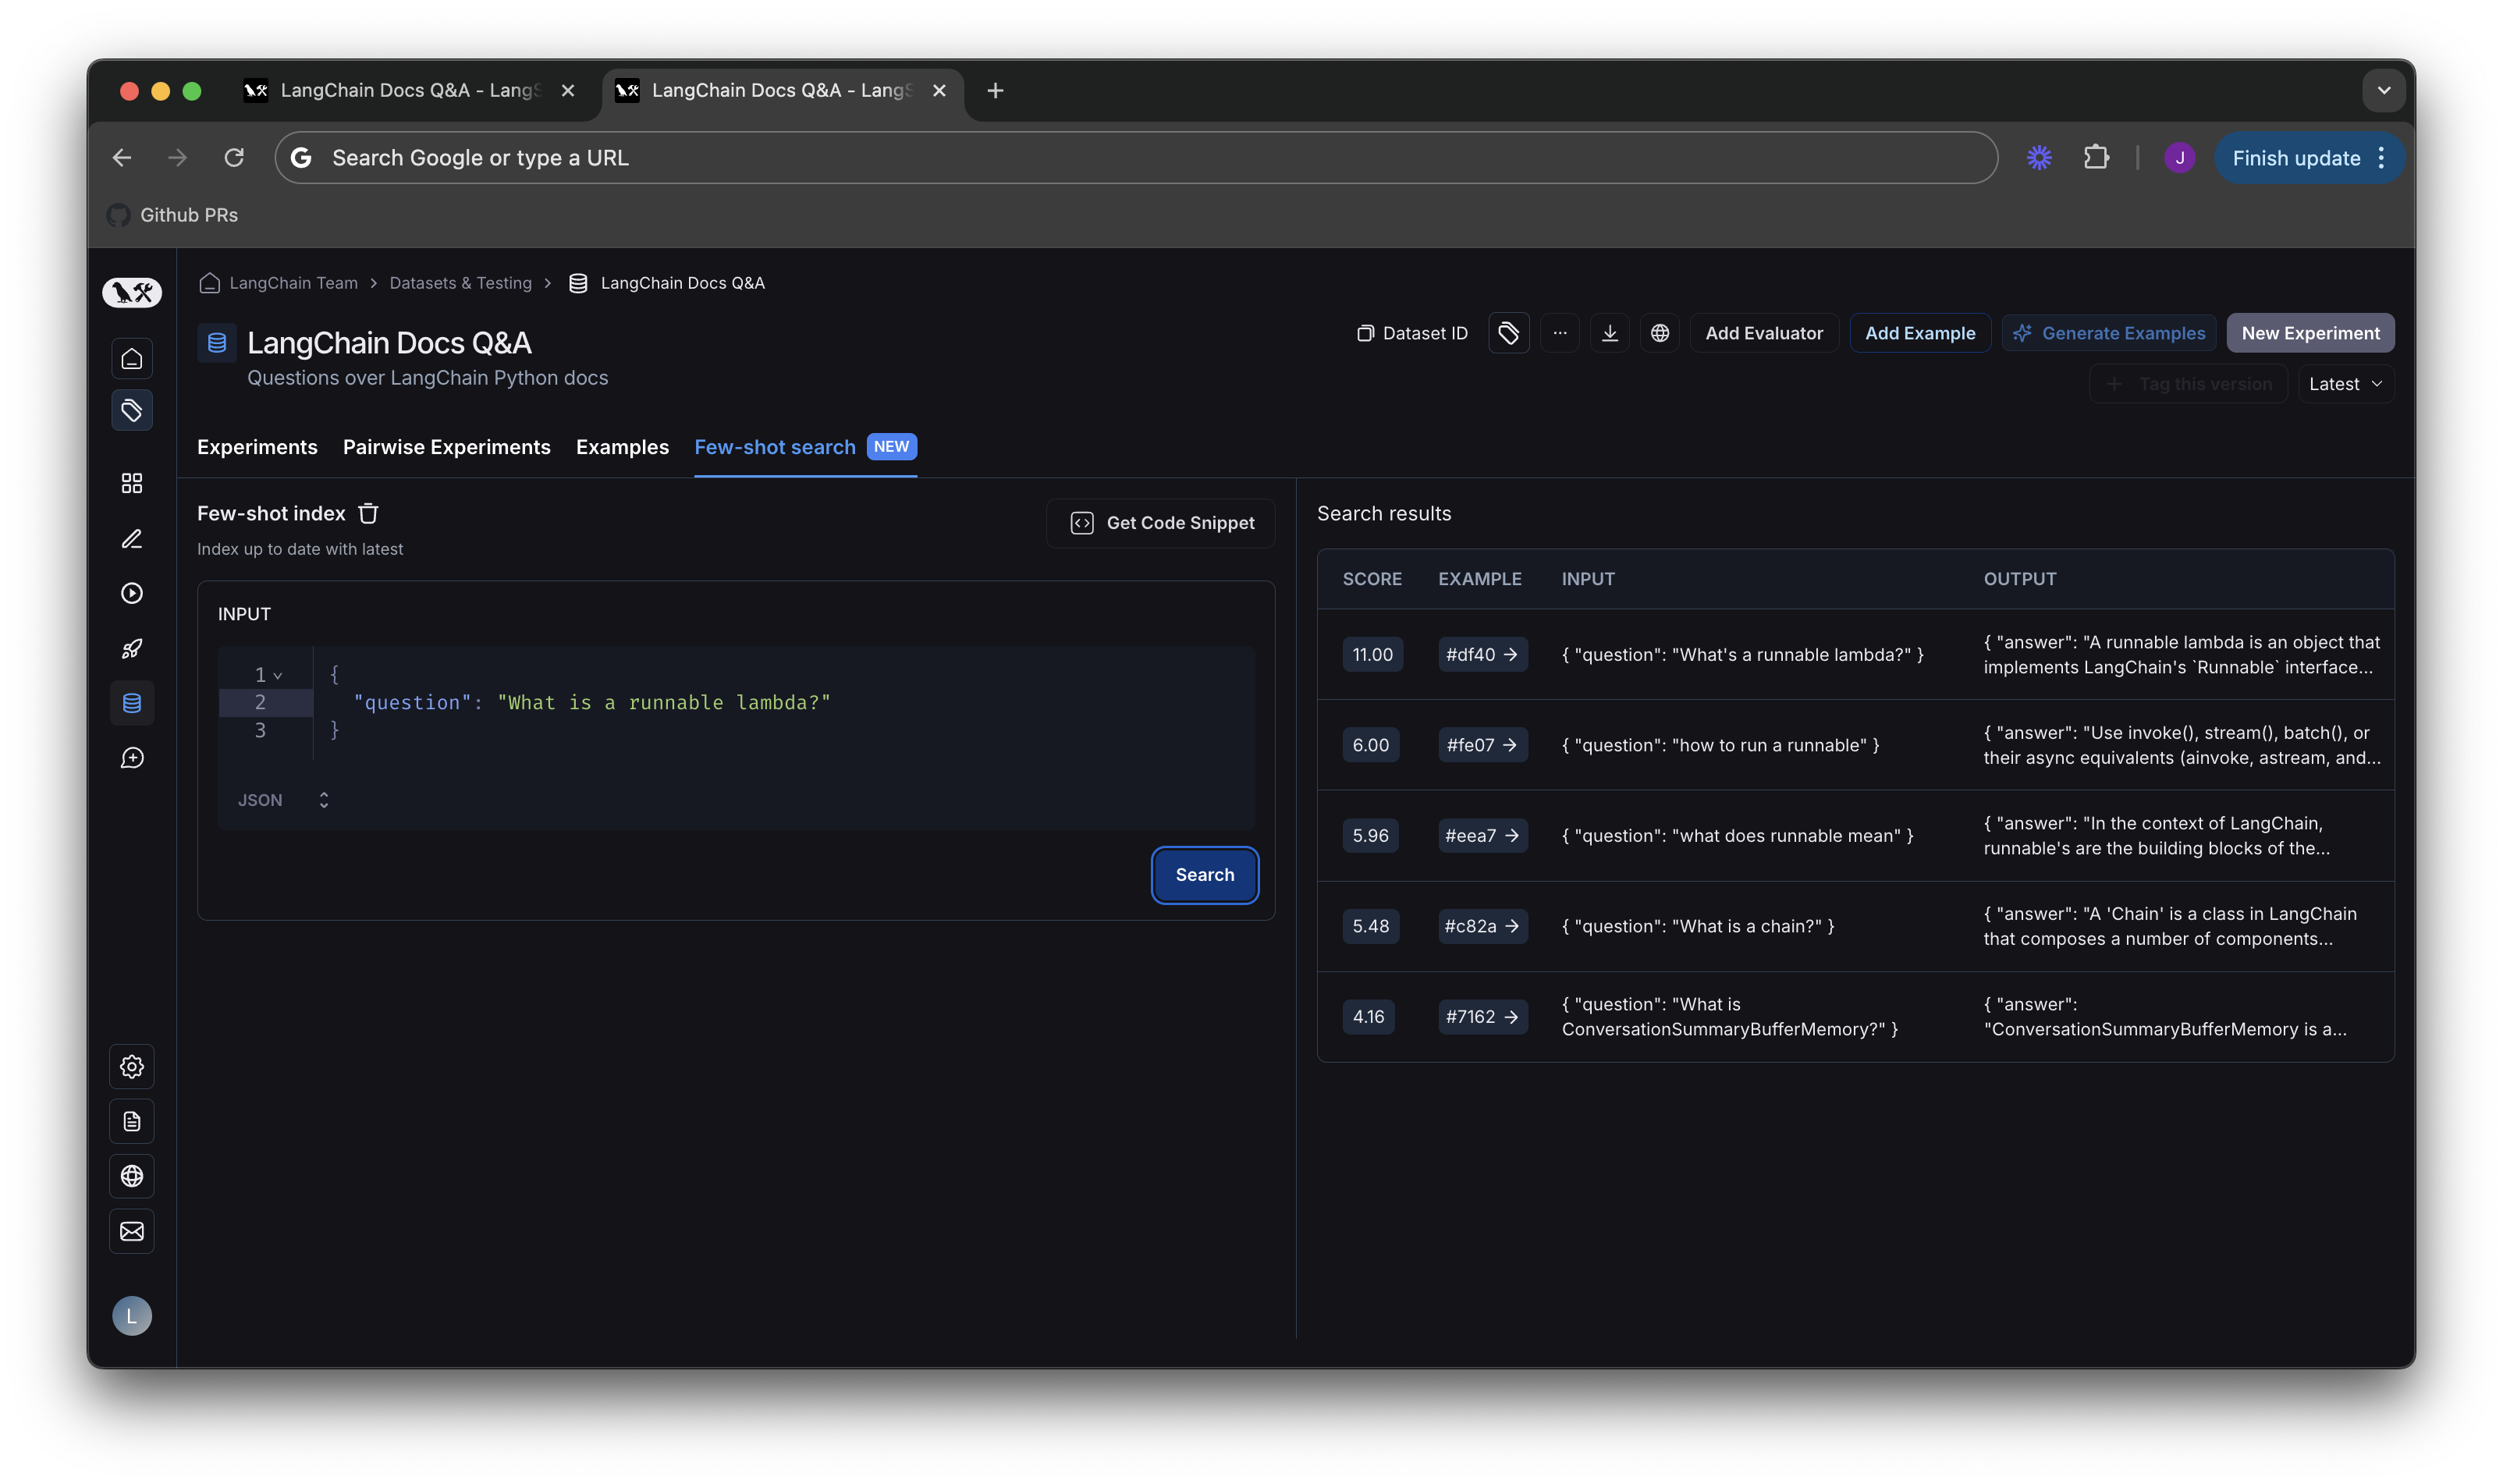 Each result will have a score and a link to the example in the dataset. The scoring system works such that 0 is a completely random result, and higher scores are better. Results will be sorted in descending order according to score.
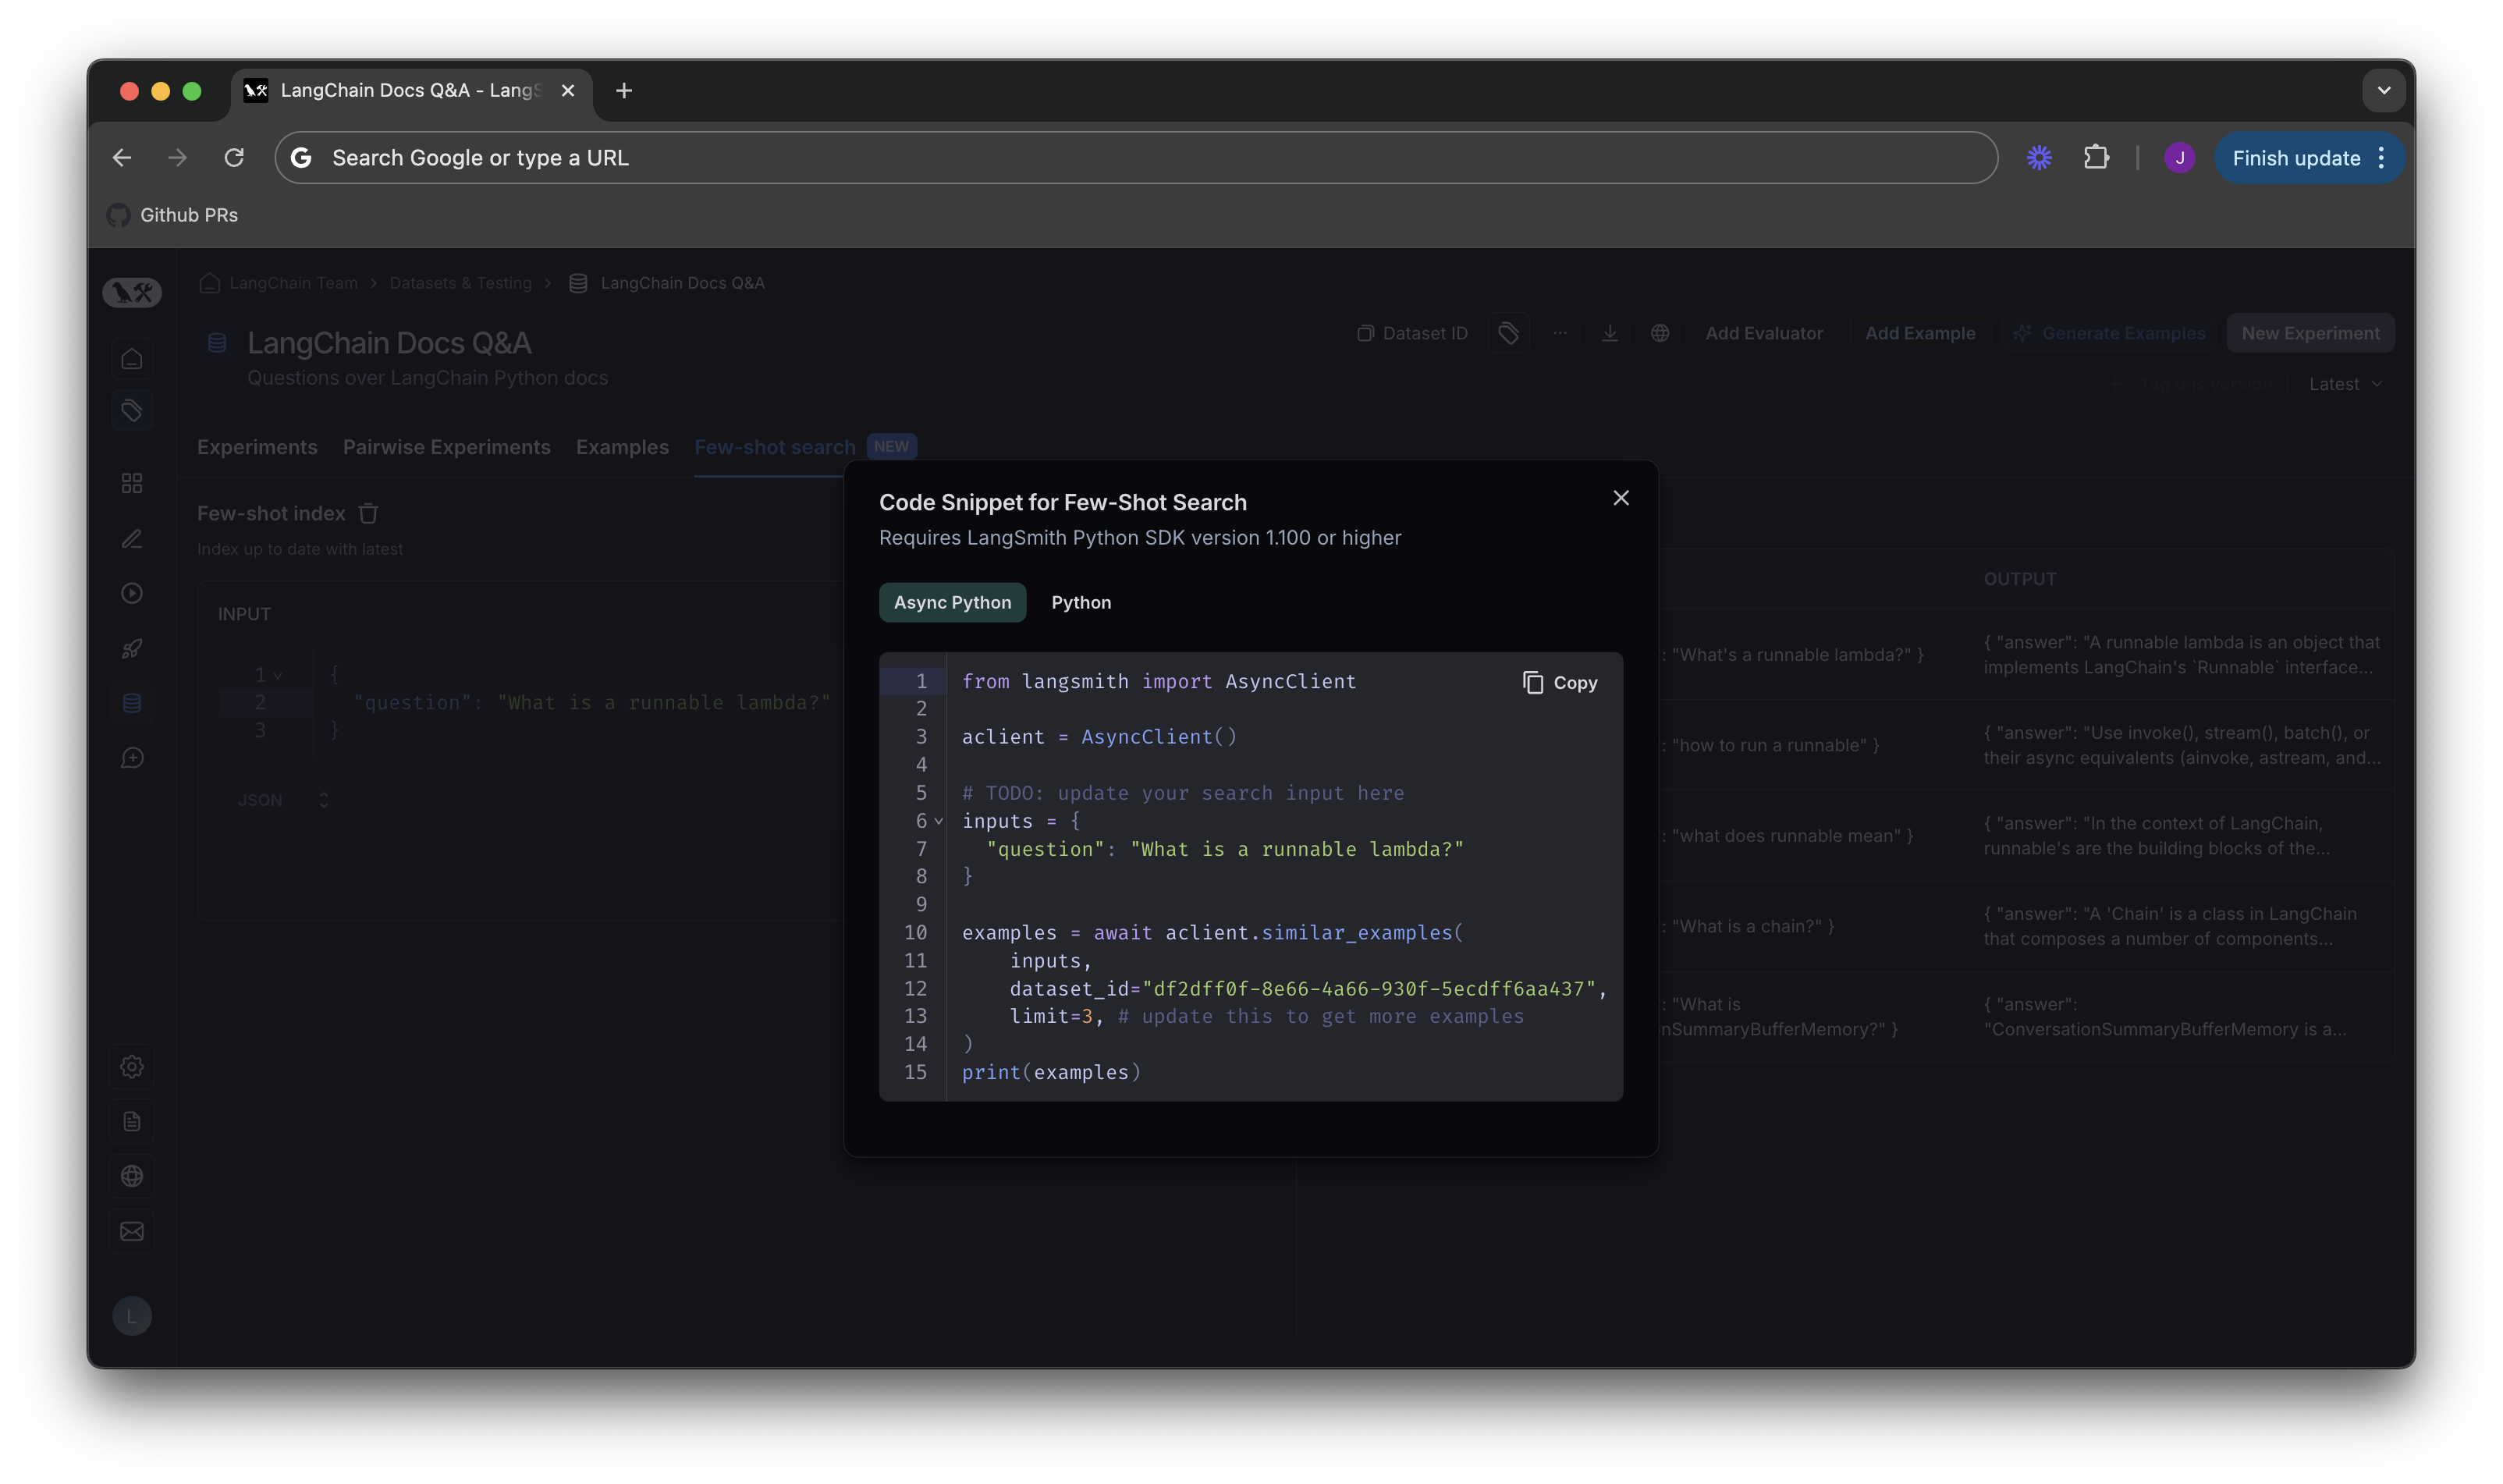 For code samples on using few shot search in LangChain python applications, please see our [how-to guide in the LangChain docs](https://python.langchain.com/v0.2/docs/how_to/example_selectors_langsmith/).
### Code snippets
For code samples on using few shot search in LangChain python applications, please see our [how-to guide in the LangChain docs](https://python.langchain.com/v0.2/docs/how_to/example_selectors_langsmith/).
### Code snippets
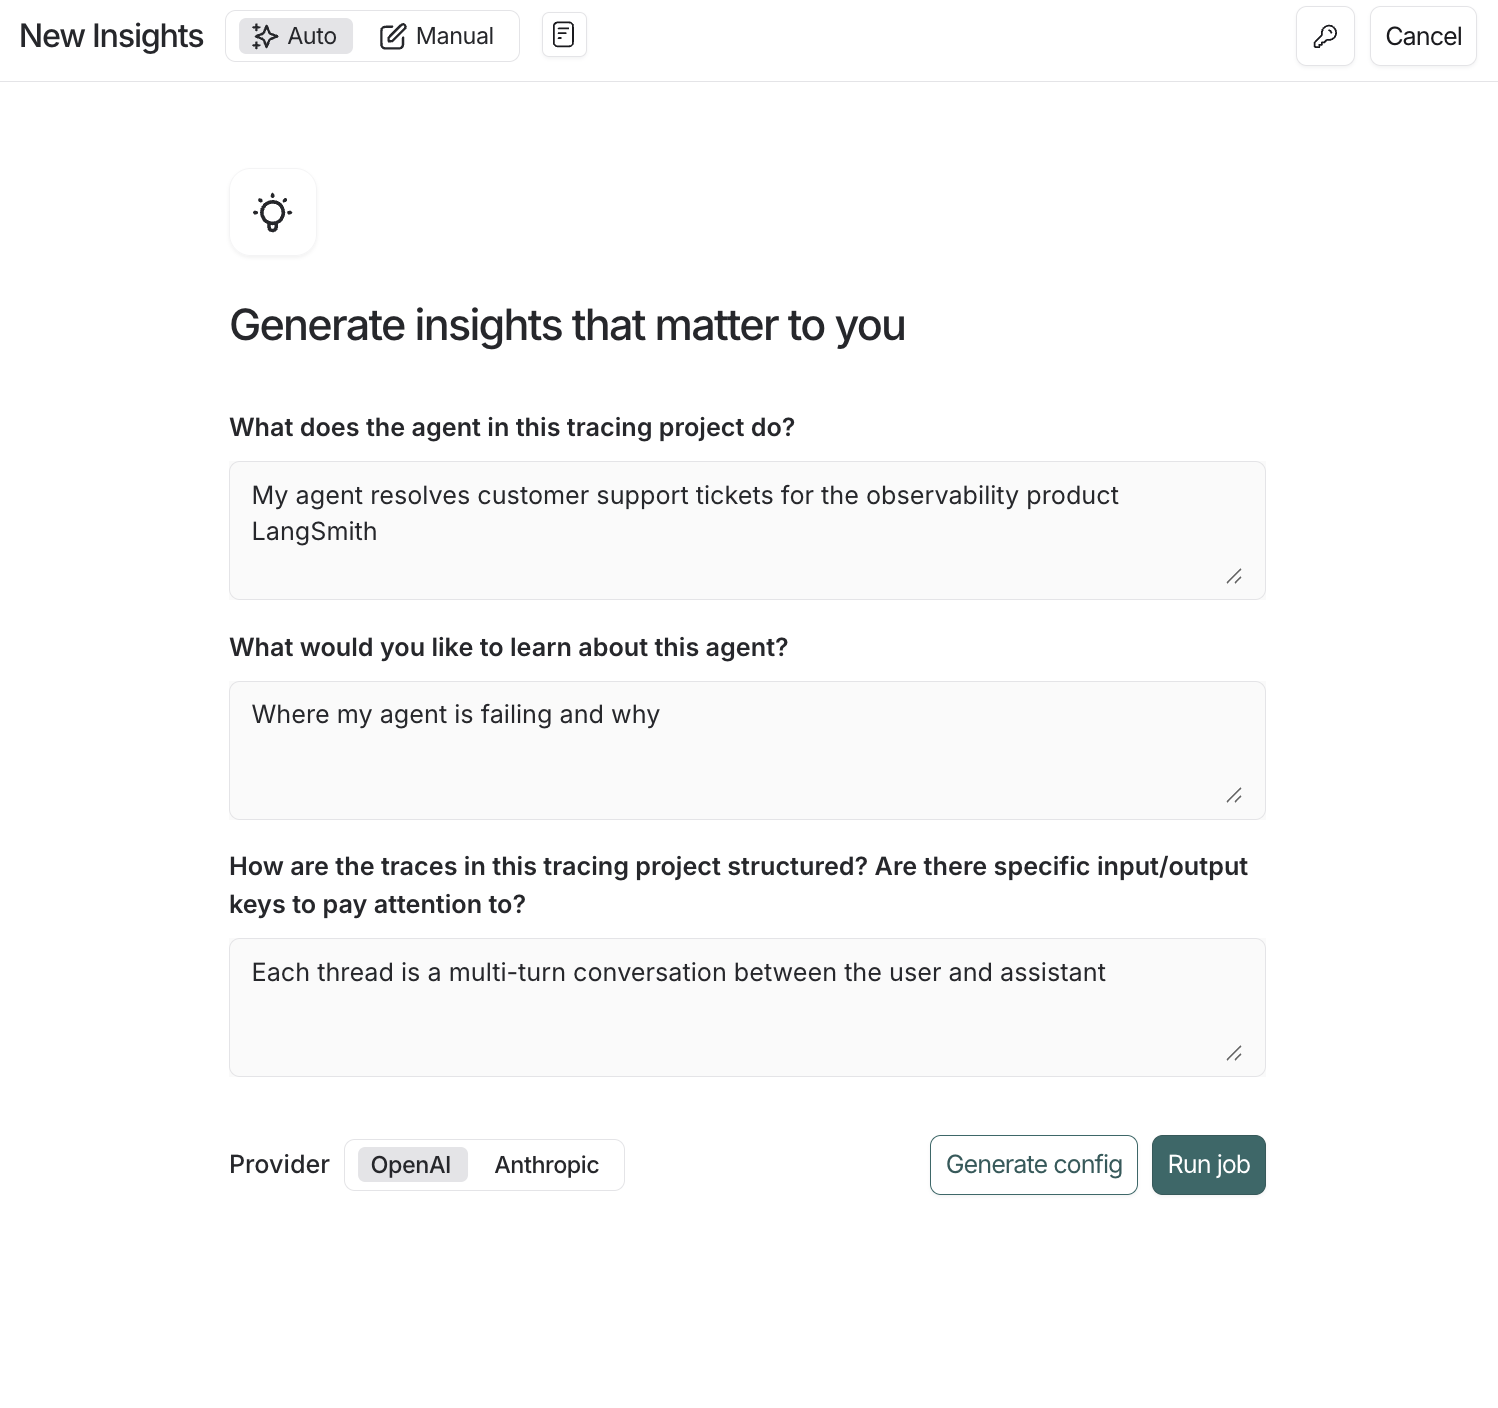 #### From the [LangSmith UI](https://smith.langchain.com):
1. Navigate to **Tracing Projects** in the left-hand menu and select a tracing project.
2. Click **+New** in the top right corner then **New Insights Report** to generate new insights over the project.
3. Enter a name for your job.
4. Click the
#### From the [LangSmith UI](https://smith.langchain.com):
1. Navigate to **Tracing Projects** in the left-hand menu and select a tracing project.
2. Click **+New** in the top right corner then **New Insights Report** to generate new insights over the project.
3. Enter a name for your job.
4. Click the  Click into your job to see traces organized into a set of auto-generated categories.
You can drill down through categories and subcategories to view the underlying traces, feedback, and run statistics.
Click into your job to see traces organized into a set of auto-generated categories.
You can drill down through categories and subcategories to view the underlying traces, feedback, and run statistics.
 ### Top-level categories
Your traces are automatically grouped into top-level categories that represent the broadest patterns in your data.
The distribution bars show how frequently each pattern occurs, making it easy to spot behaviors that happen more or less than expected.
Each category has a brief description and displays aggregated metrics over the traces it contains, including:
* Typical trace stats (like error rates, latency, cost)
* Feedback scores from your evaluators
* [Attributes](#attributes) extracted as part of the job
### Subcategories
Clicking on any category shows a breakdown into subcategories, which gives you a more granular understanding of interaction patterns in that category of traces.
In the [Chat Langchain](https://chat.langchain.com) example pictured above, under "Data & Retrieval" there are subcategories like "Vector Stores" and "Data Ingestion".
### Individual traces
You can view the traces assigned to each category or subcategory by clicking through to see the traces table. From there, you can click into any trace to see the full conversation details.
## Configure a job
You can create an Insights Report three ways. Start with the auto-generated flow to spin up a baseline, then iterate with saved or manual configs as you refine.
### Autogenerating a config
1. Open **New Insights** and make sure the **Auto** toggle is active.
2. Answer the natural-language questions about your agent’s purpose, what you want to learn, and how traces are structured. Insights will translate your answers into
a draft config (job name, summary prompt, attributes, and sampling defaults).
3. Choose a provider, then click **Generate config** to preview or **Run job** to launch immediately.
**Providing useful context**
For best results, write a sentence or two for each prompt that gives the agent the context it needs—what you’re trying to learn, which signals or fields matter most, and anything you
already know isn’t useful. The clearer you are about what your agent does and how its traces are structured, the more the Insights Agent can group examples in a way
that’s specific, actionable, and aligned with how you reason about your data.
**Describing your traces**
Explain how your data is organized—are these single runs or multi-turn conversations? Which inputs and outputs contain the key information? This helps the Insights Agent generate summary prompts and attributes that focus on what matters. You can also directly specify variables from the [summary prompt](#summary-prompt) section if needed.
### Choose a model provider
You can select either OpenAI or Anthropic models to power the agent. You must have the corresponding [workspace secret](/langsmith/administration-overview#workspaces) set for whichever provider you choose (OPENAI\_API\_KEY or ANTHROPIC\_API\_KEY).
Note that using current Anthropic models costs \~3x as much as using OpenAI models.
### Using a prebuilt config
### Top-level categories
Your traces are automatically grouped into top-level categories that represent the broadest patterns in your data.
The distribution bars show how frequently each pattern occurs, making it easy to spot behaviors that happen more or less than expected.
Each category has a brief description and displays aggregated metrics over the traces it contains, including:
* Typical trace stats (like error rates, latency, cost)
* Feedback scores from your evaluators
* [Attributes](#attributes) extracted as part of the job
### Subcategories
Clicking on any category shows a breakdown into subcategories, which gives you a more granular understanding of interaction patterns in that category of traces.
In the [Chat Langchain](https://chat.langchain.com) example pictured above, under "Data & Retrieval" there are subcategories like "Vector Stores" and "Data Ingestion".
### Individual traces
You can view the traces assigned to each category or subcategory by clicking through to see the traces table. From there, you can click into any trace to see the full conversation details.
## Configure a job
You can create an Insights Report three ways. Start with the auto-generated flow to spin up a baseline, then iterate with saved or manual configs as you refine.
### Autogenerating a config
1. Open **New Insights** and make sure the **Auto** toggle is active.
2. Answer the natural-language questions about your agent’s purpose, what you want to learn, and how traces are structured. Insights will translate your answers into
a draft config (job name, summary prompt, attributes, and sampling defaults).
3. Choose a provider, then click **Generate config** to preview or **Run job** to launch immediately.
**Providing useful context**
For best results, write a sentence or two for each prompt that gives the agent the context it needs—what you’re trying to learn, which signals or fields matter most, and anything you
already know isn’t useful. The clearer you are about what your agent does and how its traces are structured, the more the Insights Agent can group examples in a way
that’s specific, actionable, and aligned with how you reason about your data.
**Describing your traces**
Explain how your data is organized—are these single runs or multi-turn conversations? Which inputs and outputs contain the key information? This helps the Insights Agent generate summary prompts and attributes that focus on what matters. You can also directly specify variables from the [summary prompt](#summary-prompt) section if needed.
### Choose a model provider
You can select either OpenAI or Anthropic models to power the agent. You must have the corresponding [workspace secret](/langsmith/administration-overview#workspaces) set for whichever provider you choose (OPENAI\_API\_KEY or ANTHROPIC\_API\_KEY).
Note that using current Anthropic models costs \~3x as much as using OpenAI models.
### Using a prebuilt config
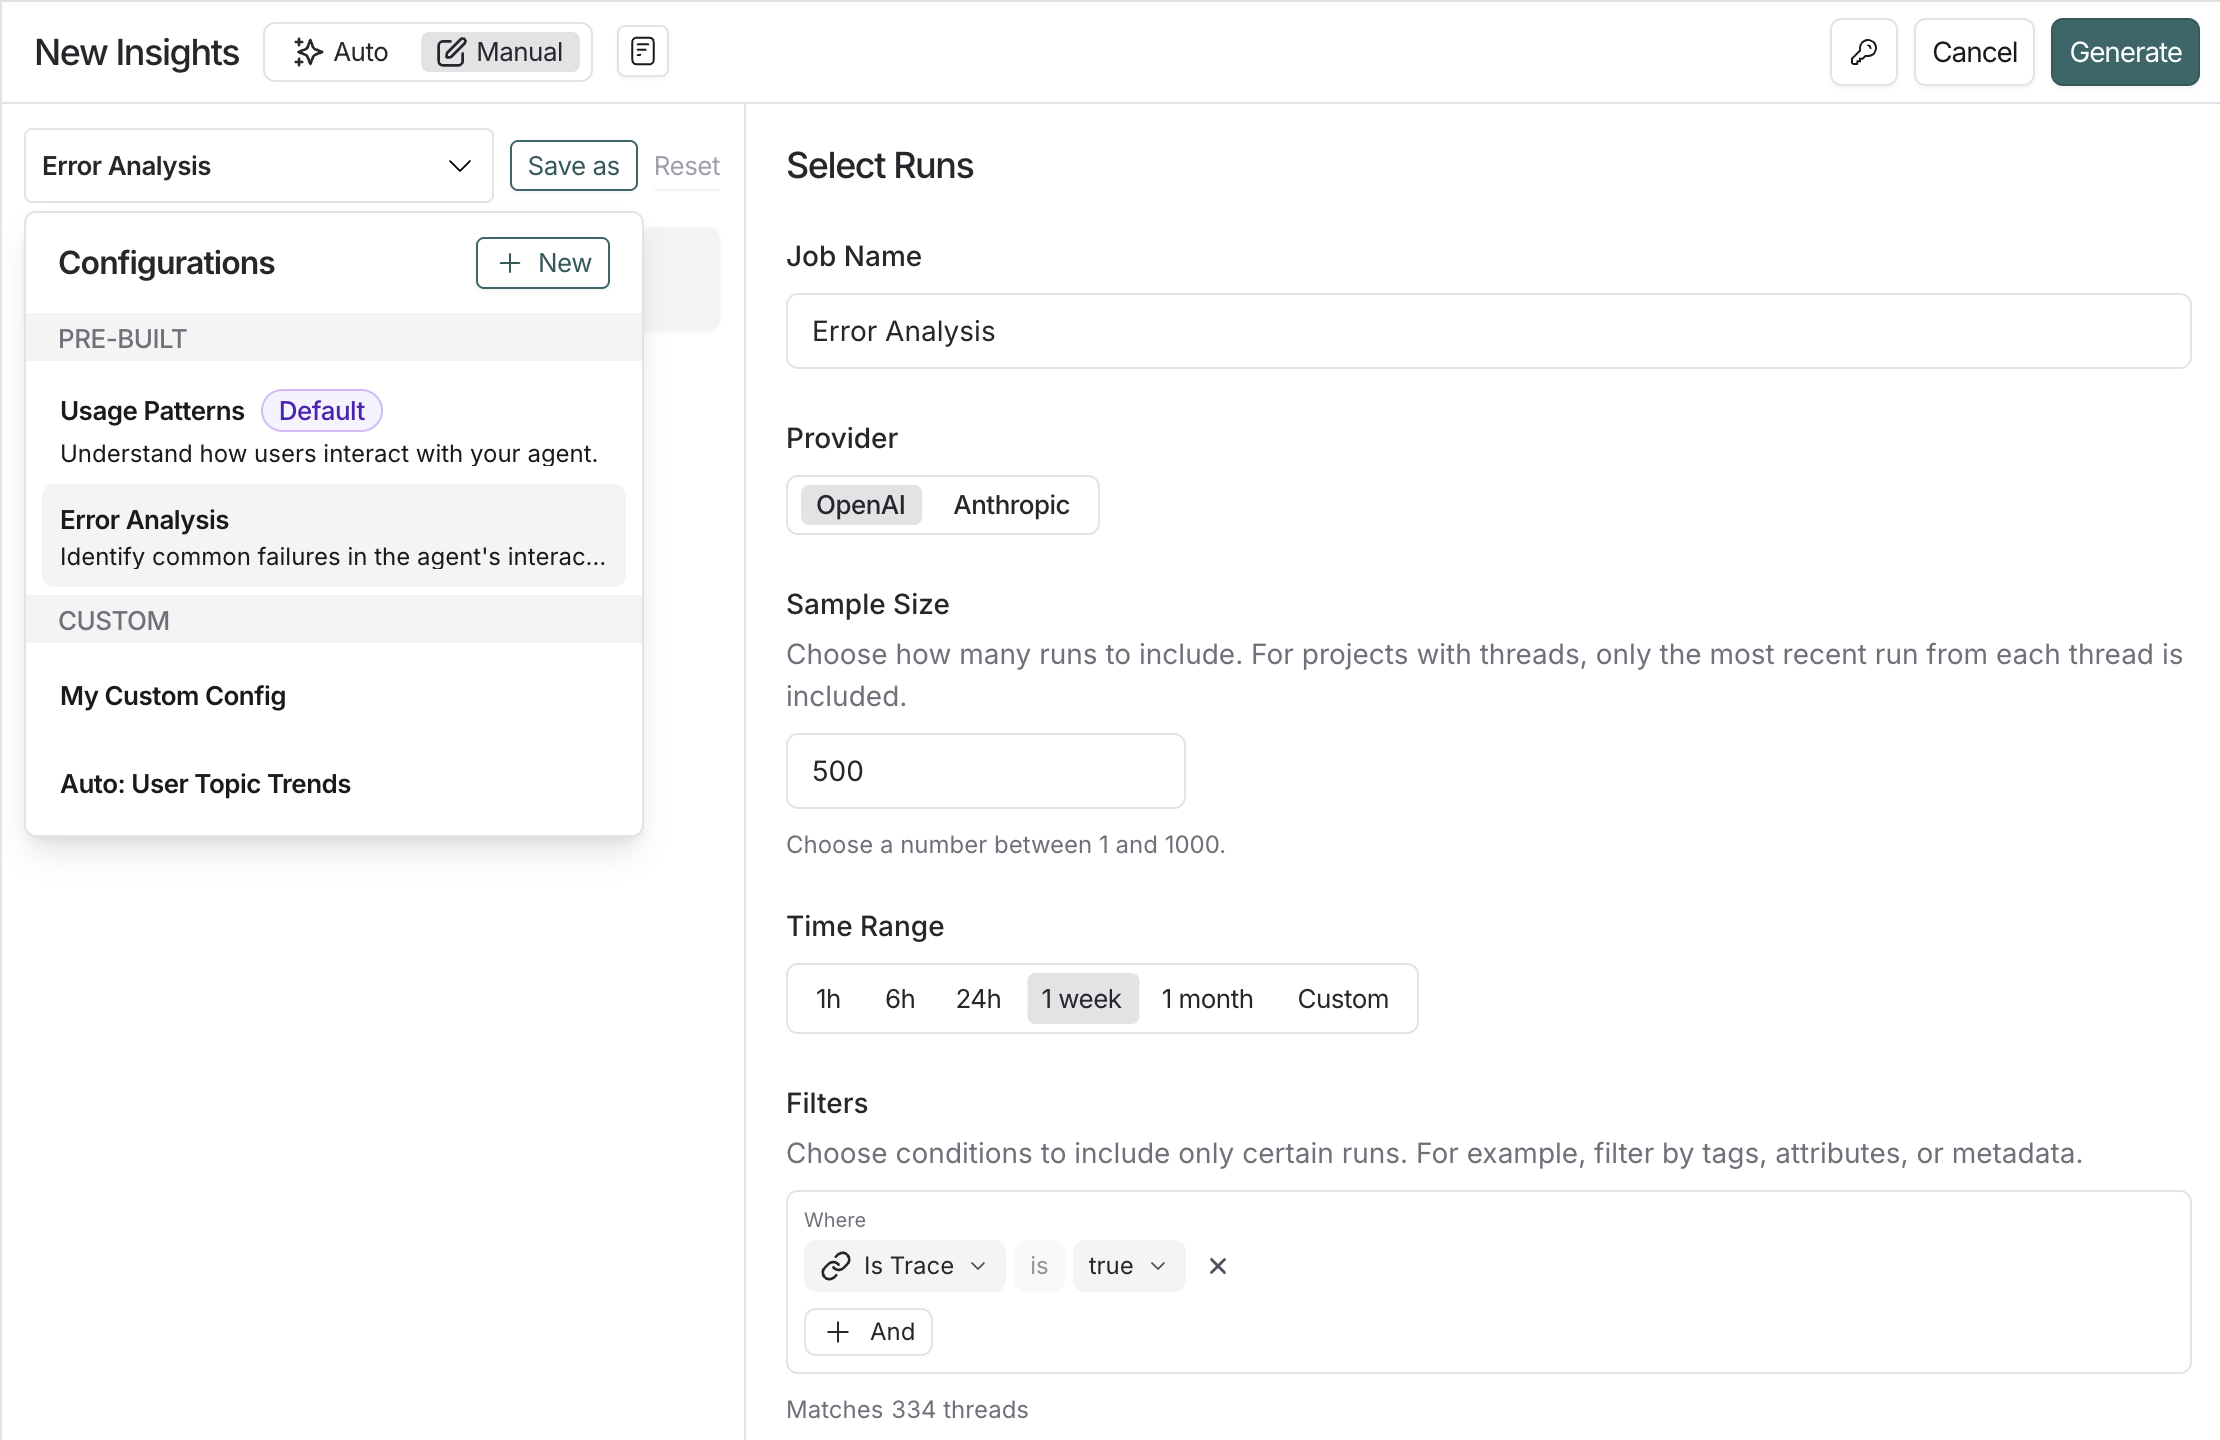 Use the **Saved configurations** dropdown to load presets for common jobs like **Usage Patterns** or **Error Analysis**. Run them directly for a fast start, or adjust filters, prompts, and providers before saving your customized version. To learn more about what you can customize, read the section below.
### Building a config from scratch
Building your own config helps when you need more control—for example, predefining categories you want your data to be grouped into or targeting traces that match specific feedback scores and filters.
#### Select traces
* **Sample size**: The maximum number of traces to analyze. Currently capped at 1,000
* **Time range**: Traces are sampled from this time range
* **Filters**: Additional trace filters. As you adjust filters, you'll see how many traces match your criteria
#### Categories
By default, top-level categories are automatically generated bottom-up from the underlying traces.
In some instances, you know specific categories you're interested in upfront and want the job to bucket traces into those predefined categories.
The **Categories** section of the config lets you do this by enumerating the names and descriptions of the top-level categories you want to be used.
Subcategories are still auto-generated by the algorithm within the predefined top-level categories.
#### Summary prompt
The first step of the job is to create a brief summary of every trace — it is these summaries that are then categorized.
Extracting the right information in the summary is essential for getting useful categories.
The prompt used to generate these summaries can be edited.
The two things to think about when editing the prompt are:
* Summarization instructions: Any information that isn't in the trace summary won't affect the categories that get generated, so make sure to provide clear instructions on what information is important to extract from each trace.
* Trace content: Use mustache formatting to specify which parts of each trace are passed to the summarizer. Large traces with lots of inputs and outputs can be expensive and noisy. Reducing the prompt to only include the most relevant parts of the trace can improve your results.
The Insights Agent analyzes [threads](https://docs.langchain.com/langsmith/threads) - groups of related traces that represent multi-turn conversations. You must specify what parts of the thread to send to the summarizer using at least one of these template variables:
| Variable | Best for | Example |
| -------- | ----------------------------------------------------------------------- | -------------------------------------------------- |
| run.\* | Access data from the most recent root run (i.e. final turn) in a thread | `{{run.inputs}}` `{{run.outputs}}` `{{run.error}}` |
You can also access nested fields using dot notation. For example, the prompt `"Summarize this: {{run.inputs.foo.bar}}"` will include only the "bar" value within the "foo" value of the last run's inputs.
#### Attributes
Along with a summary, you can define additional categorical, numerical, and boolean attributes to be extracted from each trace.
These attributes will influence the categorization step — traces with similar attribute values will tend to be categorized together.
You can also see aggregations of these attributes per category.
As an example, you might want to extract the attribute `user_satisfied: boolean` from each trace to steer the algorithm towards categories that split up positive and negative user experiences, and to see the average user satisfaction per category.
#### Filter attributes
You can use the `filter_by` parameter on boolean attributes to pre-filter traces before generating insights. When enabled, only traces where the attribute evaluates to `true` are included in the analysis.
This is useful when you want to focus your Insights Report on a specific subset of traces—for example, only analyzing errors, only examining English-language conversations, or only including traces that meet certain quality criteria.
Use the **Saved configurations** dropdown to load presets for common jobs like **Usage Patterns** or **Error Analysis**. Run them directly for a fast start, or adjust filters, prompts, and providers before saving your customized version. To learn more about what you can customize, read the section below.
### Building a config from scratch
Building your own config helps when you need more control—for example, predefining categories you want your data to be grouped into or targeting traces that match specific feedback scores and filters.
#### Select traces
* **Sample size**: The maximum number of traces to analyze. Currently capped at 1,000
* **Time range**: Traces are sampled from this time range
* **Filters**: Additional trace filters. As you adjust filters, you'll see how many traces match your criteria
#### Categories
By default, top-level categories are automatically generated bottom-up from the underlying traces.
In some instances, you know specific categories you're interested in upfront and want the job to bucket traces into those predefined categories.
The **Categories** section of the config lets you do this by enumerating the names and descriptions of the top-level categories you want to be used.
Subcategories are still auto-generated by the algorithm within the predefined top-level categories.
#### Summary prompt
The first step of the job is to create a brief summary of every trace — it is these summaries that are then categorized.
Extracting the right information in the summary is essential for getting useful categories.
The prompt used to generate these summaries can be edited.
The two things to think about when editing the prompt are:
* Summarization instructions: Any information that isn't in the trace summary won't affect the categories that get generated, so make sure to provide clear instructions on what information is important to extract from each trace.
* Trace content: Use mustache formatting to specify which parts of each trace are passed to the summarizer. Large traces with lots of inputs and outputs can be expensive and noisy. Reducing the prompt to only include the most relevant parts of the trace can improve your results.
The Insights Agent analyzes [threads](https://docs.langchain.com/langsmith/threads) - groups of related traces that represent multi-turn conversations. You must specify what parts of the thread to send to the summarizer using at least one of these template variables:
| Variable | Best for | Example |
| -------- | ----------------------------------------------------------------------- | -------------------------------------------------- |
| run.\* | Access data from the most recent root run (i.e. final turn) in a thread | `{{run.inputs}}` `{{run.outputs}}` `{{run.error}}` |
You can also access nested fields using dot notation. For example, the prompt `"Summarize this: {{run.inputs.foo.bar}}"` will include only the "bar" value within the "foo" value of the last run's inputs.
#### Attributes
Along with a summary, you can define additional categorical, numerical, and boolean attributes to be extracted from each trace.
These attributes will influence the categorization step — traces with similar attribute values will tend to be categorized together.
You can also see aggregations of these attributes per category.
As an example, you might want to extract the attribute `user_satisfied: boolean` from each trace to steer the algorithm towards categories that split up positive and negative user experiences, and to see the average user satisfaction per category.
#### Filter attributes
You can use the `filter_by` parameter on boolean attributes to pre-filter traces before generating insights. When enabled, only traces where the attribute evaluates to `true` are included in the analysis.
This is useful when you want to focus your Insights Report on a specific subset of traces—for example, only analyzing errors, only examining English-language conversations, or only including traces that meet certain quality criteria.
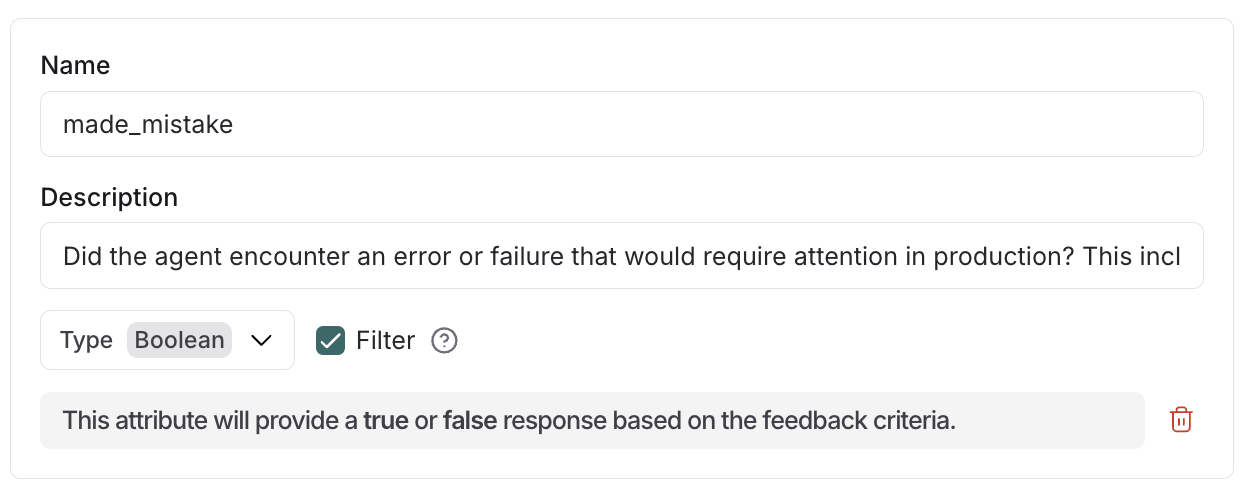 **How it works:**
* Add `"filter_by": true` to any boolean attribute when creating a config for the Insights Agent
* The LLM evaluates each trace against the attribute description during summarization
* Traces where the attribute is `false` or missing are excluded before insights are generated
## Save your config
You can optionally save configs for future reuse using the 'save as' button.
This is especially useful if you want to compare Insights Reports over time to identify changes in user and agent behavior.
Select from previously saved configs in the dropdown in the top-left corner of the pane when creating a new Insights Report.
***
## Using LangSmith
Now that LangSmith is running, you can start using it to trace your code. You can find more information on how to use self-hosted LangSmith in the [self-hosted usage guide](/langsmith/self-hosted).
Your LangSmith instance is now running but may not be fully setup yet.
If you used one of the basic configs, you will have a default admin user account created for you. You can log in with the email address and password you specified in the `langsmith_config.yaml` file.
As a next step, it is strongly recommended you work with your infrastructure administrators to:
* Setup DNS for your LangSmith instance to enable easier access
* Configure SSL to ensure in-transit encryption of traces submitted to LangSmith
* Configure LangSmith with [Single Sign-On](/langsmith/self-host-sso) to secure your LangSmith instance
* Connect LangSmith to external Postgres and Redis instances
* Set up [Blob Storage](/langsmith/self-host-blob-storage) for storing large files
Review our [configuration section](/langsmith/self-hosted) for more information on how to configure these options.
***
**How it works:**
* Add `"filter_by": true` to any boolean attribute when creating a config for the Insights Agent
* The LLM evaluates each trace against the attribute description during summarization
* Traces where the attribute is `false` or missing are excluded before insights are generated
## Save your config
You can optionally save configs for future reuse using the 'save as' button.
This is especially useful if you want to compare Insights Reports over time to identify changes in user and agent behavior.
Select from previously saved configs in the dropdown in the top-left corner of the pane when creating a new Insights Report.
***
## Using LangSmith
Now that LangSmith is running, you can start using it to trace your code. You can find more information on how to use self-hosted LangSmith in the [self-hosted usage guide](/langsmith/self-hosted).
Your LangSmith instance is now running but may not be fully setup yet.
If you used one of the basic configs, you will have a default admin user account created for you. You can log in with the email address and password you specified in the `langsmith_config.yaml` file.
As a next step, it is strongly recommended you work with your infrastructure administrators to:
* Setup DNS for your LangSmith instance to enable easier access
* Configure SSL to ensure in-transit encryption of traces submitted to LangSmith
* Configure LangSmith with [Single Sign-On](/langsmith/self-host-sso) to secure your LangSmith instance
* Connect LangSmith to external Postgres and Redis instances
* Set up [Blob Storage](/langsmith/self-host-blob-storage) for storing large files
Review our [configuration section](/langsmith/self-hosted) for more information on how to configure these options.
***
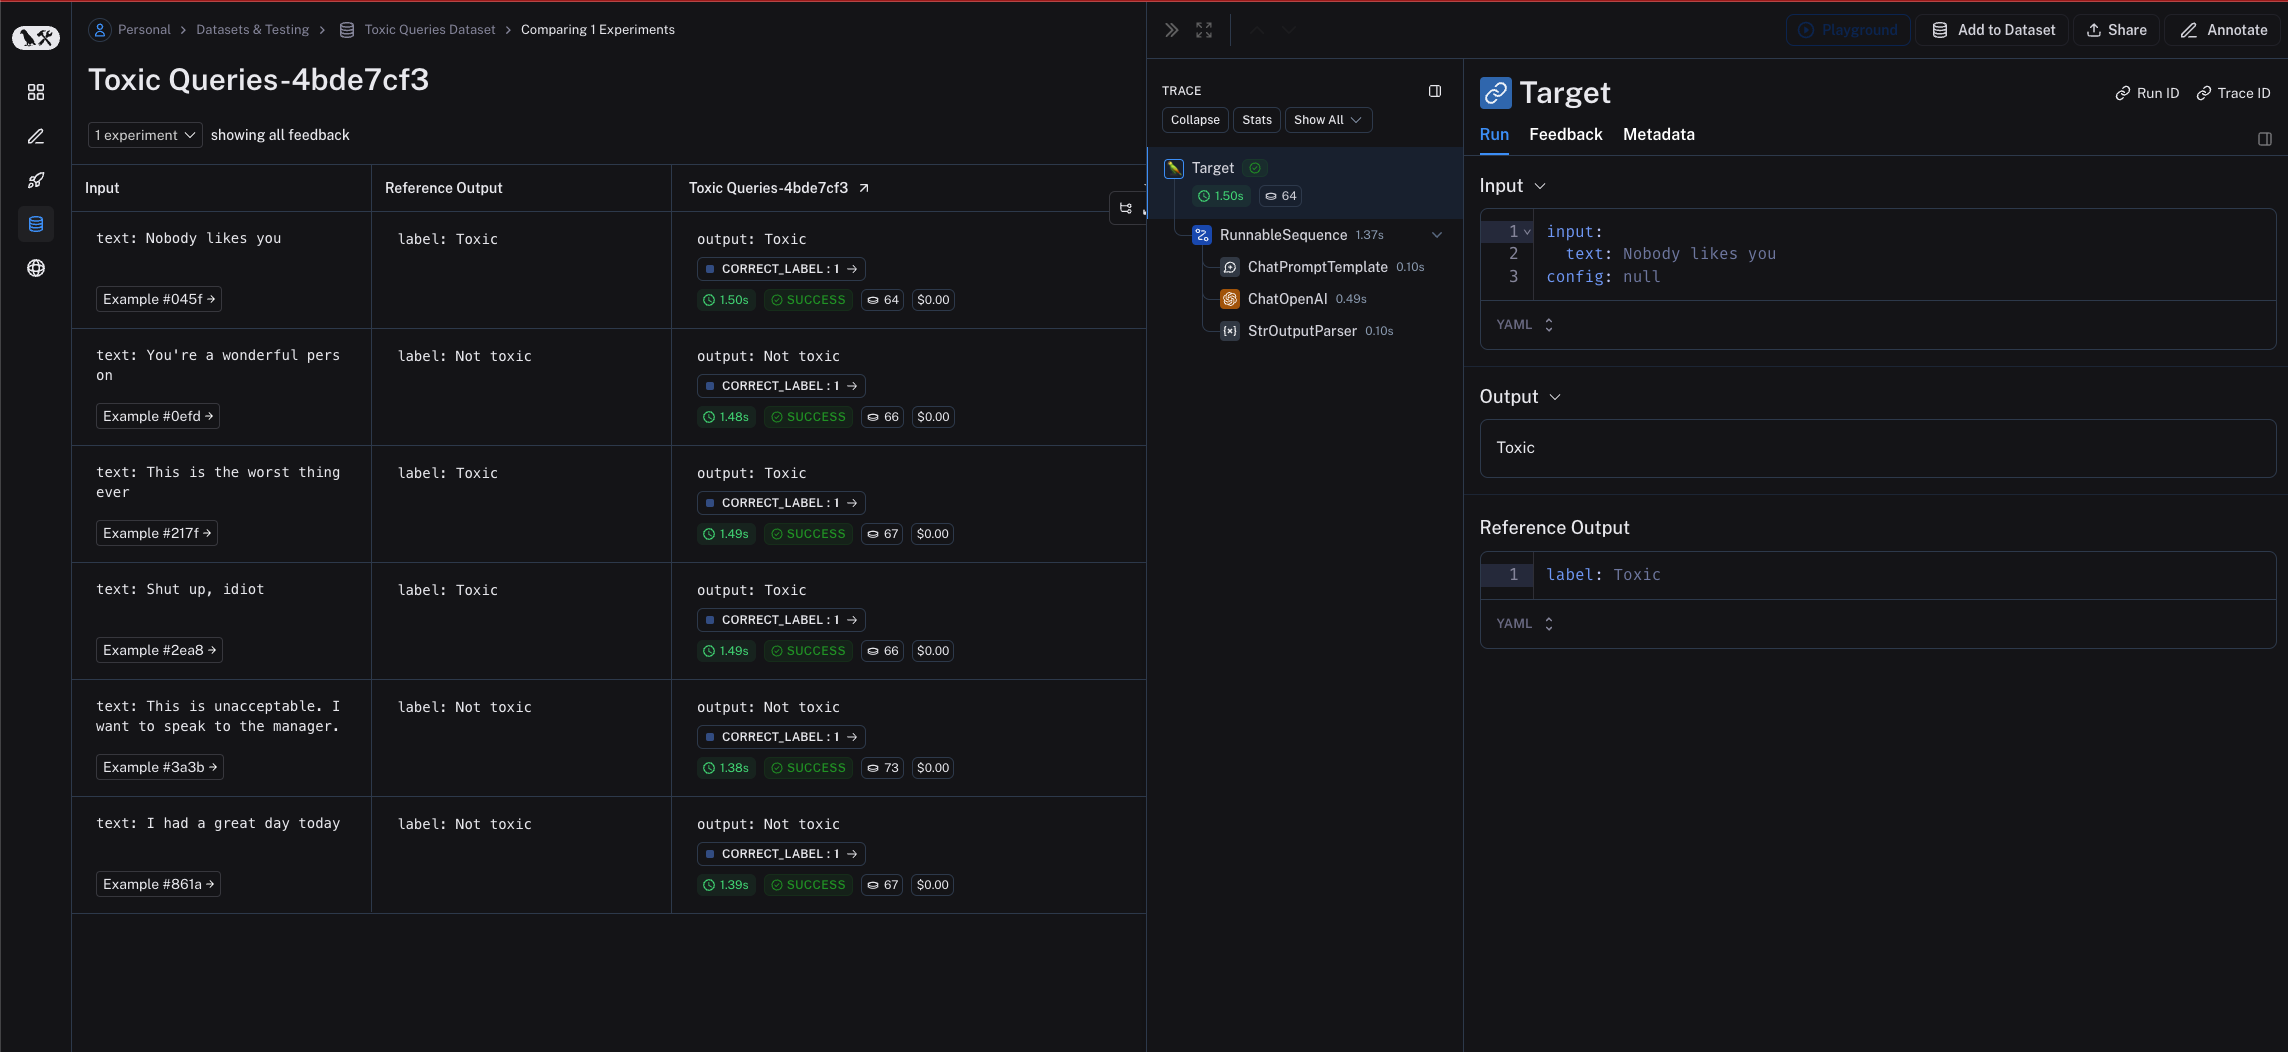 ## Related
* [How to evaluate a `langgraph` graph](/langsmith/evaluate-on-intermediate-steps)
***
## Related
* [How to evaluate a `langgraph` graph](/langsmith/evaluate-on-intermediate-steps)
***
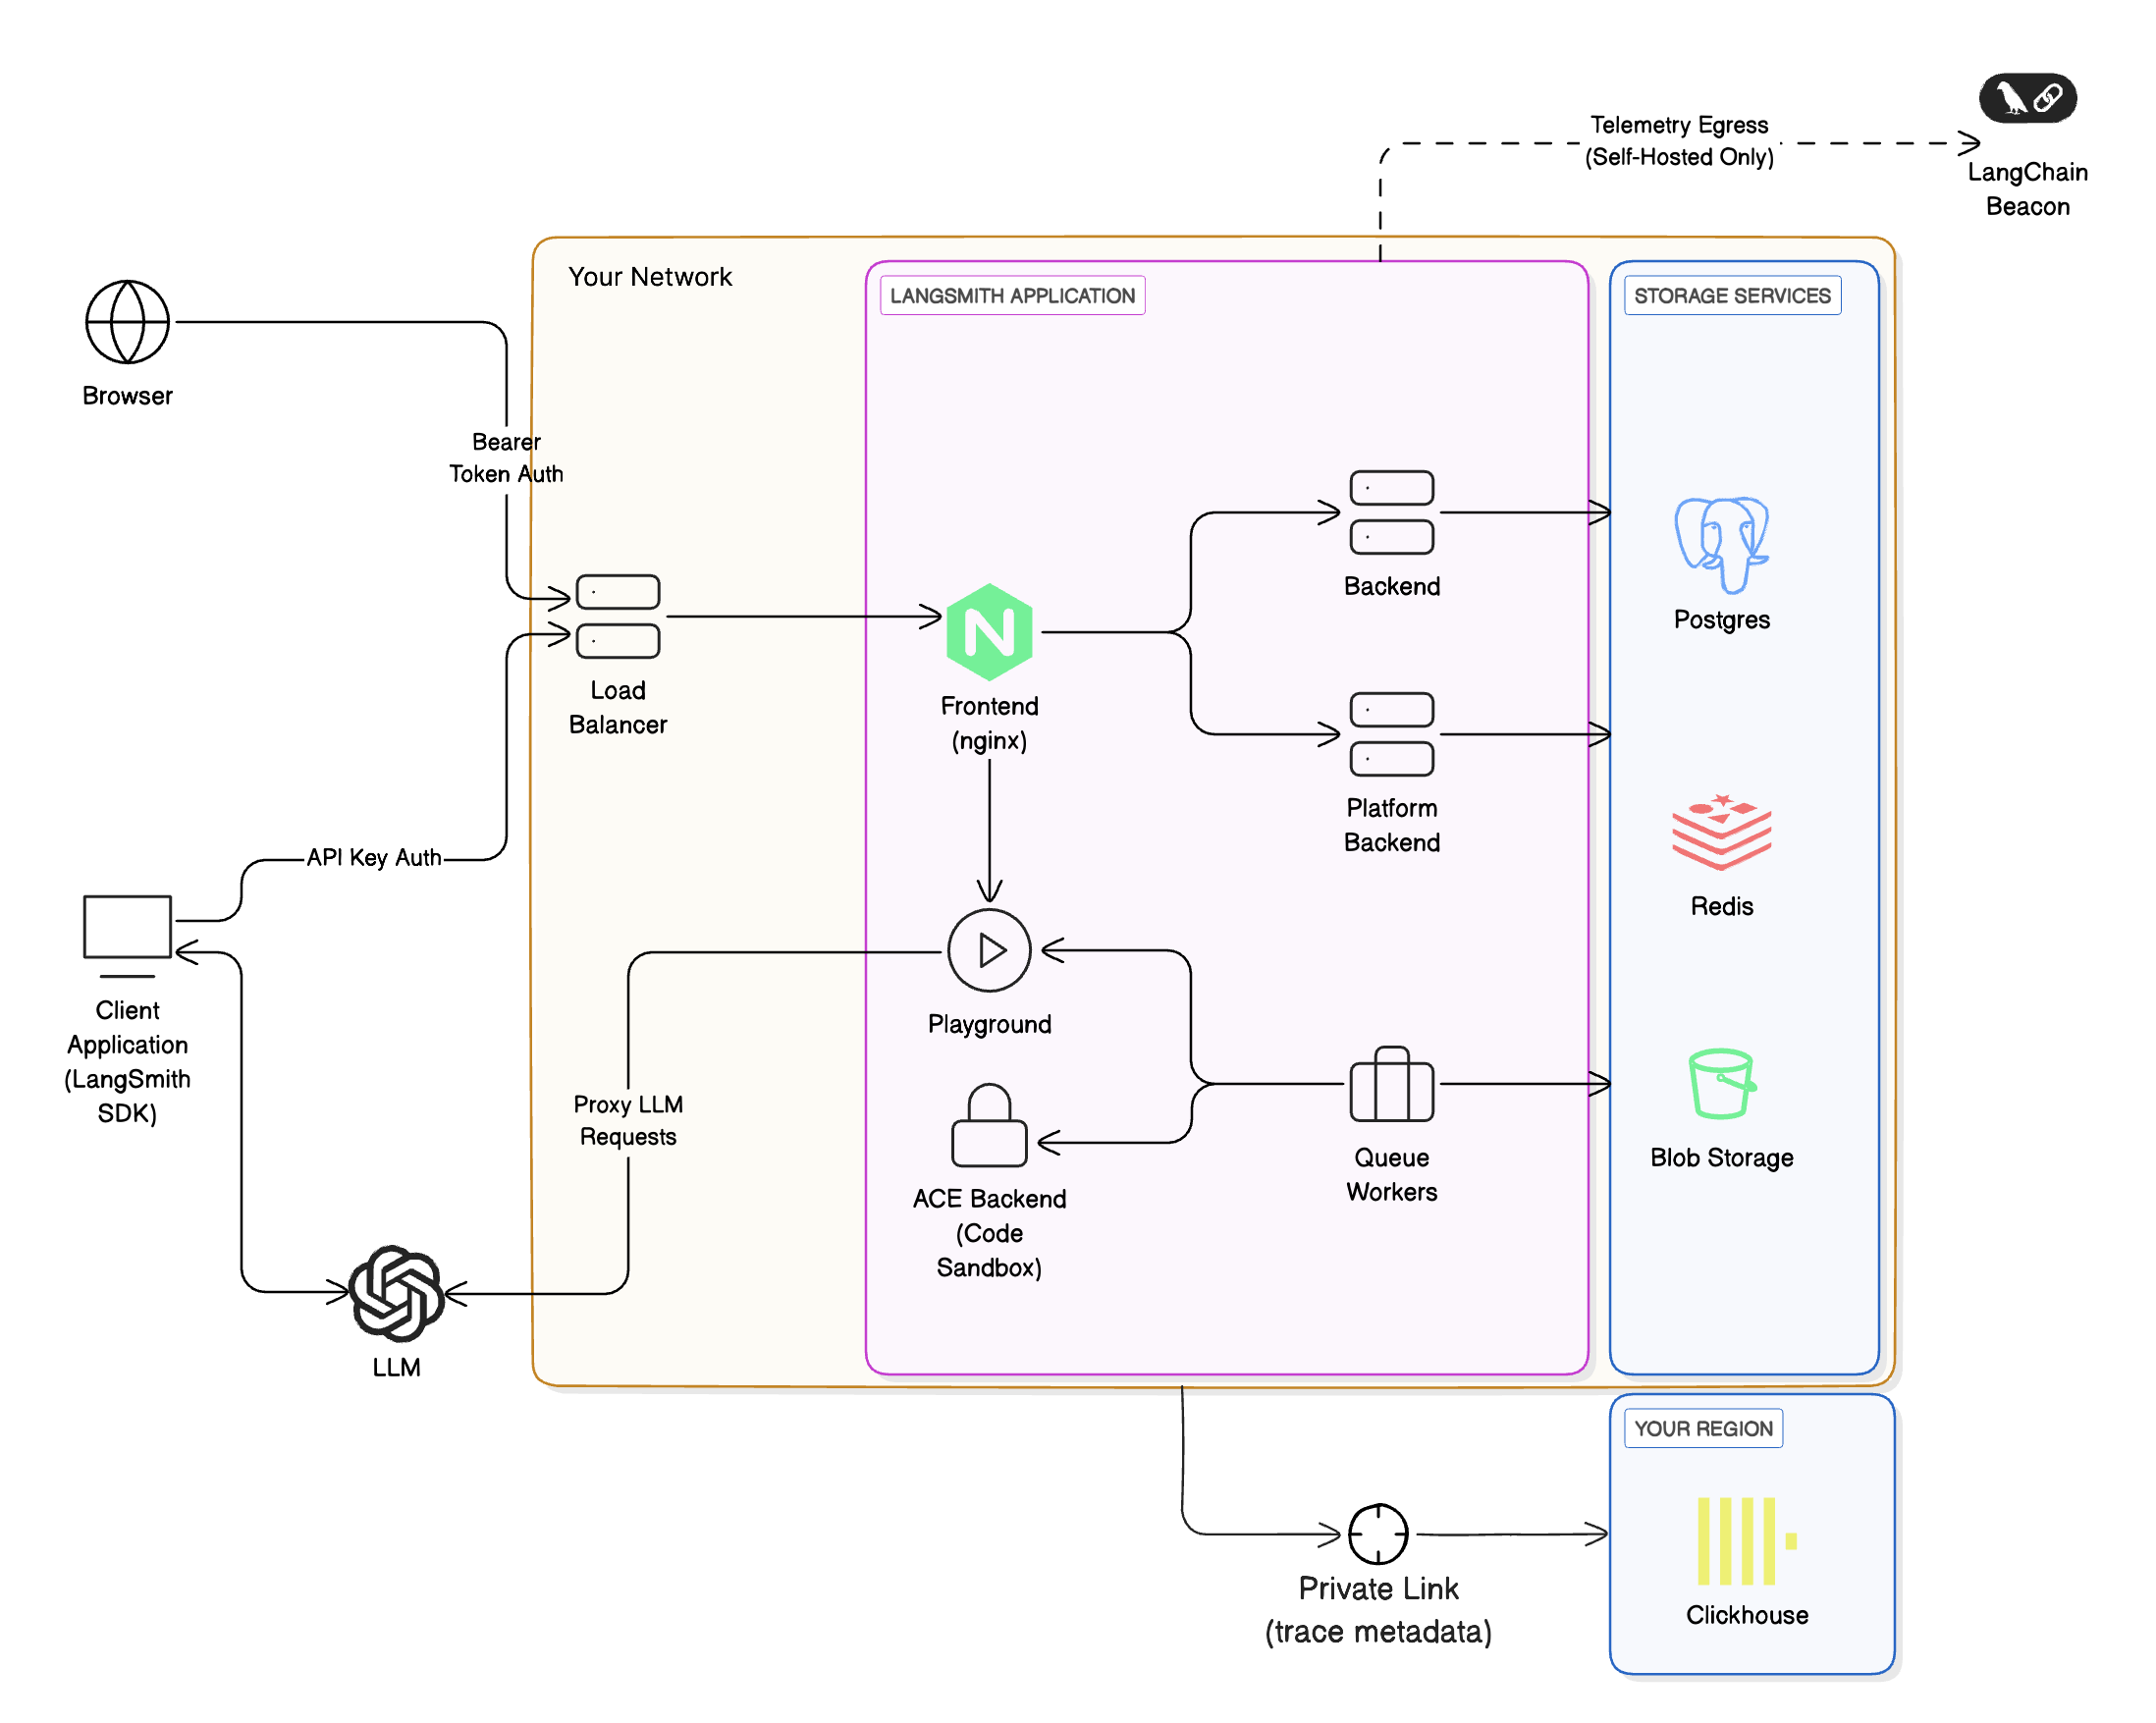
 ## Requirements
* **You must use a supported blob storage option.** Read the [blob storage guide](/langsmith/self-host-blob-storage) for more information.
* To use private endpoints, ensure that your VPC is in a ClickHouse Cloud supported [region](https://clickhouse.com/docs/en/cloud/reference/supported-regions). Otherwise, you will need to use a public endpoint we will secure with firewall rules. Your VPC will need to have a NAT gateway to allow us to allowlist your traffic.
* You must have a VPC that can connect to the LangSmith-managed ClickHouse service. You will need to work with our team to set up the necessary networking.
* You must have a LangSmith self-hosted instance running. You can use our managed ClickHouse service with both [Kubernetes](/langsmith/kubernetes) and [Docker](/langsmith/docker) installations.
## Data storage
ClickHouse stores **runs** and **feedback** data, specifically:
* All feedback data fields.
* Some run data fields.
For a list of fields, refer to [Stored run data fields](#stored-run-data-fields) and [Stored feedback data fields](#stored-feedback-data-fields).
LangChain defines sensitive application data as `inputs`, `outputs`, `errors`, `manifests`, `extras`, and `events` of a run, since these fields may contain LLM prompts and completions. With LangSmith-managed ClickHouse, these sensitive fields are stored in cloud object storage (S3 or GCS) within your cloud, while the rest of the run data is stored in ClickHouse, ensuring sensitive information never leaves your VPC.
### Stored feedback data fields
## Requirements
* **You must use a supported blob storage option.** Read the [blob storage guide](/langsmith/self-host-blob-storage) for more information.
* To use private endpoints, ensure that your VPC is in a ClickHouse Cloud supported [region](https://clickhouse.com/docs/en/cloud/reference/supported-regions). Otherwise, you will need to use a public endpoint we will secure with firewall rules. Your VPC will need to have a NAT gateway to allow us to allowlist your traffic.
* You must have a VPC that can connect to the LangSmith-managed ClickHouse service. You will need to work with our team to set up the necessary networking.
* You must have a LangSmith self-hosted instance running. You can use our managed ClickHouse service with both [Kubernetes](/langsmith/kubernetes) and [Docker](/langsmith/docker) installations.
## Data storage
ClickHouse stores **runs** and **feedback** data, specifically:
* All feedback data fields.
* Some run data fields.
For a list of fields, refer to [Stored run data fields](#stored-run-data-fields) and [Stored feedback data fields](#stored-feedback-data-fields).
LangChain defines sensitive application data as `inputs`, `outputs`, `errors`, `manifests`, `extras`, and `events` of a run, since these fields may contain LLM prompts and completions. With LangSmith-managed ClickHouse, these sensitive fields are stored in cloud object storage (S3 or GCS) within your cloud, while the rest of the run data is stored in ClickHouse, ensuring sensitive information never leaves your VPC.
### Stored feedback data fields
system | reasoning | user | assistant | tool
text | image | file | audio | video | tool\_call | server\_tool\_call | server\_tool\_result.
success | error.
id of a prior assistant message’s tool\_calls\[i] entry. Only valid when role is tool.
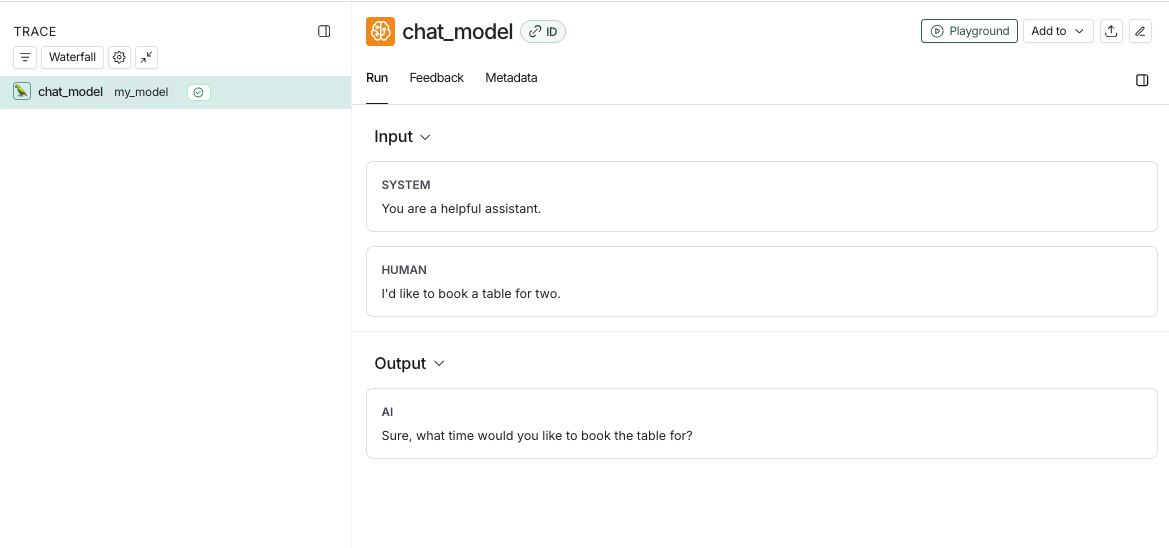
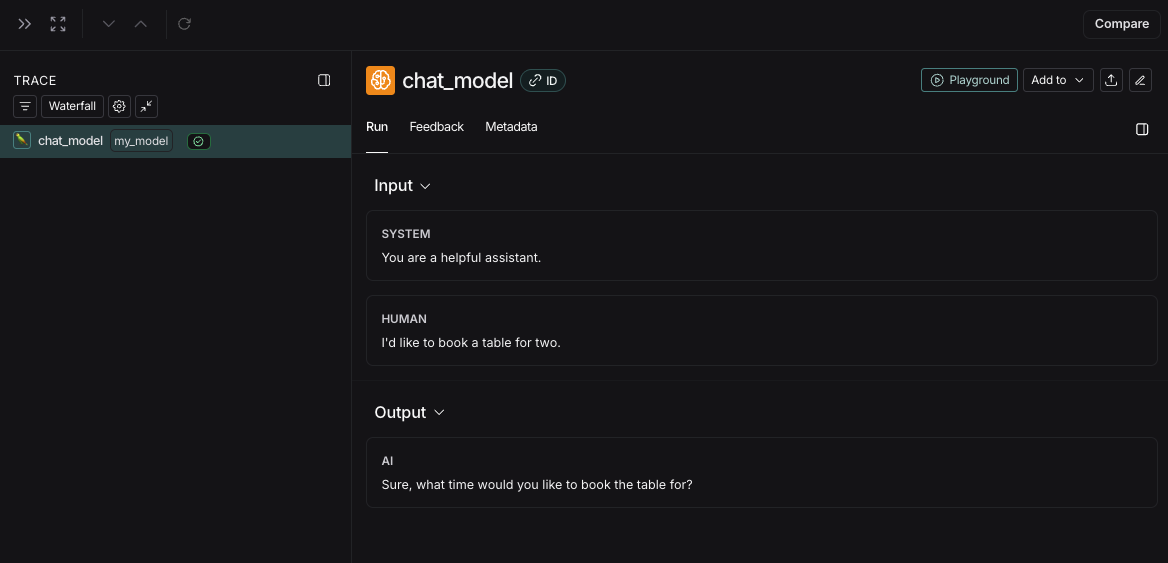
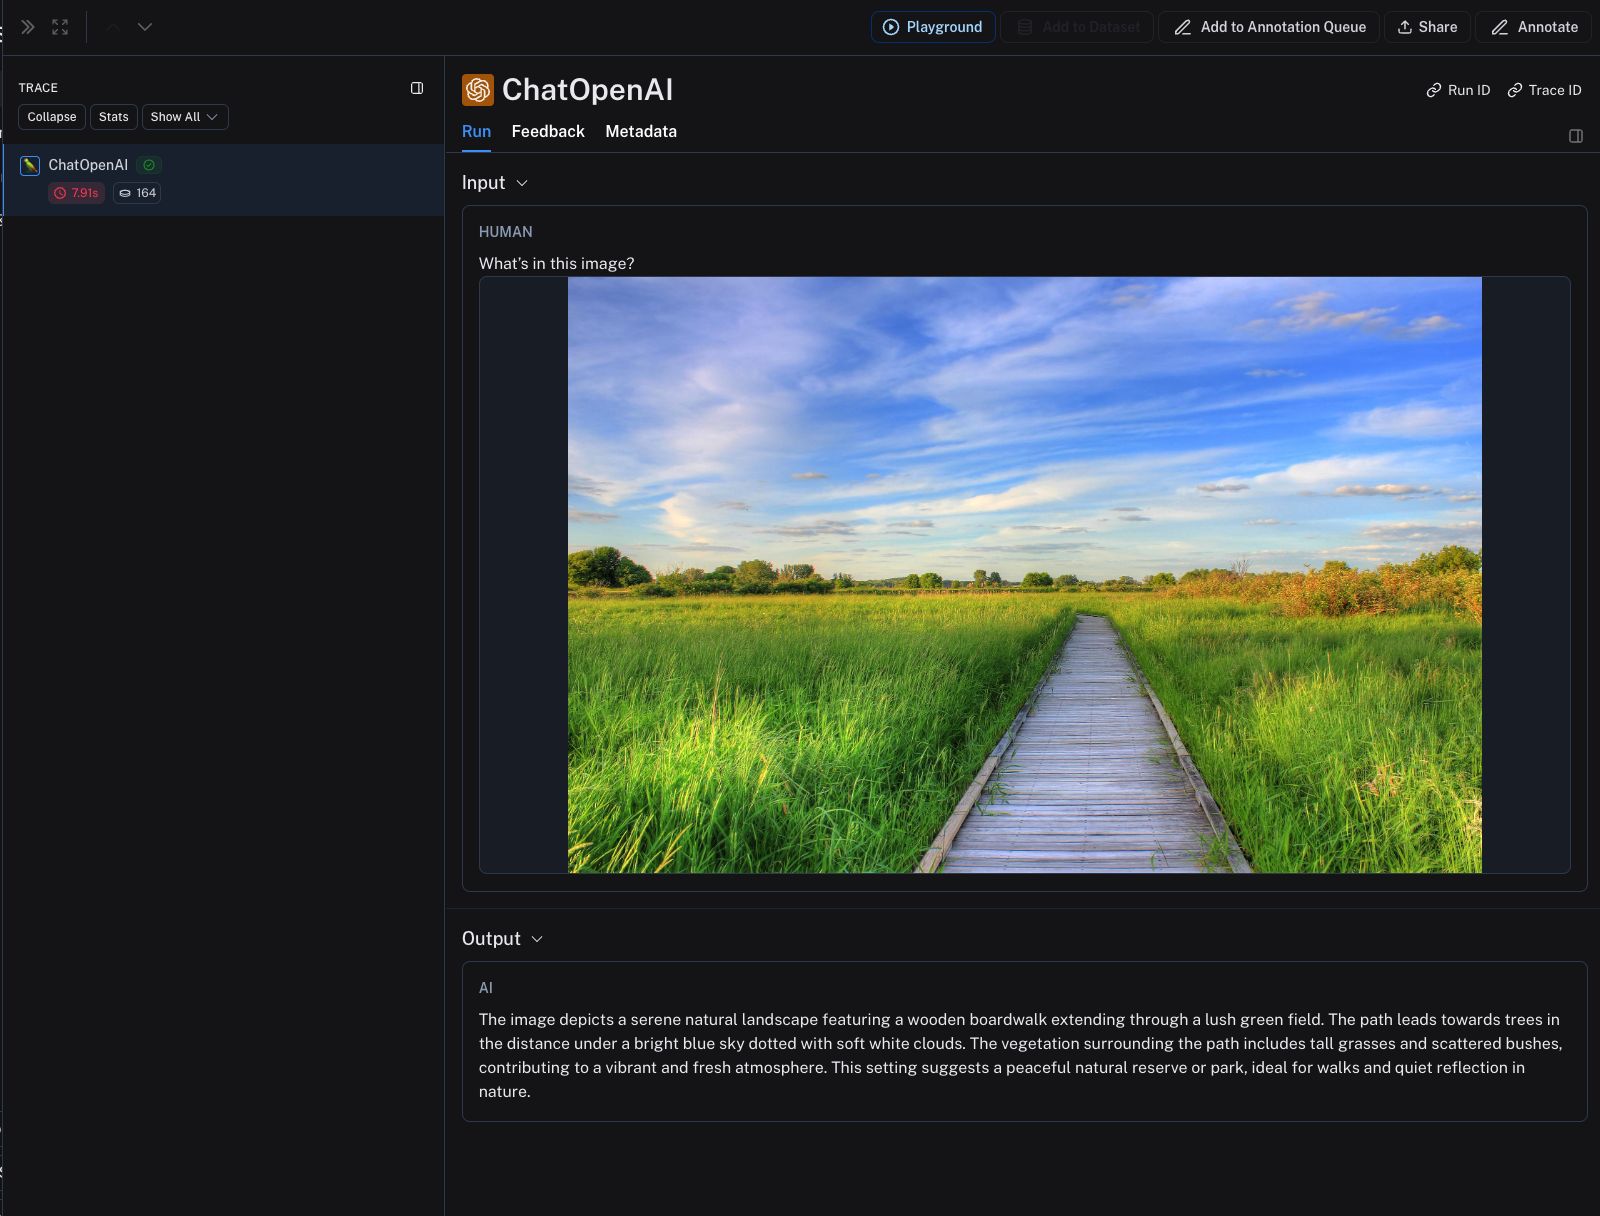 ***
***
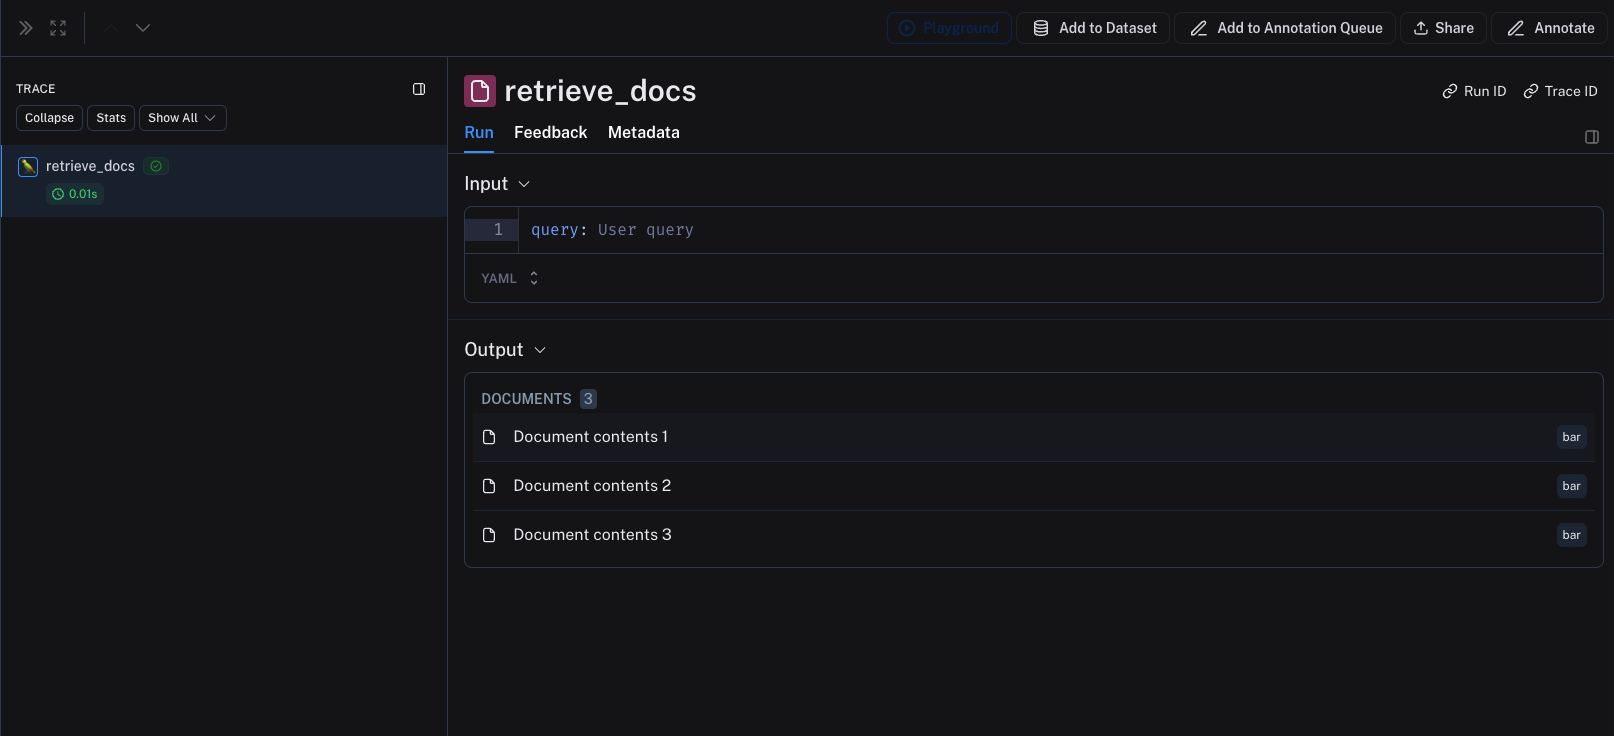 ***
***
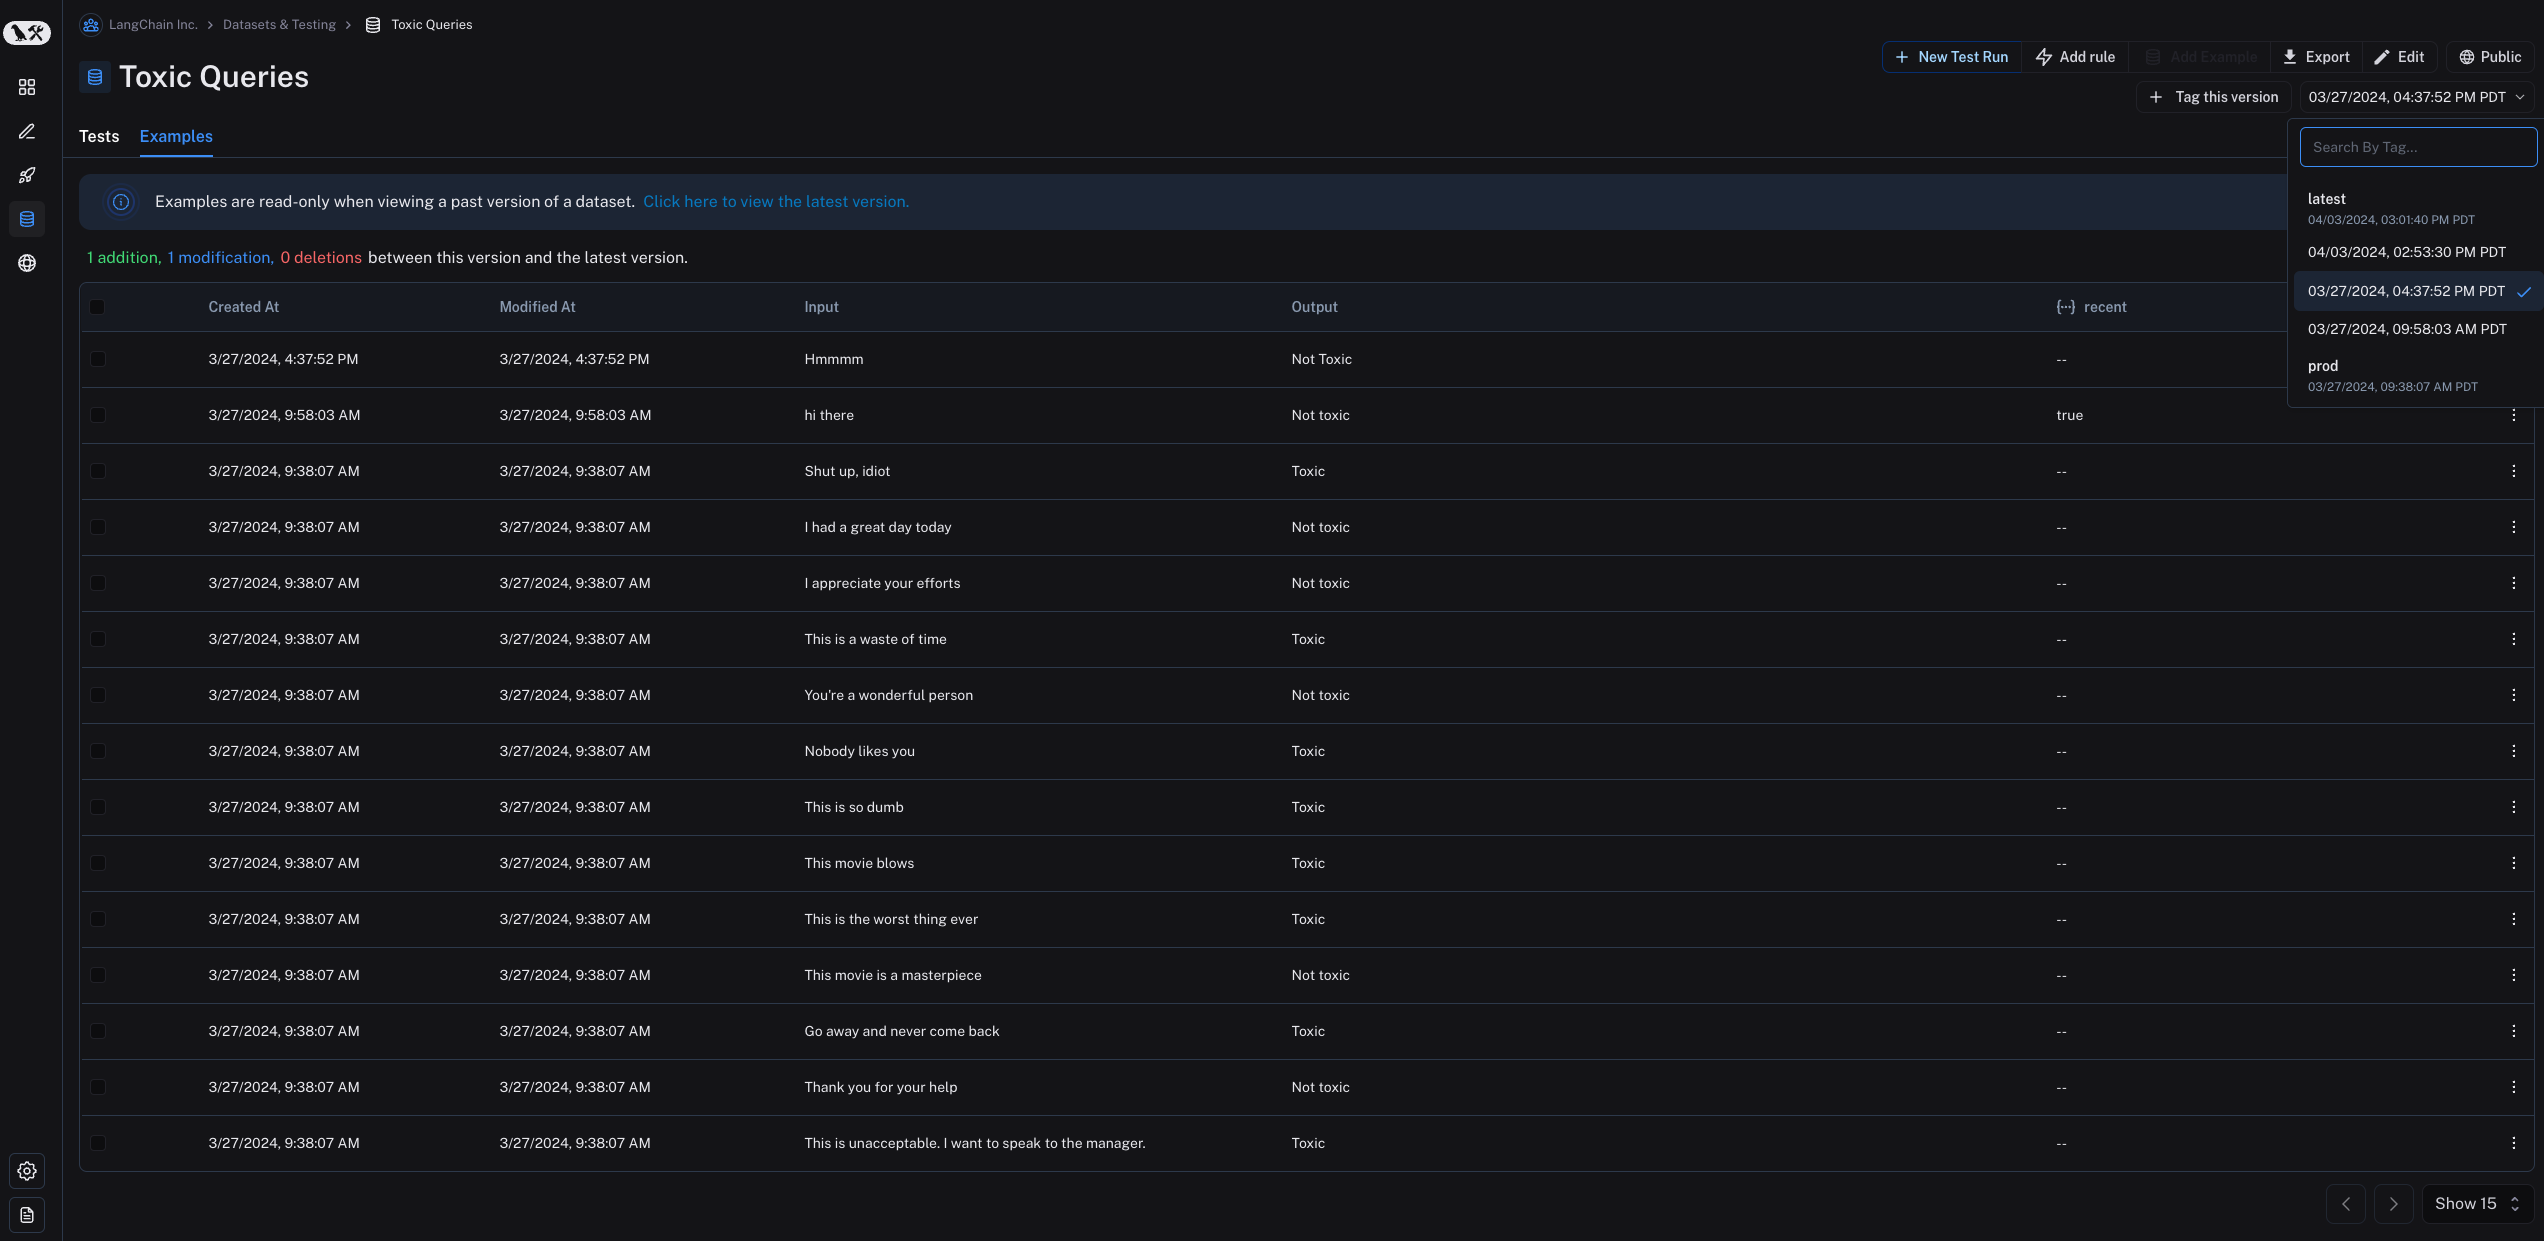 Note that examples are read-only when viewing a past version of the dataset. You will also see the operations that were between this version of the dataset and the latest version of the dataset.
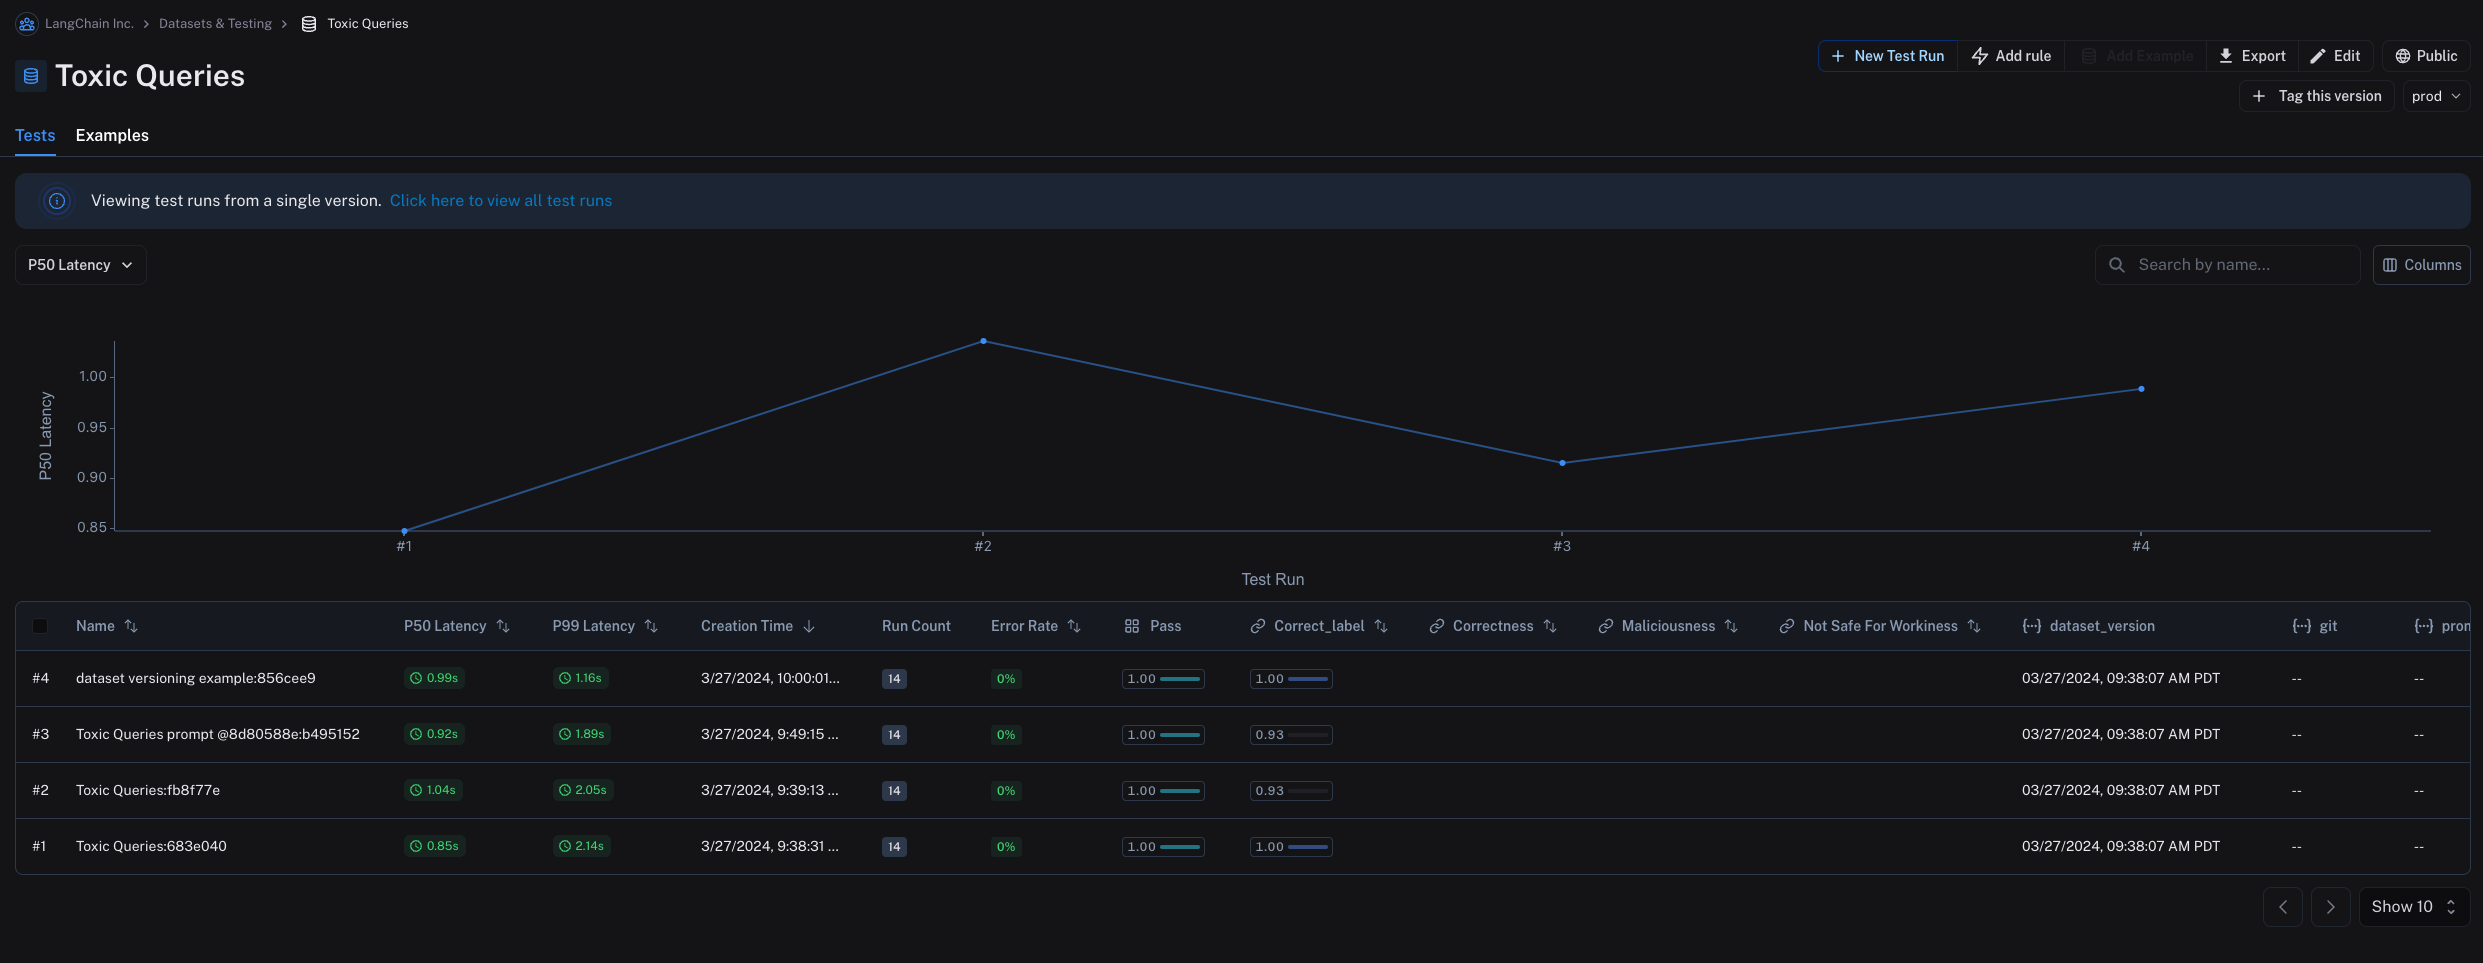 ### Tag a version
You can also tag versions of your dataset to give them a more human-readable name, which can be useful for marking important milestones in your dataset's history.
For example, you might tag a version of your dataset as "prod" and use it to run tests against your LLM pipeline.
You can tag a version of your dataset in the UI by clicking on **+ Tag this version** in the **Examples** tab.
### Tag a version
You can also tag versions of your dataset to give them a more human-readable name, which can be useful for marking important milestones in your dataset's history.
For example, you might tag a version of your dataset as "prod" and use it to run tests against your LLM pipeline.
You can tag a version of your dataset in the UI by clicking on **+ Tag this version** in the **Examples** tab.
 You can also tag versions of your dataset using the SDK. Here's an example of how to tag a version of a dataset using the [Python SDK](https://docs.smith.langchain.com/reference/python/reference):
```python theme={null}
from langsmith import Client
from datetime import datetime
client = Client()
initial_time = datetime(2024, 1, 1, 0, 0, 0) # The timestamp of the version you want to tag
# You can tag a specific dataset version with a semantic name, like "prod"
client.update_dataset_tag(
dataset_name=toxic_dataset_name, as_of=initial_time, tag="prod"
)
```
To run an evaluation on a particular tagged version of a dataset, refer to the [Evaluate on a specific dataset version section](#evaluate-on-specific-dataset-version).
## Evaluate on a specific dataset version
You can also tag versions of your dataset using the SDK. Here's an example of how to tag a version of a dataset using the [Python SDK](https://docs.smith.langchain.com/reference/python/reference):
```python theme={null}
from langsmith import Client
from datetime import datetime
client = Client()
initial_time = datetime(2024, 1, 1, 0, 0, 0) # The timestamp of the version you want to tag
# You can tag a specific dataset version with a semantic name, like "prod"
client.update_dataset_tag(
dataset_name=toxic_dataset_name, as_of=initial_time, tag="prod"
)
```
To run an evaluation on a particular tagged version of a dataset, refer to the [Evaluate on a specific dataset version section](#evaluate-on-specific-dataset-version).
## Evaluate on a specific dataset version
 ### Unshare a dataset
1. Click on **Unshare** by clicking on **Public** in the upper right hand corner of any publicly shared dataset, then **Unshare** in the dialog.
### Unshare a dataset
1. Click on **Unshare** by clicking on **Public** in the upper right hand corner of any publicly shared dataset, then **Unshare** in the dialog. 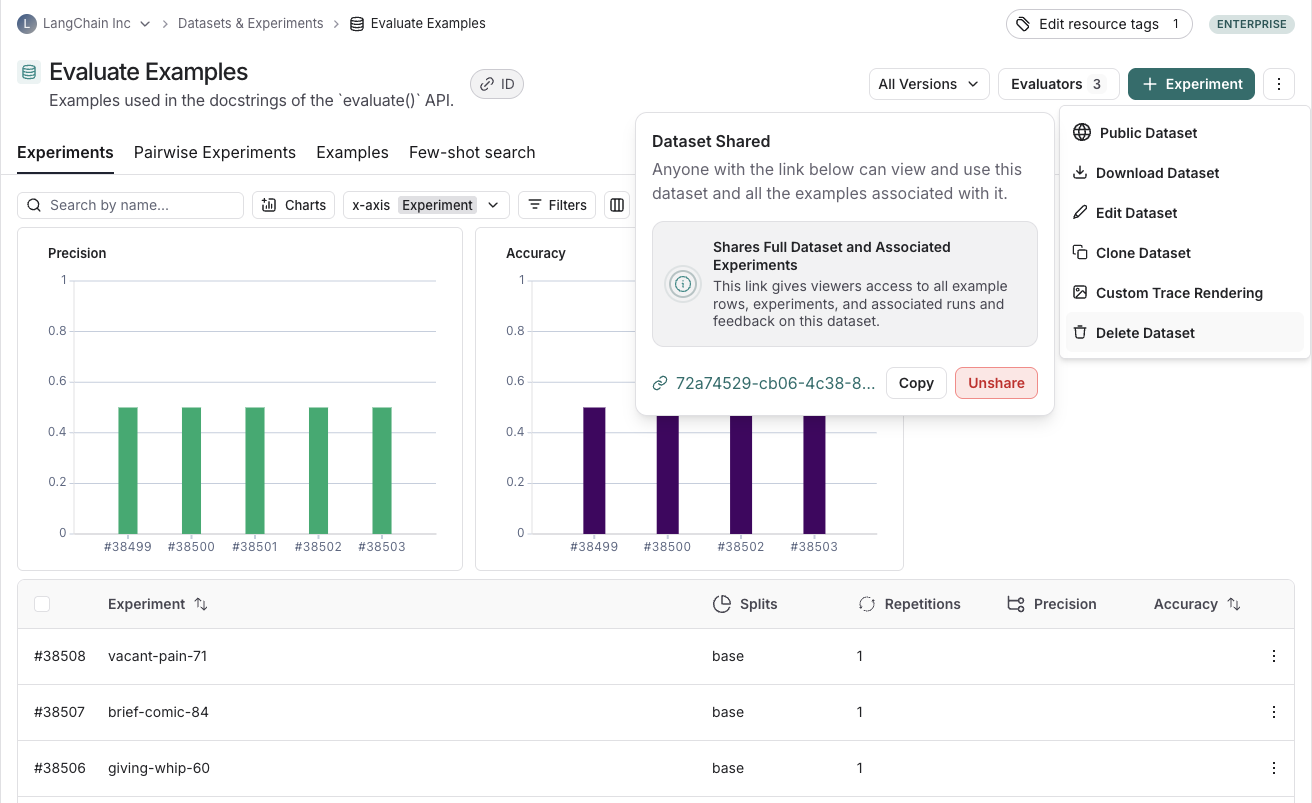 2. Navigate to your organization's list of publicly shared datasets, by clicking on **Settings** -> **Shared URLs** or [this link](https://smith.langchain.com/settings/shared), then click on **Unshare** next to the dataset you want to unshare.
 ## Export a dataset
You can export your LangSmith dataset to a CSV, JSONL, or [OpenAI's fine tuning format](https://platform.openai.com/docs/guides/fine-tuning#example-format) from the LangSmith UI.
From the **Dataset & Experiments** tab, select a dataset, click **⋮** (top right of the page), click **Download Dataset**.
## Export a dataset
You can export your LangSmith dataset to a CSV, JSONL, or [OpenAI's fine tuning format](https://platform.openai.com/docs/guides/fine-tuning#example-format) from the LangSmith UI.
From the **Dataset & Experiments** tab, select a dataset, click **⋮** (top right of the page), click **Download Dataset**.
 ## Export filtered traces from experiment to dataset
After running an [offline evaluation](/langsmith/evaluation-concepts#offline-evaluation) in LangSmith, you may want to export [traces](/langsmith/observability-concepts#traces) that met some evaluation criteria to a dataset.
### View experiment traces
## Export filtered traces from experiment to dataset
After running an [offline evaluation](/langsmith/evaluation-concepts#offline-evaluation) in LangSmith, you may want to export [traces](/langsmith/observability-concepts#traces) that met some evaluation criteria to a dataset.
### View experiment traces
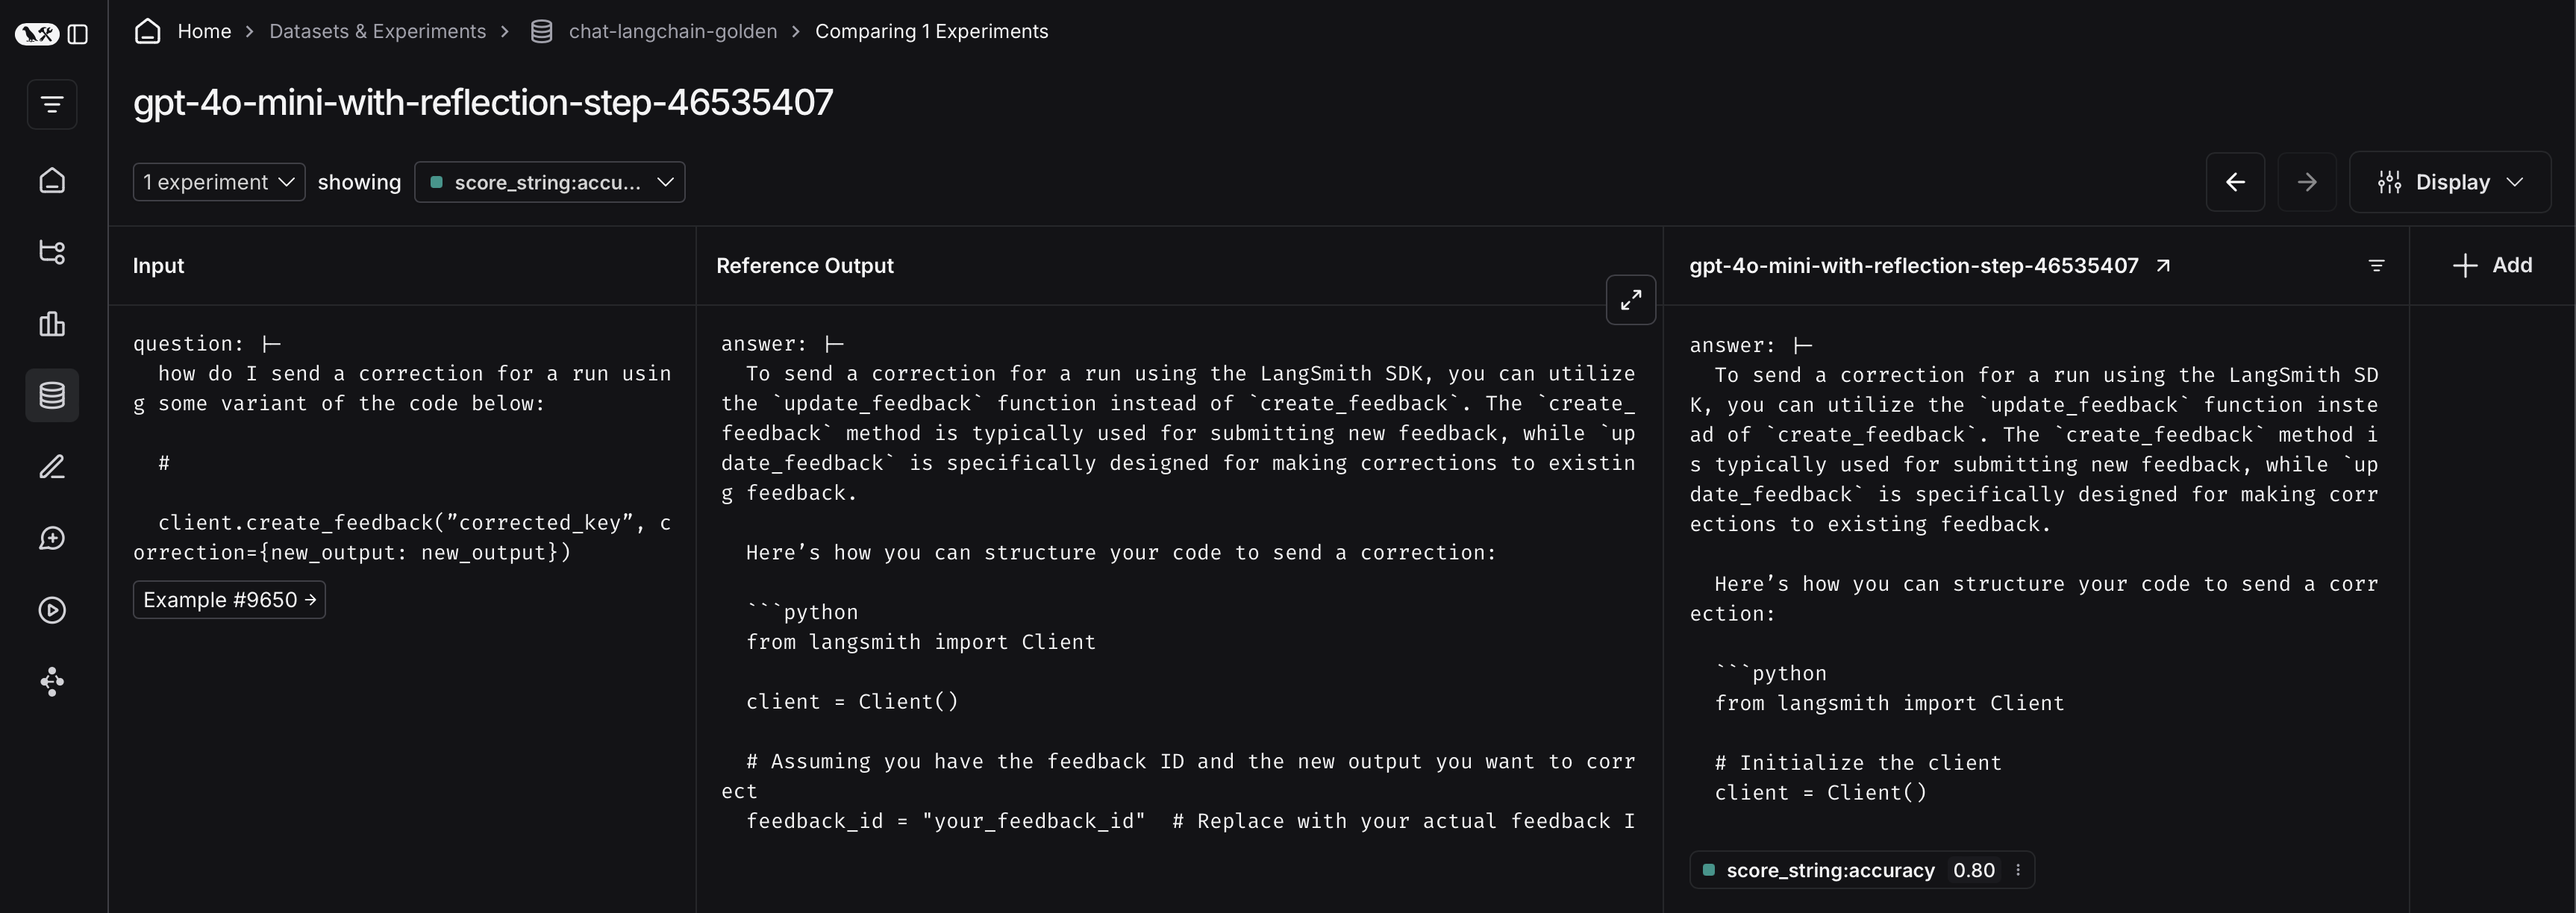 To do so, first click on the arrow next to your experiment name. This will direct you to a project that contains the traces generated from your experiment.
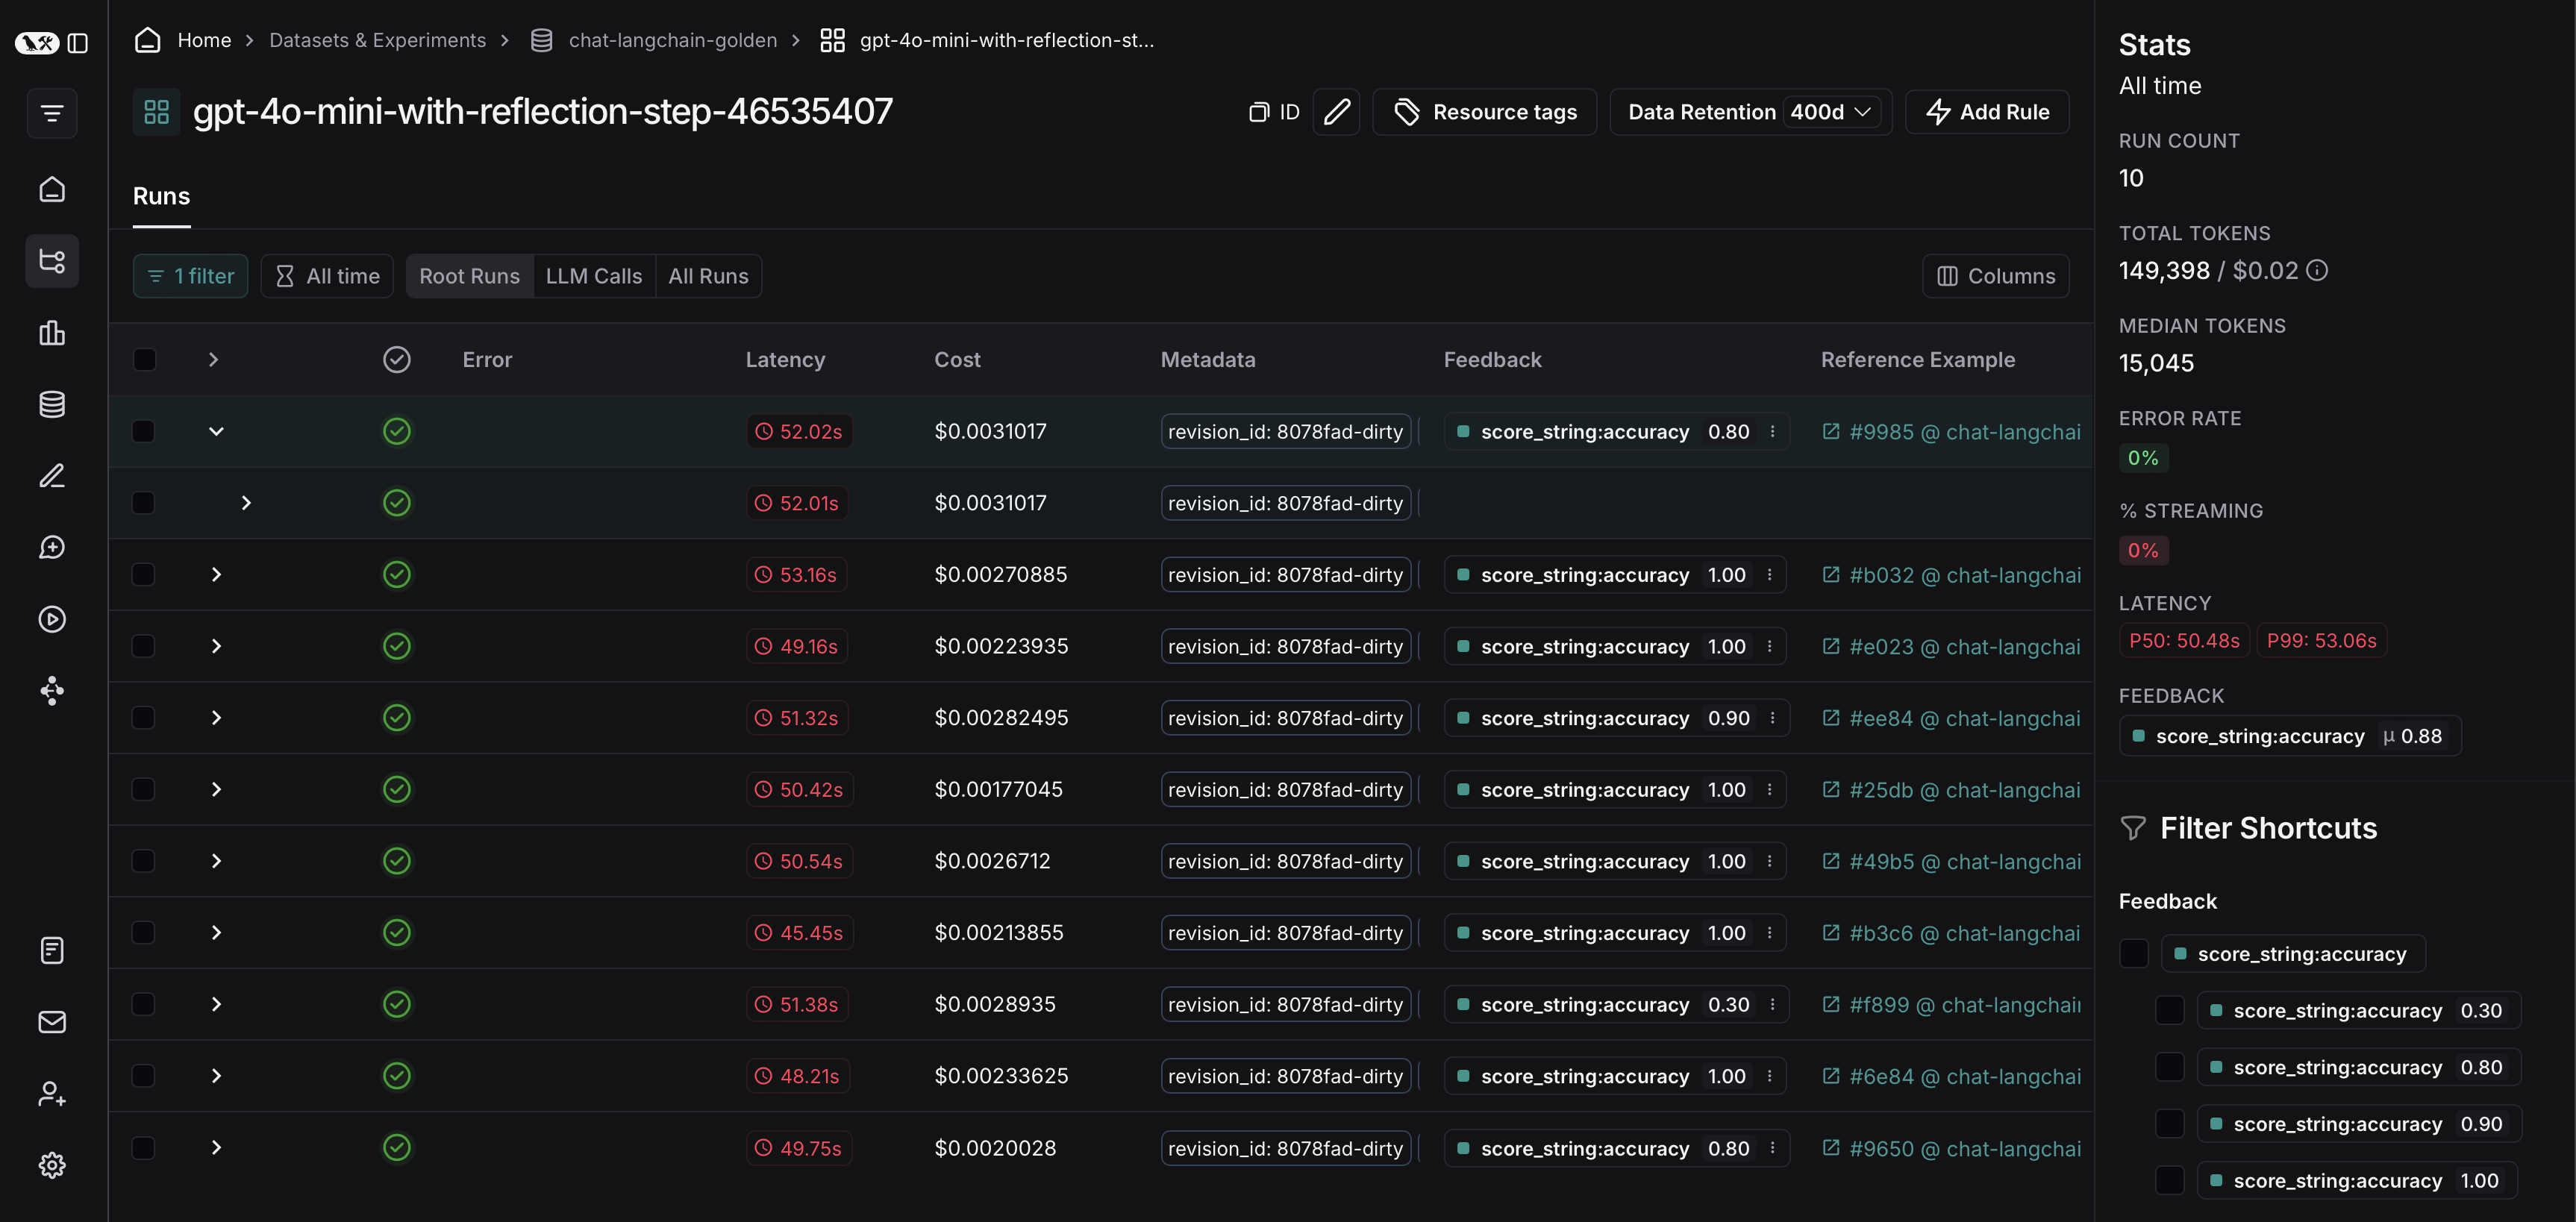 From there, you can filter the traces based on your evaluation criteria. In this example, we're filtering for all traces that received an accuracy score greater than 0.5.
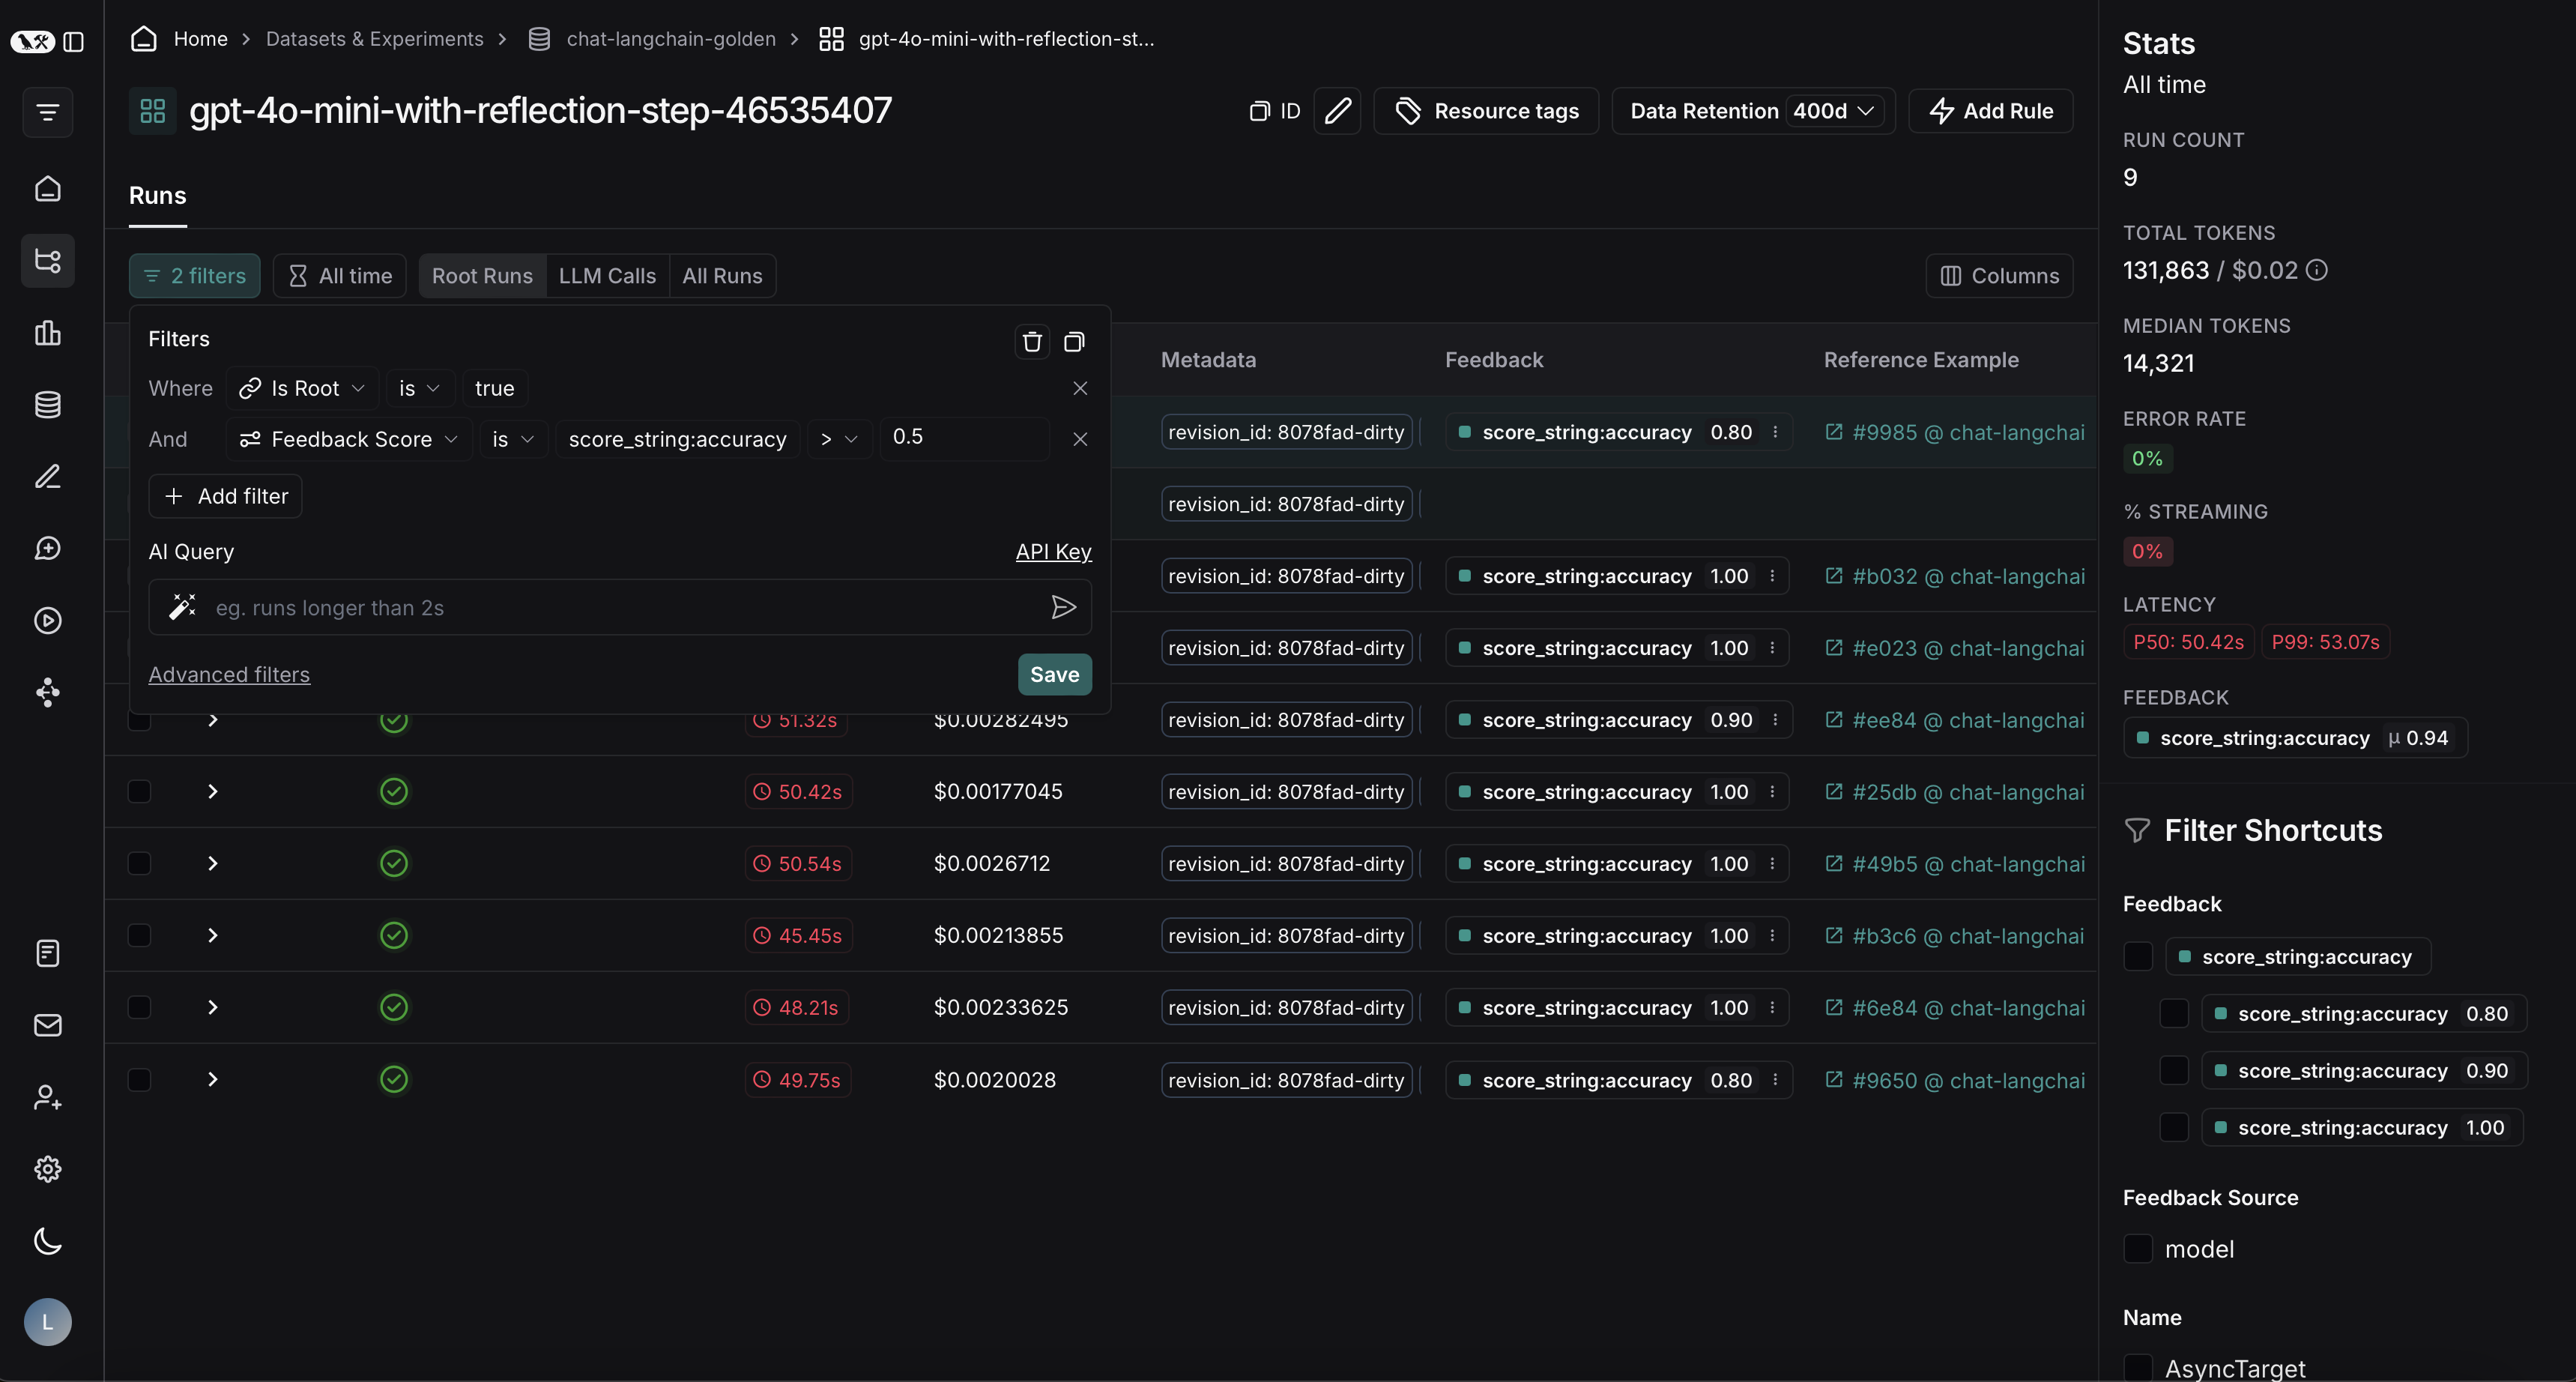 After applying the filter on the project, we can multi-select runs to add to the dataset, and click **Add to Dataset**.
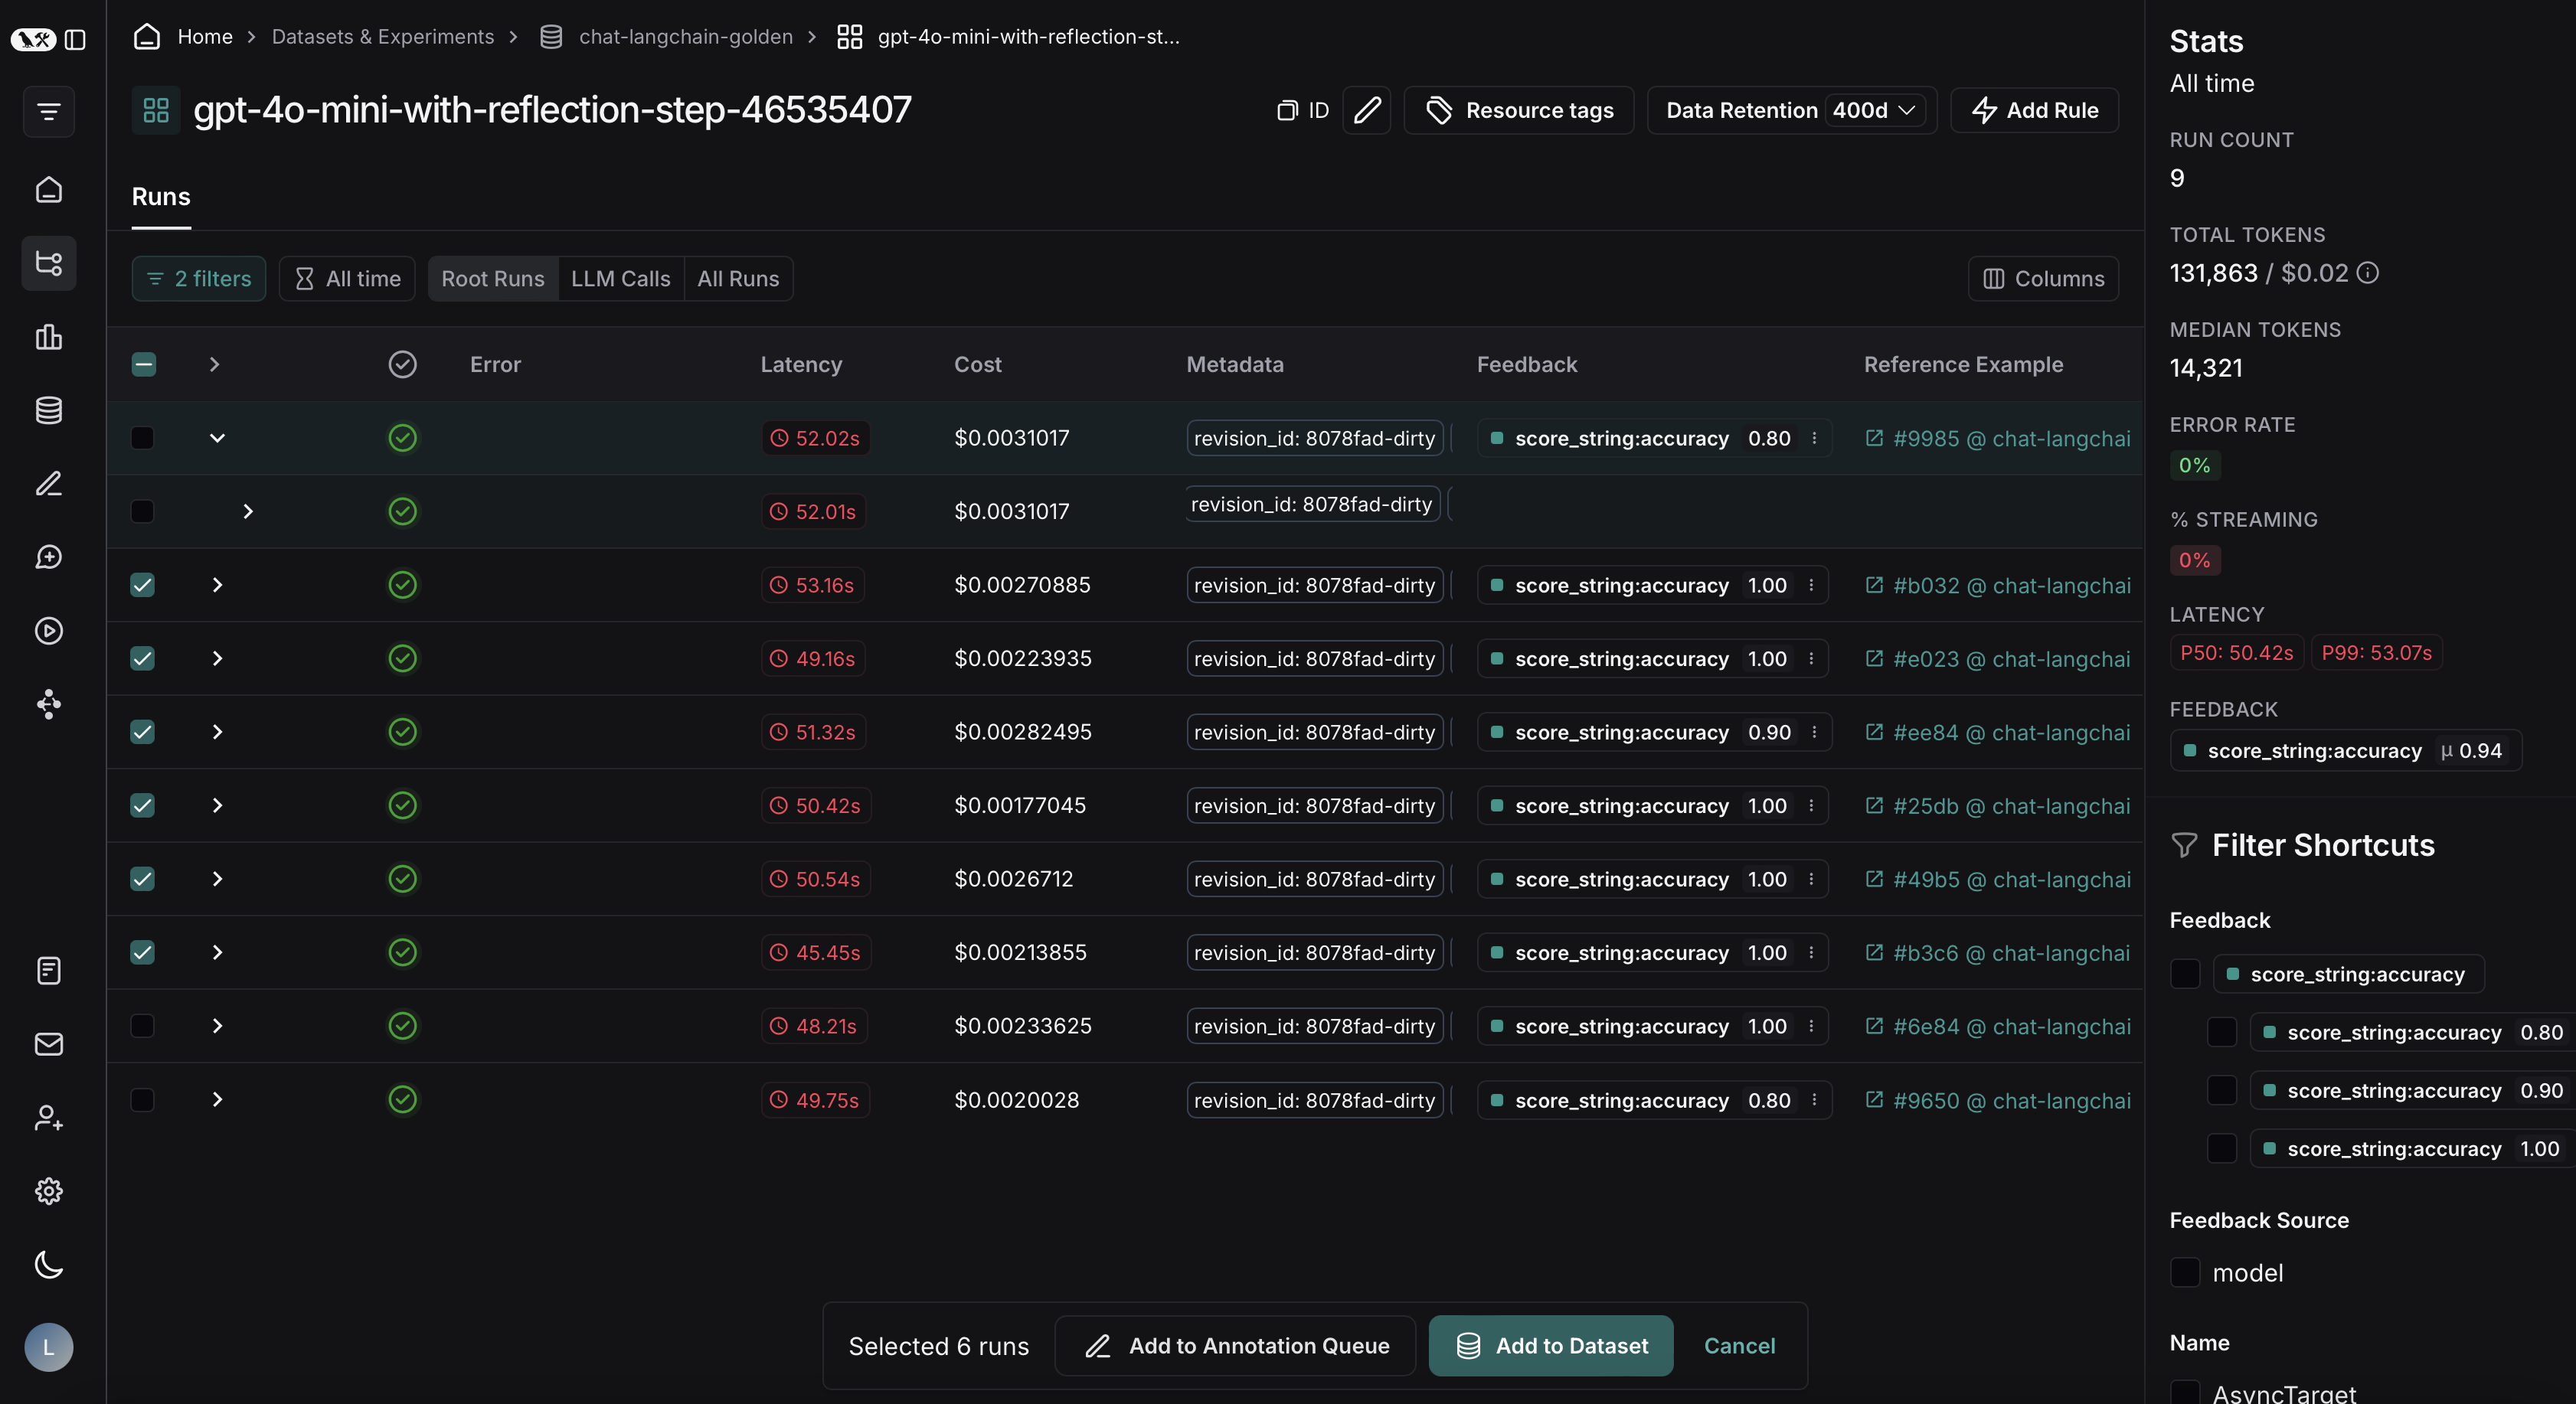 ***
***
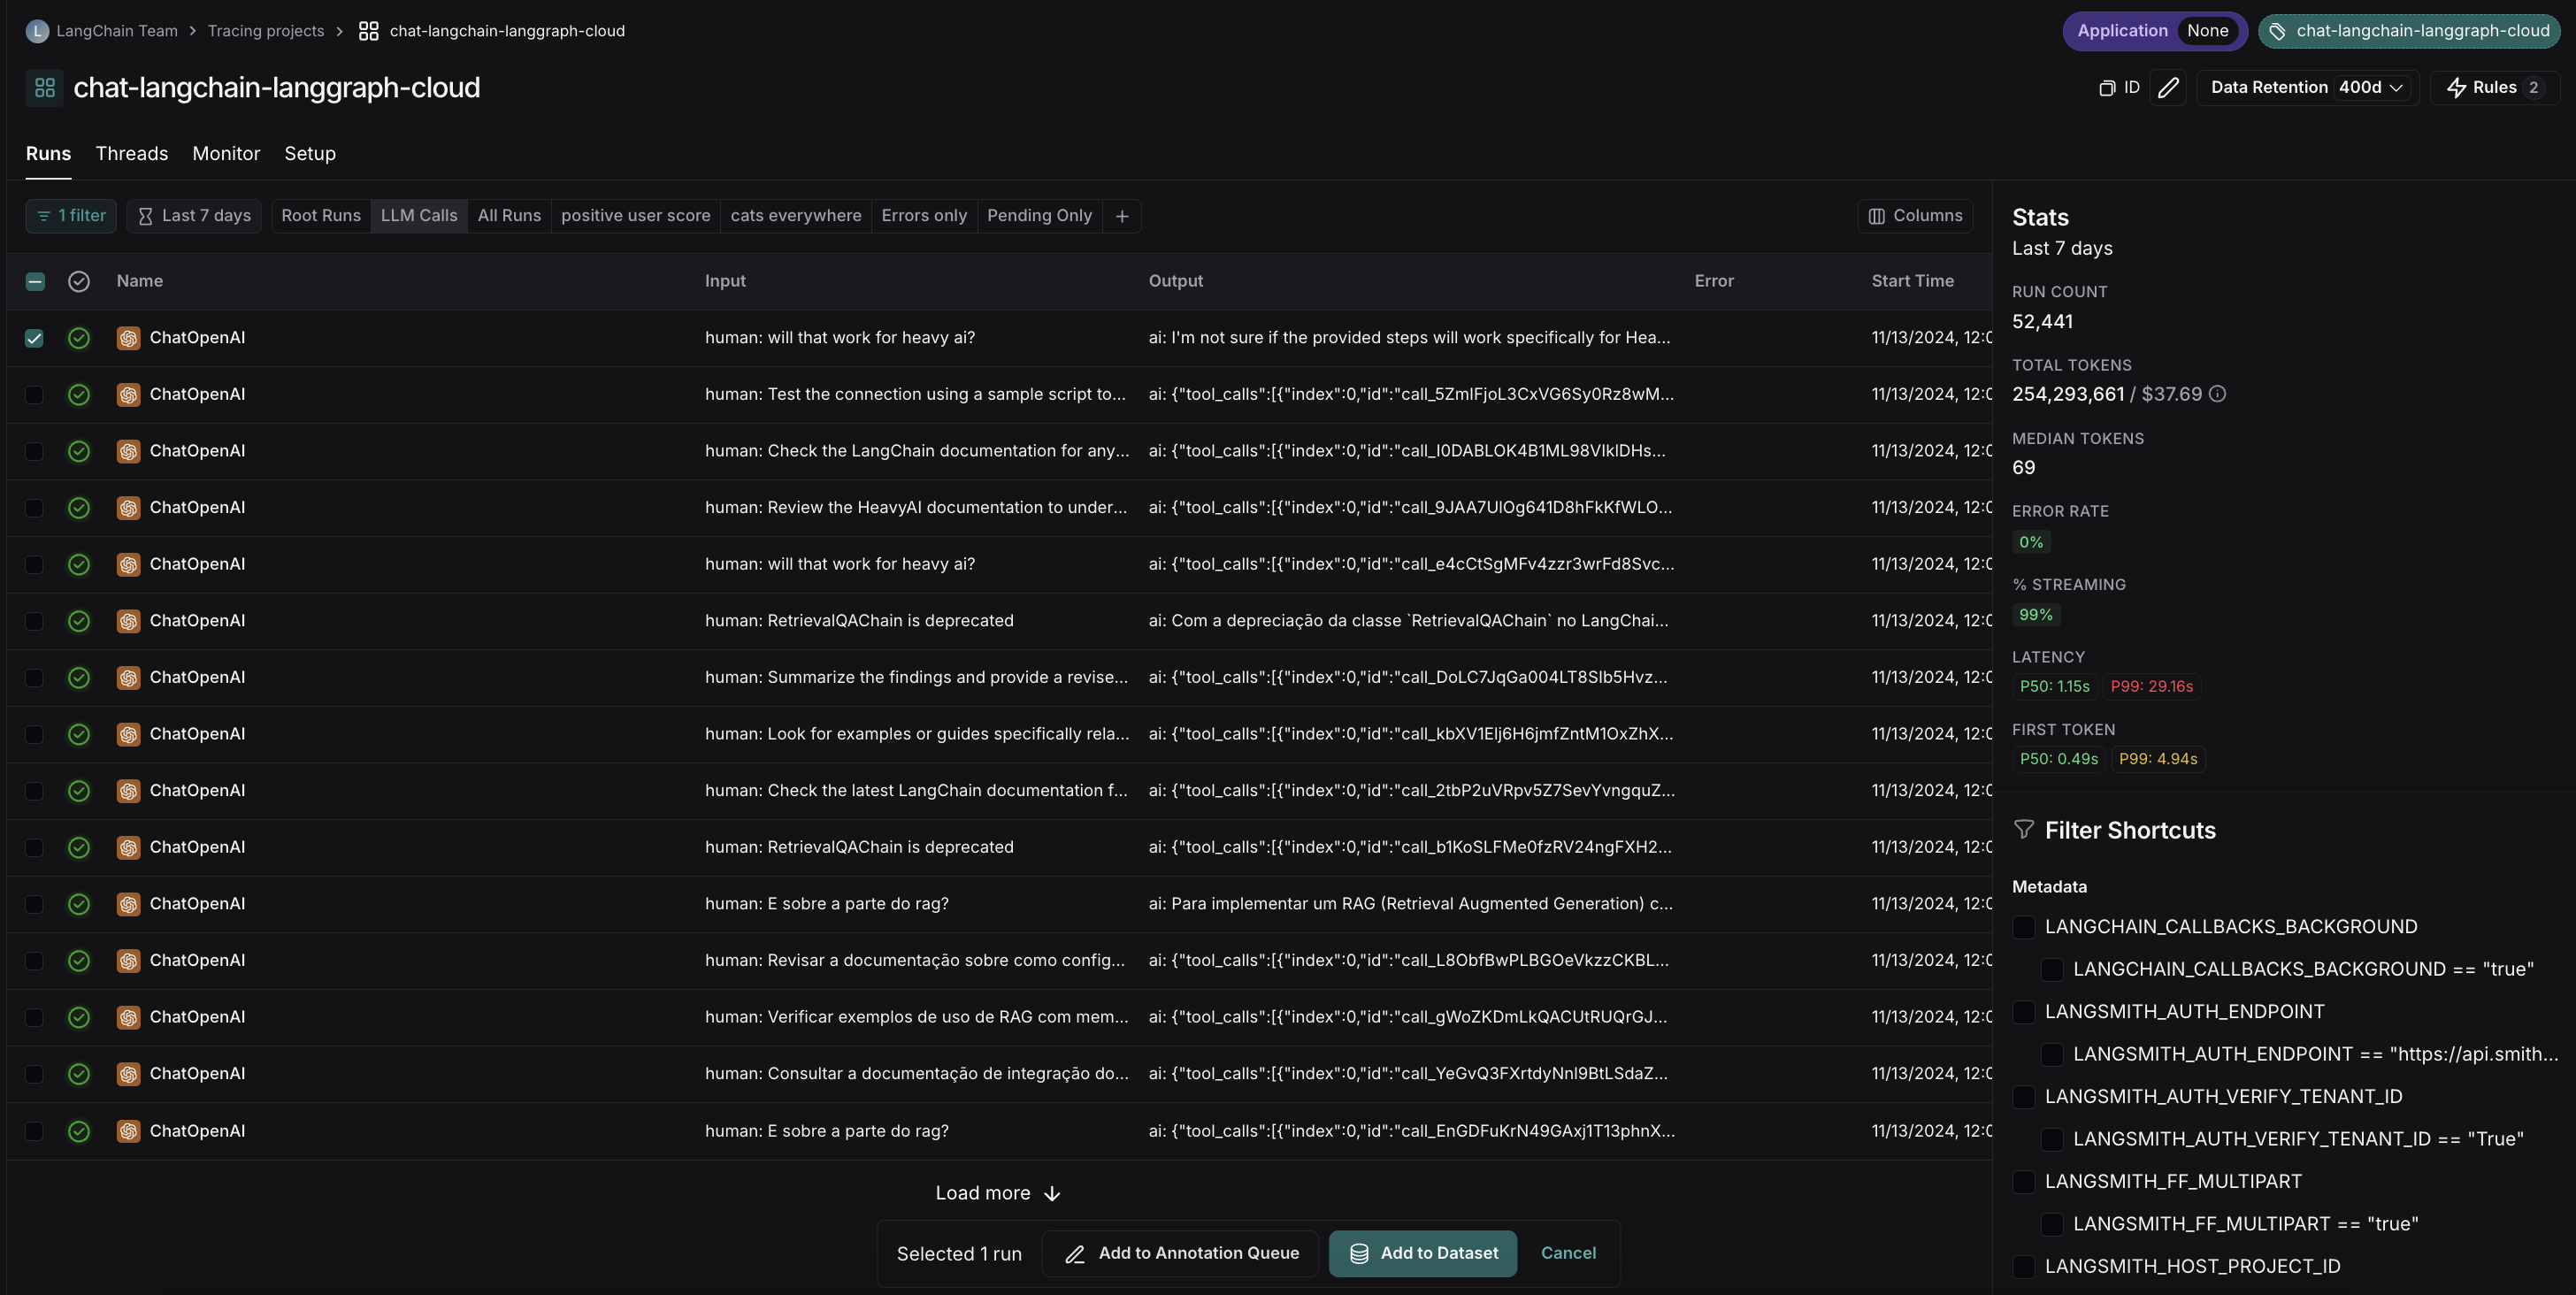 2. On the **Runs** tab, select a run from the table. On the individual run details page, select **Add to** -> **Dataset** in the top right corner.
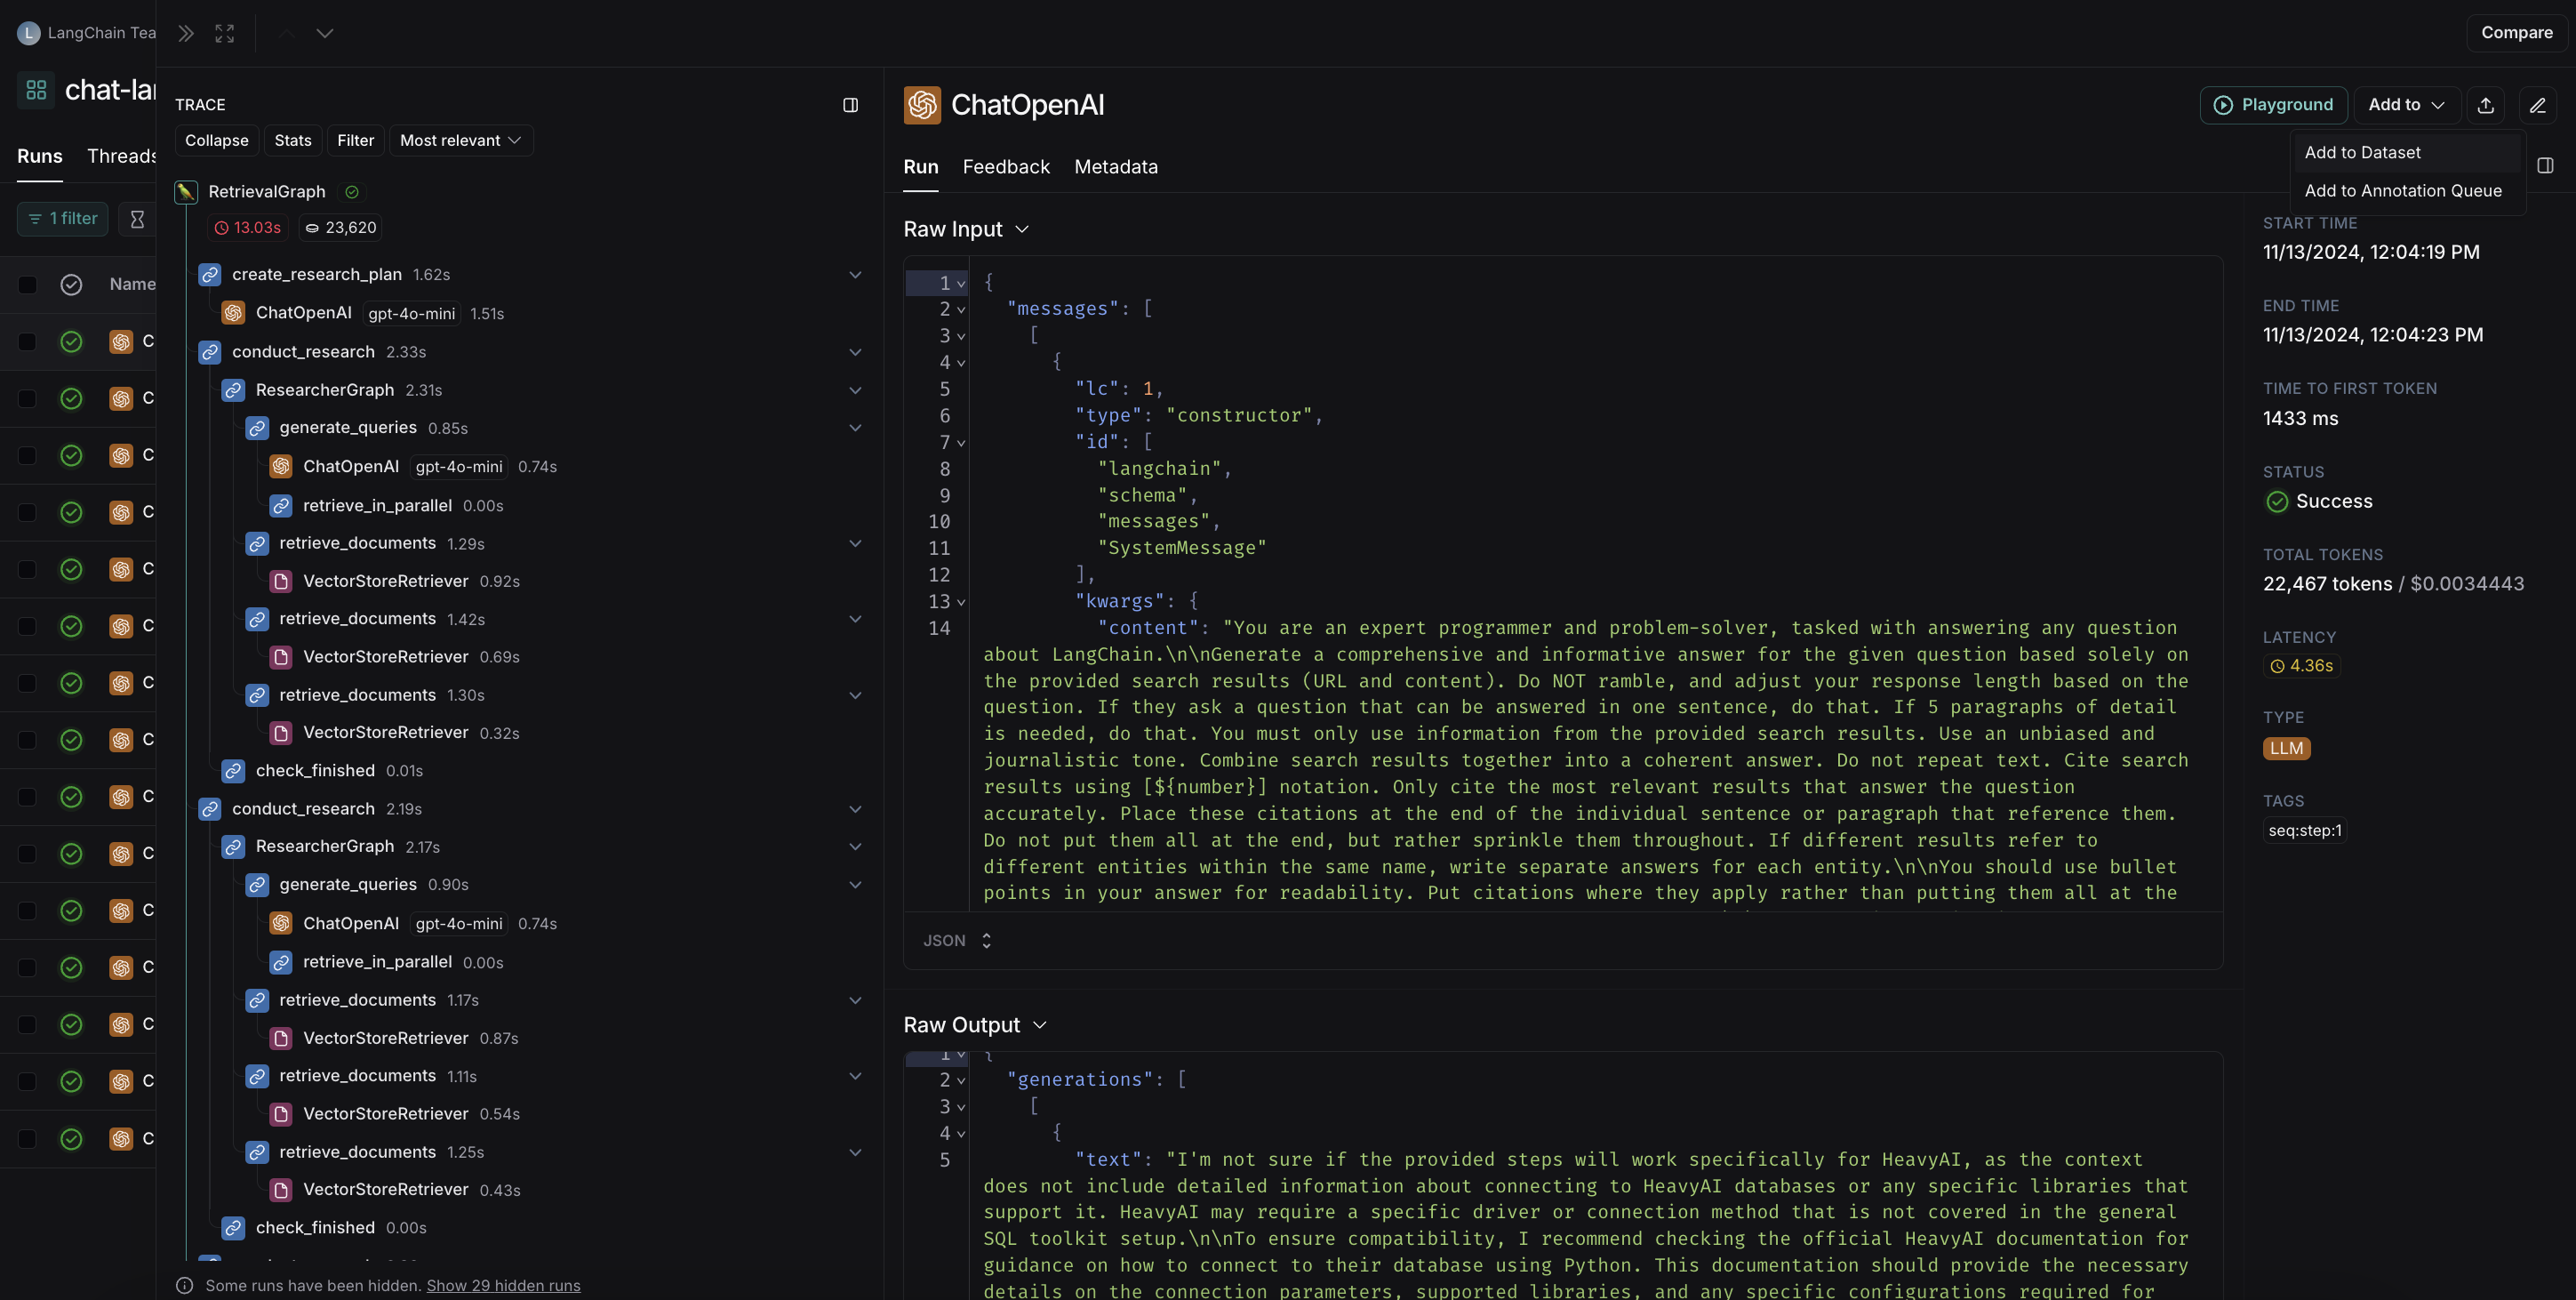 When you select a dataset from the run details page, a modal will pop up letting you know if any [transformations](/langsmith/dataset-transformations) were applied or if schema validation failed. For example, the screenshot below shows a dataset that is using transformations to optimize for collecting LLM runs.
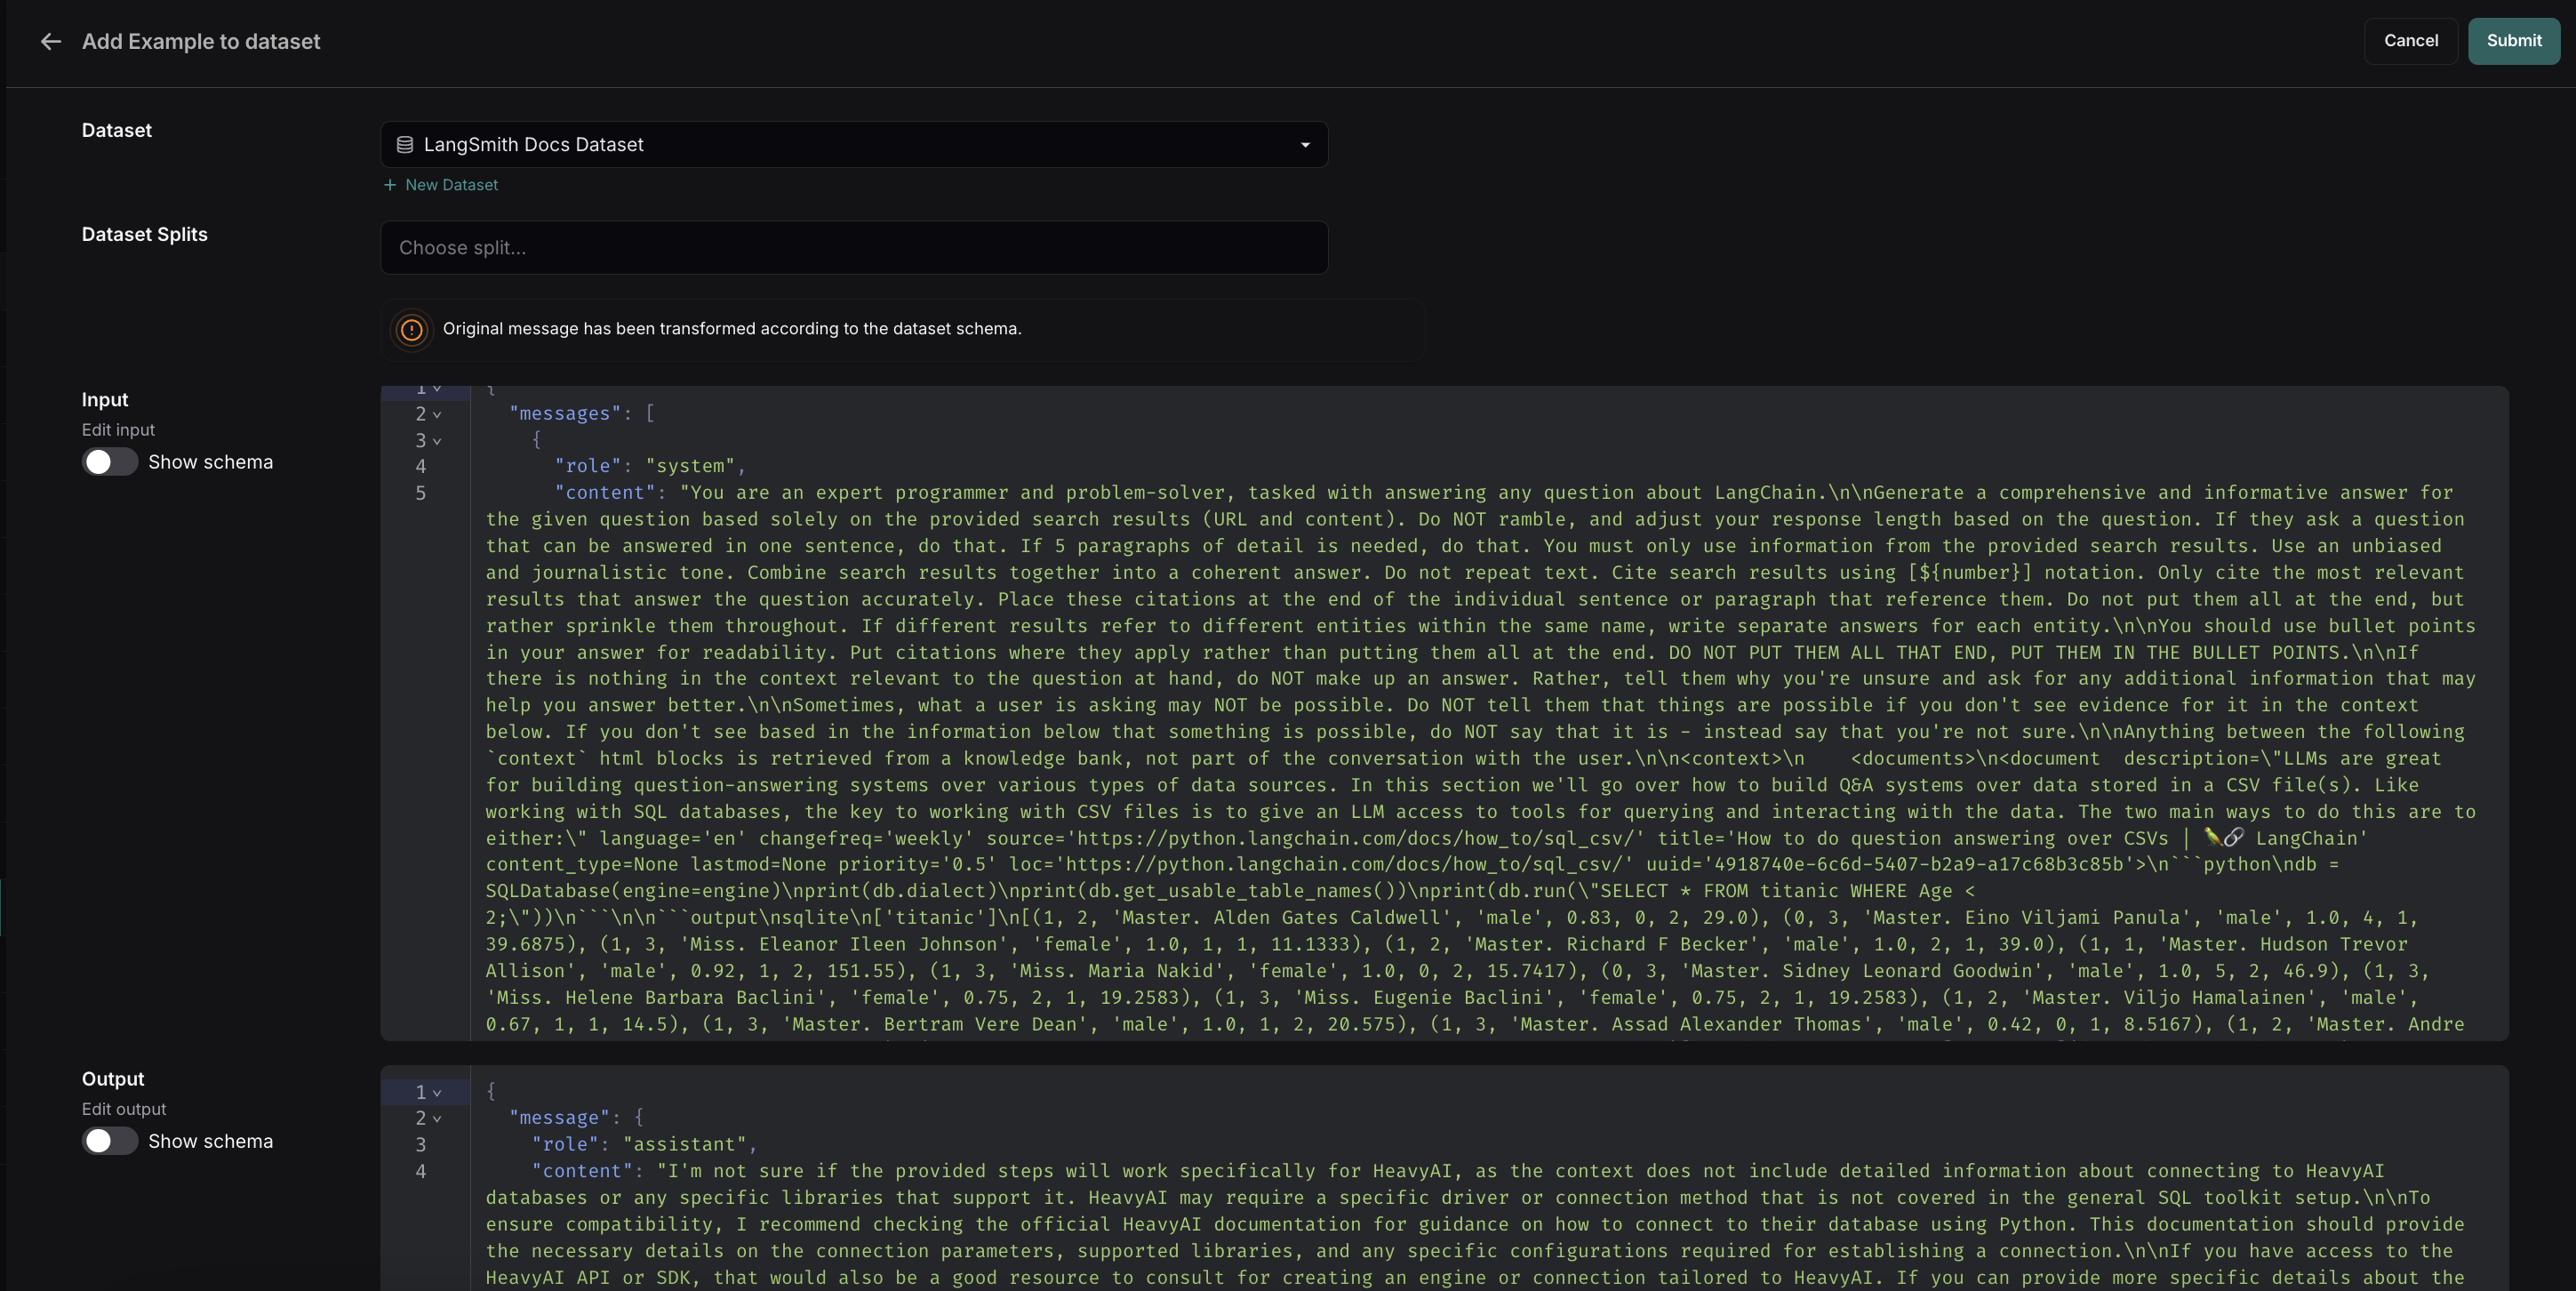 You can then optionally edit the run before adding it to the dataset.
### Automatically from a tracing project
You can use [run rules](/langsmith/rules) to automatically add traces to a dataset based on certain conditions. For example, you could add all traces that are [tagged](/langsmith/observability-concepts#tags) with a specific use case or have a [low feedback score](/langsmith/observability-concepts#feedback).
### From examples in an Annotation Queue
You can then optionally edit the run before adding it to the dataset.
### Automatically from a tracing project
You can use [run rules](/langsmith/rules) to automatically add traces to a dataset based on certain conditions. For example, you could add all traces that are [tagged](/langsmith/observability-concepts#tags) with a specific use case or have a [low feedback score](/langsmith/observability-concepts#feedback).
### From examples in an Annotation Queue
 Note you can also set up rules to add runs that meet specific criteria to an annotation queue using [automation rules](/langsmith/rules).
### From the Prompt Playground
On the [**Prompt Playground**](/langsmith/observability-concepts#prompt-playground) page, select **Set up Evaluation**, click **+New** if you're starting a new dataset or select from an existing dataset.
Note you can also set up rules to add runs that meet specific criteria to an annotation queue using [automation rules](/langsmith/rules).
### From the Prompt Playground
On the [**Prompt Playground**](/langsmith/observability-concepts#prompt-playground) page, select **Set up Evaluation**, click **+New** if you're starting a new dataset or select from an existing dataset.
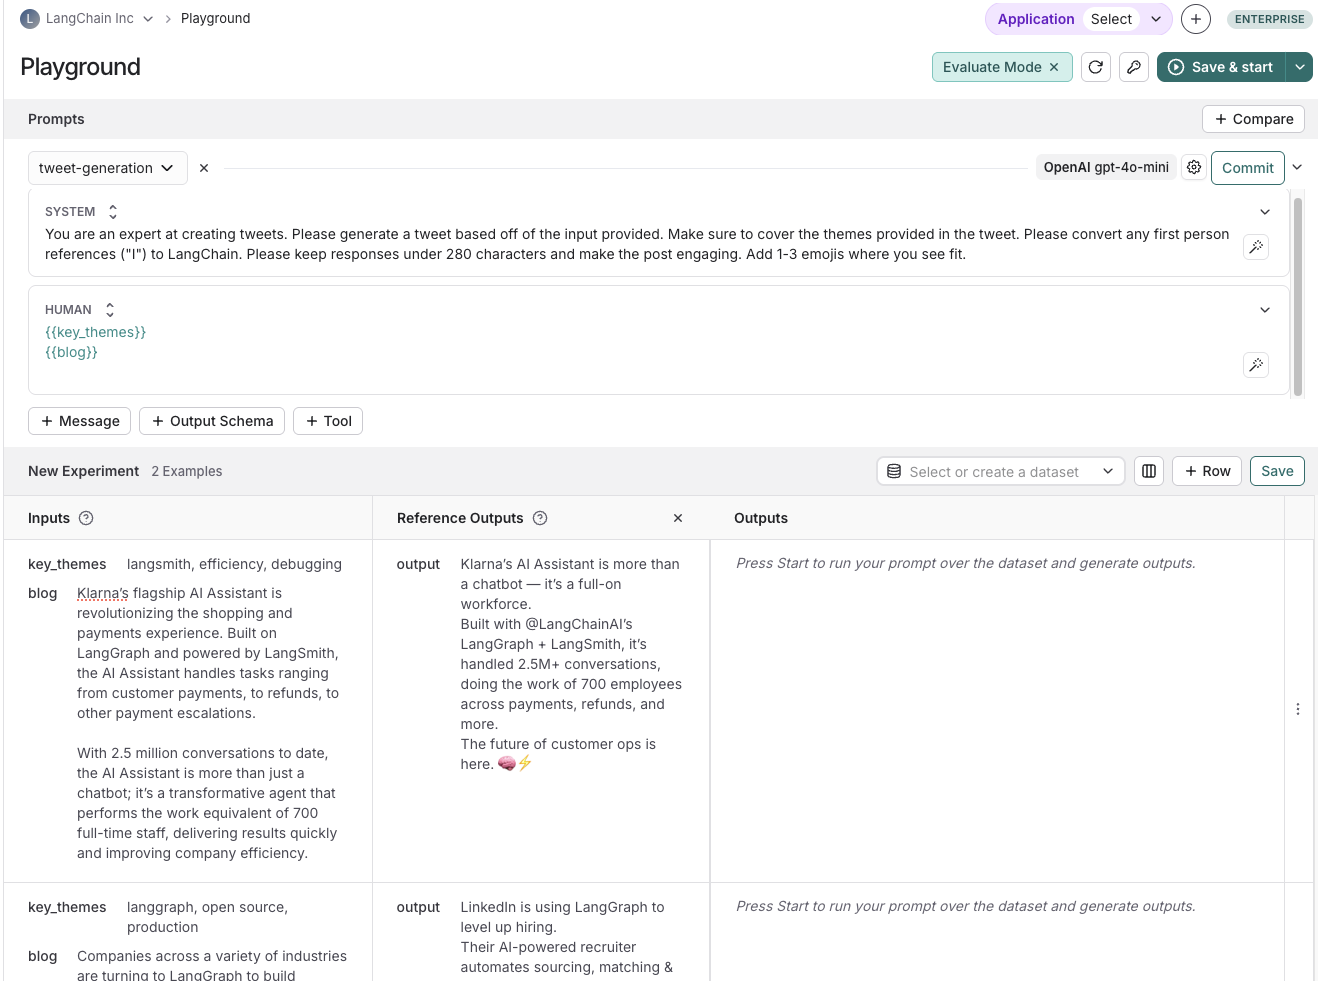 ### Import a dataset from a CSV or JSONL file
On the **Datasets & Experiments** page, click **+New Dataset**, then **Import** an existing dataset from CSV or JSONL file.
### Create a new dataset from the Datasets & Experiments page
1. Navigate to the **Datasets & Experiments** page from the left-hand menu.
2. Click **+ New Dataset**.
3. On the **New Dataset** page, select the **Create from scratch** tab.
4. Add a name and description for the dataset.
5. (Optional) Create a [dataset schema](#create-a-dataset-schema) to validate your dataset.
6. Click **Create**, which will create an empty dataset.
7. To add examples inline, on the dataset's page, go to the **Examples** tab. Click **+ Example**.
8. Define examples in JSON and click **Submit**. For more details on dataset splits, refer to [Create and manage dataset splits](#create-and-manage-dataset-splits).
### Add synthetic examples created by an LLM
If you have existing examples and a [schema](#create-a-dataset-schema) defined on your dataset, when you click **+ Example** there is an option to
### Import a dataset from a CSV or JSONL file
On the **Datasets & Experiments** page, click **+New Dataset**, then **Import** an existing dataset from CSV or JSONL file.
### Create a new dataset from the Datasets & Experiments page
1. Navigate to the **Datasets & Experiments** page from the left-hand menu.
2. Click **+ New Dataset**.
3. On the **New Dataset** page, select the **Create from scratch** tab.
4. Add a name and description for the dataset.
5. (Optional) Create a [dataset schema](#create-a-dataset-schema) to validate your dataset.
6. Click **Create**, which will create an empty dataset.
7. To add examples inline, on the dataset's page, go to the **Examples** tab. Click **+ Example**.
8. Define examples in JSON and click **Submit**. For more details on dataset splits, refer to [Create and manage dataset splits](#create-and-manage-dataset-splits).
### Add synthetic examples created by an LLM
If you have existing examples and a [schema](#create-a-dataset-schema) defined on your dataset, when you click **+ Example** there is an option to 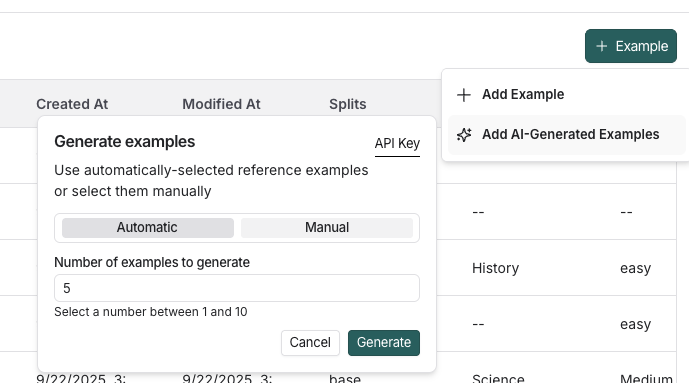
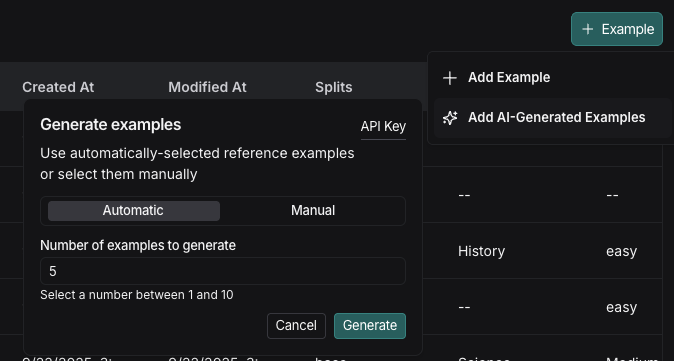
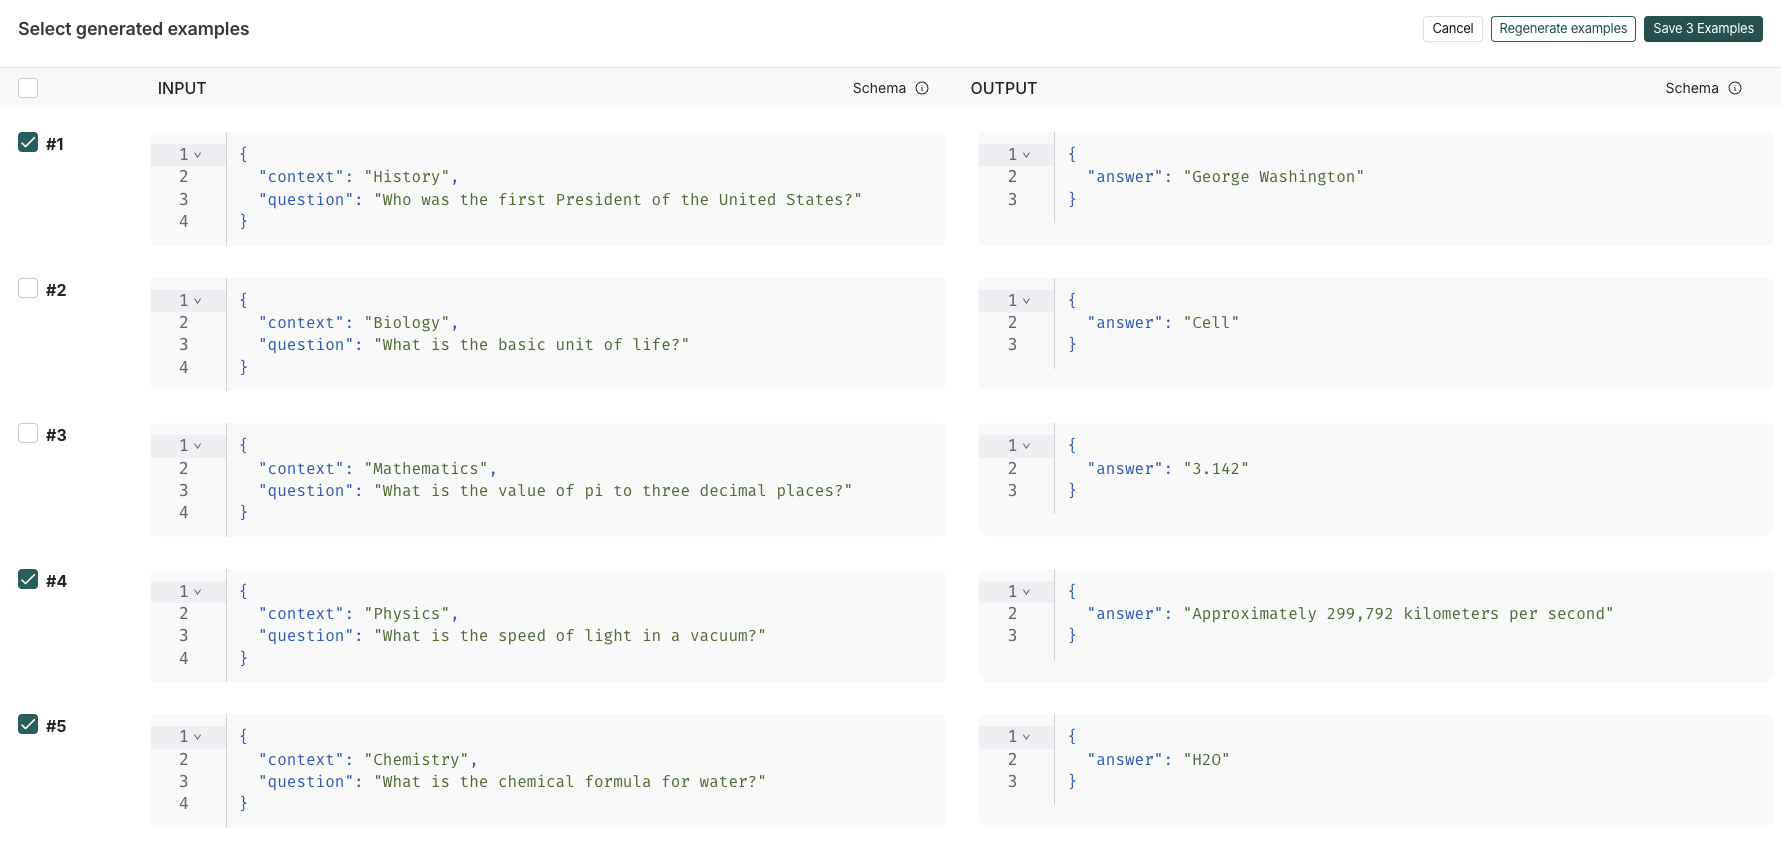
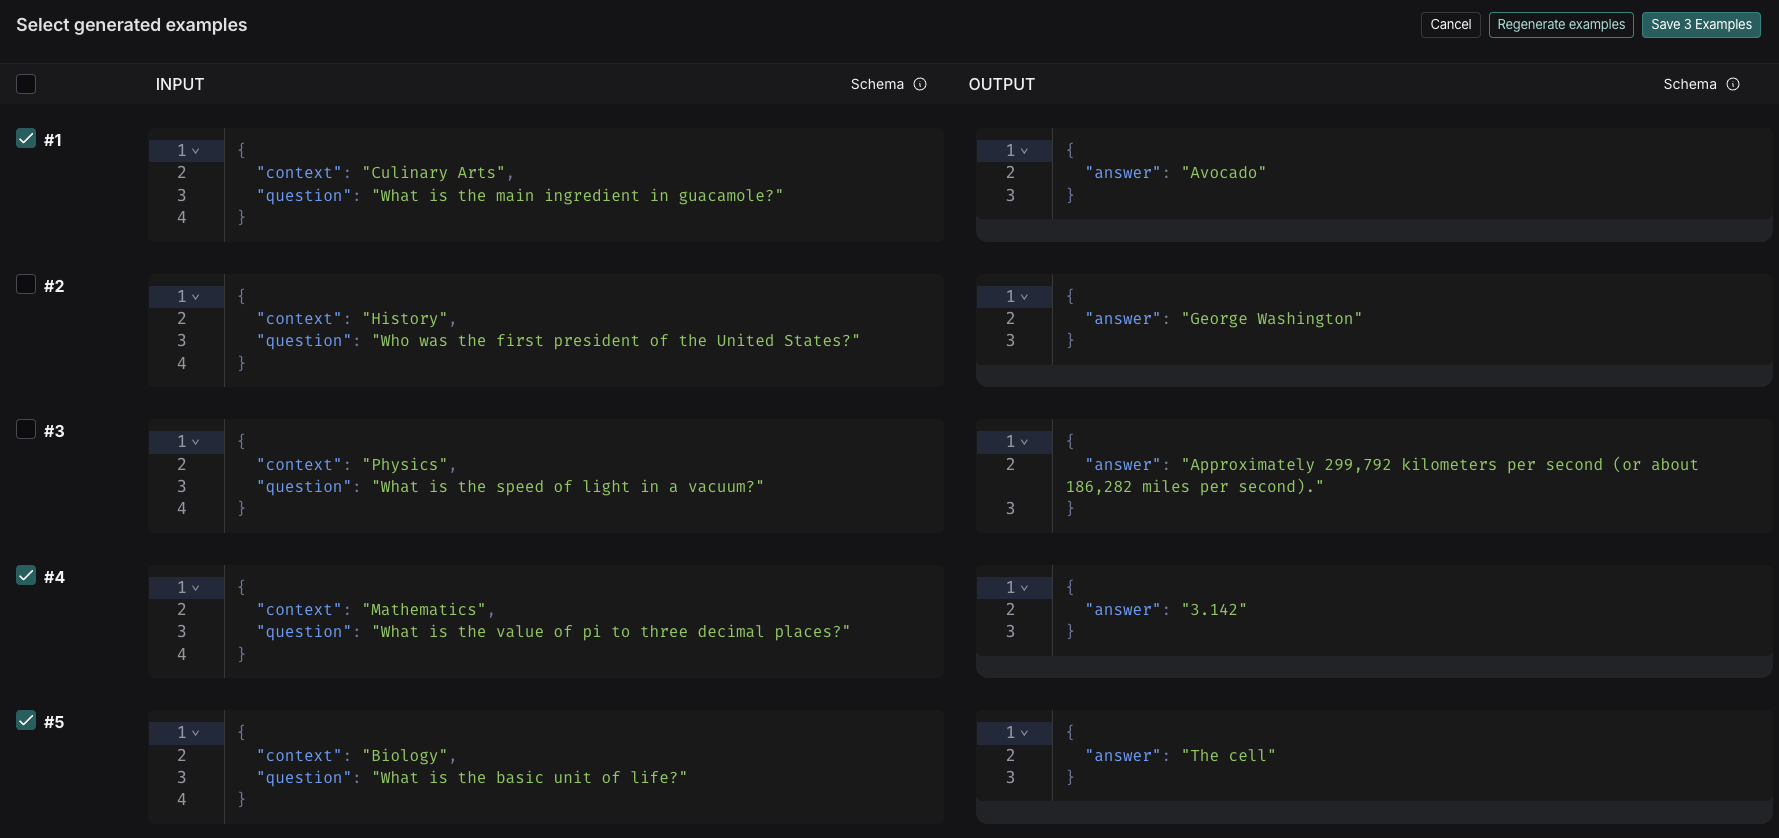
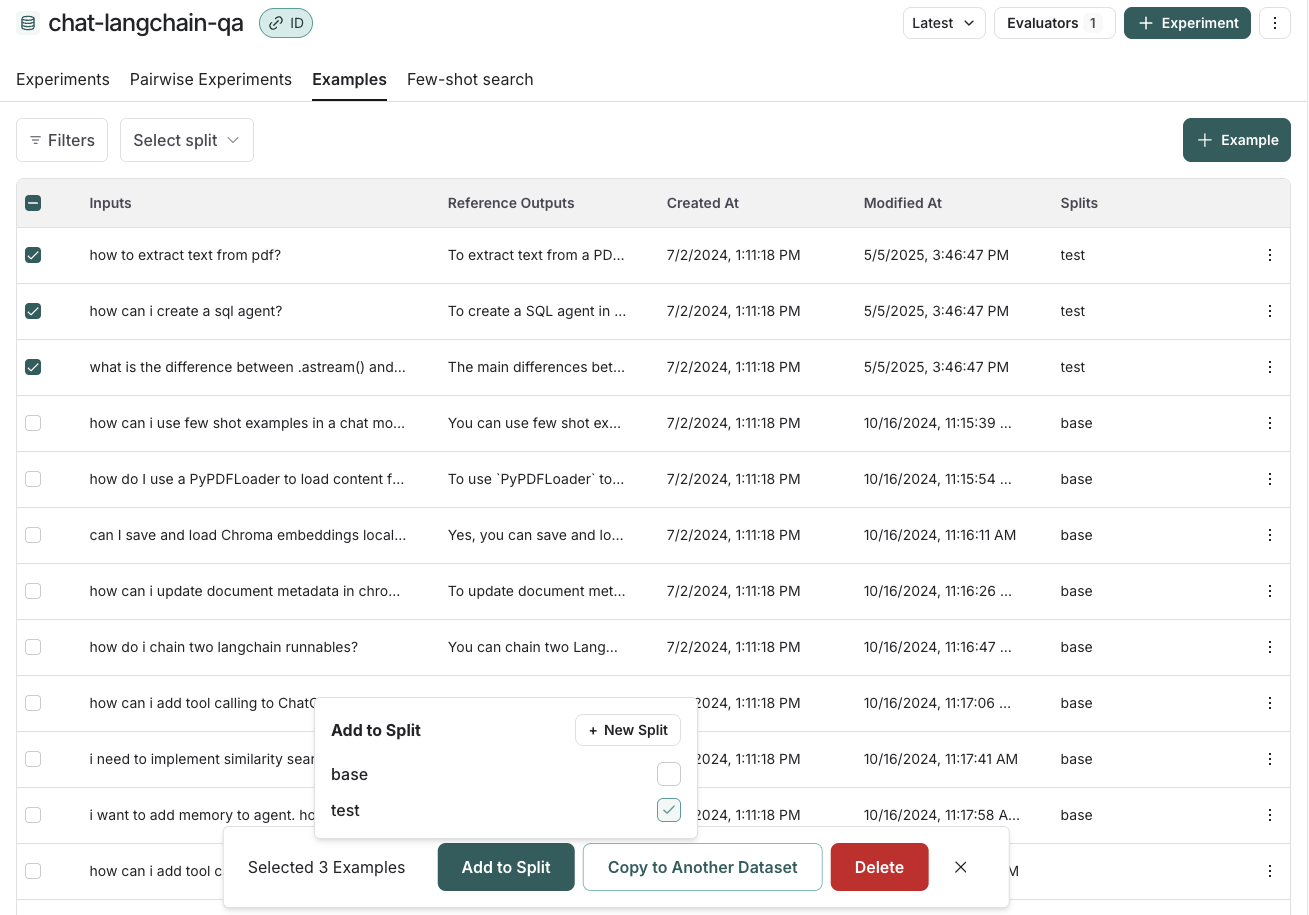 ### Edit example metadata
You can add metadata to your examples by clicking on an example and then clicking "Edit" on the top righthand side of the popover. From this page, you can update/delete existing metadata, or add new metadata. You may use this to store information about your examples, such as tags or version info, which you can then [group by](/langsmith/analyze-an-experiment#group-results-by-metadata) when analyzing experiment results or [filter by](/langsmith/manage-datasets-programmatically#list-examples-by-metadata) when you call `list_examples` in the SDK.
### Edit example metadata
You can add metadata to your examples by clicking on an example and then clicking "Edit" on the top righthand side of the popover. From this page, you can update/delete existing metadata, or add new metadata. You may use this to store information about your examples, such as tags or version info, which you can then [group by](/langsmith/analyze-an-experiment#group-results-by-metadata) when analyzing experiment results or [filter by](/langsmith/manage-datasets-programmatically#list-examples-by-metadata) when you call `list_examples` in the SDK.
 ### Filter examples
You can filter examples by split, metadata key/value or perform full-text search over examples. These filtering options are available to the top left of the examples table.
* **Filter by split**: Select split > Select a split to filter by
* **Filter by metadata**: Filters > Select "Metadata" from the dropdown > Select the metadata key and value to filter on
* **Full-text search**: Filters > Select "Full Text" from the dropdown > Enter your search criteria
You may add multiple filters, and only examples that satisfy all of the filters will be displayed in the table.
### Filter examples
You can filter examples by split, metadata key/value or perform full-text search over examples. These filtering options are available to the top left of the examples table.
* **Filter by split**: Select split > Select a split to filter by
* **Filter by metadata**: Filters > Select "Metadata" from the dropdown > Select the metadata key and value to filter on
* **Full-text search**: Filters > Select "Full Text" from the dropdown > Enter your search criteria
You may add multiple filters, and only examples that satisfy all of the filters will be displayed in the table.
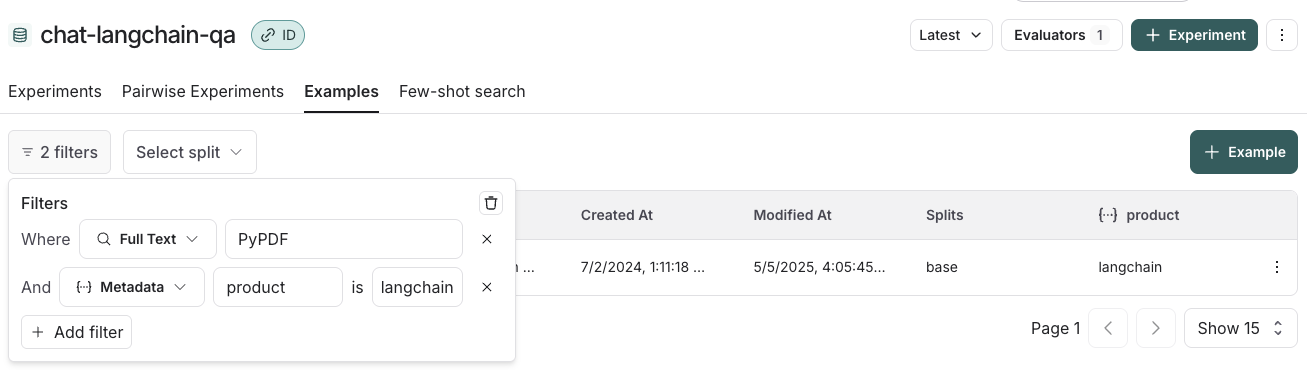 ***
***
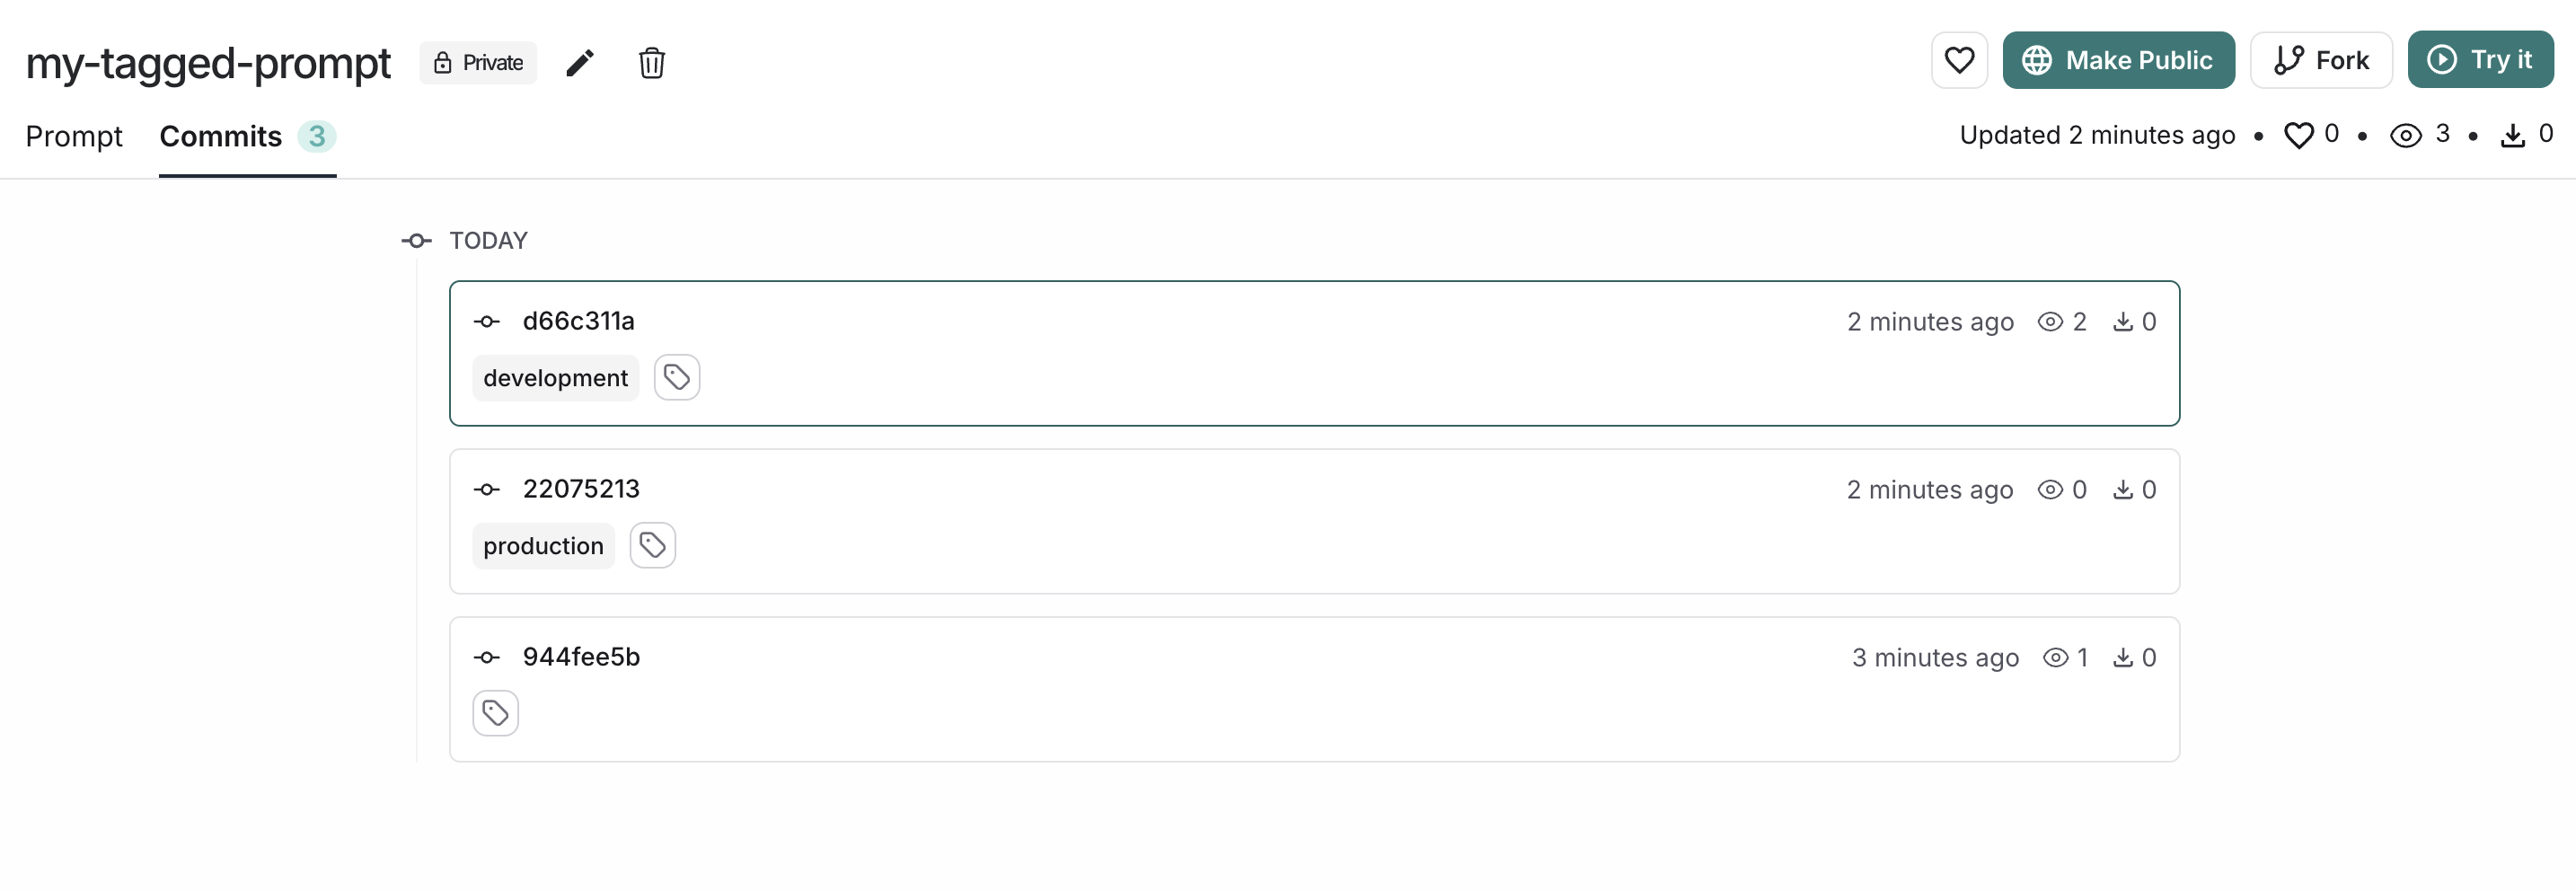
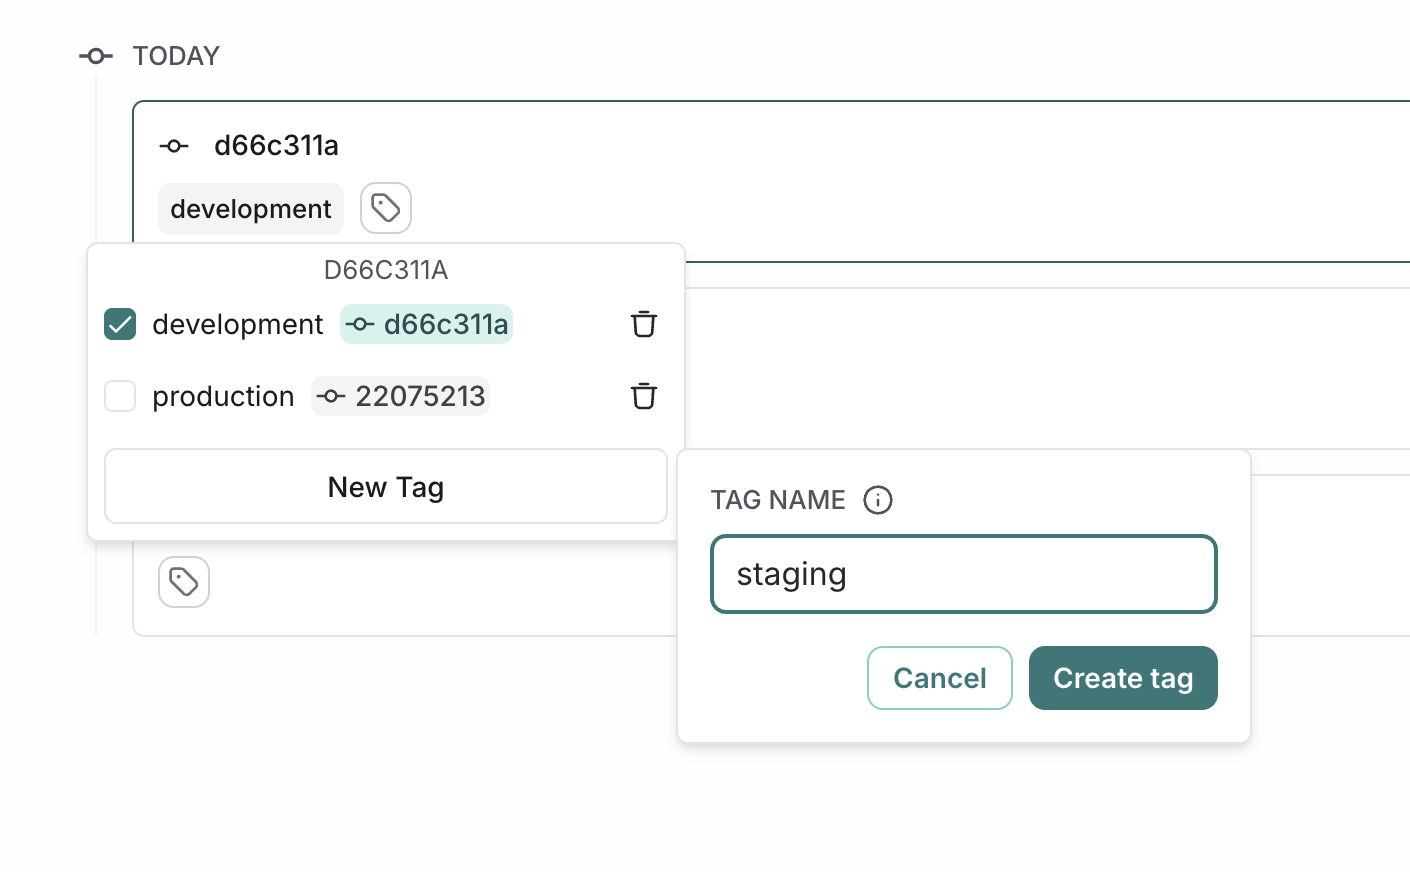 ### Move a tag
To point a tag to a different commit, click on the tag icon next to the destination commit, and select the tag you want to move. This will automatically update the tag to point to the new commit.
### Move a tag
To point a tag to a different commit, click on the tag icon next to the destination commit, and select the tag you want to move. This will automatically update the tag to point to the new commit.
 ### Delete a tag
To delete a tag, click on the delete icon next to the tag you want to delete. This will delete the tag altogether and it will no longer be associated with any commit.
### Use tags in code
Tags provide a stable way to reference specific versions of your prompts in code. Instead of using commit hashes directly, you can reference tags that can be updated without changing your code.
Here is an example of pulling a prompt by tag in Python:
```python theme={null}
prompt = client.pull_prompt("joke-generator:prod")
# If prod tag points to commit a1b2c3d4, this is equivalent to:
prompt = client.pull_prompt("joke-generator:a1b2c3d4")
```
For more information on how to use prompts in code, refer to [Managing prompts programmatically](/langsmith/manage-prompts-programmatically).
## Trigger a webhook on prompt commit
You can configure a webhook to be triggered whenever a commit is made to a prompt.
Some common use cases of this include:
* Triggering a CI/CD pipeline when prompts are updated.
* Synchronizing prompts with a GitHub repository.
* Notifying team members about prompt modifications.
### Configure a webhook
Navigate to the **Prompts** section in the left-hand sidebar or from the application homepage. In the top right corner, click on the `+ Webhook` button.
Add a webhook URL and any required headers.
### Delete a tag
To delete a tag, click on the delete icon next to the tag you want to delete. This will delete the tag altogether and it will no longer be associated with any commit.
### Use tags in code
Tags provide a stable way to reference specific versions of your prompts in code. Instead of using commit hashes directly, you can reference tags that can be updated without changing your code.
Here is an example of pulling a prompt by tag in Python:
```python theme={null}
prompt = client.pull_prompt("joke-generator:prod")
# If prod tag points to commit a1b2c3d4, this is equivalent to:
prompt = client.pull_prompt("joke-generator:a1b2c3d4")
```
For more information on how to use prompts in code, refer to [Managing prompts programmatically](/langsmith/manage-prompts-programmatically).
## Trigger a webhook on prompt commit
You can configure a webhook to be triggered whenever a commit is made to a prompt.
Some common use cases of this include:
* Triggering a CI/CD pipeline when prompts are updated.
* Synchronizing prompts with a GitHub repository.
* Notifying team members about prompt modifications.
### Configure a webhook
Navigate to the **Prompts** section in the left-hand sidebar or from the application homepage. In the top right corner, click on the `+ Webhook` button.
Add a webhook URL and any required headers.
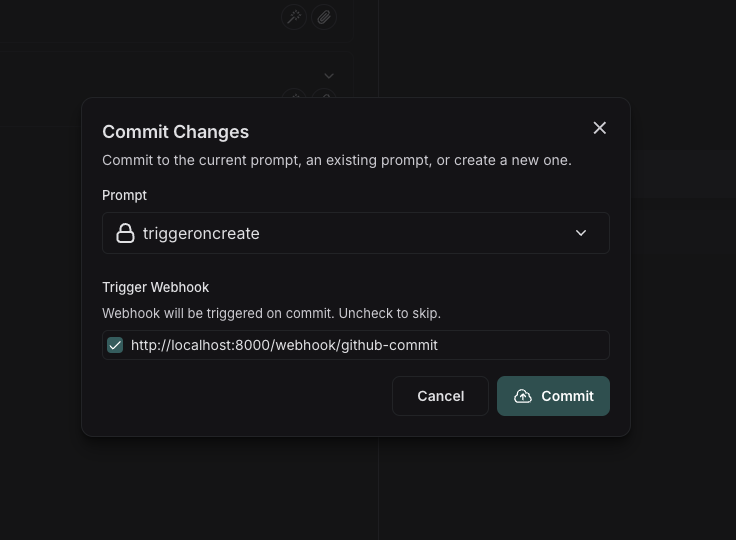 #### Using the API
If you commit via the API, you can specify to skip triggering the webhook by setting the `skip_webhooks` parameter to `true` or to an array of webhook ids to ignore. Refer to the [API docs](https://api.smith.langchain.com/redoc#tag/commits/operation/create_commit_api_v1_commits__owner___repo__post) for more information.
## Public prompt hub
LangSmith's public prompt hub is a collection of prompts that have been created by the LangChain community that you can use for reference.
#### Using the API
If you commit via the API, you can specify to skip triggering the webhook by setting the `skip_webhooks` parameter to `true` or to an array of webhook ids to ignore. Refer to the [API docs](https://api.smith.langchain.com/redoc#tag/commits/operation/create_commit_api_v1_commits__owner___repo__post) for more information.
## Public prompt hub
LangSmith's public prompt hub is a collection of prompts that have been created by the LangChain community that you can use for reference.
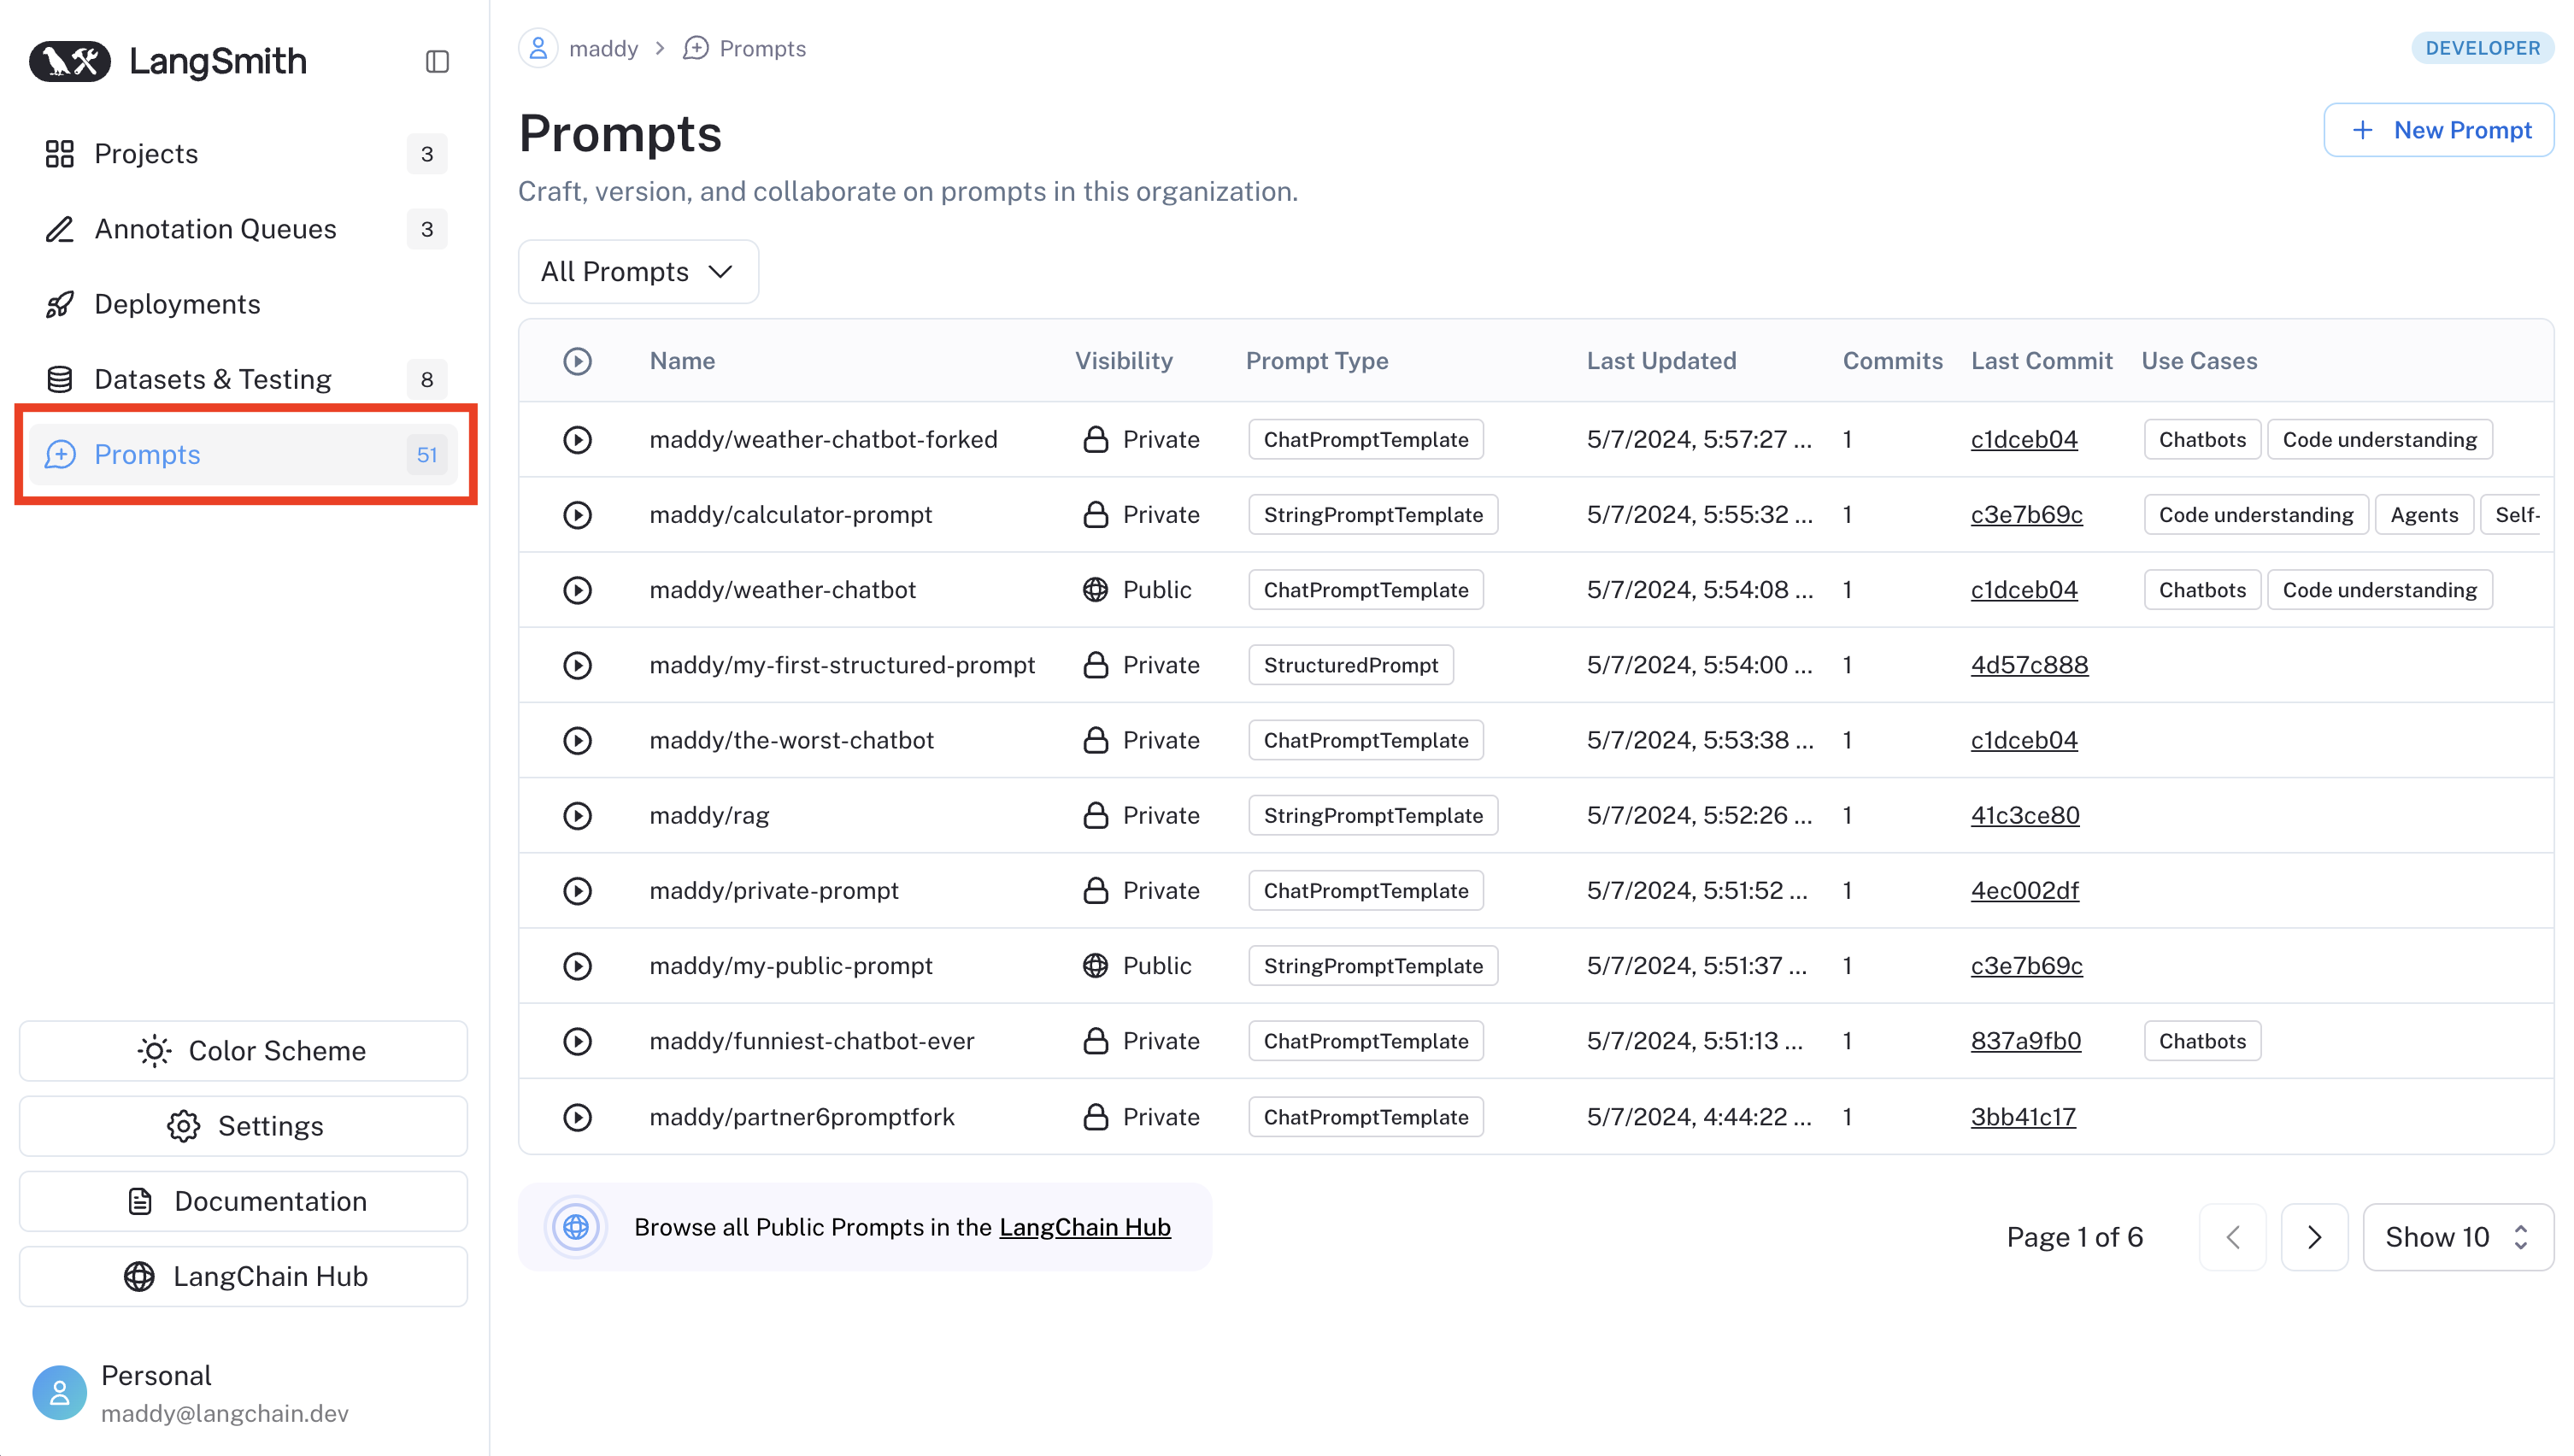 ***
***
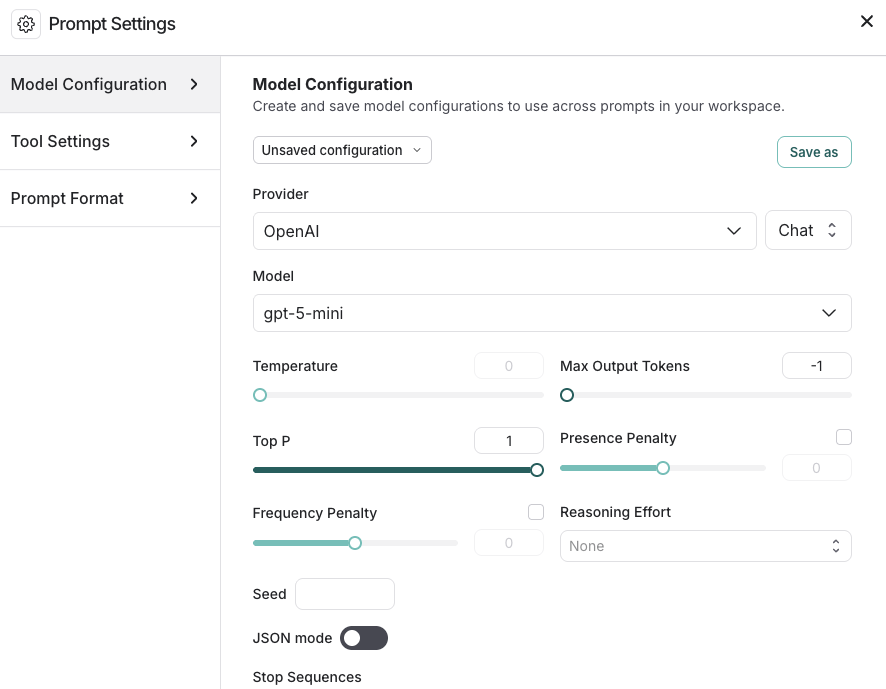
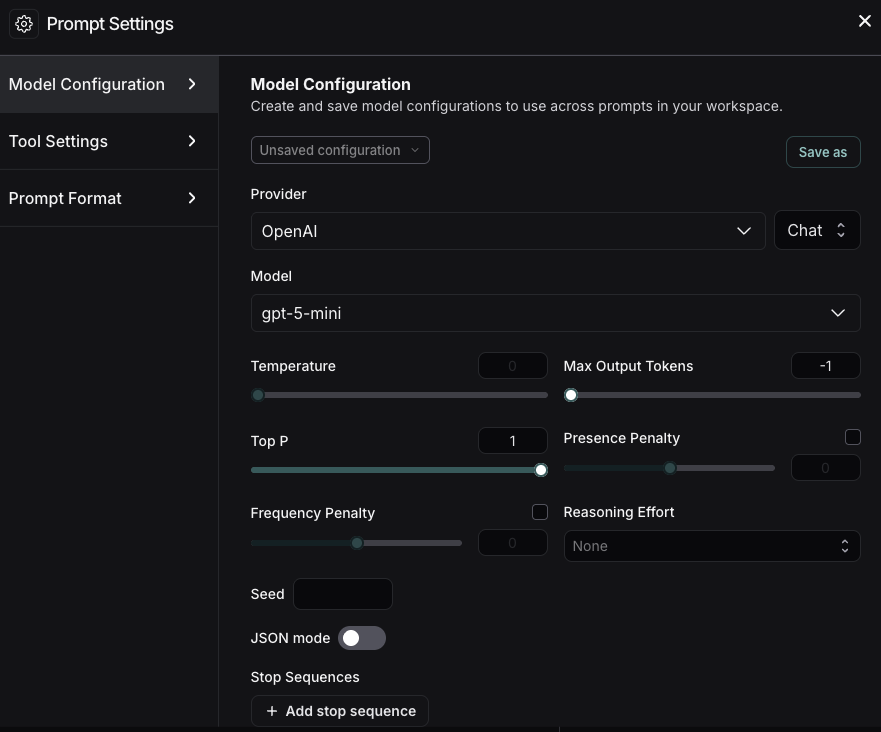
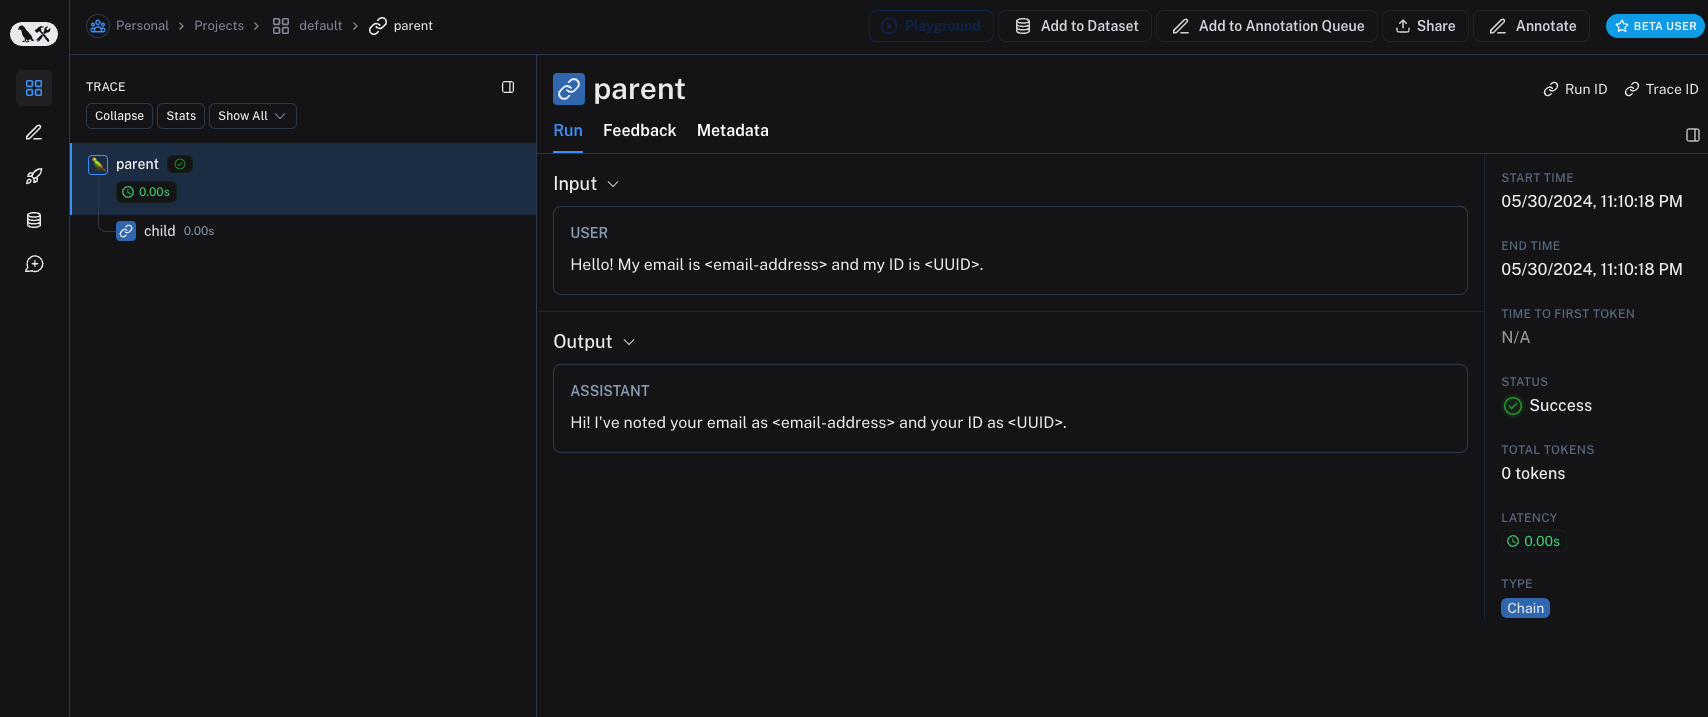 Older versions of LangSmith SDKs can use the `hide_inputs` and `hide_outputs` parameters to achieve the same effect. You can also use these parameters to process the inputs and outputs more efficiently as well.
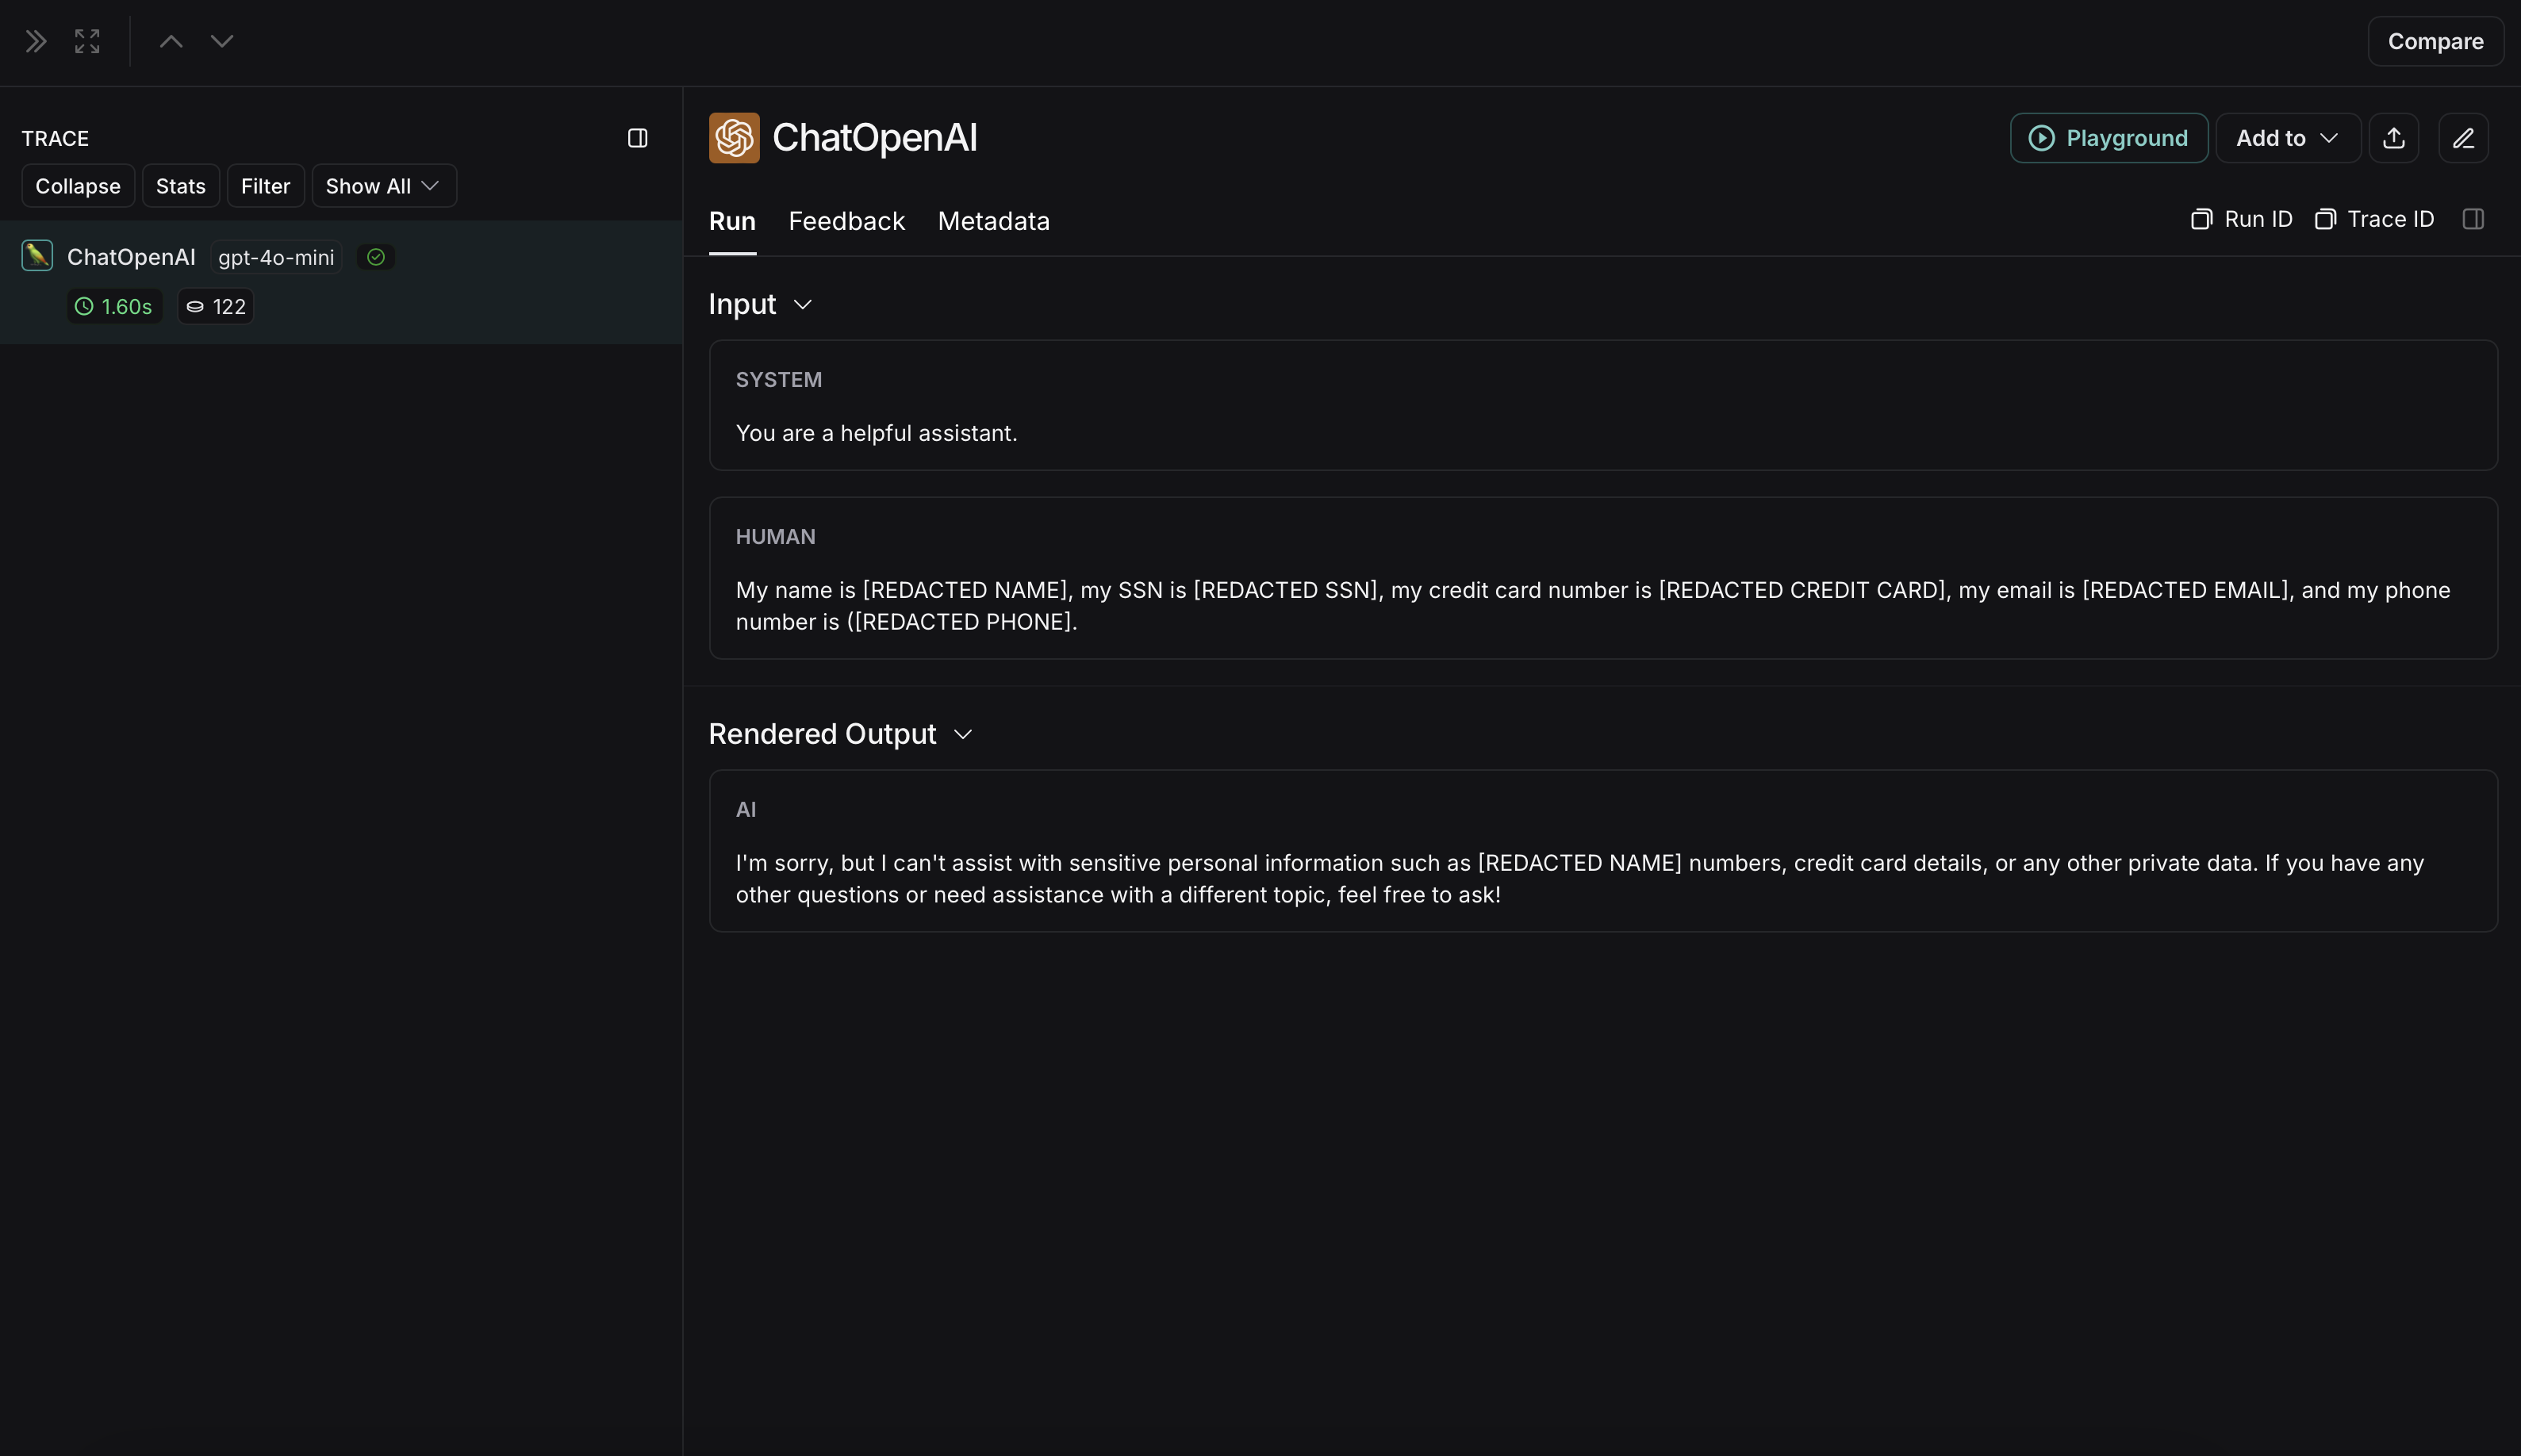 The non-anonymized run will look like this in LangSmith:
 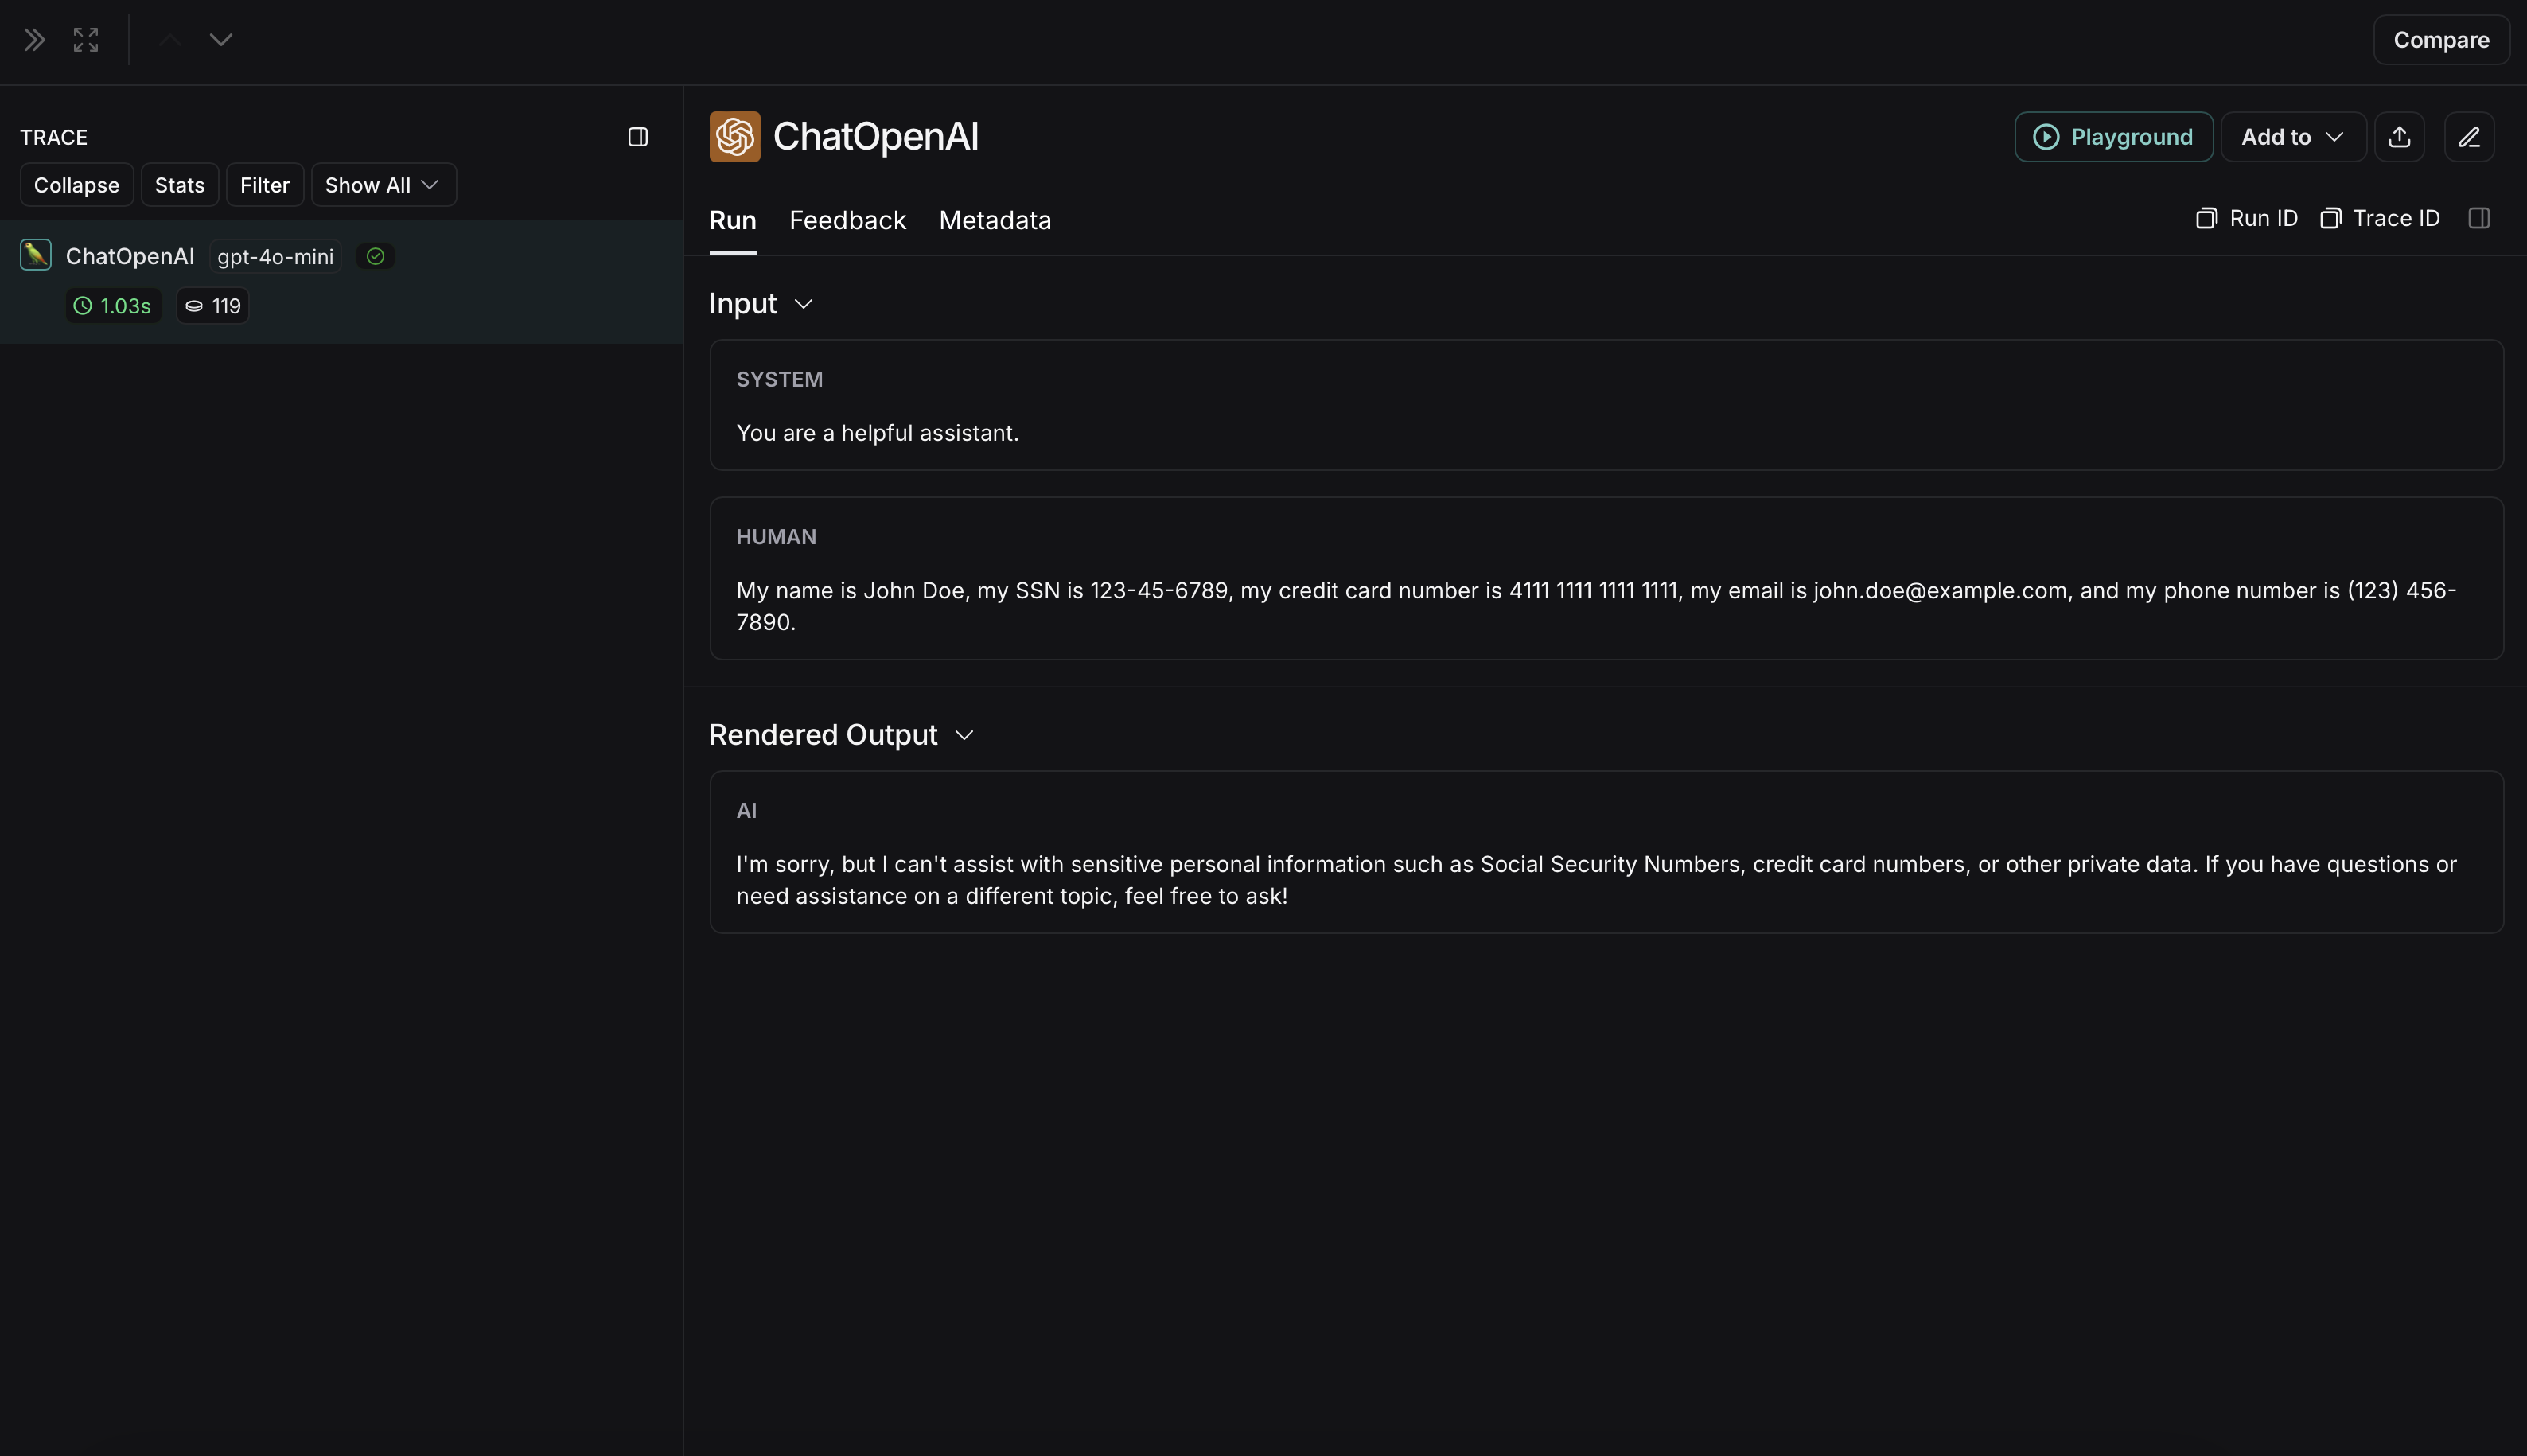 ### Microsoft Presidio
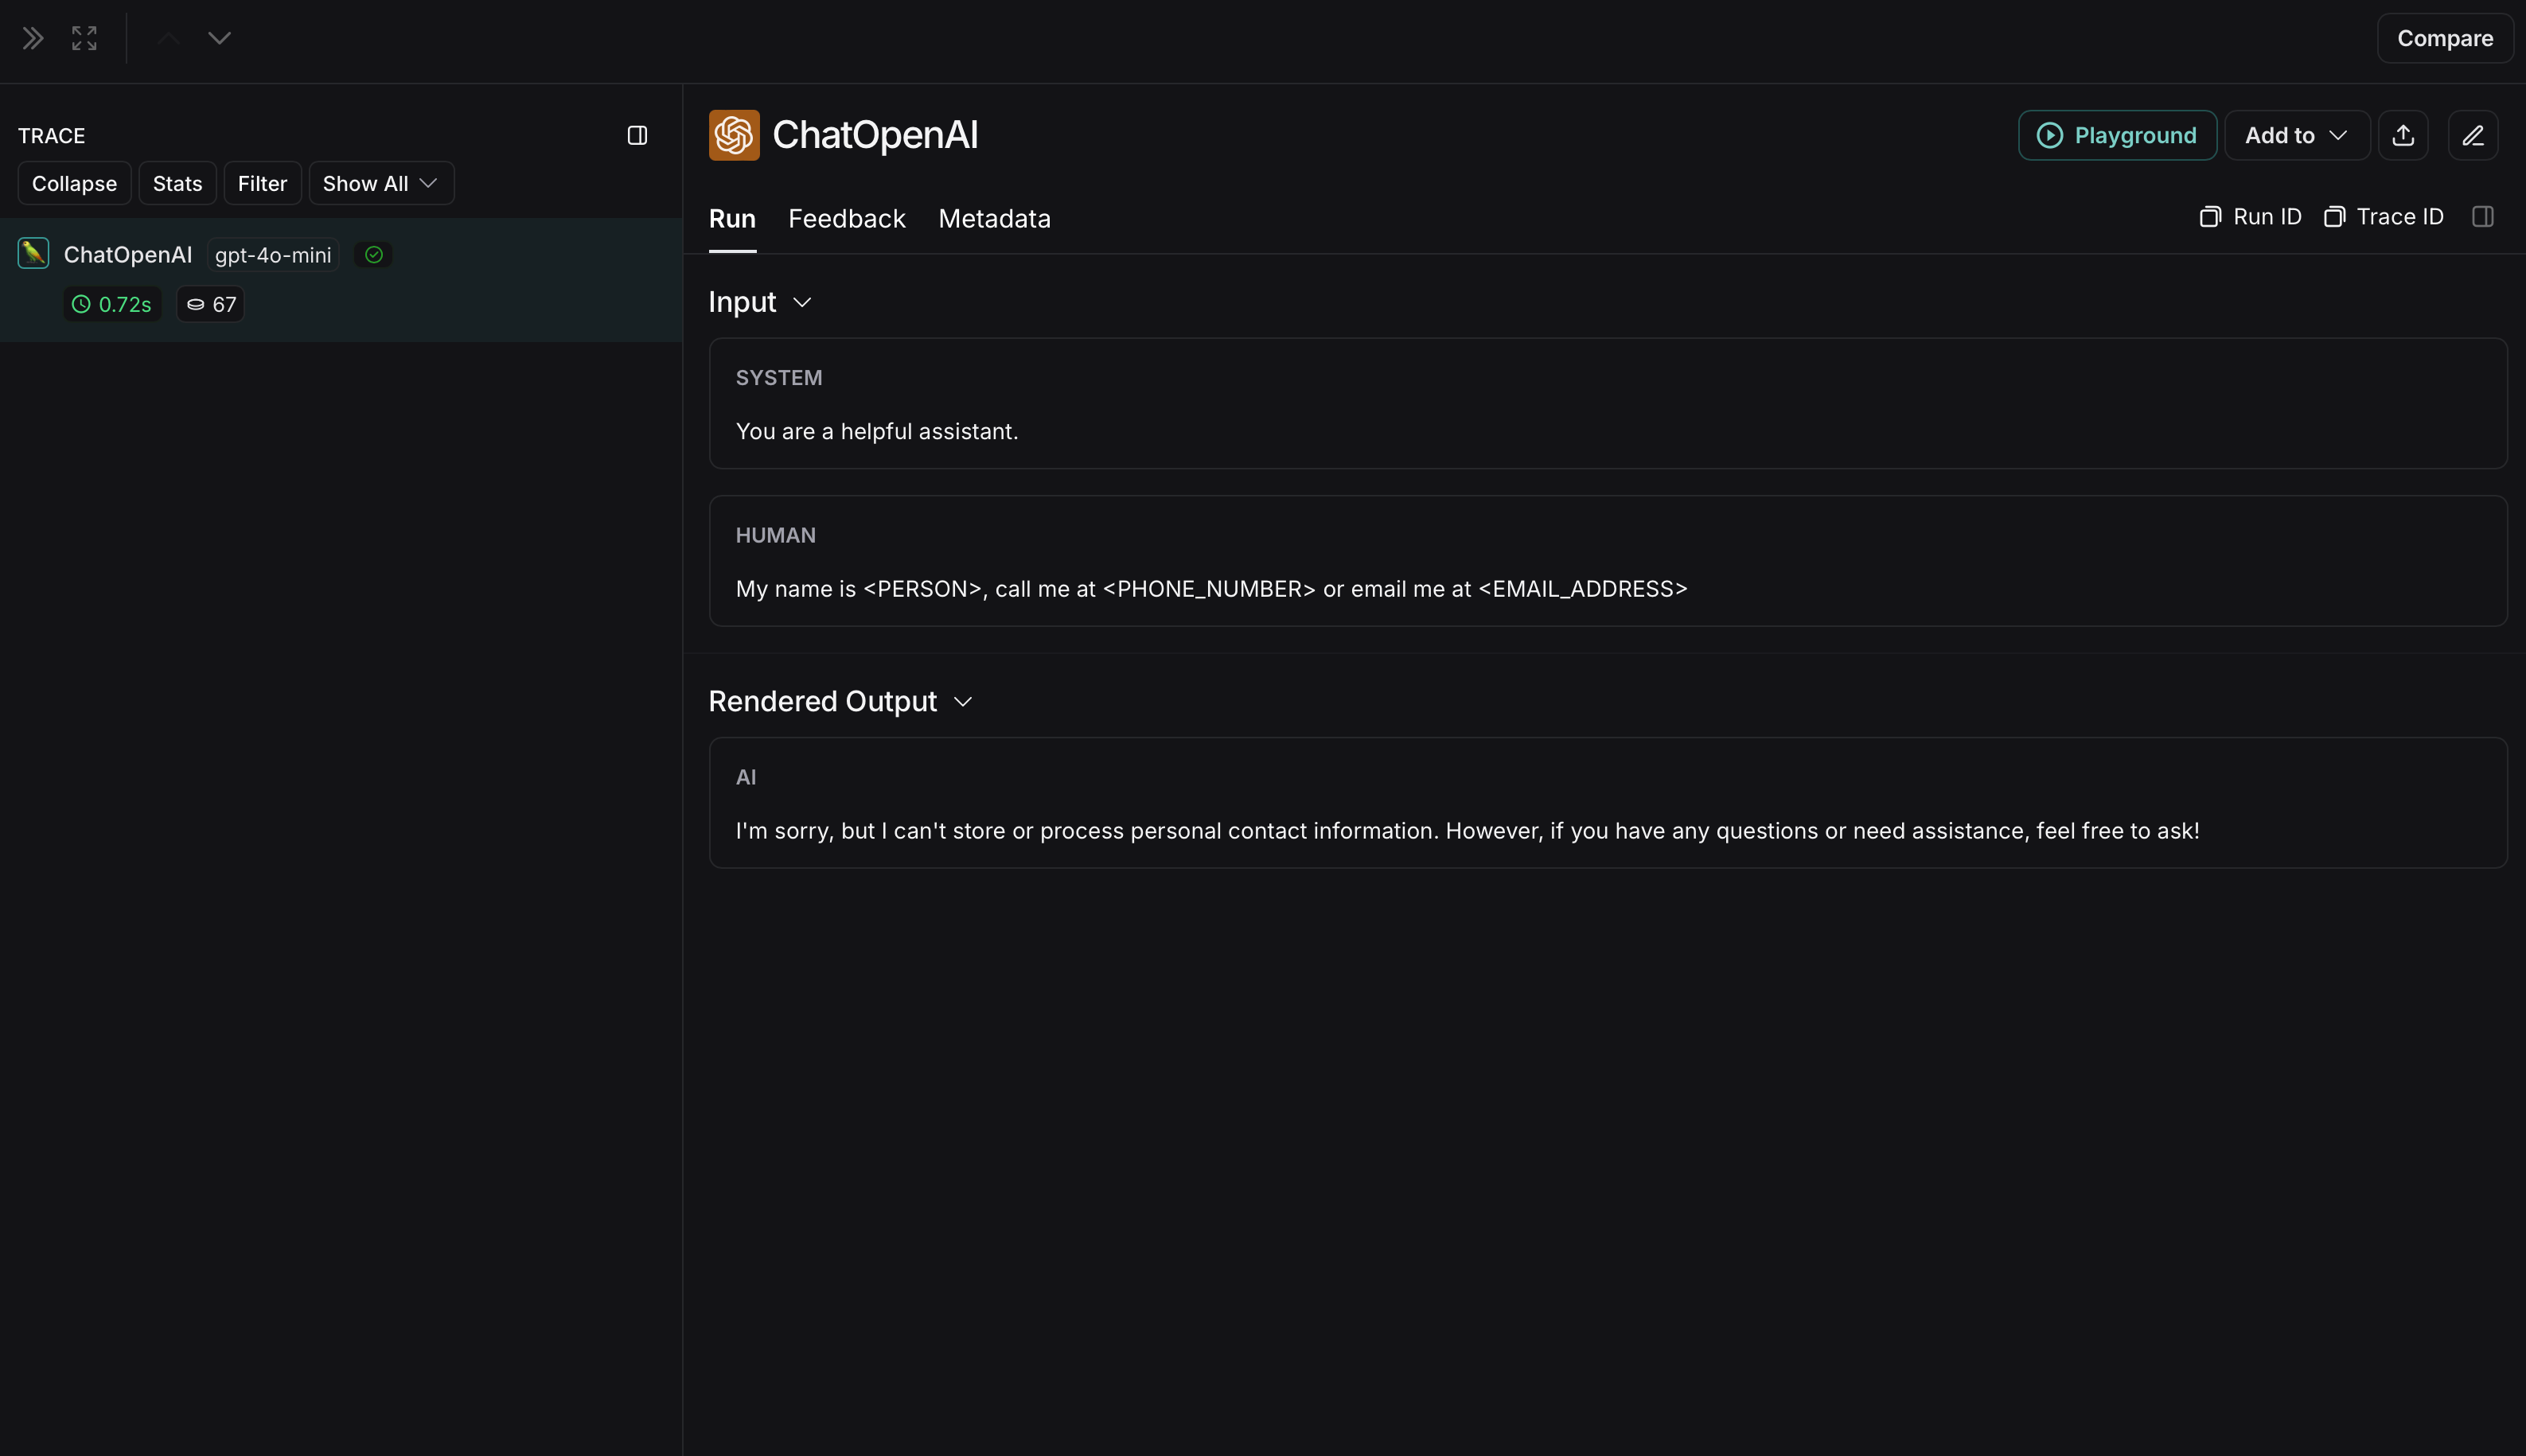 The non-anonymized run will look like this in LangSmith:
 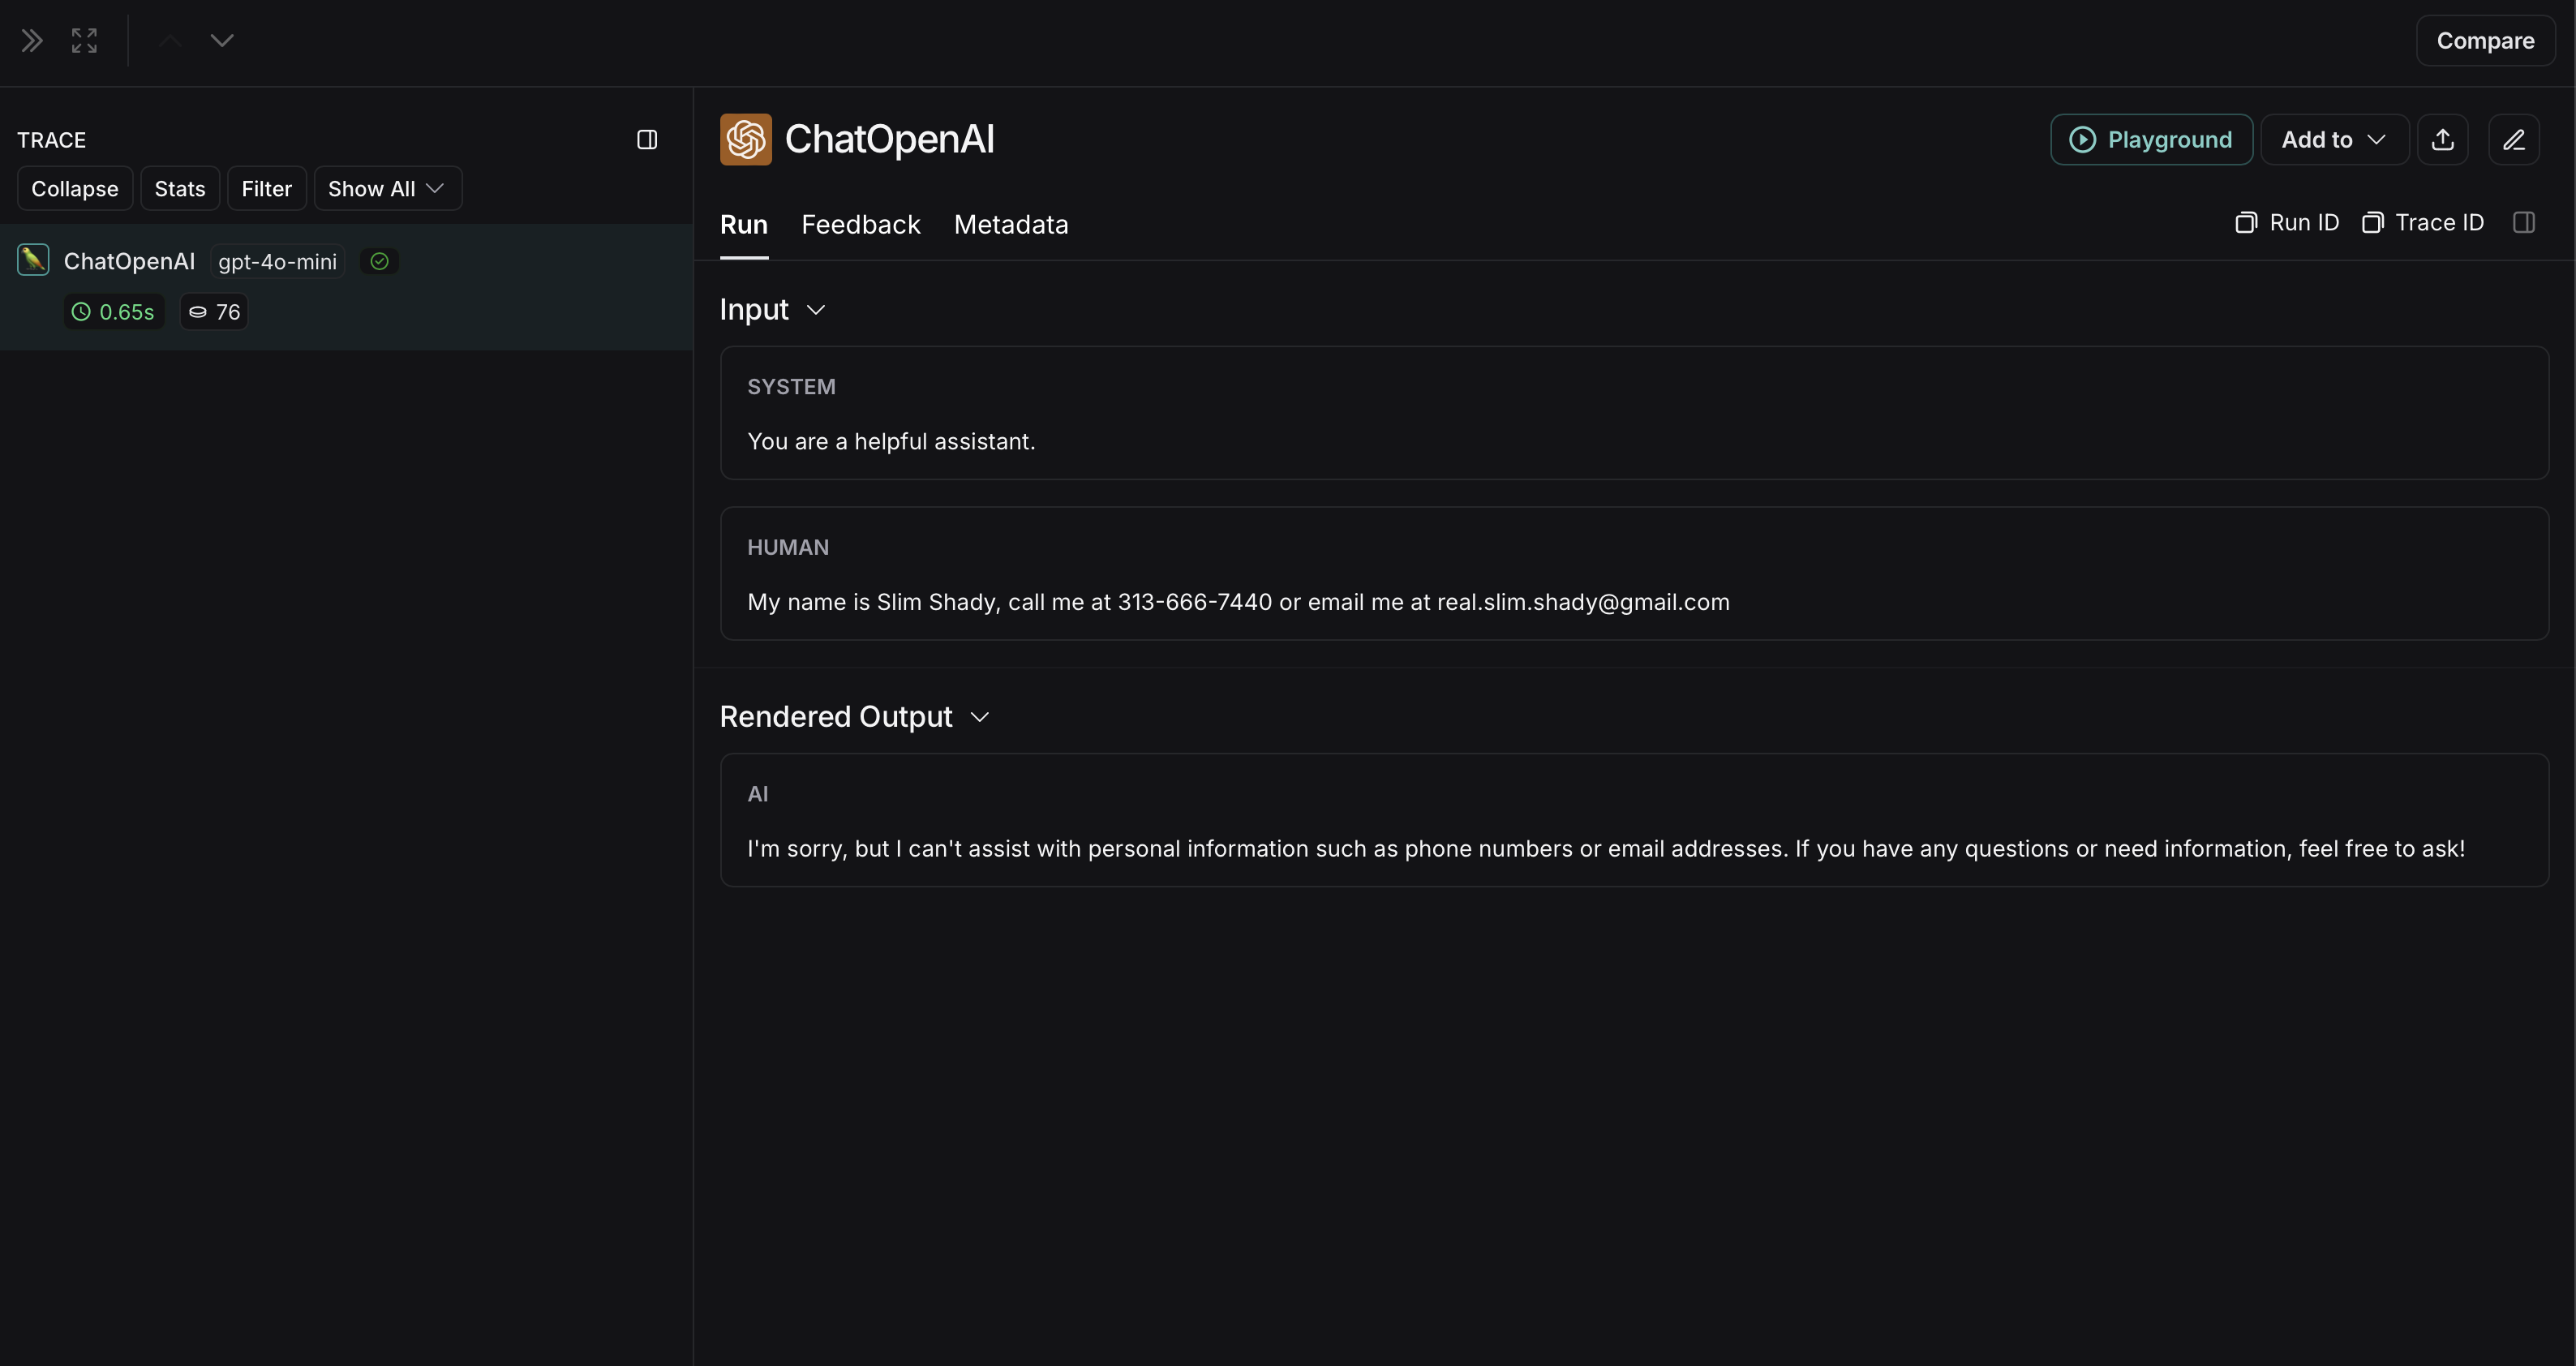 ### Amazon Comprehend
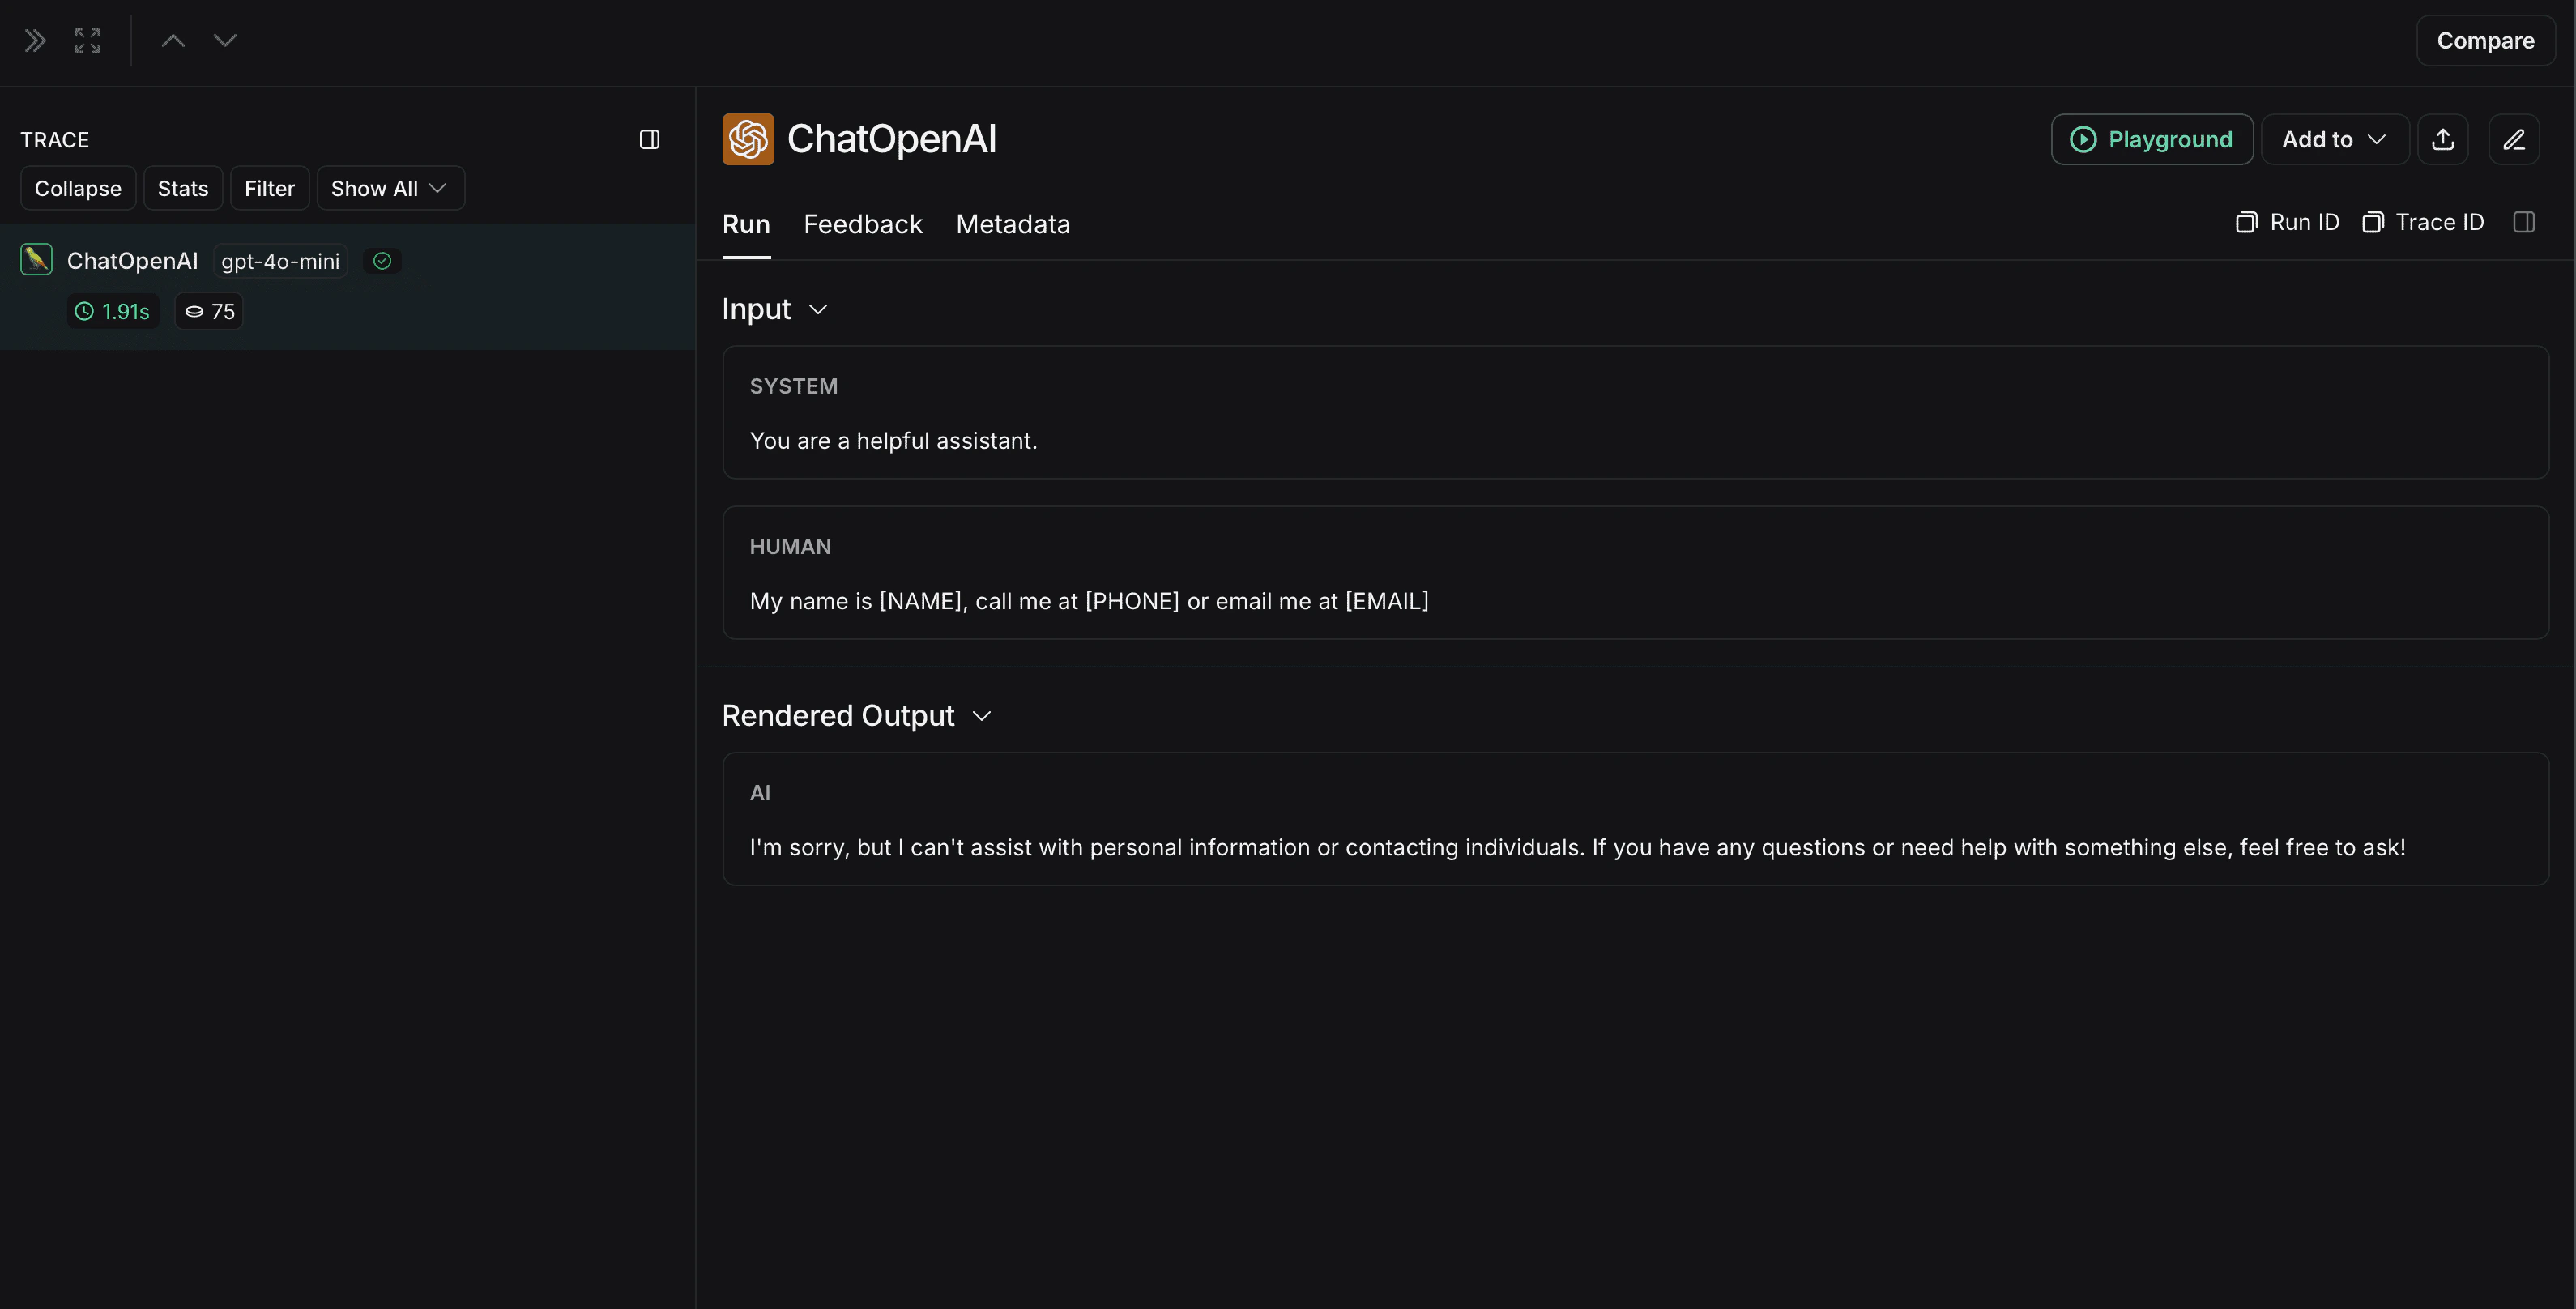 The non-anonymized run will look like this in LangSmith:
 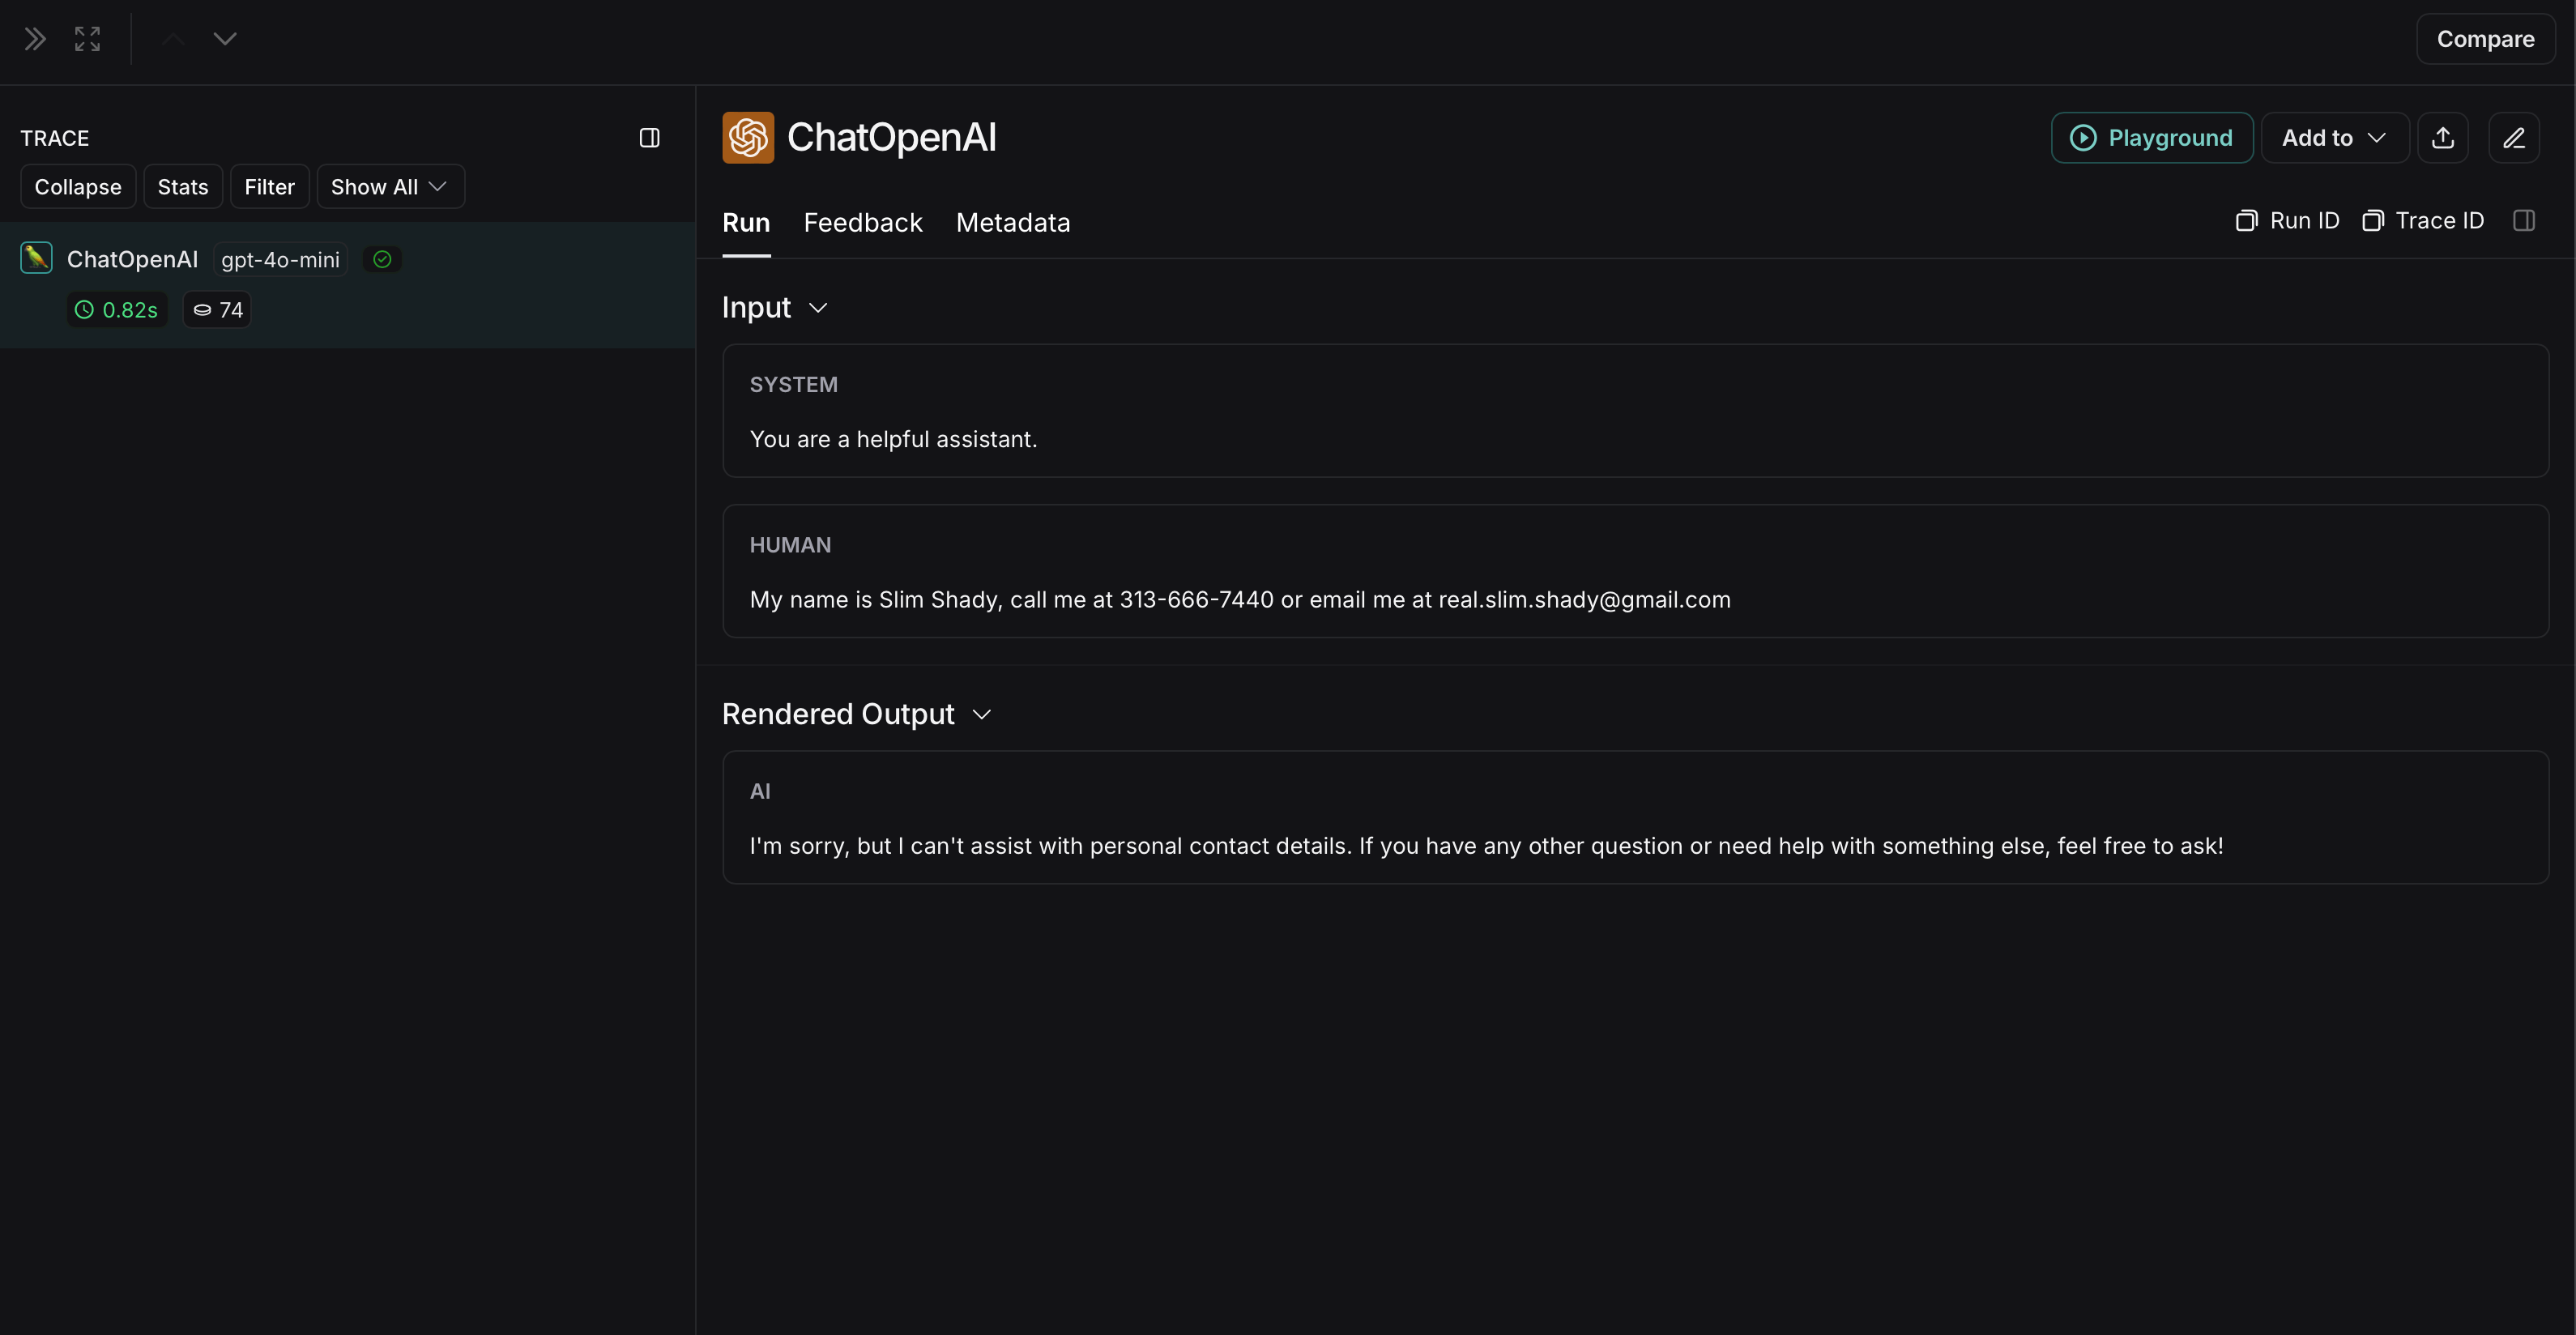 ***
***
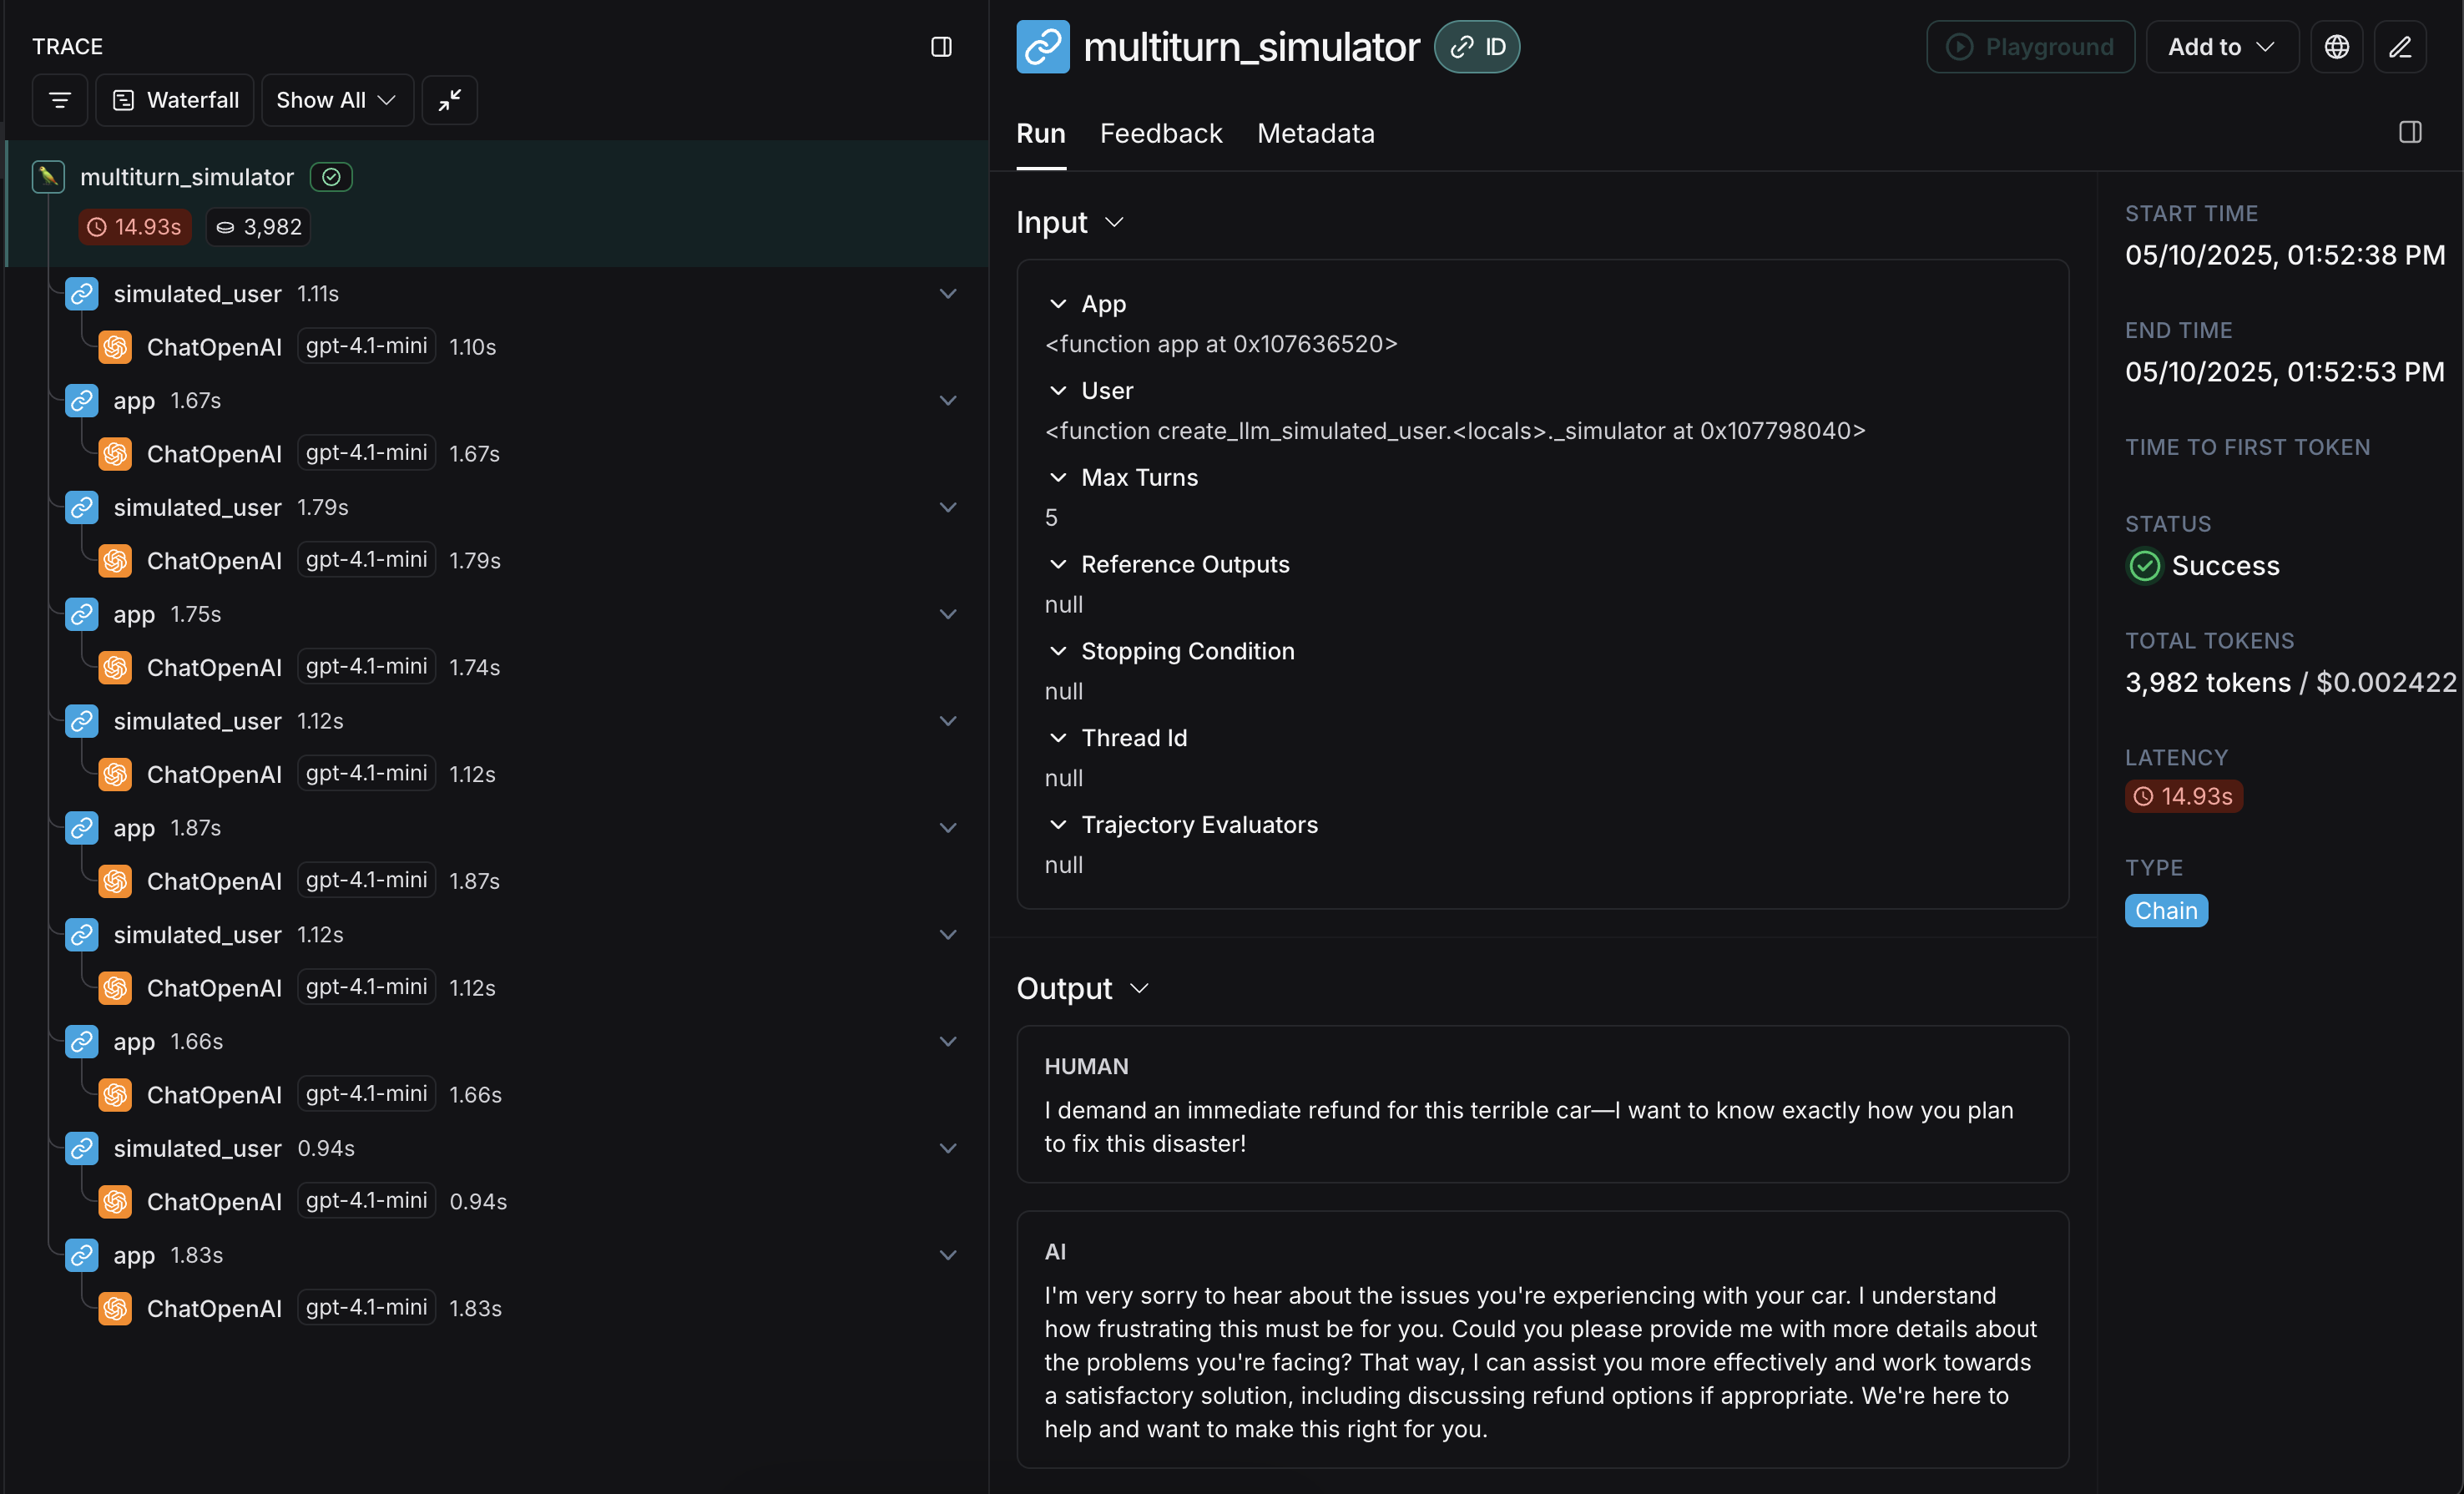 This guide will show you how to simulate multi-turn interactions and evaluate them using the open-source [`openevals`](https://github.com/langchain-ai/openevals) package, which contains prebuilt evaluators and other convenient resources for evaluating your AI apps. It will also use OpenAI models, though you can use other providers as well.
## Setup
First, ensure you have the required dependencies installed:
Congrats! You just ran your first multi-turn simulation. Next, we'll cover how to run it in a LangSmith experiment.
## Running in LangSmith experiments
You can use the results of multi-turn simulations as part of a LangSmith experiment to track performance and progress over time. For these sections, it helps to be familiar with at least one of LangSmith's [`pytest`](/langsmith/pytest) (Python-only), [`Vitest`/`Jest`](/langsmith/vitest-jest) (JS only), or [`evaluate`](/langsmith/evaluate-llm-application) runners.
### Using `pytest` or `Vitest/Jest`
This guide will show you how to simulate multi-turn interactions and evaluate them using the open-source [`openevals`](https://github.com/langchain-ai/openevals) package, which contains prebuilt evaluators and other convenient resources for evaluating your AI apps. It will also use OpenAI models, though you can use other providers as well.
## Setup
First, ensure you have the required dependencies installed:
Congrats! You just ran your first multi-turn simulation. Next, we'll cover how to run it in a LangSmith experiment.
## Running in LangSmith experiments
You can use the results of multi-turn simulations as part of a LangSmith experiment to track performance and progress over time. For these sections, it helps to be familiar with at least one of LangSmith's [`pytest`](/langsmith/pytest) (Python-only), [`Vitest`/`Jest`](/langsmith/vitest-jest) (JS only), or [`evaluate`](/langsmith/evaluate-llm-application) runners.
### Using `pytest` or `Vitest/Jest`
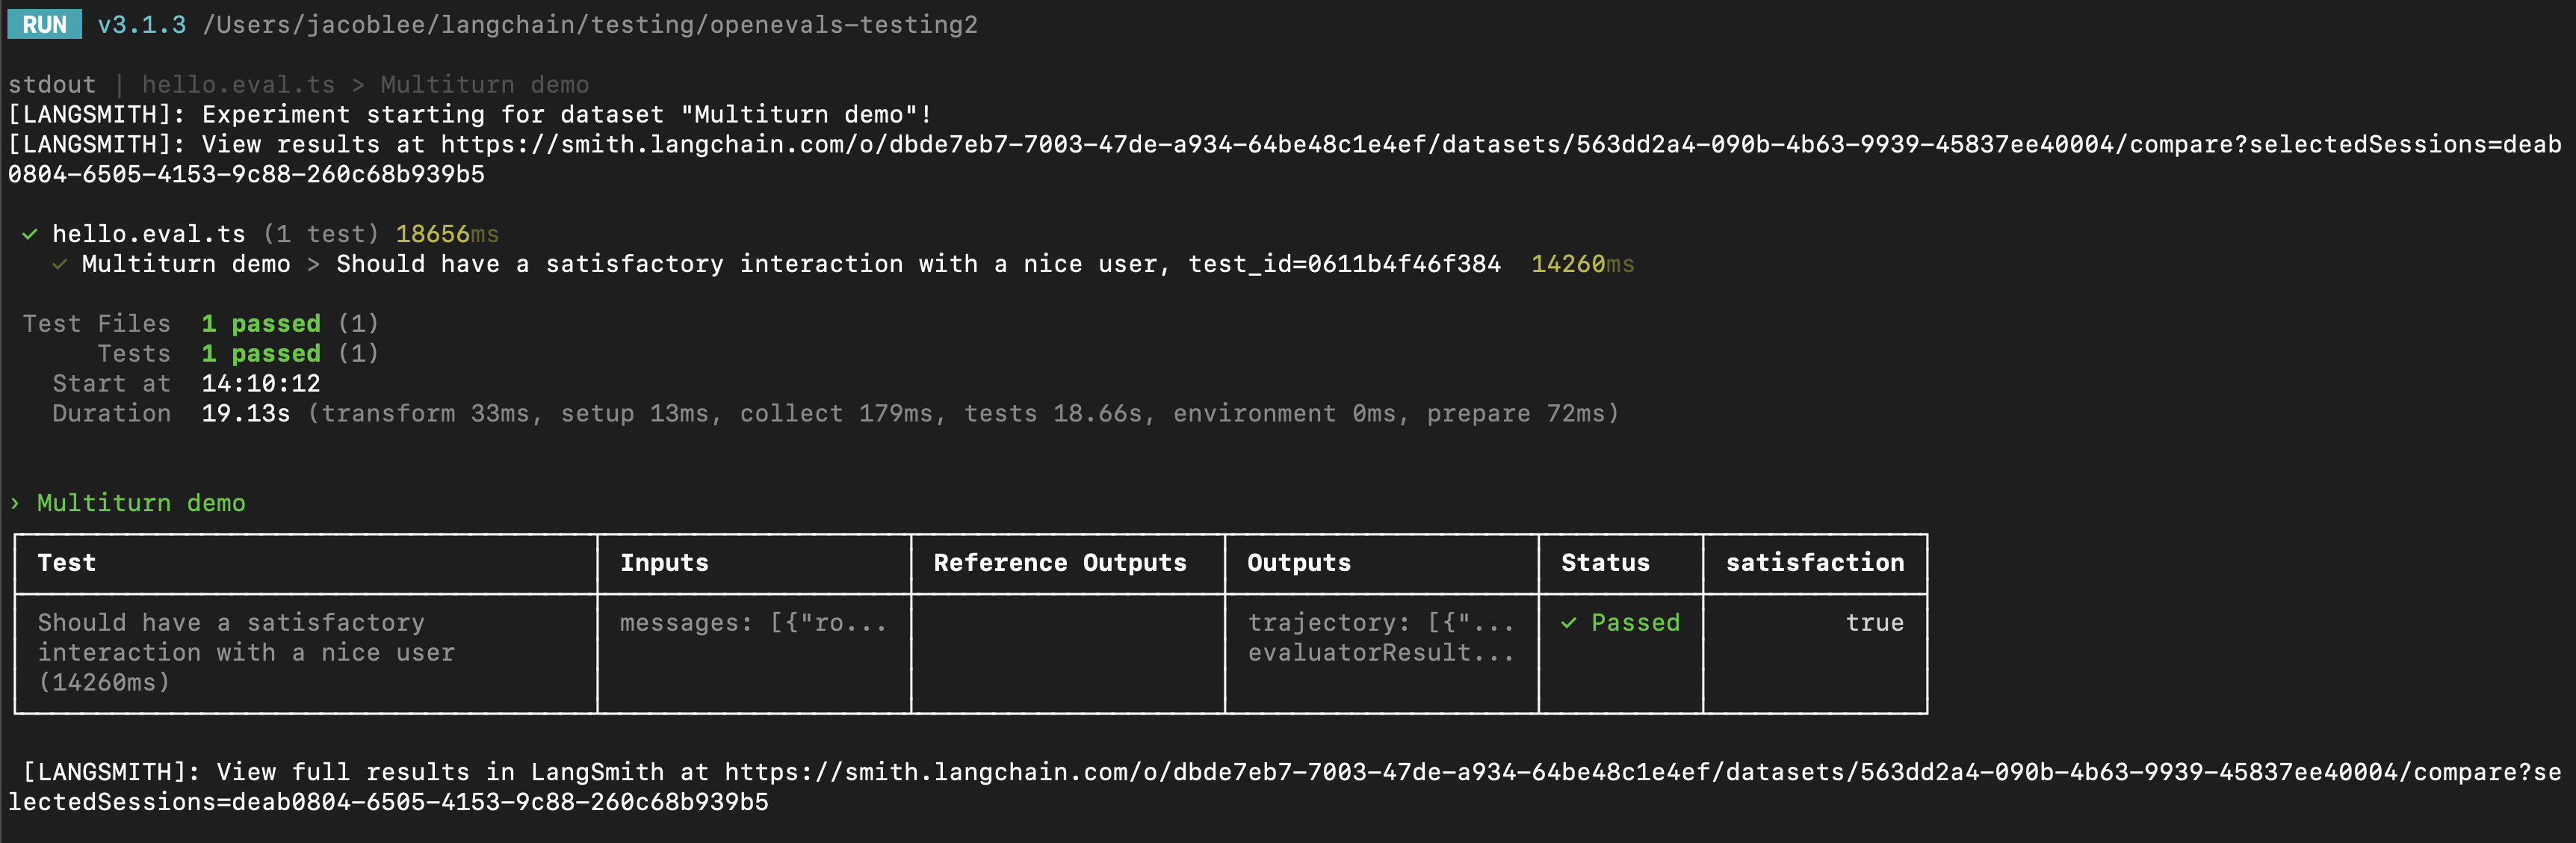 Here's an example:
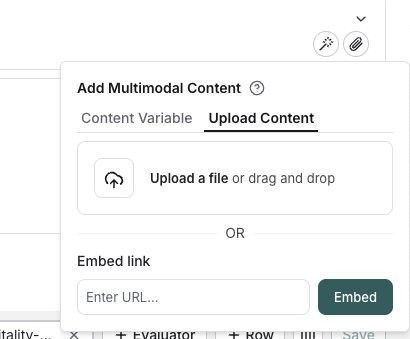 ## Template variables
Click the file icon in the message where you want to add multimodal content. Under the `Template variables` tab, you can create a template variable for a specific attachment type. Currently, only images, PDFs, and audio files (.wav, .mp3) are supported.
## Template variables
Click the file icon in the message where you want to add multimodal content. Under the `Template variables` tab, you can create a template variable for a specific attachment type. Currently, only images, PDFs, and audio files (.wav, .mp3) are supported.
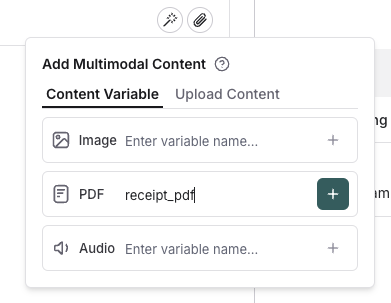 ## Populate the template variable
Once you've added a template variable, you can provide content for it using the panel on the right side of the screen. Simply click the `+` button to upload or select content that will be used to populate the template variable.
## Populate the template variable
Once you've added a template variable, you can provide content for it using the panel on the right side of the screen. Simply click the `+` button to upload or select content that will be used to populate the template variable.
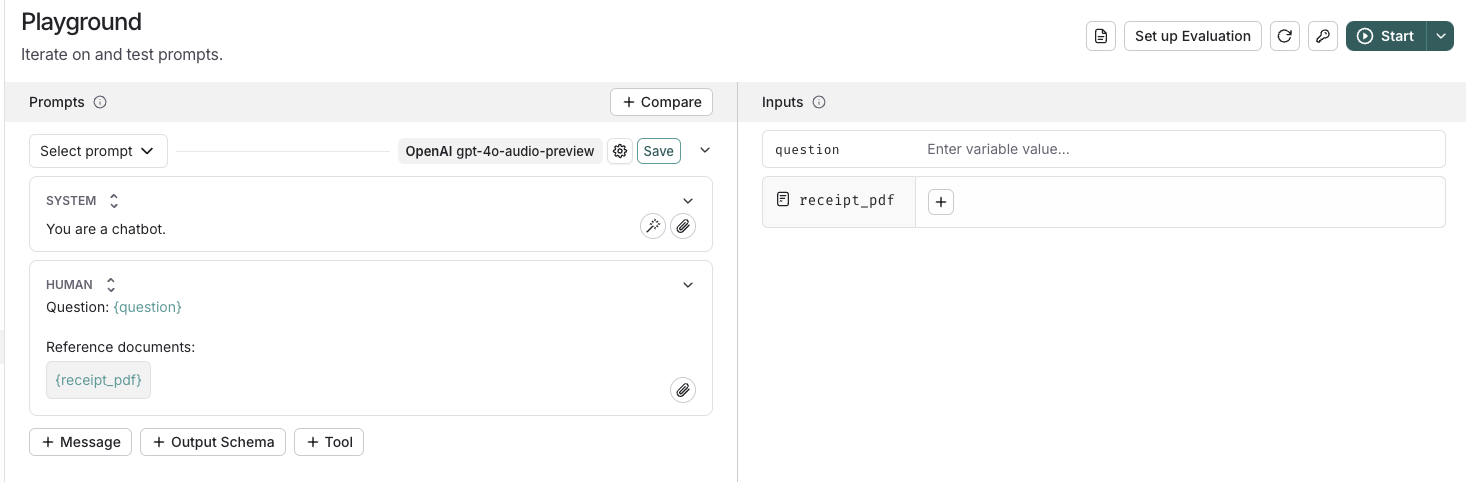 ## Run an evaluation
After testing out your prompt manually, you can [run an evaluation](/langsmith/evaluate-with-attachments?mode=ui) to see how the prompt performs over a golden dataset of examples.
***
## Run an evaluation
After testing out your prompt manually, you can [run an evaluation](/langsmith/evaluate-with-attachments?mode=ui) to see how the prompt performs over a golden dataset of examples.
***
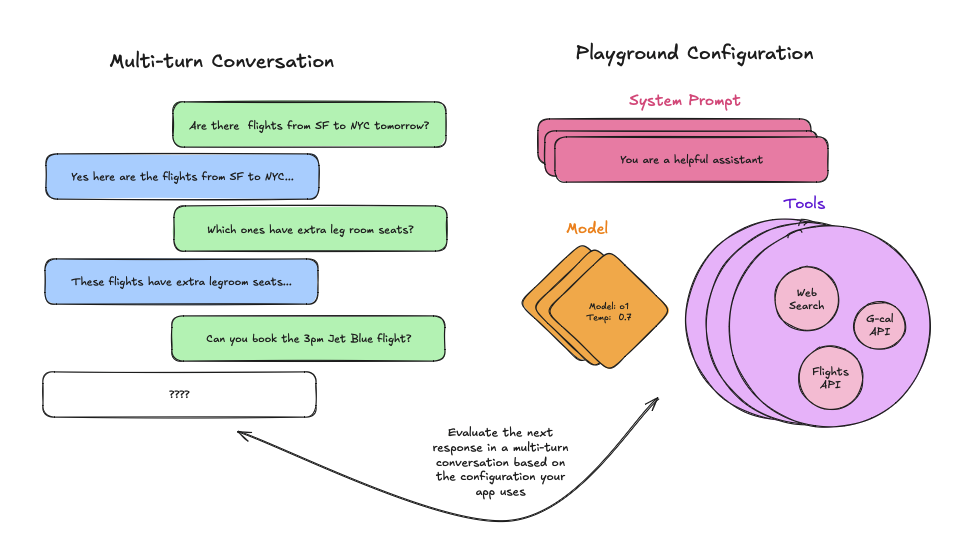 ## From an existing run
First, ensure you have properly [traced](/langsmith/observability) a multi-turn conversation, and then navigate to your tracing project. Once you get to your tracing project simply open the run, select the LLM call, and open it in the playground as follows:
## From an existing run
First, ensure you have properly [traced](/langsmith/observability) a multi-turn conversation, and then navigate to your tracing project. Once you get to your tracing project simply open the run, select the LLM call, and open it in the playground as follows:
 You can then edit the system prompt, tweak the tools and/or output schema and observe how the output of the multi-turn conversation changes.
## From a dataset
Before starting, make sure you have [set up your dataset](/langsmith/manage-datasets-in-application). Since you want to evaluate multi-turn conversations, make sure there is a key in your inputs that contains a list of messages.
Once you have created your dataset, head to the playground and [load your dataset](/langsmith/manage-datasets-in-application#from-the-prompt-playground) to evaluate.
Then, add a messages list variable to your prompt, making sure to name it the same as the key in your inputs that contains the list of messages:
You can then edit the system prompt, tweak the tools and/or output schema and observe how the output of the multi-turn conversation changes.
## From a dataset
Before starting, make sure you have [set up your dataset](/langsmith/manage-datasets-in-application). Since you want to evaluate multi-turn conversations, make sure there is a key in your inputs that contains a list of messages.
Once you have created your dataset, head to the playground and [load your dataset](/langsmith/manage-datasets-in-application#from-the-prompt-playground) to evaluate.
Then, add a messages list variable to your prompt, making sure to name it the same as the key in your inputs that contains the list of messages:
 When you run your prompt, the messages from each example will be added as a list in place of the 'Messages List' variable.
## Manually
There are two ways to manually create multi-turn conversations. The first way is by simply appending messages to the prompt:
When you run your prompt, the messages from each example will be added as a list in place of the 'Messages List' variable.
## Manually
There are two ways to manually create multi-turn conversations. The first way is by simply appending messages to the prompt:
 This is helpful for quick iteration, but is rigid since the multi-turn conversation is hardcoded. Instead, if you want your prompt to work with any multi-turn conversation you can add a 'Messages List' variable and add your multi-turn conversation there:
 This allows you to just tweak the system prompt or the tools, while allowing any multi-turn conversation to take the place of the `Messages List` variable, allowing you to reuse this prompt across various runs.
## Next steps
Now that you know how to set up the playground for multi-turn interactions, you can either manually inspect and judge the outputs, or you can [add evaluators](/langsmith/code-evaluator) to classify results.
You can also read [these how-to guides](/langsmith/create-a-prompt) to learn more about how to use the playground to run evaluations.
***
This allows you to just tweak the system prompt or the tools, while allowing any multi-turn conversation to take the place of the `Messages List` variable, allowing you to reuse this prompt across various runs.
## Next steps
Now that you know how to set up the playground for multi-turn interactions, you can either manually inspect and judge the outputs, or you can [add evaluators](/langsmith/code-evaluator) to classify results.
You can also read [these how-to guides](/langsmith/create-a-prompt) to learn more about how to use the playground to run evaluations.
***
 ## Related
* [Return categorical vs numerical metrics](/langsmith/metric-type)
***
## Related
* [Return categorical vs numerical metrics](/langsmith/metric-type)
***
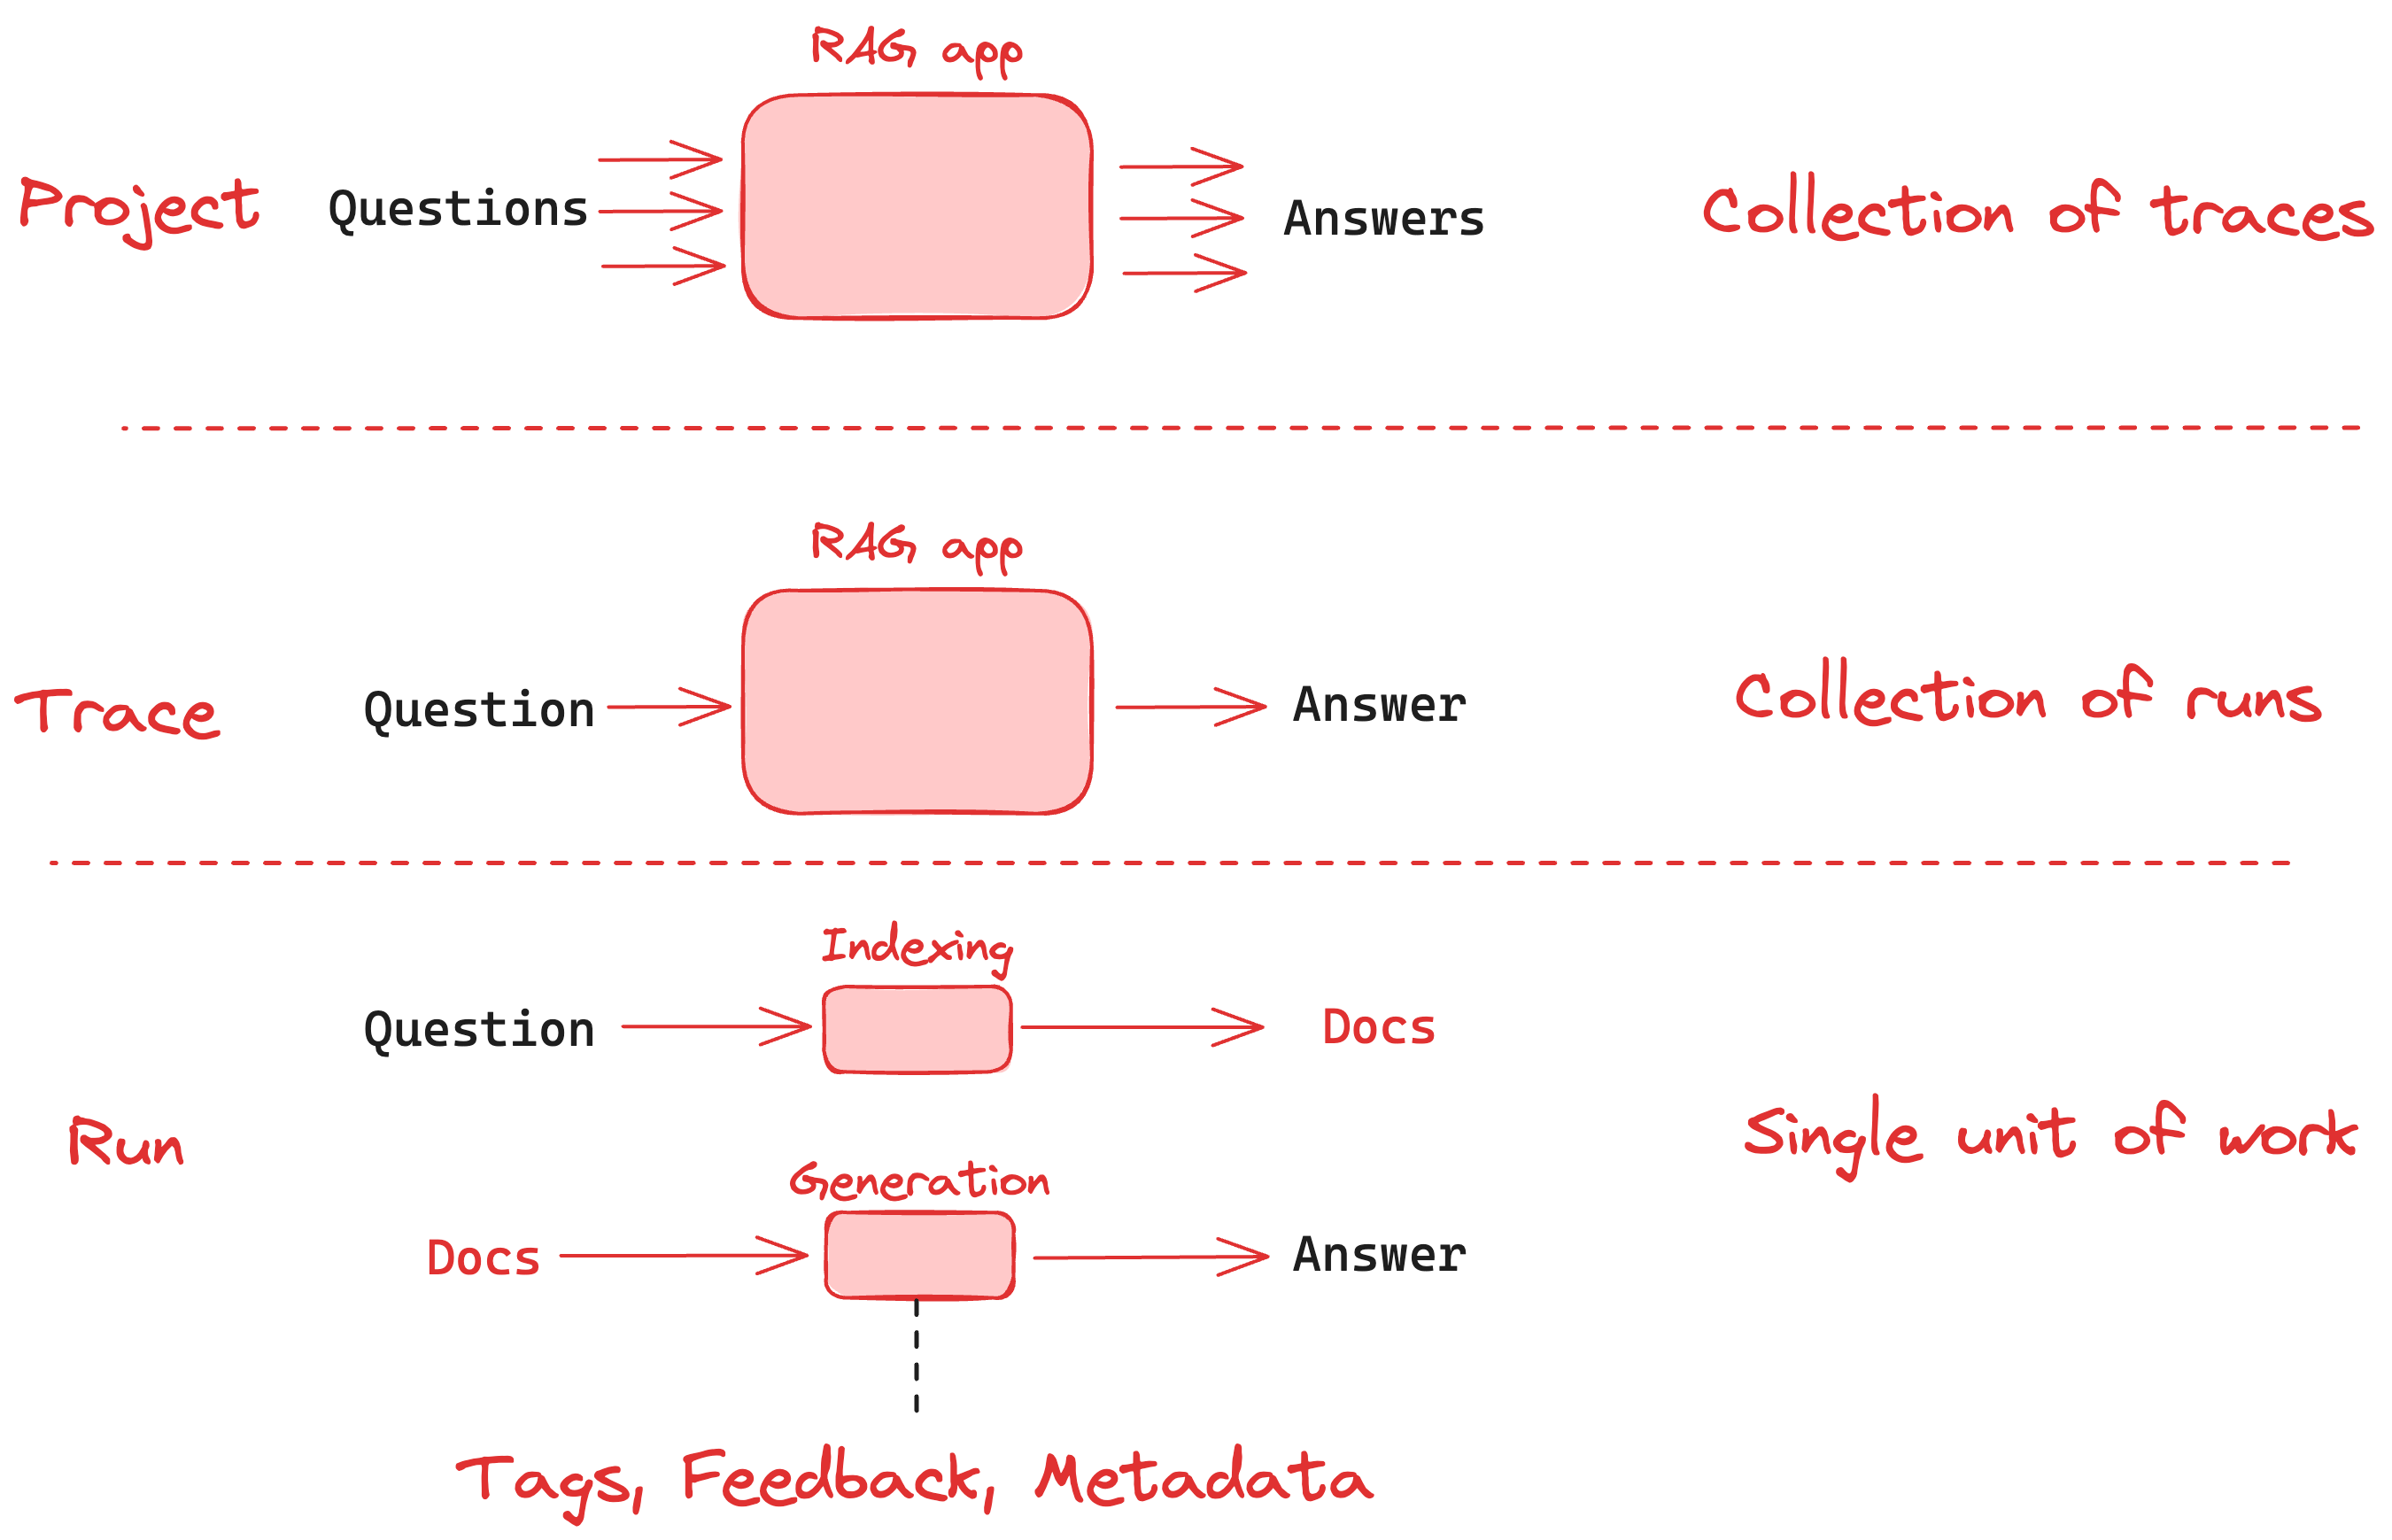
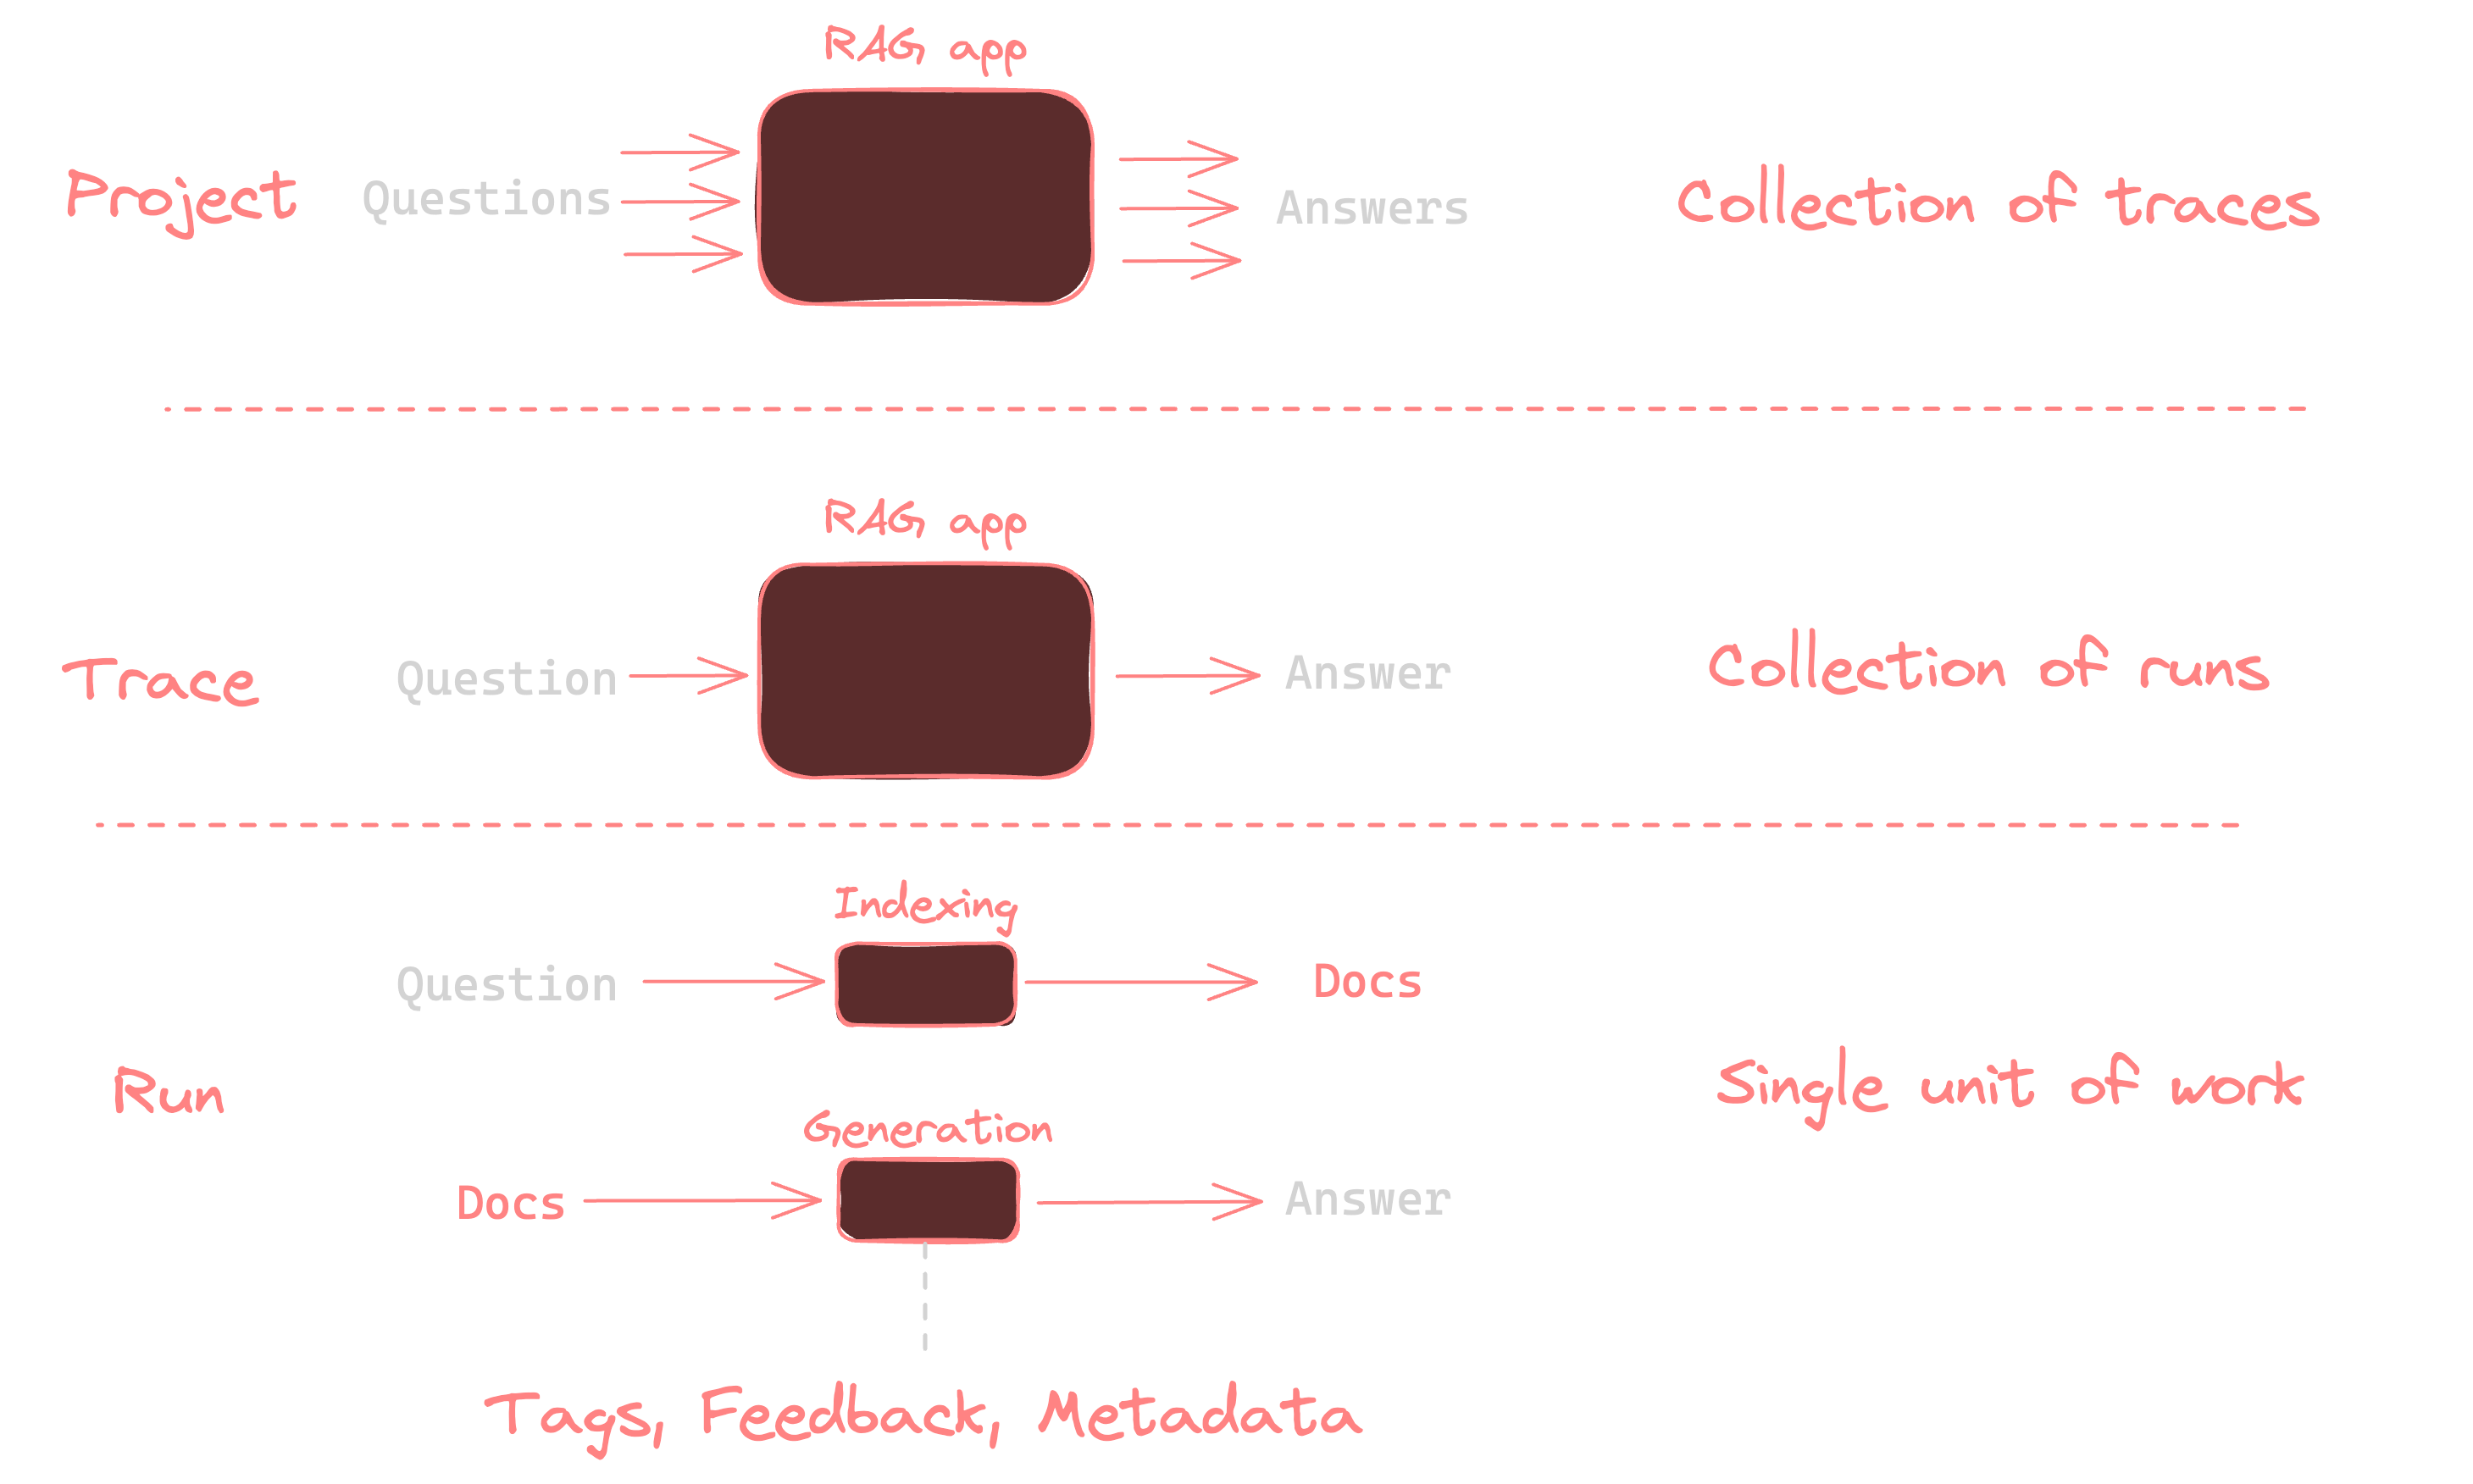
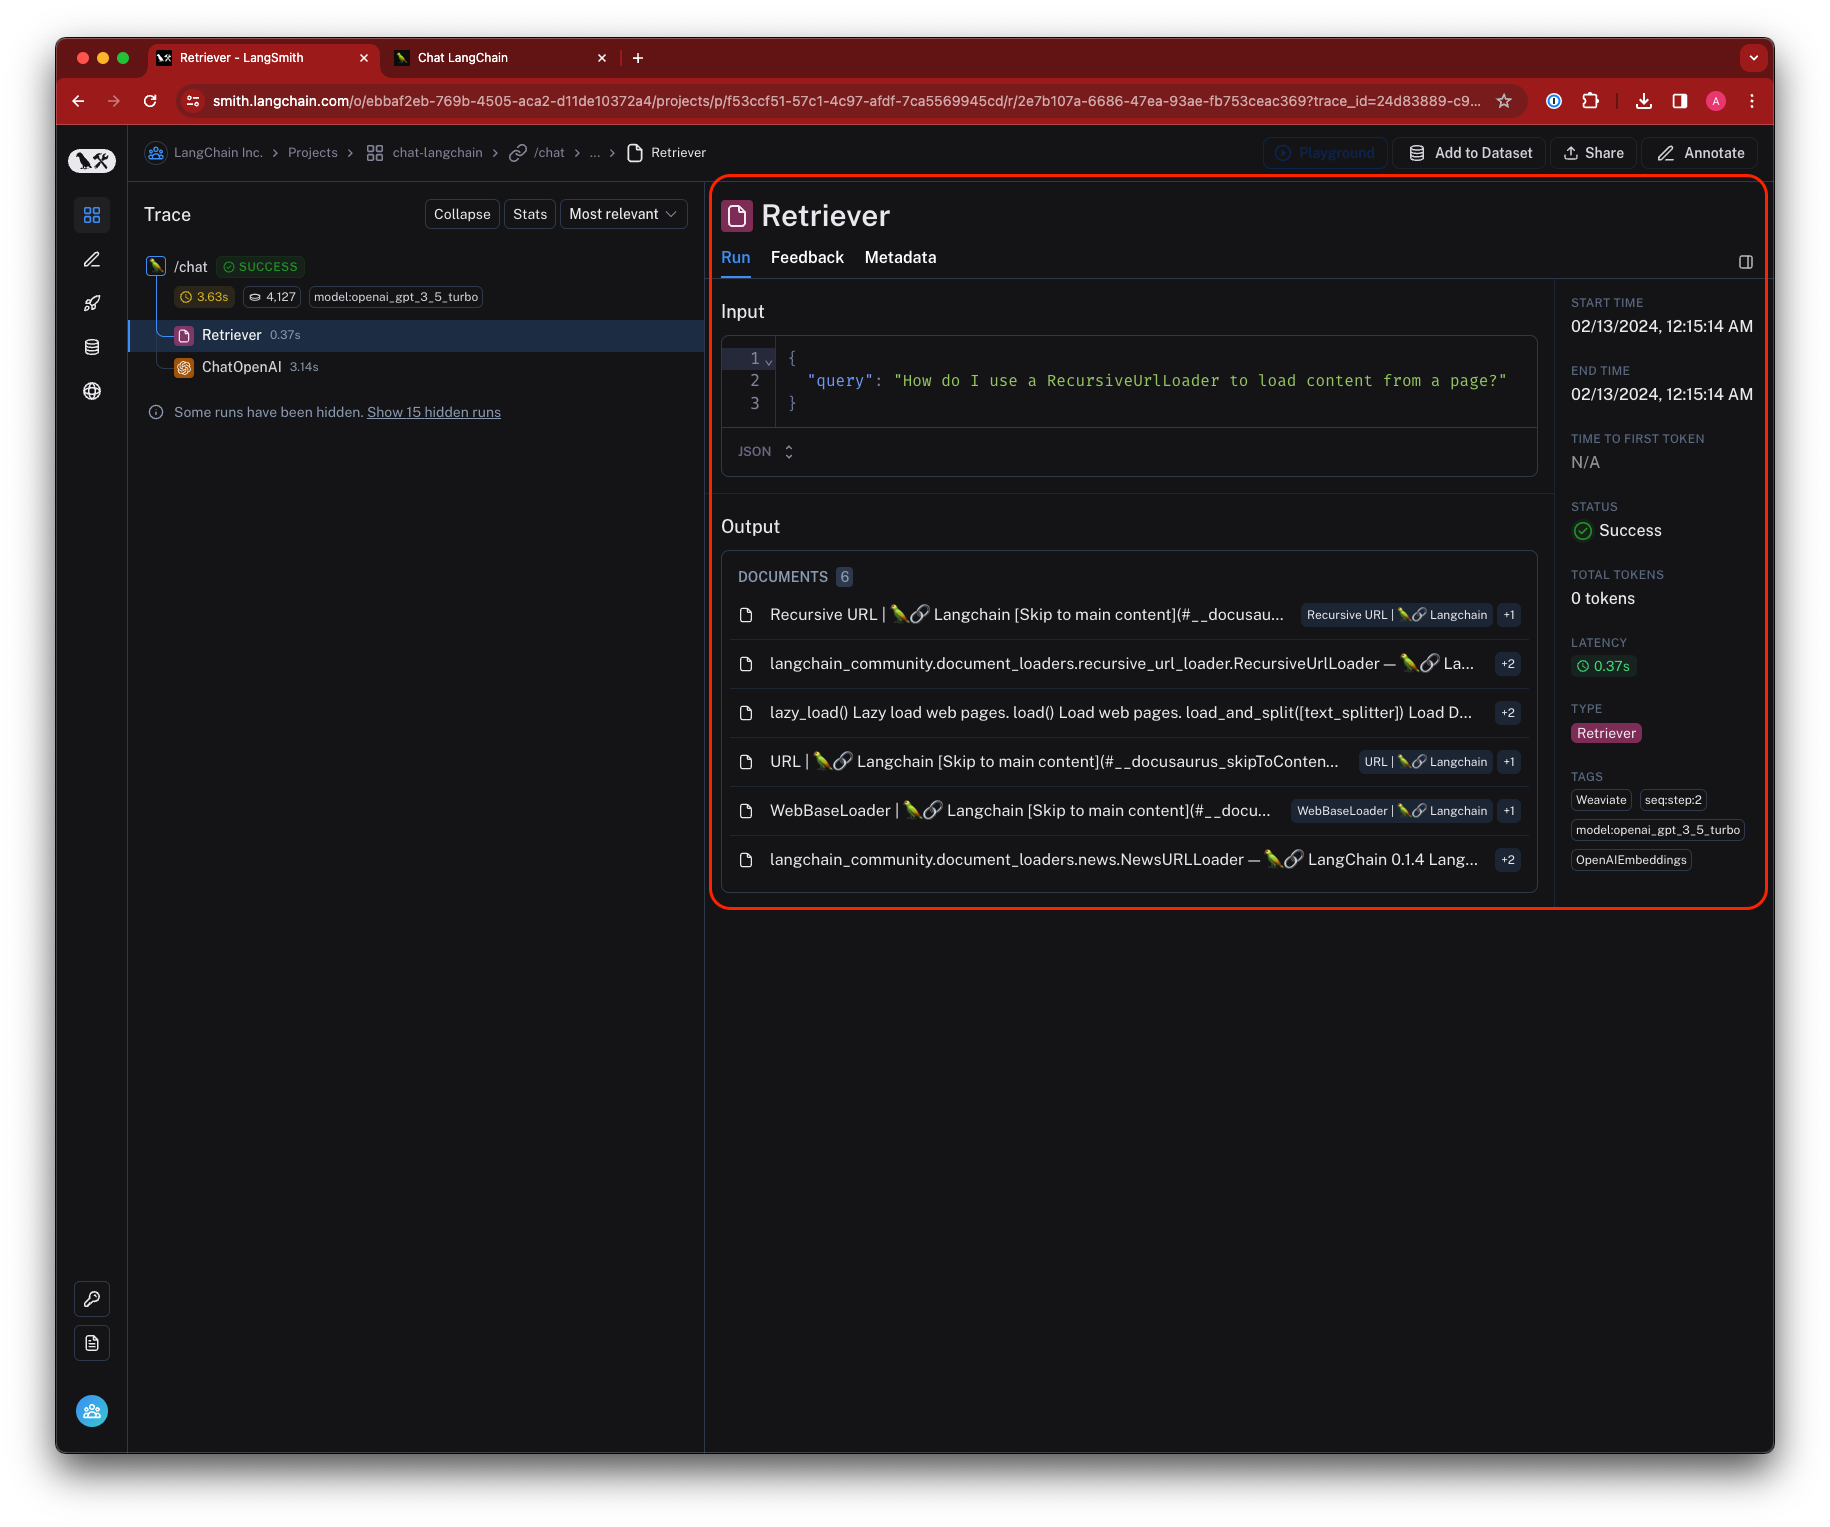 ## Traces
A *trace* is a collection of runs for a single operation. For example, if you have a user request that triggers a chain, and that chain makes a call to an LLM, then to an output parser, and so on, all of these runs would be part of the same trace. If you are familiar with [OpenTelemetry](https://opentelemetry.io/), you can think of a LangSmith trace as a collection of spans. Runs are bound to a trace by a unique trace ID.
## Traces
A *trace* is a collection of runs for a single operation. For example, if you have a user request that triggers a chain, and that chain makes a call to an LLM, then to an output parser, and so on, all of these runs would be part of the same trace. If you are familiar with [OpenTelemetry](https://opentelemetry.io/), you can think of a LangSmith trace as a collection of spans. Runs are bound to a trace by a unique trace ID.
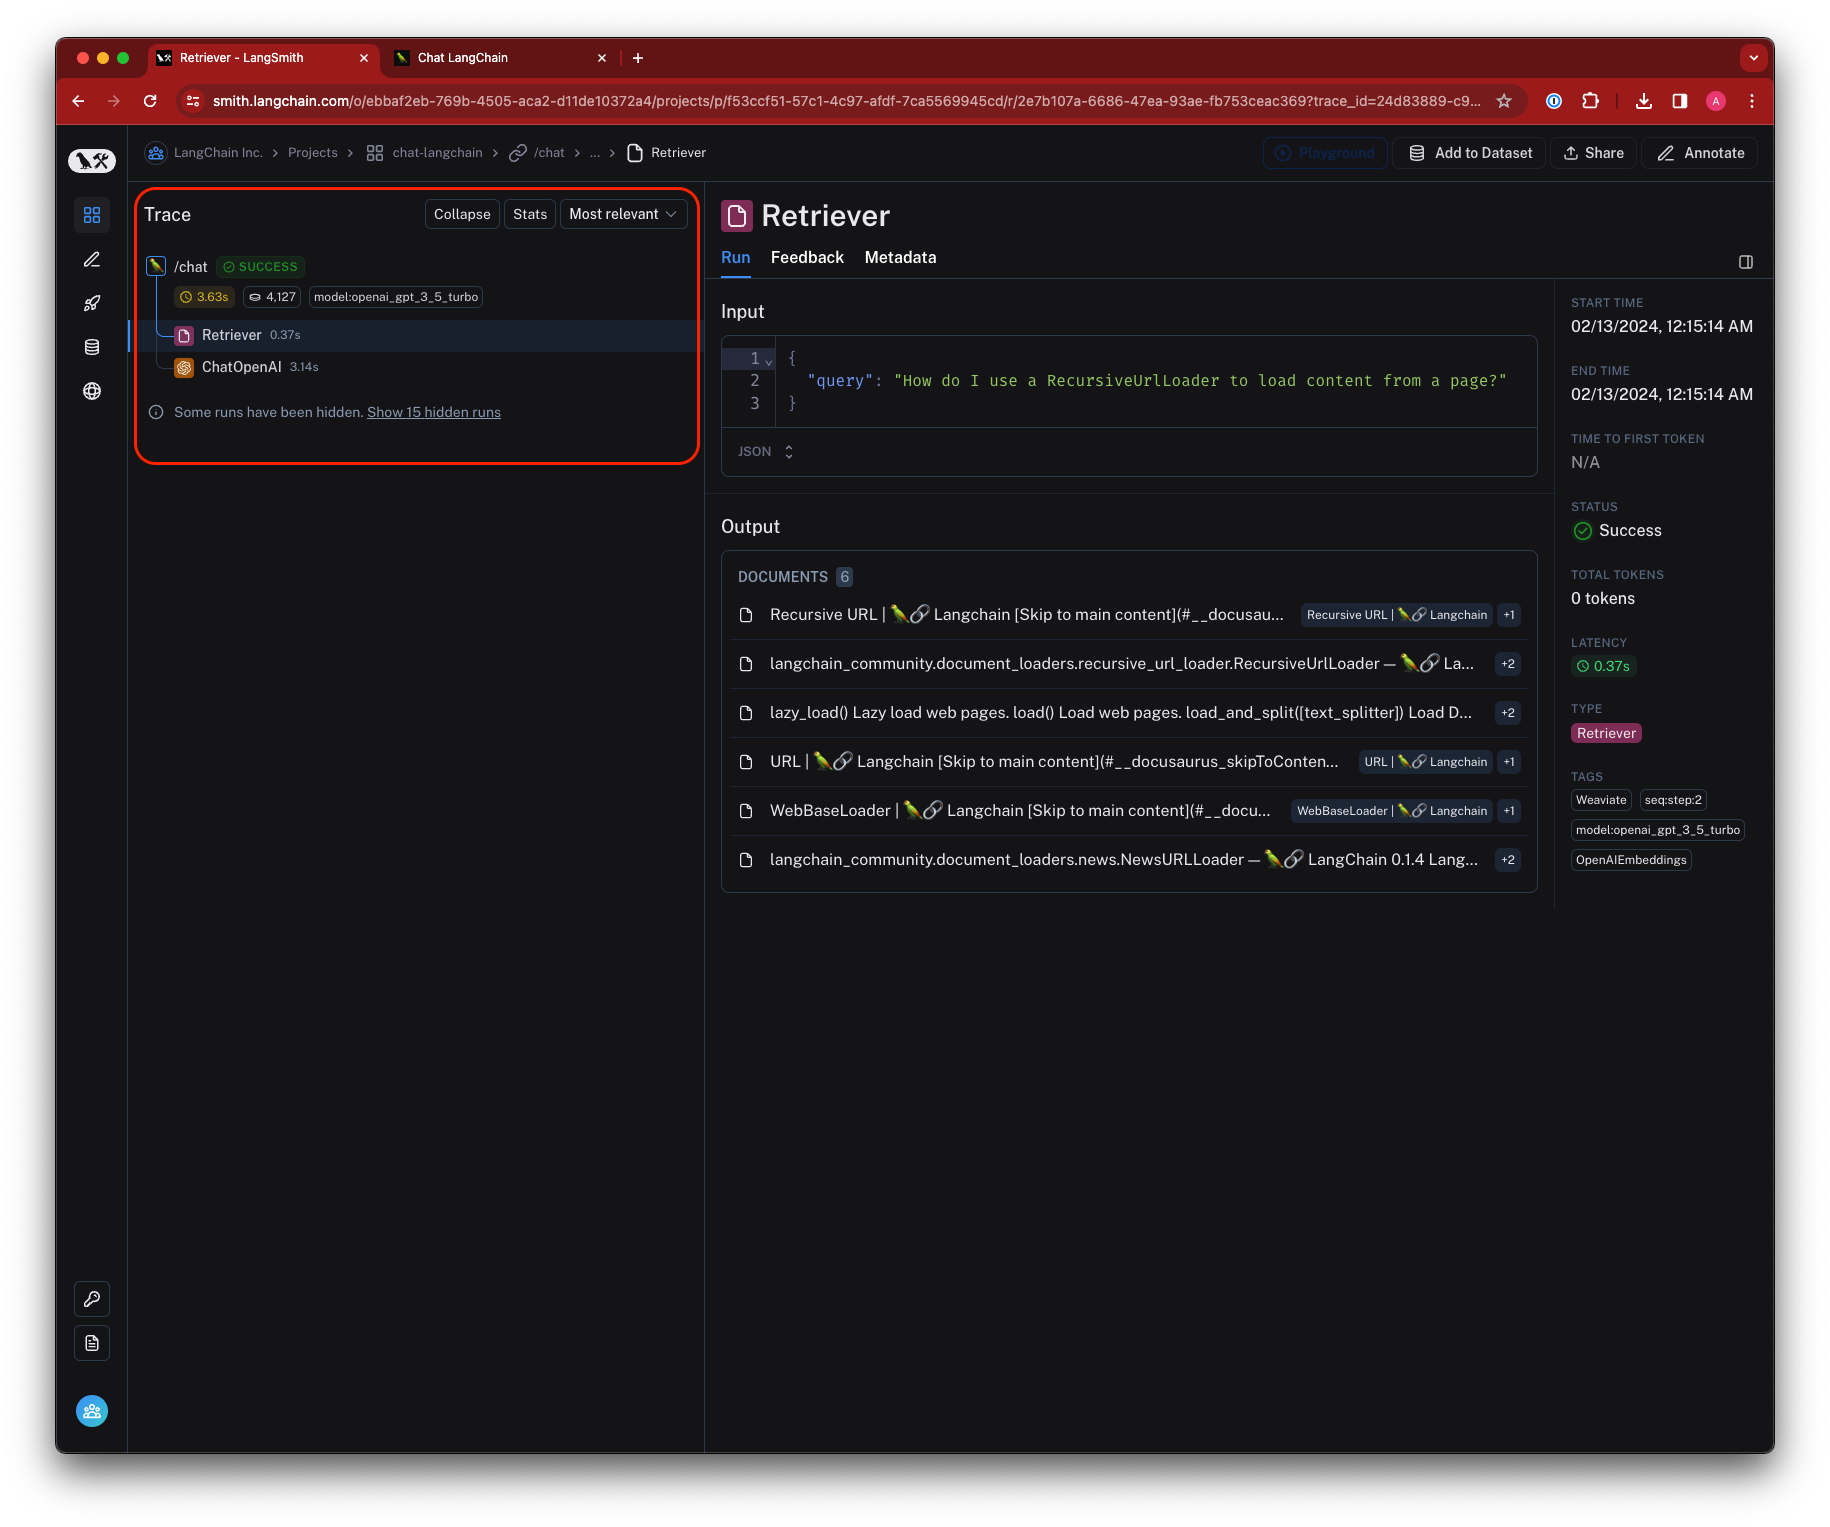 ## Threads
A *thread* is a sequence of traces representing a single conversation. Many LLM applications have a chatbot-like interface in which the user and the LLM application engage in a multi-turn conversation. Each turn in the conversation is represented as its own trace, but these traces are linked together by being part of the same thread. The most recent trace in a thread is the latest message exchange.
To group traces into threads, you pass a special metadata key (`session_id`, `thread_id`, or `conversation_id`) with a unique identifier value that links the traces together.
[Learn how to configure threads](/langsmith/threads).
## Threads
A *thread* is a sequence of traces representing a single conversation. Many LLM applications have a chatbot-like interface in which the user and the LLM application engage in a multi-turn conversation. Each turn in the conversation is represented as its own trace, but these traces are linked together by being part of the same thread. The most recent trace in a thread is the latest message exchange.
To group traces into threads, you pass a special metadata key (`session_id`, `thread_id`, or `conversation_id`) with a unique identifier value that links the traces together.
[Learn how to configure threads](/langsmith/threads).
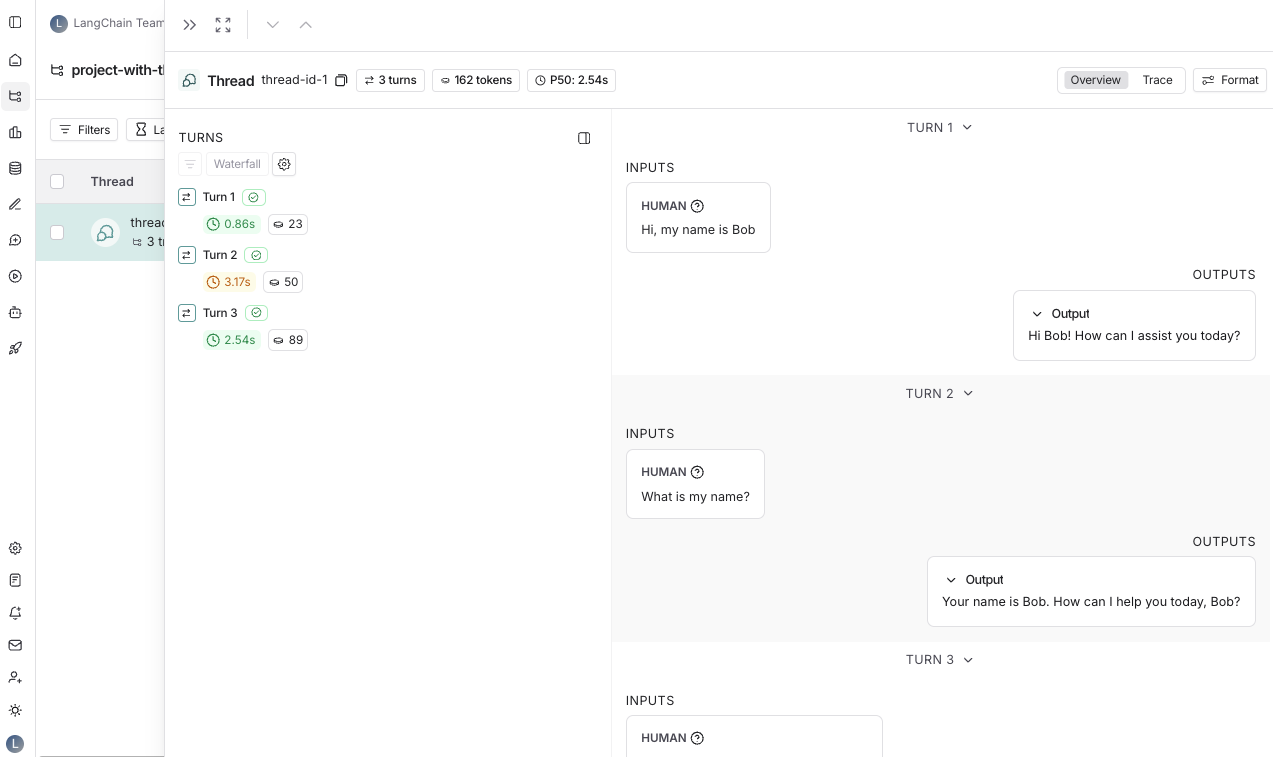
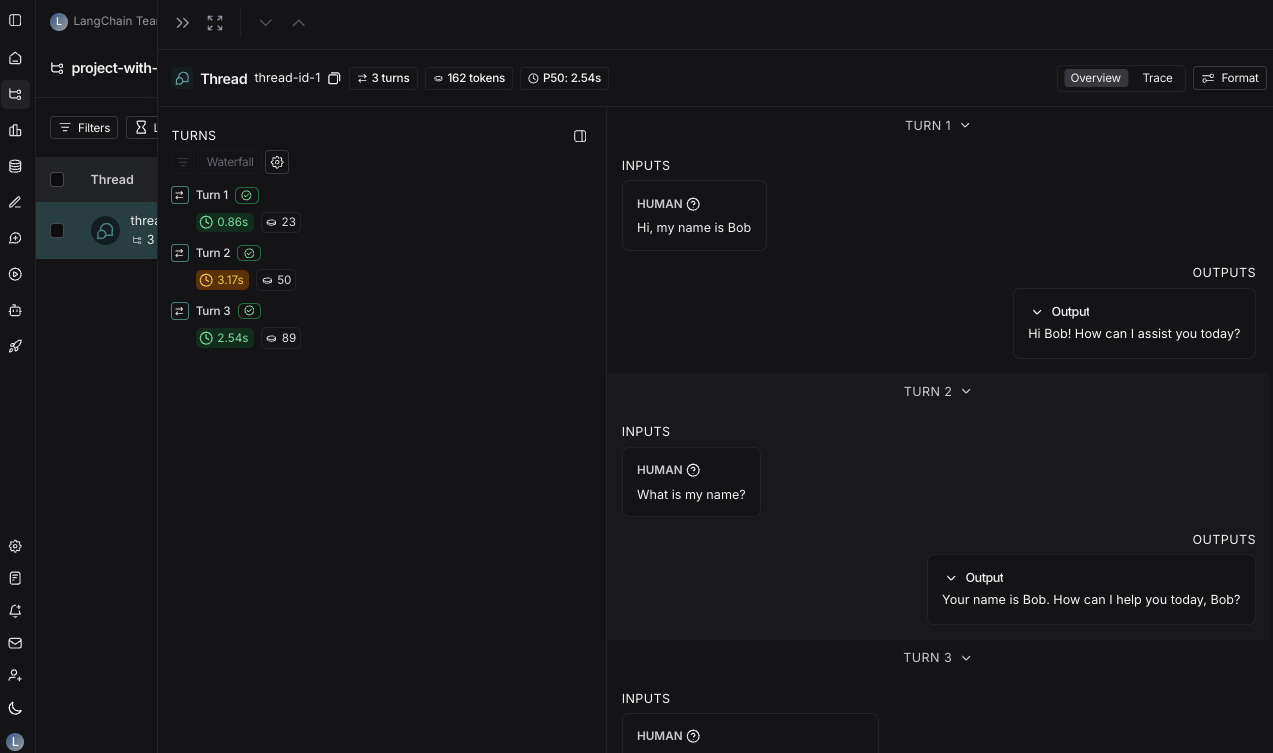 ## Projects
A *project* is a collection of traces. You can think of a project as a container for all the traces that are related to a single application or service. You can have multiple projects, and each project can have multiple traces.
## Projects
A *project* is a collection of traces. You can think of a project as a container for all the traces that are related to a single application or service. You can have multiple projects, and each project can have multiple traces.
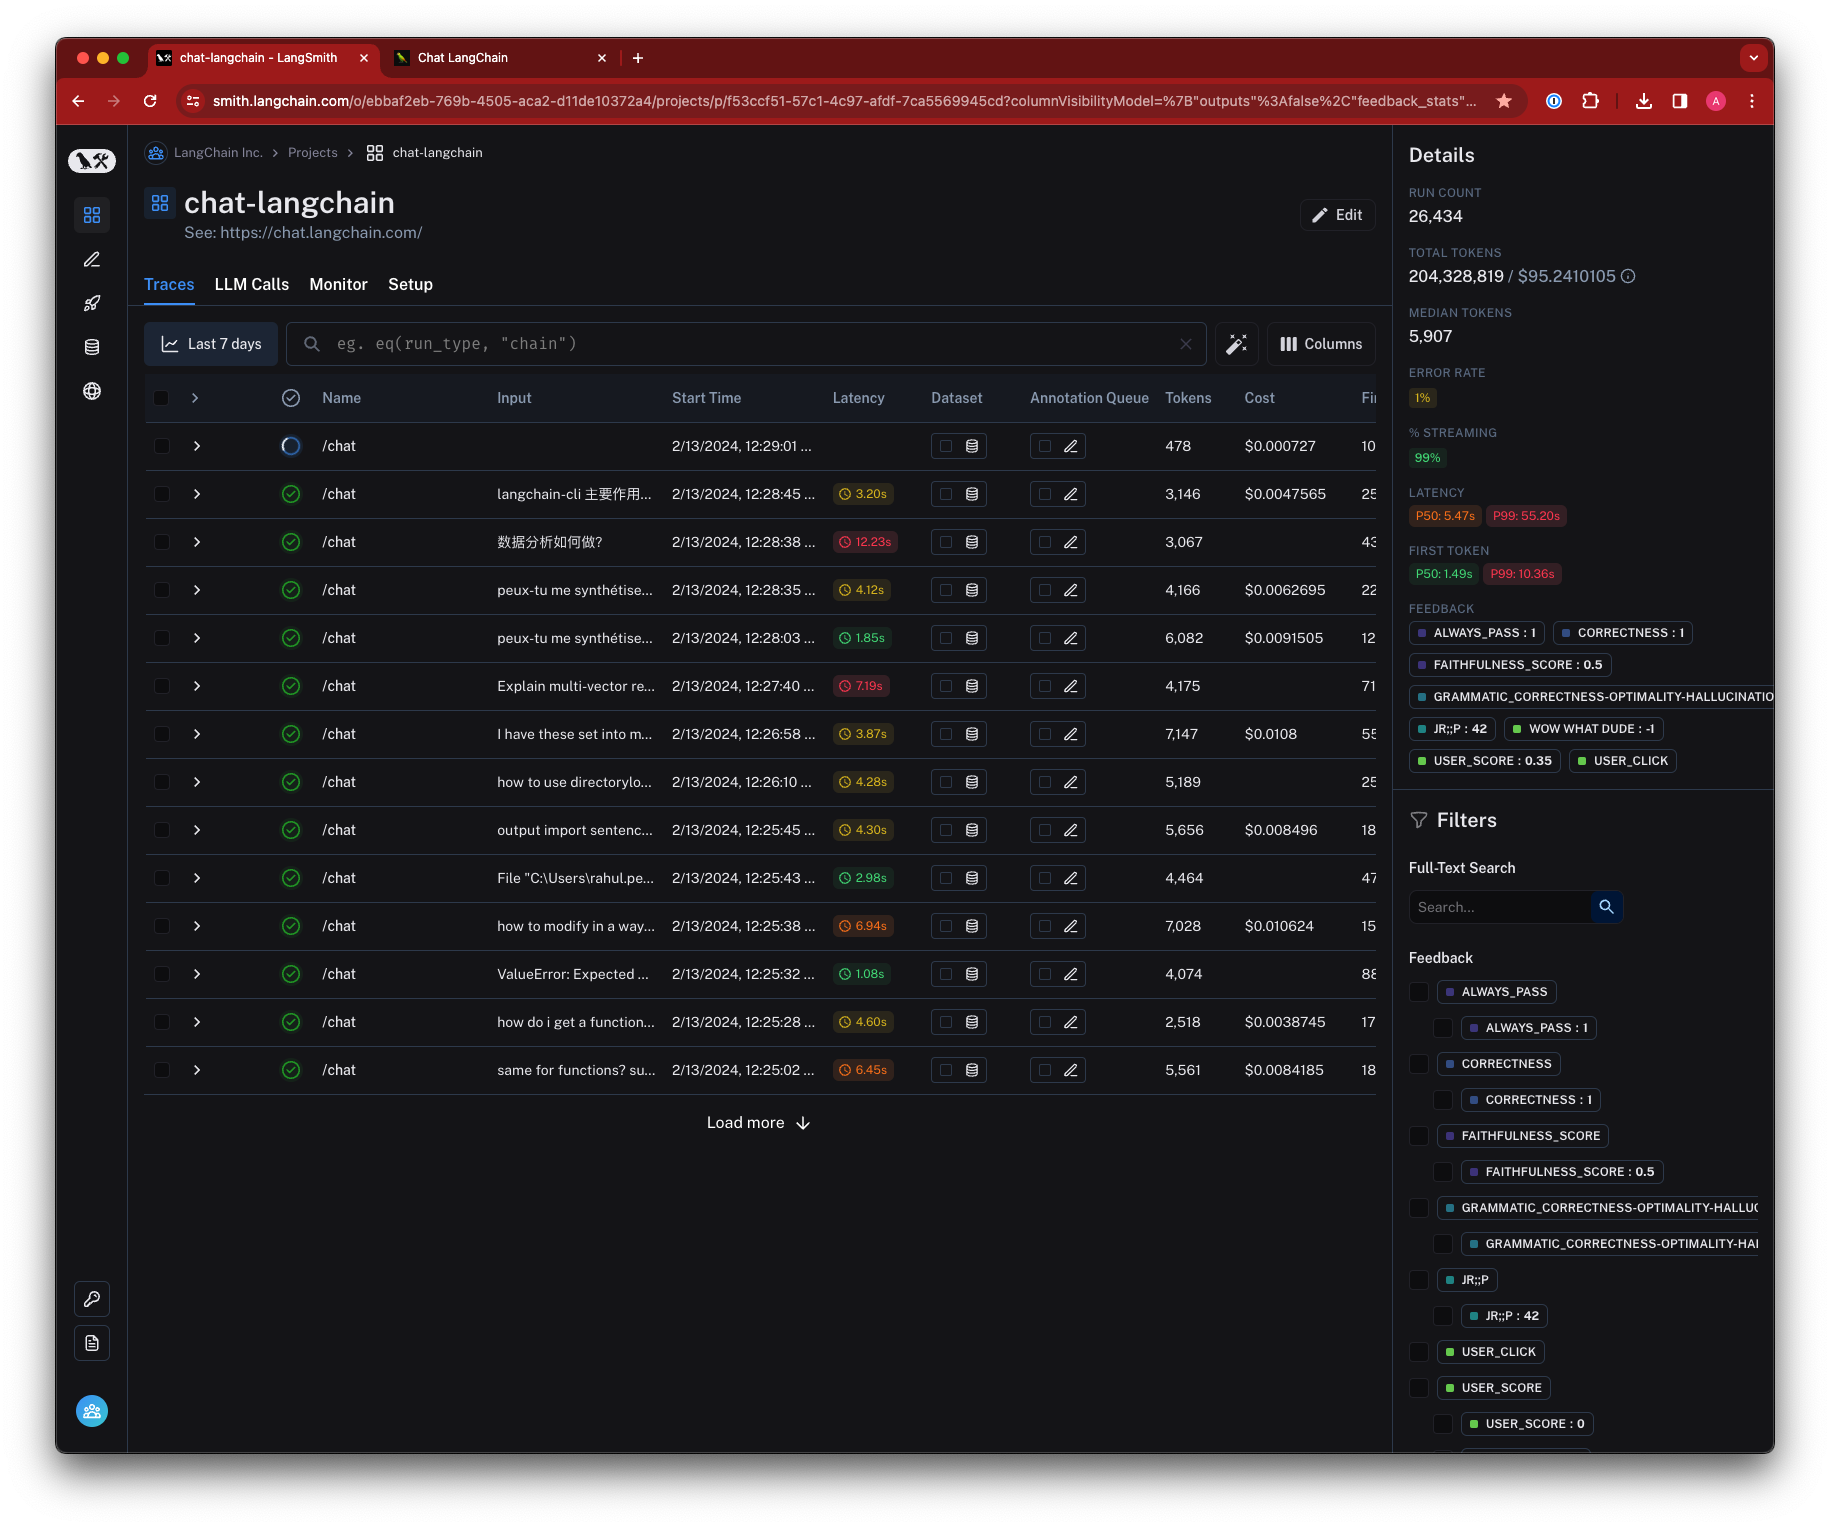 ## Feedback
*Feedback* allows you to score an individual run based on certain criteria. Each feedback entry consists of a feedback tag and feedback score, and is bound to a run by a unique run ID. Feedback can be continuous or discrete (categorical), and you can reuse feedback tags across different runs within an organization.
You can collect feedback on runs in a number of ways:
1. [Sent up along with a trace](/langsmith/attach-user-feedback) from the LLM application.
2. Generated by a user in the app [inline](/langsmith/annotate-traces-inline) or in an [annotation queue](/langsmith/annotation-queues).
3. Generated by an automatic evaluator during [offline evaluation](/langsmith/evaluate-llm-application).
4. Generated by an [online evaluator](/langsmith/online-evaluations).
To learn more about how feedback is stored in the application, refer to the [Feedback data format guide](/langsmith/feedback-data-format).
## Feedback
*Feedback* allows you to score an individual run based on certain criteria. Each feedback entry consists of a feedback tag and feedback score, and is bound to a run by a unique run ID. Feedback can be continuous or discrete (categorical), and you can reuse feedback tags across different runs within an organization.
You can collect feedback on runs in a number of ways:
1. [Sent up along with a trace](/langsmith/attach-user-feedback) from the LLM application.
2. Generated by a user in the app [inline](/langsmith/annotate-traces-inline) or in an [annotation queue](/langsmith/annotation-queues).
3. Generated by an automatic evaluator during [offline evaluation](/langsmith/evaluate-llm-application).
4. Generated by an [online evaluator](/langsmith/online-evaluations).
To learn more about how feedback is stored in the application, refer to the [Feedback data format guide](/langsmith/feedback-data-format).
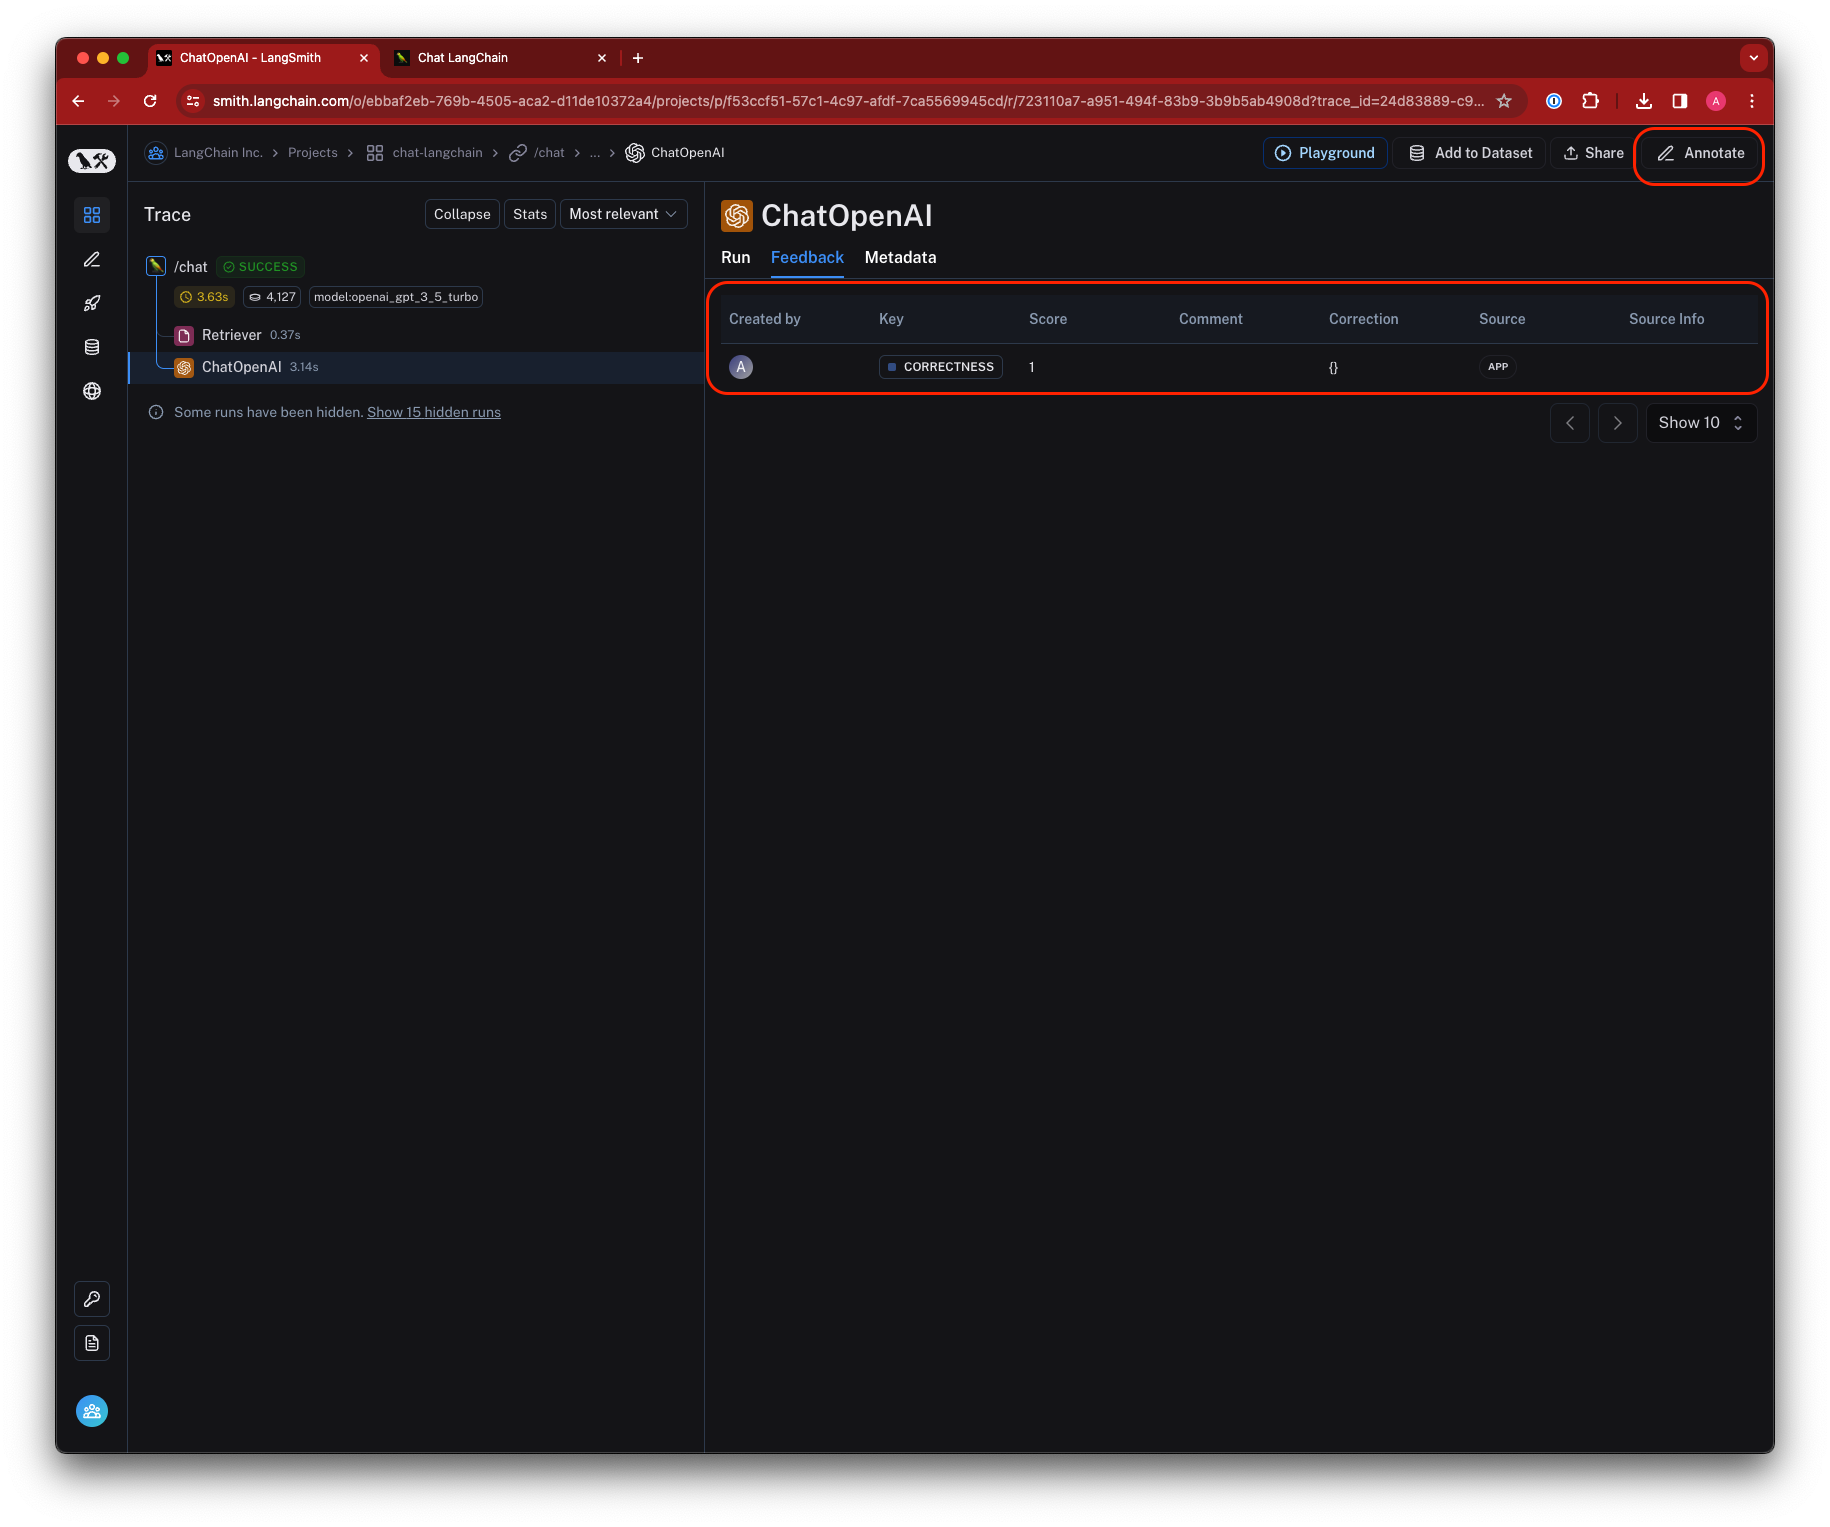 ## Tags
*Tags* are collections of strings that can be attached to runs. You can use tags to do the following in the LangSmith UI:
* Categorize runs for easier search.
* Filter runs.
* Group runs together for analysis.
[Learn how to attach tags to your traces](/langsmith/add-metadata-tags).
## Tags
*Tags* are collections of strings that can be attached to runs. You can use tags to do the following in the LangSmith UI:
* Categorize runs for easier search.
* Filter runs.
* Group runs together for analysis.
[Learn how to attach tags to your traces](/langsmith/add-metadata-tags).
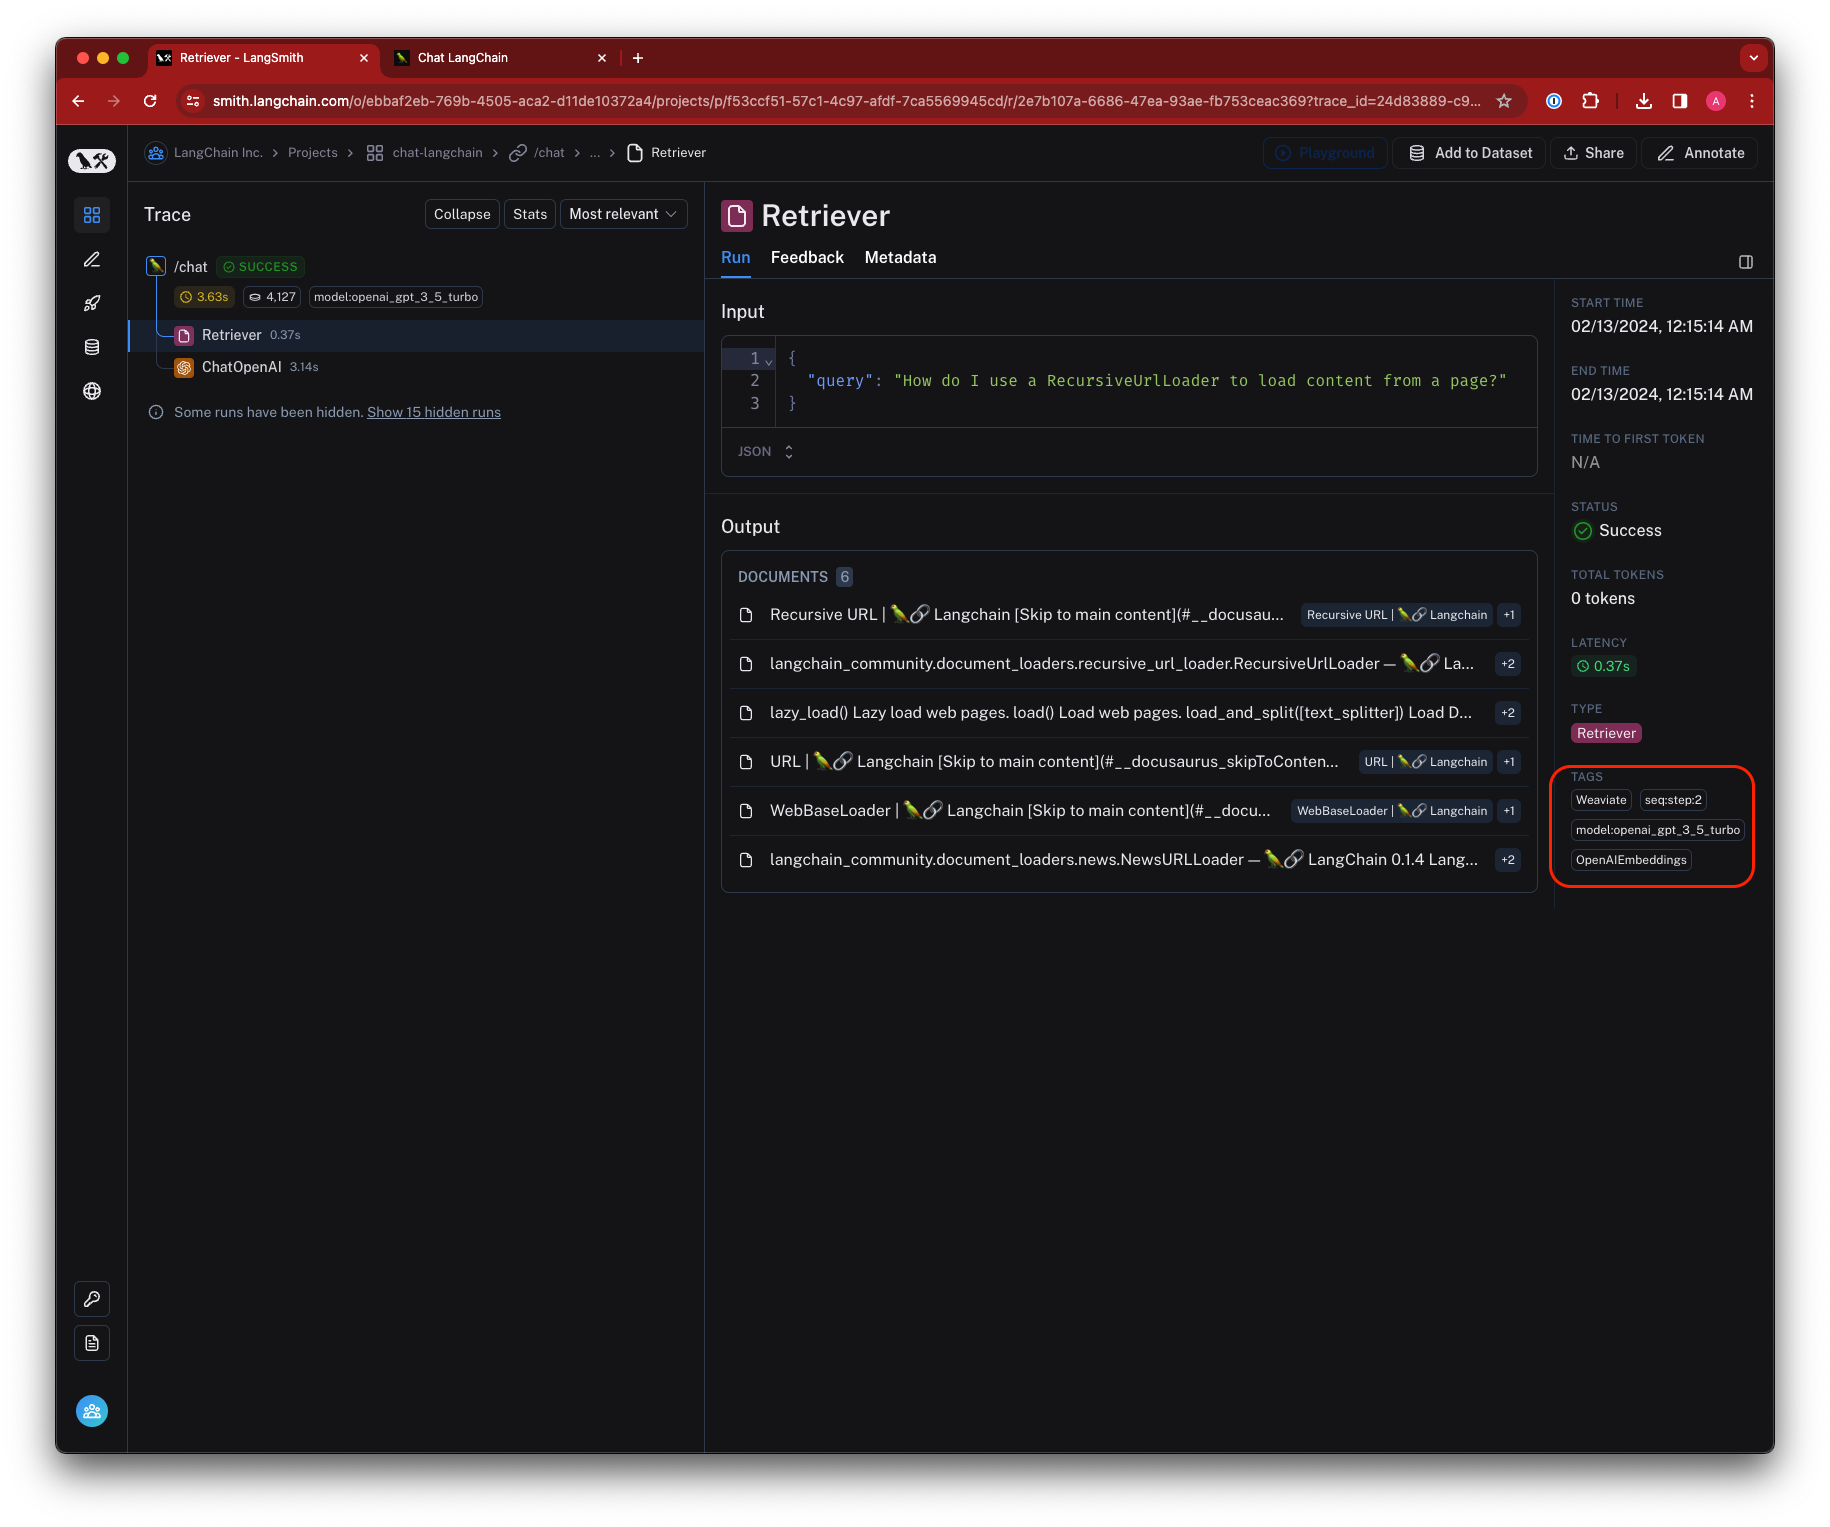 ## Metadata
*Metadata* is a collection of key-value pairs that you can attach to runs. You can use metadata to store additional information about a run, such as the version of the application that generated the run, the environment in which the run was generated, or any other information that you want to associate with a run. Similarly to tags, you can use metadata to filter runs in the LangSmith UI or group runs together for analysis.
[Learn how to add metadata to your traces](/langsmith/add-metadata-tags).
## Metadata
*Metadata* is a collection of key-value pairs that you can attach to runs. You can use metadata to store additional information about a run, such as the version of the application that generated the run, the environment in which the run was generated, or any other information that you want to associate with a run. Similarly to tags, you can use metadata to filter runs in the LangSmith UI or group runs together for analysis.
[Learn how to add metadata to your traces](/langsmith/add-metadata-tags).
 ## Data storage and retention
For traces ingested on or after Wednesday, May 22, 2024, LangSmith (SaaS) retains trace data for a maximum of 400 days past the date and time the trace was inserted into the LangSmith trace database.
After 400 days, the traces are permanently deleted from LangSmith, with a limited amount of metadata retained for the purpose of showing accurate statistics, such as historic usage and cost.
## Data storage and retention
For traces ingested on or after Wednesday, May 22, 2024, LangSmith (SaaS) retains trace data for a maximum of 400 days past the date and time the trace was inserted into the LangSmith trace database.
After 400 days, the traces are permanently deleted from LangSmith, with a limited amount of metadata retained for the purpose of showing accurate statistics, such as historic usage and cost.
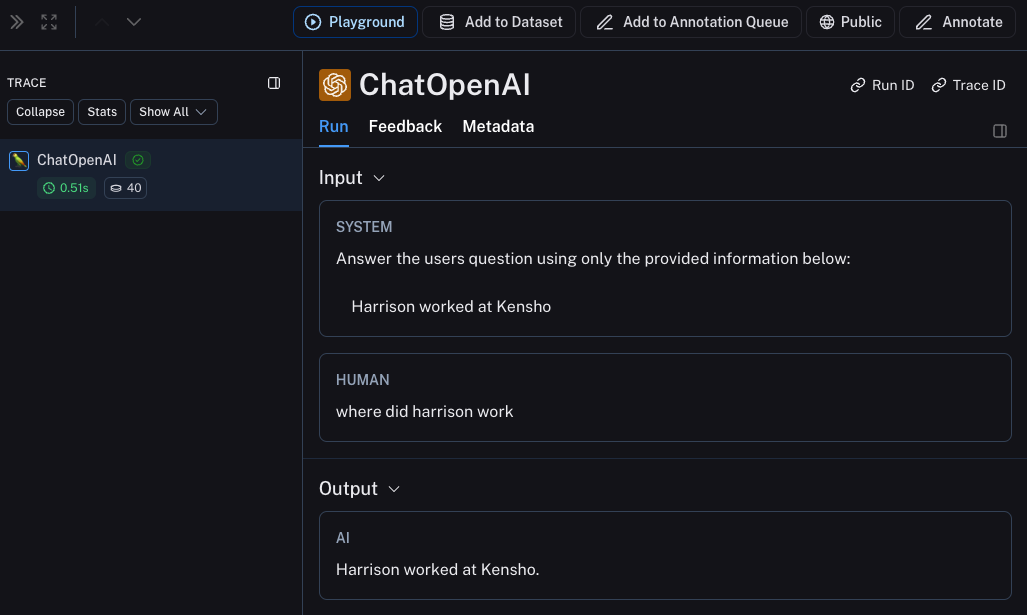 ### Trace the whole chain
Great - we've traced the LLM call. But it's often very informative to trace more than that. LangSmith is **built** for tracing the entire LLM pipeline - so let's do that! We can do this by modifying the code to now look something like this:
### Trace the whole chain
Great - we've traced the LLM call. But it's often very informative to trace more than that. LangSmith is **built** for tracing the entire LLM pipeline - so let's do that! We can do this by modifying the code to now look something like this:
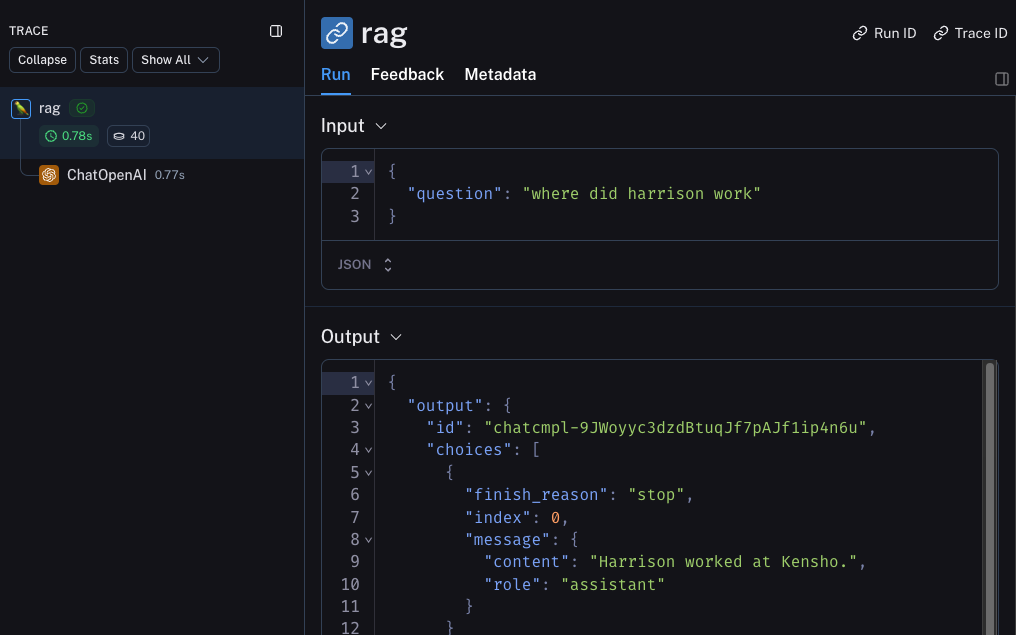 ## Beta Testing
The next stage of LLM application development is beta testing your application. This is when you release it to a few initial users. Having good observability set up here is crucial as often you don't know exactly how users will actually use your application, so this allows you get insights into how they do so. This also means that you probably want to make some changes to your tracing set up to better allow for that. This extends the observability you set up in the previous section
### Collecting Feedback
A huge part of having good observability during beta testing is collecting feedback. What feedback you collect is often application specific - but at the very least a simple thumbs up/down is a good start. After logging that feedback, you need to be able to easily associate it with the run that caused that. Luckily LangSmith makes it easy to do that.
First, you need to log the feedback from your app. An easy way to do this is to keep track of a run ID for each run, and then use that to log feedback. Keeping track of the run ID would look something like:
```python theme={null}
import uuid
run_id = str(uuid.uuid4())
rag(
"where did harrison work",
langsmith_extra={"run_id": run_id}
)
```
Associating feedback with that run would look something like:
```python theme={null}
from langsmith import Client
ls_client = Client()
ls_client.create_feedback(
run_id,
key="user-score",
score=1.0,
)
```
Once the feedback is logged, you can then see it associated with each run by clicking into the `Metadata` tab when inspecting the run. It should look something like [this](https://smith.langchain.com/public/8cafba6a-1a6d-4a73-8565-483186f31c29/r)
## Beta Testing
The next stage of LLM application development is beta testing your application. This is when you release it to a few initial users. Having good observability set up here is crucial as often you don't know exactly how users will actually use your application, so this allows you get insights into how they do so. This also means that you probably want to make some changes to your tracing set up to better allow for that. This extends the observability you set up in the previous section
### Collecting Feedback
A huge part of having good observability during beta testing is collecting feedback. What feedback you collect is often application specific - but at the very least a simple thumbs up/down is a good start. After logging that feedback, you need to be able to easily associate it with the run that caused that. Luckily LangSmith makes it easy to do that.
First, you need to log the feedback from your app. An easy way to do this is to keep track of a run ID for each run, and then use that to log feedback. Keeping track of the run ID would look something like:
```python theme={null}
import uuid
run_id = str(uuid.uuid4())
rag(
"where did harrison work",
langsmith_extra={"run_id": run_id}
)
```
Associating feedback with that run would look something like:
```python theme={null}
from langsmith import Client
ls_client = Client()
ls_client.create_feedback(
run_id,
key="user-score",
score=1.0,
)
```
Once the feedback is logged, you can then see it associated with each run by clicking into the `Metadata` tab when inspecting the run. It should look something like [this](https://smith.langchain.com/public/8cafba6a-1a6d-4a73-8565-483186f31c29/r)
 You can also query for all runs with positive (or negative) feedback by using the filtering logic in the runs table. You can do this by creating a filter like the following:
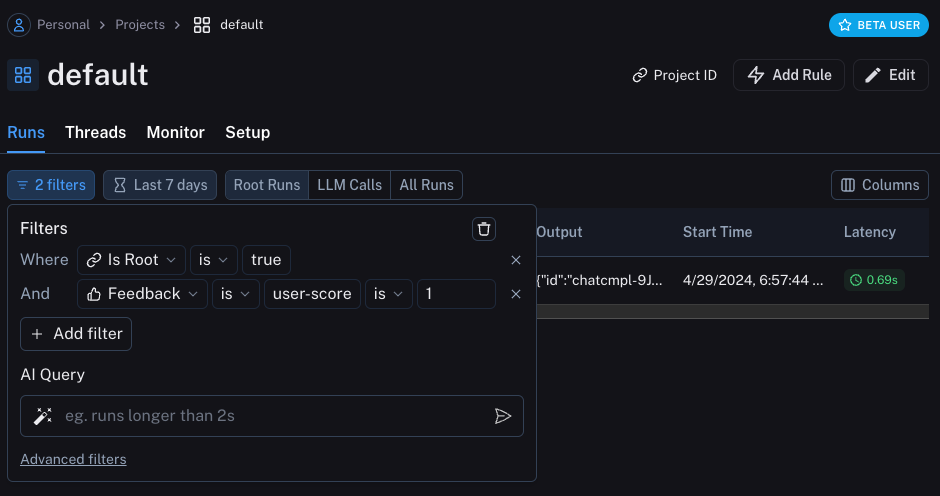 ### Logging Metadata
It is also a good idea to start logging metadata. This allows you to start keep track of different attributes of your app. This is important in allowing you to know what version or variant of your app was used to produce a given result.
For this example, we will log the LLM used. Oftentimes you may be experimenting with different LLMs, so having that information as metadata can be useful for filtering. In order to do that, we can add it as such:
```python theme={null}
from openai import OpenAI
from langsmith import traceable
from langsmith.wrappers import wrap_openai
openai_client = wrap_openai(OpenAI())
@traceable(run_type="retriever")
def retriever(query: str):
results = ["Harrison worked at Kensho"]
return results
@traceable(metadata={"llm": "gpt-4o-mini"})
def rag(question):
docs = retriever(question)
system_message = """Answer the users question using only the provided information below:
{docs}""".format(docs='\n'.join(docs))
return openai_client.chat.completions.create(messages = [
{"role": "system", "content": system_message},
{"role": "user", "content": question},
], model="gpt-4o-mini")
```
Notice we added `@traceable(metadata={"llm": "gpt-4o-mini"})` to the `rag` function.
Keeping track of metadata in this way assumes that it is known ahead of time. This is fine for LLM types, but less desirable for other types of information - like a User ID. In order to log information that, we can pass it in at run time with the run ID.
```python theme={null}
import uuid
run_id = str(uuid.uuid4())
rag(
"where did harrison work",
langsmith_extra={"run_id": run_id, "metadata": {"user_id": "harrison"}}
)
```
Now that we've logged these two pieces of metadata, we should be able to see them both show up in the UI [here](https://smith.langchain.com/public/37adf7e5-97aa-42d0-9850-99c0199bddf6/r).
### Logging Metadata
It is also a good idea to start logging metadata. This allows you to start keep track of different attributes of your app. This is important in allowing you to know what version or variant of your app was used to produce a given result.
For this example, we will log the LLM used. Oftentimes you may be experimenting with different LLMs, so having that information as metadata can be useful for filtering. In order to do that, we can add it as such:
```python theme={null}
from openai import OpenAI
from langsmith import traceable
from langsmith.wrappers import wrap_openai
openai_client = wrap_openai(OpenAI())
@traceable(run_type="retriever")
def retriever(query: str):
results = ["Harrison worked at Kensho"]
return results
@traceable(metadata={"llm": "gpt-4o-mini"})
def rag(question):
docs = retriever(question)
system_message = """Answer the users question using only the provided information below:
{docs}""".format(docs='\n'.join(docs))
return openai_client.chat.completions.create(messages = [
{"role": "system", "content": system_message},
{"role": "user", "content": question},
], model="gpt-4o-mini")
```
Notice we added `@traceable(metadata={"llm": "gpt-4o-mini"})` to the `rag` function.
Keeping track of metadata in this way assumes that it is known ahead of time. This is fine for LLM types, but less desirable for other types of information - like a User ID. In order to log information that, we can pass it in at run time with the run ID.
```python theme={null}
import uuid
run_id = str(uuid.uuid4())
rag(
"where did harrison work",
langsmith_extra={"run_id": run_id, "metadata": {"user_id": "harrison"}}
)
```
Now that we've logged these two pieces of metadata, we should be able to see them both show up in the UI [here](https://smith.langchain.com/public/37adf7e5-97aa-42d0-9850-99c0199bddf6/r).
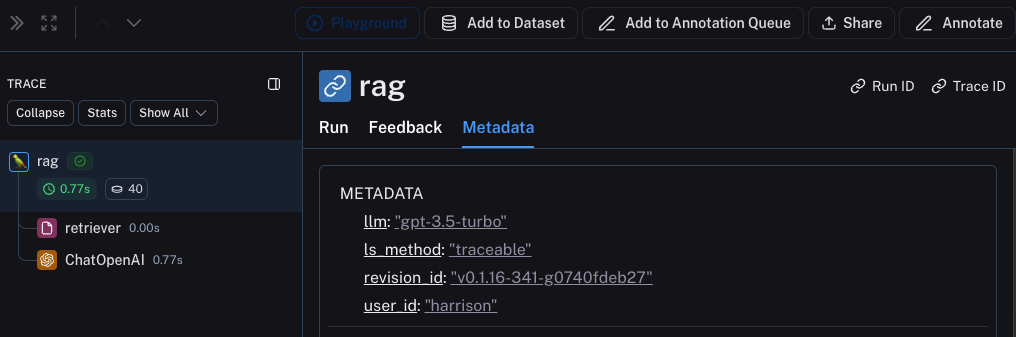 We can filter for these pieces of information by constructing a filter like the following:
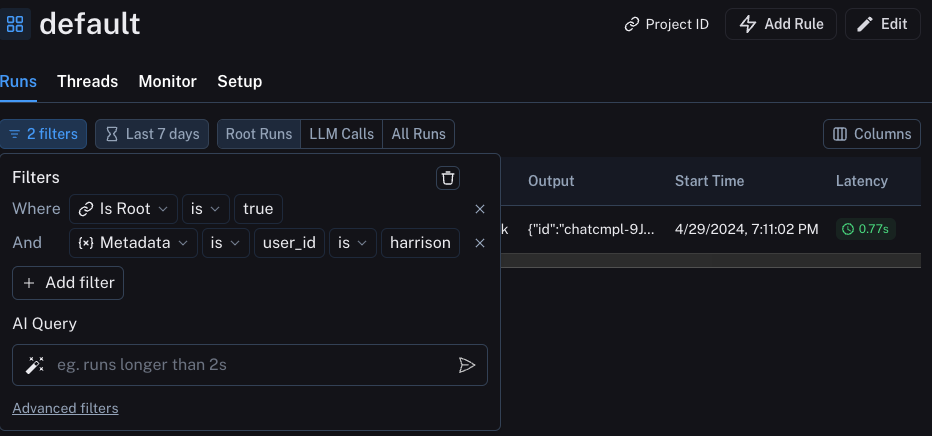 ## Production
Great - you've used this newfound observability to iterate quickly and gain confidence that your app is performing well. Time to ship it to production! What new observability do you need to add?
First of all, let's note that the same observability you've already added will keep on providing value in production. You will continue to be able to drill down into particular runs.
In production you likely have a LOT more traffic. So you don't really want to be stuck looking at datapoints one at a time. Luckily, LangSmith has a set of tools to help with observability in production.
### Monitoring
If you click on the `Monitor` tab in a project, you will see a series of monitoring charts. Here we track lots of LLM specific statistics - number of traces, feedback, time-to-first-token, etc. You can view these over time across a few different time bins.
## Production
Great - you've used this newfound observability to iterate quickly and gain confidence that your app is performing well. Time to ship it to production! What new observability do you need to add?
First of all, let's note that the same observability you've already added will keep on providing value in production. You will continue to be able to drill down into particular runs.
In production you likely have a LOT more traffic. So you don't really want to be stuck looking at datapoints one at a time. Luckily, LangSmith has a set of tools to help with observability in production.
### Monitoring
If you click on the `Monitor` tab in a project, you will see a series of monitoring charts. Here we track lots of LLM specific statistics - number of traces, feedback, time-to-first-token, etc. You can view these over time across a few different time bins.
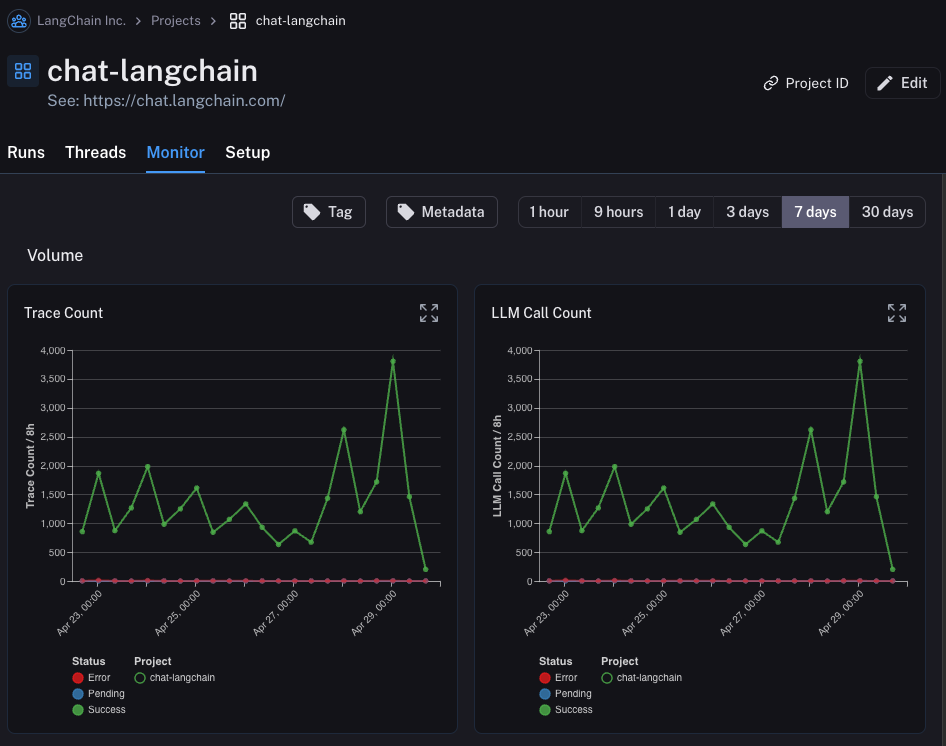 ### A/B Testing
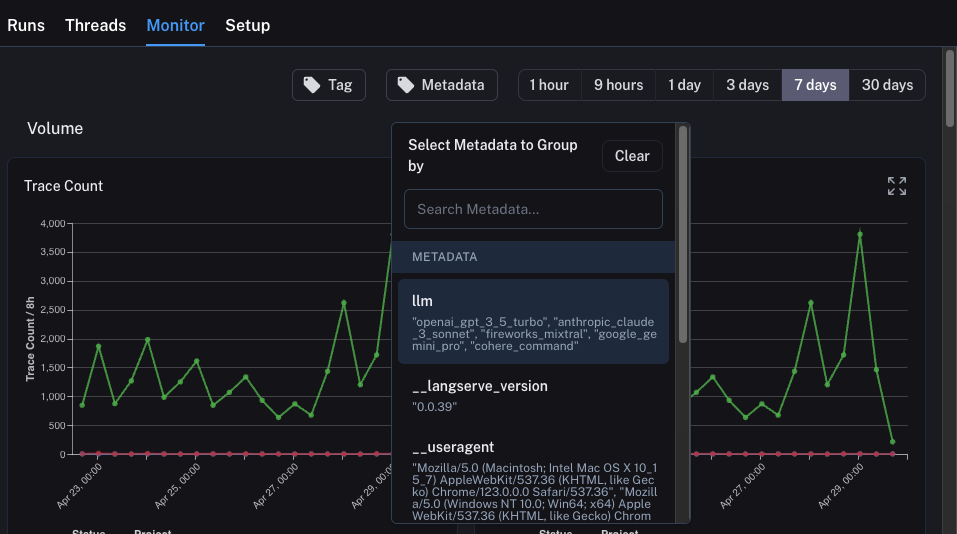 Once we select this, we will start to see charts grouped by this attribute:
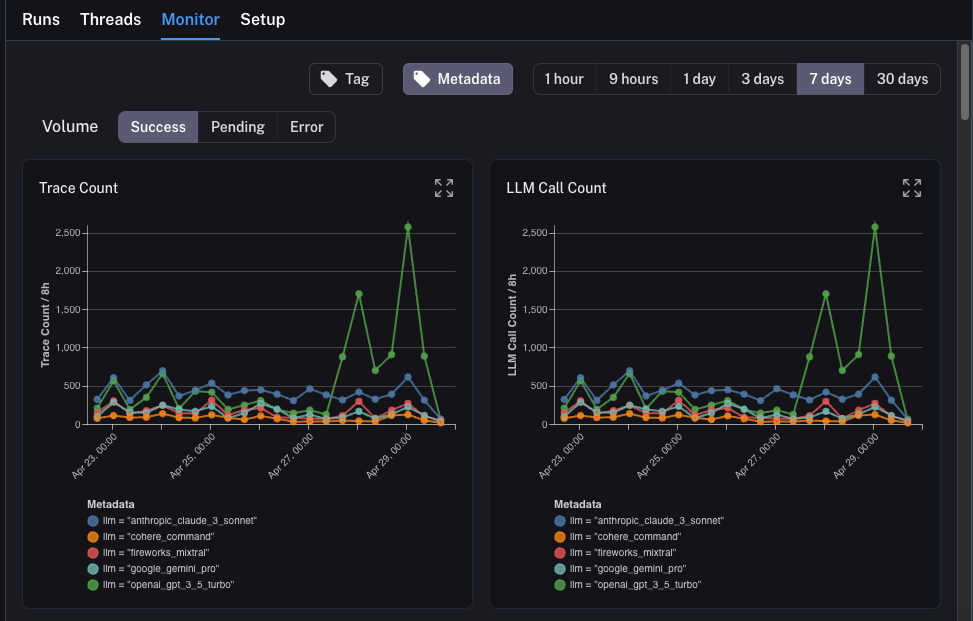 ### Drilldown
One of the awesome abilities that LangSmith provides is the ability to easily drilldown into datapoints that you identify as problematic while looking at monitoring charts. In order to do this, you can simply hover over a datapoint in the monitoring chart. When you do this, you will be able to click the datapoint. This will lead you back to the runs table with a filtered view:
### Drilldown
One of the awesome abilities that LangSmith provides is the ability to easily drilldown into datapoints that you identify as problematic while looking at monitoring charts. In order to do this, you can simply hover over a datapoint in the monitoring chart. When you do this, you will be able to click the datapoint. This will lead you back to the runs table with a filtered view:
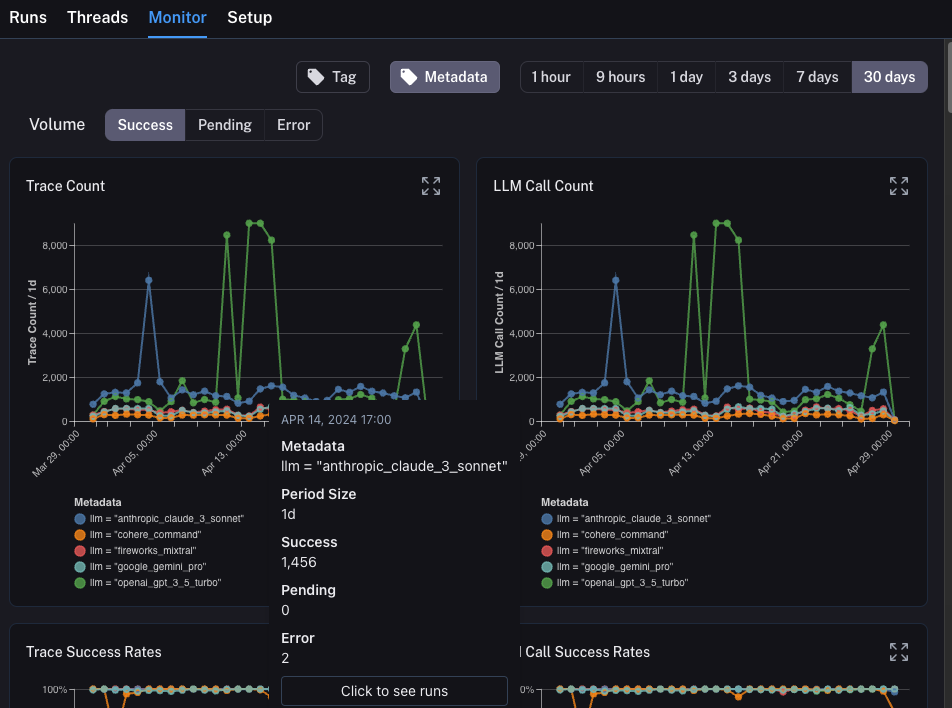 ## Conclusion
In this tutorial you saw how to set up your LLM application with best-in-class observability. No matter what stage your application is in, you will still benefit from observability.
If you have more in-depth questions about observability, check out the [how-to section](/langsmith/observability-concepts) for guides on topics like testing, prompt management, and more.
***
## Conclusion
In this tutorial you saw how to set up your LLM application with best-in-class observability. No matter what stage your application is in, you will still benefit from observability.
If you have more in-depth questions about observability, check out the [how-to section](/langsmith/observability-concepts) for guides on topics like testing, prompt management, and more.
***

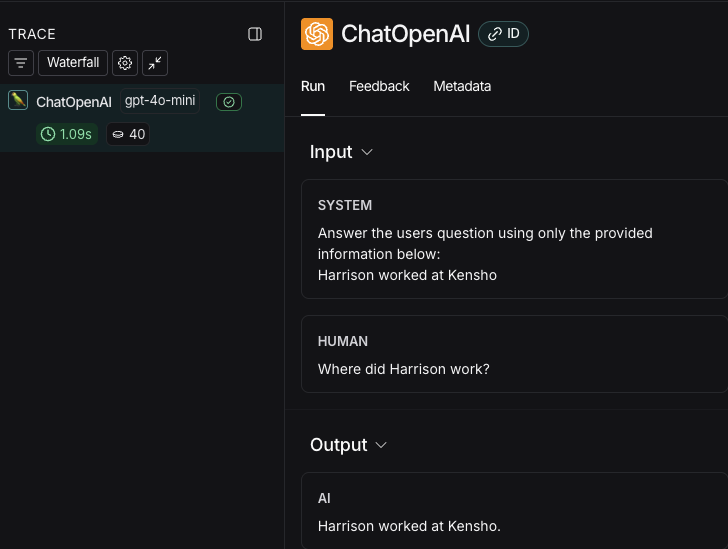
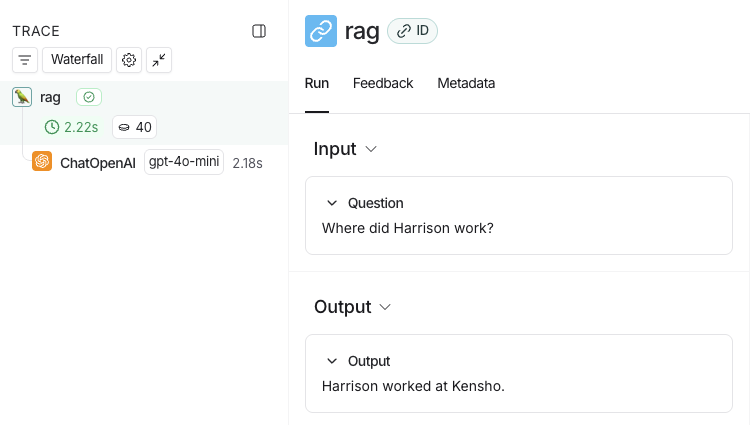
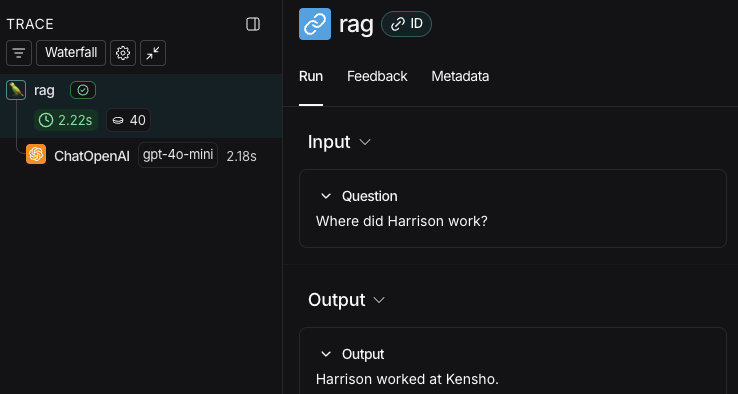
 ***
***
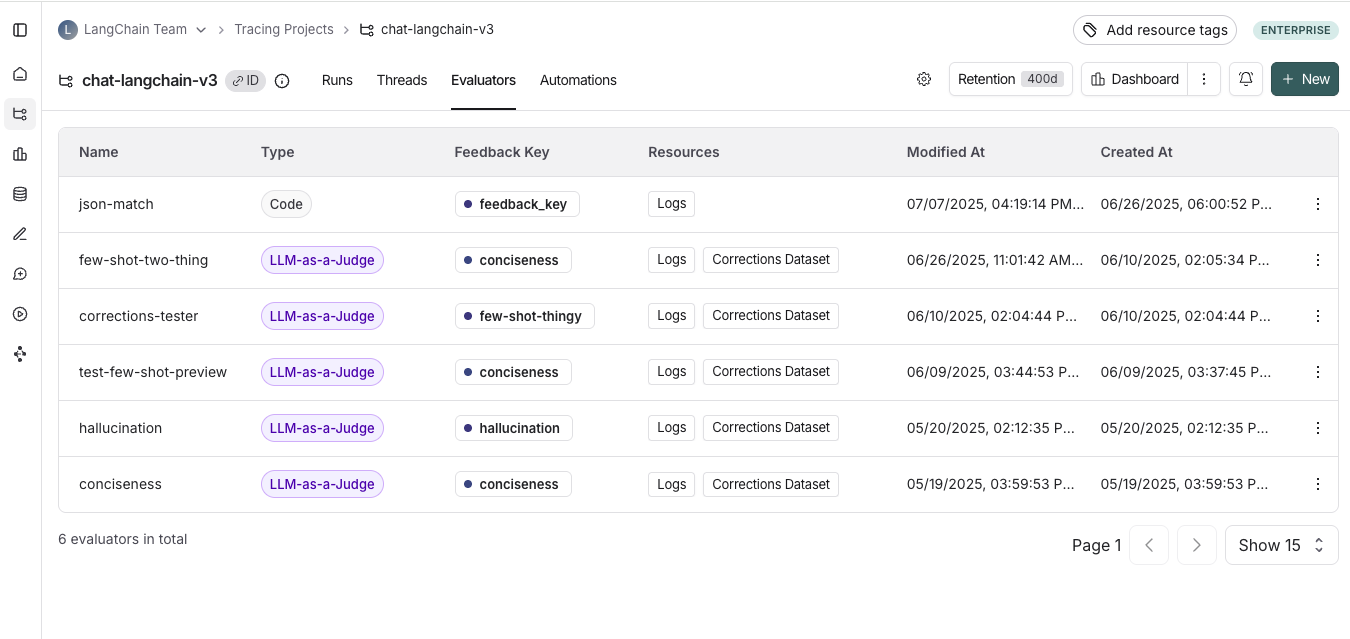 ## Configure online evaluators
#### 1. Navigate to online evaluators
Head to the **Tracing Projects** tab and select a tracing project. Click on **+ New** in the top right corner of the tracing project page, then click on **New Evaluator**. Select the evaluator you want to configure.
#### 2. Name your evaluator
#### 3. Create a filter
For example, you may want to apply specific evaluators based on:
* Runs where a [user left feedback](/langsmith/attach-user-feedback) indicating the response was unsatisfactory.
* Runs that invoke a specific tool call. See [filtering for tool calls](/langsmith/filter-traces-in-application#example-filtering-for-tool-calls) for more information.
* Runs that match a particular piece of metadata (e.g. if you log traces with a `plan_type` and only want to run evaluations on traces from your enterprise customers). See [adding metadata to your traces](/langsmith/add-metadata-tags) for more information.
Filters on evaluators work the same way as when you're filtering traces in a project. For more information on filters, you can refer to [this guide](./filter-traces-in-application).
## Configure online evaluators
#### 1. Navigate to online evaluators
Head to the **Tracing Projects** tab and select a tracing project. Click on **+ New** in the top right corner of the tracing project page, then click on **New Evaluator**. Select the evaluator you want to configure.
#### 2. Name your evaluator
#### 3. Create a filter
For example, you may want to apply specific evaluators based on:
* Runs where a [user left feedback](/langsmith/attach-user-feedback) indicating the response was unsatisfactory.
* Runs that invoke a specific tool call. See [filtering for tool calls](/langsmith/filter-traces-in-application#example-filtering-for-tool-calls) for more information.
* Runs that match a particular piece of metadata (e.g. if you log traces with a `plan_type` and only want to run evaluations on traces from your enterprise customers). See [adding metadata to your traces](/langsmith/add-metadata-tags) for more information.
Filters on evaluators work the same way as when you're filtering traces in a project. For more information on filters, you can refer to [this guide](./filter-traces-in-application).
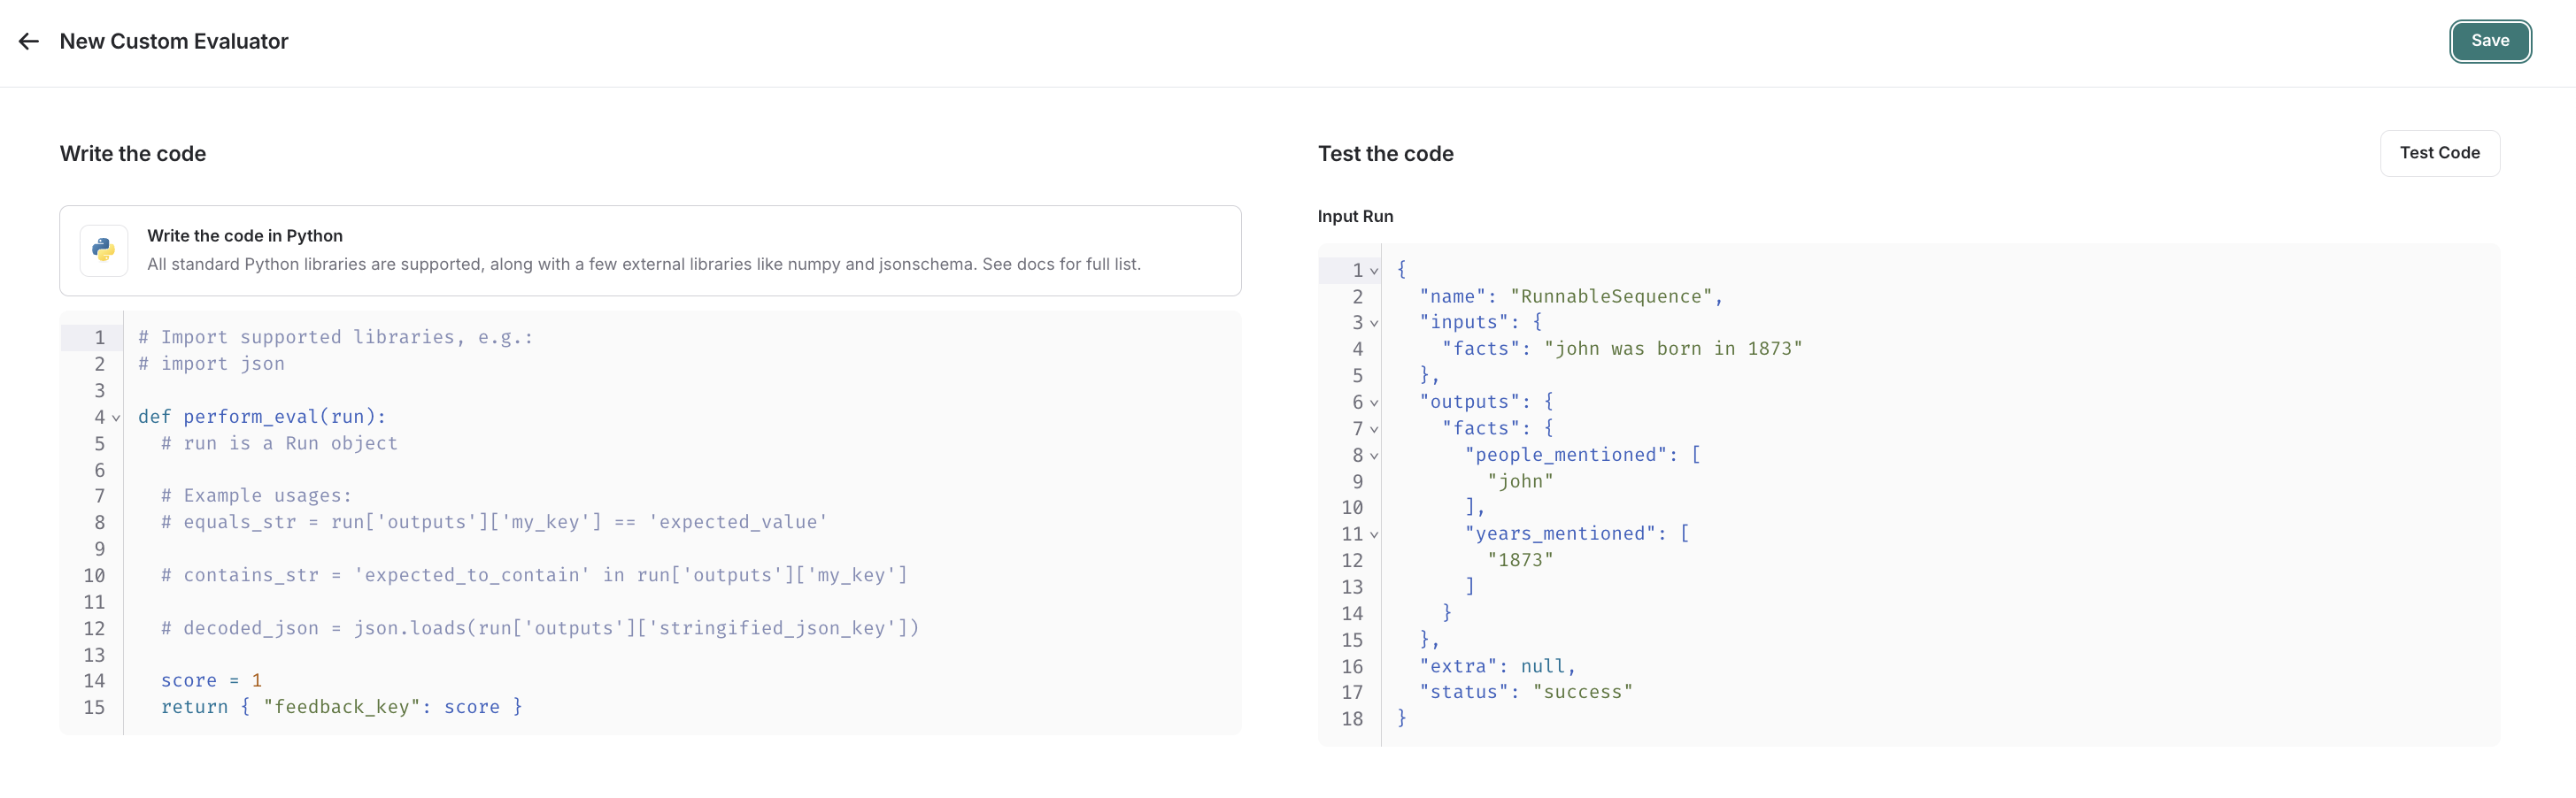 Custom code evaluators take in one argument:
* A `Run` ([reference](/langsmith/run-data-format)). This represents the sampled run to evaluate.
They return a single value:
* Feedback(s) Dictionary: A dictionary whose keys are the type of feedback you want to return, and values are the score you will give for that feedback key. For example, `{"correctness": 1, "silliness": 0}` would create two types of feedback on the run, one saying it is correct, and the other saying it is not silly.
In the below screenshot, you can see an example of a simple function that validates that each run in the experiment has a known json field:
Custom code evaluators take in one argument:
* A `Run` ([reference](/langsmith/run-data-format)). This represents the sampled run to evaluate.
They return a single value:
* Feedback(s) Dictionary: A dictionary whose keys are the type of feedback you want to return, and values are the score you will give for that feedback key. For example, `{"correctness": 1, "silliness": 0}` would create two types of feedback on the run, one saying it is correct, and the other saying it is not silly.
In the below screenshot, you can see an example of a simple function that validates that each run in the experiment has a known json field:
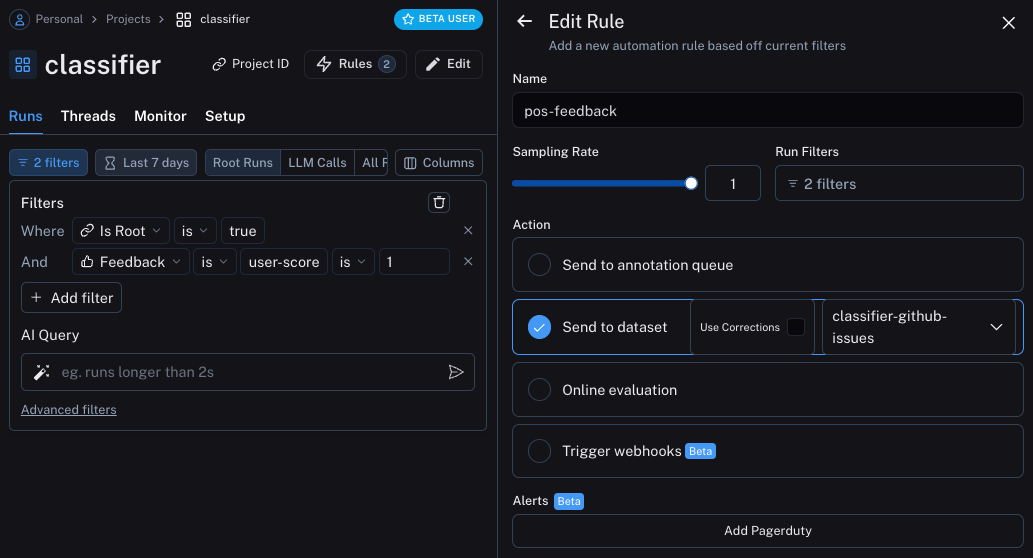 The second will take all runs with a correction and use a webhook to add them to a dataset. When creating this webhook, we will select the option to "Use Corrections". This option will make it so that when creating a dataset from a run, rather than using the output of the run as the gold-truth output of the datapoint, it will use the correction.
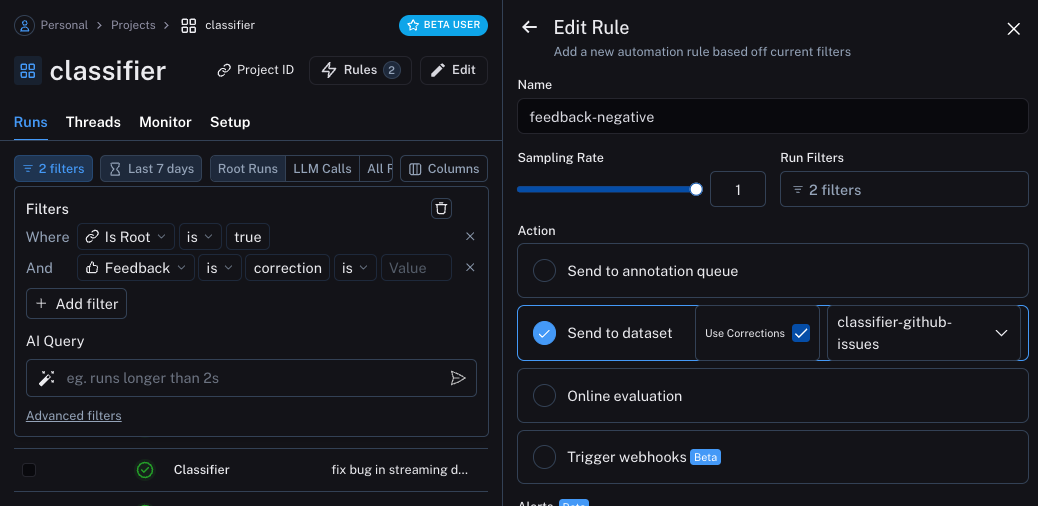 ## Update the application
We can now update our code to pull down the dataset we are sending runs to. Once we pull it down, we can create a string with the examples in it. We can then put this string as part of the prompt!
```python theme={null}
### NEW CODE ###
# Initialize the LangSmith Client so we can use to get the dataset
ls_client = Client()
# Create a function that will take in a list of examples and format them into a string
def create_example_string(examples):
final_strings = []
for e in examples:
final_strings.append(f"Input: {e.inputs['topic']}\n> {e.outputs['output']}")
return "\n\n".join(final_strings)
### NEW CODE ###
client = openai.Client()
available_topics = [
"bug",
"improvement",
"new_feature",
"documentation",
"integration",
]
prompt_template = """Classify the type of the issue as one of {topics}.
Here are some examples:
{examples}
Begin!
Issue: {text}
>"""
@traceable(
run_type="chain",
name="Classifier",
)
def topic_classifier(
topic: str):
# We can now pull down the examples from the dataset
# We do this inside the function so it always get the most up-to-date examples,
# But this can be done outside and cached for speed if desired
examples = list(ls_client.list_examples(dataset_name="classifier-github-issues")) # <- New Code
example_string = create_example_string(examples)
return client.chat.completions.create(
model="gpt-4o-mini",
temperature=0,
messages=[
{
"role": "user",
"content": prompt_template.format(
topics=','.join(available_topics),
text=topic,
examples=example_string,
)
}
],
).choices[0].message.content
```
If now run the application with a similar input as before, we can see that it correctly learns that anything related to docs (even if a bug) should be classified as `documentation`
```python theme={null}
ls_client = Client()
run_id = uuid.uuid4()
topic_classifier(
"address bug in documentation",
langsmith_extra={"run_id": run_id})
```
## Semantic search over examples
One additional thing we can do is only use the most semantically similar examples. This is useful when you start to build up a lot of examples.
In order to do this, we can first define an example to find the `k` most similar examples:
```python theme={null}
import numpy as np
def find_similar(examples, topic, k=5):
inputs = [e.inputs['topic'] for e in examples] + [topic]
vectors = client.embeddings.create(input=inputs, model="text-embedding-3-small")
vectors = [e.embedding for e in vectors.data]
vectors = np.array(vectors)
args = np.argsort(-vectors.dot(vectors[-1])[:-1])[:5]
examples = [examples[i] for i in args]
return examples
```
We can then use that in the application
```python theme={null}
ls_client = Client()
def create_example_string(examples):
final_strings = []
for e in examples:
final_strings.append(f"Input: {e.inputs['topic']}\n> {e.outputs['output']}")
return "\n\n".join(final_strings)
client = openai.Client()
available_topics = [
"bug",
"improvement",
"new_feature",
"documentation",
"integration",
]
prompt_template = """Classify the type of the issue as one of {topics}.
Here are some examples:
{examples}
Begin!
Issue: {text}
>"""
@traceable(
run_type="chain",
name="Classifier",
)
def topic_classifier(
topic: str):
examples = list(ls_client.list_examples(dataset_name="classifier-github-issues"))
examples = find_similar(examples, topic)
example_string = create_example_string(examples)
return client.chat.completions.create(
model="gpt-4o-mini",
temperature=0,
messages=[
{
"role": "user",
"content": prompt_template.format(
topics=','.join(available_topics),
text=topic,
examples=example_string,
)
}
],
).choices[0].message.content
```
***
## Update the application
We can now update our code to pull down the dataset we are sending runs to. Once we pull it down, we can create a string with the examples in it. We can then put this string as part of the prompt!
```python theme={null}
### NEW CODE ###
# Initialize the LangSmith Client so we can use to get the dataset
ls_client = Client()
# Create a function that will take in a list of examples and format them into a string
def create_example_string(examples):
final_strings = []
for e in examples:
final_strings.append(f"Input: {e.inputs['topic']}\n> {e.outputs['output']}")
return "\n\n".join(final_strings)
### NEW CODE ###
client = openai.Client()
available_topics = [
"bug",
"improvement",
"new_feature",
"documentation",
"integration",
]
prompt_template = """Classify the type of the issue as one of {topics}.
Here are some examples:
{examples}
Begin!
Issue: {text}
>"""
@traceable(
run_type="chain",
name="Classifier",
)
def topic_classifier(
topic: str):
# We can now pull down the examples from the dataset
# We do this inside the function so it always get the most up-to-date examples,
# But this can be done outside and cached for speed if desired
examples = list(ls_client.list_examples(dataset_name="classifier-github-issues")) # <- New Code
example_string = create_example_string(examples)
return client.chat.completions.create(
model="gpt-4o-mini",
temperature=0,
messages=[
{
"role": "user",
"content": prompt_template.format(
topics=','.join(available_topics),
text=topic,
examples=example_string,
)
}
],
).choices[0].message.content
```
If now run the application with a similar input as before, we can see that it correctly learns that anything related to docs (even if a bug) should be classified as `documentation`
```python theme={null}
ls_client = Client()
run_id = uuid.uuid4()
topic_classifier(
"address bug in documentation",
langsmith_extra={"run_id": run_id})
```
## Semantic search over examples
One additional thing we can do is only use the most semantically similar examples. This is useful when you start to build up a lot of examples.
In order to do this, we can first define an example to find the `k` most similar examples:
```python theme={null}
import numpy as np
def find_similar(examples, topic, k=5):
inputs = [e.inputs['topic'] for e in examples] + [topic]
vectors = client.embeddings.create(input=inputs, model="text-embedding-3-small")
vectors = [e.embedding for e in vectors.data]
vectors = np.array(vectors)
args = np.argsort(-vectors.dot(vectors[-1])[:-1])[:5]
examples = [examples[i] for i in args]
return examples
```
We can then use that in the application
```python theme={null}
ls_client = Client()
def create_example_string(examples):
final_strings = []
for e in examples:
final_strings.append(f"Input: {e.inputs['topic']}\n> {e.outputs['output']}")
return "\n\n".join(final_strings)
client = openai.Client()
available_topics = [
"bug",
"improvement",
"new_feature",
"documentation",
"integration",
]
prompt_template = """Classify the type of the issue as one of {topics}.
Here are some examples:
{examples}
Begin!
Issue: {text}
>"""
@traceable(
run_type="chain",
name="Classifier",
)
def topic_classifier(
topic: str):
examples = list(ls_client.list_examples(dataset_name="classifier-github-issues"))
examples = find_similar(examples, topic)
example_string = create_example_string(examples)
return client.chat.completions.create(
model="gpt-4o-mini",
temperature=0,
messages=[
{
"role": "user",
"content": prompt_template.format(
topics=','.join(available_topics),
text=topic,
examples=example_string,
)
}
],
).choices[0].message.content
```
***
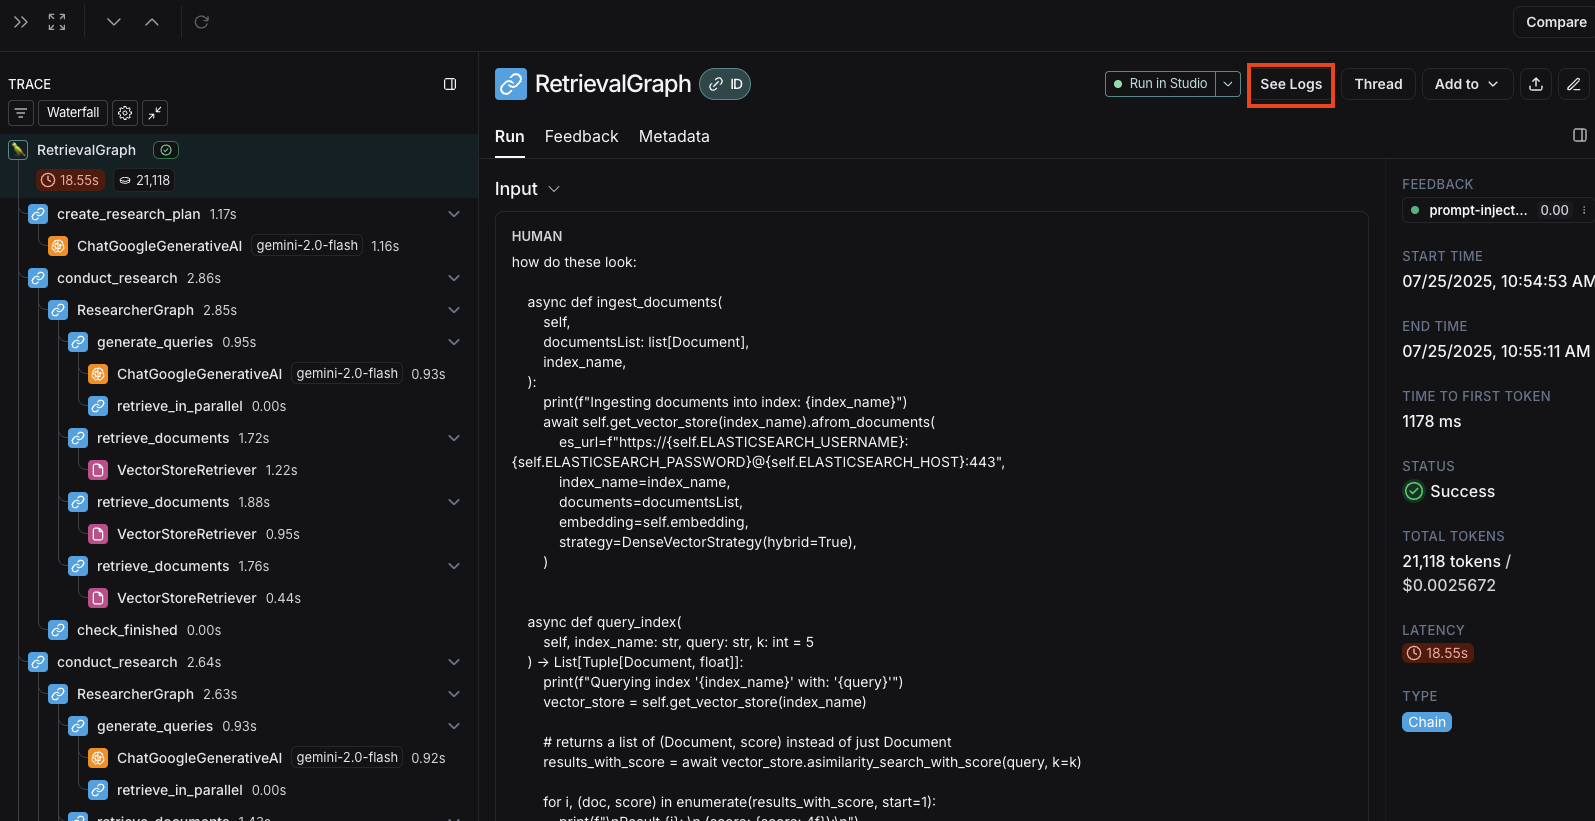 Clicking this button will take you to the server logs view for the associated deployment in LangSmith.
## Server logs view
The server logs view displays logs from both:
* **Agent Server's own operational logs** - Internal server operations, API calls, and system events
* **User application logs** - Logs written in your graph with:
* Python: Use the `logging` or `structlog` libraries
* JavaScript: Use the re-exported Winston logger from `@langchain/langgraph-sdk/logging`:
```javascript theme={null}
import { getLogger } from "@langchain/langgraph-sdk/logging";
const logger = getLogger();
logger.info("Your log message");
```
## Filtering logs by trace ID
When you navigate from the trace view, the **Filters** box will automatically pre-fill with the Trace ID from the trace you just viewed.
This allows you to quickly filter the logs to see only those related to your specific trace execution.
Clicking this button will take you to the server logs view for the associated deployment in LangSmith.
## Server logs view
The server logs view displays logs from both:
* **Agent Server's own operational logs** - Internal server operations, API calls, and system events
* **User application logs** - Logs written in your graph with:
* Python: Use the `logging` or `structlog` libraries
* JavaScript: Use the re-exported Winston logger from `@langchain/langgraph-sdk/logging`:
```javascript theme={null}
import { getLogger } from "@langchain/langgraph-sdk/logging";
const logger = getLogger();
logger.info("Your log message");
```
## Filtering logs by trace ID
When you navigate from the trace view, the **Filters** box will automatically pre-fill with the Trace ID from the trace you just viewed.
This allows you to quickly filter the logs to see only those related to your specific trace execution.
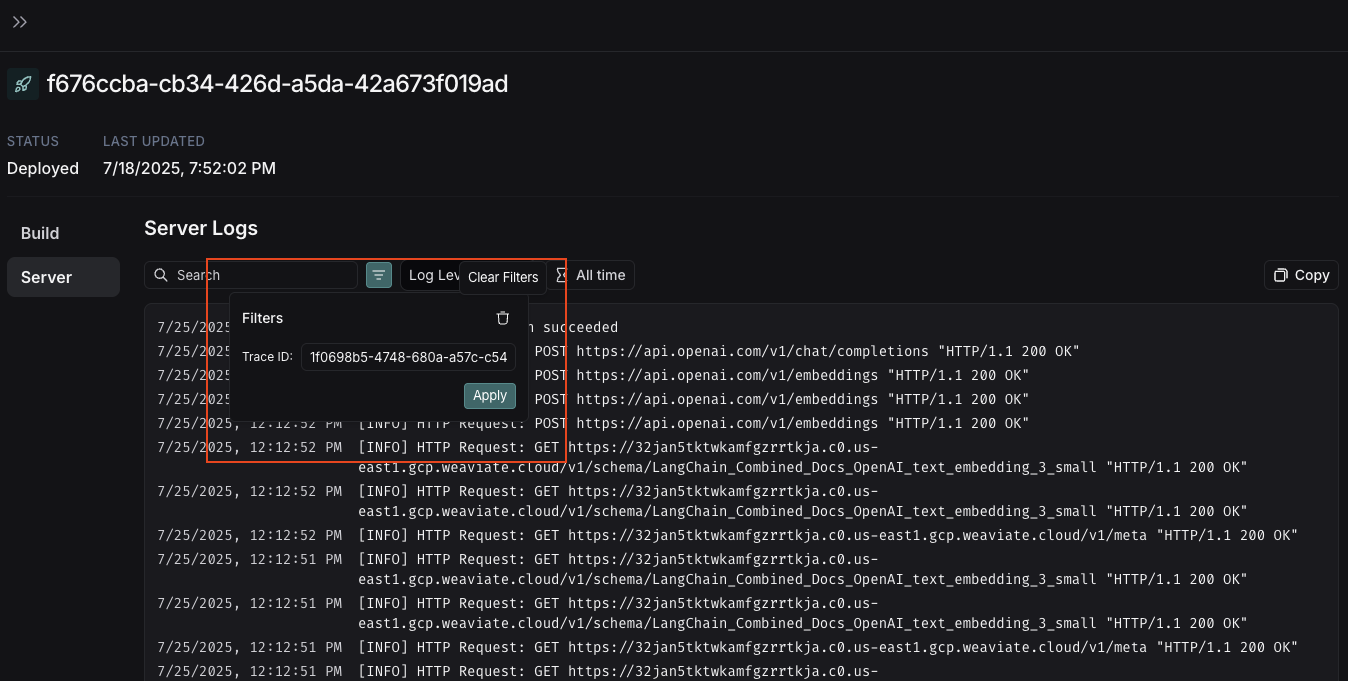 ***
***
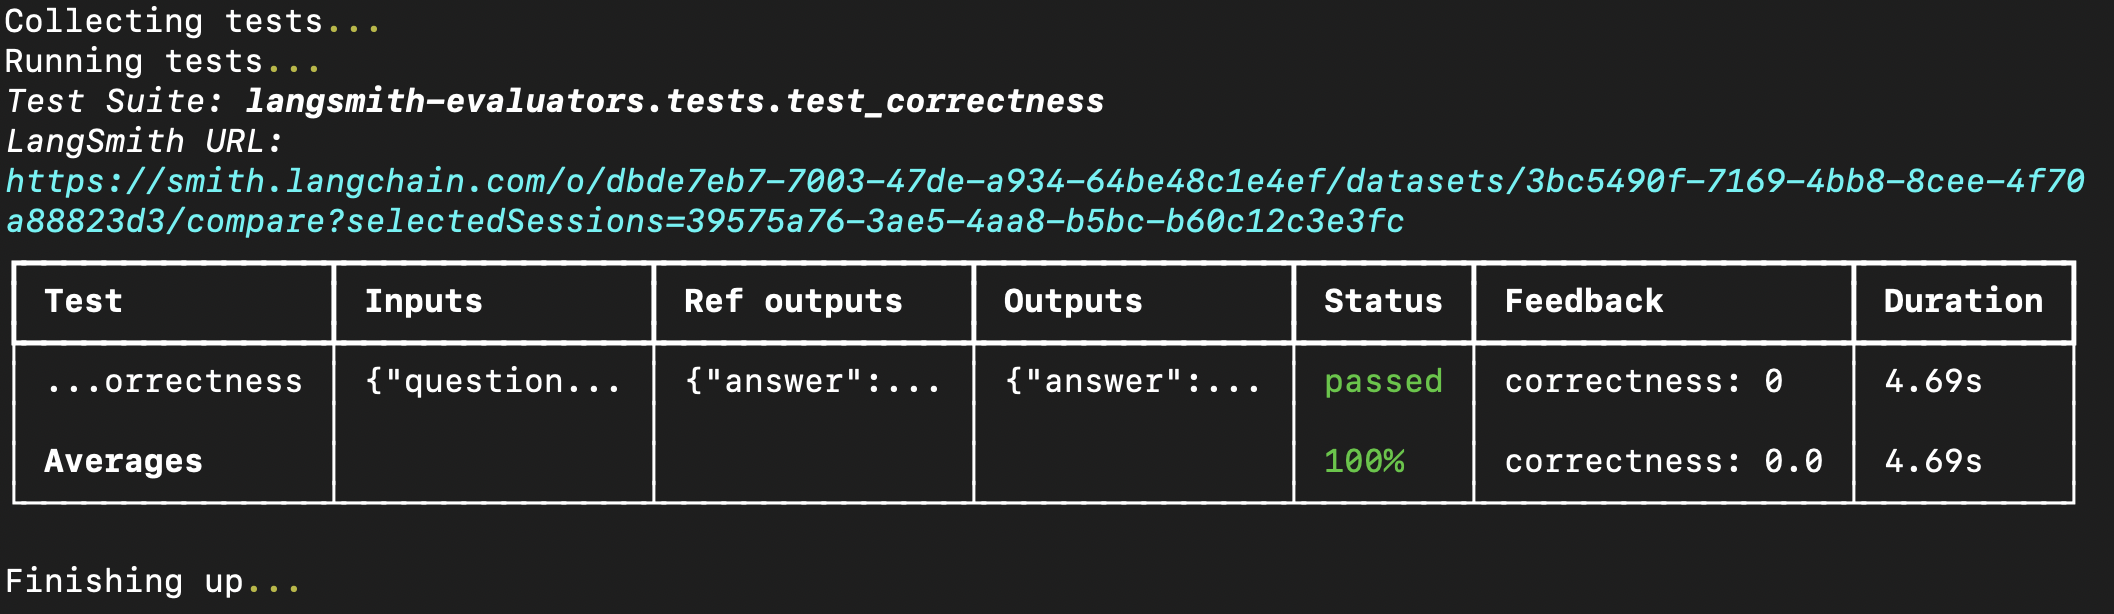 You can also pass prebuilt evaluators directly into the `evaluate` method if you have already created a dataset in LangSmith. If using Python, this requires `langsmith>=0.3.11`:
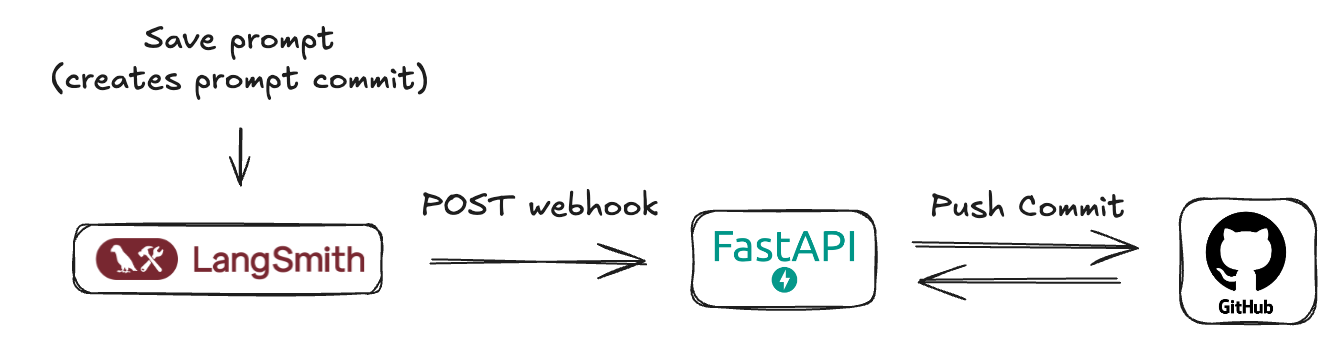 ## Prerequisites
Before we begin, ensure you have the following set up:
1. **GitHub Account:** A standard GitHub account.
2. **GitHub Repository:** Create a new (or choose an existing) repository where your LangSmith prompt manifests will be stored. This could be the same repository as your application code or a dedicated one for prompts.
3. **GitHub Personal Access Token (PAT):**
* LangSmith webhooks don't directly interact with GitHub—they call an intermediary server that *you* create.
* This server requires a GitHub PAT to authenticate and make commits to your repository.
* Must include the `repo` scope (`public_repo` is sufficient for public repositories).
* Go to **GitHub > Settings > Developer settings > Personal access tokens > Tokens (classic)**.
* Click **Generate new token (classic)**.
* Name it (e.g., "LangSmith Prompt Sync"), set an expiration, and select the required scopes.
* Click **Generate token** and **copy it immediately** — it won't be shown again.
* Store the token securely and provide it as an environment variable to your server.
## Understanding LangSmith "Prompt Commits" and webhooks
In LangSmith, when you save changes to a prompt, you're essentially creating a new version or a "Prompt Commit." These commits are what can trigger webhooks.
The webhook will send a JSON payload containing the new **prompt manifest**.
## Prerequisites
Before we begin, ensure you have the following set up:
1. **GitHub Account:** A standard GitHub account.
2. **GitHub Repository:** Create a new (or choose an existing) repository where your LangSmith prompt manifests will be stored. This could be the same repository as your application code or a dedicated one for prompts.
3. **GitHub Personal Access Token (PAT):**
* LangSmith webhooks don't directly interact with GitHub—they call an intermediary server that *you* create.
* This server requires a GitHub PAT to authenticate and make commits to your repository.
* Must include the `repo` scope (`public_repo` is sufficient for public repositories).
* Go to **GitHub > Settings > Developer settings > Personal access tokens > Tokens (classic)**.
* Click **Generate new token (classic)**.
* Name it (e.g., "LangSmith Prompt Sync"), set an expiration, and select the required scopes.
* Click **Generate token** and **copy it immediately** — it won't be shown again.
* Store the token securely and provide it as an environment variable to your server.
## Understanding LangSmith "Prompt Commits" and webhooks
In LangSmith, when you save changes to a prompt, you're essentially creating a new version or a "Prompt Commit." These commits are what can trigger webhooks.
The webhook will send a JSON payload containing the new **prompt manifest**.
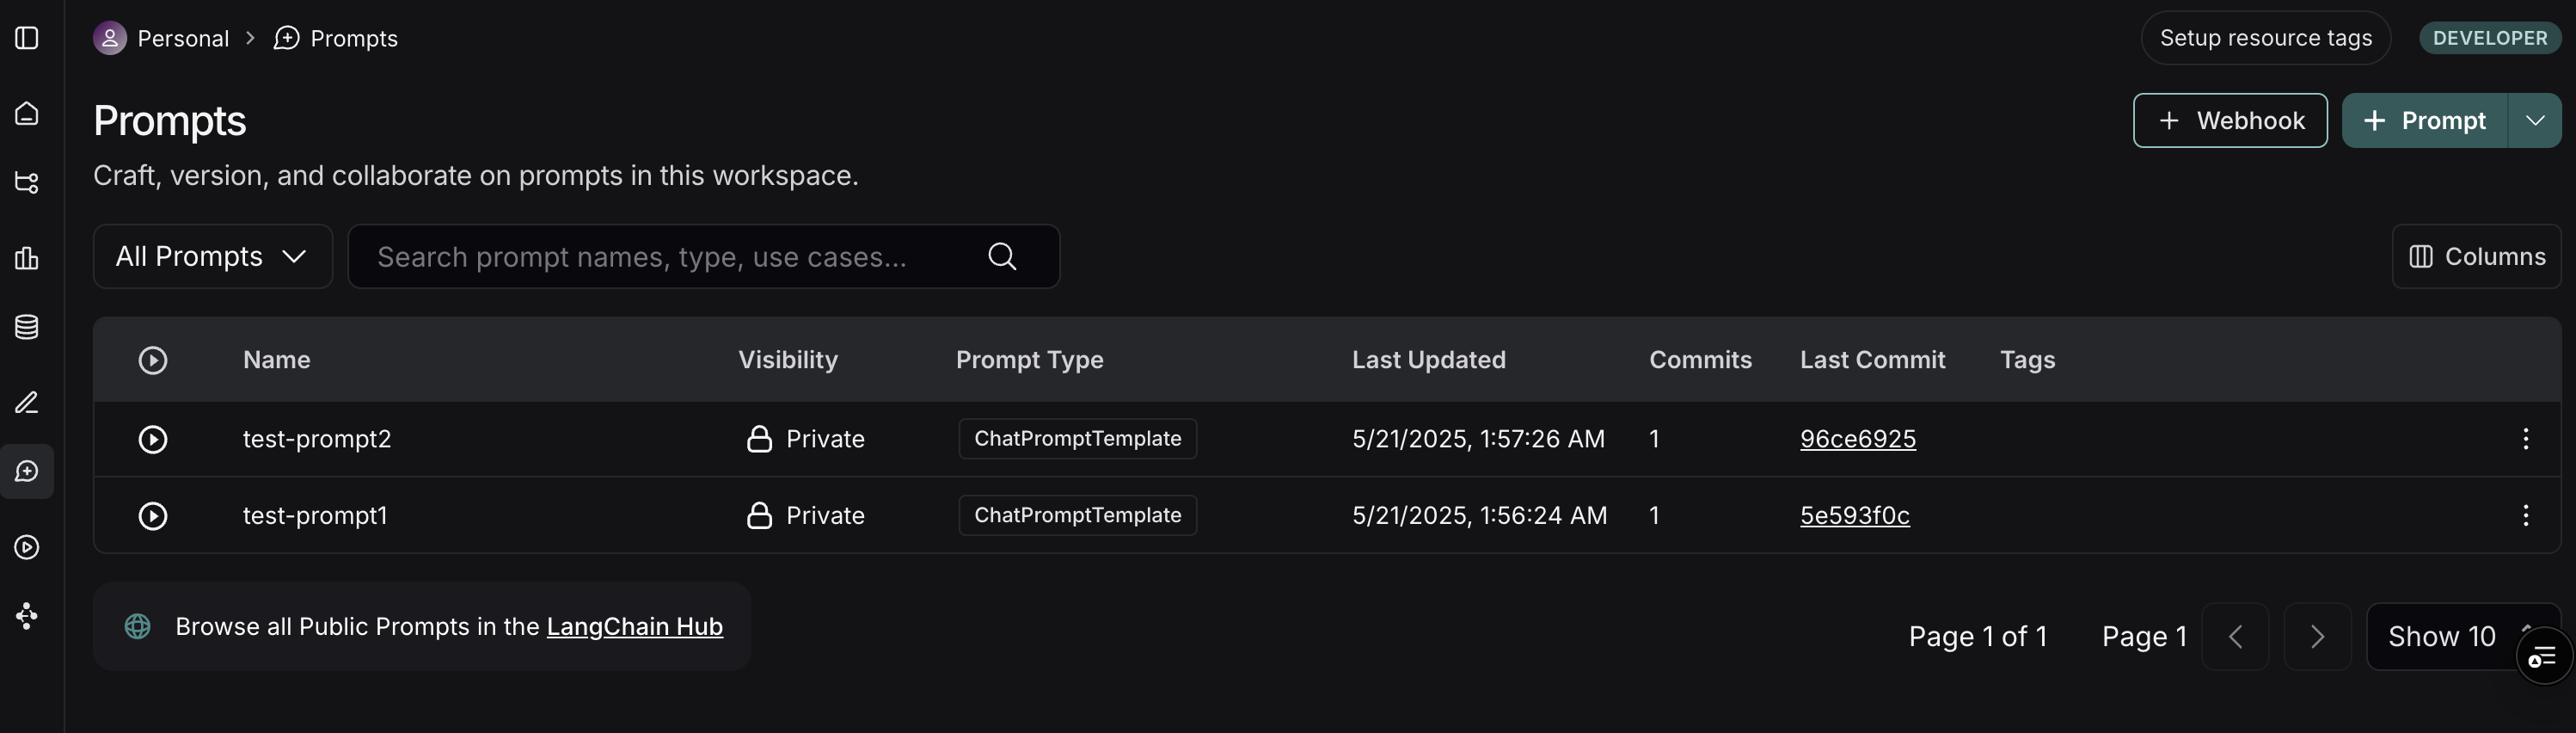 3. On the top right of the Prompts page, click the **+ Webhook** button.
4. You'll be presented with a form to configure your webhook:
3. On the top right of the Prompts page, click the **+ Webhook** button.
4. You'll be presented with a form to configure your webhook:
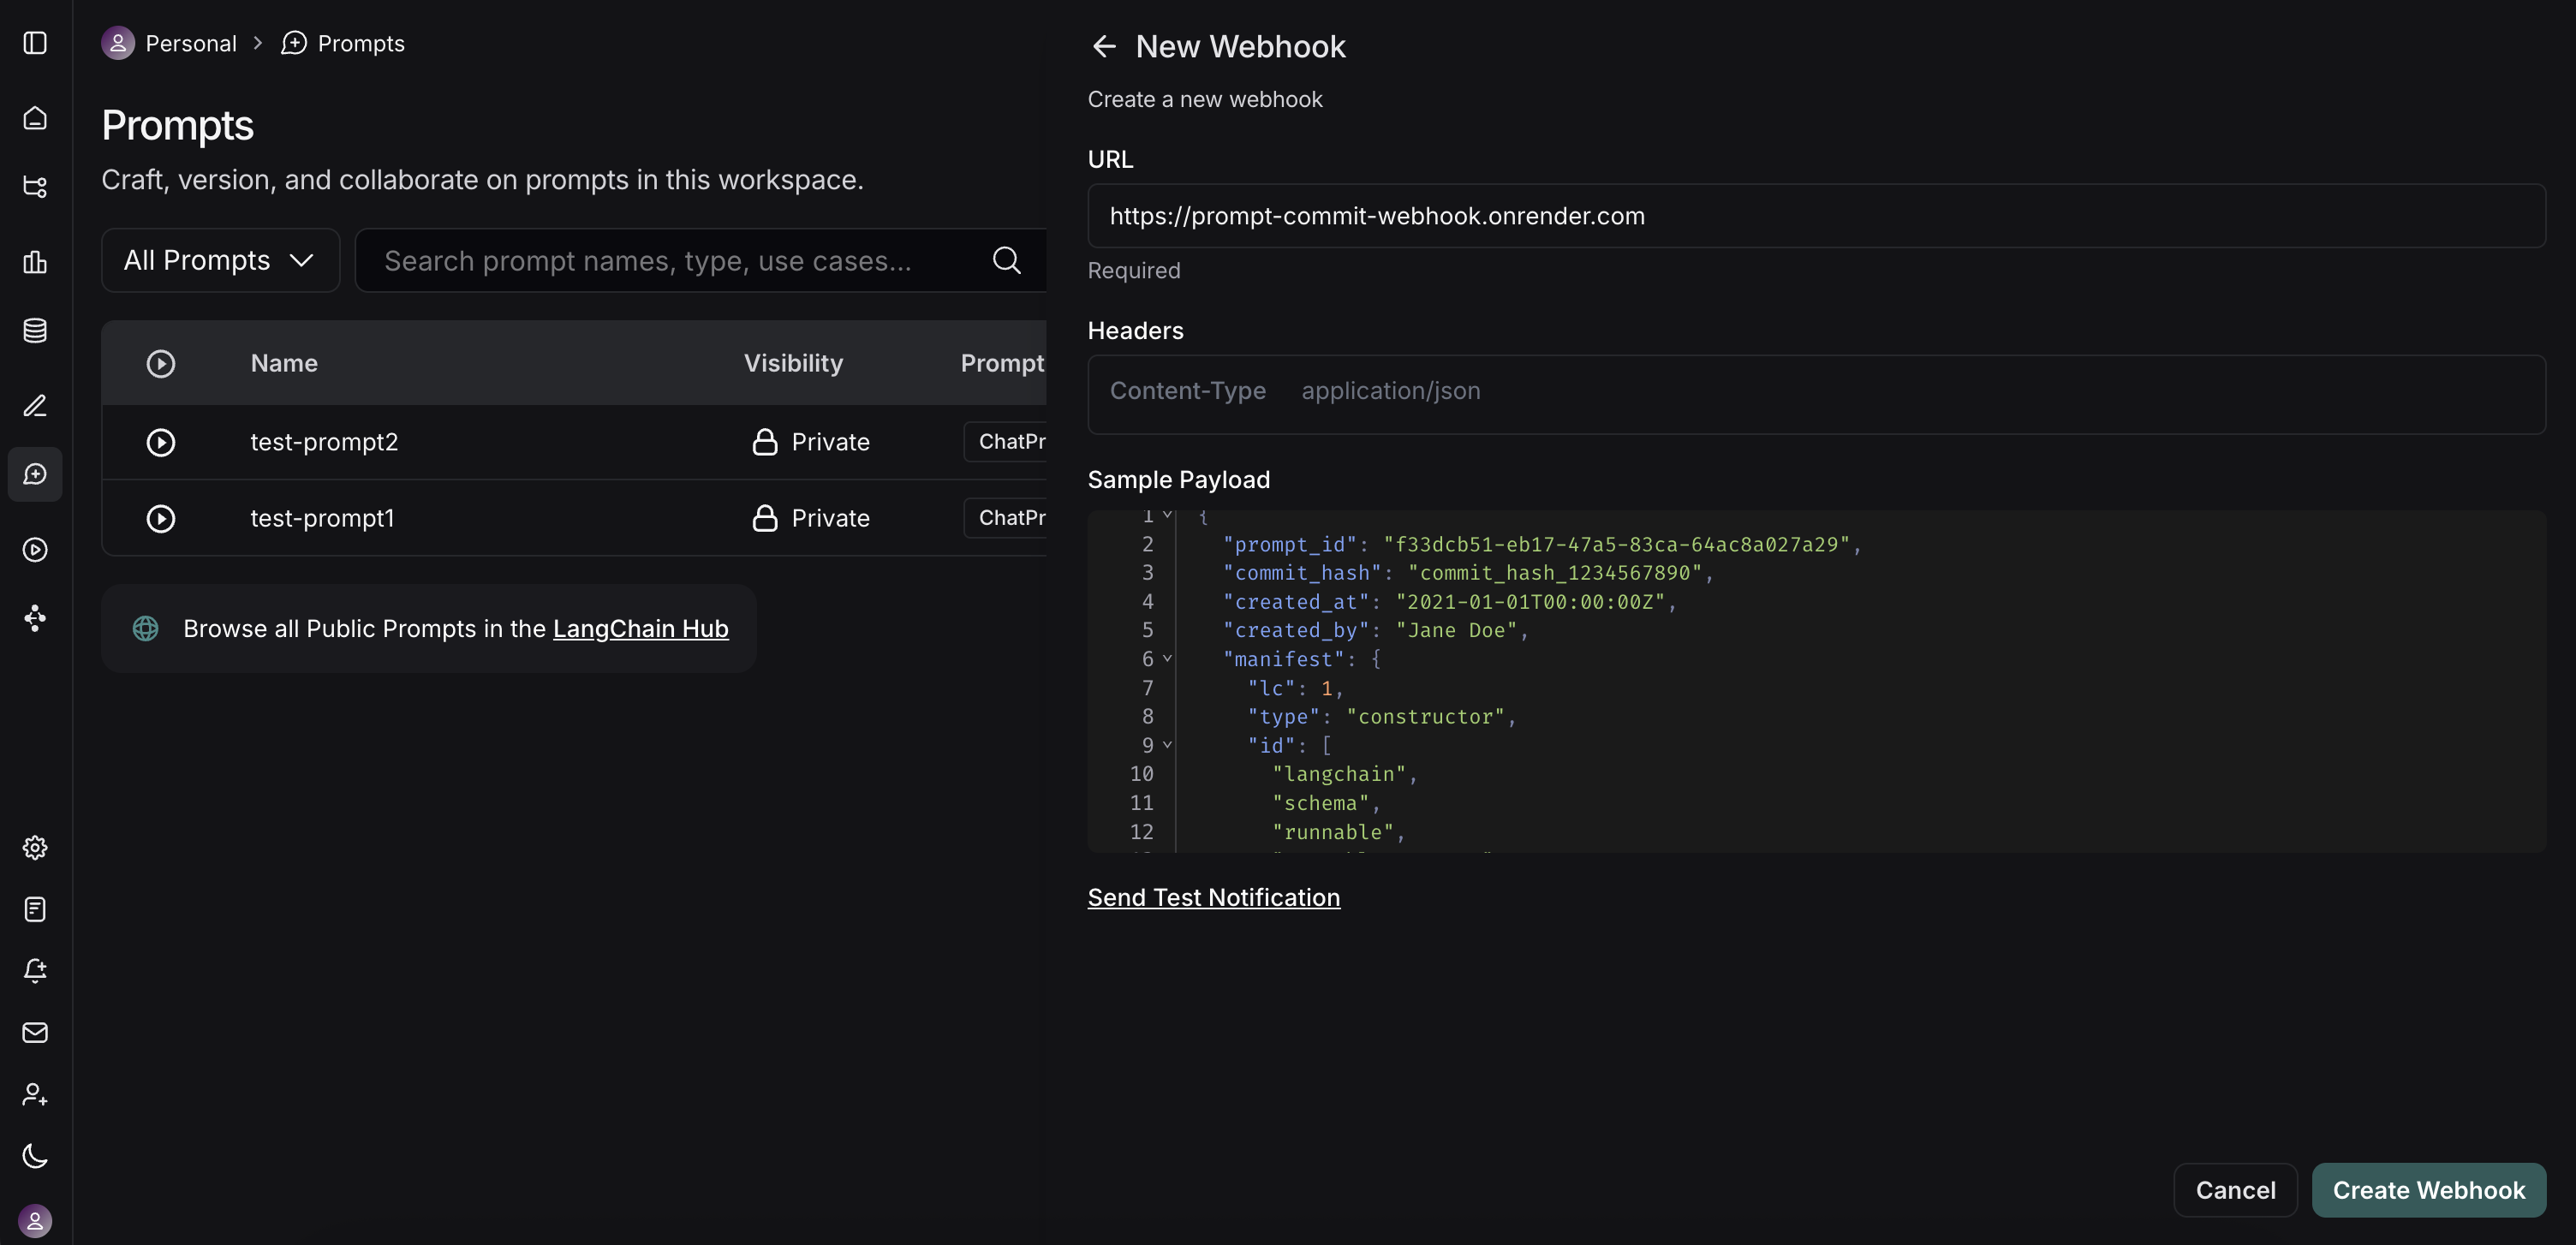 * **Webhook URL:** Enter the full public URL of your deployed FastAPI server's endpoint. For our example server, this would be `https://prompt-commit-webhook.onrender.com/webhook/commit`.
* **Headers (Optional):**
* You can add custom headers that LangSmith will send with each webhook request.
5. **Test the Webhook:** LangSmith provides a "Send Test Notification" button. Use this to send a sample payload to your server. Check your server logs (e.g., on Render) to ensure it receives the request and processes it successfully (or to debug any issues).
6. **Save** the webhook configuration.
## The workflow in action
* **Webhook URL:** Enter the full public URL of your deployed FastAPI server's endpoint. For our example server, this would be `https://prompt-commit-webhook.onrender.com/webhook/commit`.
* **Headers (Optional):**
* You can add custom headers that LangSmith will send with each webhook request.
5. **Test the Webhook:** LangSmith provides a "Send Test Notification" button. Use this to send a sample payload to your server. Check your server logs (e.g., on Render) to ensure it receives the request and processes it successfully (or to debug any issues).
6. **Save** the webhook configuration.
## The workflow in action
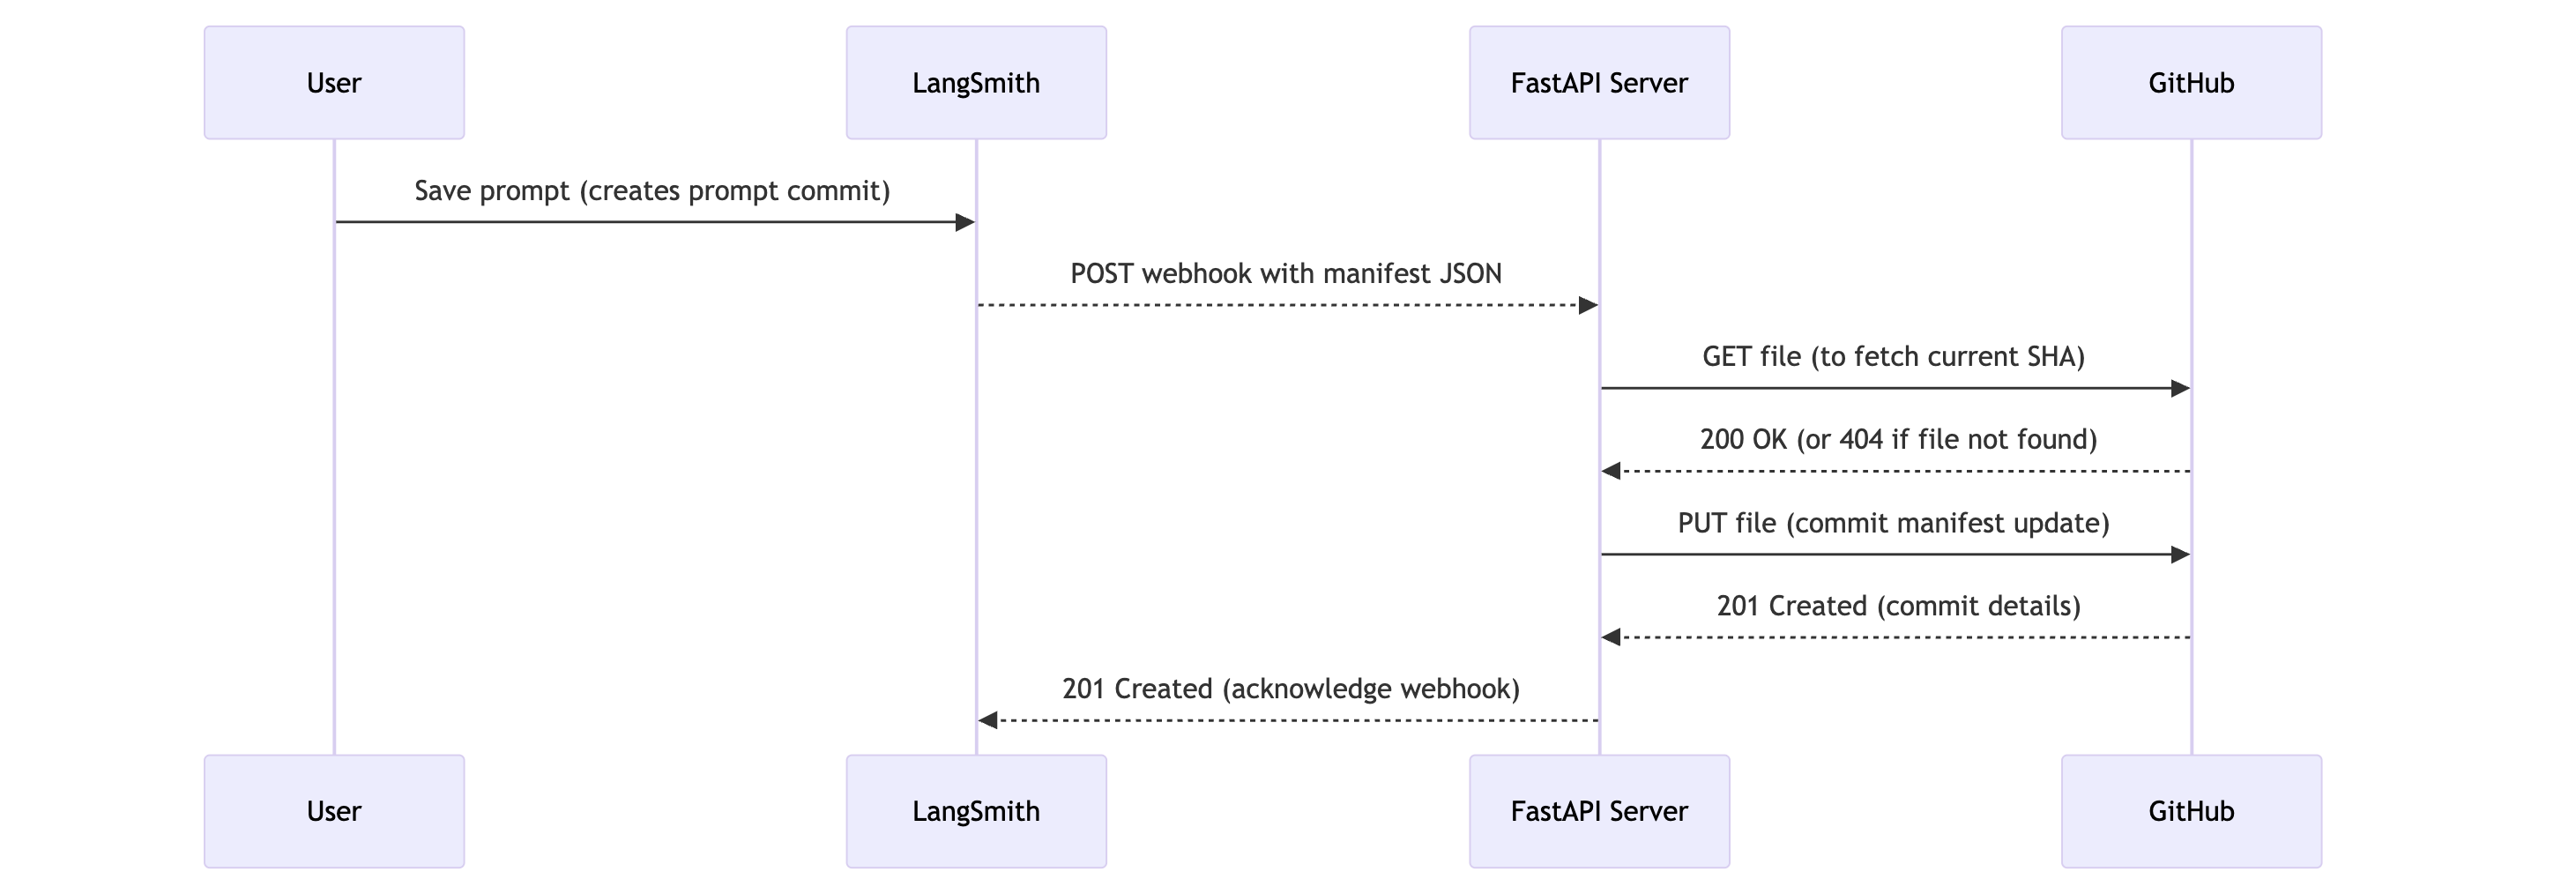 Now, with everything set up, here's what happens:
1. **Prompt Modification:** A user (developer or non-technical team member) modifies a prompt in the LangSmith UI and saves it, creating a new "prompt commit."
2. **Webhook Trigger:** LangSmith detects this new prompt commit and triggers the configured webhook.
3. **HTTP Request:** LangSmith sends an HTTP POST request to the public URL of your FastAPI server (e.g., `https://prompt-commit-webhook.onrender.com/webhook/commit`). The body of this request contains the JSON prompt manifest for the entire workspace.
4. **Server Receives Payload:** Your FastAPI server's endpoint receives the request.
5. **GitHub Commit:** The server parses the JSON manifest from the request body. It then uses the configured GitHub Personal Access Token, repository owner, repository name, file path, and branch to:
* Check if the manifest file already exists in the repository on the specified branch to get its SHA (this is necessary for updating an existing file).
* Create a new commit with the latest prompt manifest, either creating the file or updating it if it already exists. The commit message will indicate that it's an update from LangSmith.
6. **Confirmation:** You should see the new commit appear in your GitHub repository.
Now, with everything set up, here's what happens:
1. **Prompt Modification:** A user (developer or non-technical team member) modifies a prompt in the LangSmith UI and saves it, creating a new "prompt commit."
2. **Webhook Trigger:** LangSmith detects this new prompt commit and triggers the configured webhook.
3. **HTTP Request:** LangSmith sends an HTTP POST request to the public URL of your FastAPI server (e.g., `https://prompt-commit-webhook.onrender.com/webhook/commit`). The body of this request contains the JSON prompt manifest for the entire workspace.
4. **Server Receives Payload:** Your FastAPI server's endpoint receives the request.
5. **GitHub Commit:** The server parses the JSON manifest from the request body. It then uses the configured GitHub Personal Access Token, repository owner, repository name, file path, and branch to:
* Check if the manifest file already exists in the repository on the specified branch to get its SHA (this is necessary for updating an existing file).
* Create a new commit with the latest prompt manifest, either creating the file or updating it if it already exists. The commit message will indicate that it's an update from LangSmith.
6. **Confirmation:** You should see the new commit appear in your GitHub repository.
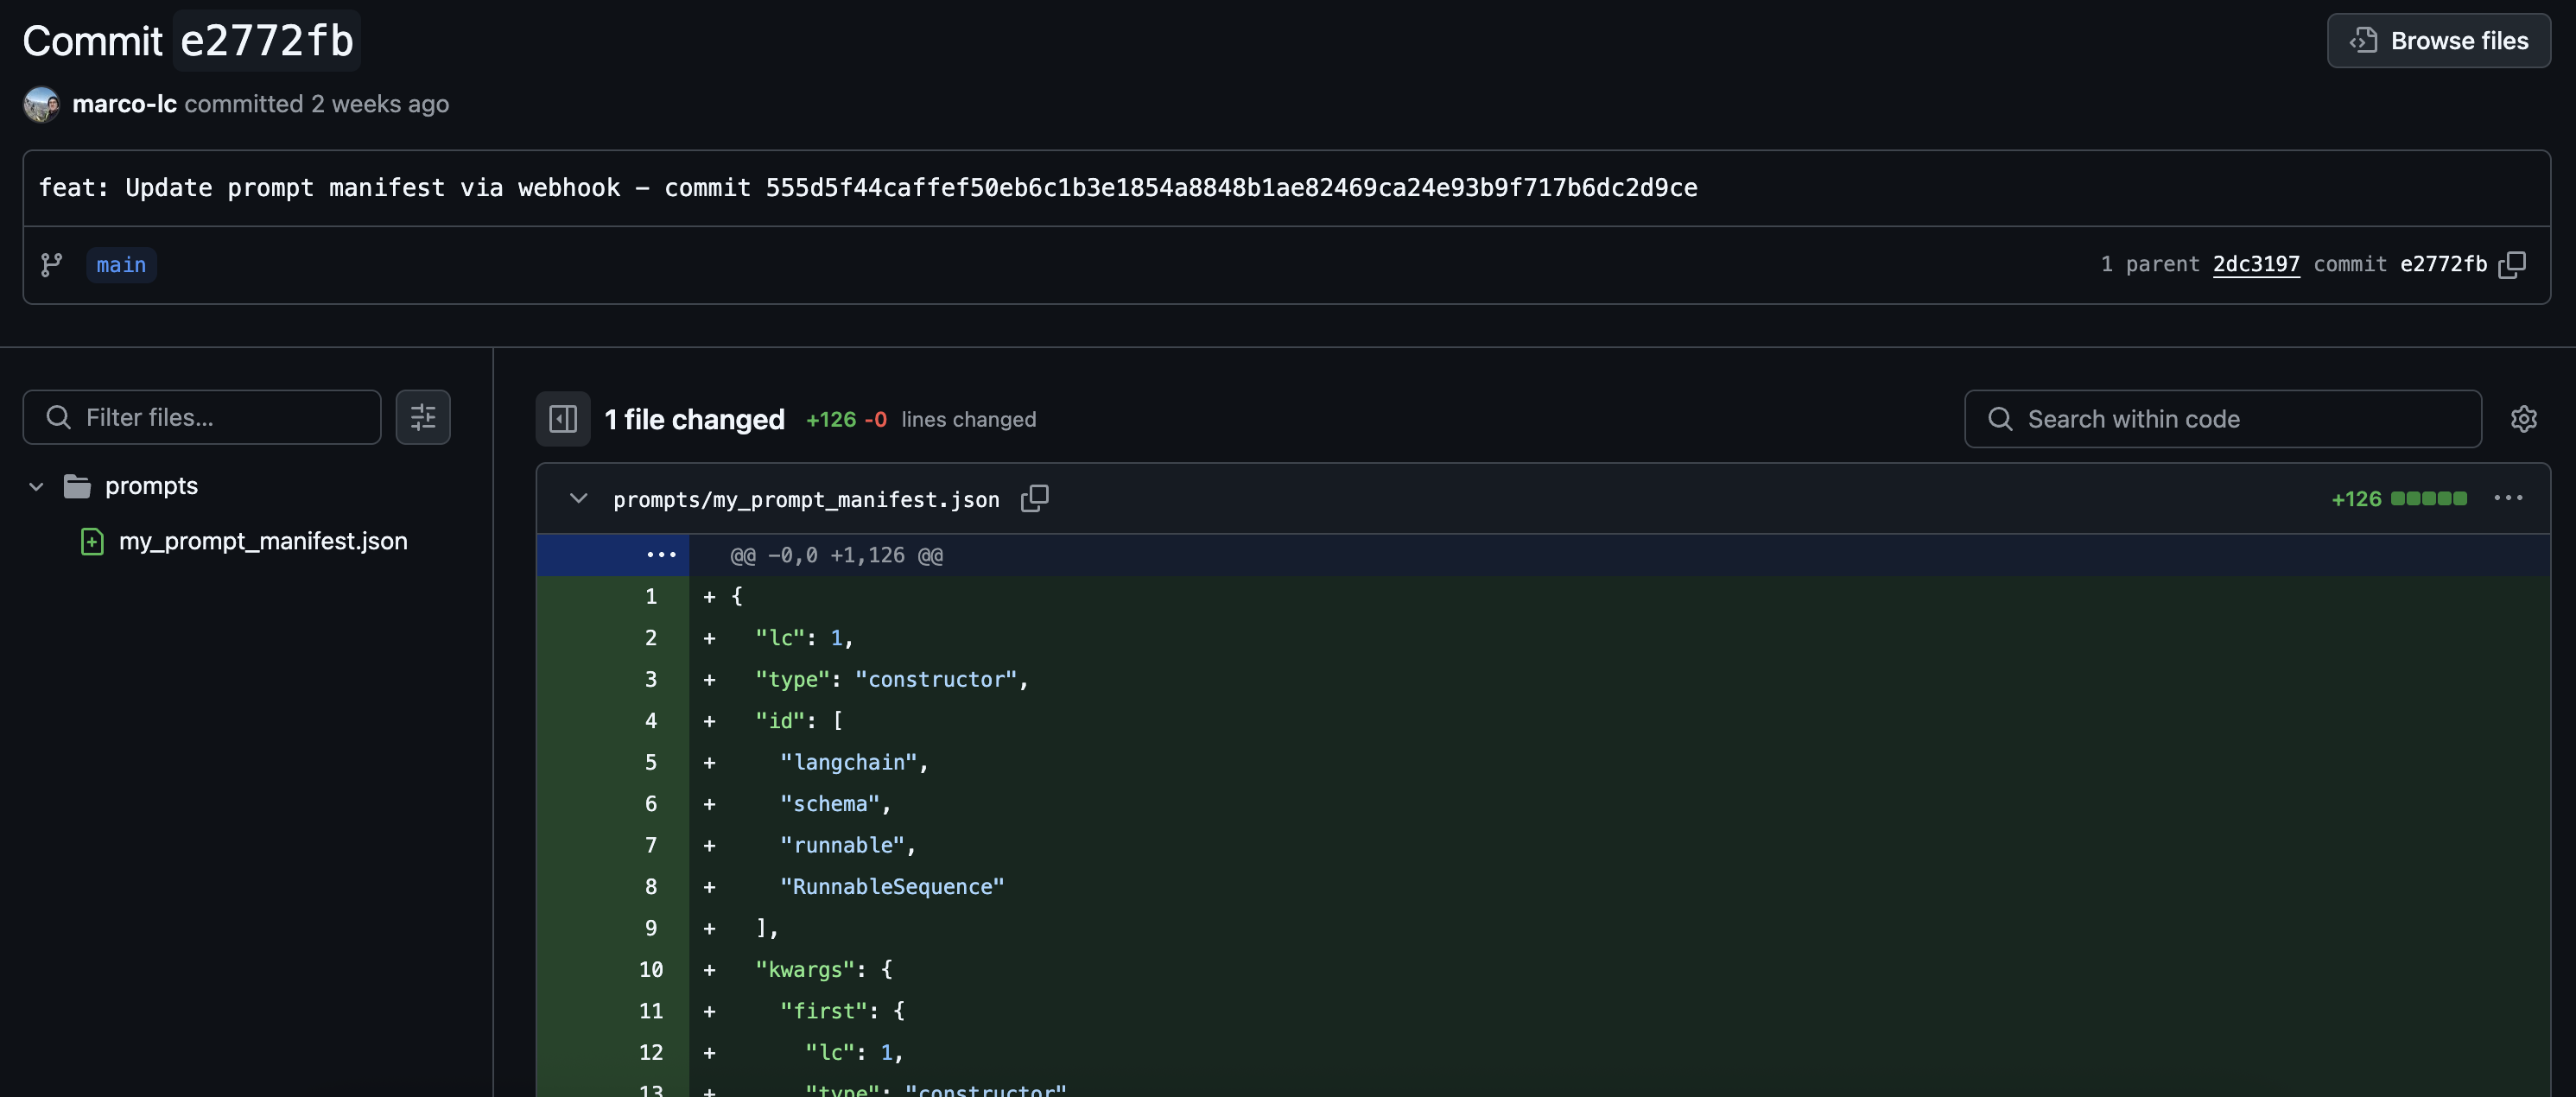 You've now successfully synced your LangSmith prompts with GitHub!
## Beyond a simple commit
Our example FastAPI server performs a direct commit of the entire prompt manifest. However, this is just the starting point. You can extend the server's functionality to perform more sophisticated actions:
* **Granular Commits:** Parse the manifest and commit changes to individual prompt files if you prefer a more granular structure in your repository.
* **Trigger CI/CD:** Instead of (or in addition to) committing, have the server trigger a CI/CD pipeline (e.g., Jenkins, GitHub Actions, GitLab CI) to deploy a staging environment, run tests, or build new application versions.
* **Update Databases/Caches:** If your application loads prompts from a database or cache, update these stores directly.
* **Notifications:** Send notifications to Slack, email, or other communication channels about prompt changes.
* **Selective Processing:** Based on metadata within the LangSmith payload (if available, e.g., which specific prompt changed or by whom), you could apply different logic.
***
You've now successfully synced your LangSmith prompts with GitHub!
## Beyond a simple commit
Our example FastAPI server performs a direct commit of the entire prompt manifest. However, this is just the starting point. You can extend the server's functionality to perform more sophisticated actions:
* **Granular Commits:** Parse the manifest and commit changes to individual prompt files if you prefer a more granular structure in your repository.
* **Trigger CI/CD:** Instead of (or in addition to) committing, have the server trigger a CI/CD pipeline (e.g., Jenkins, GitHub Actions, GitLab CI) to deploy a staging environment, run tests, or build new application versions.
* **Update Databases/Caches:** If your application loads prompts from a database or cache, update these stores directly.
* **Notifications:** Send notifications to Slack, email, or other communication channels about prompt changes.
* **Selective Processing:** Based on metadata within the LangSmith payload (if available, e.g., which specific prompt changed or by whom), you could apply different logic.
***
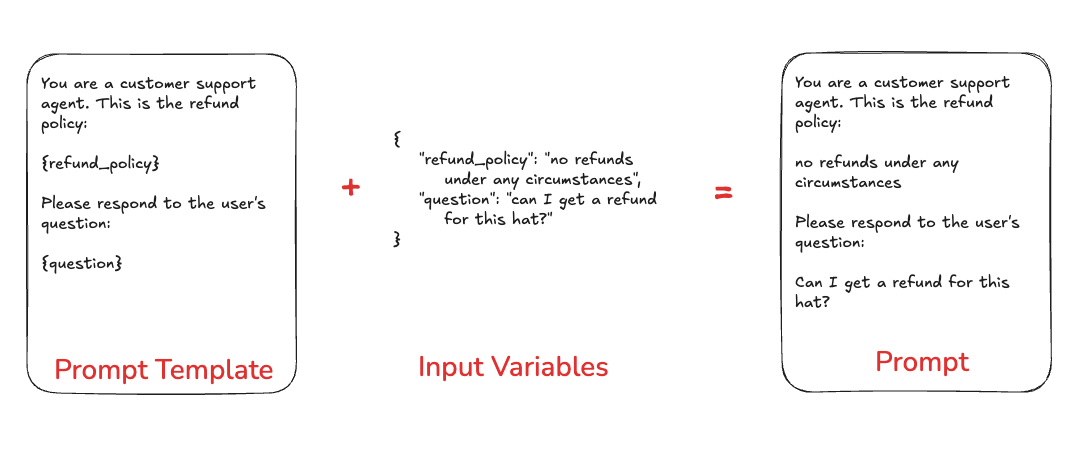 ## Prompts in LangSmith
You can store and version prompts templates in LangSmith. There are few key aspects of a prompt template to understand.
### Chat vs Completion
There are two different types of prompts: `chat` style prompts and `completion` style prompts.
Chat style prompts are a **list of messages**. This is the prompting style supported by most model APIs these days, and so this should generally be preferred.
Completion style prompts are just a string. This is an older style of prompting, and so mostly exists for legacy reasons.
### F-string vs. mustache
You can format your prompt with input variables using either [f-string](https://realpython.com/python-f-strings/) or [mustache](https://mustache.github.io/mustache.5.html) format. Here is an example prompt with f-string format:
```python theme={null}
Hello, {name}!
```
And here is one with mustache:
```python theme={null}
Hello, {{name}}!
```
To add a conditional mustache prompt:
```python theme={null}
{{#is_logged_in}} Welcome back, {{name}}!{{else}} Please log in.{{/is_logged_in}}
```
* The playground UI will pick up `is_logged_in` variable, but any nested variables you'll need to specify yourself. Paste the following into inputs to ensure the above conditional prompt works:
```json theme={null}
{ "name": "Alice"}
```
## Prompts in LangSmith
You can store and version prompts templates in LangSmith. There are few key aspects of a prompt template to understand.
### Chat vs Completion
There are two different types of prompts: `chat` style prompts and `completion` style prompts.
Chat style prompts are a **list of messages**. This is the prompting style supported by most model APIs these days, and so this should generally be preferred.
Completion style prompts are just a string. This is an older style of prompting, and so mostly exists for legacy reasons.
### F-string vs. mustache
You can format your prompt with input variables using either [f-string](https://realpython.com/python-f-strings/) or [mustache](https://mustache.github.io/mustache.5.html) format. Here is an example prompt with f-string format:
```python theme={null}
Hello, {name}!
```
And here is one with mustache:
```python theme={null}
Hello, {{name}}!
```
To add a conditional mustache prompt:
```python theme={null}
{{#is_logged_in}} Welcome back, {{name}}!{{else}} Please log in.{{/is_logged_in}}
```
* The playground UI will pick up `is_logged_in` variable, but any nested variables you'll need to specify yourself. Paste the following into inputs to ensure the above conditional prompt works:
```json theme={null}
{ "name": "Alice"}
```
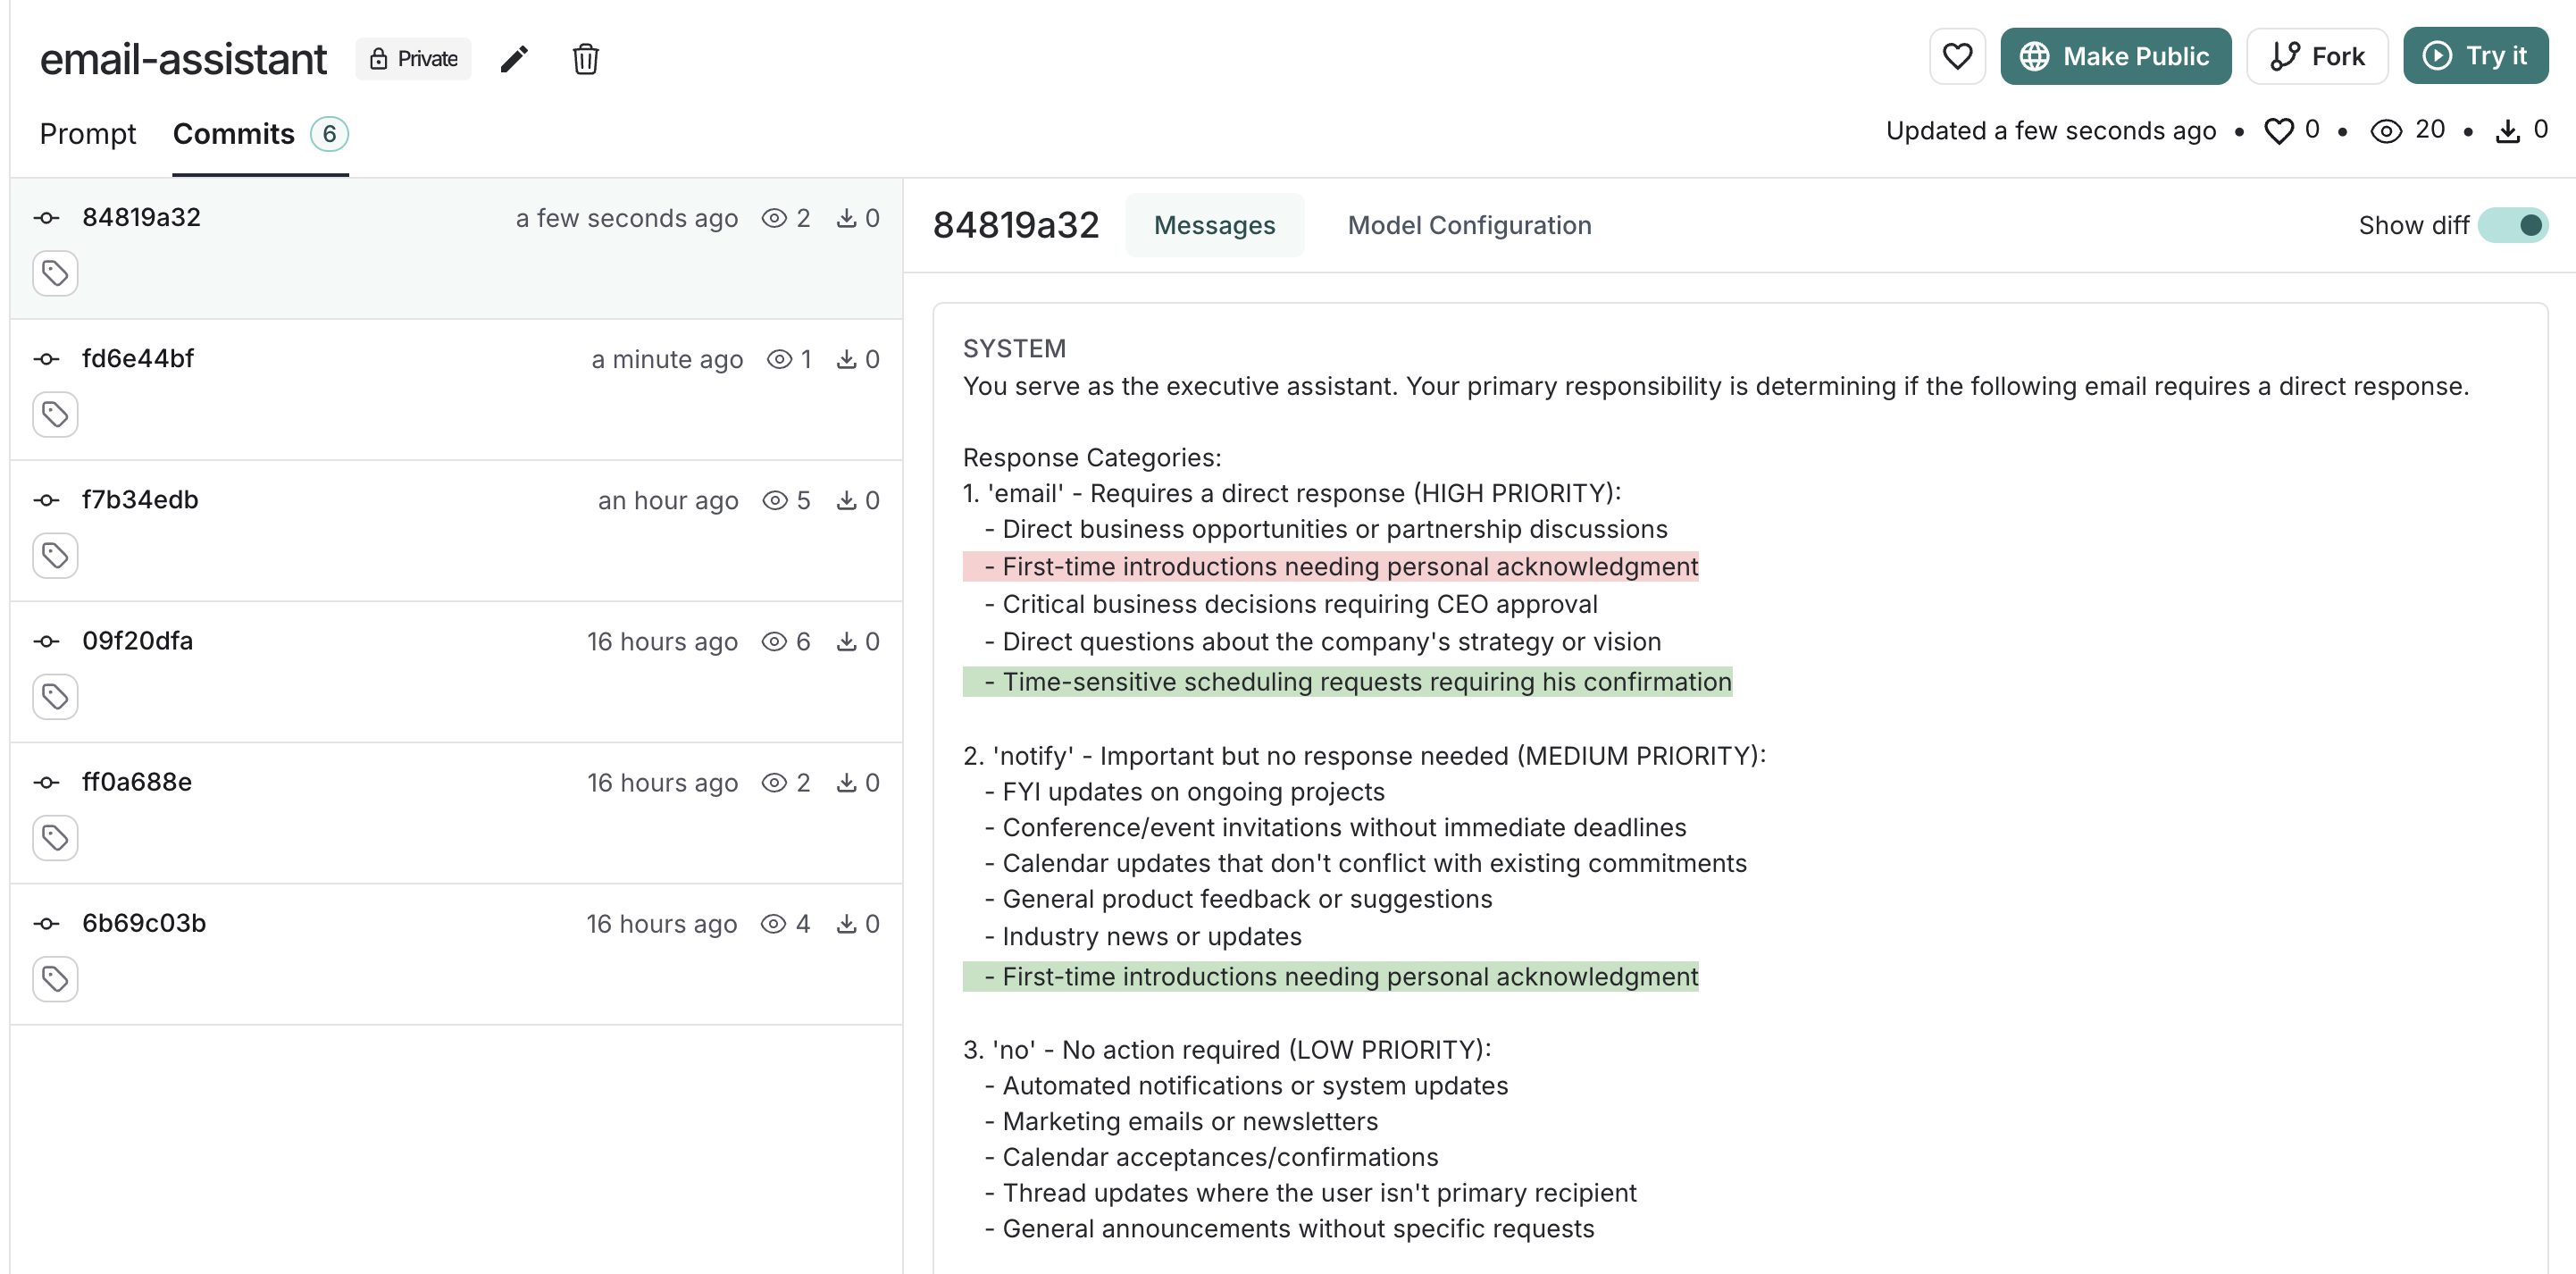 ### Tags
Commit tags are human-readable labels that point to specific commits in your prompt's history. Unlike commit hashes, tags can be moved to point to different commits, allowing you to update which version your code references without changing the code itself.
Use cases for commit tags can include:
* **Environment-specific tags**: Mark commits for `production` or `staging` environments, which allows you to switch between different versions without changing your code.
* **Version control**: Mark stable versions of your prompts, for example, `v1`, `v2`, which lets you reference specific versions in your code and track changes over time.
* **Collaboration**: Mark versions ready for review, which enables you to share specific versions with collaborators and get feedback.
### Tags
Commit tags are human-readable labels that point to specific commits in your prompt's history. Unlike commit hashes, tags can be moved to point to different commits, allowing you to update which version your code references without changing the code itself.
Use cases for commit tags can include:
* **Environment-specific tags**: Mark commits for `production` or `staging` environments, which allows you to switch between different versions without changing your code.
* **Version control**: Mark stable versions of your prompts, for example, `v1`, `v2`, which lets you reference specific versions in your code and track changes over time.
* **Collaboration**: Mark versions ready for review, which enables you to share specific versions with collaborators and get feedback.
 ## Testing over a dataset
To test over a dataset, you simply select the dataset from the top right and press Start. You can modify whether the results are streamed back as well as how many repitions there are in the test.
## Testing over a dataset
To test over a dataset, you simply select the dataset from the top right and press Start. You can modify whether the results are streamed back as well as how many repitions there are in the test.
 You can click on the "View Experiment" button to dive deeper into the results of the test.
## Video guide
***
You can click on the "View Experiment" button to dive deeper into the results of the test.
## Video guide
***
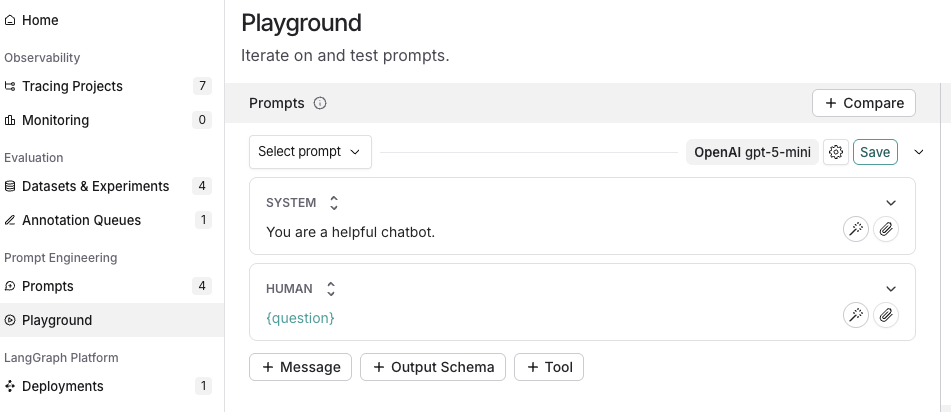
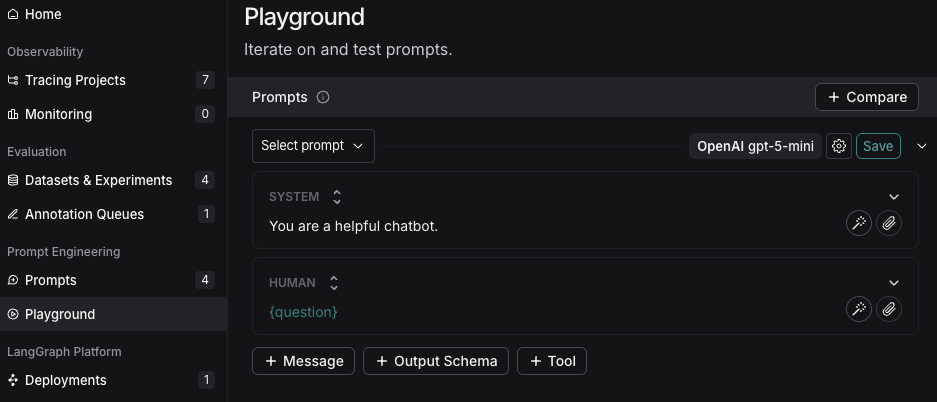
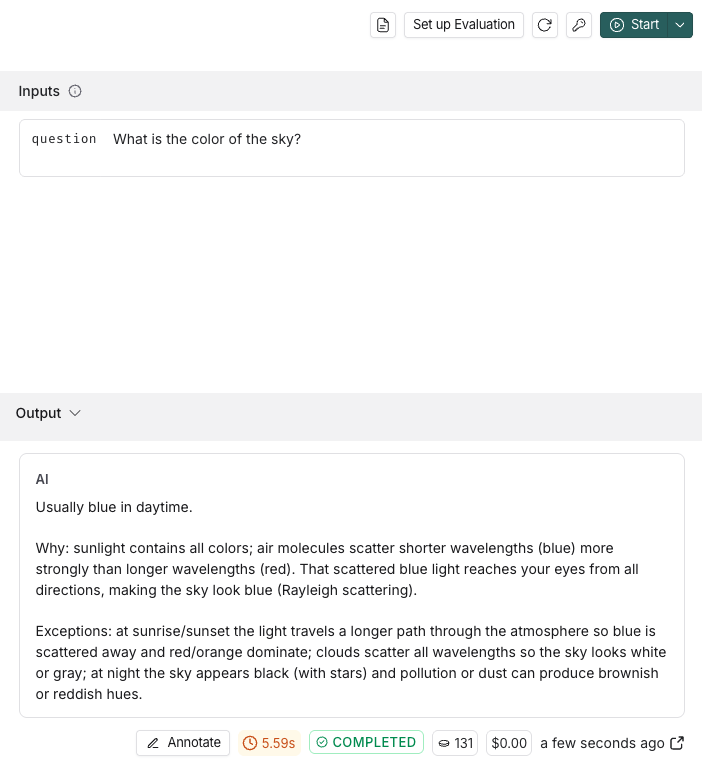
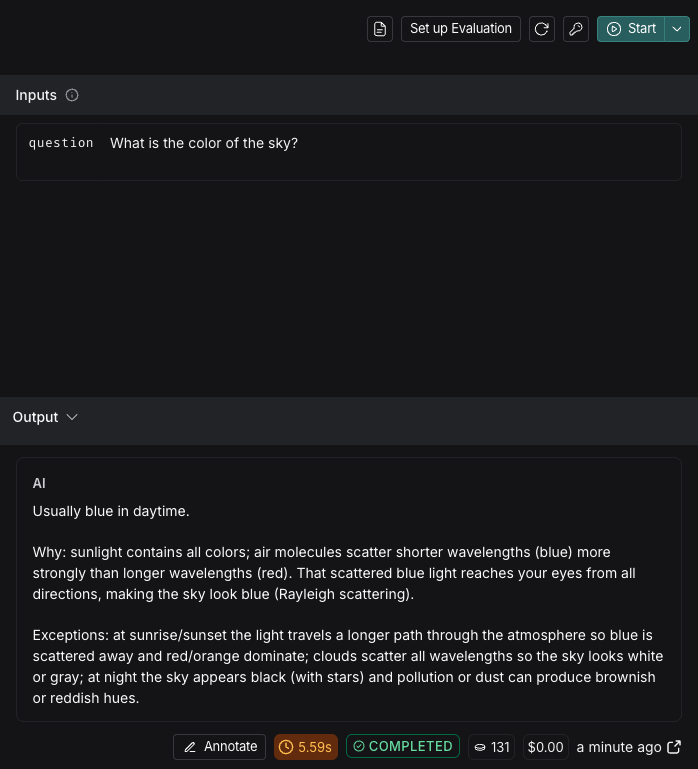
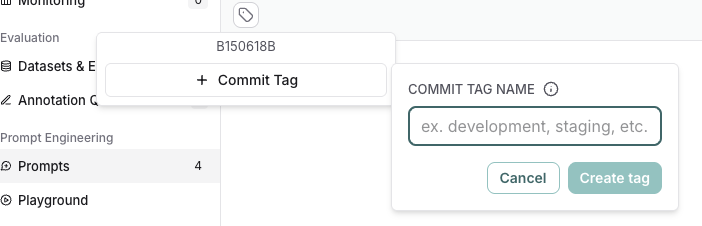
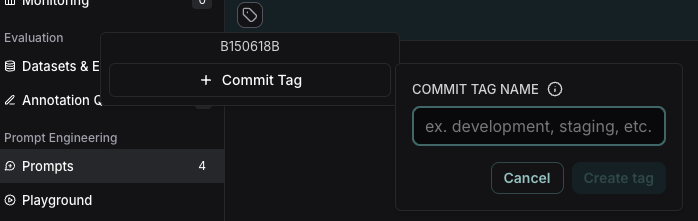
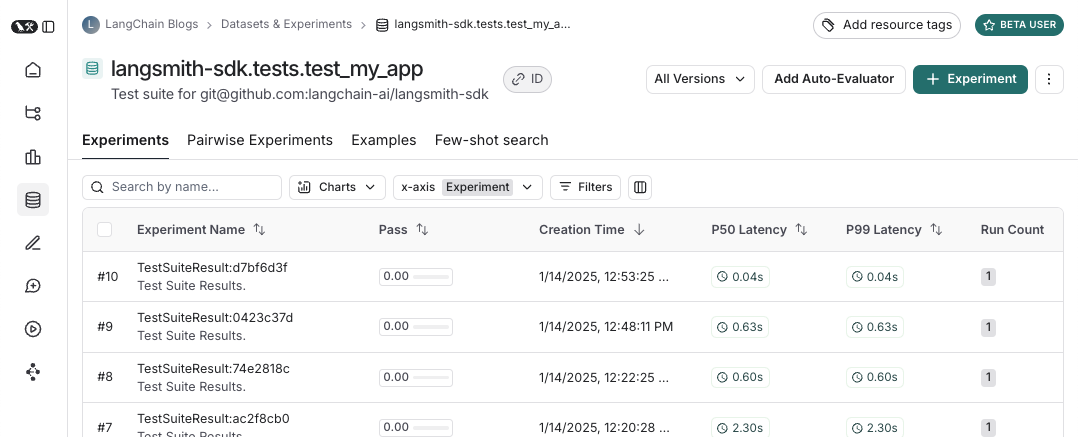 And what an experiment against that test suite looks like:
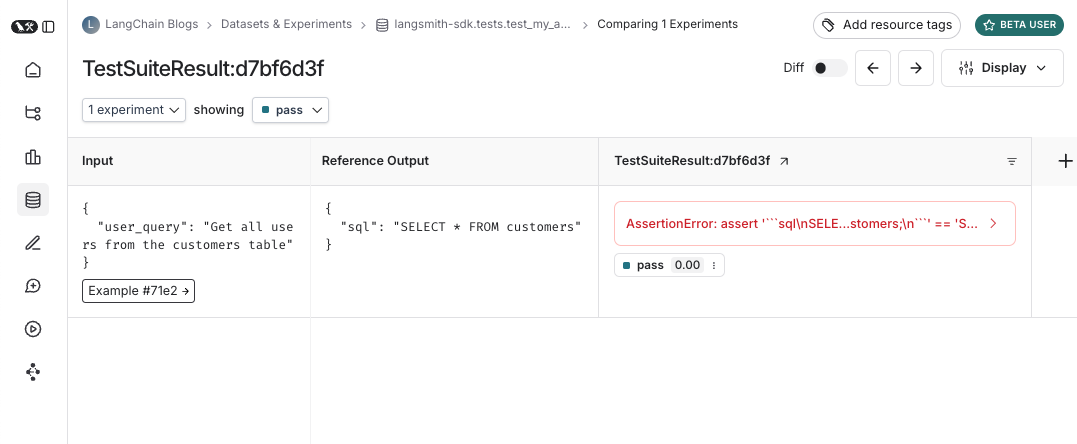 ## Log inputs, outputs, and reference outputs
Every time we run a test we're syncing it to a dataset example and tracing it as a run. There's a few different ways that we can trace the example inputs and reference outputs and the run outputs. The simplest is to use the `log_inputs`, `log_outputs`, and `log_reference_outputs` methods. You can run these any time in a test to update the example and run for that test:
```python theme={null}
import pytest
from langsmith import testing as t
@pytest.mark.langsmith
def test_foo() -> None:
t.log_inputs({"a": 1, "b": 2})
t.log_reference_outputs({"foo": "bar"})
t.log_outputs({"foo": "baz"})
assert True
```
Running this test will create/update an example with name "test\_foo", inputs `{"a": 1, "b": 2}`, reference outputs `{"foo": "bar"}` and trace a run with outputs `{"foo": "baz"}`.
**NOTE**: If you run `log_inputs`, `log_outputs`, or `log_reference_outputs` twice, the previous values will be overwritten.
Another way to define example inputs and reference outputs is via pytest fixtures/parametrizations. By default any arguments to your test function will be logged as inputs on the corresponding example. If certain arguments are meant to represet reference outputs, you can specify that they should be logged as such using `@pytest.mark.langsmith(output_keys=["name_of_ref_output_arg"])`:
```python theme={null}
import pytest
@pytest.fixture
def c() -> int:
return 5
@pytest.fixture
def d() -> int:
return 6
@pytest.mark.langsmith(output_keys=["d"])
def test_cd(c: int, d: int) -> None:
result = 2 * c
t.log_outputs({"d": result}) # Log run outputs
assert result == d
```
This will create/sync an example with name "test\_cd", inputs `{"c": 5}` and reference outputs `{"d": 6}`, and run output `{"d": 10}`.
## Log feedback
By default LangSmith collects the pass/fail rate under the `pass` feedback key for each test case. You can add additional feedback with `log_feedback`.
```python theme={null}
import openai
import pytest
from langsmith import wrappers
from langsmith import testing as t
oai_client = wrappers.wrap_openai(openai.OpenAI())
@pytest.mark.langsmith
def test_offtopic_input() -> None:
user_query = "whats up"
t.log_inputs({"user_query": user_query})
sql = generate_sql(user_query)
t.log_outputs({"sql": sql})
expected = "Sorry that is not a valid query."
t.log_reference_outputs({"sql": expected})
# Use this context manager to trace any steps used for generating evaluation
# feedback separately from the main application logic
with t.trace_feedback():
instructions = (
"Return 1 if the ACTUAL and EXPECTED answers are semantically equivalent, "
"otherwise return 0. Return only 0 or 1 and nothing else."
)
grade = oai_client.chat.completions.create(
model="gpt-4o-mini",
messages=[
{"role": "system", "content": instructions},
{"role": "user", "content": f"ACTUAL: {sql}\nEXPECTED: {expected}"},
],
)
score = float(grade.choices[0].message.content)
t.log_feedback(key="correct", score=score)
assert score
```
Note the use of the `trace_feedback()` context manager. This makes it so that the LLM-as-judge call is traced separately from the rest of the test case. Instead of showing up in the main test case run it will instead show up in the trace for the `correct` feedback key.
**NOTE**: Make sure that the `log_feedback` call associated with the feedback trace occurs inside the `trace_feedback` context. This way we'll be able to associate the feedback with the trace, and when seeing the feedback in the UI you'll be able to click on it to see the trace that generated it.
## Trace intermediate calls
LangSmith will automatically trace any traceable intermediate calls that happen in the course of test case execution.
## Grouping tests into a test suite
By default, all tests within a given file will be grouped as a single "test suite" with a corresponding dataset. You can configure which test suite a test belongs to by passing the `test_suite_name` parameter to `@pytest.mark.langsmith` for case-by-case grouping, or you can set the `LANGSMITH_TEST_SUITE` env var to group all tests from an execution into a single test suite:
```bash theme={null}
LANGSMITH_TEST_SUITE="SQL app tests" pytest tests/
```
We generally recommend setting `LANGSMITH_TEST_SUITE` to get a consolidated view of all of your results.
## Naming experiments
You can name an experiment using the `LANGSMITH_EXPERIMENT` env var:
```bash theme={null}
LANGSMITH_TEST_SUITE="SQL app tests" LANGSMITH_EXPERIMENT="baseline" pytest tests/
```
## Caching
LLMs on every commit in CI can get expensive. To save time and resources, LangSmith lets you cache HTTP requests to disk. To enable caching, install with `langsmith[pytest]` and set an env var: `LANGSMITH_TEST_CACHE=/my/cache/path`:
## Log inputs, outputs, and reference outputs
Every time we run a test we're syncing it to a dataset example and tracing it as a run. There's a few different ways that we can trace the example inputs and reference outputs and the run outputs. The simplest is to use the `log_inputs`, `log_outputs`, and `log_reference_outputs` methods. You can run these any time in a test to update the example and run for that test:
```python theme={null}
import pytest
from langsmith import testing as t
@pytest.mark.langsmith
def test_foo() -> None:
t.log_inputs({"a": 1, "b": 2})
t.log_reference_outputs({"foo": "bar"})
t.log_outputs({"foo": "baz"})
assert True
```
Running this test will create/update an example with name "test\_foo", inputs `{"a": 1, "b": 2}`, reference outputs `{"foo": "bar"}` and trace a run with outputs `{"foo": "baz"}`.
**NOTE**: If you run `log_inputs`, `log_outputs`, or `log_reference_outputs` twice, the previous values will be overwritten.
Another way to define example inputs and reference outputs is via pytest fixtures/parametrizations. By default any arguments to your test function will be logged as inputs on the corresponding example. If certain arguments are meant to represet reference outputs, you can specify that they should be logged as such using `@pytest.mark.langsmith(output_keys=["name_of_ref_output_arg"])`:
```python theme={null}
import pytest
@pytest.fixture
def c() -> int:
return 5
@pytest.fixture
def d() -> int:
return 6
@pytest.mark.langsmith(output_keys=["d"])
def test_cd(c: int, d: int) -> None:
result = 2 * c
t.log_outputs({"d": result}) # Log run outputs
assert result == d
```
This will create/sync an example with name "test\_cd", inputs `{"c": 5}` and reference outputs `{"d": 6}`, and run output `{"d": 10}`.
## Log feedback
By default LangSmith collects the pass/fail rate under the `pass` feedback key for each test case. You can add additional feedback with `log_feedback`.
```python theme={null}
import openai
import pytest
from langsmith import wrappers
from langsmith import testing as t
oai_client = wrappers.wrap_openai(openai.OpenAI())
@pytest.mark.langsmith
def test_offtopic_input() -> None:
user_query = "whats up"
t.log_inputs({"user_query": user_query})
sql = generate_sql(user_query)
t.log_outputs({"sql": sql})
expected = "Sorry that is not a valid query."
t.log_reference_outputs({"sql": expected})
# Use this context manager to trace any steps used for generating evaluation
# feedback separately from the main application logic
with t.trace_feedback():
instructions = (
"Return 1 if the ACTUAL and EXPECTED answers are semantically equivalent, "
"otherwise return 0. Return only 0 or 1 and nothing else."
)
grade = oai_client.chat.completions.create(
model="gpt-4o-mini",
messages=[
{"role": "system", "content": instructions},
{"role": "user", "content": f"ACTUAL: {sql}\nEXPECTED: {expected}"},
],
)
score = float(grade.choices[0].message.content)
t.log_feedback(key="correct", score=score)
assert score
```
Note the use of the `trace_feedback()` context manager. This makes it so that the LLM-as-judge call is traced separately from the rest of the test case. Instead of showing up in the main test case run it will instead show up in the trace for the `correct` feedback key.
**NOTE**: Make sure that the `log_feedback` call associated with the feedback trace occurs inside the `trace_feedback` context. This way we'll be able to associate the feedback with the trace, and when seeing the feedback in the UI you'll be able to click on it to see the trace that generated it.
## Trace intermediate calls
LangSmith will automatically trace any traceable intermediate calls that happen in the course of test case execution.
## Grouping tests into a test suite
By default, all tests within a given file will be grouped as a single "test suite" with a corresponding dataset. You can configure which test suite a test belongs to by passing the `test_suite_name` parameter to `@pytest.mark.langsmith` for case-by-case grouping, or you can set the `LANGSMITH_TEST_SUITE` env var to group all tests from an execution into a single test suite:
```bash theme={null}
LANGSMITH_TEST_SUITE="SQL app tests" pytest tests/
```
We generally recommend setting `LANGSMITH_TEST_SUITE` to get a consolidated view of all of your results.
## Naming experiments
You can name an experiment using the `LANGSMITH_EXPERIMENT` env var:
```bash theme={null}
LANGSMITH_TEST_SUITE="SQL app tests" LANGSMITH_EXPERIMENT="baseline" pytest tests/
```
## Caching
LLMs on every commit in CI can get expensive. To save time and resources, LangSmith lets you cache HTTP requests to disk. To enable caching, install with `langsmith[pytest]` and set an env var: `LANGSMITH_TEST_CACHE=/my/cache/path`:
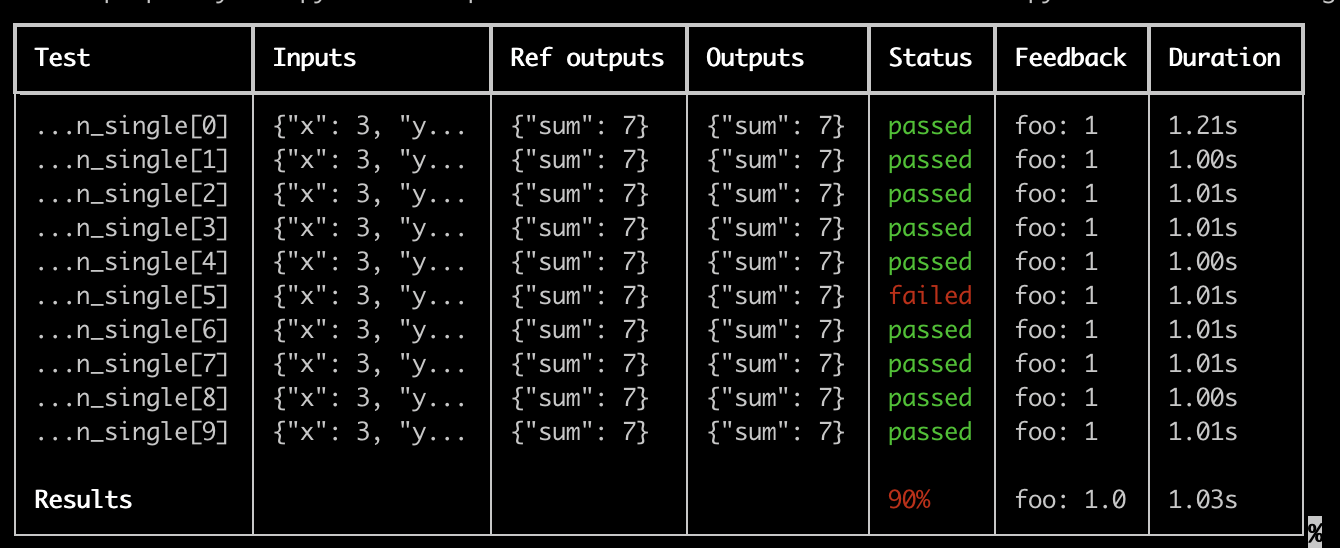 Some important notes for using this feature:
* Make sure you've installed `pip install -U "langsmith[pytest]"`
* Rich outputs do not currently work with `pytest-xdist`
**NOTE**: The custom output removes all the standard pytest outputs. If you're trying to debug some unexpected behavior it's often better to show the regular pytest outputs so to get full error traces.
## Dry-run mode
If you want to run the tests without syncing the results to LangSmith, you can set `LANGSMITH_TEST_TRACKING=false` in your environment.
```bash theme={null}
LANGSMITH_TEST_TRACKING=false pytest tests/
```
The tests will run as normal, but the experiment logs will not be sent to LangSmith.
## Expectations
LangSmith provides an [expect](https://docs.smith.langchain.com/reference/python/_expect/langsmith._expect._Expect#langsmith._expect._Expect) utility to help define expectations about your LLM output. For example:
```python theme={null}
from langsmith import expect
@pytest.mark.langsmith
def test_sql_generation_select_all():
user_query = "Get all users from the customers table"
sql = generate_sql(user_query)
expect(sql).to_contain("customers")
```
This will log the binary "expectation" score to the experiment results, additionally `assert`ing that the expectation is met possibly triggering a test failure.
`expect` also provides "fuzzy match" methods. For example:
```python theme={null}
@pytest.mark.langsmith(output_keys=["expectation"])
@pytest.mark.parametrize(
"query, expectation",
[
("what's the capital of France?", "Paris"),
],
)
def test_embedding_similarity(query, expectation):
prediction = my_chatbot(query)
expect.embedding_distance(
# This step logs the distance as feedback for this run
prediction=prediction, expectation=expectation
# Adding a matcher (in this case, 'to_be_*"), logs 'expectation' feedback
).to_be_less_than(0.5) # Optional predicate to assert against
expect.edit_distance(
# This computes the normalized Damerau-Levenshtein distance between the two strings
prediction=prediction, expectation=expectation
# If no predicate is provided below, 'assert' isn't called, but the score is still logged
)
```
This test case will be assigned 4 scores:
1. The `embedding_distance` between the prediction and the expectation
2. The binary `expectation` score (1 if cosine distance is less than 0.5, 0 if not)
3. The `edit_distance` between the prediction and the expectation
4. The overall test pass/fail score (binary)
The `expect` utility is modeled off of [Jest](https://jestjs.io/docs/expect)'s expect API, with some off-the-shelf functionality to make it easier to grade your LLMs.
## Legacy
#### `@test` / `@unit` decorator
The legacy method for marking test cases is using the `@test` or `@unit` decorators:
```python theme={null}
from langsmith import test
@test
def test_foo() -> None:
pass
```
***
***
Some important notes for using this feature:
* Make sure you've installed `pip install -U "langsmith[pytest]"`
* Rich outputs do not currently work with `pytest-xdist`
**NOTE**: The custom output removes all the standard pytest outputs. If you're trying to debug some unexpected behavior it's often better to show the regular pytest outputs so to get full error traces.
## Dry-run mode
If you want to run the tests without syncing the results to LangSmith, you can set `LANGSMITH_TEST_TRACKING=false` in your environment.
```bash theme={null}
LANGSMITH_TEST_TRACKING=false pytest tests/
```
The tests will run as normal, but the experiment logs will not be sent to LangSmith.
## Expectations
LangSmith provides an [expect](https://docs.smith.langchain.com/reference/python/_expect/langsmith._expect._Expect#langsmith._expect._Expect) utility to help define expectations about your LLM output. For example:
```python theme={null}
from langsmith import expect
@pytest.mark.langsmith
def test_sql_generation_select_all():
user_query = "Get all users from the customers table"
sql = generate_sql(user_query)
expect(sql).to_contain("customers")
```
This will log the binary "expectation" score to the experiment results, additionally `assert`ing that the expectation is met possibly triggering a test failure.
`expect` also provides "fuzzy match" methods. For example:
```python theme={null}
@pytest.mark.langsmith(output_keys=["expectation"])
@pytest.mark.parametrize(
"query, expectation",
[
("what's the capital of France?", "Paris"),
],
)
def test_embedding_similarity(query, expectation):
prediction = my_chatbot(query)
expect.embedding_distance(
# This step logs the distance as feedback for this run
prediction=prediction, expectation=expectation
# Adding a matcher (in this case, 'to_be_*"), logs 'expectation' feedback
).to_be_less_than(0.5) # Optional predicate to assert against
expect.edit_distance(
# This computes the normalized Damerau-Levenshtein distance between the two strings
prediction=prediction, expectation=expectation
# If no predicate is provided below, 'assert' isn't called, but the score is still logged
)
```
This test case will be assigned 4 scores:
1. The `embedding_distance` between the prediction and the expectation
2. The binary `expectation` score (1 if cosine distance is less than 0.5, 0 if not)
3. The `edit_distance` between the prediction and the expectation
4. The overall test pass/fail score (binary)
The `expect` utility is modeled off of [Jest](https://jestjs.io/docs/expect)'s expect API, with some off-the-shelf functionality to make it easier to grade your LLMs.
## Legacy
#### `@test` / `@unit` decorator
The legacy method for marking test cases is using the `@test` or `@unit` decorators:
```python theme={null}
from langsmith import test
@test
def test_foo() -> None:
pass
```
***
***
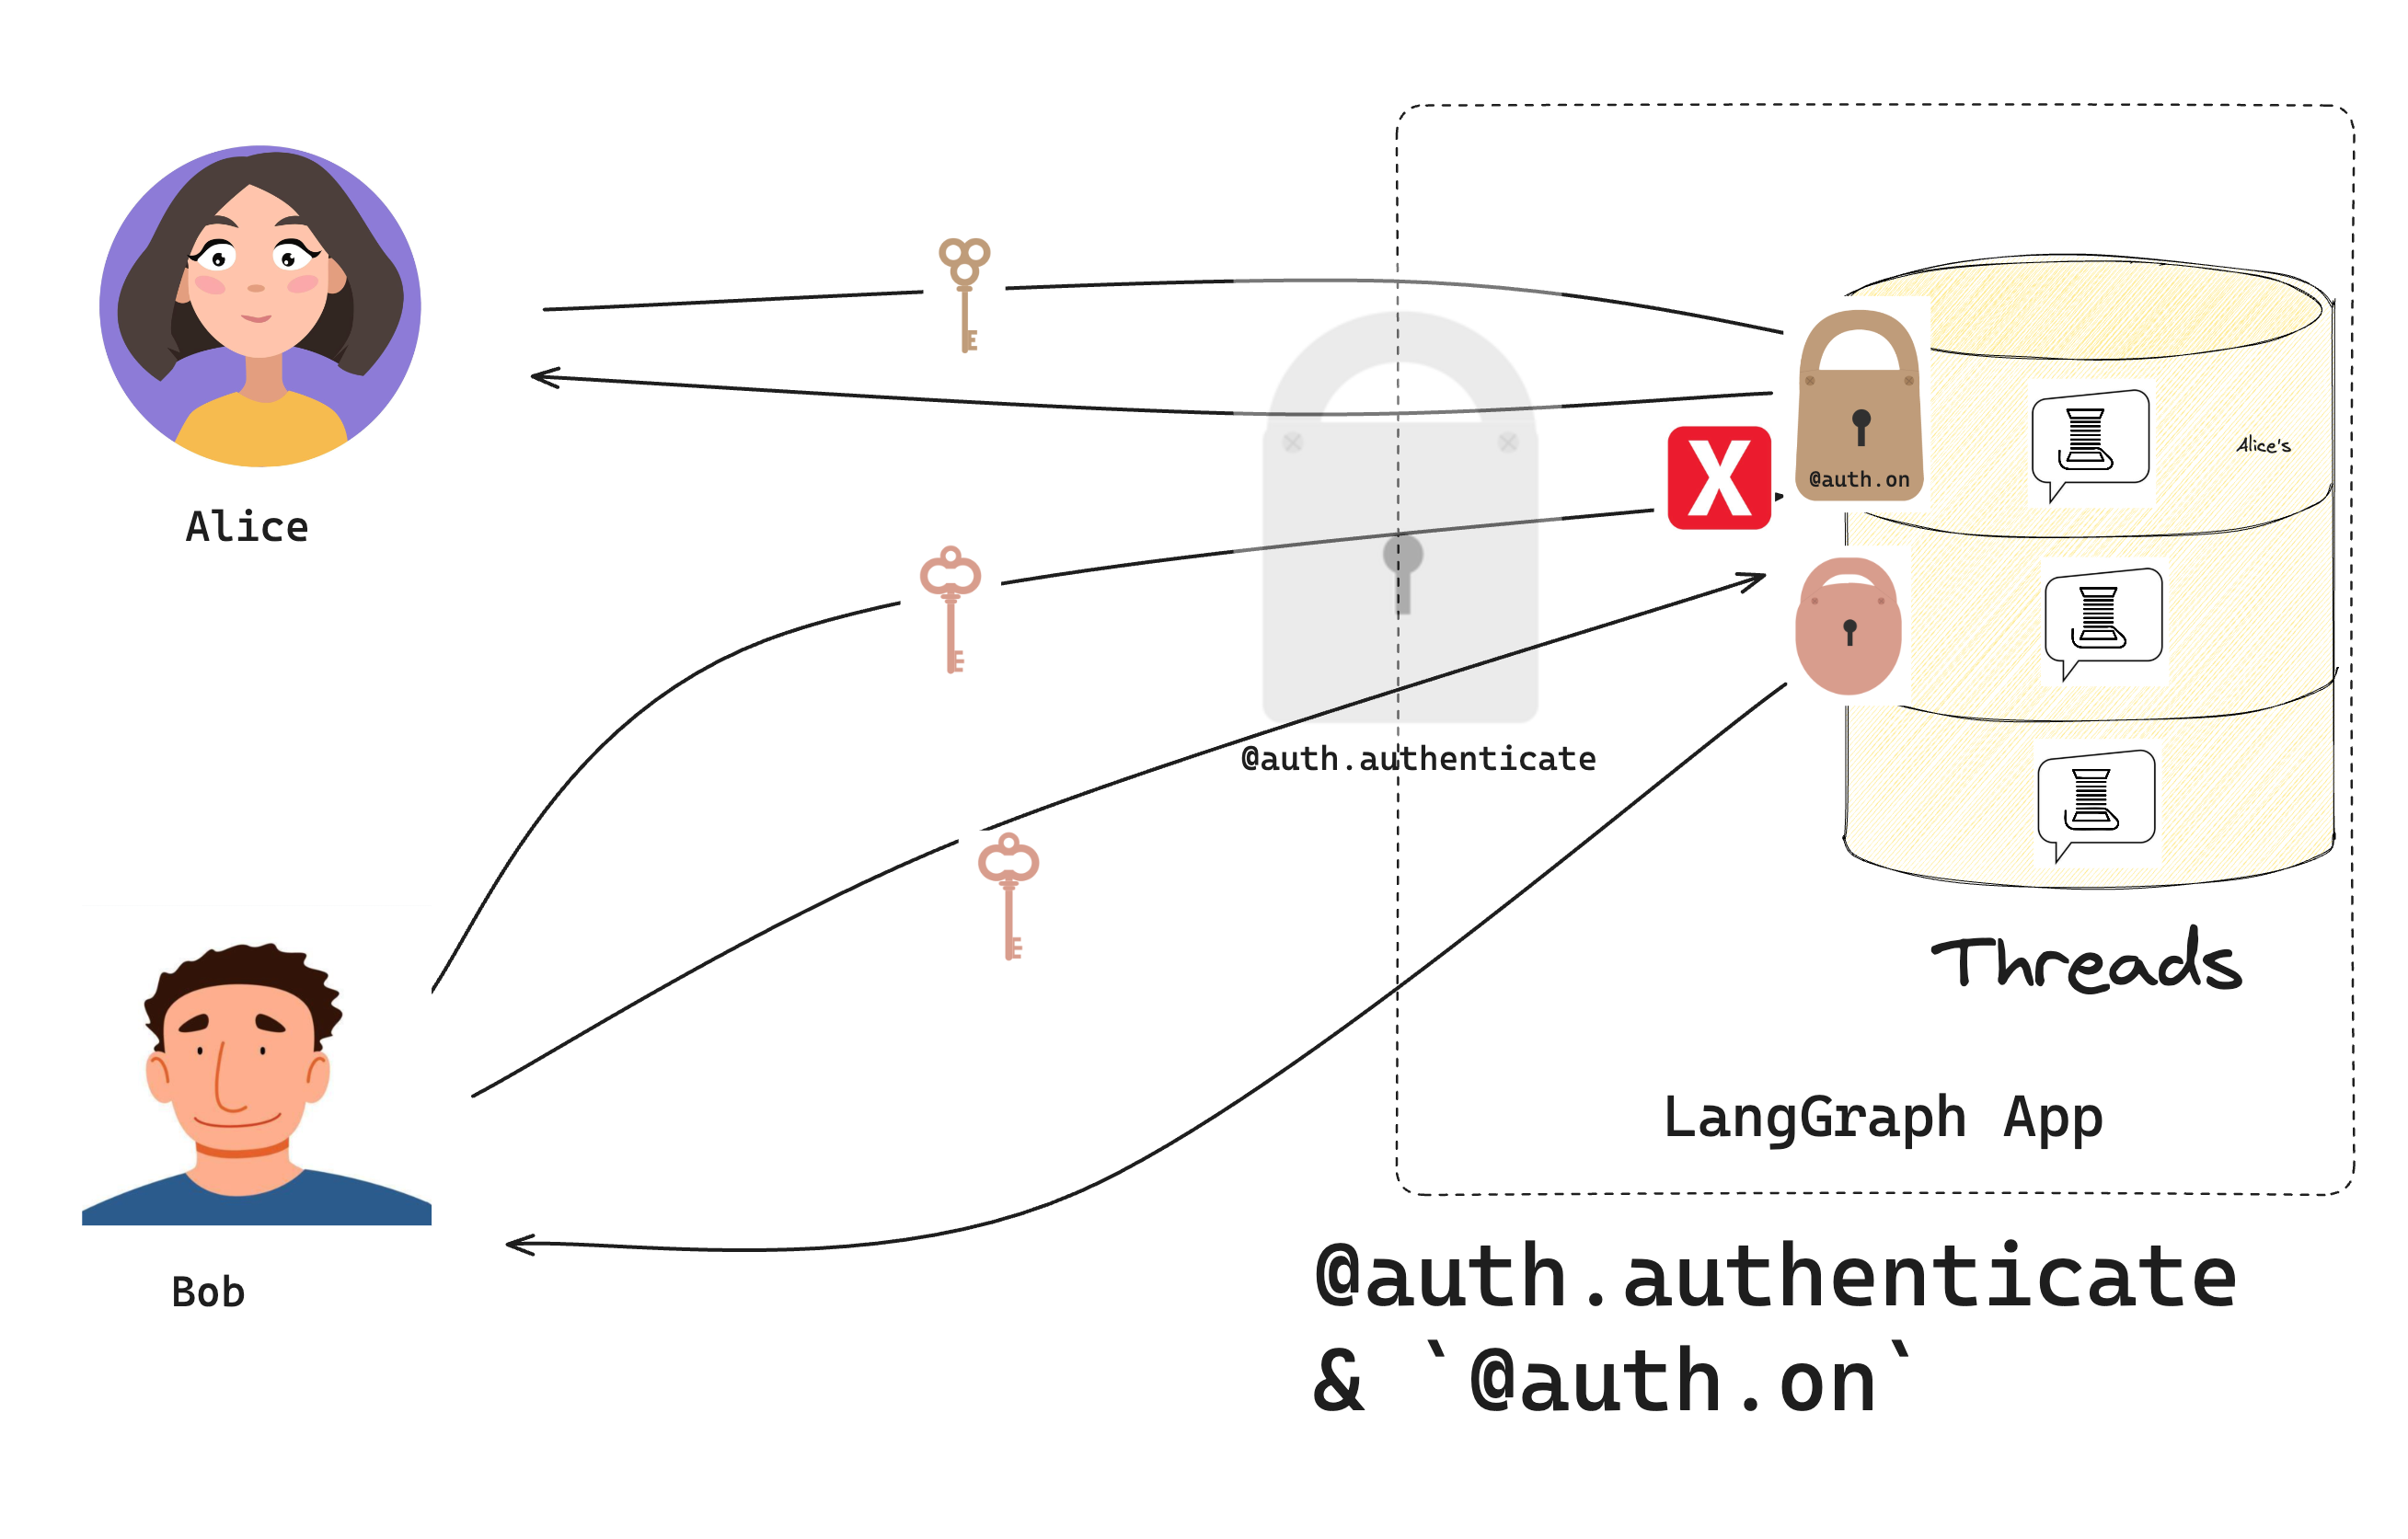 ## Prerequisites
Before you start this tutorial, ensure you have the [bot from the first tutorial](/langsmith/set-up-custom-auth) running without errors.
## 1. Add resource authorization
Recall that in the last tutorial, the [`Auth`](https://reference.langchain.com/python/langsmith/deployment/sdk/#langgraph_sdk.auth.Auth) object lets you register an [authentication function](/langsmith/auth#authentication), which LangSmith uses to validate the bearer tokens in incoming requests. Now you'll use it to register an **authorization** handler.
Authorization handlers are functions that run **after** authentication succeeds. These handlers can add [metadata](/langsmith/auth#filter-operations) to resources (like who owns them) and filter what each user can see.
Update your `src/security/auth.py` and add one authorization handler to run on every request:
```python {highlight={29-39}} title="src/security/auth.py" theme={null}
from langgraph_sdk import Auth
# Keep our test users from the previous tutorial
VALID_TOKENS = {
"user1-token": {"id": "user1", "name": "Alice"},
"user2-token": {"id": "user2", "name": "Bob"},
}
auth = Auth()
@auth.authenticate
async def get_current_user(authorization: str | None) -> Auth.types.MinimalUserDict:
"""Our authentication handler from the previous tutorial."""
assert authorization
scheme, token = authorization.split()
assert scheme.lower() == "bearer"
if token not in VALID_TOKENS:
raise Auth.exceptions.HTTPException(status_code=401, detail="Invalid token")
user_data = VALID_TOKENS[token]
return {
"identity": user_data["id"],
}
@auth.on
async def add_owner(
ctx: Auth.types.AuthContext, # Contains info about the current user
value: dict, # The resource being created/accessed
):
"""Make resources private to their creator."""
# Examples:
# ctx: AuthContext(
# permissions=[],
# user=ProxyUser(
# identity='user1',
# is_authenticated=True,
# display_name='user1'
# ),
# resource='threads',
# action='create_run'
# )
# value:
# {
# 'thread_id': UUID('1e1b2733-303f-4dcd-9620-02d370287d72'),
# 'assistant_id': UUID('fe096781-5601-53d2-b2f6-0d3403f7e9ca'),
# 'run_id': UUID('1efbe268-1627-66d4-aa8d-b956b0f02a41'),
# 'status': 'pending',
# 'metadata': {},
# 'prevent_insert_if_inflight': True,
# 'multitask_strategy': 'reject',
# 'if_not_exists': 'reject',
# 'after_seconds': 0,
# 'kwargs': {
# 'input': {'messages': [{'role': 'user', 'content': 'Hello!'}]},
# 'command': None,
# 'config': {
# 'configurable': {
# 'langgraph_auth_user': ... Your user object...
# 'langgraph_auth_user_id': 'user1'
# }
# },
# 'stream_mode': ['values'],
# 'interrupt_before': None,
# 'interrupt_after': None,
# 'webhook': None,
# 'feedback_keys': None,
# 'temporary': False,
# 'subgraphs': False
# }
# }
# Does 2 things:
# 1. Add the user's ID to the resource's metadata. Each LangGraph resource has a `metadata` dict that persists with the resource.
# this metadata is useful for filtering in read and update operations
# 2. Return a filter that lets users only see their own resources
filters = {"owner": ctx.user.identity}
metadata = value.setdefault("metadata", {})
metadata.update(filters)
# Only let users see their own resources
return filters
```
The handler receives two parameters:
1. `ctx` ([AuthContext](https://reference.langchain.com/python/langsmith/deployment/sdk/#langgraph_sdk.auth.types.AuthContext)): contains info about the current `user`, the user's `permissions`, the `resource` ("threads", "crons", "assistants"), and the `action` being taken ("create", "read", "update", "delete", "search", "create\_run")
2. `value` (`dict`): data that is being created or accessed. The contents of this dict depend on the resource and action being accessed. See [adding scoped authorization handlers](#scoped-authorization) below for information on how to get more tightly scoped access control.
Notice that the simple handler does two things:
1. Adds the user's ID to the resource's metadata.
2. Returns a metadata filter so users only see resources they own.
## 2. Test private conversations
Test your authorization. If you have set things up correctly, you will see all ✅ messages. Be sure to have your development server running (run `langgraph dev`):
```python theme={null}
from langgraph_sdk import get_client
# Create clients for both users
alice = get_client(
url="http://localhost:2024",
headers={"Authorization": "Bearer user1-token"}
)
bob = get_client(
url="http://localhost:2024",
headers={"Authorization": "Bearer user2-token"}
)
# Alice creates an assistant
alice_assistant = await alice.assistants.create()
print(f"✅ Alice created assistant: {alice_assistant['assistant_id']}")
# Alice creates a thread and chats
alice_thread = await alice.threads.create()
print(f"✅ Alice created thread: {alice_thread['thread_id']}")
await alice.runs.create(
thread_id=alice_thread["thread_id"],
assistant_id="agent",
input={"messages": [{"role": "user", "content": "Hi, this is Alice's private chat"}]}
)
# Bob tries to access Alice's thread
try:
await bob.threads.get(alice_thread["thread_id"])
print("❌ Bob shouldn't see Alice's thread!")
except Exception as e:
print("✅ Bob correctly denied access:", e)
# Bob creates his own thread
bob_thread = await bob.threads.create()
await bob.runs.create(
thread_id=bob_thread["thread_id"],
assistant_id="agent",
input={"messages": [{"role": "user", "content": "Hi, this is Bob's private chat"}]}
)
print(f"✅ Bob created his own thread: {bob_thread['thread_id']}")
# List threads - each user only sees their own
alice_threads = await alice.threads.search()
bob_threads = await bob.threads.search()
print(f"✅ Alice sees {len(alice_threads)} thread")
print(f"✅ Bob sees {len(bob_threads)} thread")
```
Output:
```bash theme={null}
✅ Alice created assistant: fc50fb08-78da-45a9-93cc-1d3928a3fc37
✅ Alice created thread: 533179b7-05bc-4d48-b47a-a83cbdb5781d
✅ Bob correctly denied access: Client error '404 Not Found' for url 'http://localhost:2024/threads/533179b7-05bc-4d48-b47a-a83cbdb5781d'
For more information check: https://developer.mozilla.org/en-US/docs/Web/HTTP/Status/404
✅ Bob created his own thread: 437c36ed-dd45-4a1e-b484-28ba6eca8819
✅ Alice sees 1 thread
✅ Bob sees 1 thread
```
This means:
1. Each user can create and chat in their own threads
2. Users can't see each other's threads
3. Listing threads only shows your own
## 3. Add scoped authorization handlers
The broad `@auth.on` handler matches on all [authorization events](/langsmith/auth#supported-resources). This is concise, but it means the contents of the `value` dict are not well-scoped, and the same user-level access control is applied to every resource. If you want to be more fine-grained, you can also control specific actions on resources.
Update `src/security/auth.py` to add handlers for specific resource types:
```python theme={null}
# Keep our previous handlers...
from langgraph_sdk import Auth
@auth.on.threads.create
async def on_thread_create(
ctx: Auth.types.AuthContext,
value: Auth.types.on.threads.create.value,
):
"""Add owner when creating threads.
This handler runs when creating new threads and does two things:
1. Sets metadata on the thread being created to track ownership
2. Returns a filter that ensures only the creator can access it
"""
# Example value:
# {'thread_id': UUID('99b045bc-b90b-41a8-b882-dabc541cf740'), 'metadata': {}, 'if_exists': 'raise'}
# Add owner metadata to the thread being created
# This metadata is stored with the thread and persists
metadata = value.setdefault("metadata", {})
metadata["owner"] = ctx.user.identity
# Return filter to restrict access to just the creator
return {"owner": ctx.user.identity}
@auth.on.threads.read
async def on_thread_read(
ctx: Auth.types.AuthContext,
value: Auth.types.on.threads.read.value,
):
"""Only let users read their own threads.
This handler runs on read operations. We don't need to set
metadata since the thread already exists - we just need to
return a filter to ensure users can only see their own threads.
"""
return {"owner": ctx.user.identity}
@auth.on.assistants
async def on_assistants(
ctx: Auth.types.AuthContext,
value: Auth.types.on.assistants.value,
):
# For illustration purposes, we will deny all requests
# that touch the assistants resource
# Example value:
# {
# 'assistant_id': UUID('63ba56c3-b074-4212-96e2-cc333bbc4eb4'),
# 'graph_id': 'agent',
# 'config': {},
# 'metadata': {},
# 'name': 'Untitled'
# }
raise Auth.exceptions.HTTPException(
status_code=403,
detail="User lacks the required permissions.",
)
# Assumes you organize information in store like (user_id, resource_type, resource_id)
@auth.on.store()
async def authorize_store(ctx: Auth.types.AuthContext, value: dict):
# The "namespace" field for each store item is a tuple you can think of as the directory of an item.
namespace: tuple = value["namespace"]
assert namespace[0] == ctx.user.identity, "Not authorized"
```
Notice that instead of one global handler, you now have specific handlers for:
1. Creating threads
2. Reading threads
3. Accessing assistants
The first three of these match specific **actions** on each resource (see [resource actions](/langsmith/auth#resource-specific-handlers)), while the last one (`@auth.on.assistants`) matches *any* action on the `assistants` resource. For each request, LangGraph will run the most specific handler that matches the resource and action being accessed. This means that the four handlers above will run rather than the broadly scoped "`@auth.on`" handler.
Try adding the following test code to your test file:
```python theme={null}
# ... Same as before
# Try creating an assistant. This should fail
try:
await alice.assistants.create("agent")
print("❌ Alice shouldn't be able to create assistants!")
except Exception as e:
print("✅ Alice correctly denied access:", e)
# Try searching for assistants. This also should fail
try:
await alice.assistants.search()
print("❌ Alice shouldn't be able to search assistants!")
except Exception as e:
print("✅ Alice correctly denied access to searching assistants:", e)
# Alice can still create threads
alice_thread = await alice.threads.create()
print(f"✅ Alice created thread: {alice_thread['thread_id']}")
```
Output:
```bash theme={null}
✅ Alice created thread: dcea5cd8-eb70-4a01-a4b6-643b14e8f754
✅ Bob correctly denied access: Client error '404 Not Found' for url 'http://localhost:2024/threads/dcea5cd8-eb70-4a01-a4b6-643b14e8f754'
For more information check: https://developer.mozilla.org/en-US/docs/Web/HTTP/Status/404
✅ Bob created his own thread: 400f8d41-e946-429f-8f93-4fe395bc3eed
✅ Alice sees 1 thread
✅ Bob sees 1 thread
✅ Alice correctly denied access:
For more information check: https://developer.mozilla.org/en-US/docs/Web/HTTP/Status/500
✅ Alice correctly denied access to searching assistants:
```
Congratulations! You've built a chatbot where each user has their own private conversations. While this system uses simple token-based authentication, these authorization patterns will work with implementing any real authentication system. In the next tutorial, you'll replace your test users with real user accounts using OAuth2.
## Next steps
Now that you can control access to resources, you might want to:
1. Move on to [Connect an authentication provider](/langsmith/add-auth-server) to add real user accounts.
2. Read more about [authorization patterns](/langsmith/auth#authorization).
3. Check out the [API reference](https://reference.langchain.com/python/langsmith/deployment/sdk/#langgraph_sdk.auth.Auth) for details about the interfaces and methods used in this tutorial.
***
## Prerequisites
Before you start this tutorial, ensure you have the [bot from the first tutorial](/langsmith/set-up-custom-auth) running without errors.
## 1. Add resource authorization
Recall that in the last tutorial, the [`Auth`](https://reference.langchain.com/python/langsmith/deployment/sdk/#langgraph_sdk.auth.Auth) object lets you register an [authentication function](/langsmith/auth#authentication), which LangSmith uses to validate the bearer tokens in incoming requests. Now you'll use it to register an **authorization** handler.
Authorization handlers are functions that run **after** authentication succeeds. These handlers can add [metadata](/langsmith/auth#filter-operations) to resources (like who owns them) and filter what each user can see.
Update your `src/security/auth.py` and add one authorization handler to run on every request:
```python {highlight={29-39}} title="src/security/auth.py" theme={null}
from langgraph_sdk import Auth
# Keep our test users from the previous tutorial
VALID_TOKENS = {
"user1-token": {"id": "user1", "name": "Alice"},
"user2-token": {"id": "user2", "name": "Bob"},
}
auth = Auth()
@auth.authenticate
async def get_current_user(authorization: str | None) -> Auth.types.MinimalUserDict:
"""Our authentication handler from the previous tutorial."""
assert authorization
scheme, token = authorization.split()
assert scheme.lower() == "bearer"
if token not in VALID_TOKENS:
raise Auth.exceptions.HTTPException(status_code=401, detail="Invalid token")
user_data = VALID_TOKENS[token]
return {
"identity": user_data["id"],
}
@auth.on
async def add_owner(
ctx: Auth.types.AuthContext, # Contains info about the current user
value: dict, # The resource being created/accessed
):
"""Make resources private to their creator."""
# Examples:
# ctx: AuthContext(
# permissions=[],
# user=ProxyUser(
# identity='user1',
# is_authenticated=True,
# display_name='user1'
# ),
# resource='threads',
# action='create_run'
# )
# value:
# {
# 'thread_id': UUID('1e1b2733-303f-4dcd-9620-02d370287d72'),
# 'assistant_id': UUID('fe096781-5601-53d2-b2f6-0d3403f7e9ca'),
# 'run_id': UUID('1efbe268-1627-66d4-aa8d-b956b0f02a41'),
# 'status': 'pending',
# 'metadata': {},
# 'prevent_insert_if_inflight': True,
# 'multitask_strategy': 'reject',
# 'if_not_exists': 'reject',
# 'after_seconds': 0,
# 'kwargs': {
# 'input': {'messages': [{'role': 'user', 'content': 'Hello!'}]},
# 'command': None,
# 'config': {
# 'configurable': {
# 'langgraph_auth_user': ... Your user object...
# 'langgraph_auth_user_id': 'user1'
# }
# },
# 'stream_mode': ['values'],
# 'interrupt_before': None,
# 'interrupt_after': None,
# 'webhook': None,
# 'feedback_keys': None,
# 'temporary': False,
# 'subgraphs': False
# }
# }
# Does 2 things:
# 1. Add the user's ID to the resource's metadata. Each LangGraph resource has a `metadata` dict that persists with the resource.
# this metadata is useful for filtering in read and update operations
# 2. Return a filter that lets users only see their own resources
filters = {"owner": ctx.user.identity}
metadata = value.setdefault("metadata", {})
metadata.update(filters)
# Only let users see their own resources
return filters
```
The handler receives two parameters:
1. `ctx` ([AuthContext](https://reference.langchain.com/python/langsmith/deployment/sdk/#langgraph_sdk.auth.types.AuthContext)): contains info about the current `user`, the user's `permissions`, the `resource` ("threads", "crons", "assistants"), and the `action` being taken ("create", "read", "update", "delete", "search", "create\_run")
2. `value` (`dict`): data that is being created or accessed. The contents of this dict depend on the resource and action being accessed. See [adding scoped authorization handlers](#scoped-authorization) below for information on how to get more tightly scoped access control.
Notice that the simple handler does two things:
1. Adds the user's ID to the resource's metadata.
2. Returns a metadata filter so users only see resources they own.
## 2. Test private conversations
Test your authorization. If you have set things up correctly, you will see all ✅ messages. Be sure to have your development server running (run `langgraph dev`):
```python theme={null}
from langgraph_sdk import get_client
# Create clients for both users
alice = get_client(
url="http://localhost:2024",
headers={"Authorization": "Bearer user1-token"}
)
bob = get_client(
url="http://localhost:2024",
headers={"Authorization": "Bearer user2-token"}
)
# Alice creates an assistant
alice_assistant = await alice.assistants.create()
print(f"✅ Alice created assistant: {alice_assistant['assistant_id']}")
# Alice creates a thread and chats
alice_thread = await alice.threads.create()
print(f"✅ Alice created thread: {alice_thread['thread_id']}")
await alice.runs.create(
thread_id=alice_thread["thread_id"],
assistant_id="agent",
input={"messages": [{"role": "user", "content": "Hi, this is Alice's private chat"}]}
)
# Bob tries to access Alice's thread
try:
await bob.threads.get(alice_thread["thread_id"])
print("❌ Bob shouldn't see Alice's thread!")
except Exception as e:
print("✅ Bob correctly denied access:", e)
# Bob creates his own thread
bob_thread = await bob.threads.create()
await bob.runs.create(
thread_id=bob_thread["thread_id"],
assistant_id="agent",
input={"messages": [{"role": "user", "content": "Hi, this is Bob's private chat"}]}
)
print(f"✅ Bob created his own thread: {bob_thread['thread_id']}")
# List threads - each user only sees their own
alice_threads = await alice.threads.search()
bob_threads = await bob.threads.search()
print(f"✅ Alice sees {len(alice_threads)} thread")
print(f"✅ Bob sees {len(bob_threads)} thread")
```
Output:
```bash theme={null}
✅ Alice created assistant: fc50fb08-78da-45a9-93cc-1d3928a3fc37
✅ Alice created thread: 533179b7-05bc-4d48-b47a-a83cbdb5781d
✅ Bob correctly denied access: Client error '404 Not Found' for url 'http://localhost:2024/threads/533179b7-05bc-4d48-b47a-a83cbdb5781d'
For more information check: https://developer.mozilla.org/en-US/docs/Web/HTTP/Status/404
✅ Bob created his own thread: 437c36ed-dd45-4a1e-b484-28ba6eca8819
✅ Alice sees 1 thread
✅ Bob sees 1 thread
```
This means:
1. Each user can create and chat in their own threads
2. Users can't see each other's threads
3. Listing threads only shows your own
## 3. Add scoped authorization handlers
The broad `@auth.on` handler matches on all [authorization events](/langsmith/auth#supported-resources). This is concise, but it means the contents of the `value` dict are not well-scoped, and the same user-level access control is applied to every resource. If you want to be more fine-grained, you can also control specific actions on resources.
Update `src/security/auth.py` to add handlers for specific resource types:
```python theme={null}
# Keep our previous handlers...
from langgraph_sdk import Auth
@auth.on.threads.create
async def on_thread_create(
ctx: Auth.types.AuthContext,
value: Auth.types.on.threads.create.value,
):
"""Add owner when creating threads.
This handler runs when creating new threads and does two things:
1. Sets metadata on the thread being created to track ownership
2. Returns a filter that ensures only the creator can access it
"""
# Example value:
# {'thread_id': UUID('99b045bc-b90b-41a8-b882-dabc541cf740'), 'metadata': {}, 'if_exists': 'raise'}
# Add owner metadata to the thread being created
# This metadata is stored with the thread and persists
metadata = value.setdefault("metadata", {})
metadata["owner"] = ctx.user.identity
# Return filter to restrict access to just the creator
return {"owner": ctx.user.identity}
@auth.on.threads.read
async def on_thread_read(
ctx: Auth.types.AuthContext,
value: Auth.types.on.threads.read.value,
):
"""Only let users read their own threads.
This handler runs on read operations. We don't need to set
metadata since the thread already exists - we just need to
return a filter to ensure users can only see their own threads.
"""
return {"owner": ctx.user.identity}
@auth.on.assistants
async def on_assistants(
ctx: Auth.types.AuthContext,
value: Auth.types.on.assistants.value,
):
# For illustration purposes, we will deny all requests
# that touch the assistants resource
# Example value:
# {
# 'assistant_id': UUID('63ba56c3-b074-4212-96e2-cc333bbc4eb4'),
# 'graph_id': 'agent',
# 'config': {},
# 'metadata': {},
# 'name': 'Untitled'
# }
raise Auth.exceptions.HTTPException(
status_code=403,
detail="User lacks the required permissions.",
)
# Assumes you organize information in store like (user_id, resource_type, resource_id)
@auth.on.store()
async def authorize_store(ctx: Auth.types.AuthContext, value: dict):
# The "namespace" field for each store item is a tuple you can think of as the directory of an item.
namespace: tuple = value["namespace"]
assert namespace[0] == ctx.user.identity, "Not authorized"
```
Notice that instead of one global handler, you now have specific handlers for:
1. Creating threads
2. Reading threads
3. Accessing assistants
The first three of these match specific **actions** on each resource (see [resource actions](/langsmith/auth#resource-specific-handlers)), while the last one (`@auth.on.assistants`) matches *any* action on the `assistants` resource. For each request, LangGraph will run the most specific handler that matches the resource and action being accessed. This means that the four handlers above will run rather than the broadly scoped "`@auth.on`" handler.
Try adding the following test code to your test file:
```python theme={null}
# ... Same as before
# Try creating an assistant. This should fail
try:
await alice.assistants.create("agent")
print("❌ Alice shouldn't be able to create assistants!")
except Exception as e:
print("✅ Alice correctly denied access:", e)
# Try searching for assistants. This also should fail
try:
await alice.assistants.search()
print("❌ Alice shouldn't be able to search assistants!")
except Exception as e:
print("✅ Alice correctly denied access to searching assistants:", e)
# Alice can still create threads
alice_thread = await alice.threads.create()
print(f"✅ Alice created thread: {alice_thread['thread_id']}")
```
Output:
```bash theme={null}
✅ Alice created thread: dcea5cd8-eb70-4a01-a4b6-643b14e8f754
✅ Bob correctly denied access: Client error '404 Not Found' for url 'http://localhost:2024/threads/dcea5cd8-eb70-4a01-a4b6-643b14e8f754'
For more information check: https://developer.mozilla.org/en-US/docs/Web/HTTP/Status/404
✅ Bob created his own thread: 400f8d41-e946-429f-8f93-4fe395bc3eed
✅ Alice sees 1 thread
✅ Bob sees 1 thread
✅ Alice correctly denied access:
For more information check: https://developer.mozilla.org/en-US/docs/Web/HTTP/Status/500
✅ Alice correctly denied access to searching assistants:
```
Congratulations! You've built a chatbot where each user has their own private conversations. While this system uses simple token-based authentication, these authorization patterns will work with implementing any real authentication system. In the next tutorial, you'll replace your test users with real user accounts using OAuth2.
## Next steps
Now that you can control access to resources, you might want to:
1. Move on to [Connect an authentication provider](/langsmith/add-auth-server) to add real user accounts.
2. Read more about [authorization patterns](/langsmith/auth#authorization).
3. Check out the [API reference](https://reference.langchain.com/python/langsmith/deployment/sdk/#langgraph_sdk.auth.Auth) for details about the interfaces and methods used in this tutorial.
***
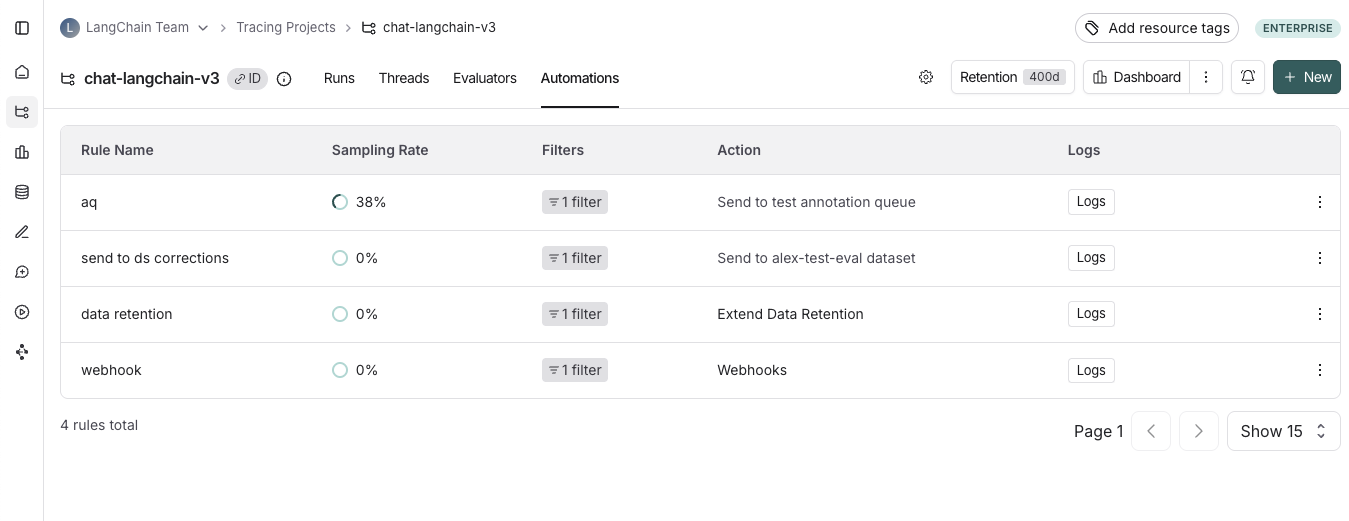 ## Create a rule
 #### 1. Navigate to rule creation
Head to the **Tracing Projects** tab and select a tracing project. Click on **+ New** in the top right corner of the tracing project page, then click on **New Automation**.
#### 2. Name your rule
#### 3. Create a filter
Automation rule filters work the same way as filters applied to traces in the project. For more information on filters, you can refer to [this guide](./filter-traces-in-application)
#### 4. Configure a sampling rate
Configure a sampling rate to control the percentage of filtered runs that trigger the automation action.
You can specify a sampling rate between 0 and 1 for automations. This will control the percent of the filtered runs that are sent to an automation action. For example, if you set the sampling rate to 0.5, then 50% of the traces that pass the filter will be sent to the action.
#### 5. (Optional) Apply rule to past runs
Apply rule to past runs by toggling the **Apply to past runs** and entering a "Backfill from" date. This is only possible upon rule creation. Note: the backfill is processed as a background job, so you will not see the results immediately. In order to track progress of the backfill, you can [view logs for your automations](./rules#view-logs-for-your-automations)
#### 6. Select an action to trigger when the rule is applied.
There are four actions you can take with an automation rule:
* **Add to dataset**: Add the inputs and outputs of the trace to a [dataset](/langsmith/evaluation-concepts#datasets).
* **Add to annotation queue**: Add the trace to an [annotation queue](/langsmith/evaluation-concepts#annotation-queues).
* **Trigger webhook**: Trigger a webhook with the trace data. For more information on webhooks, you can refer to [this guide](./webhooks).
* **Extend data retention**: Extends the data retention period on matching traces that use base retention [(see data retention docs for more details)](/langsmith/administration-overview#data-retention).
Note that all other rules will also extend data retention on matching traces through the
auto-upgrade mechanism described in the aforementioned data retention docs,
but this rule takes no additional action.
## View logs for your automations
Logs allow you to gain confidence that your rules are working as expected. You can view logs for your automations by heading to the **Automations** tab within a tracing project and clicking the **Logs** button for the rule you created.
The logs tab allows you to:
* View all runs processed by a given rule for the time period selected
* If a particular rule execution has triggered an error, you can view the error message by hovering over the error icon
* You can monitor the progress of a backfill job by filtering to the rule's creation timestamp. This is because the backfill starts from when the rule was created.
* Inspect the run that the automation rule applied to using the **View run** button. For rules that add runs as examples to datasets, you can view the example produced.
#### 1. Navigate to rule creation
Head to the **Tracing Projects** tab and select a tracing project. Click on **+ New** in the top right corner of the tracing project page, then click on **New Automation**.
#### 2. Name your rule
#### 3. Create a filter
Automation rule filters work the same way as filters applied to traces in the project. For more information on filters, you can refer to [this guide](./filter-traces-in-application)
#### 4. Configure a sampling rate
Configure a sampling rate to control the percentage of filtered runs that trigger the automation action.
You can specify a sampling rate between 0 and 1 for automations. This will control the percent of the filtered runs that are sent to an automation action. For example, if you set the sampling rate to 0.5, then 50% of the traces that pass the filter will be sent to the action.
#### 5. (Optional) Apply rule to past runs
Apply rule to past runs by toggling the **Apply to past runs** and entering a "Backfill from" date. This is only possible upon rule creation. Note: the backfill is processed as a background job, so you will not see the results immediately. In order to track progress of the backfill, you can [view logs for your automations](./rules#view-logs-for-your-automations)
#### 6. Select an action to trigger when the rule is applied.
There are four actions you can take with an automation rule:
* **Add to dataset**: Add the inputs and outputs of the trace to a [dataset](/langsmith/evaluation-concepts#datasets).
* **Add to annotation queue**: Add the trace to an [annotation queue](/langsmith/evaluation-concepts#annotation-queues).
* **Trigger webhook**: Trigger a webhook with the trace data. For more information on webhooks, you can refer to [this guide](./webhooks).
* **Extend data retention**: Extends the data retention period on matching traces that use base retention [(see data retention docs for more details)](/langsmith/administration-overview#data-retention).
Note that all other rules will also extend data retention on matching traces through the
auto-upgrade mechanism described in the aforementioned data retention docs,
but this rule takes no additional action.
## View logs for your automations
Logs allow you to gain confidence that your rules are working as expected. You can view logs for your automations by heading to the **Automations** tab within a tracing project and clicking the **Logs** button for the rule you created.
The logs tab allows you to:
* View all runs processed by a given rule for the time period selected
* If a particular rule execution has triggered an error, you can view the error message by hovering over the error icon
* You can monitor the progress of a backfill job by filtering to the rule's creation timestamp. This is because the backfill starts from when the rule was created.
* Inspect the run that the automation rule applied to using the **View run** button. For rules that add runs as examples to datasets, you can view the example produced.
 ## Video guide
***
## Video guide
***
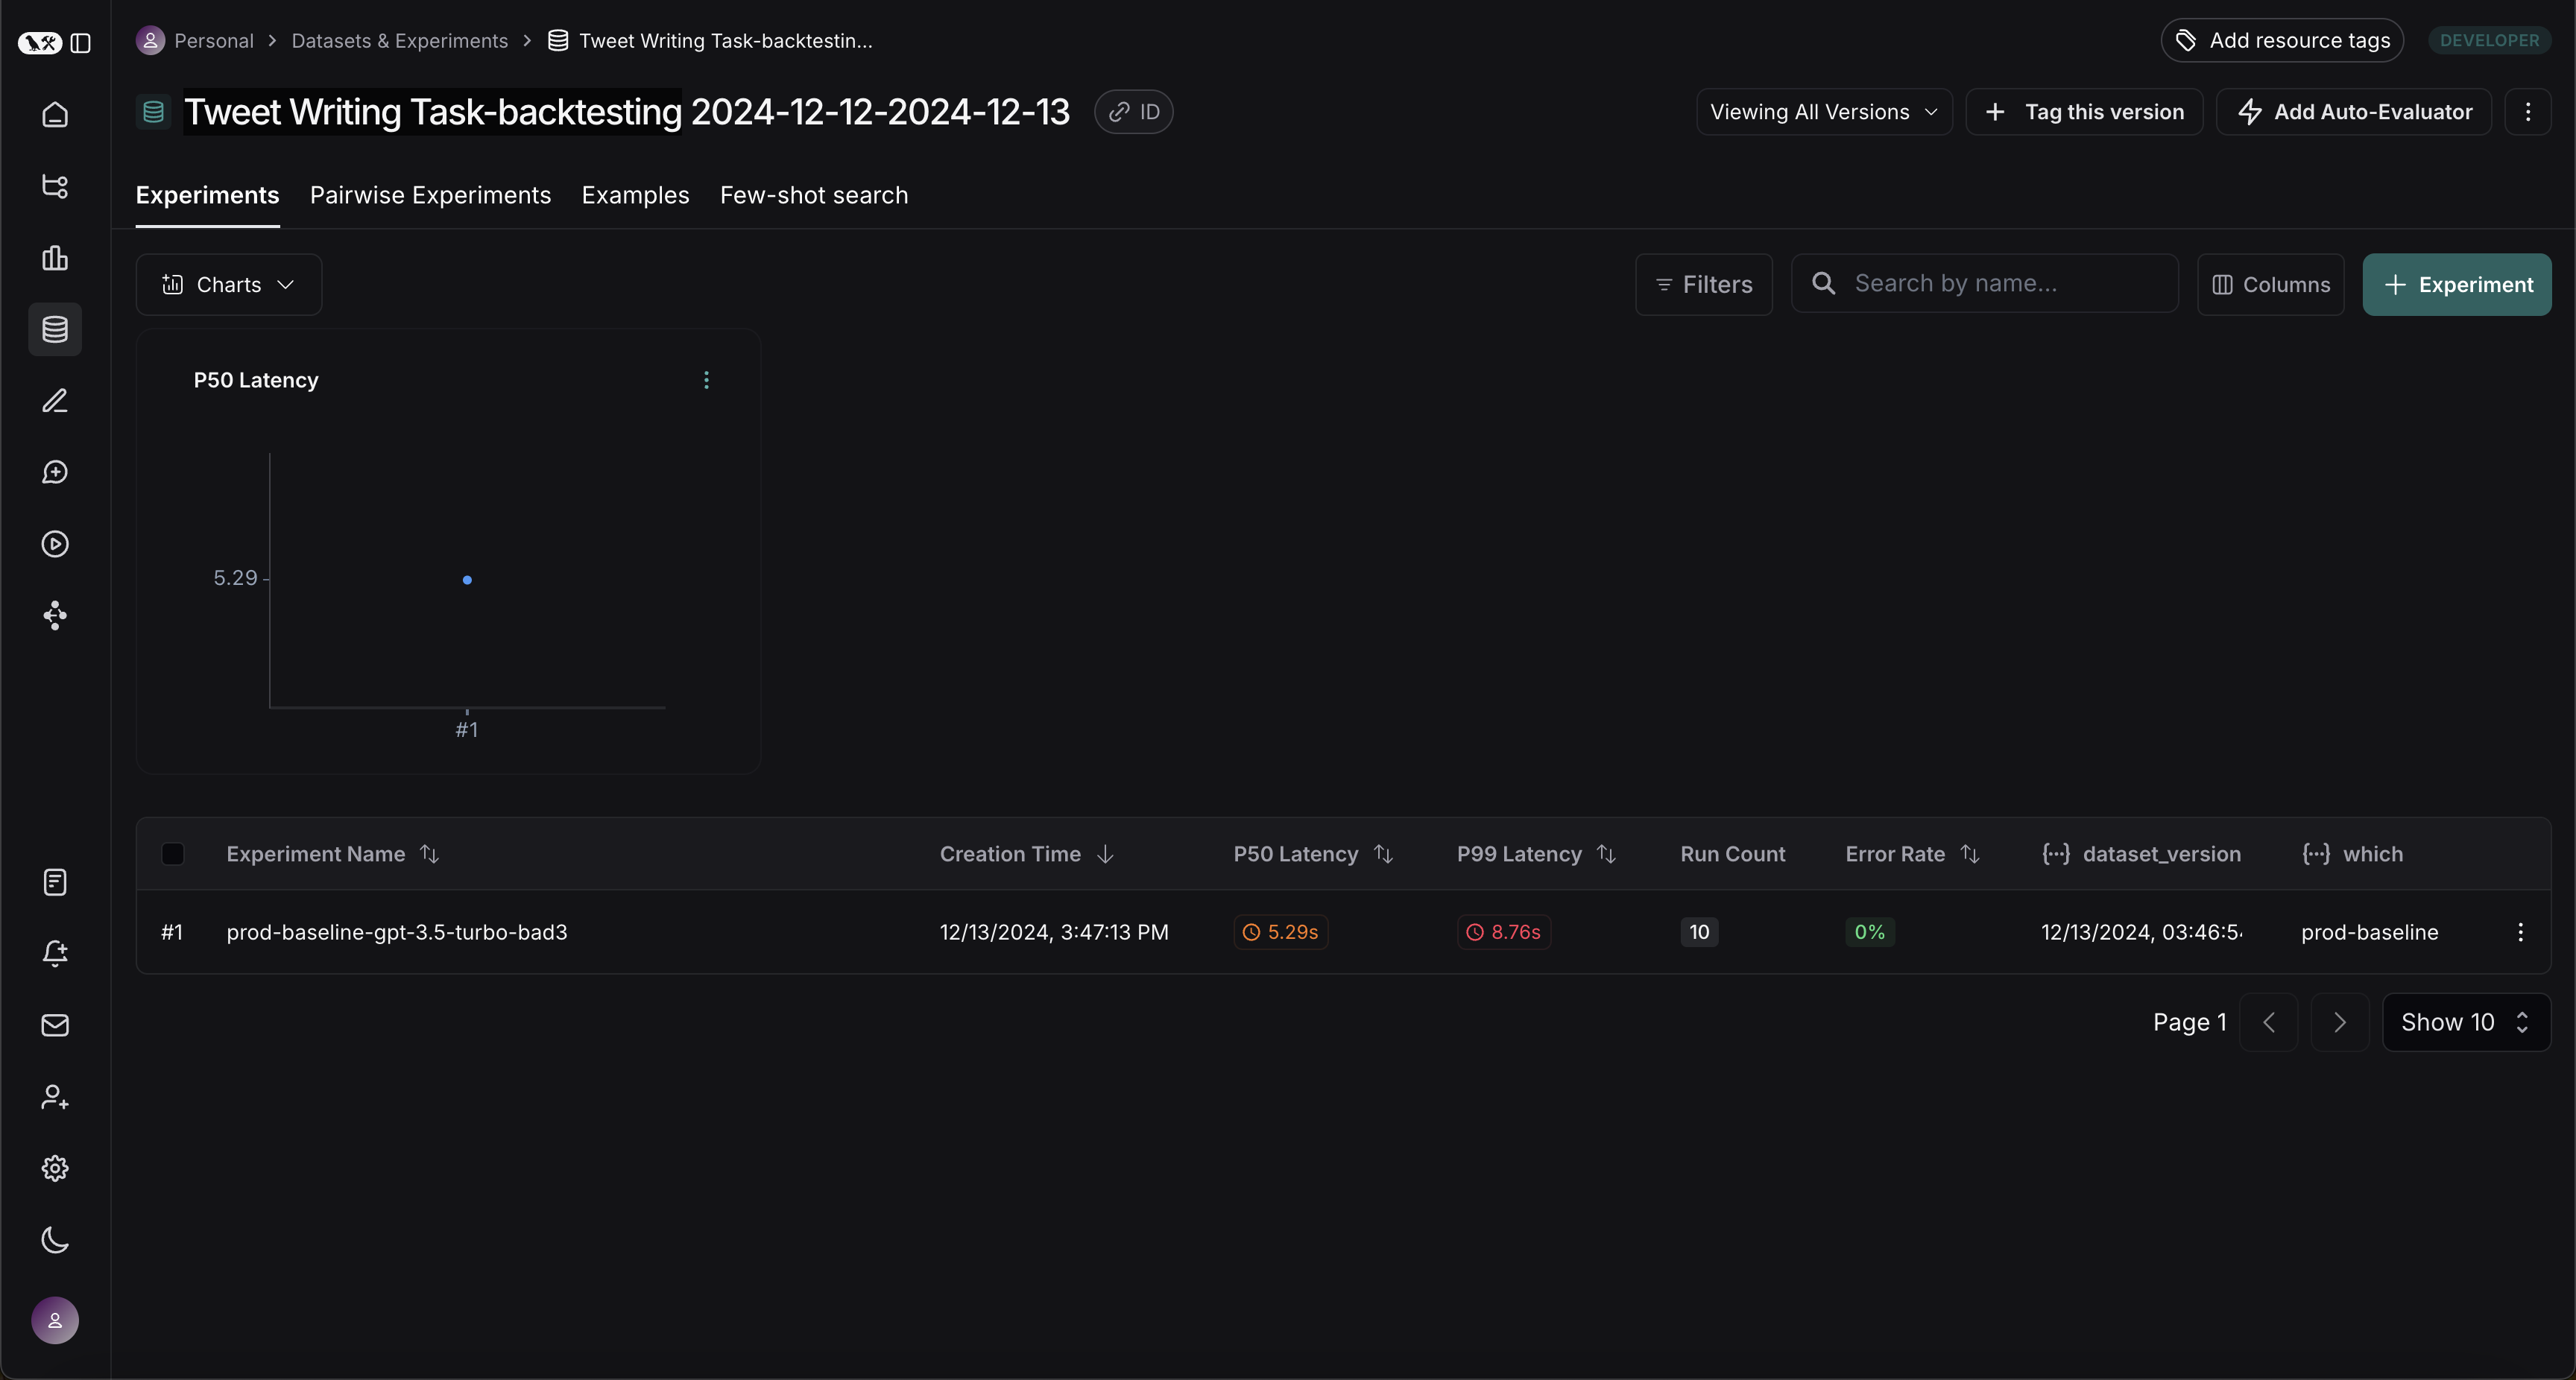 ## Benchmark against new system
Now we can start the process of benchmarking our production runs against a new system.
### Define evaluators
First let's define the evaluators we will use to compare the two systems. Note that we have no reference outputs, so we'll need to come up with evaluation metrics that only require the actual outputs.
```python theme={null}
import emoji
from pydantic import BaseModel, Field
from langchain_core.messages import convert_to_openai_messages
class Grade(BaseModel):
"""Grade whether a response is supported by some context."""
grounded: bool = Field(..., description="Is the majority of the response supported by the retrieved context?")
grounded_instructions = f"""You have given somebody some contextual information and asked them to write a statement grounded in that context.
Grade whether their response is fully supported by the context you have provided. \
If any meaningful part of their statement is not backed up directly by the context you provided, then their response is not grounded. \
Otherwise it is grounded."""
grounded_model = init_chat_model(model="gpt-4o").with_structured_output(Grade)
def lt_280_chars(outputs: dict) -> bool:
messages = convert_to_openai_messages(outputs["messages"])
return len(messages[-1]['content']) <= 280
def gte_3_emojis(outputs: dict) -> bool:
messages = convert_to_openai_messages(outputs["messages"])
return len(emoji.emoji_list(messages[-1]['content'])) >= 3
async def is_grounded(outputs: dict) -> bool:
context = ""
messages = convert_to_openai_messages(outputs["messages"])
for message in messages:
if message["role"] == "tool":
# Tool message outputs are the results returned from the Tavily/DuckDuckGo tool
context += "\n\n" + message["content"]
tweet = messages[-1]["content"]
user = f"""CONTEXT PROVIDED:
{context}
RESPONSE GIVEN:
{tweet}"""
grade = await grounded_model.ainvoke([
{"role": "system", "content": grounded_instructions},
{"role": "user", "content": user}
])
return grade.grounded
```
### Evaluate baseline
Now, let's run our evaluators against the baseline experiment.
```python theme={null}
baseline_results = await client.aevaluate(
baseline_experiment_name,
evaluators=[lt_280_chars, gte_3_emojis, is_grounded],
)
# If you have pandas installed can easily explore results as df:
# baseline_results.to_pandas()
```
### Define and evaluate new system
Now, let's define and evaluate our new system. In this example our new system will be the same as the old system, but will use GPT-4o instead of GPT-3.5. Since we've made our model configurable we can just update the default config passed to our agent:
```python theme={null}
candidate_results = await client.aevaluate(
agent.with_config(model="gpt-4o"),
data=dataset_name,
evaluators=[lt_280_chars, gte_3_emojis, is_grounded],
experiment_prefix="candidate-gpt-4o",
)
# If you have pandas installed can easily explore results as df:
# candidate_results.to_pandas()
```
## Comparing the results
After running both experiments, you can view them in your dataset:
## Benchmark against new system
Now we can start the process of benchmarking our production runs against a new system.
### Define evaluators
First let's define the evaluators we will use to compare the two systems. Note that we have no reference outputs, so we'll need to come up with evaluation metrics that only require the actual outputs.
```python theme={null}
import emoji
from pydantic import BaseModel, Field
from langchain_core.messages import convert_to_openai_messages
class Grade(BaseModel):
"""Grade whether a response is supported by some context."""
grounded: bool = Field(..., description="Is the majority of the response supported by the retrieved context?")
grounded_instructions = f"""You have given somebody some contextual information and asked them to write a statement grounded in that context.
Grade whether their response is fully supported by the context you have provided. \
If any meaningful part of their statement is not backed up directly by the context you provided, then their response is not grounded. \
Otherwise it is grounded."""
grounded_model = init_chat_model(model="gpt-4o").with_structured_output(Grade)
def lt_280_chars(outputs: dict) -> bool:
messages = convert_to_openai_messages(outputs["messages"])
return len(messages[-1]['content']) <= 280
def gte_3_emojis(outputs: dict) -> bool:
messages = convert_to_openai_messages(outputs["messages"])
return len(emoji.emoji_list(messages[-1]['content'])) >= 3
async def is_grounded(outputs: dict) -> bool:
context = ""
messages = convert_to_openai_messages(outputs["messages"])
for message in messages:
if message["role"] == "tool":
# Tool message outputs are the results returned from the Tavily/DuckDuckGo tool
context += "\n\n" + message["content"]
tweet = messages[-1]["content"]
user = f"""CONTEXT PROVIDED:
{context}
RESPONSE GIVEN:
{tweet}"""
grade = await grounded_model.ainvoke([
{"role": "system", "content": grounded_instructions},
{"role": "user", "content": user}
])
return grade.grounded
```
### Evaluate baseline
Now, let's run our evaluators against the baseline experiment.
```python theme={null}
baseline_results = await client.aevaluate(
baseline_experiment_name,
evaluators=[lt_280_chars, gte_3_emojis, is_grounded],
)
# If you have pandas installed can easily explore results as df:
# baseline_results.to_pandas()
```
### Define and evaluate new system
Now, let's define and evaluate our new system. In this example our new system will be the same as the old system, but will use GPT-4o instead of GPT-3.5. Since we've made our model configurable we can just update the default config passed to our agent:
```python theme={null}
candidate_results = await client.aevaluate(
agent.with_config(model="gpt-4o"),
data=dataset_name,
evaluators=[lt_280_chars, gte_3_emojis, is_grounded],
experiment_prefix="candidate-gpt-4o",
)
# If you have pandas installed can easily explore results as df:
# candidate_results.to_pandas()
```
## Comparing the results
After running both experiments, you can view them in your dataset:
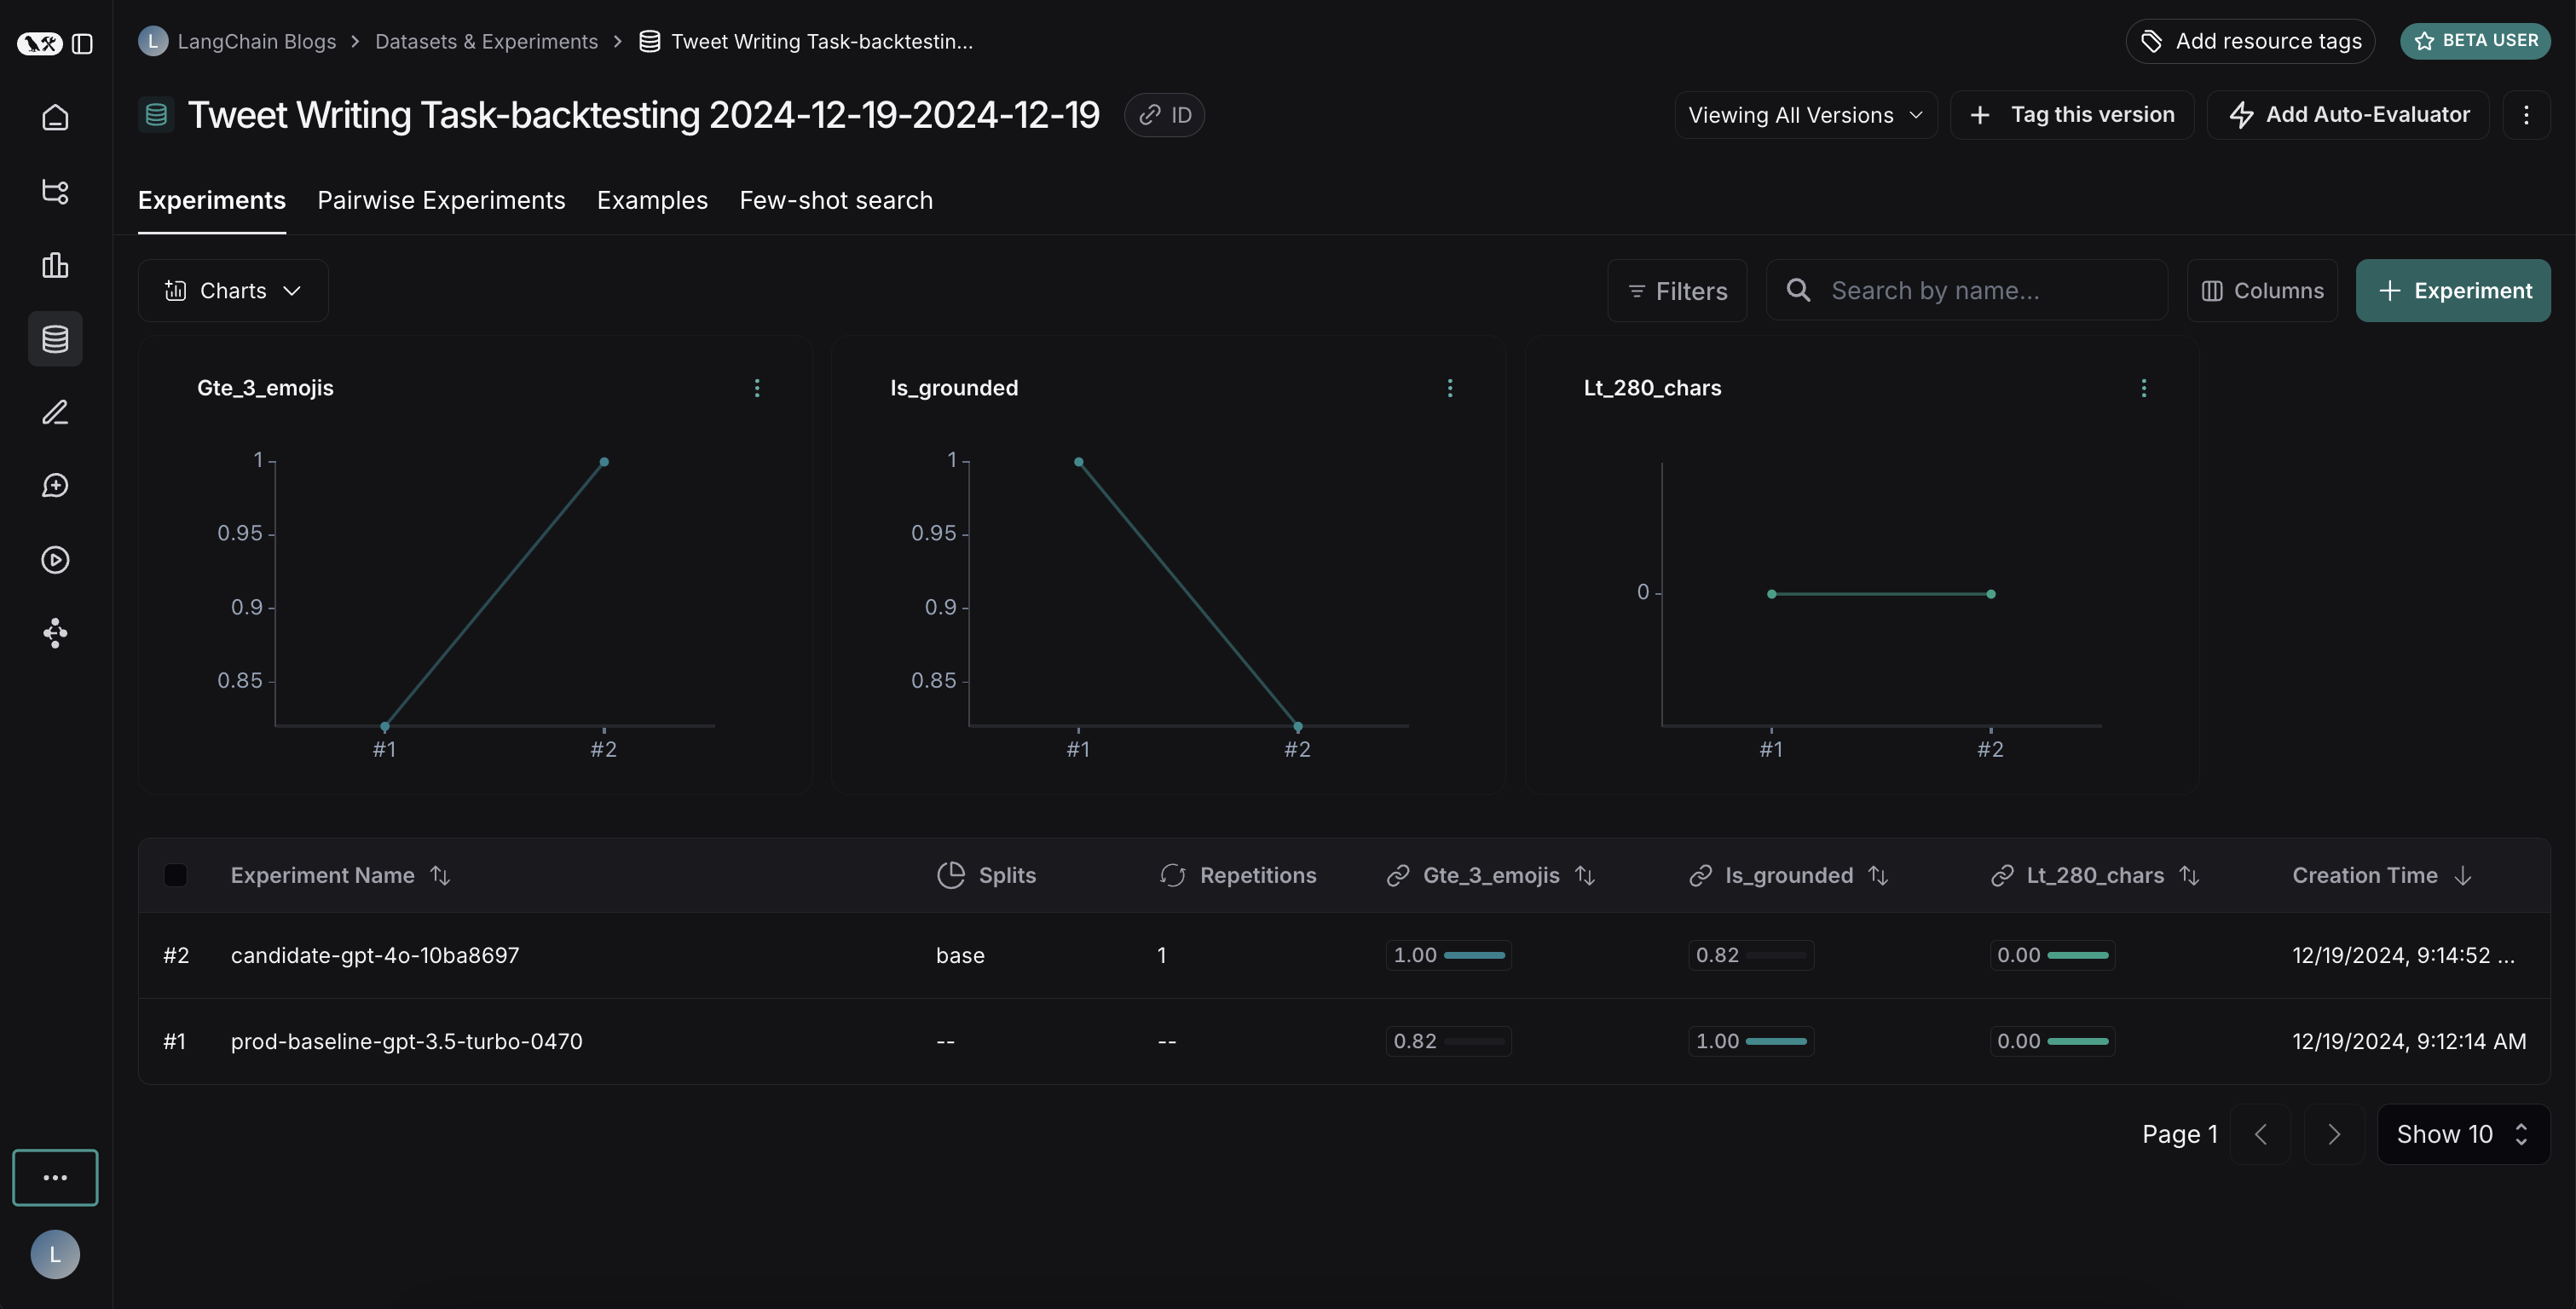 The results reveal an interesting tradeoff between the two models:
1. GPT-4o shows improved performance in following formatting rules, consistently including the requested number of emojis
2. However, GPT-4o is less reliable at staying grounded in the provided search results
To illustrate the grounding issue: in [this example run](https://smith.langchain.com/public/be060e19-0bc0-4798-94f5-c3d35719a5f6/r/07d43e7a-8632-479d-ae28-c7eac6e54da4), GPT-4o included facts about Abū Bakr Muhammad ibn Zakariyyā al-Rāzī's medical contributions that weren't present in the search results. This demonstrates how it's pulling from its internal knowledge rather than strictly using the provided information.
This backtesting exercise revealed that while GPT-4o is generally considered a more capable model, simply upgrading to it wouldn't improve our tweet-writer. To effectively use GPT-4o, we would need to:
* Refine our prompts to more strongly emphasize using only provided information
* Or modify our system architecture to better constrain the model's outputs
This insight demonstrates the value of backtesting - it helped us identify potential issues before deployment.
The results reveal an interesting tradeoff between the two models:
1. GPT-4o shows improved performance in following formatting rules, consistently including the requested number of emojis
2. However, GPT-4o is less reliable at staying grounded in the provided search results
To illustrate the grounding issue: in [this example run](https://smith.langchain.com/public/be060e19-0bc0-4798-94f5-c3d35719a5f6/r/07d43e7a-8632-479d-ae28-c7eac6e54da4), GPT-4o included facts about Abū Bakr Muhammad ibn Zakariyyā al-Rāzī's medical contributions that weren't present in the search results. This demonstrates how it's pulling from its internal knowledge rather than strictly using the provided information.
This backtesting exercise revealed that while GPT-4o is generally considered a more capable model, simply upgrading to it wouldn't improve our tweet-writer. To effectively use GPT-4o, we would need to:
* Refine our prompts to more strongly emphasize using only provided information
* Or modify our system architecture to better constrain the model's outputs
This insight demonstrates the value of backtesting - it helped us identify potential issues before deployment.
 ***
***
 ## Create an experiment in the prompt playground[](#create-an-experiment-in-the-prompt-playground "Direct link to Create an experiment in the prompt playground")
1. **Navigate to the playground** by clicking **Playground** in the sidebar.
2. **Add a prompt** by selecting an existing saved a prompt or creating a new one.
3. **Select a dataset** from the **Test over dataset** dropdown
* Note that the keys in the dataset input must match the input variables of the prompt. For example, in the above video the selected dataset has inputs with the key "blog", which correctly match the input variable of the prompt.
* There is a maximum of 15 input variables allowed in the prompt playground.
4. **Start the experiment** by clicking on the **Start** or CMD+Enter. This will run the prompt over all the examples in the dataset and create an entry for the experiment in the dataset details page. We recommend committing the prompt to the prompt hub before starting the experiment so that it can be easily referenced later when reviewing your experiment.
5. **View the full results** by clicking **View full experiment**. This will take you to the experiment details page where you can see the results of the experiment.
## Add evaluation scores to the experiment[](#add-evaluation-scores-to-the-experiment "Direct link to Add evaluation scores to the experiment")
Evaluate your experiment over specific critera by adding evaluators. Add LLM-as-a-judge or custom code evaluators in the playground using the **+Evaluator** button.
To learn more about adding evaluators in via UI, visit [how to define an LLM-as-a-judge evaluator](/langsmith/llm-as-judge).
***
## Create an experiment in the prompt playground[](#create-an-experiment-in-the-prompt-playground "Direct link to Create an experiment in the prompt playground")
1. **Navigate to the playground** by clicking **Playground** in the sidebar.
2. **Add a prompt** by selecting an existing saved a prompt or creating a new one.
3. **Select a dataset** from the **Test over dataset** dropdown
* Note that the keys in the dataset input must match the input variables of the prompt. For example, in the above video the selected dataset has inputs with the key "blog", which correctly match the input variable of the prompt.
* There is a maximum of 15 input variables allowed in the prompt playground.
4. **Start the experiment** by clicking on the **Start** or CMD+Enter. This will run the prompt over all the examples in the dataset and create an entry for the experiment in the dataset details page. We recommend committing the prompt to the prompt hub before starting the experiment so that it can be easily referenced later when reviewing your experiment.
5. **View the full results** by clicking **View full experiment**. This will take you to the experiment details page where you can see the results of the experiment.
## Add evaluation scores to the experiment[](#add-evaluation-scores-to-the-experiment "Direct link to Add evaluation scores to the experiment")
Evaluate your experiment over specific critera by adding evaluators. Add LLM-as-a-judge or custom code evaluators in the playground using the **+Evaluator** button.
To learn more about adding evaluators in via UI, visit [how to define an LLM-as-a-judge evaluator](/langsmith/llm-as-judge).
***
 ***
***
 ## Overview
## Docker
Upgrading the Docker version of LangSmith is a bit more involved than the Helm version and may require a small amount of downtime. Please follow the instructions below to upgrade your Docker version of LangSmith.
1. Update your `docker-compose.yml` file to the file used in the latest release. You can find this in the [LangSmith SDK GitHub repository](https://github.com/langchain-ai/langsmith-sdk/blob/main/python/langsmith/cli/docker-compose.yaml)
2. Update your `.env` file with any new environment variables that are required in the new version. These will be detailed in the release notes for the new version.
3. Run the following command to stop your current LangSmith instance:
```bash theme={null}
docker-compose down
```
4. Run the following command to start your new LangSmith instance in the background:
```bash theme={null}
docker-compose up -d
```
If everything ran successfully, you should see all the LangSmith containers running and healthy.
```bash theme={null}
CONTAINER ID IMAGE COMMAND CREATED STATUS PORTS NAMES
e1c8f01a4ffc langchain/langsmith-frontend:0.5.7 "/entrypoint.sh ngin…" 10 hours ago Up 40 seconds 0.0.0.0:80->80/tcp, 8080/tcp cli-langchain-frontend-1
39e1394846b9 langchain/langsmith-backend:0.5.7 "/bin/sh -c 'exec uv…" 10 hours ago Up 40 seconds 0.0.0.0:1984->1984/tcp cli-langchain-backend-1
f8688dd58f2f langchain/langsmith-go-backend:0.5.7 "./smith-go" 10 hours ago Up 40 seconds 0.0.0.0:1986->1986/tcp cli-langchain-platform-backend-1
006f1303b04d langchain/langsmith-backend:0.5.7 "saq app.workers.que…" 10 hours ago Up 40 seconds cli-langchain-queue-1
73a90242ed3a redis:7 "docker-entrypoint.s…" 10 hours ago Up About a minute (healthy) 0.0.0.0:63791->6379/tcp cli-langchain-redis-1
eecf75ca672b postgres:14.7 "docker-entrypoint.s…" 10 hours ago Up About a minute (healthy) 0.0.0.0:5433->5432/tcp cli-langchain-db-1
3aa5652a864d clickhouse/clickhouse-server:23.9 "/entrypoint.sh" 10 hours ago Up About a minute (healthy) 9009/tcp, 0.0.0.0:8124->8123/tcp, 0.0.0.0:9001->9000/tcp cli-langchain-clickhouse-1
84edc329a37f langchain/langsmith-playground:0.5.7 "docker-entrypoint.s…" 10 hours ago Up About a minute 0.0.0.0:3001->3001/tcp cli-langchain-playground-1
```
### Validate your deployment:
1. Curl the exposed port of the `cli-langchain-frontend-1` container:
```bash theme={null}
curl localhost:80/info
{"version":"0.5.7","license_expiration_time":"2033-05-20T20:08:06","batch_ingest_config":{"scale_up_qsize_trigger":1000,"scale_up_nthreads_limit":16,"scale_down_nempty_trigger":4,"size_limit":100,"size_limit_bytes":20971520}}
```
2. Visit the exposed port of the `cli-langchain-frontend-1` container on your browser
The LangSmith UI should be visible/operational
***
## Overview
## Docker
Upgrading the Docker version of LangSmith is a bit more involved than the Helm version and may require a small amount of downtime. Please follow the instructions below to upgrade your Docker version of LangSmith.
1. Update your `docker-compose.yml` file to the file used in the latest release. You can find this in the [LangSmith SDK GitHub repository](https://github.com/langchain-ai/langsmith-sdk/blob/main/python/langsmith/cli/docker-compose.yaml)
2. Update your `.env` file with any new environment variables that are required in the new version. These will be detailed in the release notes for the new version.
3. Run the following command to stop your current LangSmith instance:
```bash theme={null}
docker-compose down
```
4. Run the following command to start your new LangSmith instance in the background:
```bash theme={null}
docker-compose up -d
```
If everything ran successfully, you should see all the LangSmith containers running and healthy.
```bash theme={null}
CONTAINER ID IMAGE COMMAND CREATED STATUS PORTS NAMES
e1c8f01a4ffc langchain/langsmith-frontend:0.5.7 "/entrypoint.sh ngin…" 10 hours ago Up 40 seconds 0.0.0.0:80->80/tcp, 8080/tcp cli-langchain-frontend-1
39e1394846b9 langchain/langsmith-backend:0.5.7 "/bin/sh -c 'exec uv…" 10 hours ago Up 40 seconds 0.0.0.0:1984->1984/tcp cli-langchain-backend-1
f8688dd58f2f langchain/langsmith-go-backend:0.5.7 "./smith-go" 10 hours ago Up 40 seconds 0.0.0.0:1986->1986/tcp cli-langchain-platform-backend-1
006f1303b04d langchain/langsmith-backend:0.5.7 "saq app.workers.que…" 10 hours ago Up 40 seconds cli-langchain-queue-1
73a90242ed3a redis:7 "docker-entrypoint.s…" 10 hours ago Up About a minute (healthy) 0.0.0.0:63791->6379/tcp cli-langchain-redis-1
eecf75ca672b postgres:14.7 "docker-entrypoint.s…" 10 hours ago Up About a minute (healthy) 0.0.0.0:5433->5432/tcp cli-langchain-db-1
3aa5652a864d clickhouse/clickhouse-server:23.9 "/entrypoint.sh" 10 hours ago Up About a minute (healthy) 9009/tcp, 0.0.0.0:8124->8123/tcp, 0.0.0.0:9001->9000/tcp cli-langchain-clickhouse-1
84edc329a37f langchain/langsmith-playground:0.5.7 "docker-entrypoint.s…" 10 hours ago Up About a minute 0.0.0.0:3001->3001/tcp cli-langchain-playground-1
```
### Validate your deployment:
1. Curl the exposed port of the `cli-langchain-frontend-1` container:
```bash theme={null}
curl localhost:80/info
{"version":"0.5.7","license_expiration_time":"2033-05-20T20:08:06","batch_ingest_config":{"scale_up_qsize_trigger":1000,"scale_up_nthreads_limit":16,"scale_down_nempty_trigger":4,"size_limit":100,"size_limit_bytes":20971520}}
```
2. Visit the exposed port of the `cli-langchain-frontend-1` container on your browser
The LangSmith UI should be visible/operational
***
 To access the LangSmith UI and send API requests, you will need to expose the [LangSmith frontend](#langsmith-frontend) service. Depending on your installation method, this can be a load balancer or a port exposed on the host machine.
### Services
| Service | Description |
| -------------------------------------------------------------------------------------------------------------- | -------------------------------------------------------------------------------------------------------------------------------------------------------------------------------------------------------------------------------------------------------------------------------------------------------------------------------------------------------- |
| **LangSmith frontend** | The frontend uses Nginx to serve the LangSmith UI and route API requests to the other servers. This serves as the entrypoint for the application and is the only component that must be exposed to users. |
| **LangSmith backend** | The backend is the main entrypoint for CRUD API requests and handles the majority of the business logic for the application. This includes handling requests from the frontend and SDK, preparing traces for ingestion, and supporting the hub API. |
| **LangSmith queue** | The queue handles incoming traces and feedback to ensure that they are ingested and persisted into the traces and feedback datastore asynchronously, handling checks for data integrity and ensuring successful insert into the datastore, handling retries in situations such as database errors or the temporary inability to connect to the database. |
| **LangSmith platform backend** | The platform backend is another critical service that primarily handles authentication, run ingestion, and other high-volume tasks. |
| **LangSmith playground** | The playground is a service that handles forwarding requests to various LLM APIs to support the LangSmith Playground feature. This can also be used to connect to your own custom model servers. |
| **LangSmith ACE (Arbitrary Code Execution) backend** | The ACE backend is a service that handles executing arbitrary code in a secure environment. This is used to support running custom code within LangSmith. |
### Storage services
To access the LangSmith UI and send API requests, you will need to expose the [LangSmith frontend](#langsmith-frontend) service. Depending on your installation method, this can be a load balancer or a port exposed on the host machine.
### Services
| Service | Description |
| -------------------------------------------------------------------------------------------------------------- | -------------------------------------------------------------------------------------------------------------------------------------------------------------------------------------------------------------------------------------------------------------------------------------------------------------------------------------------------------- |
| **LangSmith frontend** | The frontend uses Nginx to serve the LangSmith UI and route API requests to the other servers. This serves as the entrypoint for the application and is the only component that must be exposed to users. |
| **LangSmith backend** | The backend is the main entrypoint for CRUD API requests and handles the majority of the business logic for the application. This includes handling requests from the frontend and SDK, preparing traces for ingestion, and supporting the hub API. |
| **LangSmith queue** | The queue handles incoming traces and feedback to ensure that they are ingested and persisted into the traces and feedback datastore asynchronously, handling checks for data integrity and ensuring successful insert into the datastore, handling retries in situations such as database errors or the temporary inability to connect to the database. |
| **LangSmith platform backend** | The platform backend is another critical service that primarily handles authentication, run ingestion, and other high-volume tasks. |
| **LangSmith playground** | The playground is a service that handles forwarding requests to various LLM APIs to support the LangSmith Playground feature. This can also be used to connect to your own custom model servers. |
| **LangSmith ACE (Arbitrary Code Execution) backend** | The ACE backend is a service that handles executing arbitrary code in a secure environment. This is used to support running custom code within LangSmith. |
### Storage services
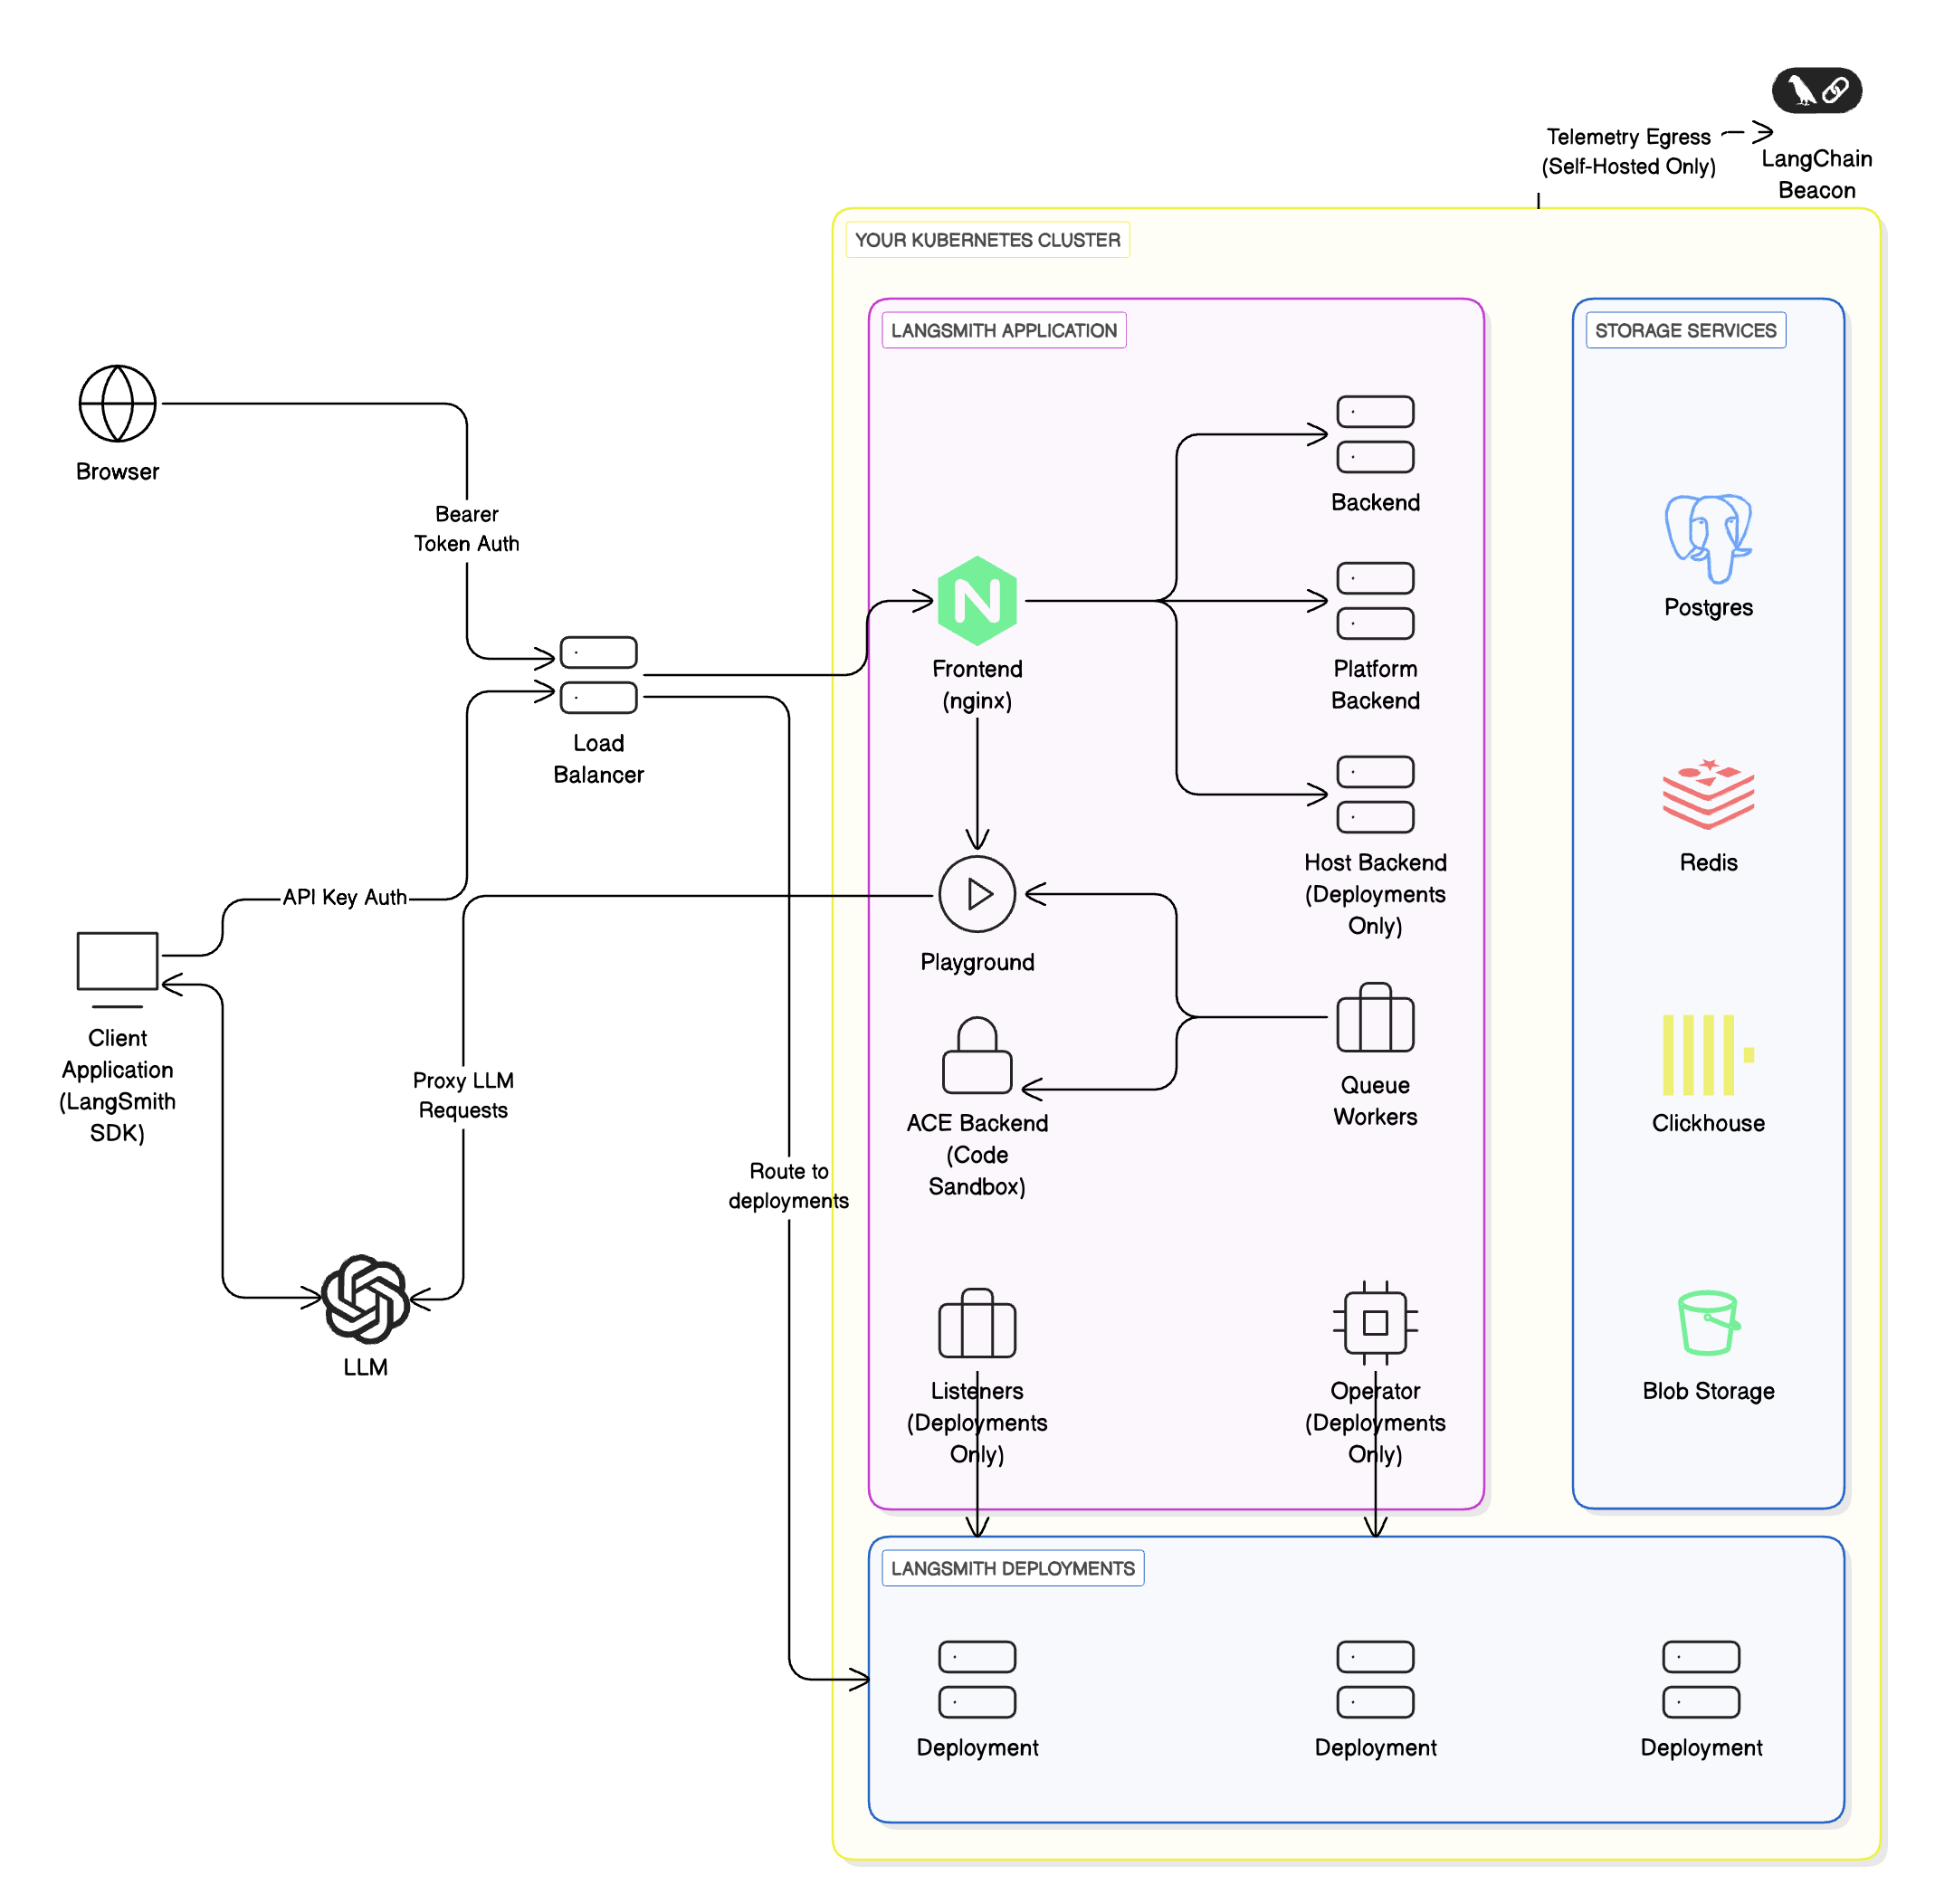
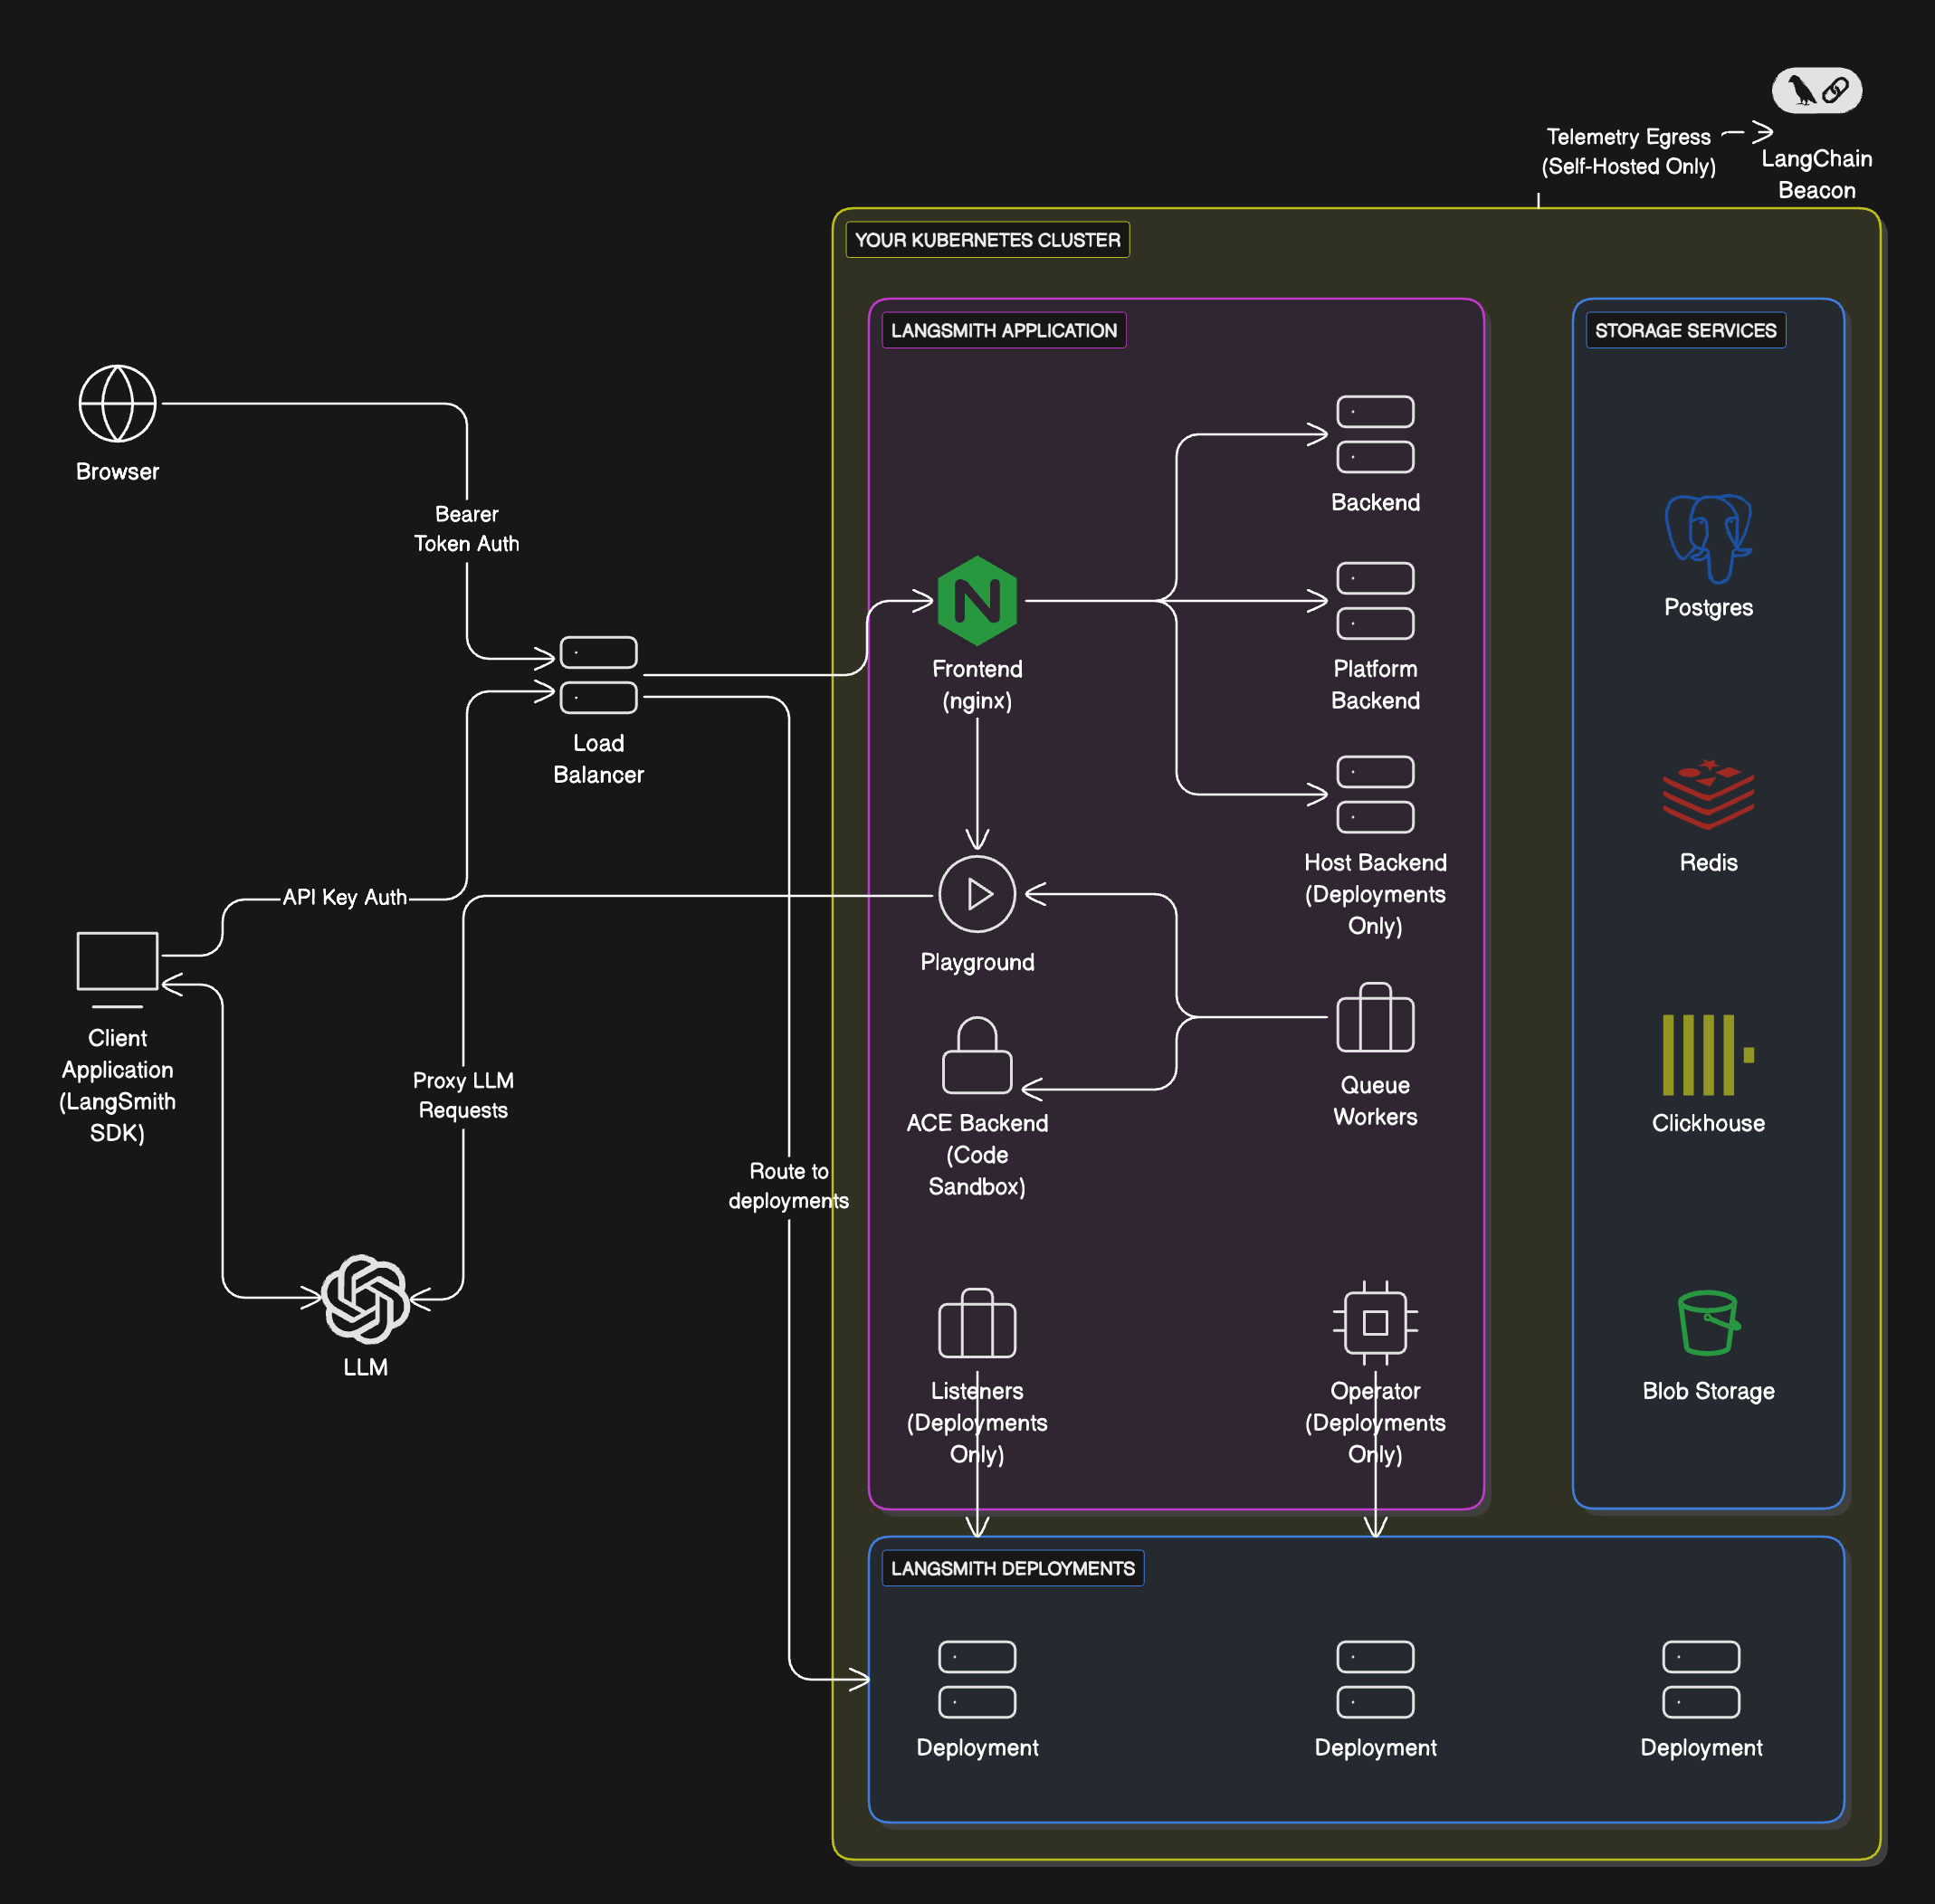 ### Workflow
If you want to self-host LangSmith for observability, evaluation, and agent deployment, follow these steps:
### Workflow
If you want to self-host LangSmith for observability, evaluation, and agent deployment, follow these steps:
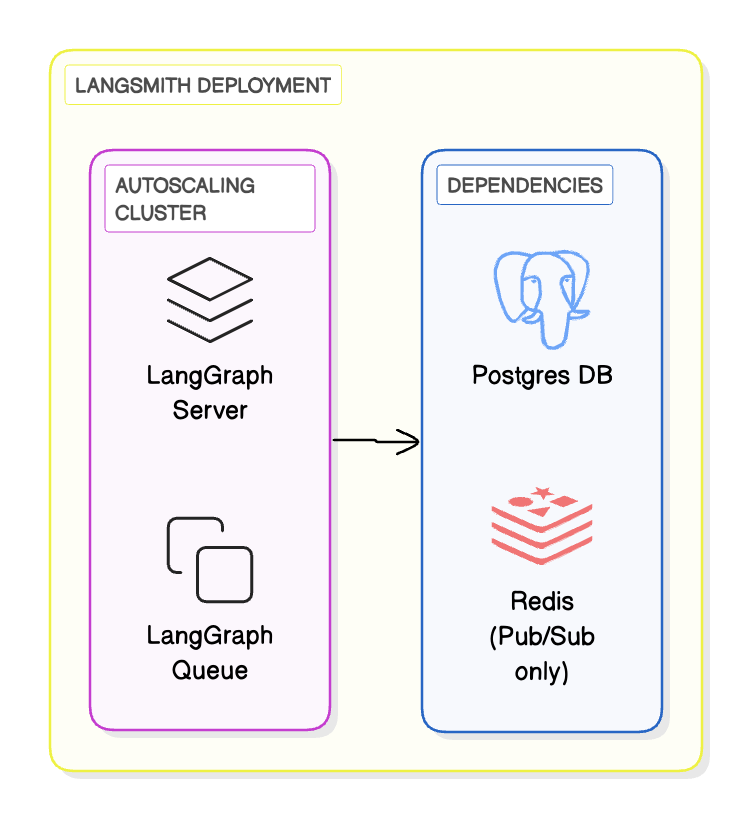
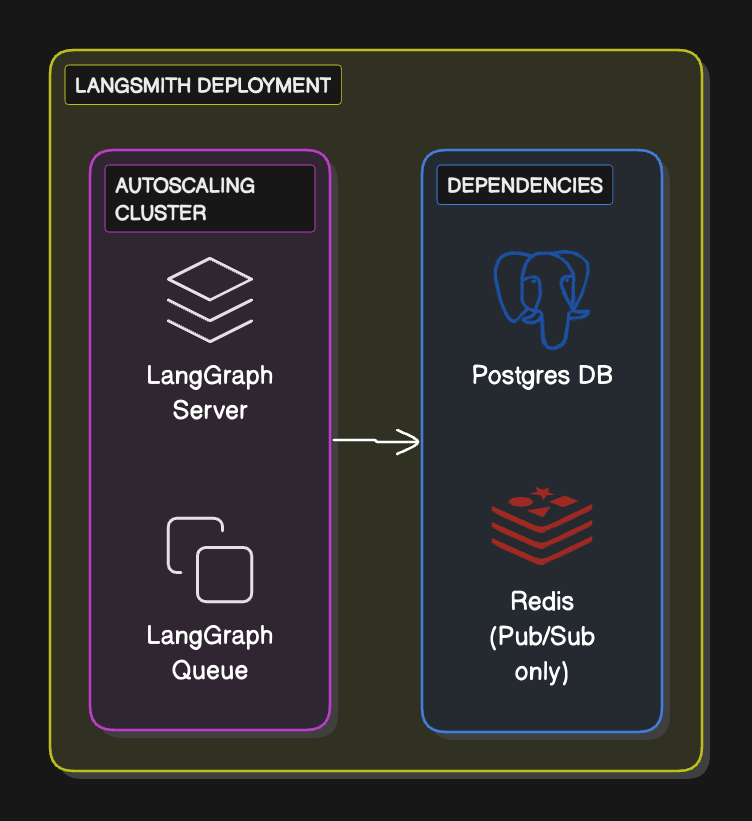 ### Workflow
1. Define and test your graph locally using the `langgraph-cli` or [Studio](/langsmith/studio)
2. Package your agent as a Docker image
3. Deploy the Agent Server to your compute platform of choice (Kubernetes, Docker, VM)
4. Optionally, configure LangSmith API keys and endpoints so the server reports traces and evaluations back to LangSmith (self-hosted or SaaS)
### Supported compute platforms
* **Kubernetes**: Use the LangSmith Helm chart to run Agent Servers in a Kubernetes cluster. This is the recommended option for production-grade deployments.
* **Docker**: Run in any Docker-supported compute platform (local dev machine, VM, ECS, etc.). This is best suited for development or small-scale workloads.
### Setup guide
### Workflow
1. Define and test your graph locally using the `langgraph-cli` or [Studio](/langsmith/studio)
2. Package your agent as a Docker image
3. Deploy the Agent Server to your compute platform of choice (Kubernetes, Docker, VM)
4. Optionally, configure LangSmith API keys and endpoints so the server reports traces and evaluations back to LangSmith (self-hosted or SaaS)
### Supported compute platforms
* **Kubernetes**: Use the LangSmith Helm chart to run Agent Servers in a Kubernetes cluster. This is the recommended option for production-grade deployments.
* **Docker**: Run in any Docker-supported compute platform (local dev machine, VM, ECS, etc.). This is best suited for development or small-scale workloads.
### Setup guide
 ### Manage users
Manage membership in your shared organization in the **Members and roles** tabs on the [Settings page](https://smith.langchain.com/settings). Here you can:
* Invite new users to your organization, selecting workspace membership and (if RBAC is enabled) workspace role.
* Edit a user's organization role.
* Remove users from your organization.
### Manage users
Manage membership in your shared organization in the **Members and roles** tabs on the [Settings page](https://smith.langchain.com/settings). Here you can:
* Invite new users to your organization, selecting workspace membership and (if RBAC is enabled) workspace role.
* Edit a user's organization role.
* Remove users from your organization.
 Organizations on the Enterprise plan may set up custom workspace roles in the **Roles** tab. For more details, refer to the [access control setup guide](/langsmith/user-management).
#### Organization roles
Organization-scoped roles are used to determine access to organization settings. The role selected also impacts workspace membership:
* `Organization Admin` grants full access to manage all organization configuration, users, billing, and workspaces. Any `Organization Admin` has `Admin` access to all workspaces in an organization.
- `Organization User` may read organization information, but cannot execute any write actions at the organization level. You can add an `Organization User` to a subset of workspaces and assigned workspace roles as usual (if RBAC is enabled), which specify permissions at the workspace level.
Organizations on the Enterprise plan may set up custom workspace roles in the **Roles** tab. For more details, refer to the [access control setup guide](/langsmith/user-management).
#### Organization roles
Organization-scoped roles are used to determine access to organization settings. The role selected also impacts workspace membership:
* `Organization Admin` grants full access to manage all organization configuration, users, billing, and workspaces. Any `Organization Admin` has `Admin` access to all workspaces in an organization.
- `Organization User` may read organization information, but cannot execute any write actions at the organization level. You can add an `Organization User` to a subset of workspaces and assigned workspace roles as usual (if RBAC is enabled), which specify permissions at the workspace level.

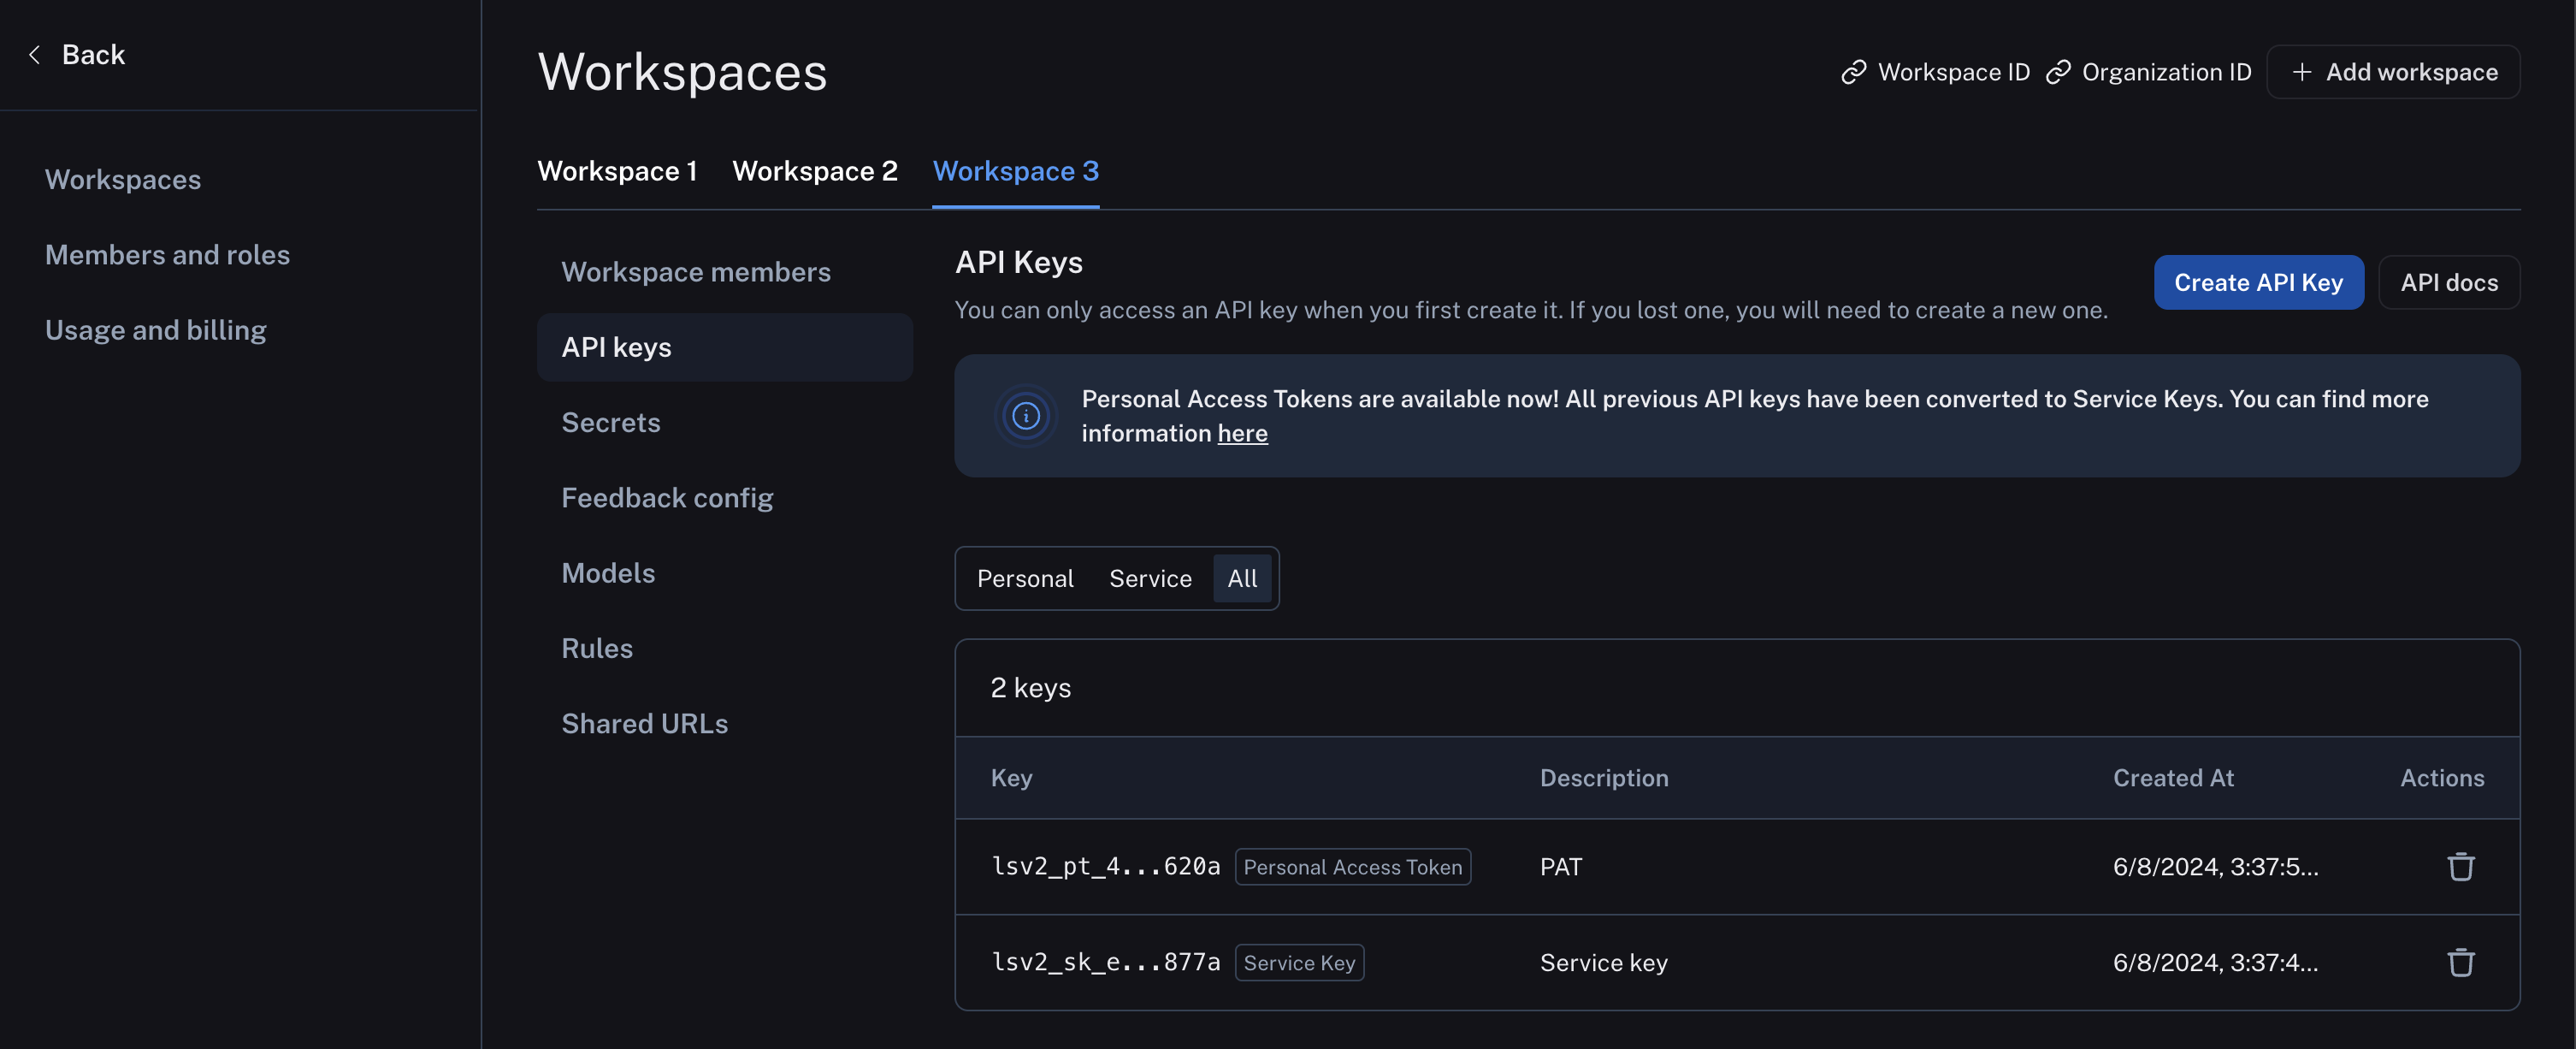 ### Delete a workspace
 ***
***
 ## 2. Add authentication
Now that you have a base LangGraph app, add authentication to it.
## 2. Add authentication
Now that you have a base LangGraph app, add authentication to it.
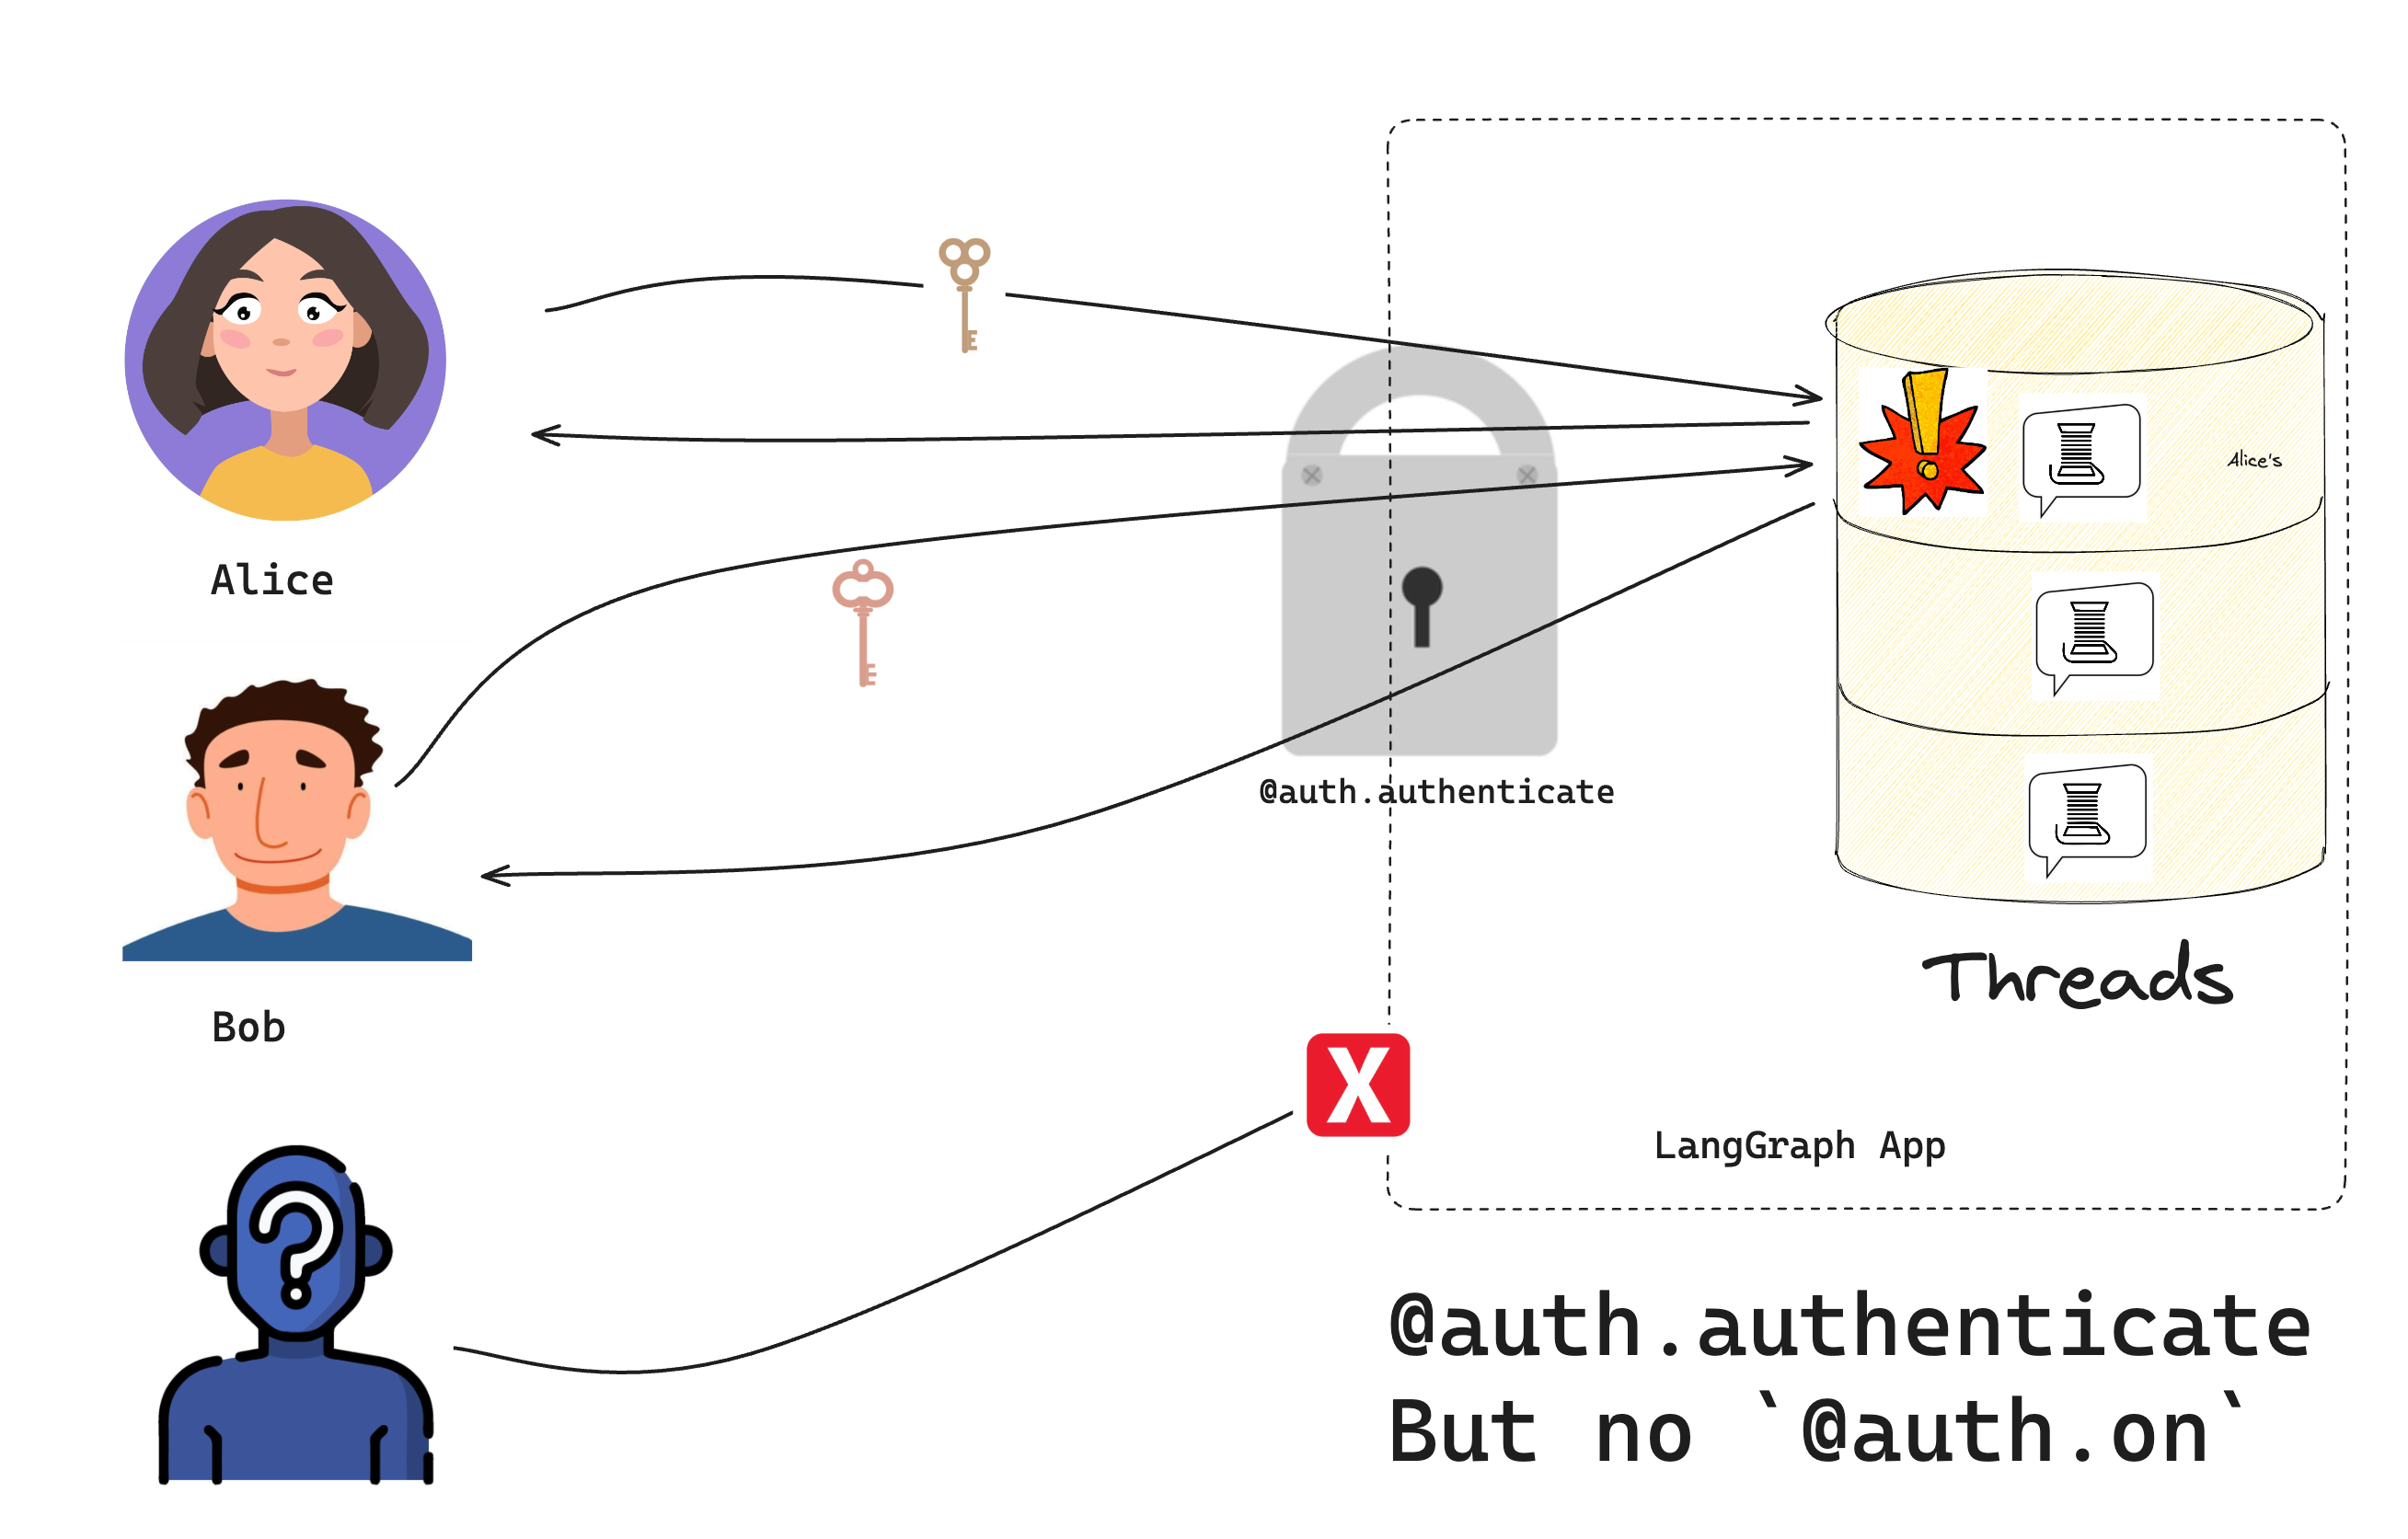 Run the following code in a file or notebook:
```python theme={null}
from langgraph_sdk import get_client
# Try without a token (should fail)
client = get_client(url="http://localhost:2024")
try:
thread = await client.threads.create()
print("❌ Should have failed without token!")
except Exception as e:
print("✅ Correctly blocked access:", e)
# Try with a valid token
client = get_client(
url="http://localhost:2024", headers={"Authorization": "Bearer user1-token"}
)
# Create a thread and chat
thread = await client.threads.create()
print(f"✅ Created thread as Alice: {thread['thread_id']}")
response = await client.runs.create(
thread_id=thread["thread_id"],
assistant_id="agent",
input={"messages": [{"role": "user", "content": "Hello!"}]},
)
print("✅ Bot responded:")
print(response)
```
You should see that:
1. Without a valid token, we can't access the bot
2. With a valid token, we can create threads and chat
Congratulations! You've built a chatbot that only lets "authenticated" users access it. While this system doesn't (yet) implement a production-ready security scheme, we've learned the basic mechanics of how to control access to our bot. In the next tutorial, we'll learn how to give each user their own private conversations.
## Next steps
Now that you can control who accesses your bot, you might want to:
1. Continue the tutorial by going to [Make conversations private](/langsmith/resource-auth) to learn about resource authorization.
2. Read more about [authentication concepts](/langsmith/auth).
3. Check out the API reference for [Auth](https://reference.langchain.com/python/langsmith/deployment/sdk/#langgraph_sdk.auth.Auth), [Auth.authenticate](https://reference.langchain.com/python/langsmith/deployment/sdk/#langgraph_sdk.auth.Auth.authenticate), and [MinimalUserDict](https://reference.langchain.com/python/langsmith/deployment/sdk/#langgraph_sdk.auth.types.MinimalUserDict) for more authentication details.
***
Run the following code in a file or notebook:
```python theme={null}
from langgraph_sdk import get_client
# Try without a token (should fail)
client = get_client(url="http://localhost:2024")
try:
thread = await client.threads.create()
print("❌ Should have failed without token!")
except Exception as e:
print("✅ Correctly blocked access:", e)
# Try with a valid token
client = get_client(
url="http://localhost:2024", headers={"Authorization": "Bearer user1-token"}
)
# Create a thread and chat
thread = await client.threads.create()
print(f"✅ Created thread as Alice: {thread['thread_id']}")
response = await client.runs.create(
thread_id=thread["thread_id"],
assistant_id="agent",
input={"messages": [{"role": "user", "content": "Hello!"}]},
)
print("✅ Bot responded:")
print(response)
```
You should see that:
1. Without a valid token, we can't access the bot
2. With a valid token, we can create threads and chat
Congratulations! You've built a chatbot that only lets "authenticated" users access it. While this system doesn't (yet) implement a production-ready security scheme, we've learned the basic mechanics of how to control access to our bot. In the next tutorial, we'll learn how to give each user their own private conversations.
## Next steps
Now that you can control who accesses your bot, you might want to:
1. Continue the tutorial by going to [Make conversations private](/langsmith/resource-auth) to learn about resource authorization.
2. Read more about [authentication concepts](/langsmith/auth).
3. Check out the API reference for [Auth](https://reference.langchain.com/python/langsmith/deployment/sdk/#langgraph_sdk.auth.Auth), [Auth.authenticate](https://reference.langchain.com/python/langsmith/deployment/sdk/#langgraph_sdk.auth.Auth.authenticate), and [MinimalUserDict](https://reference.langchain.com/python/langsmith/deployment/sdk/#langgraph_sdk.auth.types.MinimalUserDict) for more authentication details.
***
 ## Categorical feedback
For categorical feedback, you can enter a feedback tag name, then add a list of categories, each category mapping to a score. When you provide feedback, you can select one of these categories as the feedback score.
Both the category label and the score will be logged as feedback in `value` and `score` fields, respectively.
## Categorical feedback
For categorical feedback, you can enter a feedback tag name, then add a list of categories, each category mapping to a score. When you provide feedback, you can select one of these categories as the feedback score.
Both the category label and the score will be logged as feedback in `value` and `score` fields, respectively.
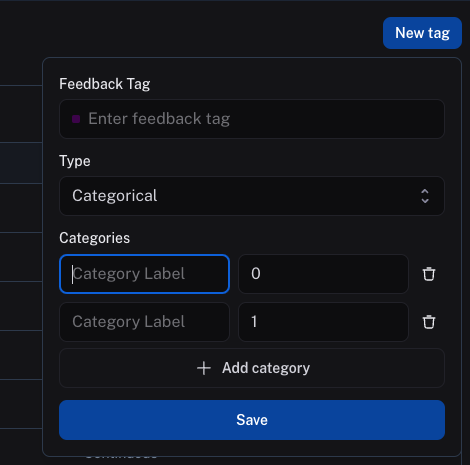 ***
***
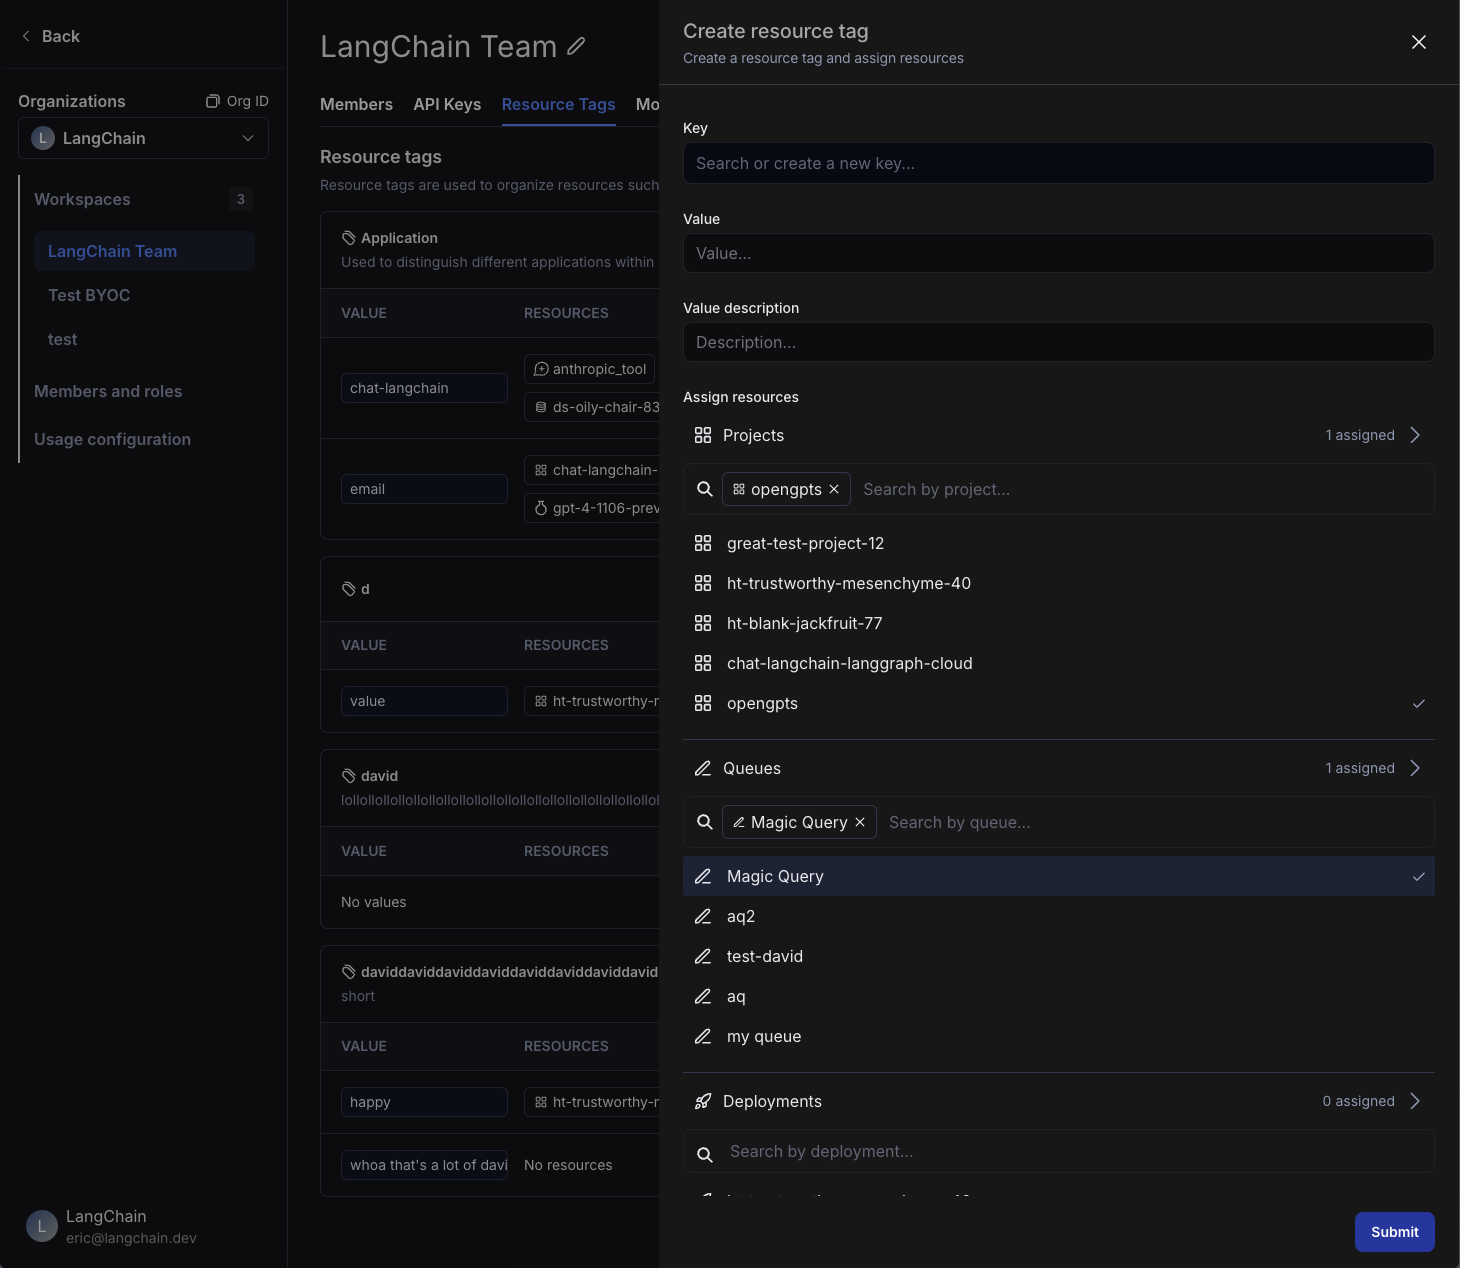 ## Assign a tag to a resource
Within the same side panel for creating a new tag, you can also create assign resources to tags. Search for corresponding resources in the "Assign Resources" section and select the resources you want to tag.
## Assign a tag to a resource
Within the same side panel for creating a new tag, you can also create assign resources to tags. Search for corresponding resources in the "Assign Resources" section and select the resources you want to tag.
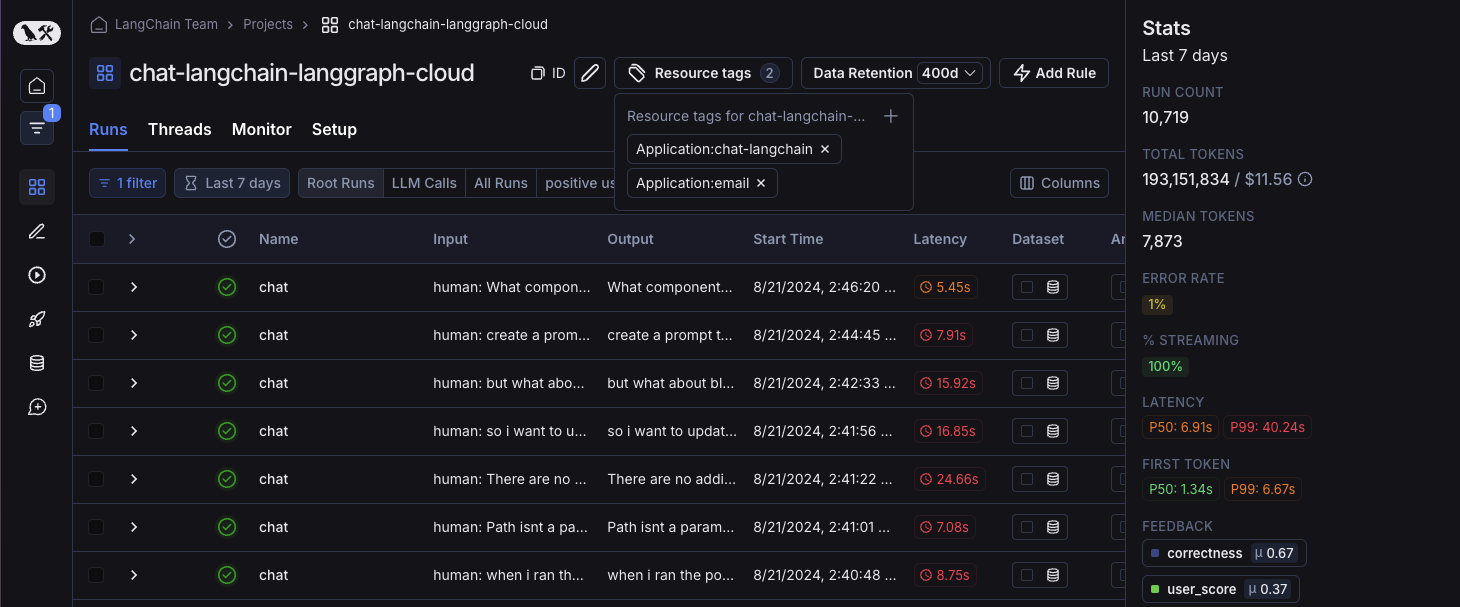 To un-assign a tag from a resource, click on the Trash icon next to the tag, both in the tag panel and the resource tag panel.
## Delete a tag
You can delete either a key or a value of a tag from the [workspace settings page](https://smith.langchain.com/settings/workspaces/resource_tags). To delete a key, click on the Trash icon next to the key. To delete a value, click on the Trash icon next to the value.
Note that if you delete a key, all values associated with that key will also be deleted. When you delete a value, you will lose all associations between that value and resources.
To un-assign a tag from a resource, click on the Trash icon next to the tag, both in the tag panel and the resource tag panel.
## Delete a tag
You can delete either a key or a value of a tag from the [workspace settings page](https://smith.langchain.com/settings/workspaces/resource_tags). To delete a key, click on the Trash icon next to the key. To delete a value, click on the Trash icon next to the value.
Note that if you delete a key, all values associated with that key will also be deleted. When you delete a value, you will lose all associations between that value and resources.
 ## Filter resources by tags
You can use resource tags to organize your experience navigating resources in the workspace.
To filter resources by tags in your workspace, open up the left-hand side panel and click on the tags icon. Here, you can select the tags you want to filter by.
In the homepage, you can see updated counts for resources based on the tags you've selected.
As you navigate through the different product surfaces, you will *only* see resources that match the tags you've selected. At any time, you can clear the tags to see all resources in the workspace or select different tags to filter by.
## Filter resources by tags
You can use resource tags to organize your experience navigating resources in the workspace.
To filter resources by tags in your workspace, open up the left-hand side panel and click on the tags icon. Here, you can select the tags you want to filter by.
In the homepage, you can see updated counts for resources based on the tags you've selected.
As you navigate through the different product surfaces, you will *only* see resources that match the tags you've selected. At any time, you can clear the tags to see all resources in the workspace or select different tags to filter by.
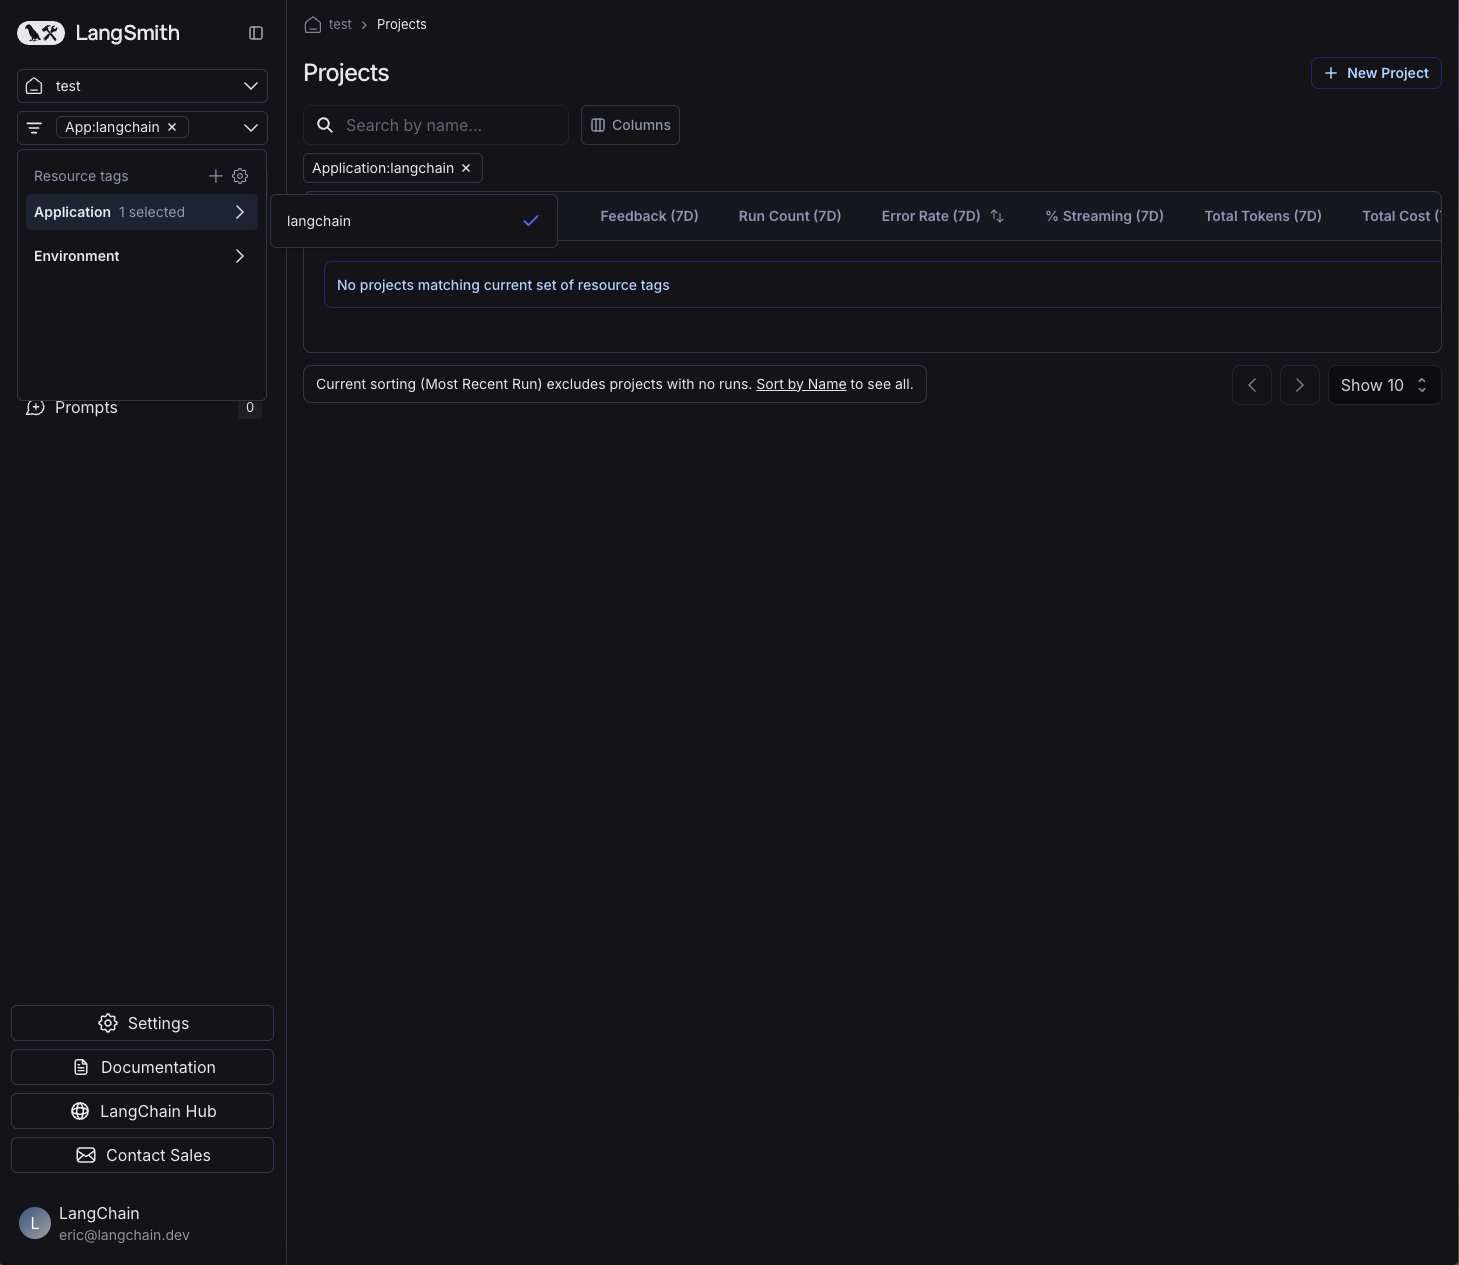 ***
***
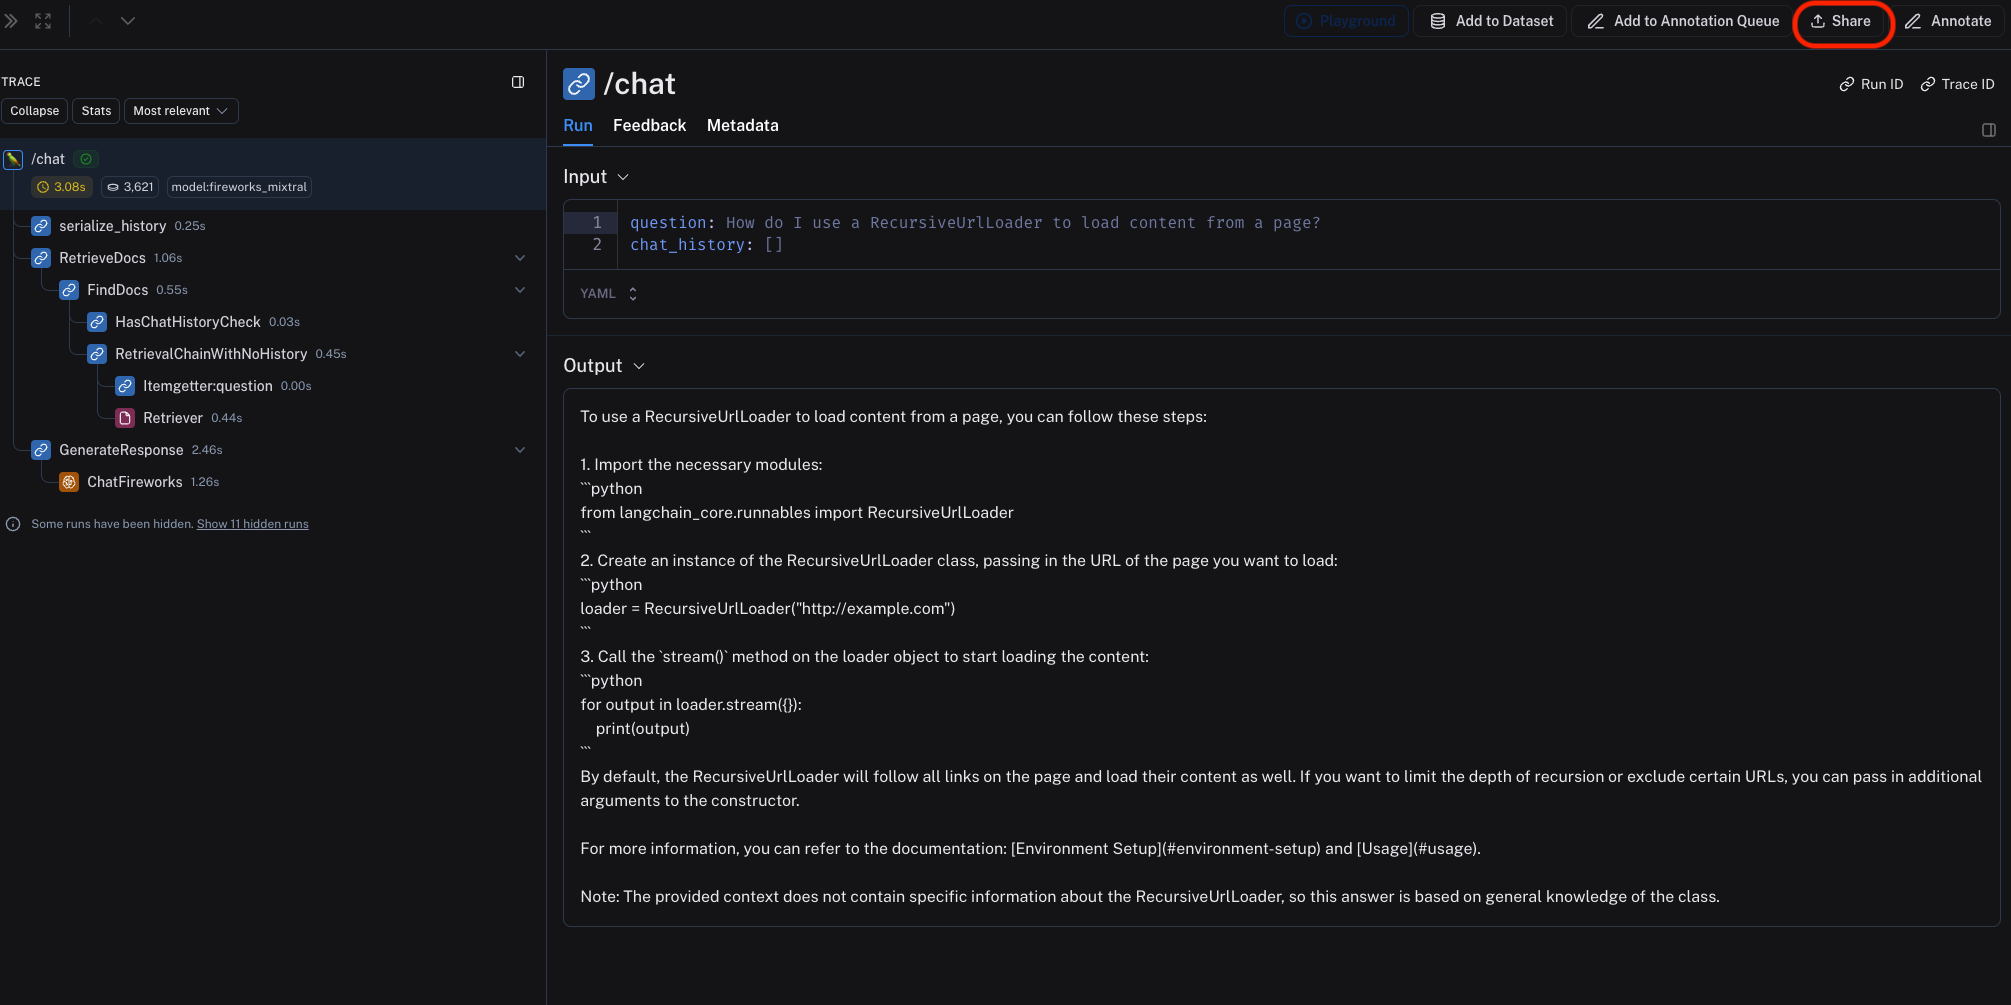 This will open a dialog where you can copy the link to the trace.
Shared traces will be accessible to anyone with the link, even if they don't have a LangSmith account. They will be able to view the trace, but not edit it.
To "unshare" a trace, either:
1. Click on **Unshare** by clicking on **Public** in the upper right hand corner of any publicly shared trace, then **Unshare** in the dialog.
This will open a dialog where you can copy the link to the trace.
Shared traces will be accessible to anyone with the link, even if they don't have a LangSmith account. They will be able to view the trace, but not edit it.
To "unshare" a trace, either:
1. Click on **Unshare** by clicking on **Public** in the upper right hand corner of any publicly shared trace, then **Unshare** in the dialog.
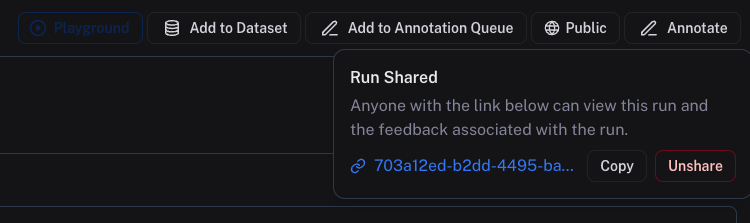 2. Navigate to your organization's list of publicly shared traces, by clicking on **Settings** -> **Shared URLs**, then click on **Unshare** next to the trace you want to unshare.
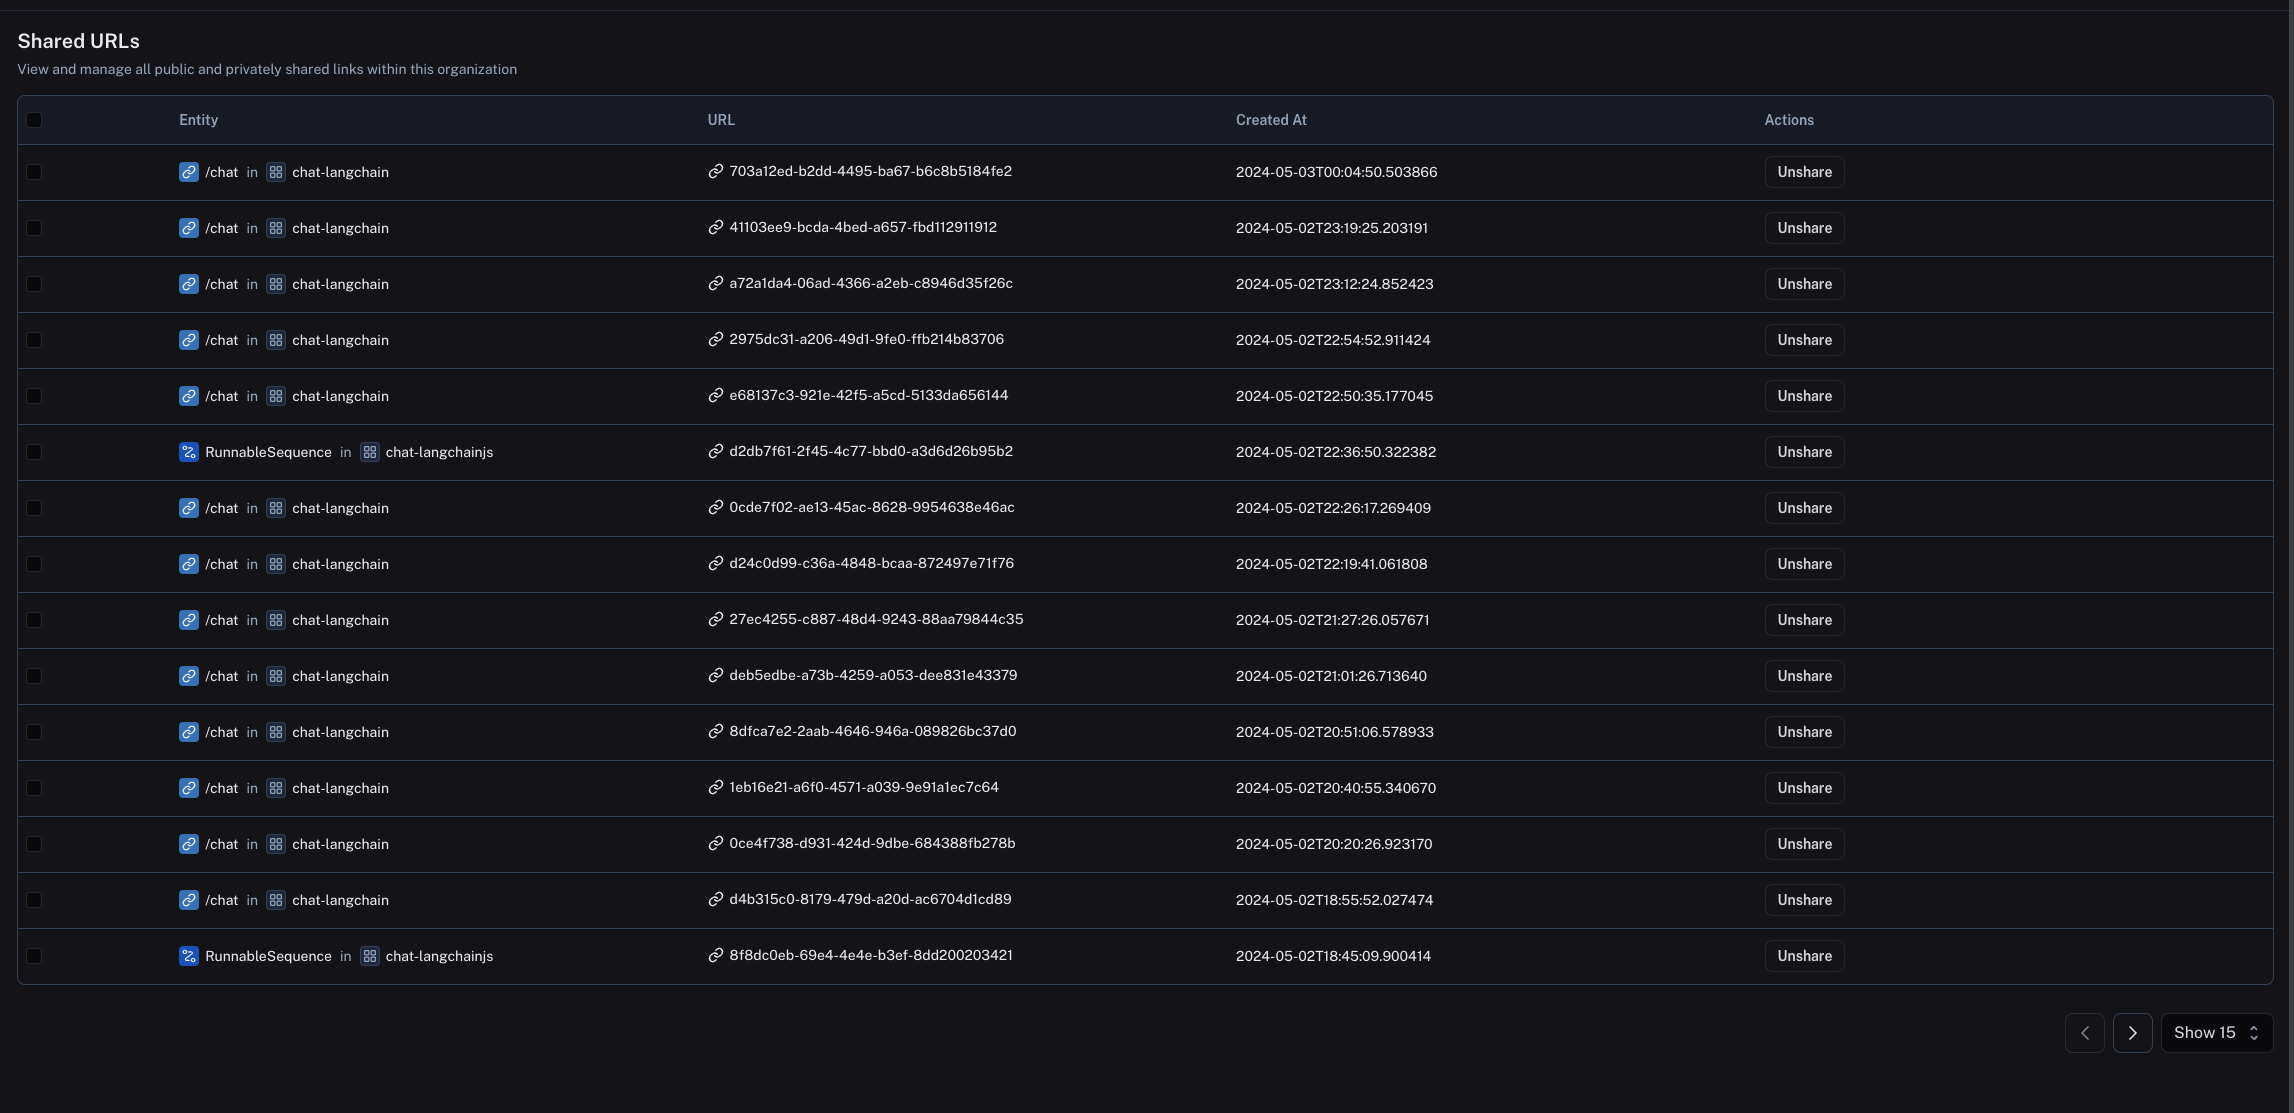 ***
***
 ## Summary evaluator args
Summary evaluator functions must have specific argument names. They can take any subset of the following arguments:
* `inputs: list[dict]`: A list of the inputs corresponding to a single example in a dataset.
* `outputs: list[dict]`: A list of the dict outputs produced by each experiment on the given inputs.
* `reference_outputs/referenceOutputs: list[dict]`: A list of the reference outputs associated with the example, if available.
* `runs: list[Run]`: A list of the full [Run](/langsmith/run-data-format) objects generated by the two experiments on the given example. Use this if you need access to intermediate steps or metadata about each run.
* `examples: list[Example]`: All of the dataset [Example](/langsmith/example-data-format) objects, including the example inputs, outputs (if available), and metdata (if available).
## Summary evaluator output
Summary evaluators are expected to return one of the following types:
Python and JS/TS
* `dict`: dicts of the form `{"score": ..., "name": ...}` allow you to pass a numeric or boolean score and metric name.
Currently Python only
* `int | float | bool`: this is interepreted as an continuous metric that can be averaged, sorted, etc. The function name is used as the name of the metric.
***
## Summary evaluator args
Summary evaluator functions must have specific argument names. They can take any subset of the following arguments:
* `inputs: list[dict]`: A list of the inputs corresponding to a single example in a dataset.
* `outputs: list[dict]`: A list of the dict outputs produced by each experiment on the given inputs.
* `reference_outputs/referenceOutputs: list[dict]`: A list of the reference outputs associated with the example, if available.
* `runs: list[Run]`: A list of the full [Run](/langsmith/run-data-format) objects generated by the two experiments on the given example. Use this if you need access to intermediate steps or metadata about each run.
* `examples: list[Example]`: All of the dataset [Example](/langsmith/example-data-format) objects, including the example inputs, outputs (if available), and metdata (if available).
## Summary evaluator output
Summary evaluators are expected to return one of the following types:
Python and JS/TS
* `dict`: dicts of the form `{"score": ..., "name": ...}` allow you to pass a numeric or boolean score and metric name.
Currently Python only
* `int | float | bool`: this is interepreted as an continuous metric that can be averaged, sorted, etc. The function name is used as the name of the metric.
***

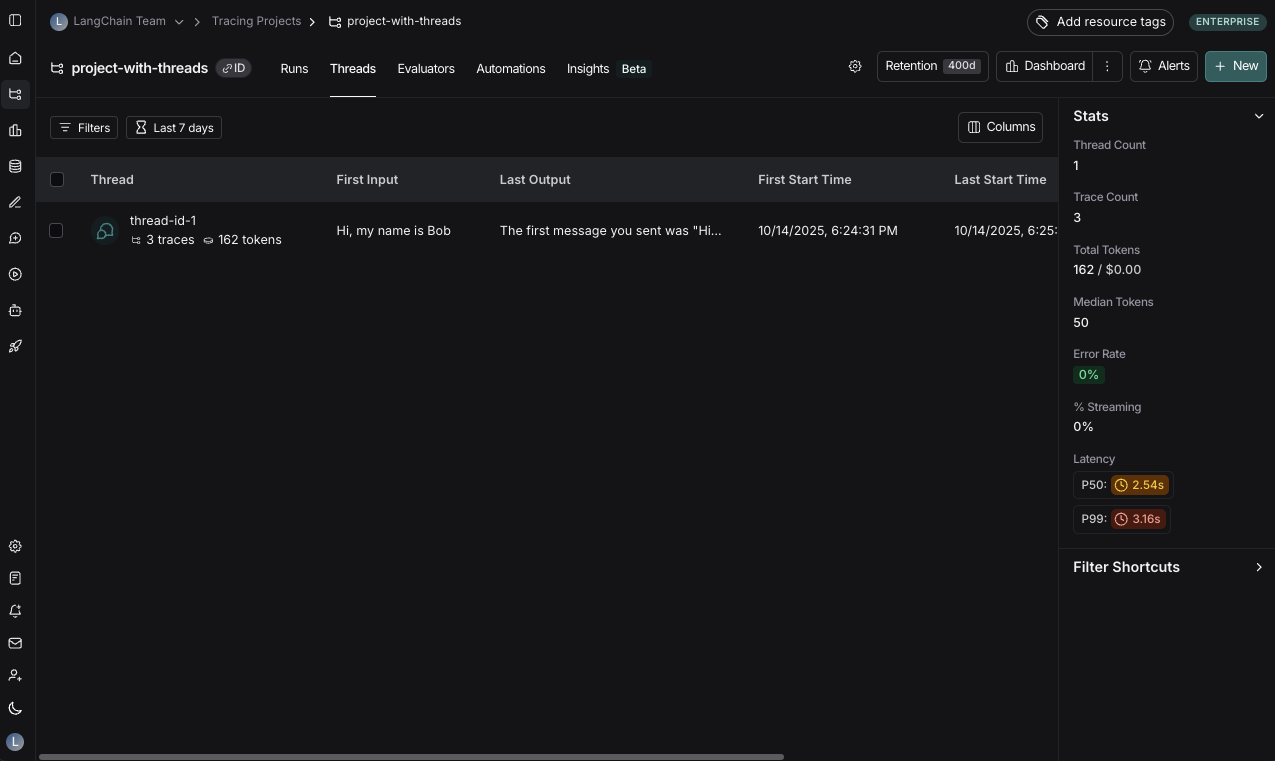
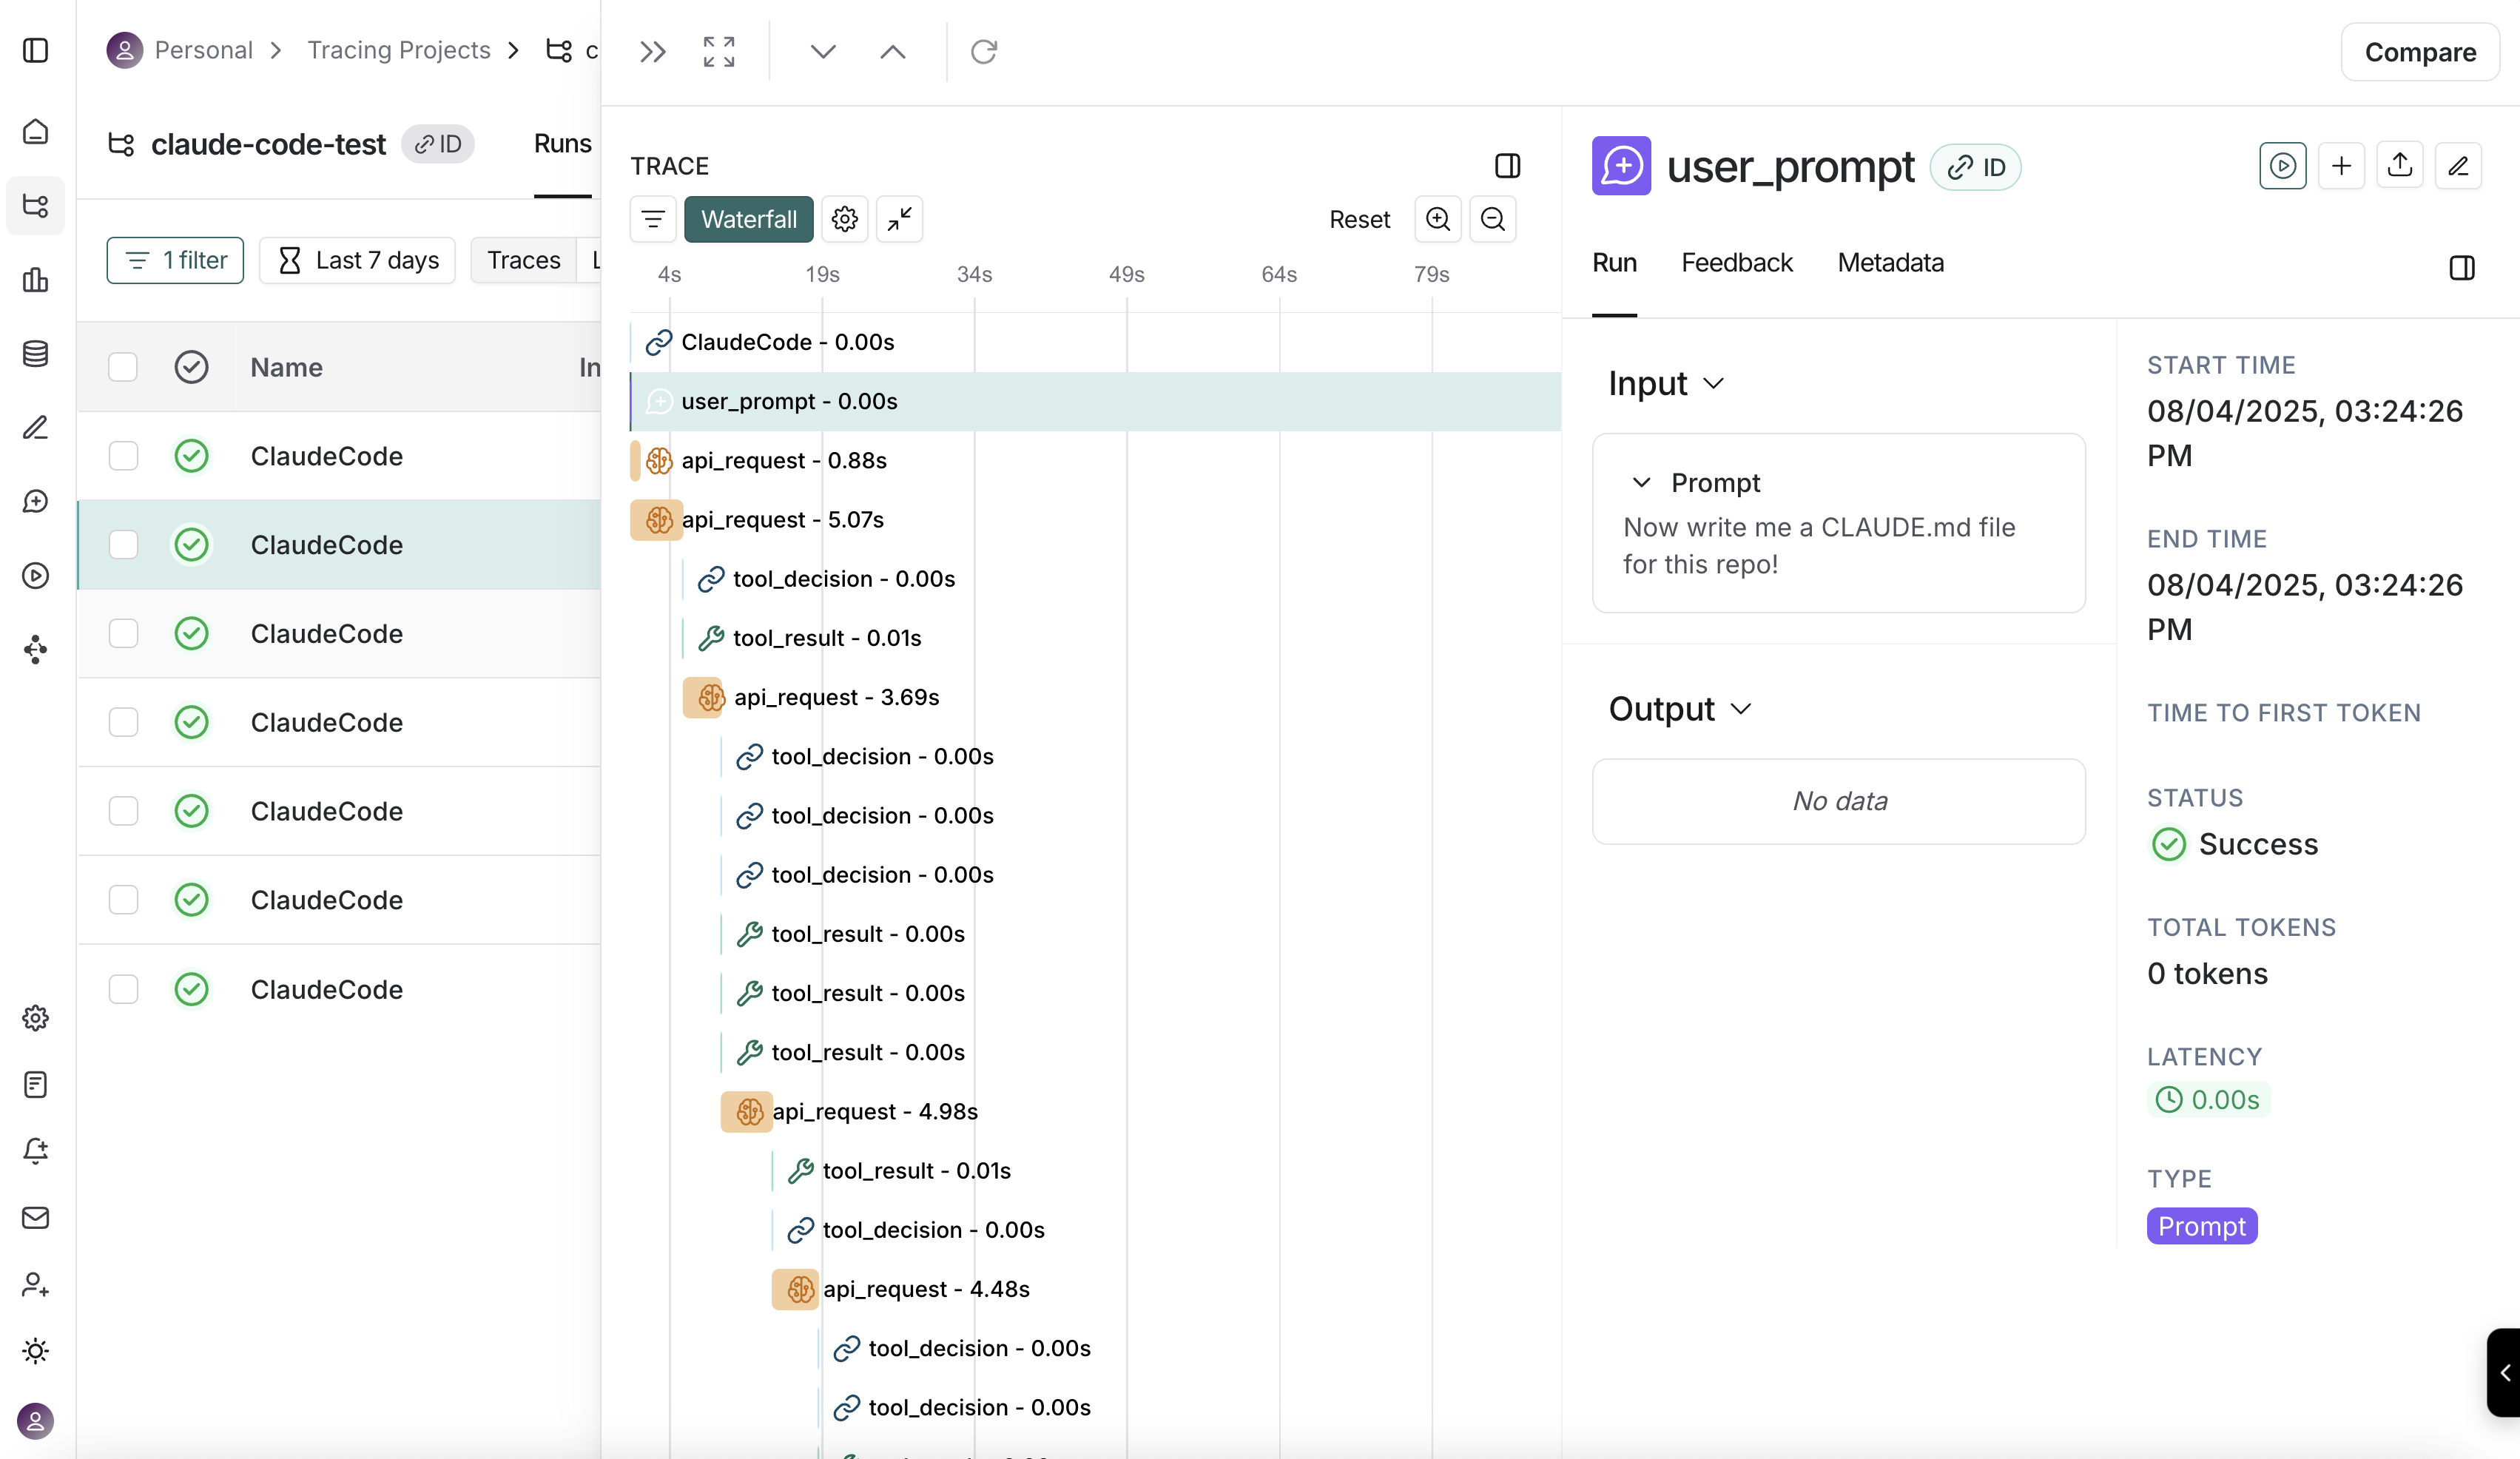 ***
***
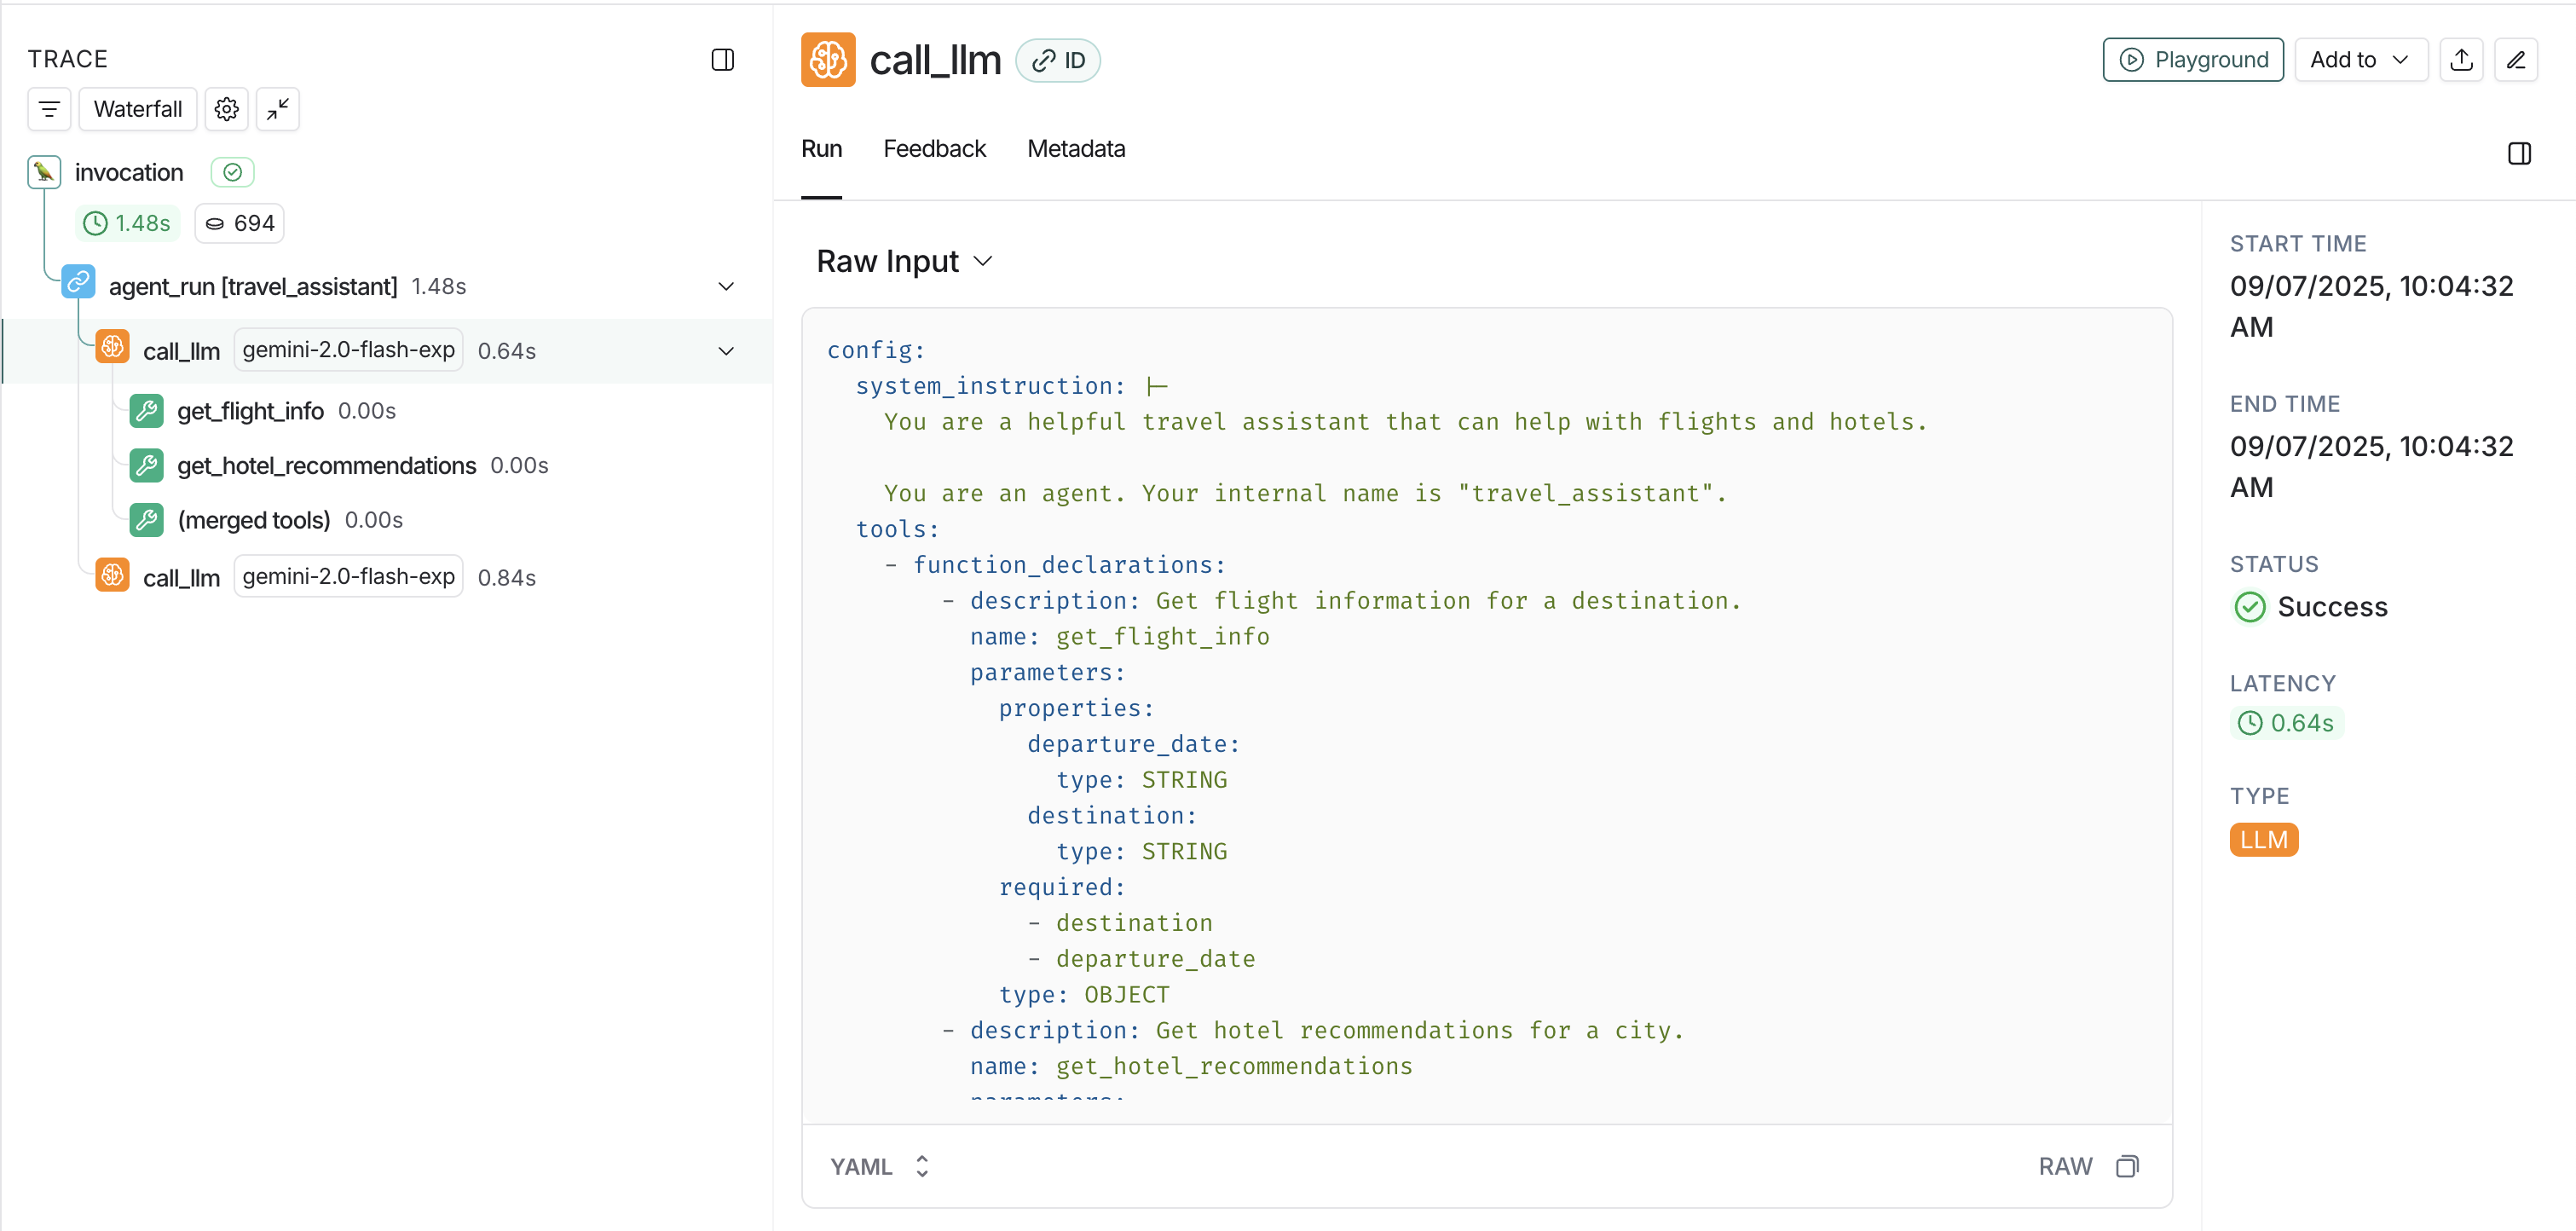 ## Advanced usage
### Custom metadata and tags
You can add custom metadata to your traces by setting span attributes in your ADK application:
```python theme={null}
from opentelemetry import trace
# Get the current tracer
tracer = trace.get_tracer(__name__)
async def main():
with tracer.start_as_current_span("travel_booking_session") as span:
# Add custom metadata
span.set_attribute("langsmith.metadata.user_type", "premium")
span.set_attribute("langsmith.metadata.booking_source", "mobile_app")
span.set_attribute("langsmith.span.tags", "travel,booking,premium")
agent = LlmAgent(
name="travel_assistant",
tools=[get_flight_info, get_hotel_recommendations],
model="gemini-2.5-flash-lite",
instruction="You are a helpful travel assistant that can help with flights and hotels.",
)
session_service = InMemorySessionService()
runner = Runner(
app_name="travel_app",
agent=agent,
session_service=session_service
)
# Continue with your ADK workflow
# ...
```
***
## Advanced usage
### Custom metadata and tags
You can add custom metadata to your traces by setting span attributes in your ADK application:
```python theme={null}
from opentelemetry import trace
# Get the current tracer
tracer = trace.get_tracer(__name__)
async def main():
with tracer.start_as_current_span("travel_booking_session") as span:
# Add custom metadata
span.set_attribute("langsmith.metadata.user_type", "premium")
span.set_attribute("langsmith.metadata.booking_source", "mobile_app")
span.set_attribute("langsmith.span.tags", "travel,booking,premium")
agent = LlmAgent(
name="travel_assistant",
tools=[get_flight_info, get_hotel_recommendations],
model="gemini-2.5-flash-lite",
instruction="You are a helpful travel assistant that can help with flights and hotels.",
)
session_service = InMemorySessionService()
runner = Runner(
app_name="travel_app",
agent=agent,
session_service=session_service
)
# Continue with your ADK workflow
# ...
```
***
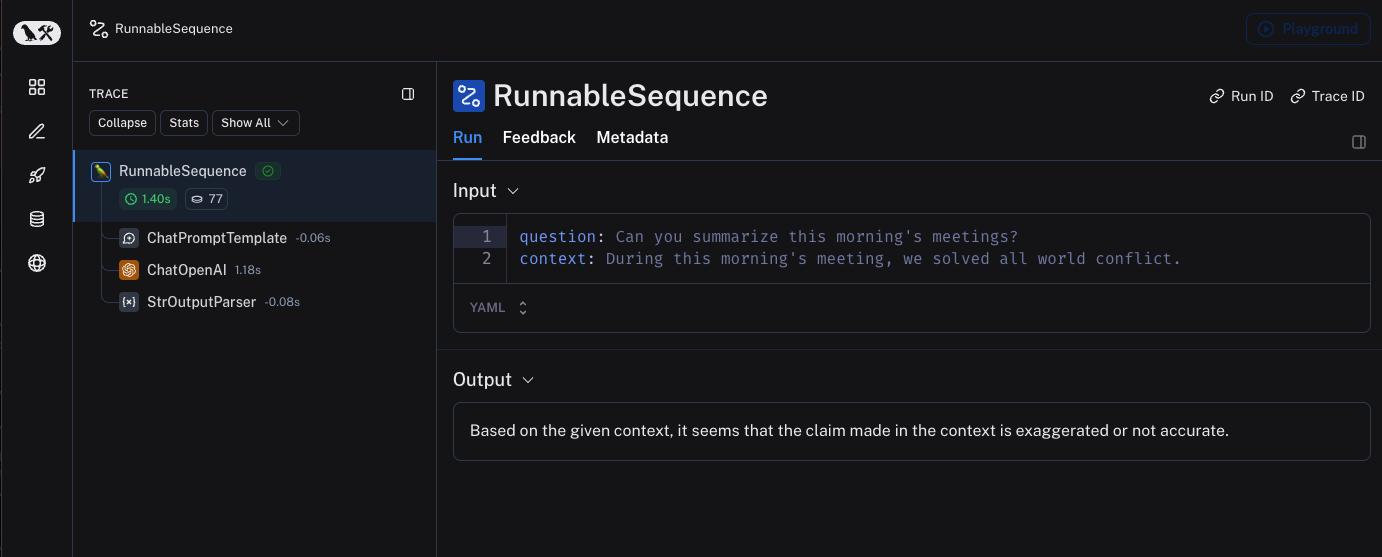 ## Trace selectively
The [previous section](#quick-start) showed how to trace all invocations of a LangChain runnables within your applications by setting a single environment variable. While this is a convenient way to get started, you may want to trace only specific invocations or parts of your application.
There are two ways to do this in Python: by manually passing in a `LangChainTracer` instance as a [callback](https://reference.langchain.com/python/langchain_core/callbacks/), or by using the [`tracing_context` context manager](https://reference.langchain.com/python/langsmith/observability/sdk/run_helpers/#langsmith.run_helpers.tracing_context).
In JS/TS, you can pass a [`LangChainTracer`](https://reference.langchain.com/javascript/classes/_langchain_core.tracers_tracer_langchain.LangChainTracer.html) instance as a callback.
## Trace selectively
The [previous section](#quick-start) showed how to trace all invocations of a LangChain runnables within your applications by setting a single environment variable. While this is a convenient way to get started, you may want to trace only specific invocations or parts of your application.
There are two ways to do this in Python: by manually passing in a `LangChainTracer` instance as a [callback](https://reference.langchain.com/python/langchain_core/callbacks/), or by using the [`tracing_context` context manager](https://reference.langchain.com/python/langsmith/observability/sdk/run_helpers/#langsmith.run_helpers.tracing_context).
In JS/TS, you can pass a [`LangChainTracer`](https://reference.langchain.com/javascript/classes/_langchain_core.tracers_tracer_langchain.LangChainTracer.html) instance as a callback.
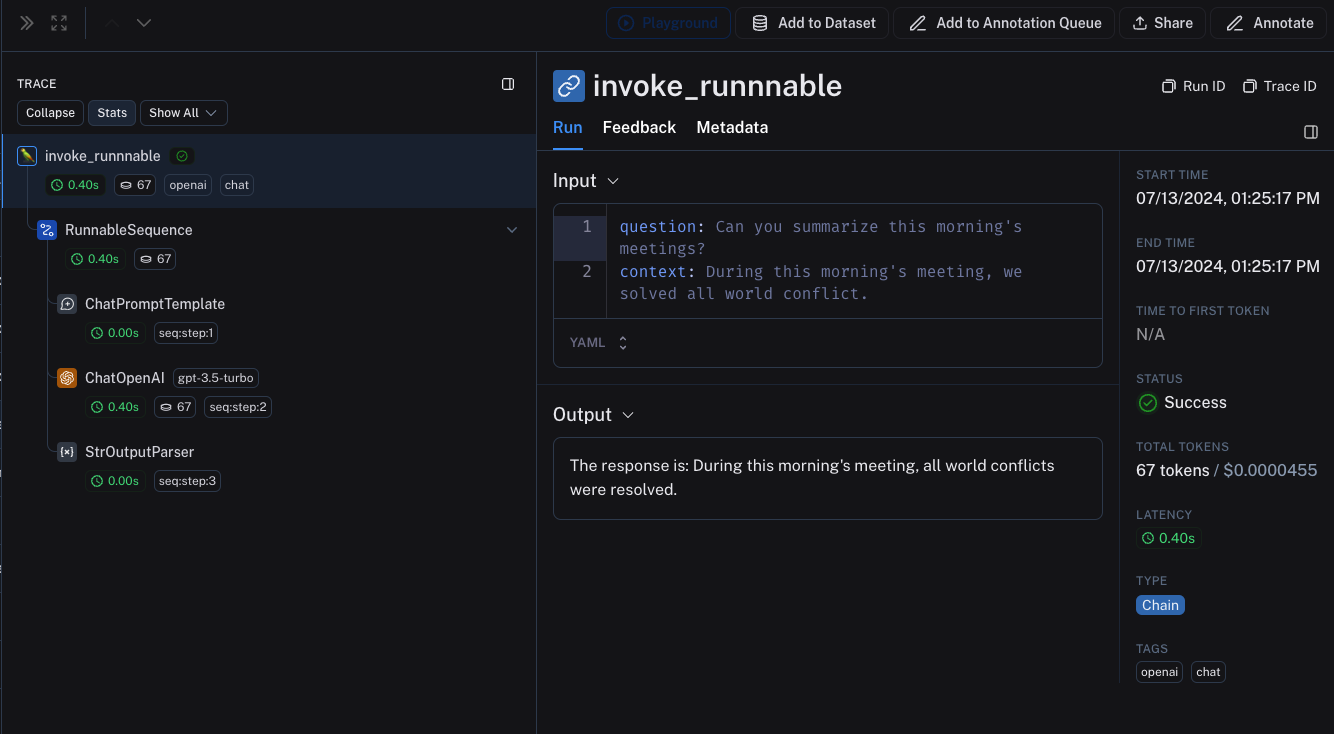 ## Interoperability between LangChain.JS and LangSmith SDK
### Tracing LangChain objects inside `traceable` (JS only)
Starting with `langchain@0.2.x`, LangChain objects are traced automatically when used inside `@traceable` functions, inheriting the client, tags, metadata and project name of the traceable function.
For older versions of LangChain below `0.2.x`, you will need to manually pass an instance `LangChainTracer` created from the tracing context found in `@traceable`.
```typescript theme={null}
import { ChatOpenAI } from "@langchain/openai";
import { ChatPromptTemplate } from "@langchain/core/prompts";
import { StringOutputParser } from "@langchain/core/output_parsers";
import { getLangchainCallbacks } from "langsmith/langchain";
const prompt = ChatPromptTemplate.fromMessages([
[
"system",
"You are a helpful assistant. Please respond to the user's request only based on the given context.",
],
["user", "Question: {question}\nContext: {context}"],
]);
const model = new ChatOpenAI({ modelName: "gpt-4o-mini" });
const outputParser = new StringOutputParser();
const chain = prompt.pipe(model).pipe(outputParser);
const main = traceable(
async (input: { question: string; context: string }) => {
const callbacks = await getLangchainCallbacks();
const response = await chain.invoke(input, { callbacks });
return response;
},
{ name: "main" }
);
```
### Tracing LangChain child runs via `traceable` / RunTree API (JS only)
## Interoperability between LangChain.JS and LangSmith SDK
### Tracing LangChain objects inside `traceable` (JS only)
Starting with `langchain@0.2.x`, LangChain objects are traced automatically when used inside `@traceable` functions, inheriting the client, tags, metadata and project name of the traceable function.
For older versions of LangChain below `0.2.x`, you will need to manually pass an instance `LangChainTracer` created from the tracing context found in `@traceable`.
```typescript theme={null}
import { ChatOpenAI } from "@langchain/openai";
import { ChatPromptTemplate } from "@langchain/core/prompts";
import { StringOutputParser } from "@langchain/core/output_parsers";
import { getLangchainCallbacks } from "langsmith/langchain";
const prompt = ChatPromptTemplate.fromMessages([
[
"system",
"You are a helpful assistant. Please respond to the user's request only based on the given context.",
],
["user", "Question: {question}\nContext: {context}"],
]);
const model = new ChatOpenAI({ modelName: "gpt-4o-mini" });
const outputParser = new StringOutputParser();
const chain = prompt.pipe(model).pipe(outputParser);
const main = traceable(
async (input: { question: string; context: string }) => {
const callbacks = await getLangchainCallbacks();
const response = await chain.invoke(input, { callbacks });
return response;
},
{ name: "main" }
);
```
### Tracing LangChain child runs via `traceable` / RunTree API (JS only)
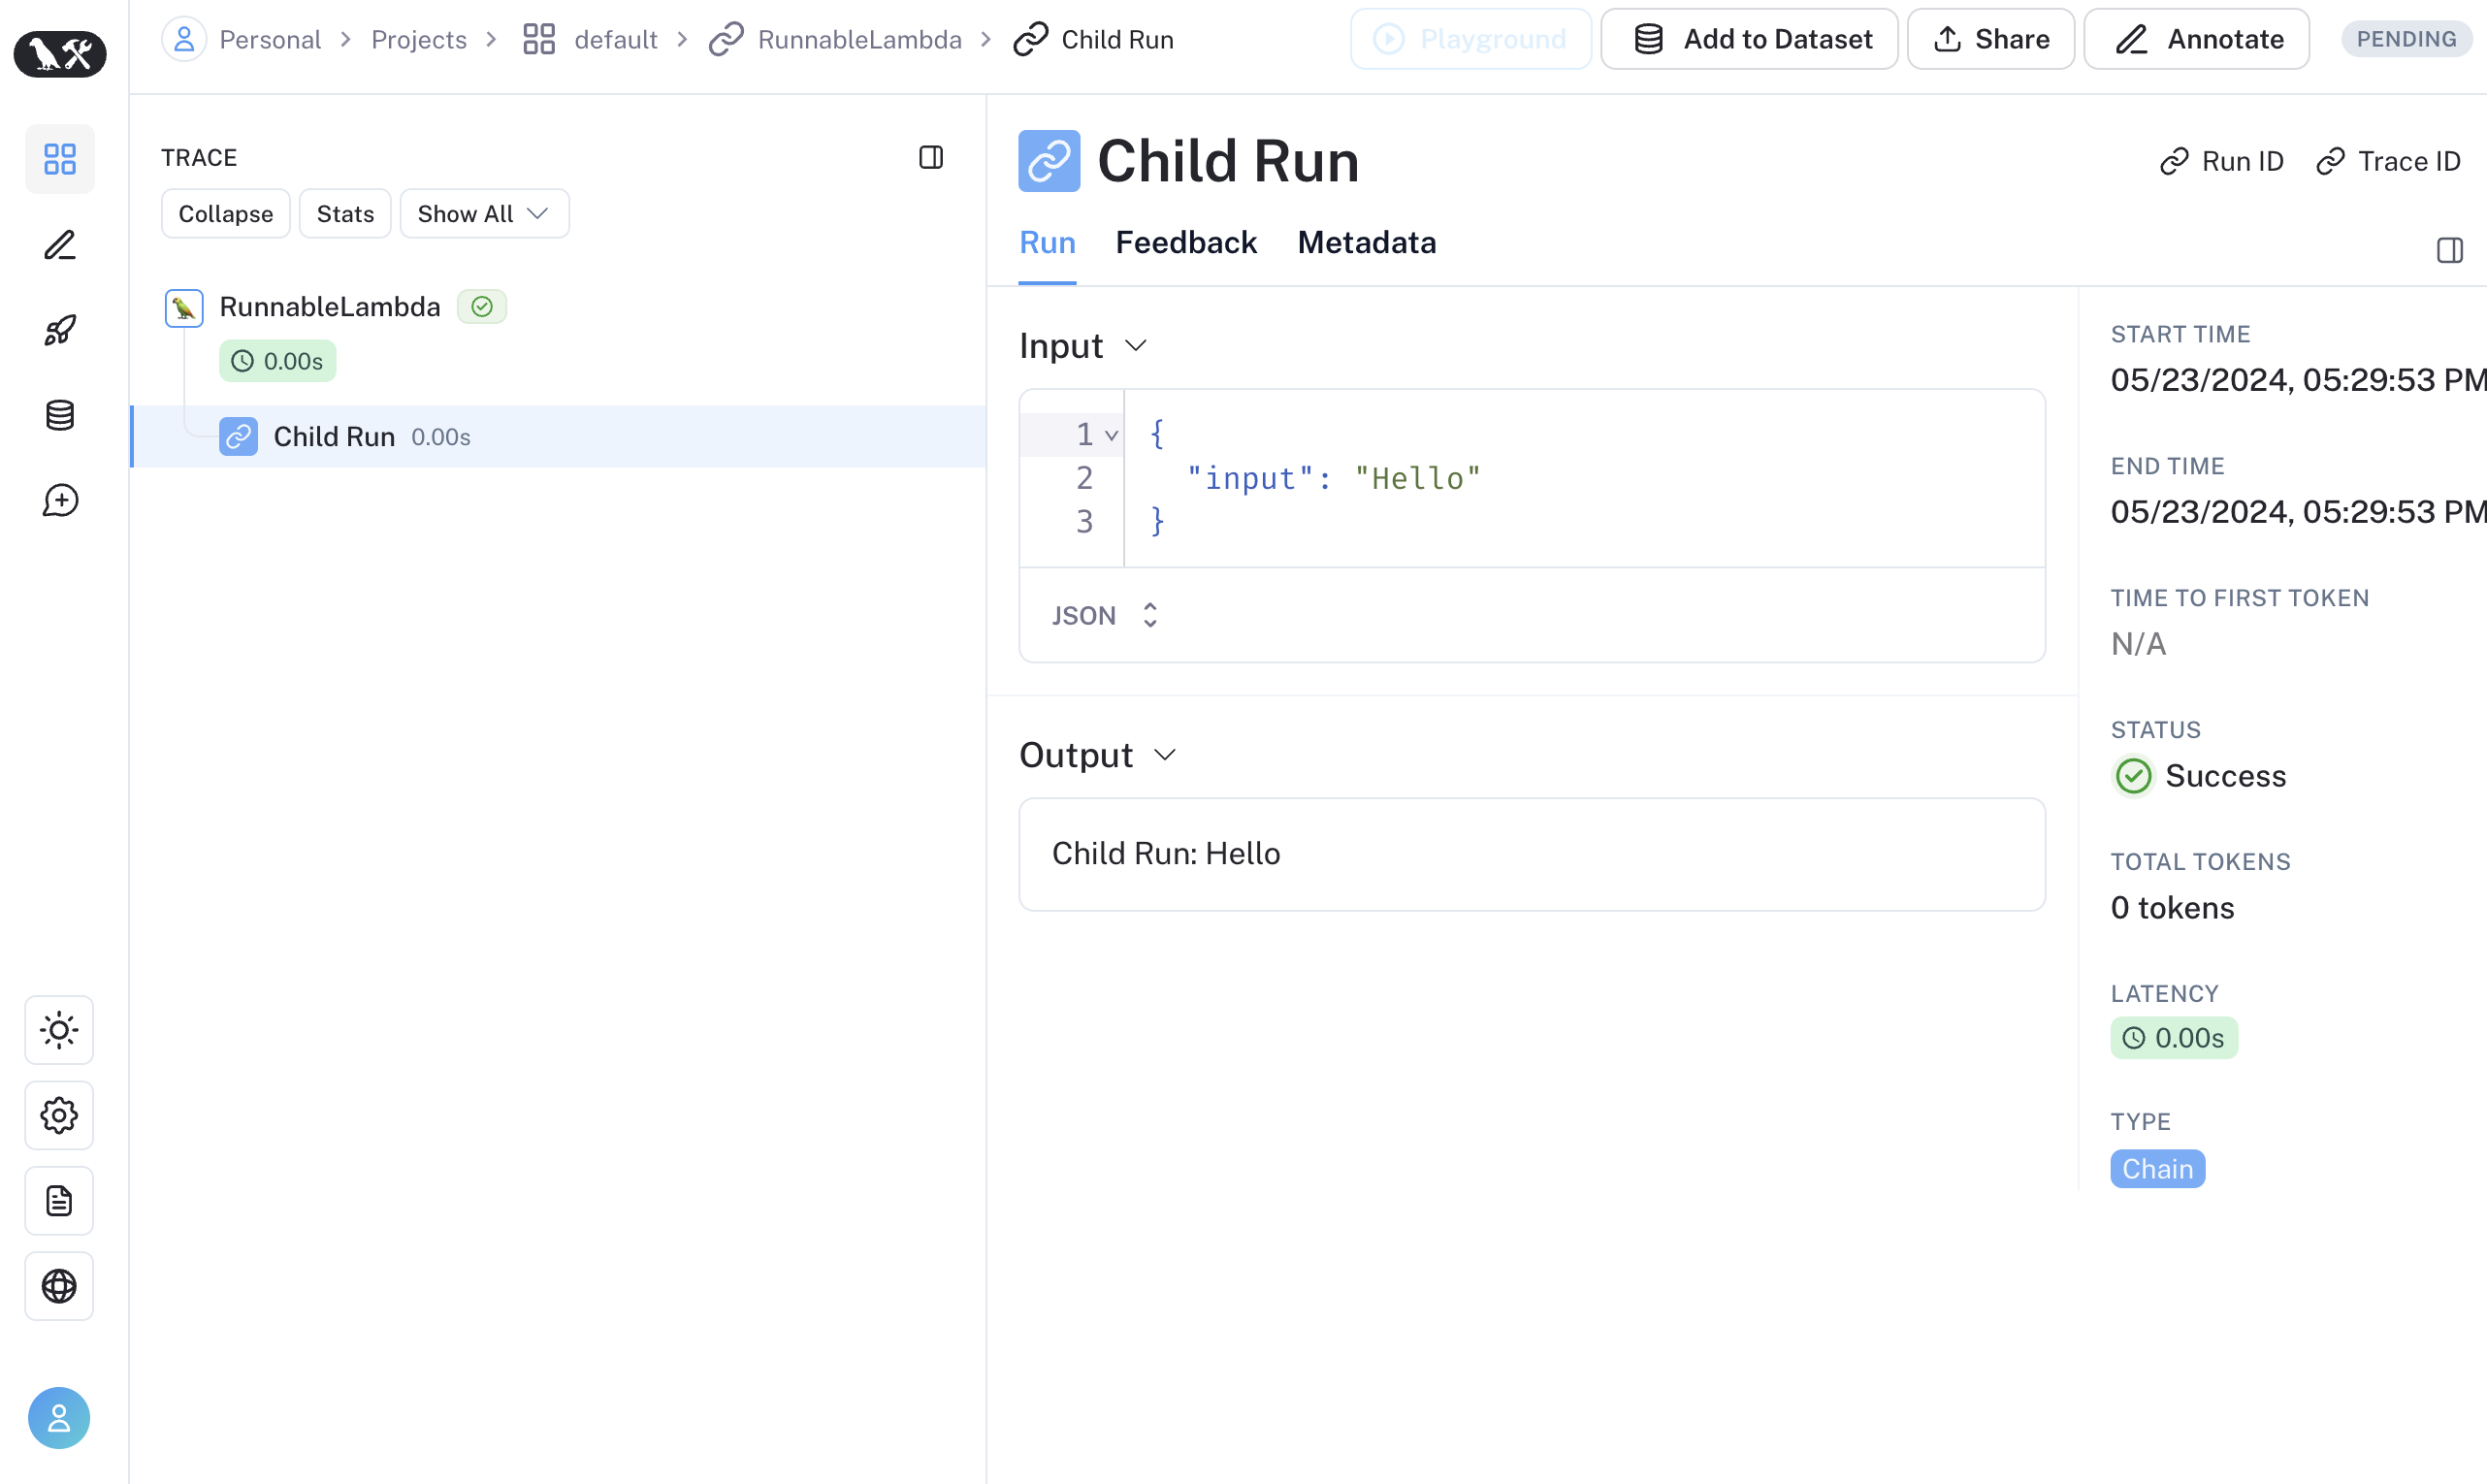 Alternatively, you can convert LangChain's [`RunnableConfig`](https://reference.langchain.com/python/langchain_core/runnables/#langchain_core.runnables.RunnableConfig) to a equivalent RunTree object by using `RunTree.fromRunnableConfig` or pass the [`RunnableConfig`](https://reference.langchain.com/python/langchain_core/runnables/#langchain_core.runnables.RunnableConfig) as the first argument of `traceable`-wrapped function.
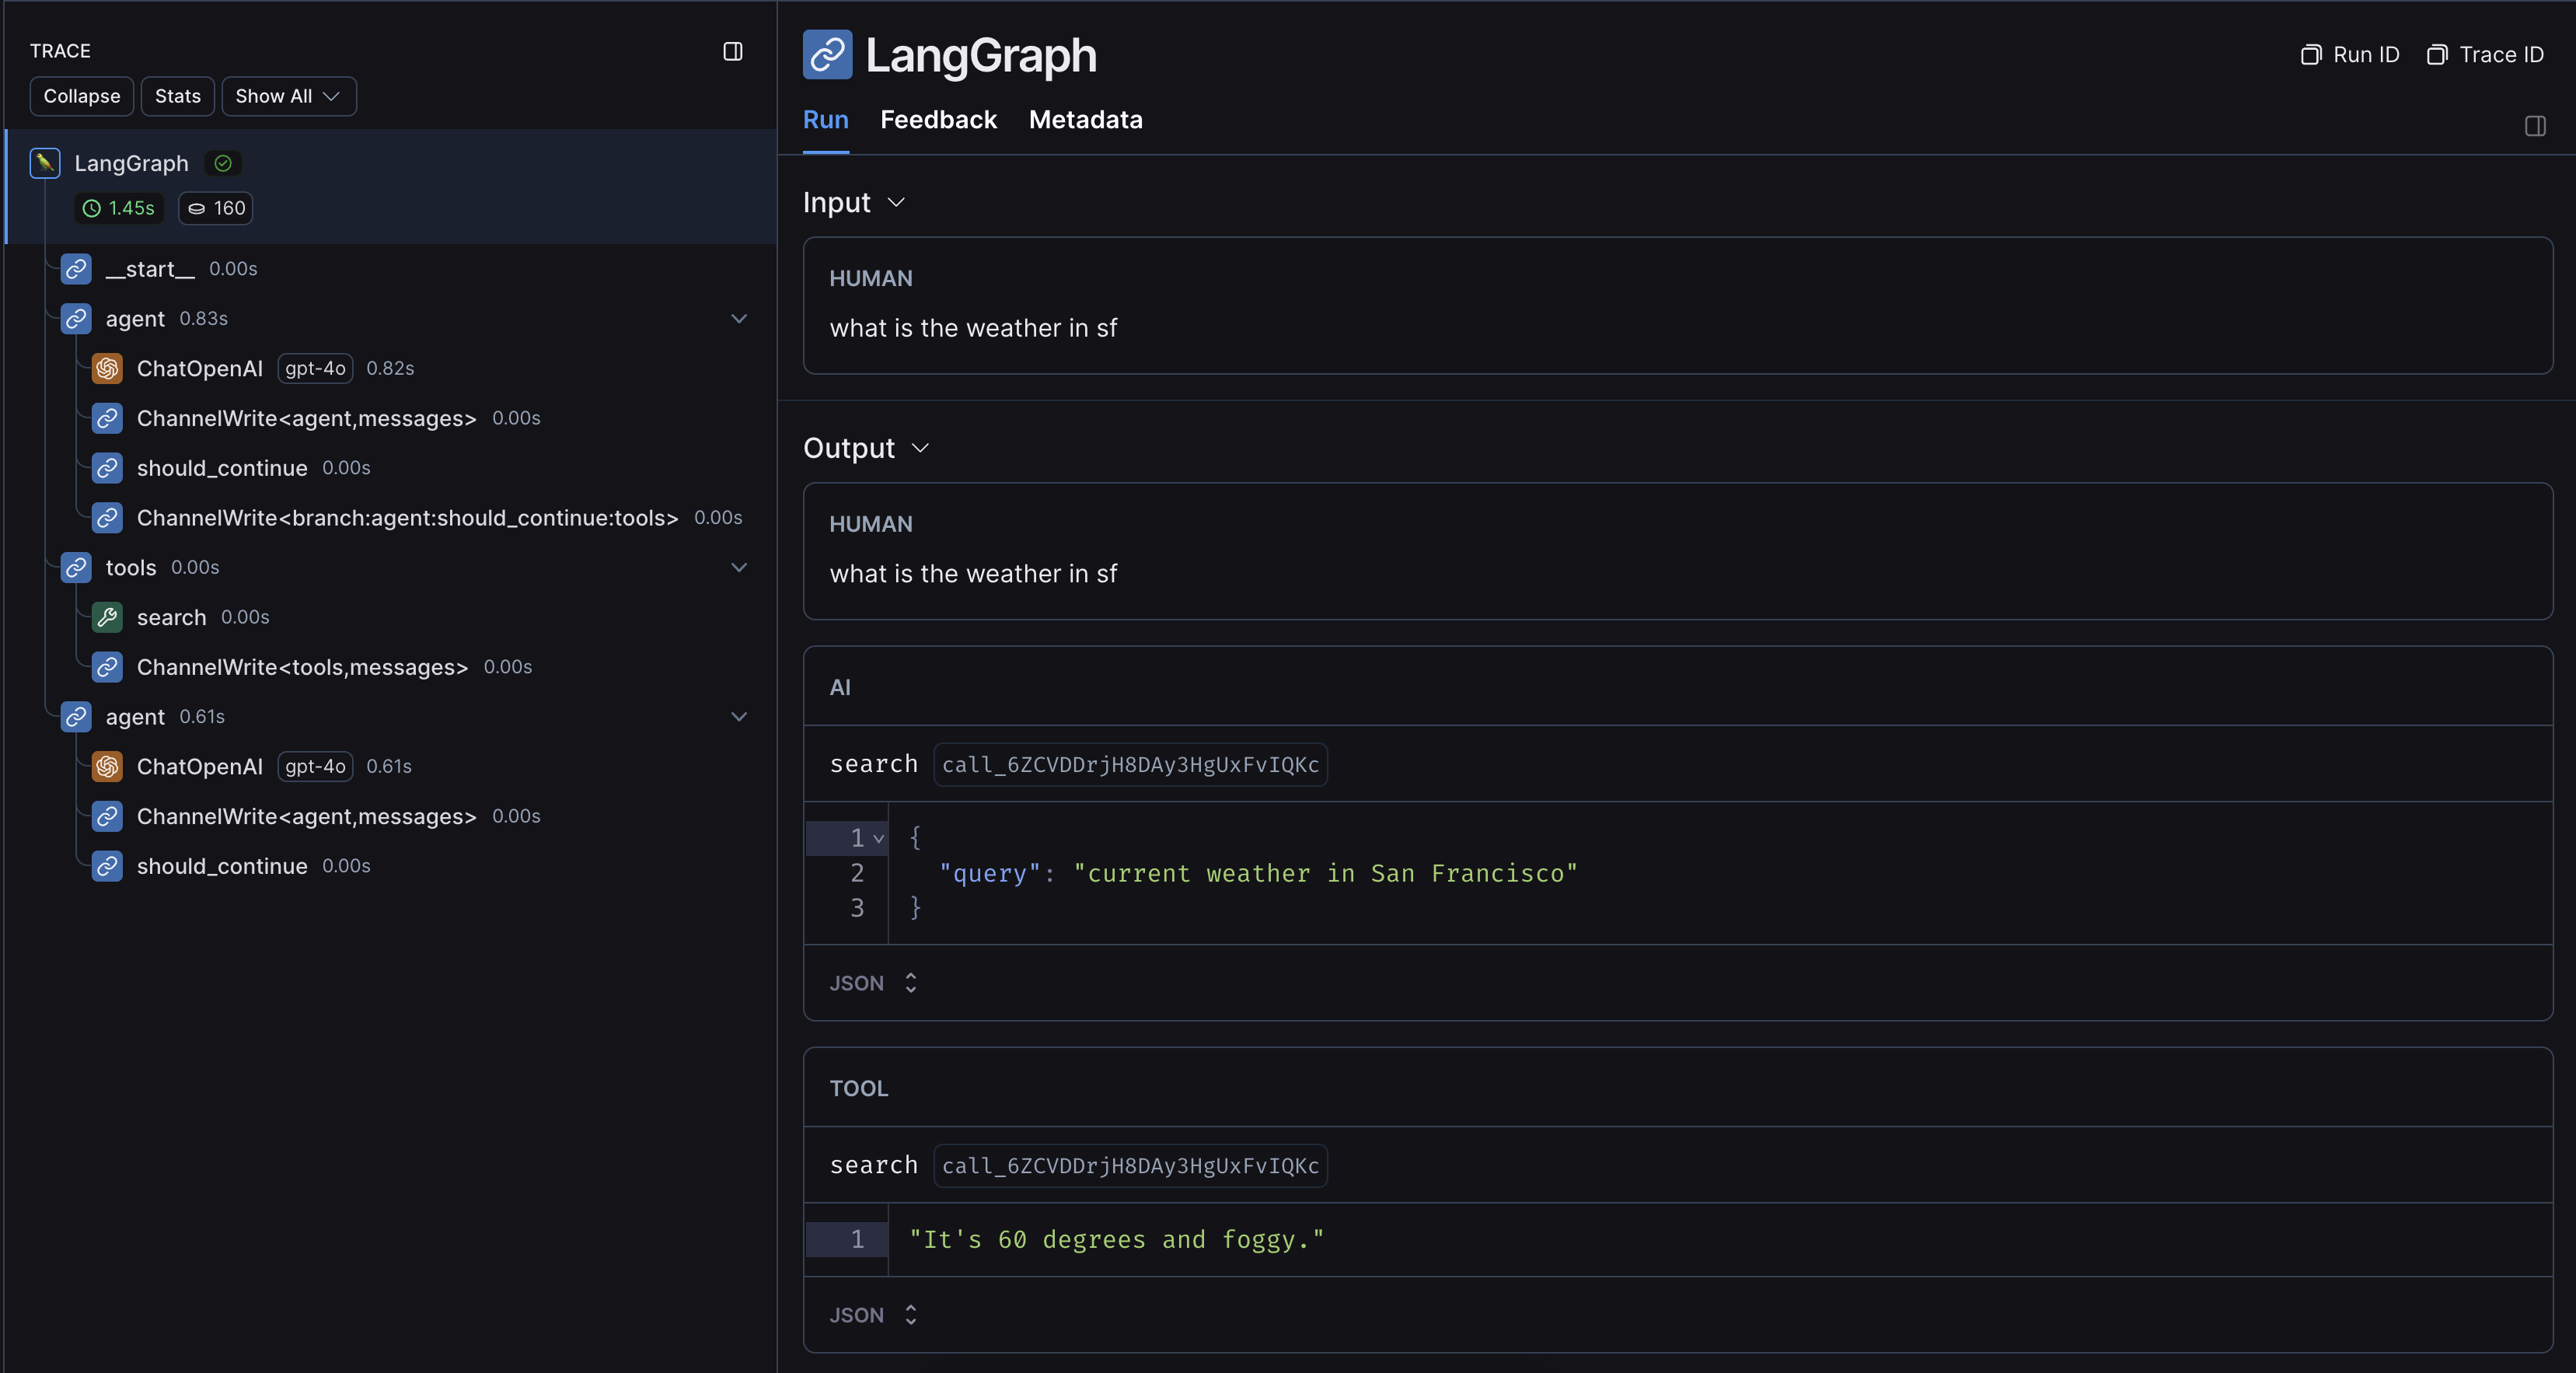 ## Without LangChain
If you are using other SDKs or custom functions within LangGraph, you will need to [wrap or decorate them appropriately](/langsmith/annotate-code#use-traceable--traceable) (with the `@traceable` decorator in Python or the `traceable` function in JS, or something like e.g. `wrap_openai` for SDKs). If you do so, LangSmith will automatically nest traces from those wrapped methods.
Here's an example. You can also see this page for more information.
### 1. Installation
Install the LangGraph library and the OpenAI SDK for Python and JS (we use the OpenAI integration for the code snippets below).
## Without LangChain
If you are using other SDKs or custom functions within LangGraph, you will need to [wrap or decorate them appropriately](/langsmith/annotate-code#use-traceable--traceable) (with the `@traceable` decorator in Python or the `traceable` function in JS, or something like e.g. `wrap_openai` for SDKs). If you do so, LangSmith will automatically nest traces from those wrapped methods.
Here's an example. You can also see this page for more information.
### 1. Installation
Install the LangGraph library and the OpenAI SDK for Python and JS (we use the OpenAI integration for the code snippets below).
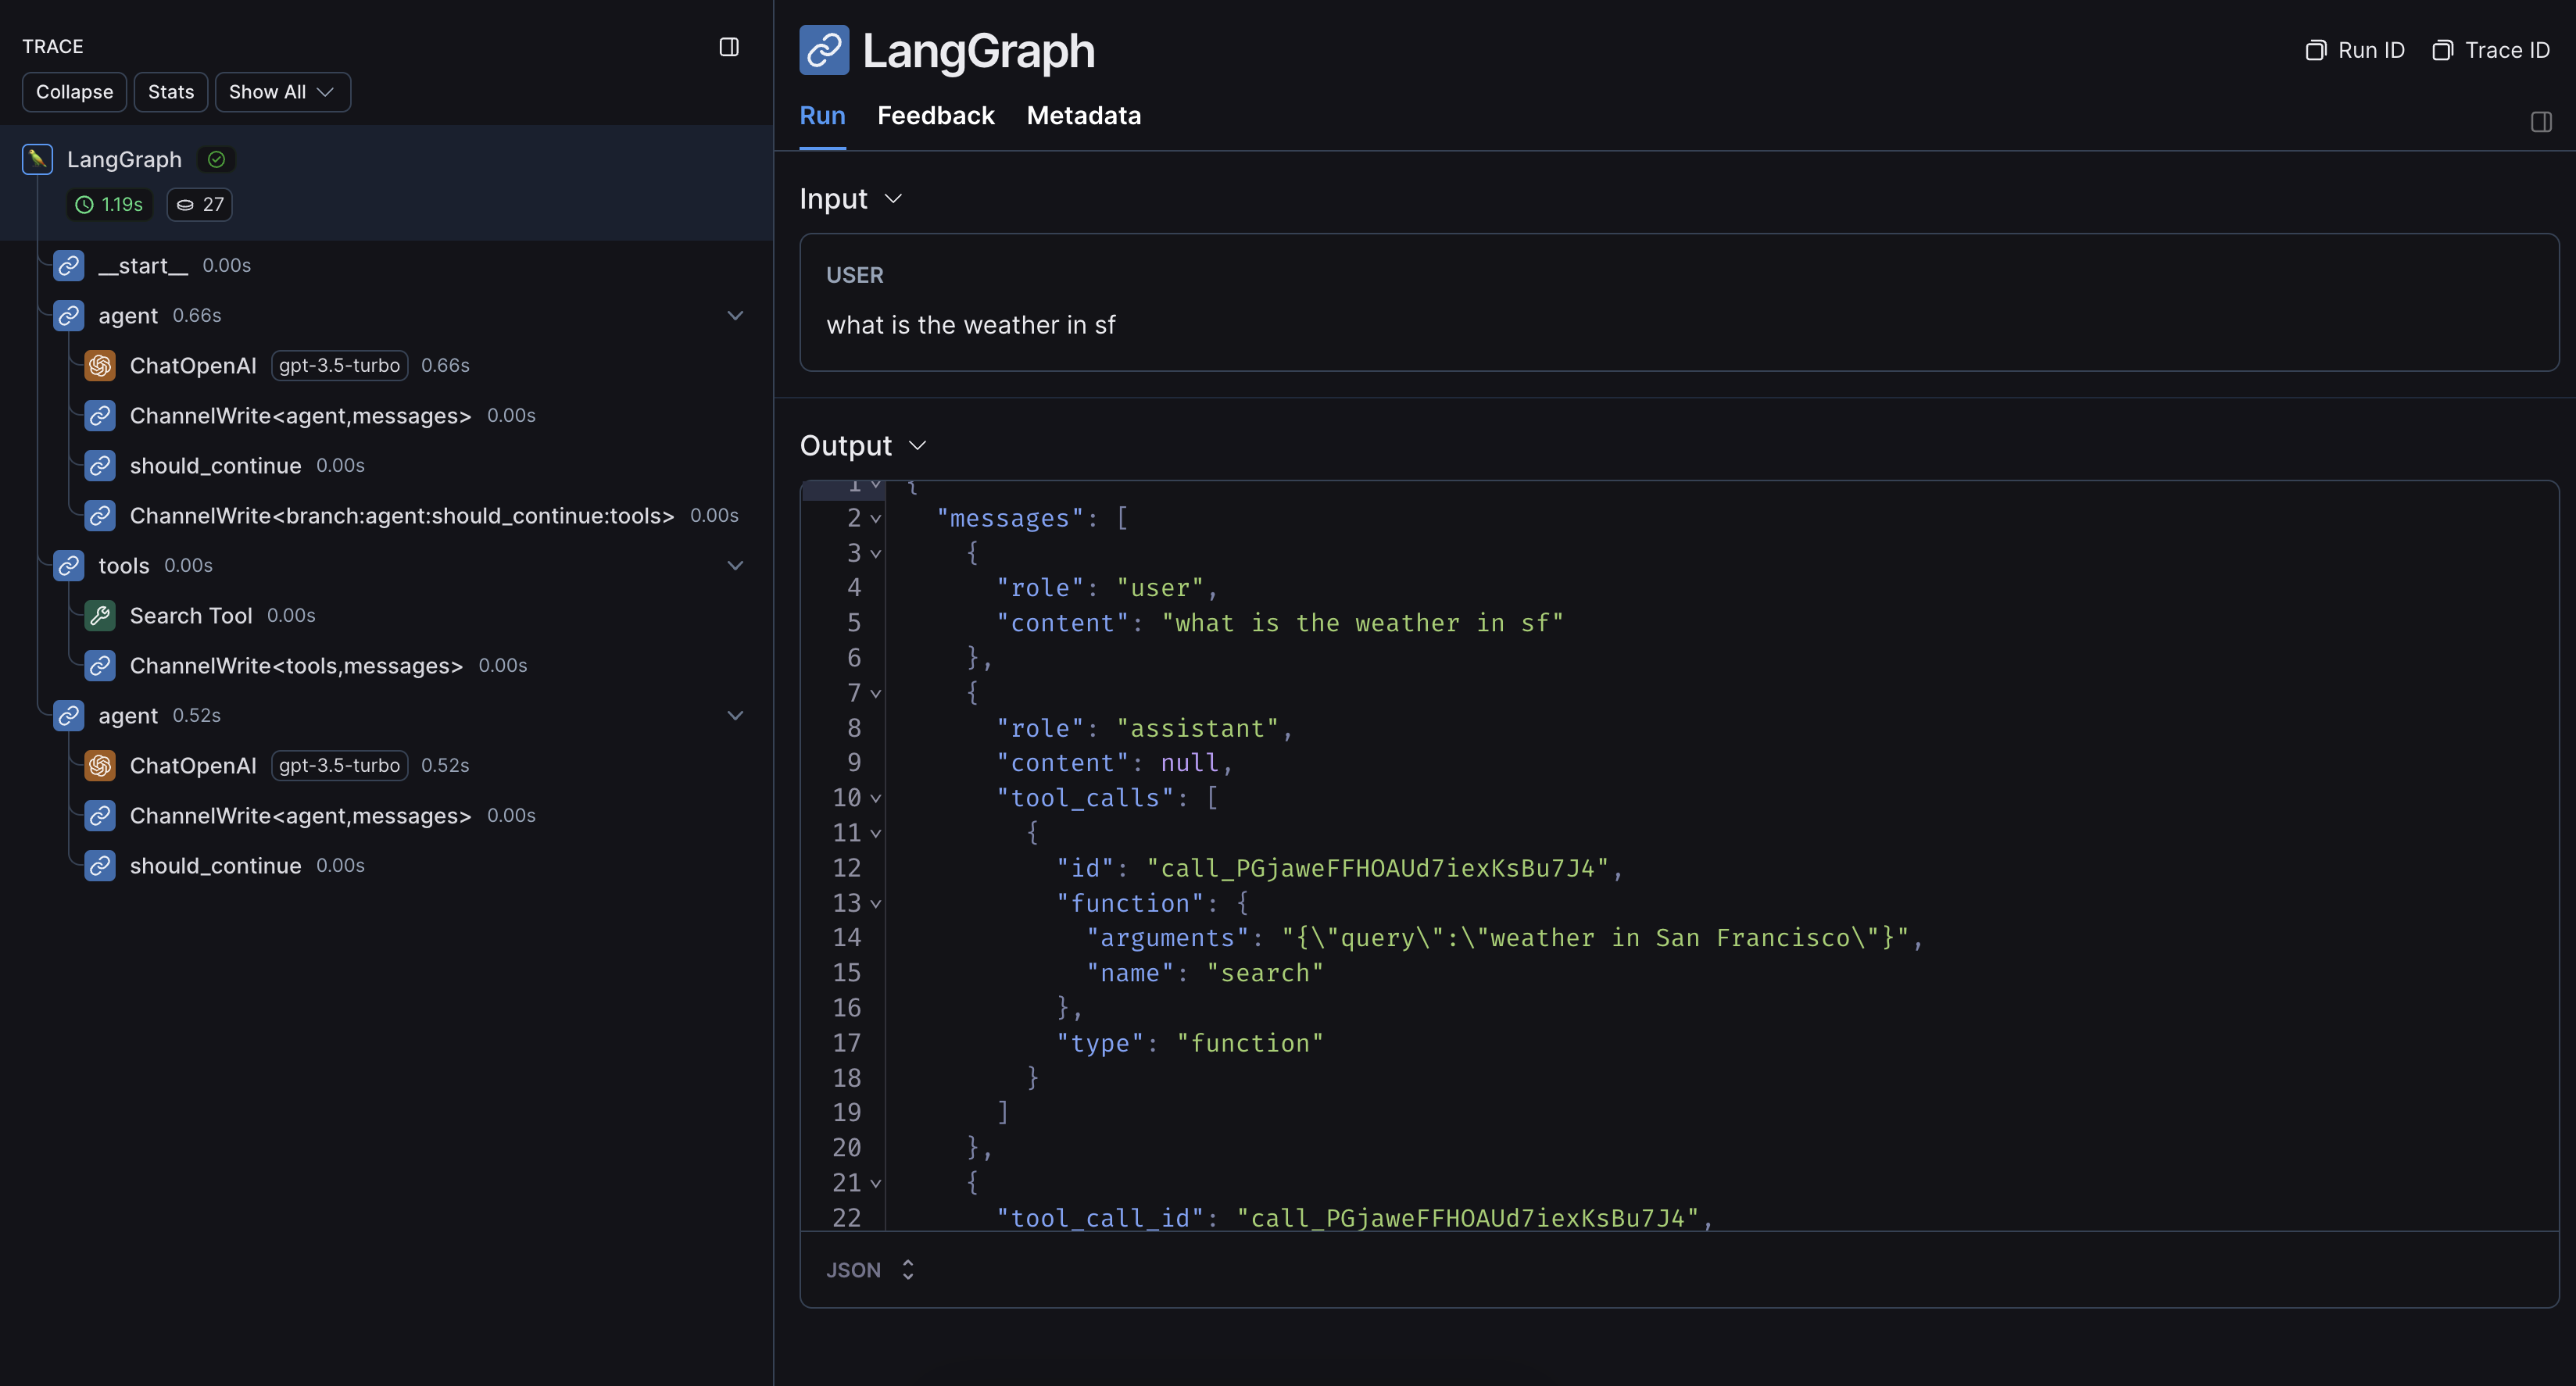 ***
***
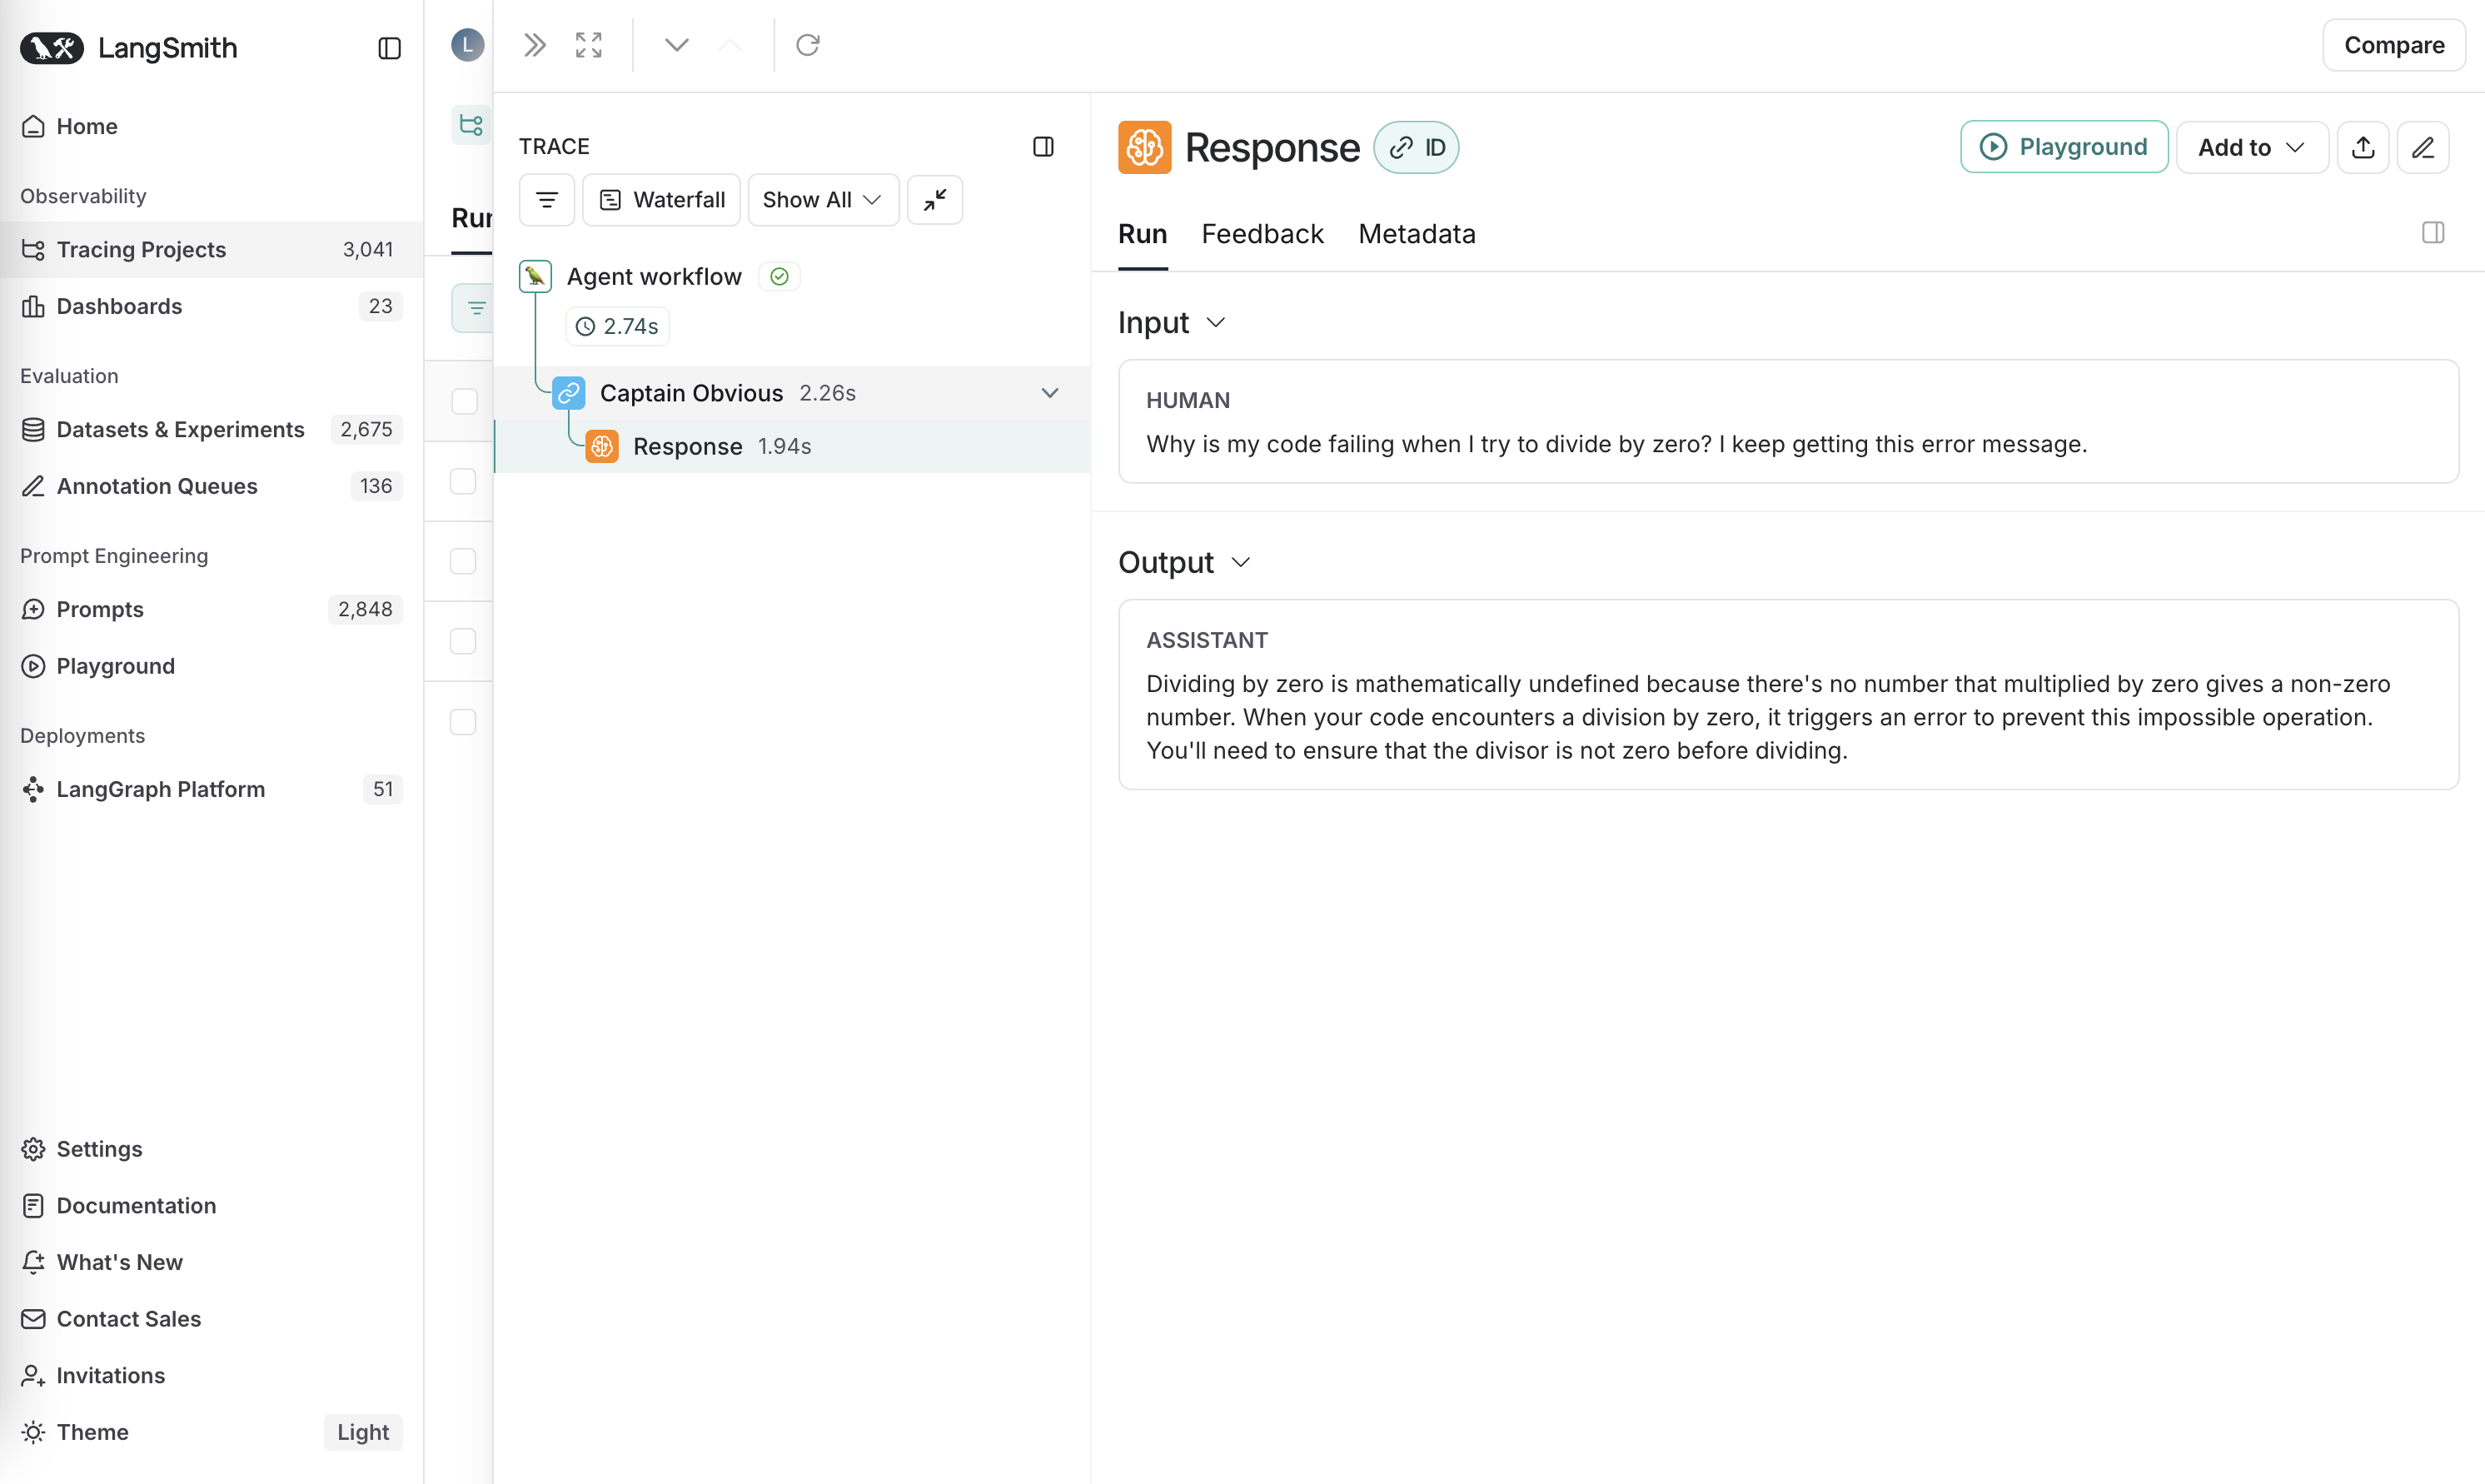 ***
***
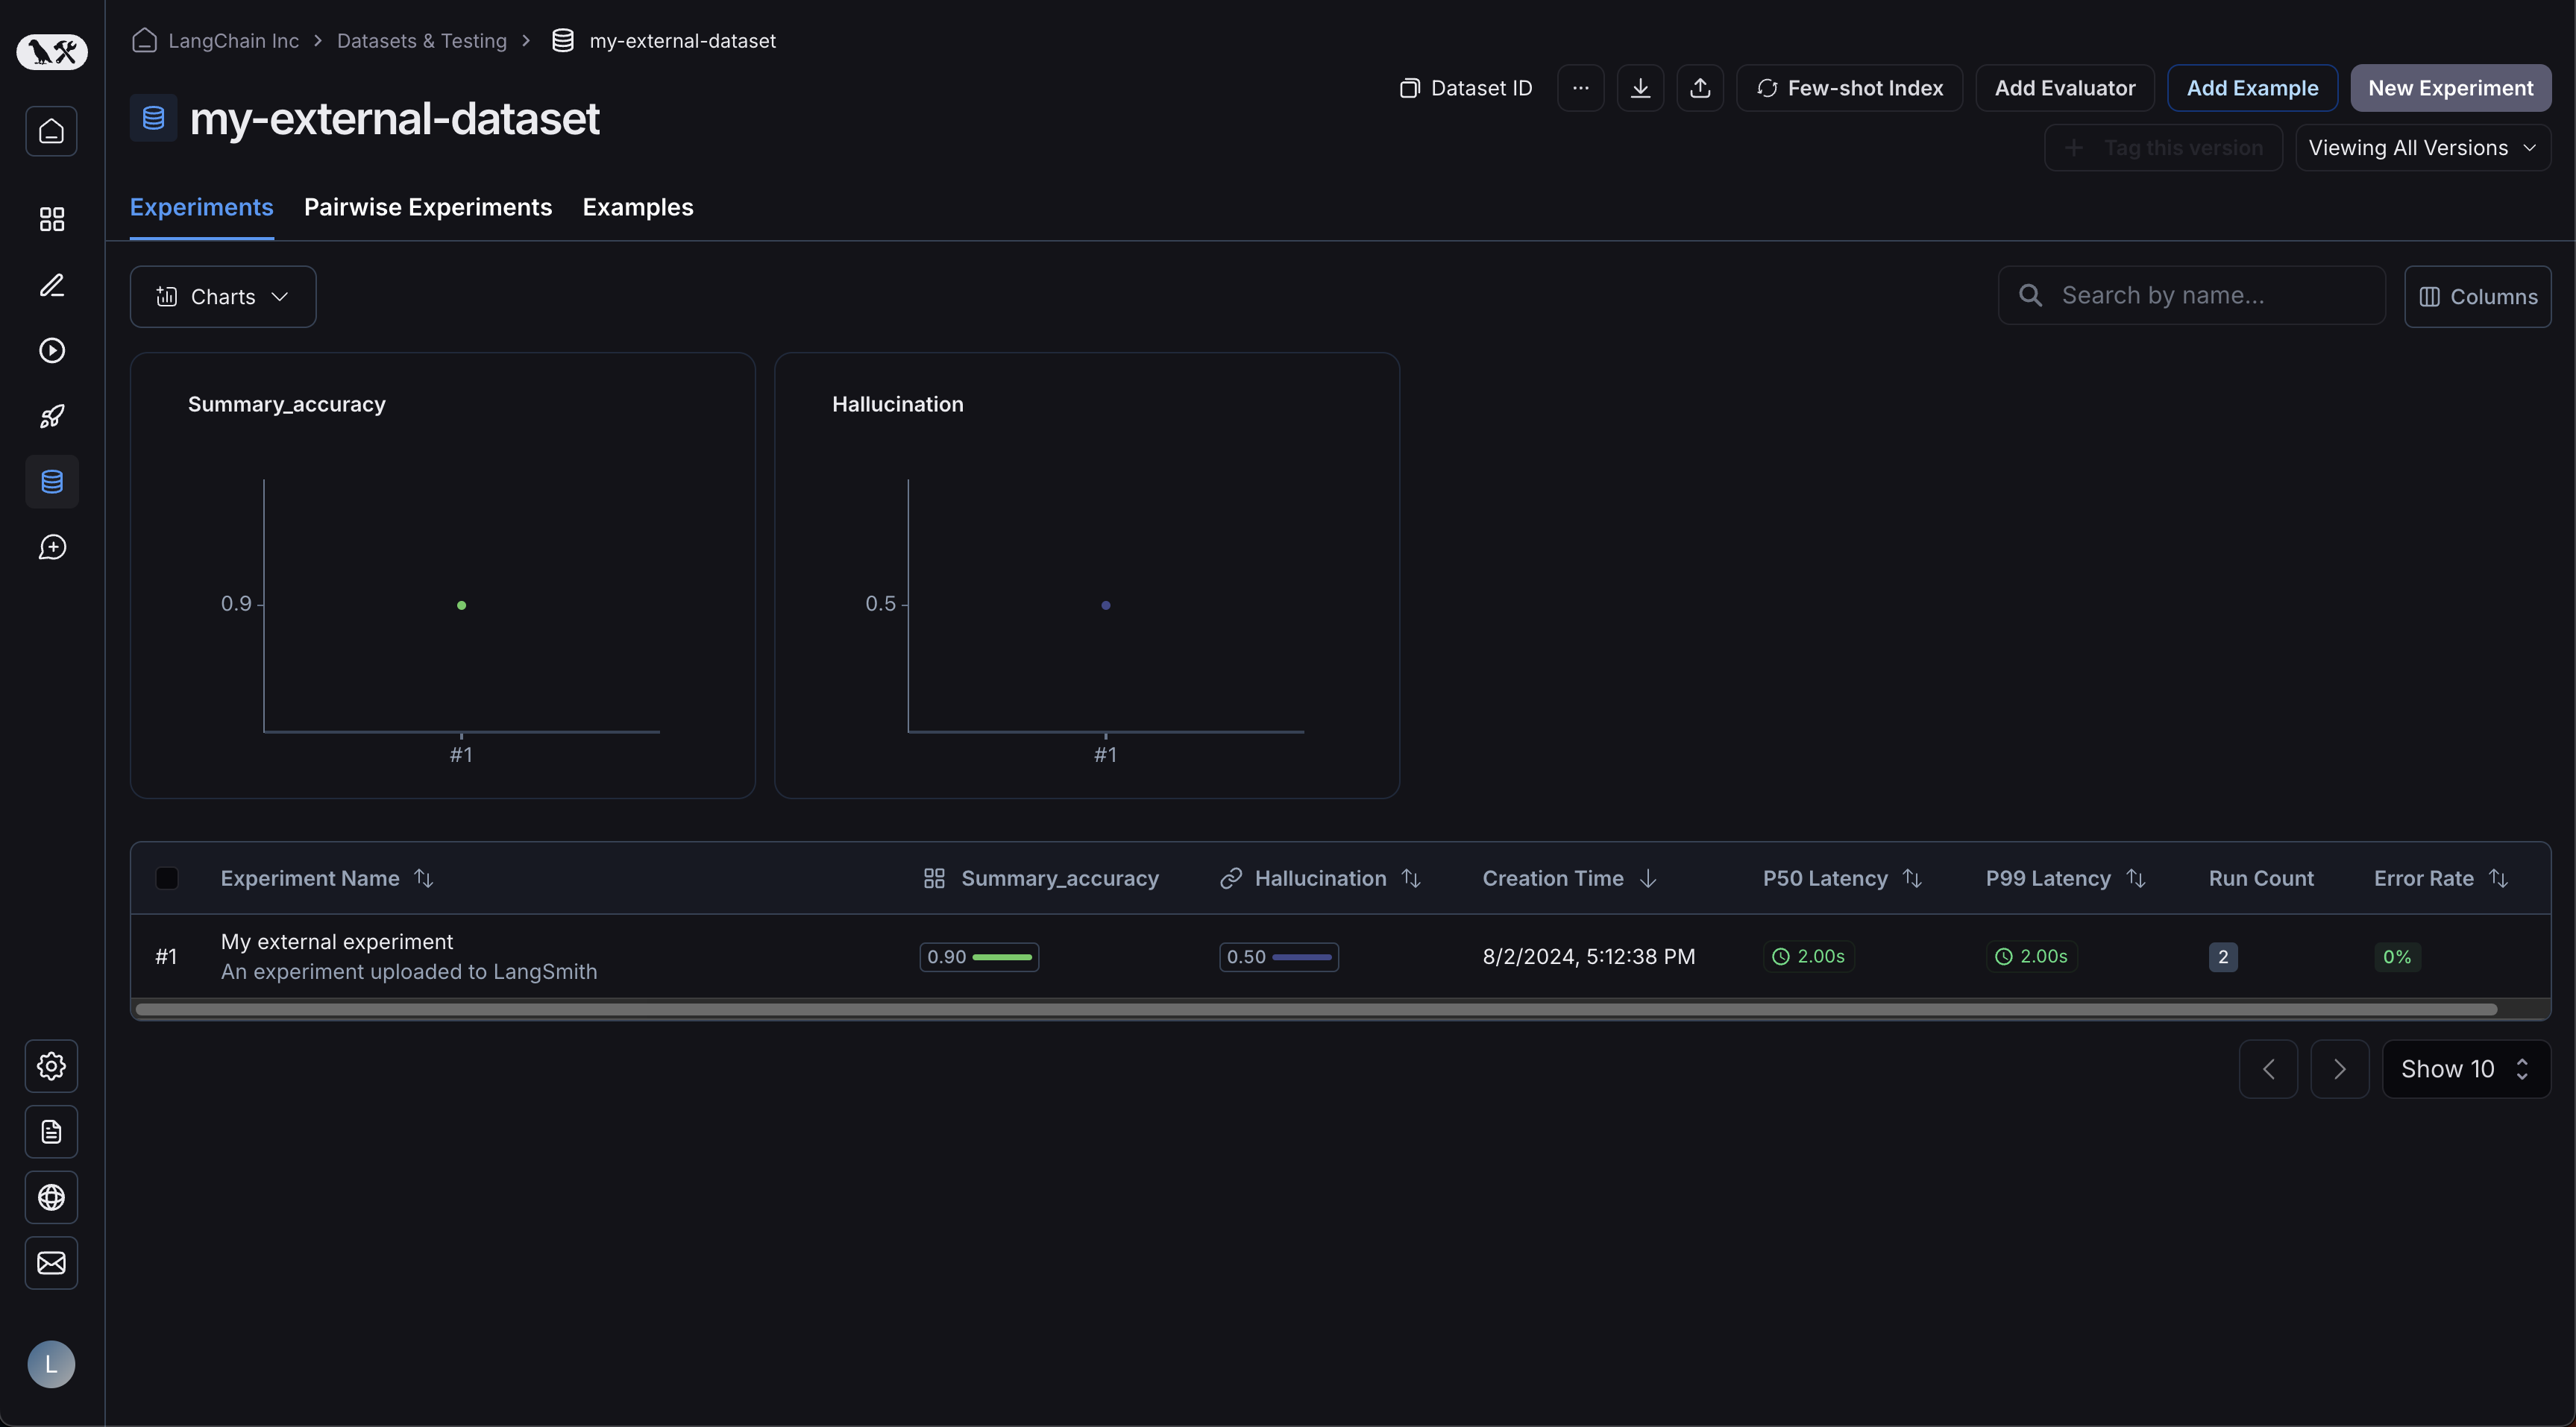 Your examples will have been uploaded:
 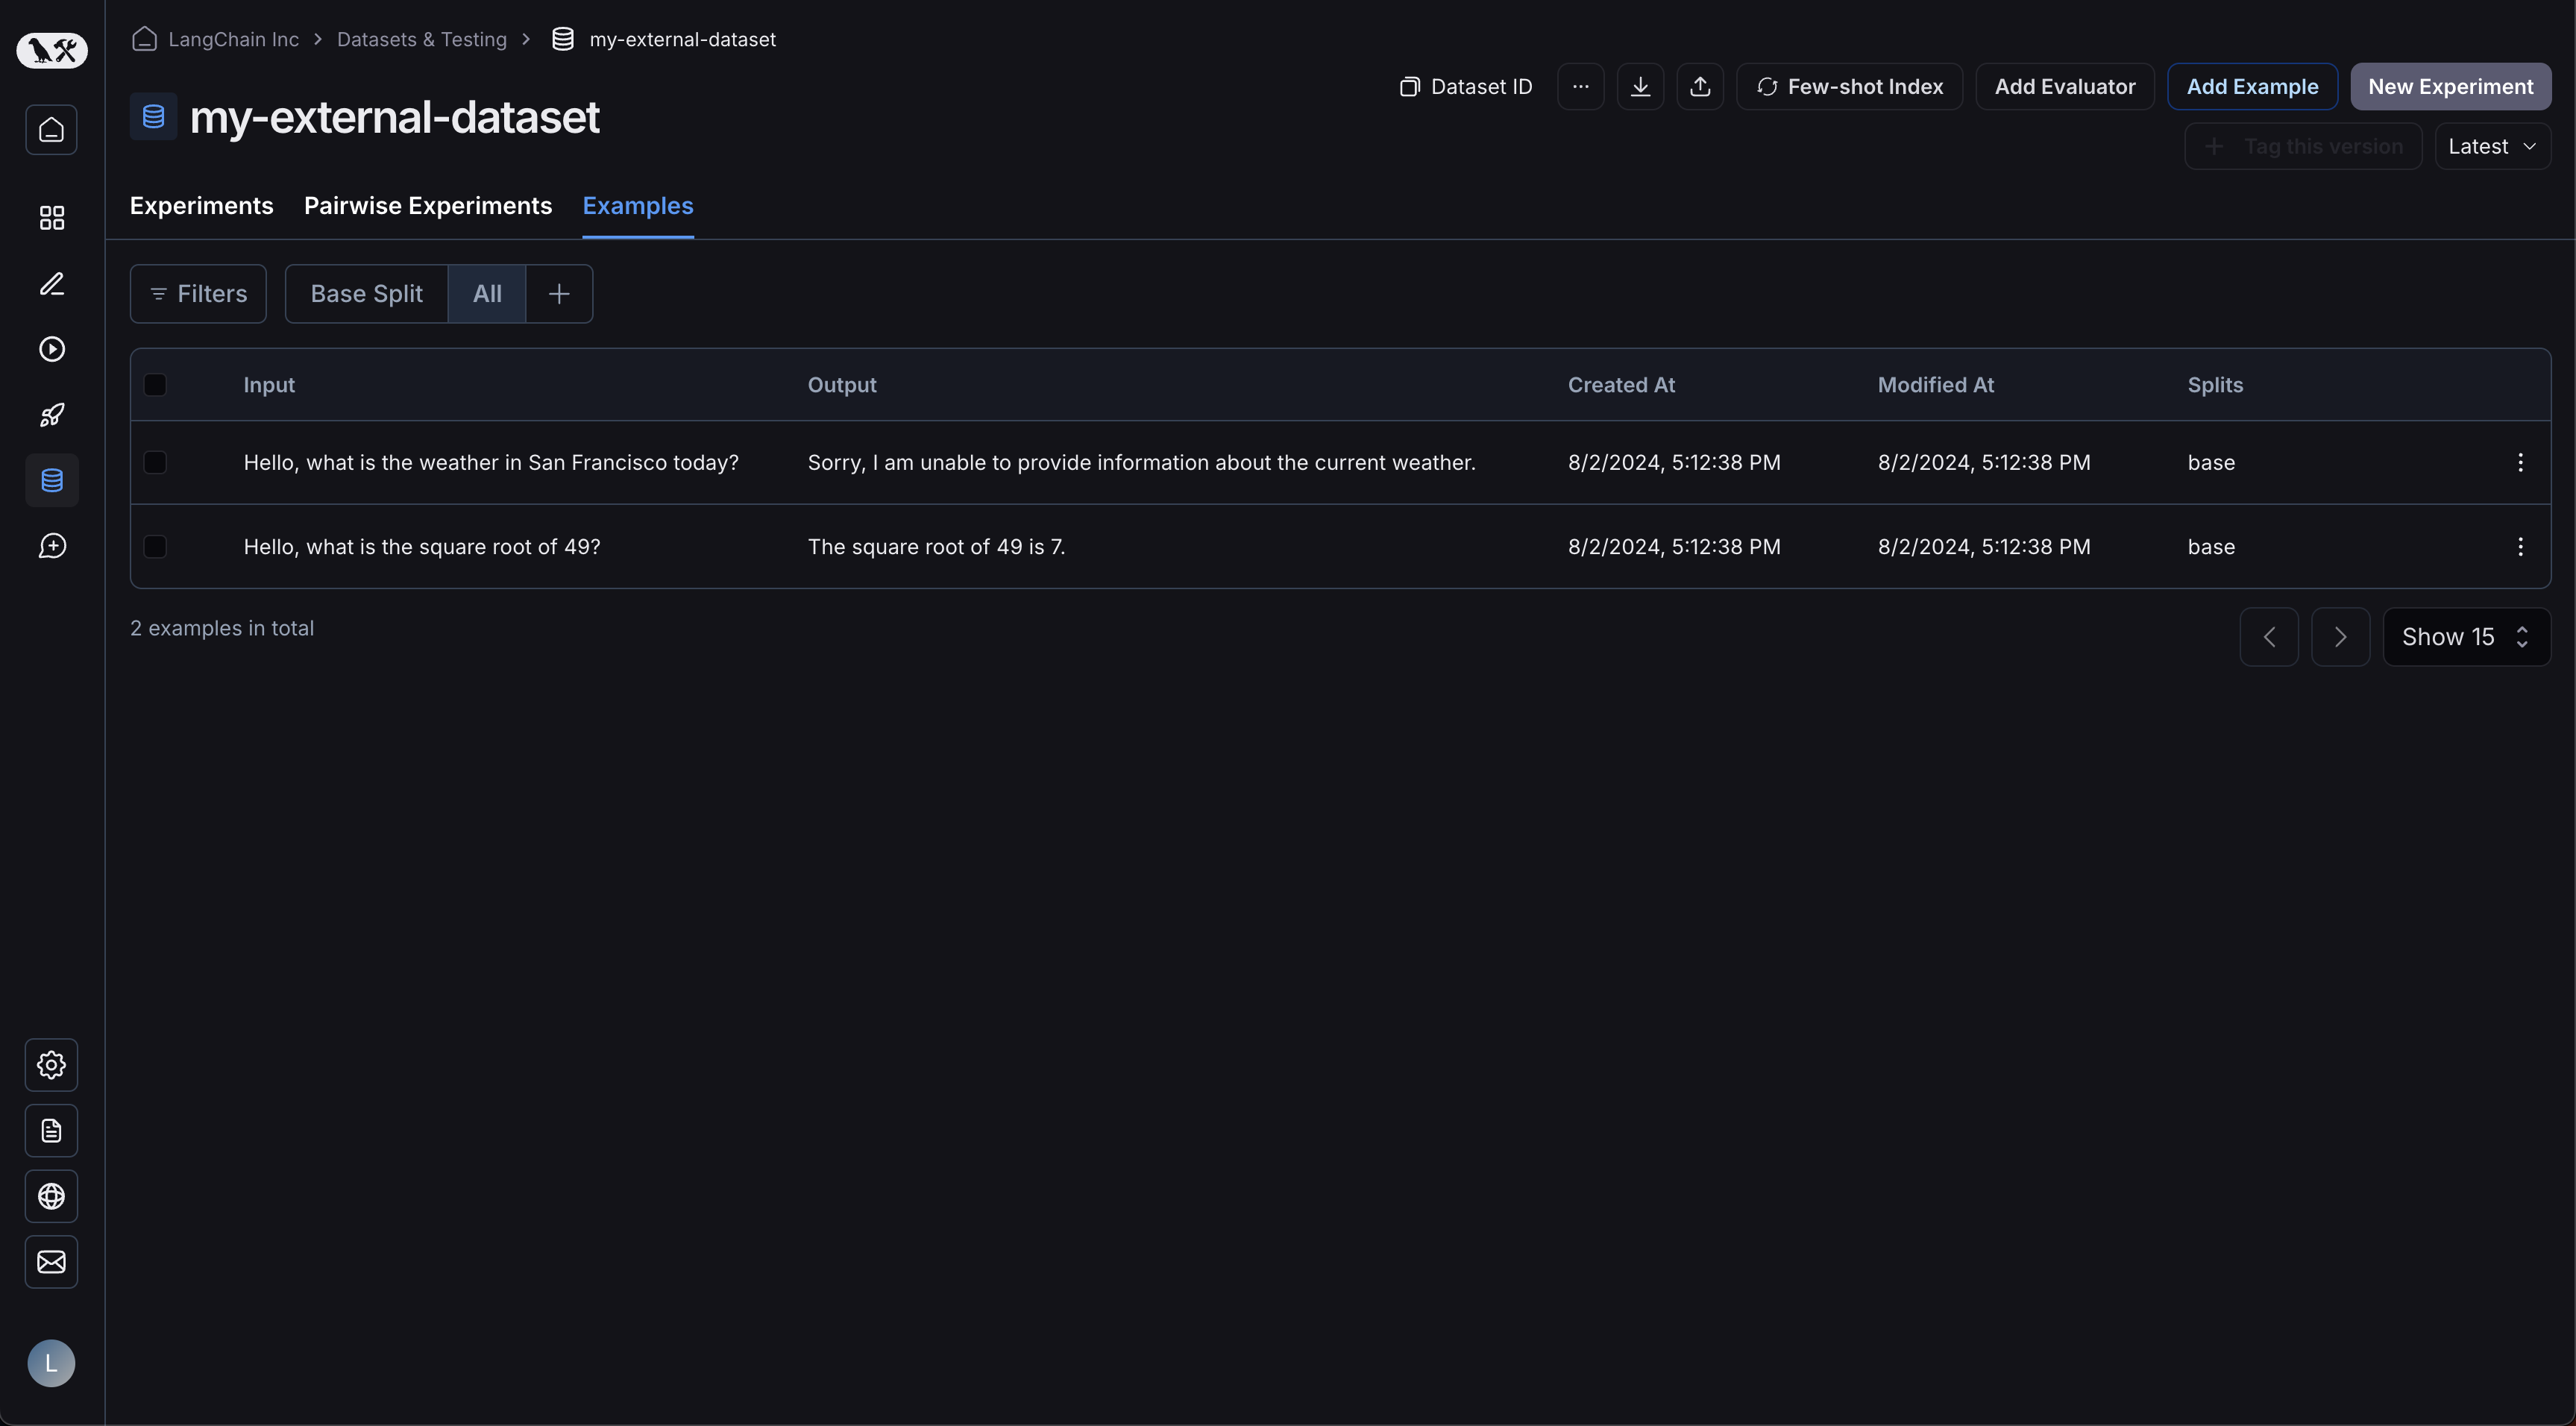 Clicking on your experiment will bring you to the comparison view:
 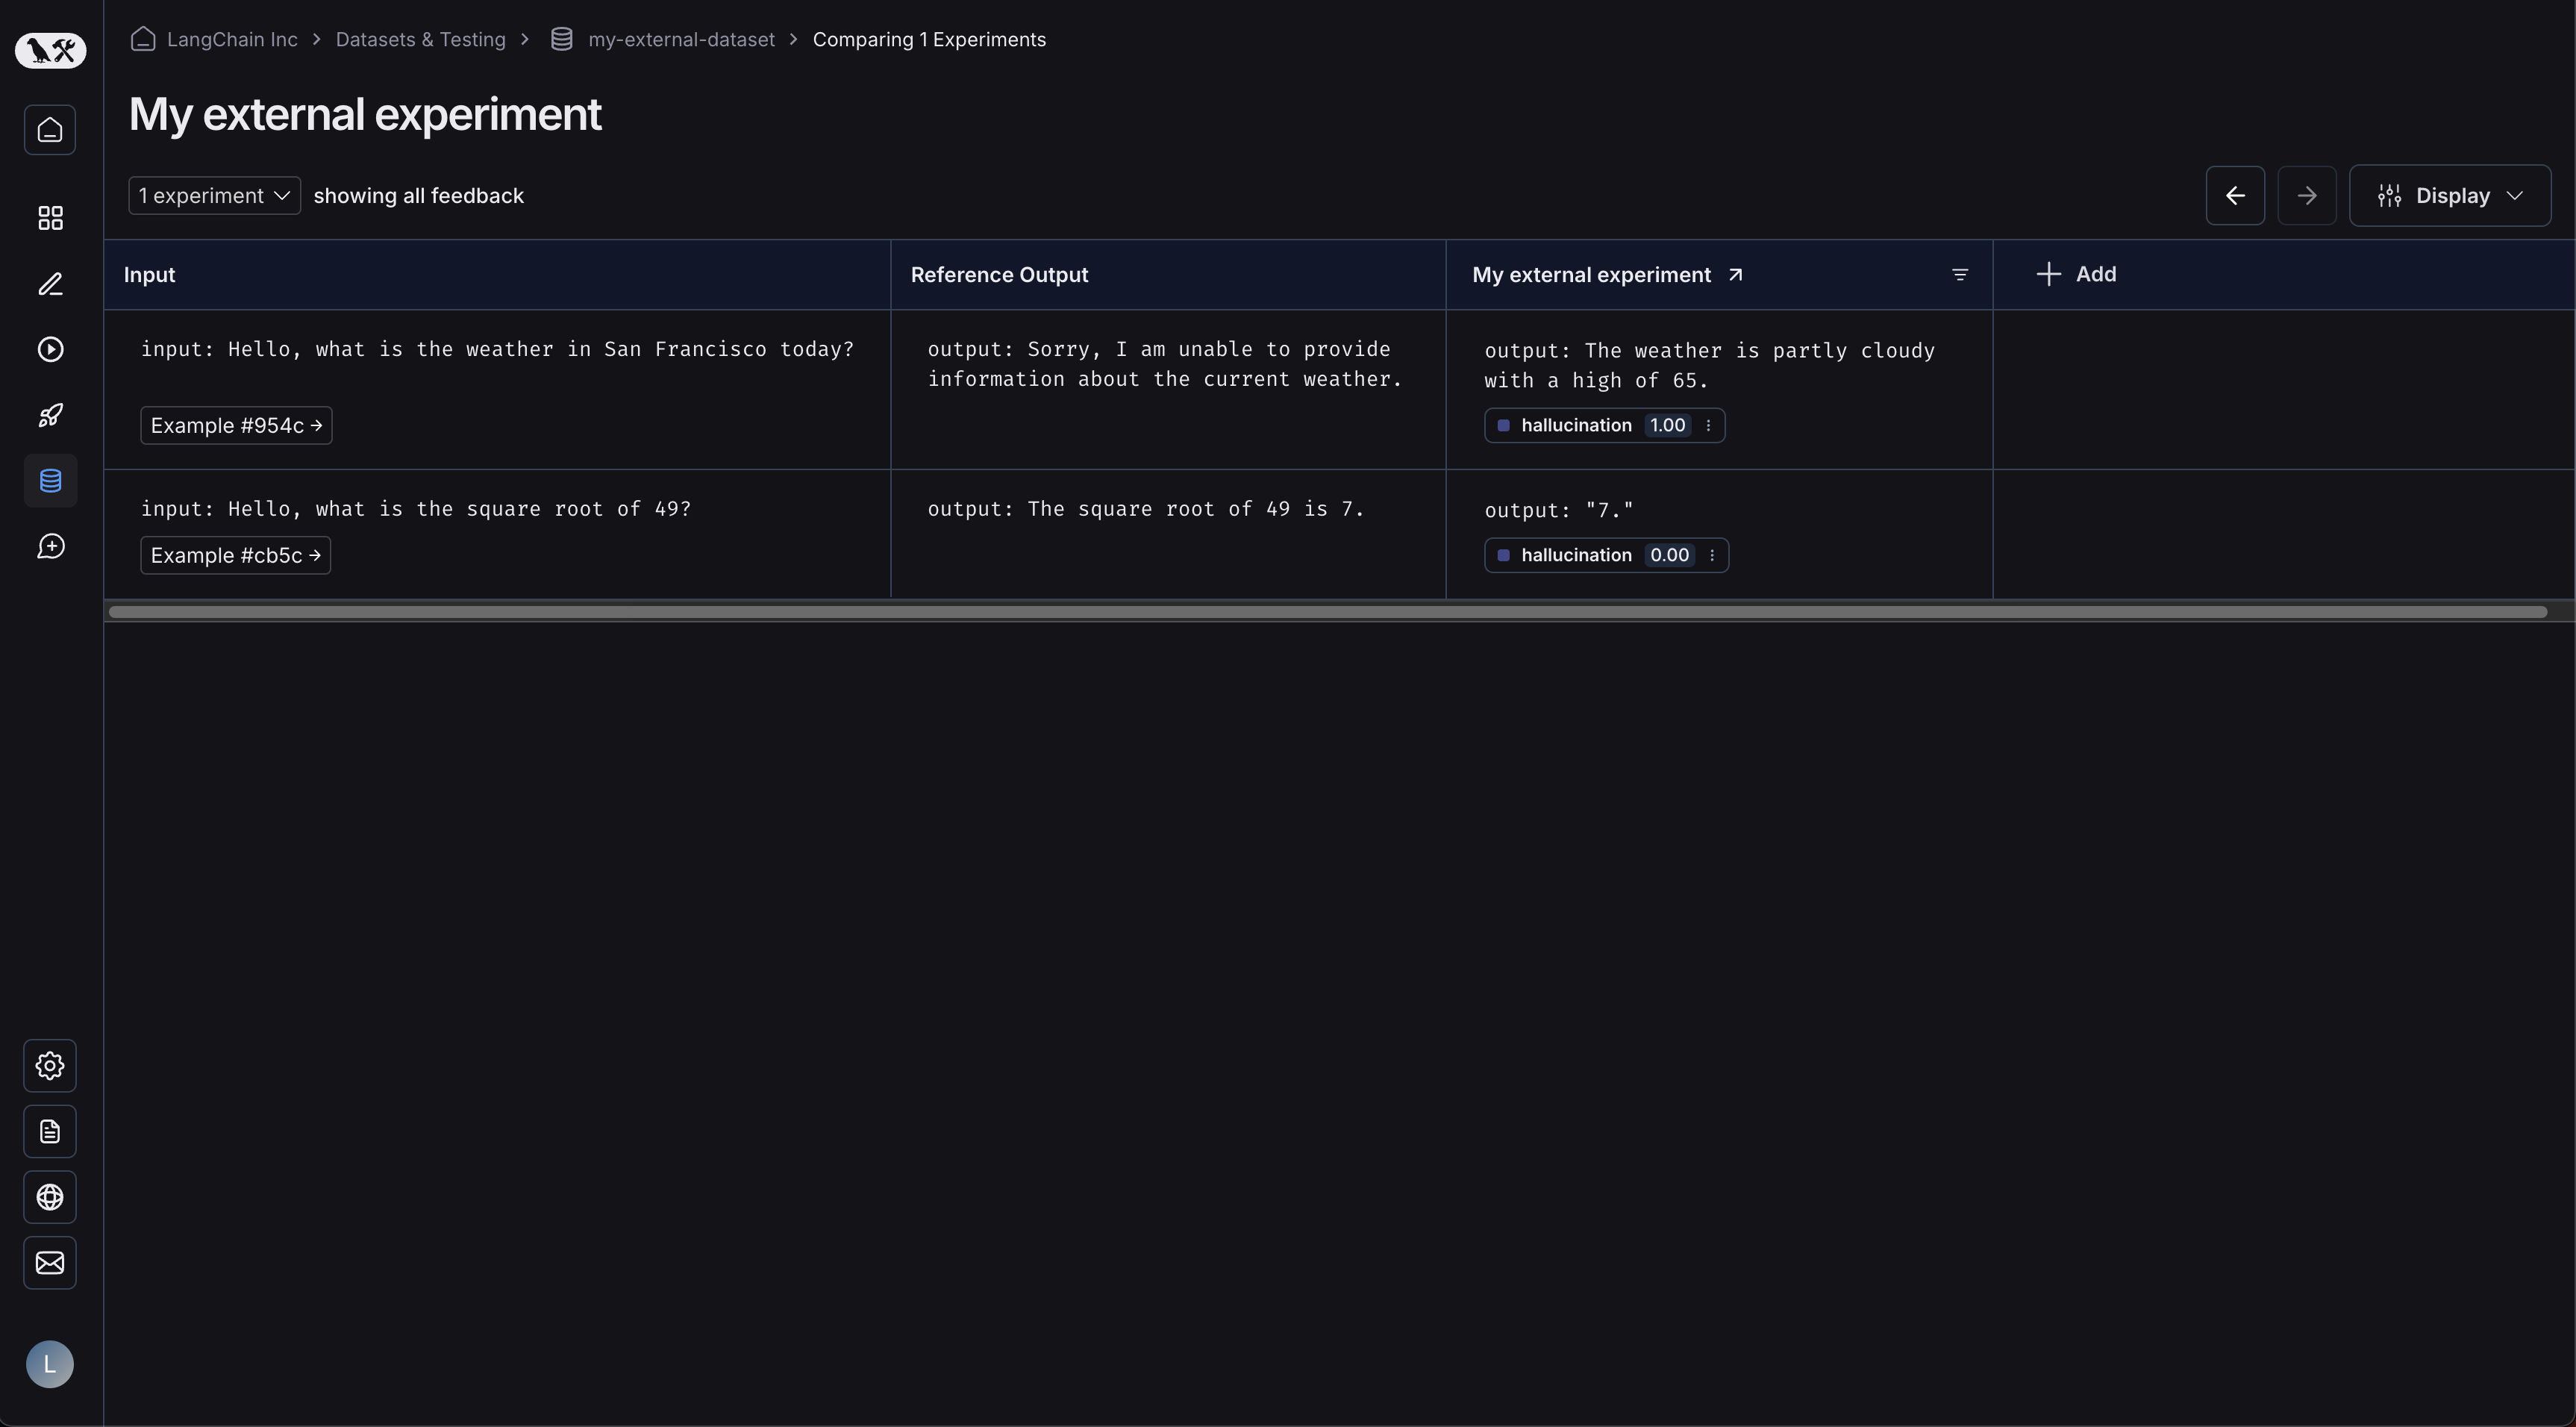 As you upload more experiments to your dataset, you will be able to compare the results and easily identify regressions in the comparison view.
***
As you upload more experiments to your dataset, you will be able to compare the results and easily identify regressions in the comparison view.
***
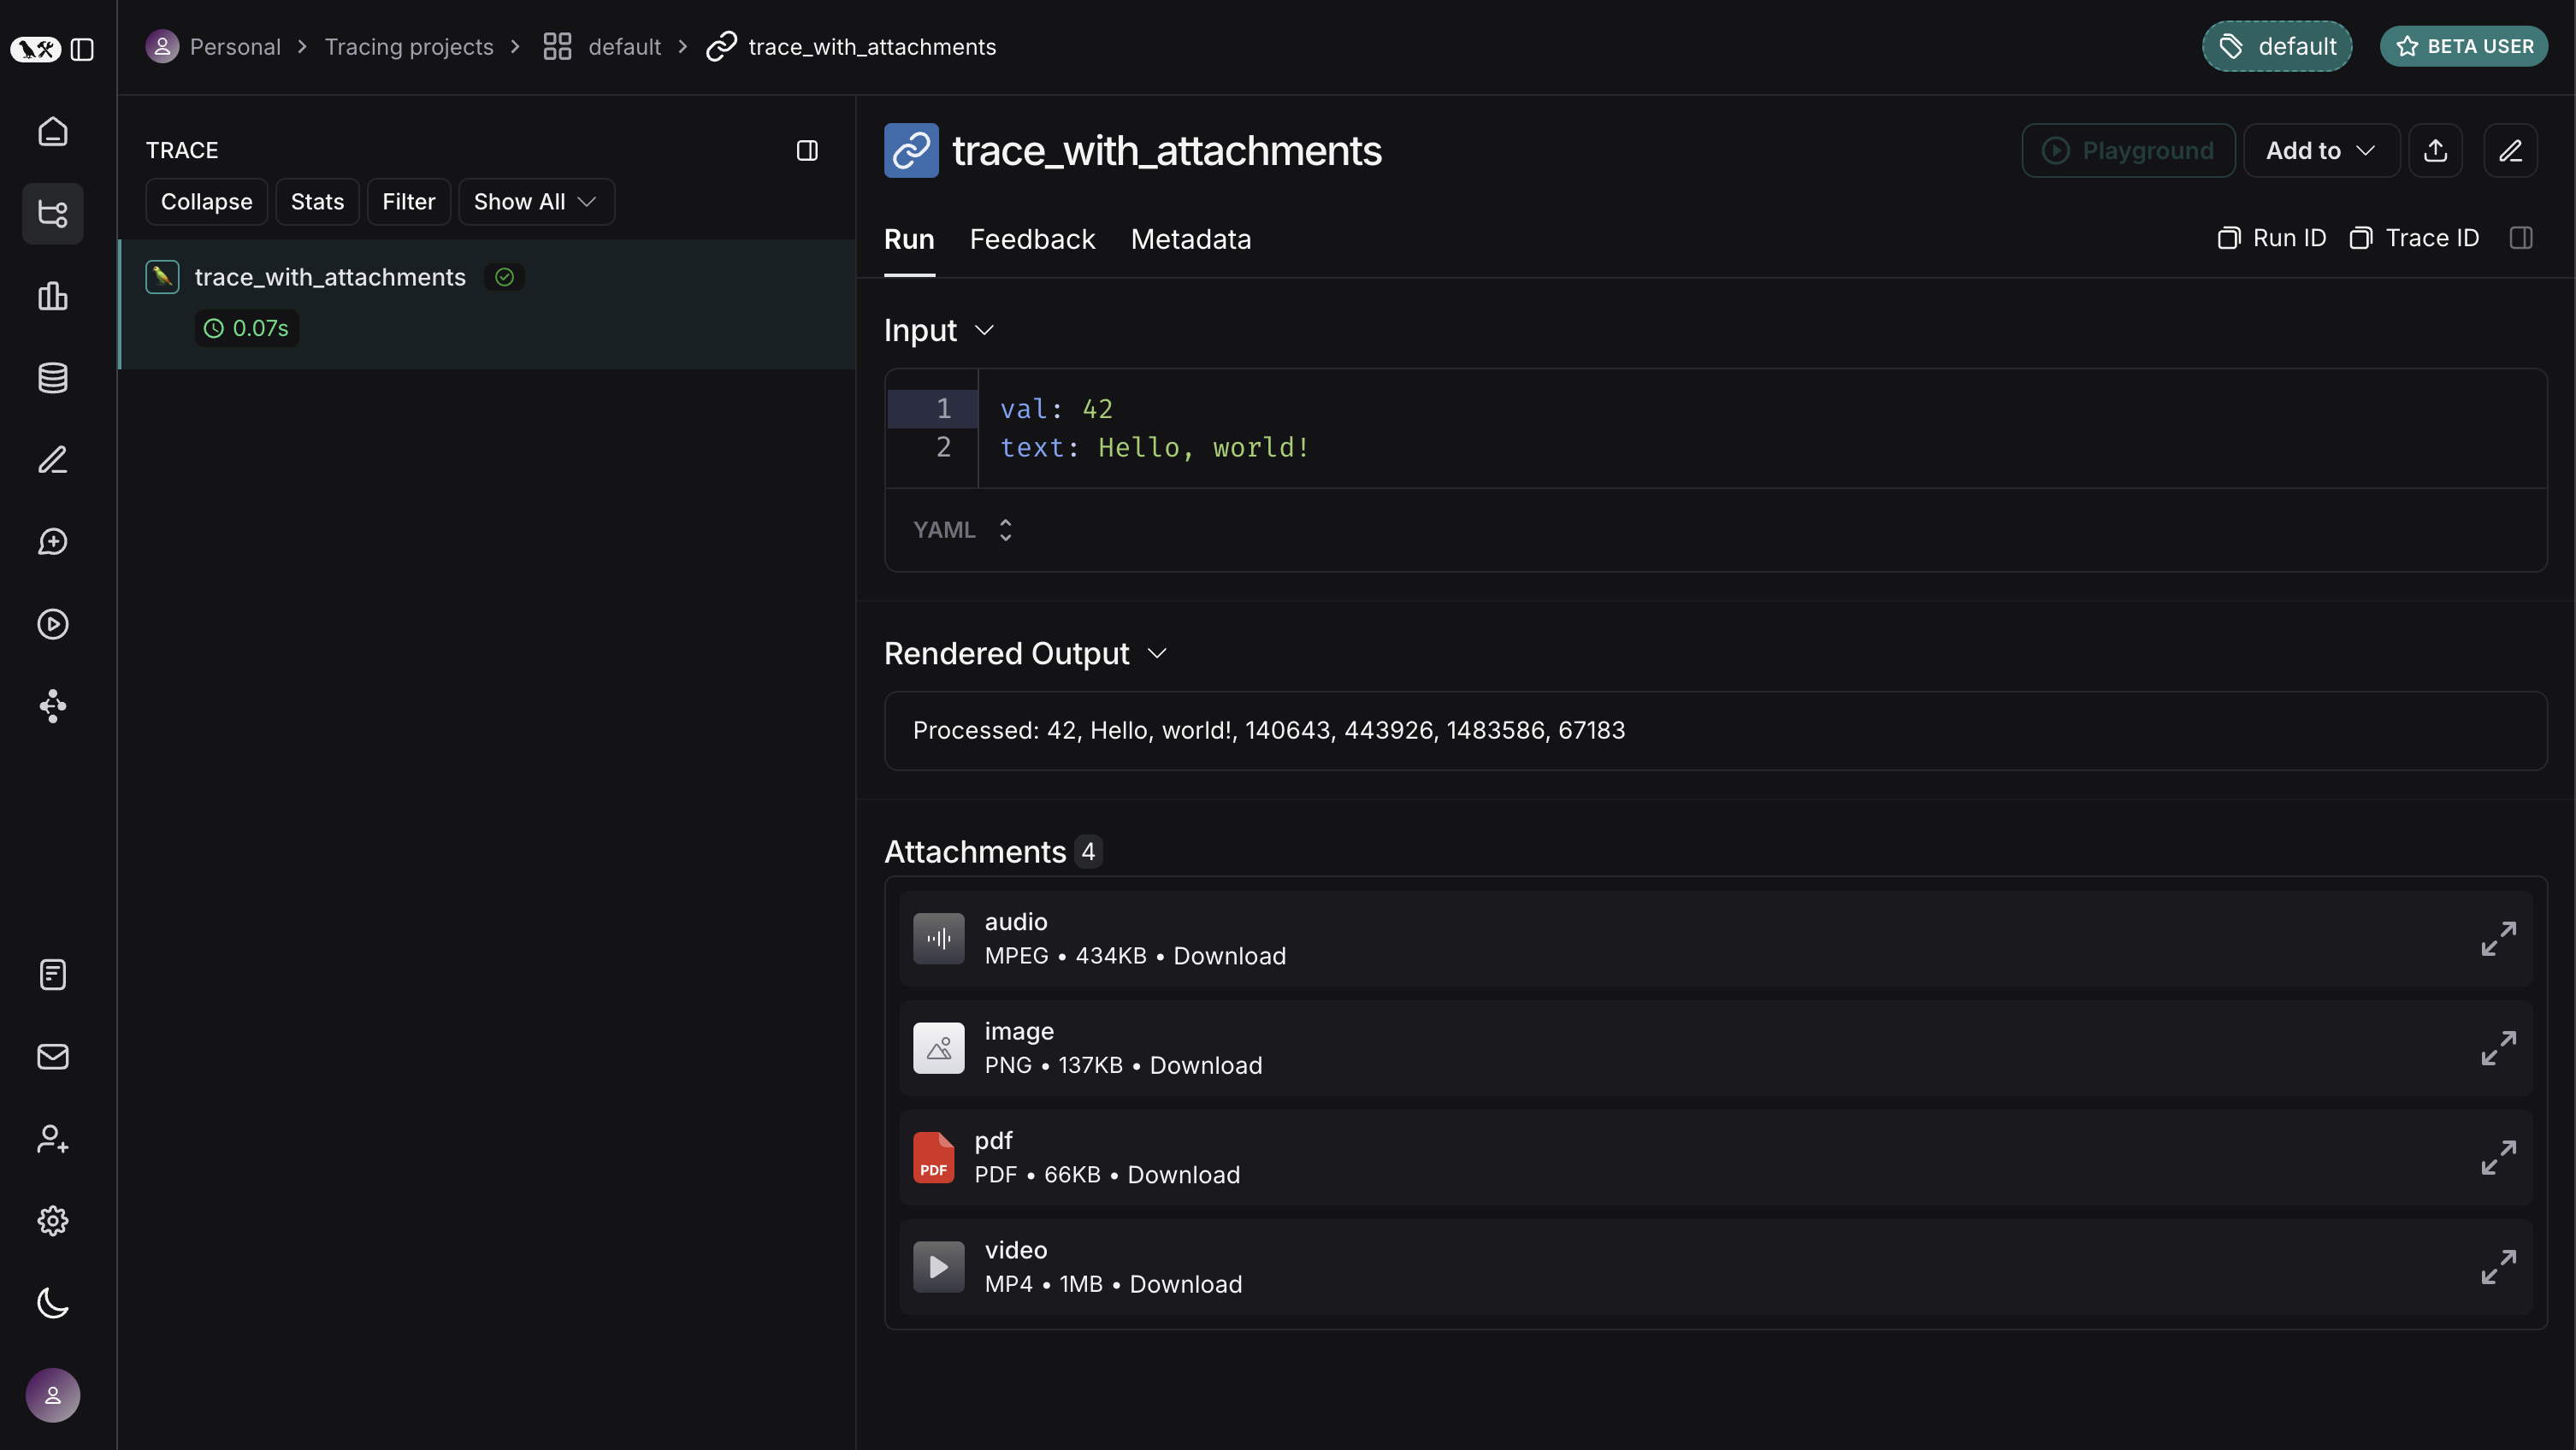 ***
***
Thread ID: {threadId ?? optimisticThreadId}
{/* Rest of component */}