

Loading the data
To load the data, we will pull thedev split from Hugging Face, but for your use case you may wish to pull one of the test, or train splits, and if you want to combine multiple splits you can use pd.concat.
Editing the ‘version’ column
This is a very important step! If you skip, the rest of the code WILL NOT WORK!
version column contains all string values but all are in float format so they get converted to floats when you upload the CSV to create a LangSmith dataset. Although you can convert the values to strings during your experiments, the issue arises with values like "0.10". When getting converted to a float, you get the value 0.1, which would become "0.1" if you converted it to a string - causing a key error during execution of your proposed patch.
In order to fix this, we need LangSmith to stop trying to convert the version column to floats. In order to do this, we can just append a string prefix to each of them that is not float compatible. We then need to split on this prefix when doing evaluation to get the actual version value. The prefix we choose here is the string "version:".
The ability to select column types when uploading a CSV to LangSmith will be added in the future to avoid having to use this workaround.
Upload the data to LangSmith
Save to CSV
To upload the data to LangSmith, we first need to save it to a CSV, which we can do using theto_csv function provided by pandas. Make sure to save this file somewhere that is easily accessible to you.
Upload CSV to LangSmith manually
We are now ready to upload the CSV to LangSmith. Once you are on the LangSmith website , go to theDatasets & Testing tab on the left side navigation bar, and then click the + New Dataset button in the top right corner.
Then click the Upload CSV button on the top, and select the CSV file you saved in the previous step. You can then give your dataset a name and description.
Next, select Key-Value as the dataset type. Lastly head to the Create Schema section and add ALL OF THE KEYS as Input fields. There are no Output fields in this example because our evaluator is not comparing against a reference, but instead will run the output of our experiments in docker containers to ensure that the code actually solves the PR issue.
Once you have populated the Input fields (and left the Output fields empty!) you can click the blue Create button in the top right corner, and your dataset will be created!
Upload CSV to LangSmith programmatically
Alternatively you can upload your csv to LangSmith using the sdk as shown in the code block below:Create dataset split for quicker testing
Since running the SWE-bench evaluator takes a long time when run on all examples, you can create a “test” split for quickly testing the evaluator and your code. Read this guide to learn more about managing dataset splits.Running our prediction function
Running evaluation over SWE-bench works a little differently than most evals you will typically run on LangSmith since we don’t have a reference output. Because of this, we first generate all of our outputs without running an evaluator (note how theevaluate call doesn’t have the evaluators parameter set). In this case we returned a dummy predict function, but you can insert your agent logic inside the predict function to make it work as intended.
Evaluating our predictions using SWE-bench
Now we can run the following code to run the predicted patches we generated above in Docker. This code is edited slightly from theSWE-bench run_evaluation.py file.
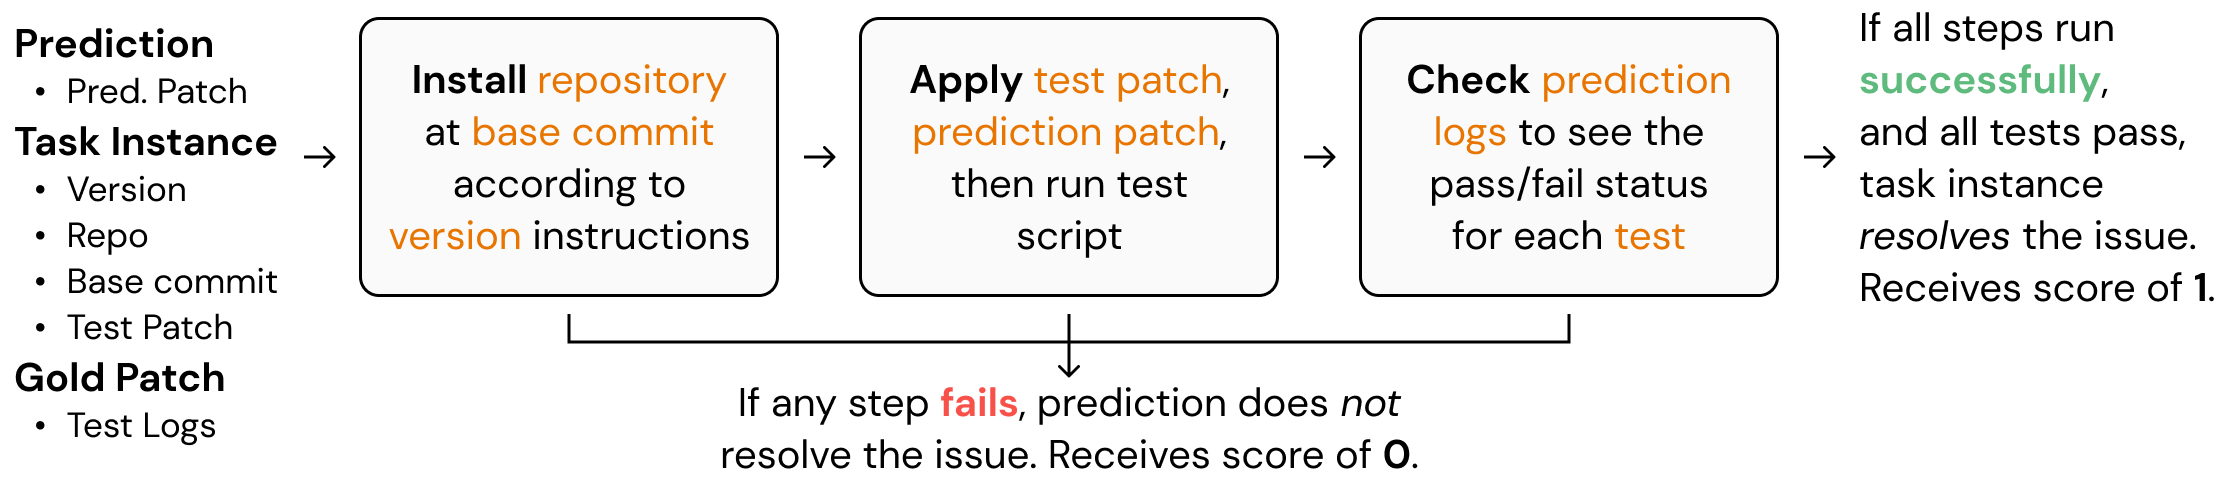
Basically, the code sets up docker images to run the predictions in parallel, which greatly reduces the time needed for evaluation. This screenshot explains the basics of how SWE-bench does evaluation under the hood. To understand it in full, make sure to read through the code in the GitHub repository.
convert_runs_to_langsmith_feedback converts the logs generated by the docker file into a nice .json file that contains feedback in the typical key/score method of LangSmith.
Sending evaluation to LangSmith
Now, we can actually send our evaluation feedback to LangSmith by using theevaluate_existing function. Our evaluate function is incredibly simple in this case, because the convert_runs_to_langsmith_feedback function above made our life very easy by saving all the feedback to a single file.
Connect these docs to Claude, VSCode, and more via MCP for real-time answers.