

- Set up billing for your account: Complete the billing setup process for Developer and Plus plans, including special instructions for legacy accounts.
- Track contract usage (Enterprise): View prepaid contract consumption.
- Update your information: Modify invoice email addresses, business information, and tax IDs for your organization.
- Enforce spend limits: Learn how to manage your spend through usage limits and data retention.
Set up billing for your account
Before using this guide, note the following:
- If you are interested in the Enterprise plan, please contact sales. This guide is only for our self-serve billing plans.
Developer plan: set up billing on your personal organization
Personal organizations are limited to 5,000 traces per month until a credit card is added. To add a card:- Click Add card to remove trace limit.
- Add your credit card information.
- Once complete, you will no longer be rate limited to 5,000 traces, and you will be charged for any excess traces at rates specified on the pricing page.
Plus plan: set up billing on a shared organization
Team organizations are given an initial 10,000 traces per month. Any excess traces will be charged at rates specified on the pricing page.New organizations that you manually create are required to be on the Plus Plan. If you see a message about needing to upgrade to Plus to use this organization, follow these steps.
- Click Upgrade to Plus.
- Invite members to your organization, as desired.
- Enter your credit card information. Then, enter business information, invoice email, and tax ID. If this organization belongs to a business, check the This is a business checkbox and enter the information accordingly. For more information, refer to the Update your information section.
Track contract usage (Enterprise)
Contract usage tracking is available for Enterprise plan customers with prepaid commitments. You must have theorganization:manage permission to access this feature.
For details on viewing your prepaid contract consumption, refer to Contract usage.
For more details on the Enterprise plan, contact the sales team.
Update your information (Paid plans only)
To update business information for your LangSmith organization, head to the Billing and Usage page under Settings.Invoice email
To update the email address for invoices, follow these steps:- Navigate to the Plans and Billing tab.
- Locate the section beneath the payment method, where the current invoice email is displayed.
- Enter the new email address for invoices in the provided field.
- The new email address will be automatically saved.
Business information and tax ID
In certain jurisdictions, LangSmith is required to collect sales tax. If you are a business, providing your tax ID may qualify you for a sales tax exemption.
- Navigate to the Plans and Billing tab.
- Below the invoice email section, you will find a checkbox labeled Business.
- Check the Business checkbox if your organization belongs to a business.
- A business information section will appear, allowing you to enter or update the following details:
- Business Name
- Address
- Tax ID for applicable jurisdictions
- A Tax ID field will appear for applicable jurisdictions after you select a country.
- After entering the necessary information, click the Save button to save your changes.
Enforce spend limits
You may find it helpful to read the following pages, before continuing with this section on optimizing your tracing spend:
Some of the features mentioned in this guide are not currently available on Enterprise plan due to its custom nature of billing. If you are on the Enterprise plan and have questions about cost optimization, contact your sales rep or support via support.langchain.com.
Understand your current usage
The first step of any optimization process is to understand current usage. For details on the usage graph, granular usage, invoices, and contract usage, refer to View usage. LangSmith measures usage per workspace, because workspaces often represent development environments or teams within an organization.Set limits on usage
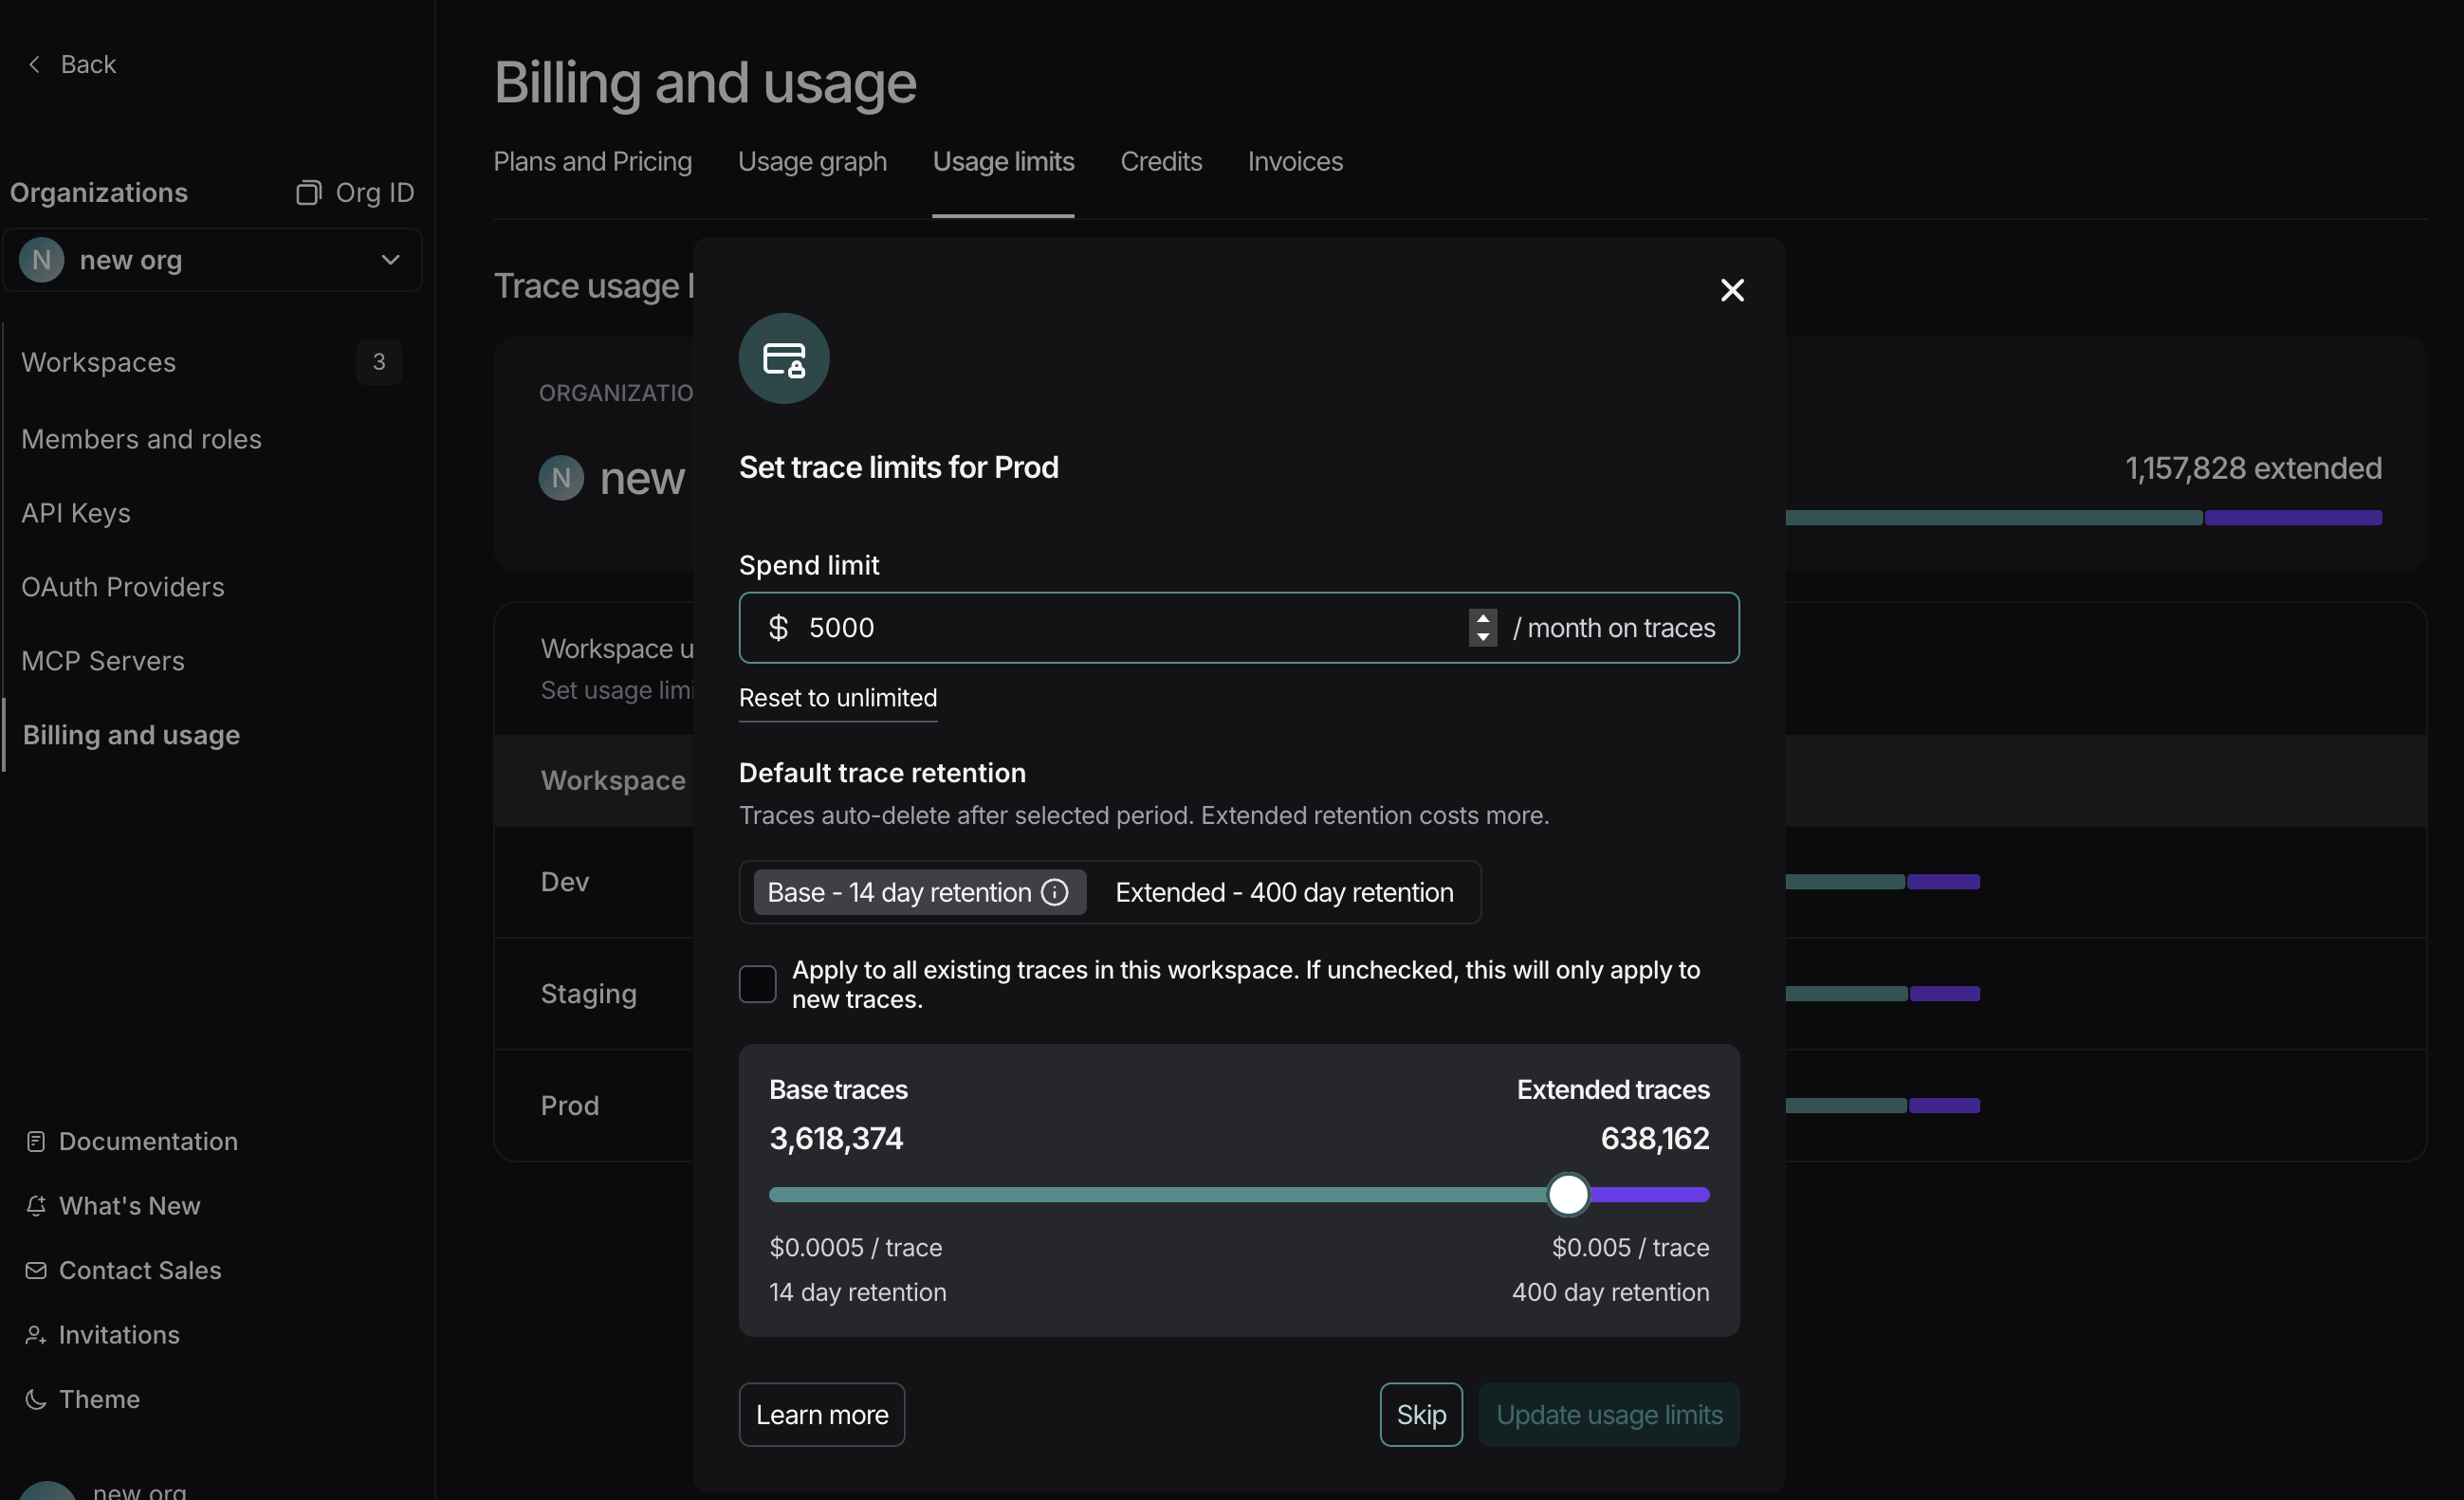
Set spend limit for workspace
- To set limits, navigate to Settings -> Billing and Usage -> Usage limits.
- Input a spend limit for your selected workspace. LangSmith will determine an appropriate number of base and extended trace limits to match that spend. The trace limits include the free trace allocation that comes with your plan (see details on pricing page).
For organizations with multiple workspaces only: For simplicity, LangSmith incorporates the free traces into the cost calculation of the first workspace only. In actuality, the free traces can be “consumed” by any workspace. Therefore, although workspace-level spend limits are approximate for multi-workspace organizations, the organization-level spend limit is absolute.
Configure trace tier distribution
LangSmith has two trace tiers: base traces and extended traces. Base traces have the base retention and are short-lived (14 days), while extended traces have extended retention and are long-lived (400 days by default, customizable for Enterprise customers). For more information, refer to the data retention conceptual docs. Set the desired default trace tier by selecting an option below the Default data retention label. All traces will have this tier by default when they are registered. Note that because extended traces cost more than base traces, selecting Extended as your default data retention option will result in less overall traces allowed in the billing period. By default, updating this setting will only apply to future incoming traces. To apply to all existing traces in the workspace, select the checkbox. If the default data retention is set to Base you can optionally use the slider to distribute trace limits across base and extended tracess. LangSmith automatically provides a suggestion for this distribution but you can tailor this to your needs. For example, if you are running lots of automations or other features that may upgrade a trace to extended, you may want to increase your extended trace limits. To see the complete list of features that may upgrade a trace, see here.The extended data retention limit can cause features other than tracing to stop working once reached. If you plan to use this feature, read more about its functionality and side effects.
Other methods of managing traces
Customize extended retention period (Enterprise only)
Enterprise customers can customize the extended data retention period at the workspace level to meet compliance requirements. The default is 400 days, but this can be adjusted based on your organization’s needs. For more information, refer to Customize extended retention policy.Change project-level default retention
Data retention settings are adjustable per tracing project. At the project level, you choose between two tiers: base (14 days) or extended (400 days). To customize the extended duration beyond 400 days, use workspace-level configuration (Enterprise only). Navigate to Projects > Your project name > Select Retention and select the desired default retention. This will only affect retention (and pricing) for traces going forward.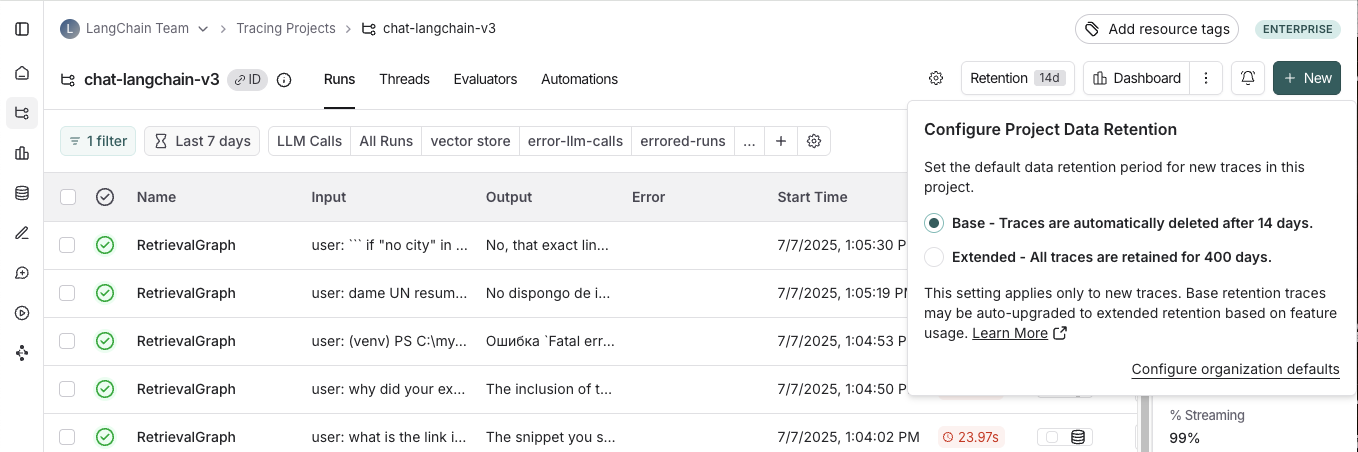
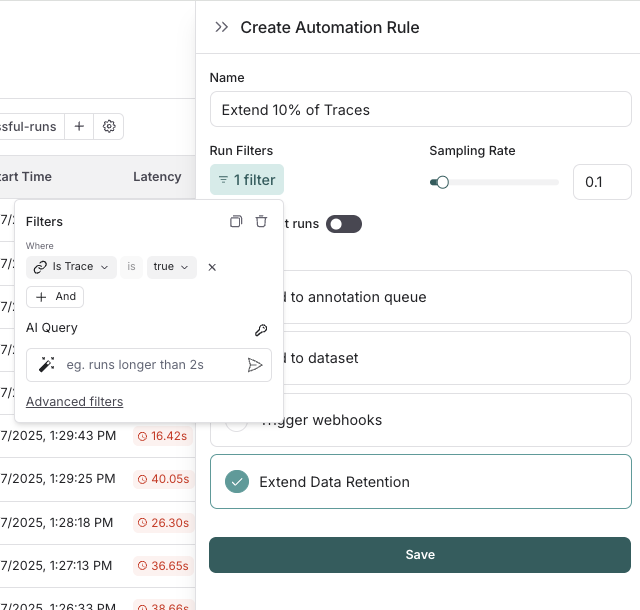
Apply extended data retention to a percentage of traces
You may not want all traces to expire after 14 days. You can automatically extend the retention of traces that match some criteria by creating an automation rule. You might want to apply extended data retention to specific types of traces, such as:- 10% of all traces: For general analysis or analyzing trends long term.
- Errored traces: To investigate and debug issues thoroughly.
- Traces with specific metadata: For long-term examination of particular features or user flows.
- Navigate to Projects > Your project name > Select + New > Select New Automation.
- Name your rule and optionally apply filters or a sample rate. For more information on configuring filters, refer to filtering techniques.
When an automation rule matches any run within a trace, then all runs within the trace are upgraded to extended data retention (400 days by default, customizable for Enterprise customers).
LangSmith Deployment billing
In addition to traces, LangSmith charges for deployed agents via LangSmith Deployment. Deployments are billed on the resources they consume:- Compute: The vCPU and memory a deployment uses while resources are provisioned, measured in LangChain Compute Units (LCU). A Serverless deployment can scale to zero (beta) after a period of inactivity, so compute charges stop only once it has scaled down. A Dedicated deployment is always-on and consumes compute continuously.
- Storage: The database storage a deployment uses to persist state, measured in LangChain Storage Units (LSU).
This usage-based model replaces the previous per-run and uptime pricing. Existing customers remain on their current pricing until October 1, 2026, then move to the new model. Scale to zero is available only for deployments on the new pricing. The inactivity window before a Serverless deployment scales to zero may change as the feature rolls out. For questions about the transition, contact support via support.langchain.com.
Summary
If you have questions about further managing your spend, please contact support via support.langchain.com.Connect these docs to Claude, VSCode, and more via MCP for real-time answers.