

- Set up access control: Configure role-based access control (RBAC) to manage user permissions within workspaces, including creating custom roles and assigning them to users.
- SAML SSO (Enterprise plan): Set up Single Sign-On authentication for Enterprise customers using SAML 2.0, including configuration for popular identity providers.
- SCIM User Provisioning (Enterprise plan): Automate user provisioning and deprovisioning between your identity provider and LangSmith using SCIM.
Set up access control
RBAC (Role-Based Access Control) is a feature that is only available to Enterprise customers. If you are interested in this feature, contact our sales team. Other plans default to using the
Admin role for all users.You may find it helpful to read the Administration overview page before setting up access control.
workspaces:manage permission can manage workspace settings, and users with the workspaces:manage-members permission can add, remove, and update workspace members. The built-in Workspace Admin role includes both permissions.
For a complete reference of workspace roles and their permissions, refer to the Role-based access control guide. For specific operations each role can perform, refer to the Organization and workspace operations reference.
Create a role
By default, LangSmith comes with a set of system roles:Admin: has full access to all resources within the workspace.Viewer: has read-only access to all resources within the workspace.Editor: has full permissions except for workspace management (adding/removing users, changing roles, configuring service keys).
Organization Admins can create custom roles to suit your needs.
To create a role, navigate to the Roles tab in the Members and roles section of the Organization settings page. Note that new roles that you create will be usable across all workspaces within your organization.
Click on the Create Role button to create a new role. A Create role form will open.

Assign a role to a user
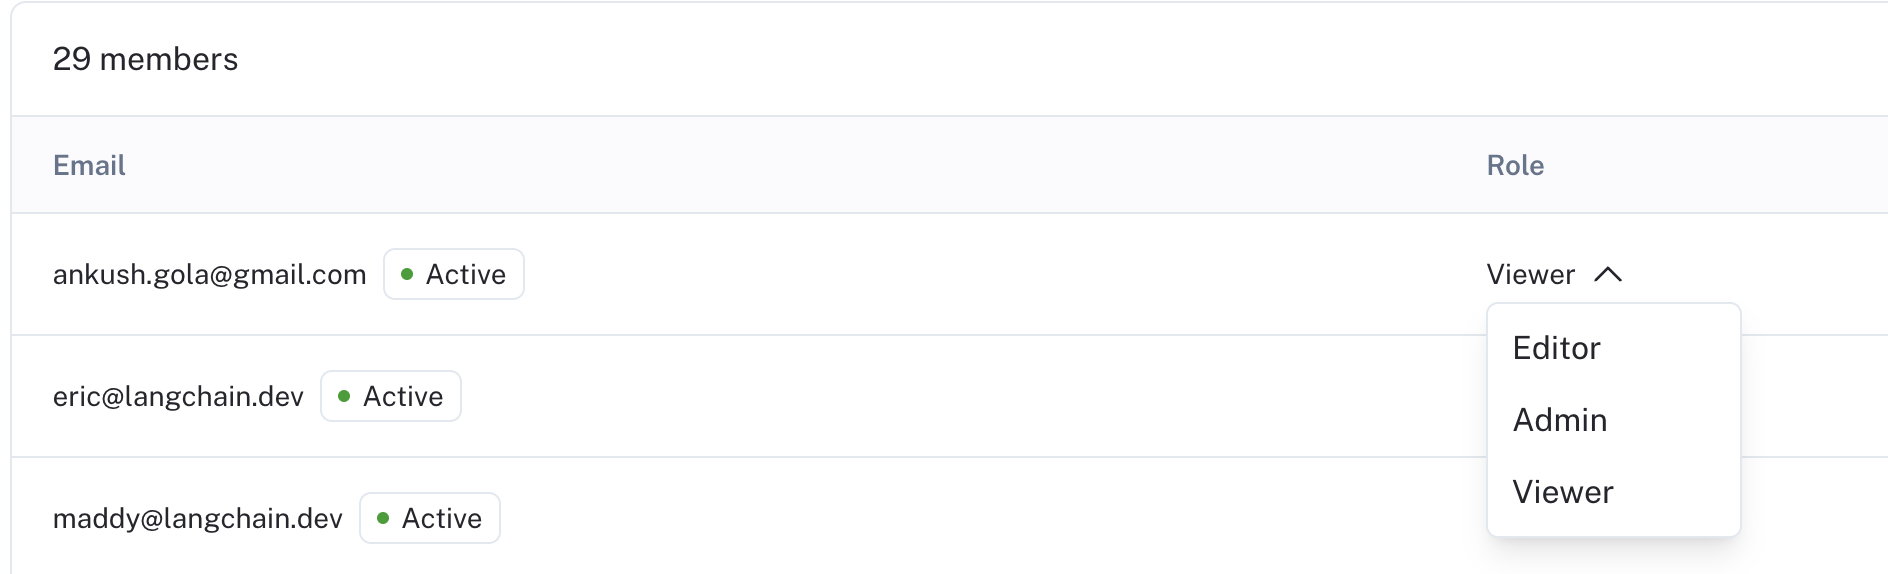
Once you have your roles set up, you can assign them to users. To assign a role to a user, navigate to theWorkspace members tab in the Workspaces section of the Organization settings page
Each user will have a Role dropdown that you can use to assign a role to them.
Set up SAML SSO for your organization
Single Sign-On (SSO) functionality is available for Enterprise Cloud customers to access LangSmith through a single authentication source. This allows administrators to centrally manage team access and keeps information more secure. LangSmith’s SSO configuration is built using the SAML (Security Assertion Markup Language) 2.0 standard. SAML 2.0 enables connecting an Identity Provider (IdP) to your organization for an easier, more secure login experience. SSO services permit a user to use one set of credentials (for example, a name or email address and password) to access multiple applications. The service authenticates the end user only once for all the applications the user has been given rights to and eliminates further prompts when the user switches applications during the same session. The benefits of SSO include:- Streamlines user management across systems for organization owners.
- Enables organizations to enforce their own security policies (e.g., MFA).
- Removes the need for end users to remember and manage multiple passwords. Simplifies the end-user experience, by allowing sign in at one single access point across multiple applications.
Just-in-time (JIT) provisioning
LangSmith supports Just-in-time provisioning when using SAML SSO. This allows someone signing in via SAML SSO to join the organization and selected workspaces automatically as a member. For detailed information on managing JIT provisioning and user invites, refer to Manage user access in SSO organizations.JIT provisioning only runs for new users, that is, users who do not already have access to the organization with the same email address via a different login method.
Login methods and access
Once you have completed your configuration of SAML SSO for your organization, users will be able to log in via SAML SSO in addition to other login methods, such as username/password or Google Authentication:- When logged in via SAML SSO, users can only access the corresponding organization with SAML SSO configured.
- Users with SAML SSO as their only login method do not have personal organizations.
- When logged in via any other method, users can access the organization with SAML SSO configured along with any other organizations they are a part of.
Enforce SAML SSO only
User invites are not supported in organizations enforcing SAML SSO only. Initial workspace membership and role is determined by JIT provisioning, and changes afterwards can be managed in the UI.
For additional flexibility in automated user management, LangSmith supports SCIM.
You must be logged in via SAML SSO in order to update this setting to
Only SAML SSO. This is to ensure the SAML settings are valid and avoid locking users out of your organization.Prerequisites
SAML SSO is available for organizations on the Enterprise plan. Please contact sales to learn more.
- Your organization must be on an Enterprise plan.
- Your Identity Provider (IdP) must support the SAML 2.0 standard.
- Only
Organization Adminscan configure SAML SSO.
Initial configuration
-
In your IdP: Configure a SAML application with the following details, then copy the metadata URL or XML for step 3.
The following URLs depend on whether your organization is on the GCP US, GCP EU, GCP APAC, or AWS US cloud region. Ensure you select the correct link.
-
Single sign-on URL (or ACS URL):
Region GCP US GCP EU GCP APAC AWS US -
Audience URI (or SP Entity ID):
Region GCP US GCP EU GCP APAC AWS US - Name ID format: email address.
- Application username: email address.
-
Required claims:
subandemail.
-
Single sign-on URL (or ACS URL):
-
In LangSmith: Go to Settings -> Members and roles -> SSO Configuration. Fill in the required information and submit to activate SSO login:
-
Fill in either the
SAML metadata URLorSAML metadata XML. -
Select the
Default workspace roleandDefault workspaces. New users logging in via SSO will be added to the specified workspaces with the selected role.Default workspace roleandDefault workspacesare editable. The updated settings will apply to new users only, not existing users.- (Coming soon)
SAML metadata URLandSAML metadata XMLare editable. This is usually only necessary when cryptographic keys are rotated/expired or the metadata URL has changed but the same IdP is still used.
-
Fill in either the
Supabase Attribute Mapping
Supabase Attribute Mapping is a cloud-only feature. Self-hosted deployments configure SAML/OIDC attributes directly with the IdP—see Set up SSO with OAuth2.0 and OIDC.
email and sub) onto the user’s JWT automatically. Any additional, non-standard SAML attribute your IdP emits (for example, groups for SSO Groups Sync) must be explicitly forwarded through Supabase before LangSmith can read it.
Attribute flow (1:1):
- IdP: emits a SAML attribute with the configured name (e.g.,
groups). - Supabase: forwards the attribute onto the user’s JWT only if the attribute name appears in the Supabase Attribute Mapping table on the SSO provider. Standard attributes are forwarded automatically; non-standard attributes are dropped unless explicitly listed.
- LangSmith: reads the JWT claim by name (e.g., the value of SSO Groups Sync’s Groups claim field).
Configuration
In Settings → Members and roles → SSO Configuration, scroll to the Supabase Attribute Mapping section and add one row per non-standard attribute you want to forward:| Column | Description |
|---|---|
| Attribute name | The SAML attribute name as emitted by your IdP. Must match the JWT claim name LangSmith expects downstream (for SSO Groups Sync, this matches the Groups claim field value). |
| Array | Check this if the attribute is multi-valued (a list of strings). Leave unchecked for scalar (single-value) attributes. Example: check this for groups; leave unchecked for full_name. |
Entra ID (Azure)
For additional information, see Microsoft’s documentation. Step 1: Create a new Entra ID application integration-
Log in to the Azure portal with a privileged role (e.g.,
Global Administrator). On the left navigation pane, select theEntra IDservice. - Navigate to Enterprise Applications and then select All Applications.
- Click Create your own application.
-
In the Create your own application window:
- Enter a name for your application (e.g.,
LangSmith). - Select Integrate any other application you don’t find in the gallery (Non-gallery).
- Enter a name for your application (e.g.,
- Click Create.
- Open the enterprise application that you created.
- In the left-side navigation, select Manage > Single sign-on.
- On the Single sign-on page, click SAML.
-
Update the Basic SAML Configuration:
-
Identifier (Entity ID):Region GCP US GCP EU GCP APAC AWS US -
Reply URL (Assertion Consumer Service URL):Region GCP US GCP EU GCP APAC AWS US -
Leave
Relay State,Logout Url, andSign on URLempty. - Click Save.
-
-
Ensure required claims are present with Namespace:
http://schemas.xmlsoap.org/ws/2005/05/identity/claims:sub:user.objectid.emailaddress:user.userprincipalnameoruser.mail(if using the latter, ensure all users have theEmailfield filled in underContact Information).- (Optional) For SCIM, see the setup documentation for specific instructions about
Unique User Identifier (Name ID).
- On the SAML-based Sign-on page, under SAML Certificates, copy the App Federation Metadata URL.
Fill in required information step, using the metadata URL from the previous step.
Step 4: Verify the SSO setup
-
Assign the application to users/groups in Entra ID:
- Select Manage > Users and groups.
- Click Add user/group.
-
In the Add Assignment window:
- Under Users, click None Selected.
- Search for the user you want to assign to the enterprise application, and then click Select.
- Verify that the user is selected, and click Assign.
- Have the user sign in via the unique login URL from the SSO Configuration page, or go to Manage > Single sign-on and select Test single sign-on with (application name).
- Make sure you’re signed into an administrator account with the appropriate permissions.
- In the Admin console, go to Menu -> Apps -> Web and mobile apps.
- Click Add App and then Add custom SAML app.
- Enter the app name and, optionally, upload an icon. Click Continue.
- On the Google Identity Provider details page, download the IDP metadata and save it for Step 2. Click Continue.
-
In the
Service Provider Detailswindow, enter:-
ACS URL:Region GCP US GCP EU GCP APAC AWS US -
Entity ID:Region GCP US GCP EU GCP APAC AWS US -
Leave
Start URLand theSigned responsebox empty. -
Set
Name IDformat toEMAILand leaveName IDas the default (Basic Information > Primary email). -
Click
Continue.
-
-
Use
Add mappingto ensure required claims are present:Basic Information > Primary email->email
Fill in required information step, using the IDP metadata from the previous step as the metadata XML.
Step 3: Turn on the SAML app in Google
-
Select the SAML app under
Menu -> Apps -> Web and mobile apps -
Click
User access. -
Turn on the service:
-
To turn the service on for everyone in your organization, click
On for everyone, and then clickSave. -
To turn the service on for an organizational unit:
- At the left, select the organizational unit then
On. - If the Service status is set to
Inheritedand you want to keep the updated setting, even if the parent setting changes, clickOverride. - If the Service status is set to
Overridden, either clickInheritto revert to the same setting as its parent, or clickSaveto keep the new setting, even if the parent setting changes.
- At the left, select the organizational unit then
- To turn on a service for a set of users across or within organizational units, select an access group. For details, go to Use groups to customize service access.
-
To turn the service on for everyone in your organization, click
- Ensure that the email addresses your users use to sign in to LangSmith match the email addresses they use to sign in to your Google domain.
Okta
Supported features
- IdP-initiated SSO (Single Sign-On)
- SP-initiated SSO
- Just-In-Time provisioning
- Enforce SSO only
Configuration steps
For additional information, see Okta’s documentation. Step 1: Create and configure the Okta SAML applicationVia Okta Integration Network (recommended)
- Sign in to Okta.
- In the upper-right corner, select Admin. The button is not visible from the Admin area.
-
Select
Browse App Integration Catalog. - Find and select the LangSmith application.
- On the application overview page, select Add Integration.
-
Leave
ApiUrlBaseempty. -
Fill in
AuthHost:Region GCP US GCP EU GCP APAC AWS US -
(Optional, if planning to use SCIM as well) Fill in
LangSmithUrl:Region GCP US GCP EU GCP APAC AWS US - Under Application Visibility, keep the box unchecked.
- Select Next.
-
Select
SAML 2.0. -
Fill in
Sign-On Options:Application username format:EmailUpdate application username on:Create and updateAllow users to securely see their password: leave unchecked.
- Copy the Metadata URL from the Sign On Options page to use in the next step.
- Log in to Okta as an administrator, and go to the Okta Admin console.
- Under Applications > Applications click Create App Integration.
- Select SAML 2.0.
-
Enter an
App name(e.g.,LangSmith) and optionally an App logo, then click Next. -
Enter the following information in the Configure SAML page:
-
Single sign-on URL(ACS URL). KeepUse this for Recipient URL and Destination URLchecked:Region GCP US GCP EU GCP APAC AWS US -
Audience URI (SP Entity ID):Region GCP US GCP EU GCP APAC AWS US -
Name ID format: Persistent. -
Application username:email. - Leave the rest of the fields empty or set to their default.
- Click Next.
-
- Click Finish.
- Copy the Metadata URL from the Sign On page to use in the next step.
- Under Applications > Applications, select the SAML application created in Step 1.
- Under the Assignments tab, click Assign then either Assign to People or Assign to Groups.
- Make the desired selection(s), then Assign and Done.
SSO Configuration page, or have a user select the application from their Okta dashboard.
SP-initiated SSO
Once service-provider–initiated SSO is configured, users can sign in using a unique login URL. You can find this in the LangSmith UI under Organization members and roles then SSO configuration.Set up SCIM for your organization
Looking for a lighter-weight alternative to SCIM that doesn’t require IdP admin involvement to push groups? See SSO Groups Sync below—it reads group memberships directly from the SSO token at login time and reuses the same naming convention.
SCIM is available for organizations on the Enterprise plan. Contact sales to learn more.SCIM is available on Helm chart versions 0.10.41 (application version 0.10.108) and later.SCIM support is API-only (see instructions below).
- Automated user management: Users are automatically added, updated, and removed from LangSmith based on their status in your IdP.
- Reduced administrative overhead: No need to manage user access manually across multiple systems.
- Improved security: Users who leave your organization are automatically deprovisioned from LangSmith.
- Consistent access control: User attributes and group memberships are synchronized between systems.
- Scaling team access control: Efficiently manage large teams with many workspaces and custom roles.
- Role assignment: Select specific Organization Roles and Workspace Roles for groups of users.
Requirements
Prerequisites
- Your organization must be on an Enterprise plan.
- Your Identity Provider (IdP) must support SCIM 2.0.
- Only Organization Admins can configure SCIM.
- For cloud customers: SAML SSO must be configurable for your organization.
- For self-hosted customers: OAuth with Client Secret authentication mode must be enabled.
- For self-hosted customers, network traffic must be allowed from the identity provider to LangSmith:
SCIM connections typically require HTTP/1.1 or later. If your client uses HTTP/1.0, you may encounter a
426 Upgrade Required error.Role precedence
When a user belongs to multiple groups for the same workspace, the following precedence applies:- Organization Admin groups take highest precedence. Users in these groups will be
Adminin all workspaces. - Most recently created workspace-specific group takes precedence over other workspace groups.
When a group is deleted or a user is removed from a group, their access is updated according to their remaining group membership, following the precedence rules.SCIM group membership overrides manually assigned roles or roles assigned via Just-in-time (JIT) provisioning. We recommend disabling JIT provisioning to avoid conflicts. For more details, refer to Manage user access in SSO organizations.
Email verification
In cloud only, creating a new user with SCIM triggers an email to the user. They must verify their email address by clicking the link in this email. The link expires in 24 hours, and can be resent if needed by removing and re-adding the user via SCIM.Attributes and mapping
Group naming convention
Group membership maps to LangSmith workspace membership and workspace roles with a specific naming convention. By default, the separator between components is a colon (:), but you can configure a custom separator for your organization.
You can omit spaces in the organization role name portion of a group name. This helps with identity providers that disallow spaces in group names. For example, LangSmith accepts
OrganizationAdmins and OrganizationUser as equivalents of Organization Admins and Organization User. This flexibility applies only to the organization role name token. Workspace names and workspace role names treat spaces as literal characters, so space-omitted variants do not match their spaced counterparts.<optional_prefix>Organization Admin or <optional_prefix>Organization Admins
Examples:
LS:Organization AdminsLS:OrganizationAdmins(spaces omitted—useful for IdPs that disallow spaces in group names)Groups-Organization AdminsOrganization Admin
<optional_prefix><org_role_name><separator><workspace_name><separator><workspace_role_name>
The separator defaults to : (colon). Supported separators are: : (colon), - (hyphen), _ (underscore), (space), & (ampersand).
Examples with default colon separator:
LS:Organization User:Production:AnnotatorsLS:OrganizationUser:Production:Annotators(spaces omitted in role name token)Groups-Organization User:Engineering:DevelopersOrganization User:Marketing:Viewers
LS-Organization User-Production-AnnotatorsLS-OrganizationUser-Production-Annotators(spaces omitted in role name token)Organization User-Engineering-Developers
If your workspace names contain the separator character (e.g., workspace
my-team with separator -), LangSmith will automatically try all possible splits to find a valid workspace and role combination.Configure custom separator
To change the SCIM group name separator for your organization, use thePATCH /api/v1/orgs/current/info endpoint. For regional SaaS deployments, send the request to the same path on the regional host (eu.api.smith.langchain.com, apac.api.smith.langchain.com, or aws.api.smith.langchain.com):
: (colon), - (hyphen), _ (underscore), (space), or & (ampersand). The default is : (colon).
Changing the separator does not rename existing SCIM groups. If you change the separator, you must also update your group names in your identity provider to use the new separator.
Mapping
While specific instructions depending on the identity provider may vary, these mappings show what is supported by the LangSmith SCIM integration:User attributes
| LangSmith App Attribute | Identity Provider Attribute | Matching Precedence |
|---|---|---|
userName1 | email address | |
active | !deactivated | |
emails[type eq "work"].value | email address2 | |
name.formatted | displayName OR givenName + familyName3 | |
givenName | givenName | |
familyName | familyName | |
externalId | sub4 | 1 |
userNameis not required by LangSmith- Email address is required
- Use the computed expression if your
displayNamedoes not match the format ofFirstname Lastname - To avoid inconsistency, this should match the SAML
NameIDassertion for cloud customers, or thesubOAuth2.0 claim for self-hosted.
Group attributes
| LangSmith App Attribute | Identity Provider Attribute | Matching Precedence |
|---|---|---|
displayName | displayName1 | 1 |
externalId | objectId | |
members | members |
- Groups must follow the naming convention described in the Group Naming Convention section.
If your company has a group naming policy, you should instead map from the
descriptionidentity provider attribute and set the description based on the Group Naming Convention section.
Step 1 - configure SAML SSO (Cloud only)
There are two scenarios for SAML SSO configuration:- If SAML SSO is already configured for your organization, you should skip the steps to initially add the application (Add application from Okta Integration Network or Create a new Entra ID application integration), as you already have an application configured and just need to enable provisioning.
- If you are configuring SAML SSO for the first time alongside SCIM, first follow the instructions to set up SAML SSO, then follow the instructions here to enable SCIM.
NameID format
LangSmith uses the SAML NameID to identify users. The NameID is a required field in the SAML response and is case-insensitive. The NameID must:- Be unique to each user.
- Be a persistent value that never changes, such as a randomly generated unique user ID.
- Match exactly on each sign-in attempt. It should not rely on user input.
Persistent, unless you are using a field, like email, that requires a different format.
Step 2 - disable JIT provisioning
Before enabling SCIM, disable Just-in-time (JIT) provisioning to prevent conflicts between automatic and manual user provisioning.Disabling JIT for cloud
Use thePATCH /orgs/current/info endpoint. For regional SaaS deployments, send the request to the same path on the regional host (eu.api.smith.langchain.com, apac.api.smith.langchain.com, or aws.api.smith.langchain.com):
Disabling JIT for Self-Hosted
As of LangSmith chart version 0.11.14, you can disable JIT provisioning for your self-hosted organization using SSO. To disable, set the following values:Step 3 - generate SCIM bearer token
In self-hosted environments, the full URL below may look like
https://langsmith.yourdomain.com/api/v1/platform/orgs/current/scim/tokens (without a subdomain, note the /api/v1 path prefix) or https://langsmith.yourdomain.com/subdomain/api/v1/platform/orgs/current/scim/tokens (with a subdomain) - see the ingress docs for more details.GET /v1/platform/orgs/current/scim/tokensGET /v1/platform/orgs/current/scim/tokens/{scim_token_id}PATCH /v1/platform/orgs/current/scim/tokens/{scim_token_id}(only thedescriptionfield is supported)DELETE /v1/platform/orgs/current/scim/tokens/{scim_token_id}
Step 4 - configure your identity provider
If you use Azure Entra ID (formerly Azure AD) or Okta, there are specific instructions for identity provider setup (refer to Azure Entra ID, Okta). The requirements and steps above are applicable for all identity providers.
Azure entra ID configuration steps
For additional information, see Microsoft’s documentation.In self-hosted installations, the
oid JWT claim is used as the sub.
See this Microsoft Learn link
and the related configuration instructions for additional details.- Log in to the Azure portal with a privileged role (e.g.,
Global Administrator). - Navigate to your existing LangSmith Enterprise Application.
- In the left-side navigation, select Manage > Provisioning.
- Click Get started.
-
Under Admin Credentials:
-
Tenant URL:
Region GCP US GCP EU GCP APAC AWS US - Self-hosted:
<langsmith_url>/scim/v2
- Self-hosted:
- Secret Token: Enter the SCIM Bearer Token generated in Step 3.
-
Tenant URL:
- Click Test Connection to verify the configuration.
- Click Save.
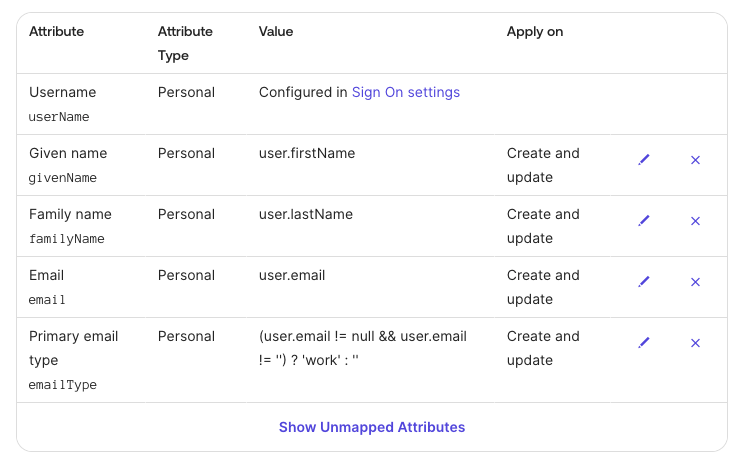
Mappings:
User Attributes
Set Target Object Actions to Create and Update (start with Delete disabled for safety):
| LangSmith App Attribute | Microsoft Entra ID Attribute | Matching Precedence |
|---|---|---|
userName | userPrincipalName | |
active | Not([IsSoftDeleted]) | |
emails[type eq "work"].value | mail1 | |
name.formatted | displayName OR Join(" ", [givenName], [surname])2 | |
externalId | objectId3 | 1 |
- User’s email address must be present in Entra ID.
- Use the
Joinexpression if yourdisplayNamedoes not match the format ofFirstname Lastname. - To avoid inconsistency, this should match the SAML NameID assertion and the
subOAuth2.0 claim. For SAML SSO in cloud, theUnique User Identifier (Name ID)required claim should beuser.objectIDand theName identifier formatshould bepersistent.
Create and Update only (start with Delete disabled for safety):
| LangSmith App Attribute | Microsoft Entra ID Attribute | Matching Precedence |
|---|---|---|
displayName | displayName1 | 1 |
externalId | objectId | |
members | members |
- Groups must follow the naming convention described in the Group Naming Convention section.
If your company has a group naming policy, you should instead map from the
descriptionMicrosoft Entra ID Attribute and set the description based on the Group Naming Convention section.
- Under Applications > Applications, select your LangSmith Enterprise Application.
- Under the Assignments tab, click Assign then either Assign to People or Assign to Groups.
- Make the desired selection(s), then Assign and Done.
- Set Provisioning Status to
Onunder Provisioning. - Monitor the initial sync to ensure users and groups are provisioned correctly.
- Once verified, enable
Deleteactions for both User and Group mappings.
Okta configuration steps
You must use the Okta Lifecycle Management product. This product tier is required to use SCIM on Okta.
Supported features
- Create users
- Update user attributes
- Deactivate users
- Group push (without group renaming)
- Import users
- Import groups
Step 1: Add application from Okta Integration Network
If you have already configured SSO login via SAML (cloud) or OAuth2.0 with OIDC (self-hosted), skip this step.
- In the General tab, ensure the
LangSmithUrlis filled in according to the instructions from Step 1 - In the Provisioning tab, select
Integration. - Select
EditthenEnable API integration. - For API Token, paste the SCIM token you generated above.
- Keep
Import Groupschecked. - To verify the configuration, select Test API Credentials.
- Select Save.
- After saving the API integration details, new settings tabs appear on the left. Select
To App. - Select Edit.
- Select the Enable checkbox for Create Users, Update Users, and Deactivate Users.
- Select Save.
- Assign users and/or groups in the Assignments tab. Assigned users are created and managed in your LangSmith group.
- Configure provisioning: under
Provisioning > To App > Provisioning to App, clickEdit, then checkCreate Users,Update User Attributes, andDeactivate Users. - Under
<application_name> Attribute Mappings, set the user attribute mappings as shown below, and delete the rest:
Okta does not support group attributes besides the group name itself, so group name must follow the naming convention described in the Group Naming Convention section.
Other identity providers
Other identity providers have not been tested but may function depending on their SCIM implementation.SSO Groups Sync (alternative)
SSO Groups Sync is available for organizations on the Enterprise plan with SAML SSO (cloud) or OIDC (self-hosted) configured. Contact sales to learn more.
When to use SSO Groups Sync vs. SCIM
SSO Groups Sync and SCIM can technically coexist (each only manages identities tagged with its own provisioning method), but we recommend choosing one mechanism per organization, not both, to avoid confusing precedence behavior.| SSO Groups Sync | SCIM | |
|---|---|---|
| Sync trigger | At each SSO login | Proactive push from IdP (~1 hour cadence) |
| IdP admin involvement | Minimal, just include groups in the SSO token | Required, configure SCIM provisioning app |
| Deprovisioning | Lags until next login | Near real-time via IdP push |
| Naming convention | Reuses SCIM convention | SCIM convention |
| Custom separator | Reuses org-level scim_group_name_separator | scim_group_name_separator |
Configuration
-
In your IdP: add the user’s group memberships to the SSO token claim (default claim name:
groups). Group names must follow the SCIM naming convention. -
In LangSmith: go to Settings → Members and roles → SSO Configuration → SSO Groups Sync and configure the following:
Setting Description Enable SSO Groups Sync Automatically assign workspace roles based on group memberships in the SSO token. Groups claim field (default groups)The claim name in the SSO token that contains group memberships. Sync workspace/role assignments Update workspace memberships and roles from group names on each SSO login. Require matching group to sign in Block login if the SSO token contains no groups matching the naming convention.
PATCH to the SSO settings endpoint:
Configure your IdP to emit a groups SAML attribute (cloud)
This section applies to enterprise cloud only. Self-hosted customers configure groups directly in their OIDC IdP, see SSO Groups Sync on self-hosted.
- Configure your IdP’s SAML application to emit a multi-valued group attribute.
- Add a matching entry to Supabase Attribute Mapping so the attribute flows through to the JWT (with Array checked).
- The IdP attribute name (e.g.,
groups) must match both the Supabase Attribute Mapping entry and the Groups claim field value (defaultgroups). - The attribute must be multi-valued (a list of strings), not a single delimited string. If your IdP only supports single-valued attributes, you’ll need to emit one attribute statement per group.
- Each value must be a group name following the SCIM naming convention.
- Only groups whose names match the convention are processed. LangSmith ignores groups that don’t match its naming convention, such as org-wide directory groups or app assignment groups. You don’t need to filter these out on the IdP side—emit all groups and LangSmith will skip the irrelevant ones.
- Okta
- Entra ID (Azure)
- Google Workspace
In the LangSmith SAML application:
- Directory → Profile Editor → select the LangSmith application’s user profile.
- Add a custom attribute named
groupswith Typestring array. - Sign On → edit the SAML settings and add an attribute statement:
- Name:
groups - Name format:
Unspecified(orBasic) - Filter:
Matches regexwith.*to send all groups, or use a more restrictive regex (e.g.,^LS:.*) to limit to LangSmith-prefixed groups.
- Name:
Group naming examples
Group names follow the SCIM naming convention. The<workspace_role> segment accepts both built-in roles and custom workspace roles by name.
| Intent | Example group name |
|---|---|
| Org admin (grants workspace admin in all workspaces) | LS:Organization Admins |
Workspace admin in Production | LS:Organization User:Production:Admin |
Workspace editor in Engineering | LS:Organization User:Engineering:Editor |
Workspace viewer in Marketing | LS:Organization User:Marketing:Viewer |
Custom role Annotators in Production | LS:Organization User:Production:Annotators |
Behavior
- Naming convention: Group names follow the same format as SCIM (e.g.,
LS:Organization Adminsfor org admins,LS:Organization User:Production:Editorfor workspace-scoped). See Group naming convention for the full format. The separator is configured per-org viascim_group_name_separatorand is shared with SCIM. - Malformed group names: Group names that don’t match the convention are skipped silently (logged) and don’t block login for valid groups.
- Login gate: When Require matching group to sign in is enabled and the SSO token contains zero matching groups, login is blocked.
- Precedence: SSO Groups Sync does not modify SCIM-sourced, manually assigned, or JIT-provisioned memberships. It is fully authoritative for its own assignments and replaces them on each login based on the token’s group membership.
- Org admin propagation: If a user receives an org admin role from their groups, they are granted workspace admin in all workspaces (same as SCIM behavior).
Things to note
- Deprovisioning lag: Unlike SCIM (proactive push), SSO Groups Sync only updates on login. A user removed from a group in the IdP retains their existing workspace access until their next LangSmith login. The Require matching group to sign in gate mitigates this by blocking the user entirely on next login.
- No retroactive sync: Changing role mappings or enabling the feature does not update existing users until they log in again.
- Naming convention required: Customers must name their IdP groups following the SCIM convention. If your IdP groups follow a different naming policy, SCIM with
description-based mapping (see Group attributes) may be a better fit.
Connect these docs to Claude, VSCode, and more via MCP for real-time answers.