In this tutorial, you will build a basic chatbot. This chatbot is the basis for the following series of tutorials where you will progressively add more sophisticated capabilities, and be introduced to key LangGraph concepts along the way. Let’s dive in! 🌟

Prerequisites

Before you start this tutorial, ensure you have access to a LLM that supports tool-calling features, such as OpenAI, Anthropic, or Google Gemini.

1. Install packages

Install the required packages:
npm install @langchain/langgraph @langchain/core zod
Sign up for LangSmith to quickly spot issues and improve the performance of your LangGraph projects. LangSmith lets you use trace data to debug, test, and monitor your LLM apps built with LangGraph. For more information on how to get started, see LangSmith docs.

2. Create a StateGraph

Now you can create a basic chatbot using LangGraph. This chatbot will respond directly to user messages. Start by creating a StateGraph. A StateGraph object defines the structure of our chatbot as a “state machine”. We’ll add nodes to represent the llm and functions our chatbot can call and edges to specify how the bot should transition between these functions.
import { StateGraph, MessagesZodState, START } from "@langchain/langgraph";
import { z } from "zod";

const State = z.object({ messages: MessagesZodState.shape.messages });

const graph = new StateGraph(State).compile();
Our graph can now handle two key tasks:
  1. Each node can receive the current State as input and output an update to the state.
  2. Updates to messages will be appended to the existing list rather than overwriting it, thanks to the prebuilt reducer function.
Concept When defining a graph, the first step is to define its State. The State includes the graph’s schema and reducer functions that handle state updates. In our example, State is a schema with one key: messages. The reducer function is used to append new messages to the list instead of overwriting it. Keys without a reducer annotation will overwrite previous values.To learn more about state, reducers, and related concepts, see LangGraph reference docs.

3. Add a node

Next, add a “chatbot” node. Nodes represent units of work and are typically regular functions. Let’s first select a chat model:
import { ChatOpenAI } from "@langchain/openai";
// or import { ChatAnthropic } from "@langchain/anthropic";

const llm = new ChatOpenAI({
  model: "gpt-4o",
  temperature: 0,
});
We can now incorporate the chat model into a simple node:
import { StateGraph, MessagesZodState, START } from "@langchain/langgraph";
import { z } from "zod";

const State = z.object({ messages: MessagesZodState.shape.messages });

const graph = new StateGraph(State)
  .addNode("chatbot", async (state: z.infer<typeof State>) => {
    return { messages: [await llm.invoke(state.messages)] };
  })
  .compile();
Notice how the chatbot node function takes the current State as input and returns a dictionary containing an updated messages list under the key “messages”. This is the basic pattern for all LangGraph node functions. The addMessages function used within MessagesZodState will append the LLM’s response messages to whatever messages are already in the state.

4. Add an entry point

Add an entry point to tell the graph where to start its work each time it is run:
import { StateGraph, MessagesZodState, START } from "@langchain/langgraph";
import { z } from "zod";

const State = z.object({ messages: MessagesZodState.shape.messages });

const graph = new StateGraph(State)
  .addNode("chatbot", async (state: z.infer<typeof State>) => {
    return { messages: [await llm.invoke(state.messages)] };
  })
  .addEdge(START, "chatbot")
  .compile();

5. Add an exit point

Add an exit point to indicate where the graph should finish execution. This is helpful for more complex flows, but even in a simple graph like this, adding an end node improves clarity.
import { StateGraph, MessagesZodState, START, END } from "@langchain/langgraph";
import { z } from "zod";

const State = z.object({ messages: MessagesZodState.shape.messages });

const graph = new StateGraph(State)
  .addNode("chatbot", async (state: z.infer<typeof State>) => {
    return { messages: [await llm.invoke(state.messages)] };
  })
  .addEdge(START, "chatbot")
  .addEdge("chatbot", END)
  .compile();
This tells the graph to terminate after running the chatbot node.

6. Compile the graph

Before running the graph, we’ll need to compile it. We can do so by calling compile() on the graph builder. This creates a CompiledGraph we can invoke on our state.
import { StateGraph, MessagesZodState, START, END } from "@langchain/langgraph";
import { z } from "zod";

const State = z.object({ messages: MessagesZodState.shape.messages });

const graph = new StateGraph(State)
  .addNode("chatbot", async (state: z.infer<typeof State>) => {
    return { messages: [await llm.invoke(state.messages)] };
  })
  .addEdge(START, "chatbot")
  .addEdge("chatbot", END)
  .compile();

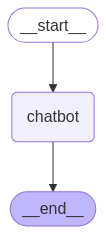
7. Visualize the graph

You can visualize the graph using the getGraph method and render the graph with the drawMermaidPng method.
import * as fs from "node:fs/promises";

const drawableGraph = await graph.getGraphAsync();
const image = await drawableGraph.drawMermaidPng();
const imageBuffer = new Uint8Array(await image.arrayBuffer());

await fs.writeFile("basic-chatbot.png", imageBuffer);
basic chatbot diagram

8. Run the chatbot

Now run the chatbot!
You can exit the chat loop at any time by typing quit, exit, or q.
import { HumanMessage } from "@langchain/core/messages";

async function streamGraphUpdates(userInput: string) {
  const stream = await graph.stream({
    messages: [new HumanMessage(userInput)],
  });

import * as readline from "node:readline/promises";
import { StateGraph, MessagesZodState, START, END } from "@langchain/langgraph";
import { ChatOpenAI } from "@langchain/openai";
import { z } from "zod";

const llm = new ChatOpenAI({ model: "gpt-4o-mini" });

const State = z.object({ messages: MessagesZodState.shape.messages });

const graph = new StateGraph(State)
  .addNode("chatbot", async (state: z.infer<typeof State>) => {
    return { messages: [await llm.invoke(state.messages)] };
  })
  .addEdge(START, "chatbot")
  .addEdge("chatbot", END)
  .compile();

async function generateText(content: string) {
  const stream = await graph.stream(
    { messages: [{ type: "human", content }] },
    { streamMode: "values" }
  );

  for await (const event of stream) {
    for (const value of Object.values(event)) {
      console.log(
        "Assistant:",
        value.messages[value.messages.length - 1].content
      );
    const lastMessage = event.messages.at(-1);
    if (lastMessage?.getType() === "ai") {
      console.log(`Assistant: ${lastMessage.text}`);
    }
  }
}

const prompt = readline.createInterface({
  input: process.stdin,
  output: process.stdout,
});

while (true) {
  const human = await prompt.question("User: ");
  if (["quit", "exit", "q"].includes(human.trim())) break;
  await generateText(human || "What do you know about LangGraph?");
}

prompt.close();
Assistant: LangGraph is a library designed to help build stateful multi-agent applications using language models. It provides tools for creating workflows and state machines to coordinate multiple AI agents or language model interactions. LangGraph is built on top of LangChain, leveraging its components while adding graph-based coordination capabilities. It's particularly useful for developing more complex, stateful AI applications that go beyond simple query-response interactions.
Congratulations! You’ve built your first chatbot using LangGraph. This bot can engage in basic conversation by taking user input and generating responses using an LLM. You can inspect a LangSmith Trace for the call above.
import { StateGraph, START, END, MessagesZodState } from "@langchain/langgraph";
import { z } from "zod";
import { ChatOpenAI } from "@langchain/openai";

const llm = new ChatOpenAI({
  model: "gpt-4o",
  temperature: 0,
});

const State = z.object({ messages: MessagesZodState.shape.messages });

const graph = new StateGraph(State);
  // The first argument is the unique node name
  // The second argument is the function or object that will be called whenever
  // the node is used.
  .addNode("chatbot", async (state) => {
    return { messages: [await llm.invoke(state.messages)] };
  });
  .addEdge(START, "chatbot");
  .addEdge("chatbot", END)
  .compile();

Next steps

You may have noticed that the bot’s knowledge is limited to what’s in its training data. In the next part, we’ll add a web search tool to expand the bot’s knowledge and make it more capable.